
Manual R200ST-N1 version: 14

- 2 -
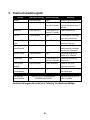
EN Recommended Not recommended Use heat alarm R200H
DE Empfohlen Nicht empfohlen Verwende Sie Hitzealarm R200H
NL Aanbevolen Niet aanbevolen Gebruik hittemelder R200H
FR Recommandée Pas recommandé Utiliser alarme chaleur R200H
ES Recomendado No se recomienda Usar alarma de calor R200H
IT Raccomandato Non raccomandato Usare rilevatore di fiamma R200H
PT Recomendado Não recomendado Usar alarme de calor R200H
SE Rekommenderad Ej rekommenderat Använd värmelarm R200H

- 3 -

- 4 -

- 5 -

- 6 -
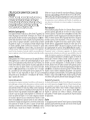
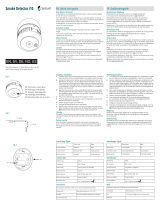
1. Introduction
Thank you for purchasing Resideo R200ST-N1 interconnected smoke alarm. This product is
suitable for indoor installation in domestic premises, including static holiday homes and
caravans. This manual contains important safety information about the installation and
operation of the alarm. Please read the manual carefully and keep it in a safe place for
future reference.
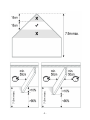
2. Where to install the device? (refer page 2)
Refer to page 2 for guidance. Please ensure that you also follow country-specific regulations
and guidelines, such as: British BS5839-6 or German DIN14676. If in doubt, please check, for
example by contacting your local Fire Service.
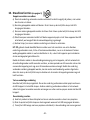
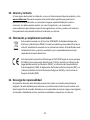
3. Where not to install the device
• In an environment with a risk of draught (e.g. close to air conditioning, fans, ventilation
outlets).
• In areas where steam or fumes are emitted, e.g. kitchens: use R200H-N1 (alarm with heat
sensor) instead.
NOTE: To avoid sensor contamination, the smoke alarm should be removed from the
mounting for the duration of any building work involving dust or debris. If this is not
possible, the alarm vents must be fully covered with a brightly colored plastic bag or tape to
reduce the risk of leaving covered when works are completed. When covered, the alarm will
not detect fires or smoke, so remove the covering when the work is completed each day and
replace it the following day if necessary.
4. Installation (refer to pages 3 and 4 for guidance)
WARNING: The alarm contains a permanently sealed, non-replaceable battery, and does not
contain serviceable parts inside. Any attempt to open or repair it creates a risk of electric
shock or malfunction.

- 7 -
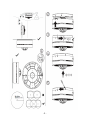
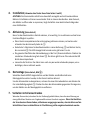
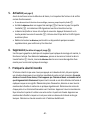
5. Activation (refer page 4)
Before commissioning the smoke alarm, it is important to activate and test it for correct
operation:
• If you need to enable the tamper proof locking feature, break off or cut off the small
cylinder ①.
• Install the alarm in its mounting bracket ② and twist until it clicks ③. The LED indicators
will flash once and emit a beep.
• The entire surface of the alarm cover is the test/silence button. Press it firmly for at least
3 seconds ④. The alarm will emit 3 short beeps with LED flash at the same pace.
• Release the button. The alarm may beep for a few more seconds, to confirming it’s
been activated.
6. Removal (refer to page 4, picture ⑤)
Once the plastic pin is cut and the mounting plate is subsequently mounted, the function is
enabled. To disassemble the alarm, take a screwdriver and push it into the mounting hole
⑤. Then rotate the alarm counterclockwise to remove the alarm from the mounting plate.
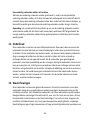
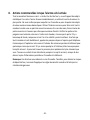
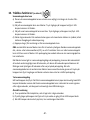
7. Practice fire safety
If the alarm sounds, and you have not pushed the test button, it may be warning of a
dangerous situation and your immediate response is necessary. If you are in any doubt
regarding the cause of an alarm it should be assumed that the alarm is due to an actual fire
and the dwelling should be evacuated. Expose everyone to the sound of a smoke alarm and
explain what the sound means. Develop family escape plans, discuss them with all
household members, and practice them regularly. Determine the exits from each room and
an escape route to the outside from each exit. Teach all household members to touch the
door and use an alternate exit when the door is hot. Teach household members to crawl
along the floor to stay below smoke and dangerous gases. Establish a safe meeting place
outside the building.

- 8 -
8. Recommended actions when the alarm is activated
Raise the alarm by shouting: “Fire! Fire! Fire!”, or by banging metal objects together.
Evacuate immediately, using the nearest fire exit. Do not stop to investigate the fire or to
collect valuables or pets. Use your escape route to get everyone out and meet at an agreed
point. Along the way, close any open doors, and only open the doors you need to go
through. Check doors and handles with the back of your hand. If they feel warm, don’t open
the door. If there is a lot of smoke, crawl along the floor as the air and visibility will be
better. Once you’ve got everyone out of the building, call the Fire Brigade from any phone.
Give the operator your name and address. Don’t go back into the building for anything. If
there is still someone inside, tell firefighters when they arrive - they will be able to find the
person quicker and more safely than you. Find somewhere safe to wait for the Fire Brigade.
When they arrive, try to give them as much information as possible about the fire and
building.
Note: These guidelines will assist you in the event of a fire, however, to reduce the chance
that fires will start, practice fire safety rules and prevent hazardous situations.

- 9 -
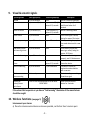
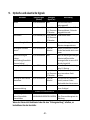
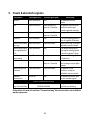
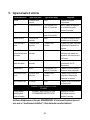
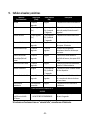
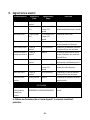
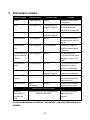
9. Visual & acoustic signals
Operating mode
Visual signal(flash)
Acoustic signal(beep)
Description
Normal
1 x per 48 seconds
None
Device is functioning properly
Test
1 x per second (4 x)
1 x per second (3 x) /
pause of 1,5 seconds
Device is testing by press the
test/silence button for 3
seconds
Alarm for smoke
1 x per second (4 x)
1 x per second (3 x) /
pause of 1,5 seconds
Device is detecting smoke
Alarm silence
1 x per 8 seconds
None
If the Alarm signal is muted,
lasting for approx. 10 minutes
Low battery warning
2 x per 48 seconds
1 x per 48 seconds
Battery is running low, replace
the smoke detector with a new
one.
Low battery/Sensor
fault warning silence
1 x per 48 seconds
None
If Low battery/Sensor fault
warning is muted, lasting for
approx. 8-10 hours
Sensor fault warning
2 x per 48 seconds
None
Sensor is not functioning
properly, see 11. Maintenance
Interconnected
alarm
None
1 x per second (3 x) /
pause of 1,5 seconds
Device received remote alarm
from other device.
End of life warning
3 x per 48 seconds
3 x per 48 seconds
The device is end of life,
replace the smoke detector
with a new one.
Wireless
interconnecting
Continuously on
None
Device is sending or searching
for wireless signal
HOW TO MUTE ALARMSOUND
Alarm/Low
battery/Sensor
fault silence
ONLY AFTER RECOMMENDED ACTIONS HAVE
BEEN TAKEN
Press cover test/silence
button for 3 seconds
If the alarm fails to operate or you have a "fault warning" the advice of the manufacturer
should be sought.
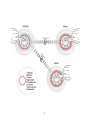
10. Wireless functions (see page 5)
Interconnect your alarms
a) Place the interconnected alarms as close as possible, not further than 5 meters apart.

- 10 -
b) Choose one interconnected alarm as Master. Press 3 times its test/silence button. The
LED light will turn on.
c) Choose another interconnected alarm as Slave. Press 3 times its test/silence button. The
LED light will turn on.
d) Wait a few seconds until the Master device beeps and Slave device turns off its LED,
indicating successful network pairing.
e) Repeat step c) for connecting more interconnected alarms.
NOTE: always use the same Master alarm for connecting additional Resideo interconnected
smoke, heat or carbon monoxide (CO) alarms, now and in future. Write down which
interconnected alarm in your home is the Master. And you can only enable pairing when the
mounting plate has installed.
After the master alarm enters interconnect mode for pairing, it will automatically exit
connection mode within 40 seconds, and this 40-second period will be extended by another
40 seconds after each successful pairing. After all interconnected alarms are connected, the
master can also manually exit by pressing the test/silence button three times if the master
device has not yet exited the pairing mode.
Test your interconnection
Hold down the test/silence button. The initial interconnected alarm will beep continuously
with the LED flashes at the same rate. Other interconnected alarms in the network will
receive the signal after few seconds, and they will beep continuously without LED flashes for
at most two test alarm period.
Reset Connection
a) Remove the product out of the back plate, and you will hear a beep in few seconds.
b) 3x Press the test/silence button and press once again when LED light turn on.
c) While the LED light turn off with a beep, the connection has been reset successfully.
How to silence interconnected alarms
When an interconnected alarm has been activated, find the originating interconnected
alarm, which will be the one both emitting the audio signal and red LED message. Mute this
interconnected alarm by pressing its test/silence button, and within 40 seconds the
remaining interconnected alarms will go back to standby.

- 11 -
Note: if you press the test/silence button on one of the interconnected alarm other than the
originating alarm, it will NOT be silenced, the remaining interconnected alarms will continue
emitting sound until the primary alarm is stopped.
11. Maintenance
This smoke alarm is equipped with a self-testing mechanism. Additionally, we recommend
testing the smoke alarm manually at least once per months by pressing the test/silence
button. If the smoke alarm functions correctly, it will generate a loud beep. Due to the
loudness of the alarm, make sure that you always stand at arm’s length distance from the
unit when testing. If the smoke alarm does not generate the acoustic signal, it must be
replaced immediately. Clean the smoke alarm at least once per month to remove dirt, dust
or debris. Use a vacuum cleaner with a soft brush and vacuum all sides of the alarm. Do not
remove the top cover to clean it inside. The alarm does not contain any serviceable parts
inside - do not attempt to open or repair it. If the alarm shows any signs of damage, it must
be replaced.
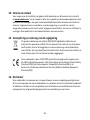
12. Warnings
This Smoke alarm is for indoor use only. To prevent injury, this smoke alarm must be
securely attached to a ceiling/wall in accordance with the installation instructions. Do not
paint or cover the Smoke alarm. This Smoke alarm should not be exposed to excessive heat
such as sunshine, fire, etc. Do not test with flame – this can set fire to the Smoke alarm and
damage the house. Do not test with smoke, as the results can be misleading, unless special
equipment is used. Prolonged exposure to low or high temperatures, or high humidity, may
reduce battery life. Prolonged periods of alarm will reduce battery life. The latest design,
materials and manufacturing techniques have been used in the construction of this Smoke
alarm to minimize the risk of its contamination by dust, insects, etc. However, it is impossible
to completely eliminate such risk, so ensure that the Smoke alarm is clean, and dust does
not build up. Any insects or cobwebs in the vicinity of the Smoke alarm should be promptly
removed. In certain circumstances, even with regular cleaning, contamination can build up in
the sensor, triggering the alarm. If this happens, the Smoke alarm must be replaced.

- 12 -
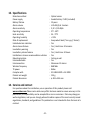
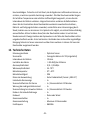
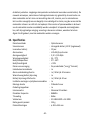
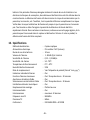
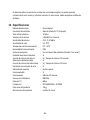
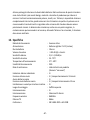
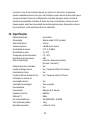
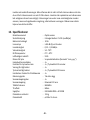
13. Specifications
Detection method : Optical sensor
Power supply : Sealed battery 3 V DC (included)
Battery lifetime : 10 years
Alarm volume : ≥ 85 dB (A) at 3 meters
Alarm sensitivity : 0,12 - 0,19 dB/m
Operating temperature : 0°C - 40°C
Heat sensitivity : 54 - 70°C
Operating humidity : < 93%
Date of replacement : See product label (“mm yyyy” format)
Individual alarm indicator : Yes
Alarm silence feature : Yes | Hush time: 10 minutes
Low battery warning : Yes
Low battery silence feature : Yes | Hush time: 10 hours
Installation in leisure accommodation vehicles : Yes
Mounting location : Ceiling or wall
Interconnectable : Yes
Interconnection : Maximum 12 alarms
Wireless frequency : 868 MHz
TX power : 8dbm
Complies with : EN 14604:2005 + AC:2008
Product net weight : 155 g
Product dimension : ø 104 x 55.4 mm
14. Service and contact
For questions about the installation, use or operation of this product please visit
www.resideo.com Please note: while every effort has been made to ensure accuracy in this
publication, no responsibility can be accepted for errors or omissions. Data may change, as
well as legislation, and you are strongly advised to obtain copies of the most recently issued
regulations, standards, and guidelines. This publication is not intended to form the basis of a
contract.

- 13 -
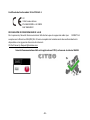
15. Disposal and regulatory compliance
This product complies with the Waste Electrical and Electronic Equipment
(WEEE) Directive 2002/96/EC. When the unit has come to the end of its life,
dispose of it in accordance with local regulations. It is classified as electronic
waste and contains a battery and therefore should be disposed of separately
from household waste.
This smoke alarm is certified by CNPP CERT to the European standard EN 14604,
the identification number 1116. It conforms to the General Product Safety
Directive (GPSD), the Electromagnetic Compatibility Directive (EMC), the
Construction Products Regulation (CPR) and the Restriction of Hazardous
Substances Directive (RoHS) and the Radio Equipment Directive (RED).
16. Disclaimer
This smoke alarm is designed to alert you to a potentially dangerous fire. It is not designed to
remedy a fire problem nor to locate a specific source of fire. Resideo shall not be liable to
pay for any fire investigation or service call carried out or arranged in response to an alarm.

- 14 -

- 15 -
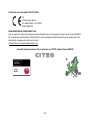
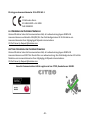
EC certificate of conformity 1116-CPR-162-1
EU DECLARATION OF CONFORMITY
Hereby, Sécurité Communications SAS declares that the radio equipment type R200ST-N1 is in
compliance with Directive 2014/53/EU. The full text of the EU declaration of conformity is
available at the following internet address: CE[email protected]
Sécurité Communications SAS is registered with CITEO, Client reference 506931
22
1116 Smoke Alarm
EN 14604:2005 + AC:2008
DoP 04062022


- 17 -
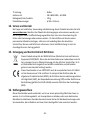
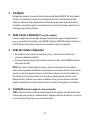
1. Einleitung
Vielen Dank, dass Sie sich für den Resideo R200ST-N1 vernetzbaren Rauchmelder
entschieden haben. Dieses Produkt ist für die Installation in Innenräumen von
Wohngebäuden, einschließlich Ferienhäusern und ortsfester Wohnwagen, geeignet. Dieses
Handbuch enthält wichtige Sicherheitsinformationen über die Installation und den Betrieb
des Melders. Bitte lesen Sie das Handbuch sorgfältig durch und bewahren Sie es zum
späteren Nachschlagen an einem sicheren Ort auf.
2. Wo wird das Gerät installiert werden? (Siehe Seite 2)
Hinweise dazu finden Sie auf der Seite 2. Bitte stellen Sie sicher, dass Sie auch die
länderspezifischen Vorschriften und Richtlinien beachten, wie z. B. die britische BS5839-6
oder die deutsche DIN14676. Im Zweifelsfall informieren Sie sich bitte, z. B. bei Ihrer
örtlichen Feuerwehr.
3. Wo das Gerät nicht installiert werden darf
• In einer Umgebung mit Zugluftgefahr (z. B. in der Nähe von Klimaanlagen, Ventilatoren,
Lüftungsauslässen)
• In Bereichen, in denen Aerosole oder Dämpfe austreten, z. B. in Küchen - verwenden Sie
stattdessen R200H-N1 (Alarm mit Wärmesensor)
HINWEIS: Um eine Verunreinigung des Sensors zu vermeiden, sollte der Rauchmelder für die
Dauer von Bauarbeiten, bei denen Staub oder Schmutz anfällt, aus der Halterung entfernt
werden. Wenn dies nicht möglich ist, müssen die Lüftungsöffnungen des Melders vollständig
mit einer auffälligen Plastiktüte oder einem Klebeband in Warnfarben abgedeckt werden.
Klebebänder in Warnfarben sollten verwendet werden, um das Risiko der Lüftungsöffnungen
zu verringern, nach Abschluss der Arbeiten abgedeckt zu bleiben. Wenn die Sensoren
abgedeckt sind, kann der Melder weder Feuer noch Rauch erkennen. Entfernen Sie daher die
Abdeckung nach Beendigung der Arbeiten jeden Tag und bringen Sie sie gegebenenfalls am
nächsten Tag wieder an.

- 18 -
4. Installation (Hinweise dazu finden Sie auf den Seiten 3 und 4)
ACHTUNG: Der Alarmmelder enthält eine dauerhaft versiegelte und nicht austauschbare
Batterie. Es befinden sich keine zu wartenden Teile im Inneren des Gerätes. Jeder Versuch,
den Melder zu öffnen oder zu reparieren, birgt die Gefahr eines elektrischen Schlags oder
einer Fehlfunktion.
5. Aktivierung (Siehe Seite 4)
Bevor Sie den Rauchmelder in Betrieb nehmen, ist es wichtig, ihn zu aktivieren und auf seine
Funktionsfähigkeit zu prüfen:
• Wenn Sie die manipulationssichere Verriegelung aktivieren müssen, so brechen oder
schneiden Sie den kleinen Zylinder ab ①.
• Siehe Seite 5. Montieren Sie den Rauchmelder in seiner Halterung ② und drehen Sie ihn,
bis er einrastet③. Die LED-Anzeige blinkt einmal und er gibt einen Ton ab.
• Die gesamte Oberfläche der Alarmabdeckung ist die Test-/Stummschalttaste. Drücken Sie
mindestens 3 Sekunden lang fest darauf ④. Der Alarm gibt 3 kurze Töne ab und das LED
blinkt dementsprechend.
• Lassen Sie die Taste los. Der Alarm kann noch ein paar weitere Sekunden piepen, um zu
bestätigen, dass er aktiviert wurde.
6. Demontage (Siehe Seite 4, Bild ⑤)
Sobald der Kunststoffstift abgeschnitten und der Melder anschließend auf seine
Montageplatte montiert wurde, ist die Alarm-Funktion aktiviert.
Um den Alarmmelder zu demontieren, nehmen Sie einen Schraubendreher und drücken Sie
ihn in das Befestigungsloch ⑤. Drehen Sie dann den Alarmmelder-gegen den Uhrzeigersinn,
um den Melder von der Montageplatte zu entfernen.
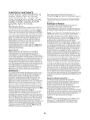
7. Verhalten im Fall eines Brandes
Wenn der Alarm ertönt, ohne dass Sie den Testknopf gedrückt haben, kann dies eine Warnung vor
einer gefährlichen Situation sein. Gegebenenfalls müssen Sie sofort reagieren. Wenn Sie Zweifel an
der Ursache eines Alarms haben, sollte davon ausgegangen werden, dass der Alarm auf ein
tatsächliches Feuer zurückzuführen ist. Die Wohnung sollte umgehend evakuiert werden.

- 19 -
Machen Sie alle Mitbewohner mit den optischen und akustischen Signalen des Rauchmelders
vertraut und erklären Sie, was jedes einzelne Signal bedeutet. Erstellen Sie Fluchtpläne für die Familie
und besprechen Sie diese mit allen Haushaltsmitgliedern. Üben Sie auch regelmäßig den Ernstfall.
Legen Sie die Notausgänge jedes Zimmers und einen Fluchtweg ins Freie von jedem (Not)Ausgang
aus fest. Bringen Sie allen Haushaltsmitgliedern bei, wie sie die Tür anfassen und/oder einen
alternativen Ausgang benutzen, wenn die Tür heiß ist. Bringen Sie den Haushaltsmitgliedern bei, auf
dem Boden zu kriechen, um unter Rauch und gefährlichen Gasen hindurchzukriechen. Richten Sie
einen sicheren Sammelplatz außerhalb des Gebäudes ein.
8. Empfohlene Maßnahmen, wenn der Alarm ausgelöst wird
Schlagen Sie Alarm, indem Sie schreien: „Feuer! Feuer! Feuer!‟ oder durch das Aneinanderschlagen
von Metallgegenständen. Verlassen Sie das Haus sofort über den nächstgelegenen Notausgang.
Bleiben Sie nicht stehen, um das Feuer zu beobachten oder um Wertsachen oder Haustiere
einzusammeln. Nutzen Sie Ihren festgelegten Fluchtweg, um alle Personen ins Freie zu bringen und
sich an der vereinbarten Sammelstelle zu treffen. Schließen Sie auf dem Weg alle offenen Türen.
Öffnen Sie nur die Türen, durch die Sie gehen müssen. Prüfen Sie Türen und Griffe vor dem Öffnen
mit dem Handrücken. Sollten sie sich warm anfühlen, so öffnen Sie die Tür nicht. Wenn es stark
raucht, kriechen Sie auf dem Boden entlang, da dort die Luft und die Sicht besser sind.
Sobald Sie alle Personen aus dem Gebäude evakuiert haben, rufen Sie von dem nächstgelegenen
Telefon aus die Feuerwehr an. Nennen Sie der Leitstelle Ihren Namen und Ihre Adresse. Gehen Sie
auf keinen Fall zurück in das Gebäude. Sollten sich noch Personen im Gebäude befinden, so
informieren Sie hierüber die eintreffende Feuerwehr. Die Feuerwehr kann vermisste Personen
schneller und sicherer finden als Sie.
Warten Sie auf die Feuerwehr an einem sicheren Ort. Wenn die Feuerwehr eintrifft, versuchen Sie,
ihr so viele Informationen wie möglich über den Brand und das Gebäude zu geben.
Hinweis: Diese Richtlinien werden Ihnen im Falle eines Brandes helfen. Um jedoch die
Wahrscheinlichkeit zu verringern, dass ein Feuer ausbricht, sollten Sie die Brandschutzregeln
einhalten und gefährliche Situationen vermeiden.

- 20 -
9. Optische und akustische Signale
Betriebsart
Optisches Signal
(Blinken)
Akustische
Signal (Ton)
Beschreibung
Normal
1 x pro 48 Sekunden
Keine
Das Gerät funktioniert
ordnungsgemäß
Test
1 x pro Sekunde (4 x)
1 x pro Sekunde
(3 x) / Pause von
1,5 Sekunden
Das Gerät testet, indem die Test-
/Stummschalttaste 3 Sekunden
lang gedrückt wurde.
Rauchmelder
1 x pro Sekunde (4 x)
1 x pro Sekunde
(3 x) / Pause von
1,5 Sekunden
Gerät erkennt Rauch
Stummschaltung des Alarms
1 x pro 8 Sekunden
Keine
Wenn das Alarmsignal für ca. 10
Minuten stummgeschaltet ist.
Warnung bei schwacher
Batterie
2 x pro 48 Sekunden
1 x pro 48
Sekunden
Batterie ist nahezu leer, ersetzen
Sie den Rauchmelder durch einen
neuen.
Optische Warnung bei
niedriger
Batterieladung/Sensorfehler
(Stummschaltung)
1 x pro 48 Sekunden
Keine
Wenn die Warnung bei niedrigem
Batteriestand/Sensorfehler
stummgeschaltet ist was ca. 8-10
Stunden lang anhält
Warnung bei Sensorfehler
2 x pro 48 Sekunden
Keine
Sensor funktioniert nicht richtig,
siehe 11. Wartung
Drahtloser Alarm
Keine
1 x pro Sekunde
(3 x) / Pause von
1,5 Sekunden
Das Gerät hat einen Fernalarm
von einem anderen Gerät
erhalten.
Warnung vor dem Ende der
Lebensdauer
3 x pro 48 Sekunden
3 x pro 48
Sekunden
Das Gerät hat sein Lebensende
erreicht, ersetzen Sie den
Rauchmelder durch einen neuen.
Drahtlose
Zusammenschaltung
Kontinuierlich ein
Keine
Das Gerät sendet oder sucht nach
einem Funksignal
ALARMTON STUMMSCHALTEN
Alarm/Niedrige
Batterie/Sensorfehler
Stummschalten
ERST NACHDEM DIE EMPFOHLENEN
MASSNAHMEN ERGRIFFEN WURDEN
Drücken Sie 3 Sekunden lang die
Test-/Stummschaltungstaste der
Abdeckung
Wenn der Alarm nicht funktioniert oder Sie eine "Störungsmeldung" erhalten, so
kontaktieren Sie den Hersteller.
Sidan laddas...
Sidan laddas...
Sidan laddas...
Sidan laddas...
Sidan laddas...
Sidan laddas...
Sidan laddas...
Sidan laddas...
Sidan laddas...
Sidan laddas...
Sidan laddas...
Sidan laddas...
Sidan laddas...
Sidan laddas...
Sidan laddas...
Sidan laddas...
Sidan laddas...
Sidan laddas...
Sidan laddas...
Sidan laddas...
Sidan laddas...
Sidan laddas...
Sidan laddas...
Sidan laddas...
Sidan laddas...
Sidan laddas...
Sidan laddas...
Sidan laddas...
Sidan laddas...
Sidan laddas...
Sidan laddas...
Sidan laddas...
Sidan laddas...
Sidan laddas...
Sidan laddas...
Sidan laddas...
Sidan laddas...
Sidan laddas...
Sidan laddas...
Sidan laddas...
Sidan laddas...
Sidan laddas...
Sidan laddas...
Sidan laddas...
Sidan laddas...
Sidan laddas...
Sidan laddas...
Sidan laddas...
Sidan laddas...
Sidan laddas...
Sidan laddas...
Sidan laddas...
Sidan laddas...
Sidan laddas...
Sidan laddas...
Sidan laddas...
Sidan laddas...
Sidan laddas...
Sidan laddas...
Sidan laddas...
Sidan laddas...
Sidan laddas...
Sidan laddas...
Sidan laddas...
Sidan laddas...
Sidan laddas...
Sidan laddas...
Sidan laddas...
Sidan laddas...
Sidan laddas...
Sidan laddas...
Sidan laddas...
Sidan laddas...
Sidan laddas...
Sidan laddas...
Sidan laddas...
-
 1
1
-
 2
2
-
 3
3
-
 4
4
-
 5
5
-
 6
6
-
 7
7
-
 8
8
-
 9
9
-
 10
10
-
 11
11
-
 12
12
-
 13
13
-
 14
14
-
 15
15
-
 16
16
-
 17
17
-
 18
18
-
 19
19
-
 20
20
-
 21
21
-
 22
22
-
 23
23
-
 24
24
-
 25
25
-
 26
26
-
 27
27
-
 28
28
-
 29
29
-
 30
30
-
 31
31
-
 32
32
-
 33
33
-
 34
34
-
 35
35
-
 36
36
-
 37
37
-
 38
38
-
 39
39
-
 40
40
-
 41
41
-
 42
42
-
 43
43
-
 44
44
-
 45
45
-
 46
46
-
 47
47
-
 48
48
-
 49
49
-
 50
50
-
 51
51
-
 52
52
-
 53
53
-
 54
54
-
 55
55
-
 56
56
-
 57
57
-
 58
58
-
 59
59
-
 60
60
-
 61
61
-
 62
62
-
 63
63
-
 64
64
-
 65
65
-
 66
66
-
 67
67
-
 68
68
-
 69
69
-
 70
70
-
 71
71
-
 72
72
-
 73
73
-
 74
74
-
 75
75
-
 76
76
-
 77
77
-
 78
78
-
 79
79
-
 80
80
-
 81
81
-
 82
82
-
 83
83
-
 84
84
-
 85
85
-
 86
86
-
 87
87
-
 88
88
-
 89
89
-
 90
90
-
 91
91
-
 92
92
-
 93
93
-
 94
94
-
 95
95
-
 96
96


på andra språk
- italiano: Honeywell Home R200ST-N1 Guida utente
- español: Honeywell Home R200ST-N1 Guía del usuario
- Deutsch: Honeywell Home R200ST-N1 Benutzerhandbuch
- português: Honeywell Home R200ST-N1 Guia de usuario
- français: Honeywell Home R200ST-N1 Mode d'emploi
- Nederlands: Honeywell Home R200ST-N1 Gebruikershandleiding
Andra dokument
-
 careium i10 Användarguide
-
Risco RWX34S Installation Instructions Manual
-
CARLO GAVAZZI BSG-SMO Installationsguide
-
-
Hard Head 014100 Användarmanual
-
Abus FURM50000 Bruksanvisningar
-
BRIGHT 024673 Användarmanual
-
Abus RM 04 Li VdS Radio Datablad
-
HQ SEC-SA301RF Specifikation
-
Ebode ESD18 Användarmanual
