Teufel TEAC TN-3B Bruksanvisningar
- Kategori
- Ljudskivspelare
- Typ
- Bruksanvisningar
Denna manual är också lämplig för

ENGLISH日本語 FRANÇAIS ESPAÑOL DEUTSCH ITALIANO NEDERLANDS SVENSKA
取扱説明書
OWNER’S MANUAL
MODE D’EMPLOI
MANUAL DEL USUARIO
BEDIENUNGSANLEITUNG
MANUALE DI ISTRUZIONI
GEBRUIKSAANWIJZING
BRUKSANVISNING
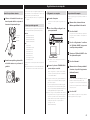
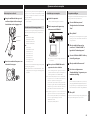
アナログターンテーブル
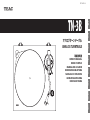
ANALOG TURNTABLE
TN-3B
Z
OPTN3BTEA02
A
N
T
I
–
S
K
A
T
I
N
G
3
0
A
N
T
I
–
S
K
A
T
I
N
G
3
0

ティアック製品をお買い上げいただき、誠にありが
とうございます。
ご使用になる前にこの取扱説明書をよくお読みくだ
さい。
また、お読みになったあとは、いつでも見られると
ころに大切に保管してください。
末永くご愛用くださいますよう、お願い申し上げます。
2
Apple, Mac, OS X and macOS are trademarks of Apple
Inc., registered in the U.S. and other countries.
Microsoft and Windows are either registered trademarks
or trademarks of Microsoft Corporation in the United
States and/or other countries.
その他、記載されている会社名、製品名は各社の
商標または登録商標です。
目 次
安全にお使いいただくために. 2
お使いになる前に. 3
レコードの取り扱い . 3
設置. 4
接続. 5
ダストカバー . 6
各部の名称. 6
基本操作. 6
レコード針について . 8
カートリッジ交換. 8
パソコンで録音するには. 8
困ったときは . 9
仕様.10
保証とアフターサービス.( よくお読みください ). 71
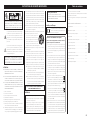
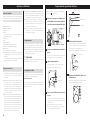
安全にお使いいただくために
製品を安全に正しくお使いいただき、あなたや他の人々への危害や財産への損害を未然に防止するために、
以下の注意事項をよくお読みください。
V
警告
以下の内容を無視して誤った取り扱いをすると、人が死亡または重傷を負
う可能性が想定される内容を示しています。
P
電源プラ
グをコン
セ ント か
ら抜く
万一、異常が起きたとき
o
煙が出たり、変なにおいや音がするとき
o
機器の内部に異物や水などが入ったときは
o
この機器を落としたり、カバーを破損したときは
すぐに機器本体の電源スイッチを切り、必ず AC アダプターの電源プラグをコンセントから抜いてく
ださい。異常状態のまま使用すると、火災・感電の原因となります。
販売店またはティアック修理センター ( 裏表紙に記載 ) に修理をご依頼ください。
=
禁止
AC アダプターのコードを傷つけない
AC アダプターのコードの上に重いものをのせたり、コードを壁や棚との間に挟み込んだり、
本機の下敷きにしない
AC アダプターのコードを無理に曲げる、ねじる、引っ張る等の行為や加工、熱器具に近づけ
て加熱したりしない
コードが傷んだまま使用すると火災・感電の原因となります。
万一、AC アダプターのコードが破損したら ( 芯線の露出、断線など )、販売店またはティアック修理
センター ( 裏表紙に記載 ) をご依頼ください。
付属の AC アダプターを他の機器に使用しない
故障、火災、感電の原因となります。
交流 100 〜 240 ボルト以外の電圧で使用しない
表示された電源電圧 ( 交流 100 〜 240 ボルト ) 以外の電圧で使用しないでください。また、船舶
などの直流 (DC) 電源には接続しないでください。火災・感電の原因となります。
この機器を設置する場合は、放熱をよくするために、壁や他の機器との間は 20cm 以上離し
て置く
ラックなどに入れるときは、機器の天面から 35cm 以上、背面から 10cm 以上のすきまをあけてくだ
さい。すきまをあけないと内部に熱がこもり、火災の原因となります。
この機器の通風孔などから内部に金属類や燃えやすい物などを差し込んだり、落としたりしない
火災・感電の原因となります。
この機器の通風孔をふさがない
通風孔をふさぐと内部に熱がこもり、火災の原因となります。
N
指示
AC アダプターの電源プラグにほこりをためない
AC アダプターの電源プラグとコンセントの間にゴミやほこりが付着すると、火災・感電の原因となり
ます。定期的 ( 年 1 回くらい ) に AC アダプターの電源プラグを抜いて、乾いた布でゴミやほこりを
取り除いてください。
C
禁止
機器の上に花びんや水などが入った容器を置かない
内部に水が入ると火災・感電の原因となります。
Y
分解禁止
この機器のカバーは絶対に外さない
カバーを開けたり改造すると、火災・感電の原因となります。
内部の点検・修理は販売店またはティアック修理センター ( 裏表紙に記載 ) にご依頼ください。
この機器を改造しない
火災・感電の原因となります。.
音のエチケット
楽しい音楽も、場合によっては大変気
になるものです。静かな夜間には小
さな音でもよく通り、隣近所に迷惑を
かけてしまうことがあります。
適当な音量を心がけ、窓を閉めたり
ヘッドホンを使用するなどして、お互いに快適な生活
環境を守りましょう。
このマークは音のエチケットのシンボルマークです。
¹

日本語
3
V
注意
以下の内容を無視して誤った取り扱いをすると、人が傷害を負う可能性が
想定される内容および物的損害のみの発生が想定される内容を示していま
す。
P
電源プラ
グをコン
セ ント か
ら抜く
移動させる場合は、電源をスタンバイにし、必ず AC アダプターの電源プラグをコンセントか
ら抜き、外部の接続ケーブルを外す
コードが傷つき、火災・感電の原因や、引っ掛けてけがの原因になることがあります。
旅行などで長期間この機器を使用しないときやお手入れの際は、安全のため必ず AC アダプ
ターの電源プラグをコンセントから抜く
通電状態の放置やお手入れは、漏電や感電の原因となることがあります。
N
指示
オーディオ機器を接続する場合は、各々の機器の取扱説明書をよく読み、電源を切り、説明に
従って接続する
また、接続は指定のケーブルを使用する
それ以外の物を使用すると、故障、火災、感電の原因となります。
電源を入れる前には、音量を最小にする
突然大きな音が出て聴力障害などの原因となることがあります。
この機器はコンセントの近くに設置し、AC アダプターの電源プラグは簡単に手が届くようにする
異常が起きた場合は、すぐに AC アダプターの電源プラグをコンセントから抜いて、完全に電
源が切 れるようにしてください 。
この機器には、付属の AC アダプターを使用する
それ以外の物を使用すると、故障、火災、感電の原因となります。
=
禁止
ぐらついた台の上や傾いた所など不安定な場所に置かない
湿気やほこりの多い場所に置かない。風呂、シャワー室では使用しない
調理台や加湿器のそばなど油煙や湯気があたる場所に置かない
火災・感電やけがの原因となることがあります。
AC アダプターの電源プラグを抜くときは、AC アダプターの電源コードを引っ張らない
コードが傷つき、火災・感電の原因となることがあります。
必ずプラグを持って抜いてください。
O
禁止
濡れた手で AC アダプターの電源プラグを抜き差ししない
感電の原因となることがあります。
お使いになる前に
º
電源ケーブルや本体に異常がないか、定期的に点検してください。
内部にほこりがたまったまま、長い間掃除をしないと火災や故障の原因となることがあります。
特に、湿気の多くなる梅雨期の前に行うと、より効果的です。
5 年に 1 度は、販売店またはティアック修理センター ( 裏表紙に記載 ) に内部の点検をご依
頼ください 。
費用についてはお問い合わせください。
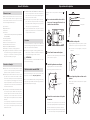
付属品の確認
万一、付属品に不足や損傷がありましたら、お買
い上げになった販売店、または弊社 AV お客様相
談室 ( 裏表紙に記載 ) にご連絡ください。
フェルトマット.x.1
ドーナツ盤用アダプター.x.1
カウンターウエイト.x.1
ヘッドシェル.x.1
オーディオテクニカ製 VM 型 ( デュアルマグ
ネット ) ステレオカートリッジ (AT-VM95E.
for.TEAC) を装着済み
ターンテーブル ( プラッター ).x.1
ダストカバー.x.1
ダストカバー取付用ヒンジ.x.2
GND 端子付き RCA オーディオケーブル.x.1
AC アダプター (GPE053A-V120050).x.1
取扱説明書 ( 保証書付き )( 本書 ).x.1
使用上の注意
o
ダストカバーの上には物を置かないでくださ
い。特に再生中は、振動でノイズが発生したり、
物が落下する恐れがあります。
o
直射日光が当たる場所や暖房器具の近くなど、
温度が高くなるところに置かないでください。
また、アンプなど熱を発生する機器の上には
置かないでください。変色や変形、故障の原
因となります。
ユーザー登録について
TEAC のウェブサイトにて、オンラインでのユー
ザー登録をお願いいたします。
https://teacjp/jp/signup
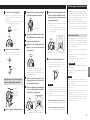
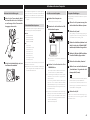
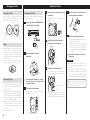
レコードの取り扱い
レコードの持ち方
レ コ ード を 持 つ と き 、 レコ ード ジャケット か ら 取 り出
すときは、音溝部分に手を触れないようにレーベル
部と外周部分を支えて持つか、両手でレコードの外
周部分をはさむように持ってください。
レーベル部 音溝部分
外周部分
お手入れ
o
指紋やほこりがつくと、雑音や音飛びの原因と
なり、レコードや針を傷めます。 市販のレコード
クリー ナ ー などでクリー ニングしてください 。 レ
コードクリーナー以外のベンジン、シンナーなど
で絶対に拭かないでください。これらの化学薬
品で表面が侵されることがあります。
o
レコードクリーナーを使用する場合は、音溝に
沿って円を描くように拭き取ってください。
使用上の注意
o
直射日光が当たる場所や、高温多湿な場所には
置かないでください。長時間放置すると、そり
やカビが生えるなどの原因となります。
o
レコードは、何枚も積み重ねたり、重いものを
のせたりしないでください。また、斜めにして
長時間放置しないでください。そりや破損の原
因となります 。
o
音溝部は、硬いものに直接触れないようにして
ください。傷の原因となります。
o
再 生 が 終 わった レコ ード は 、 必 ず レコ ード ジャケッ
トに入れて保管してください。そのまま放置する
と、そりやキズの原因となります。
o
ヒビが入ったレコードは使用しないでください。

4
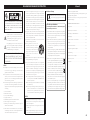
設置
電源はスタンバイの状態で作業を行ってください。
(5 ページ.
F
)
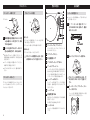
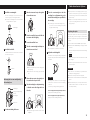
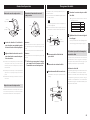
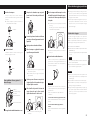
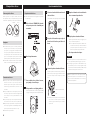
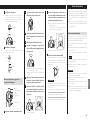
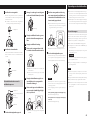
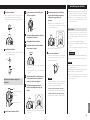
1
トーンアームに取り付けられている
運搬用のクッションを矢印の方向に
取り外す。
A
N
T
I
–
S
K
A
T
I
N
G
3
0
A
N
T
I
–
S
K
A
T
I
N
G
3
0
A
N
T
I
–
S
K
A
T
I
N
G
3
0
運搬用の.
クッション
運搬用の.
クッション
2
水平な場所に置く。
レコードを正しくトレースするため、水平な
場所に設置してください。
3
ターンテーブル ( プラッター ) を取
り付ける。
ターンテーブル ( プラッター ) をセンター
シャフトに合わせて取り付けます。
o
穴の大きい方を下にしてください。
センターシャフト
ターンテーブル
( プラッター )
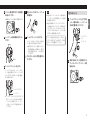
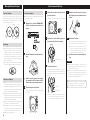
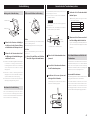
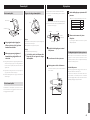
4
ベルトをモータープーリーにかける。
ターンテーブル ( プラッター ) の外周に付属
のフラットベルトをかけ、モータープーリー
にベルトをかけます。
o
ゴムがねじれないように注意してください。
o
ターンテーブル ( プラッター ) を数回転し
て、フラットベルトをなじませてください。
モータープーリー
フラットベルト
5
プーリーカバーを取り付ける。
下図のようにプーリーカバーの小さい切り欠
きを本体の小さい突起に合わせてください。
位置が合わないと、プーリーカバーが傾きます。
プーリーカバー
6
フェルトマットをターンテーブル
( プラッター ) に載せる。
付属のフェルトマットをターンテーブル ( プ
ラッター ) に載せて使用してください。
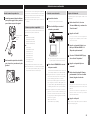
7
カウンターウエイトを取り付ける。
トーンアームの後部にカウンターウエイトを
差込み、右に回しながらゆっくり押して装着
してください。
o
カウンターウエイトが軸受け側に移動す
るようになれば、装着完了です。
カウンターウエイト
軸受け
A
N
T
I
–
S
K
A
T
I
N
G
3
0
A
N
T
I
–
S
K
A
T
I
N
G
3
0
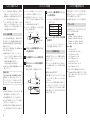
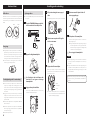
8
ヘッドシェルを取り付ける。
トーンアームの先端にヘッドシェルを差込み、
ナットを回して固定してください。
ヘッドシェル
ナット
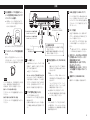
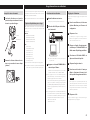
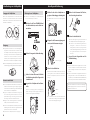
トーンアームのバランス、針圧の調整
アンチスケーティング
アームリフターレバー
カウンターウエイト
針圧調整用リング
中心線
A
N
T
I
–
S
K
A
T
I
N
G
3
0
A
N
T
I
–
S
K
A
T
I
N
G
3
0
1
アンチスケーティングの目盛を 0
にセットする。
2
トーンアームの留め具を右にずらし
て外す。
留め具
A
N
T
I
–
S
K
A
T
I
N
G
3
0
A
N
T
I
–
S
K
A
T
I
N
G
3
0
3
アームリフターレバーを上げ、トー
ンアームを左に少しずらす。
4
アームリフターレバーを下げる。
5
カウンターウエイトを回して、トーン
アームが水平になるように調節する。
A
N
T
I
–
S
K
A
T
I
N
G
3
0
A
N
T
I
–
S
K
A
T
I
N
G
3
0
o
カートリッジ針の保護キャップをはずした
状態で調節してください。
o
カートリッジの針が本機に当たらないよ
うに注意してください。
6
トーンアームを元の位置に戻し、留
め具を使ってトーンアームをロック
する。
7
針圧調整用リングを回して目盛の 0
を中心線に合わせる。
A
N
T
I
–
S
K
A
T
I
N
G
3
0
A
N
T
I
–
S
K
A
T
I
N
G
3
0
o
リング部のみを回します。カウンターウエ
イトが回らないように注意してください。

日本語
5
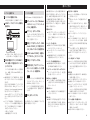
8
針圧調整用リングの目盛をカート
リッジ指定の針圧になるようにカウ
ンターウエイトを回す。
o
付属のカートリッジの針圧は 20g です。
カウンターウエイトの目盛を 20 に合わ
せるように回転させます。
A
N
T
I
–
S
K
A
T
I
N
G
3
0
A
N
T
I
–
S
K
A
T
I
N
G
3
0
0
2.5
2
1.5
1
0.5
o
0→ 05 → 10 のように右方向に回します。
9
アンチスケーティングの目盛を調節
する。
目安として目盛を 20 にセットし、レコー
ドを再生(6ページ)して、左右の音量
のバランスがとれた位置に調節してください。
A
N
T
I
–
S
K
A
T
I
N
G
3
0
ご注意
レコードの状態により、左右の音量バランスが崩
れたり、音飛びが発生する場合があります。
その場合は、下記のように調整してください。
音がバックする ( 針が戻る ) 場合
アンチスケーティングの目盛数値を若干小さくし
てください。
音が先に進む ( 針が先飛びする ) 場合
アンチスケーティングの目盛数値を若干大きくし
てください。
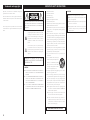
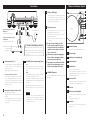
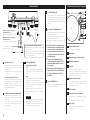
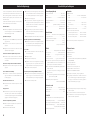
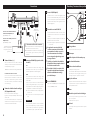
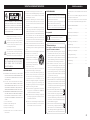
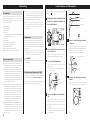
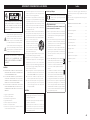
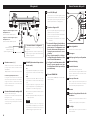
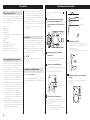
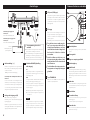
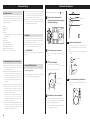
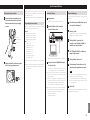
接続
A
アース端子 (
|
)
付属の RCA オーディオケーブルのアース線
を使用して、本機のアース端子とアンプなど
のアース端子を接続します。
o
安全アースではありません。
スピーカーからのノイズ音が気になるときは
オーディオケーブルのアース線を本機のアー
ス端子に接続している場合は、アース線を外
すことでノイズ音が少なくなることがありま
す。また、逆の場合もありますので、ノイズ
音が少なくなる接続方法をお選びください。
B
アナログ音声出力端子 (L/R)
アナログの音声が出力されます。
PHONO. EQ. スイッチの設定で出力信号が
切り換わります。
付属または市販のオーディオケーブルを使っ
て、各機器と本機の出力端子を接続してくだ
さい。
C
音声出力設定スイッチ (PHONO EQ)
ON
内蔵されたイコライザアンプで増幅され
た信号がアナログ音声出力端子 (L/R) か
ら出力されます。
THRU
MC カートリッジまたは、MM カートリッジ
の信号を直接アナログ音声出力端子 (L/R) か
ら出力します。
フォノイコライザーアンプや、フォノ入
力端子付きアンプなど、フォノ入力があ
る機器に接続してお使いください。
o
出荷時は「ON」に設定されています。
o
USB 端子に機器を接続して使用する場合
は、「ON」に設定してください。
注意
「ON」の状態で、アンプなどの PHONO 入
力に接続すると、スピーカーやヘッドホンか
ら大音量が出力され、機器が破損したり聴覚
障害の原因となります。
C D
E
A B
F
LR|
アンプなどのライン入力端子に接続
PHONO.EQ.を.ON.にする
アンプなどのフォノ入力端子に接続
PHONO.EQ.を.THRU.にする
付属の AC アダプター
(GPE053A-V120050)
V
接続時の注意
o
全ての接続が終わってから電源プラグを差
し込んでください。
o
接続する機器の取扱説明書をよく読み、説
明に従って接続してください。
D
USB 出力端子(USB B タイプ)
レコードの音がデジタル(最大 48kHz/16
ビット)に変換されて出力されます。USB
ケーブルでパソコンの USB. 端子と接続する
ことにより、パソコンで録音することができ
ます。(8 ページ )
E
DC 入力端子
他の全ての接続が終わったら、付属の AC ア
ダプ タ ー (GPE053A-V120050) をこ の
ジャックに接続してください。
次に、AC アダプターのプラグを交流 100V
〜 240V の電源コンセントに差し込んでく
ださい。
o
付属のACアダプター(GPE053A-.
V120050) 以外は使わないでください。
V
交流 100 〜 240 ボルト以外の電
圧で使用しないでください。火災・
感電の原因になります。
電源の抜き差しは、必ずプラグを
持って行ってください。
長期間使用しないときは、コンセン
トから電源プラグを抜いておいてく
ださい。
F
電源ボタン (STANDBY/ON)
電源スタンバイと電源オンを切り換えます。
アンプ、.
アンプ内蔵スピーカー.
録音機器など

6
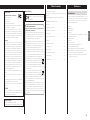
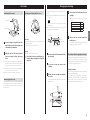
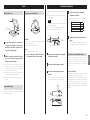
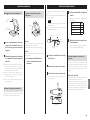
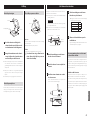
ダストカバーの取り付け
ヒンジ
本体
ダ スト カ バ ー
1
本体背面の左右両端にあるヒンジ差
し込み部にヒンジを合わせて、奥ま
ではめ込みます。
2
ヒンジの上部にダストカバーのヒンジ
差し込み部を合わせ、はめ込みます。
o
再生中はダストカバーを閉めてください。不
用意な接触による針飛びや、外来音圧から針
先を守ります。
o
レコードの再生中に開閉しないでください。
針飛びなどの原因となります。
o
ホコリがかぶらないように、通常は閉めてく
ださい。
ダストカバーの外し方
ダストカバーの両端を持ち、ゆっくり上へ引き、
ヒンジごと本体から外します。さらにダストカ
バーからヒンジを外します。
ダ スト カ バ ー
ダストカバーの開閉
開く
開くとき
ダストカバーの前端を持って、カバーが止まるま
で軽く持ち上げて開きます。
ダストカバーは開いたままの状態になります。
閉めるとき
ダストカバーをゆっくりと下ろします。
V
ダストカバーを開閉するときは、指な
どを挟まないようにご注意ください。
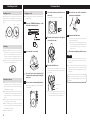
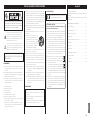
各部の名称
A
N
T
I
–
S
K
A
T
I
N
G
3
0
A
N
T
I
–
S
K
A
T
I
N
G
3
0
aa
d
e
f
i
h
g
c
b
a
ターンテーブル ( プラッター )
レコードをターンテーブル ( プラッター ) の
中心にはめてください。
b
カウンターウエイト
c
針圧調整用リング
d
アンチスケーティングつまみ
e
アームリフターレバー
トーンアームを上げ下げするときに使用します。
指よりも安全かつ確実に操作できますので、
レコード盤や針先を傷めないためにもアーム
リフターレバーのご使用をお勧めします。.
f
トーンアームホルダー
トーンアームの支持台です。レコードを再生
する前に、留め具を右にずらすようにしては
ずしてください。
g
トーンアーム
h
回転数切換つまみ
再生するレコード盤に指定されている回転数
を選んでください。
0 に設定すると回転が止まります。
i
ヘッドシェル
カートリッジ交換が容易なユニバーサルタイ
プです。
基本操作
レコードを再生する
o
カートリッジ針の保護キャップをはずした状
態でお使いください。
1
リアパネルの電源ボタン
(STANDBY/ON) を押して、電源
をオンにします。
2
ゆっくりとダストカバーを開ける。
V
ダストカバーを開閉するときは、手
などをはさまないようにご注意くだ
さい。
3
ターンテーブル ( プラッター ) にレ
コードをのせる。
ドーナツ (EP) 盤を再生する場合には、付属
の EP アダプターをご使用ください。

日本語
7
4
レコード盤に指定されている回転数
を選んでください。
回転数は 33.1/3、45 回転の 2 種類あります。
5
トーンアームの留め具を右にずらし
て外す。
留め具
A
N
T
I
–
S
K
A
T
I
N
G
3
0
A
N
T
I
–
S
K
A
T
I
N
G
3
0
6
アームリフターレバーを上げる。
アームリフターが上がり、トーンアームをレ
コード盤上に移動させても、トーンアームが
上がったままで、針先がレコード盤に接触し
ない状態になります。
トーンアーム
アームリフターレバー
A
N
T
I
–
S
K
A
T
I
N
G
3
0
A
N
T
I
–
S
K
A
T
I
N
G
3
0
o
アームリフターレバーを下げたまま、手
動で、トーンアームを浮かせた状態でレ
コードの上に移動してから、トーンアー
ムをゆっくりと下げて再生を始めること
もできます。
7
再生したいところまでトーンアーム
を移動する。
8
アームリフターレバーをさげる。
トーンアームがゆっくり下がり、針先がレ
コード盤におりて再生がはじまります。
o
再生中はダストカバーを閉めてください。
不用意な接触による針飛びや、外部から
の音圧を遮断するため、ノイズが起きに
くくなります。
V
ダストカバーの上には物を置かない
でください。
注意
o
再生中はトーンアームやレコード盤に触れな
いでください。針先の破損やレコード盤の損
傷の原因となります。
o
再生中は無理にターンテーブル ( プラッター )
の回転を止めないでください。本製品は DJ
タイプのターンテーブル(ダイレクトドライ
ブ方式)ではありませんので、このような動
作をすると故障の原因となります。
レコードの再生時に音を大きくしすぎると、
ハウリングが起こることがあります。その場
合は、アンプの音量を下げてください。
再生が終わったら
1
アームリフターレバーを上げて針を
レコード盤から離し、トーンアーム
を元の位置に戻してください。
トーンアーム
アームリフター
レバー
A
N
T
I
–
S
K
A
T
I
N
G
3
0
A
N
T
I
–
S
K
A
T
I
N
G
3
0
2
回転つまみを「0」の位置に回して、
ターンテーブル ( プラッター ) の回
転を止める。

8
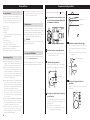
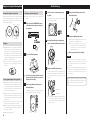
カートリッジ交換
カートリッジの交換は、ヘッドシェルをトーン
アームから取り外して作業を行ってください。
o
本機に装着されているカートリッジは、オー
ディオテクニカ製「AT-VM95E.for. TEAC」
(VM 型 ) です。
※ VM 型は MM 型と同じ特性です。
o
カートリッジ針の保護キャップを付けて作業
することをお勧めします。
ヘッドシェル
カートリッジ
シェルリード線
ネジ
ナット.
(埋込)
1
シェルリード線の端子をカートリッ
ジから取り外す。
2
ネジを緩めてカートリッジを取り外す。
3
新しいカートリッジをネジを締めて
取り付ける。
取り付け位置は、下図を参照してください。
528 ± 05mm
4
シェルリード線の端子をカートリッ
ジへ取り付ける。
o
シェルリード線の信号名と色は下図を参
照してください。
信号名 色
左チャンネル.+ 白
左チャンネル.− 青
右チャンネル.+ 赤
右チャンネル.− 緑
5
トーンアームのバランス、針圧の調
整を行う。
4ページの「トーンアームのバランス、
針圧の調整」の手順に従ってください。
カートリッジ交換時の注意
本機に使用できるカートリッジの質量には制限が
あります。10 ページの「トーンアーム部」を
参照してください。
また、ヘッドシェルを交換するときは、適用カー
トリッジ質量 ( 付属ヘッドシェルを含む ) を参照
してください。
MC カートリッジについて
本機に内蔵されているイコライザアンプは、MM
カートリッジ用です。MC カートリッジには対応
していません。
MC カートリッジをご使用の場合は、MC カート
リッジ対応のフォノイコライザーアンプや、MC
フォノ入力端子付きアンプなどに接続し、本機の
音声出力設定スイッチ (PHONO. EQ) を THRU
に設定してお使いください。
パソコンで録音するには
市販の USB ケーブルでパソコンの USB. 端子と
接続することにより、レコードの音をパソコンに
デジタル録音することができます。
o
本機の USB 端子は、パソコンとの接続用です。
サポート OS
USB 接続できるパソコンの OS は以下のいずれ
かです。(2019 年 4 月現在)
Windows の場合
Windows.7.(32bit 版、64bit 版 )
Windows.8.(32bit 版、64bit 版 )
Windows.81.(32bit 版、64bit 版 )
Windows.10.(32bit 版、64bit 版 )
Mac の場合
OS.X.Lion.(107)
OS.X.Mountain.Lion.(108)
OS.X.Mavericks.(109)
OS.X.Yosemite.(1010)
OS.X.El.Capitan.(1011)
macOS.Sierra.(1012)
macOS.High.Sierra.(1013)
macOS.Mojave.(1014)
これ以外の OS での動作保証はいたしません。
o
Windows 及び Mac の標準ドライバーで動作
します。専用ドライバーをインストールする
必要はありません。
レコード針について
o
レコード針が曲がる(破損する)と、音溝を
正確にトレースできなくなります。レコード
盤を傷めたり、故障の原因にもなりますので、
レコード針は丁寧に取扱ってください。
o
レコード針のお手入れは、市販のレコード針
専用クリーナーを必ずお使いください。レコー
ド針専用クリーナー以外を使った場合、レコー
ド針が破損する恐れがあります。
レコード針の交換
レコード針の針先が摩耗すると、音質が劣化する
だけではなくレコード盤を傷める原因となります。
再生時間 300 時間を目安に当社指定の交換針に
お取替えください。
オーディオテクニカ製交換針(AT-VMN95E.for.
TEAC)をお求めください。
o
本機に装着されているカートリッジは、オー
ディオテクニカ製「AT-VM95E.for. TEAC」
(VM 型)です。(装着しているカートリッジの
交換針本体色は緑色になります。)
※ VM 型は MM 型と同じ特性です。
o
交換方法は、交換針の取扱説明書に従って交
換してください。
交換針 ( 別売 ):
オーディオテクニカ製 AT-VMN95E for TEAC
交換用のレコード針は、弊社オンラインショッ
プ「ティアックストア」でお求めいただけます。
ティアックストア.https://storeteaccojp/.
注意
o
突然大きな音が出ることがありますので、機
器の電源を切ってから交換してください。
o
手や機器を傷付けないよう、ご注意ください。
o
小さなお子様があやまってレコード針を飲み
込まないよう、ご注意ください。
o
お客様の不注意や外部要因による針折れなど
は、保証の対象外となりますのでご注意くだ
さい。

日本語
9
パソコンと接続する
1
パソコンの電源を入れる。
OS が正常に起動したことを確認してください。
2
USB ケーブルでパソコンと本機を
接続する。
o
USB ケーブルは、市販のフェライトコア
付きの USB ケーブルを使用してください。
3
本機の電源ボタン (STANDBY/
ON) を押して電源をスタンバイか
らオンにする。
パソコン側では本機の USB ポートを自動検
出し、本機を「USB. Audio. CODEC」とし
て認識します。
o
本機の音声をパソコンで録音するには、音声録
音ソフトをパソコンにインストールする必要が
あります。
別途、お好みの音楽録音ソフトウェアをお
買い求めになるか、Web 上のフリーソフト.
(Audacity、
http://wwwaudacityteamorg/
.
等 ).をダウンロードしてご使用下さい。
Audacity. 等のフリーソフトウエアは、弊社
サポート対象外となりますので予めご了承く
ださい。
o
パソコンでの録音中は、下記の操作を行わない
でください。パソコンが誤動作する原因となり
ます。これらの操作は必ずパソコンの録音ソフ
トを終了してから行ってください。
u.USB ケーブルを抜く
u.本機の電源をスタンバイにする
パソコンの設定
OS が Windows.10 の場合を例に説明します。
1
スタートメニューから「Windows
システムツール」-「コントロール
パネル」を選択する。
2
「サウンド」をクリックする。
コントロールパネルの表示方法が「カテゴリ」
の場合は、「ハードウェアとサウンド」-「サ
ウンド」を選択してください。
3
「録音」タブをクリックして、「USB
Audio CODEC」が「既定のデバ
イス」になっていることを確認する。
4
「USB Audio CODEC」を選択し
て「プロパティ」をクリックする。
5
「詳細」タブをクリックする。
6
「既定の形式」プルダウンメニュー
のリストから録音したい音質
(フォーマット)を選択する。
ヒント
本製品から出力される最高音質で録音
するには「2チャンネル、16ビット、
48000Hz」に設定してください。
サンプリング周波数の設定値が下がるほど
ファイル容量は少なくなり、音質が低下して
いきます。
7
「OK」をクリックする。
以上の設定をしてから、音楽録音ソフトウェアを
使用して録音をしてください。
困ったときは
本機の調子がおかしいときは、修理を依頼される
前に以下の内容をもう一度チェックしてください。
また、本機以外の原因も考えられますので、接続
した機器の使用方法も併せてご確認ください。
それでも正常に動作しない場合は、お買い上げの
販売店またはティアック修理センター ( 裏表紙に
記載 ) にご連絡ください。
電源が入らない
e
AC アダプターをコンセントに差し込んで
ください。 電源ボ タン (STANDBY/ON)
を押して電源をオンにしてください。(5、
6 ページ )
ターンテーブルが回らない
e
電源ボタン (STANDBY/ON) を押して電源を
オンにしてください。(5、6 ページ )
e
ベルトをモータープーリーにかけてください。
(4 ページ )
e
回転数切換つまみをレコード盤に指定されてい
る回転数に合わせてください。(6 ページ )
ターンテーブルの回転速度がおかしい
e
回転数切換つまみを 33 に設定して、3分間で
約 100 回転するか確認してください。
アームリフターレバーをさげてもアームが下がらない
e
トーンアームのバランスをとって、針圧を設
定し直してください。(4 ページ )
音がおかしい、音が割れる
e
アンプと接続している端子を確認して音声出
力設定スイッチ (PHONO.EQ) を設定してく
ださい。(5 ページ)
音程がおかしい
e
レコード盤に指定されている回転数を選んで
ください。(6 ページ )
音がしない
e
本機のアナログ音声出力端子をアンプなどの
音声入力端子に接続している場合、音声出力
設定スイッチ (PHONO.EQ) の設定を「ON」
にして下さい。(5 ページ )
再生できない、雑音が入る
e
カートリッジ針の保護キャップをはずした状
態でお使いください。
e
RCA オーディオケーブルを接続しなおして
ください。
e
レコードに指紋やほこりがつくと、雑音や
音飛びの原因となります。市販のレコード
クリー ナ ー などでクリー ニングしてください。.
(3 ページ )
e
レコード針をクリーニングしてください。
(8 ページ )
e
レコード針が摩耗していたら、交換してくだ
さ い。(8ページ). 針の交換は、使用環
境にもよりますが約 300 時間で交換をお勧
めします。
e
テレビや電子レンジなど、電磁波を出すもの
からはできるだけ離して設置してください。
e
AC アダプターを別のコンセントにさしてく
ださい。
レコード再生中にノイズが出る
e
カートリッジ指定の値よりも高い針圧の場合
はノイズが.出やすくなります。指定の値にな
るように針圧の調整をやりなおしてください。
(4 ページ )
音飛びする
e
震動を与えると音飛びします。本機は安定し
た場所に設置してください。
e
レコード盤の汚れをクリーニングしてください。
e
傷が付いたレコードは使わないでください。
e
トーンアームのバランスをとって、針圧を設
定し直してください。(4 ページ )
カートリッジ指定の値よりも低い針圧の場合
は音飛び ( 針飛び ) しやすくなります。
e
レコード針が曲がっていたらレコード針を交
換してください。
パソコンと接続しても認識されない
e
対応するパソコンのOS は、8 ページを
ご覧ください。対応していない OS での動作
保証はいたしかねます。
e
別の USB ポートに接続してください。

10
仕様
出力電圧
PHONO.EQ.THRU..40mV.(1kHz,.5cm/sec)
PHONO.EQ.ON ..224mV.( − 13dBV)
出力端子..RCA ジャック
USB 端子
プラグインパワー対応 USB 端子.(Full.Speed)
USB コネクタ.タイプ B
USB バスパワー対応 ..5V.500mA
サンプリング周波数
8/11025/16/2205/32/441/48kHz
量子化ビット数.16 ビット
一般
AC アダプター電源
入力..AC.100V 〜 AC.240V.50/60Hz
出力..DC.12 V.500mA
消費電力
スタンバイ..05W 以下
オン.(33、45)..20W 以下
質量..約 50kg
動作保証温度 ..5℃〜35℃
外形寸法 ( 幅、高さ、奥行 ).( 突起部を含む )
ダストカバーを閉めた場合
420.x.117.x.356.mm
ダストカバーを開けた場合
420.x.381.x.402.mm
ダストカバーを外した場合
420.x.102.x.356.mm
o
性能データは、20℃で規定しています。
ターンテーブル ( プラッター ) 部
駆動方式..ベルトドライブ
モータ ..DC モータ
回転数 . .33.1/3rpm,.45rpm
ワウ・フラッター..01% 以下
SN 比. .67dB 以上
.(A-weighted、20kHz.LPF)
ターンテーブル ( プラッター )
アルミダイカスト
直径 30cm
トーンアーム部
アーム形式
スタティックバランス S 字型トーンアーム
実効アーム長 ..223mm
針圧可変範囲 ..0 〜 5g
適用カートリッジ質量..30 〜 12g
.14 〜 23g
( 付属ヘッドシェルを含む )
カートリッジ部
形式..VM 型(MM 型と同等)
出力電圧..40mV.(1kHz,.5cm/sec)
針圧..18 〜 22g.(20g 推奨 )
カートリッジ質量..61g
付属ヘッドシェル質量.
11g.( ネジ、ナット、ワイヤー含む )
o
針の交換は、使用環境にもよりますが約 300
時間で交換をお勧めします。
o
本機に装着されているカートリッジは、オー
ディオテクニカ製「AT-VM95E.for. TEAC」
(VM 型)です。( 装着しているカートリッジの
交換針本体色は緑色になります。)
※ VM 型は MM 型と同じ特性です。
交換針 ( 別売 ):
オーディオテクニカ製 AT-VMN95E for TEAC
交換用のレコード針は、弊社オンラインショッ
プ「ティアックストア」でお求めいただけます。
ティアックストア.https://storeteaccojp/.
付属品
フェルトマット.x.1
ドーナツ盤用アダプター.x.1
カウンターウエイト.x.1
ヘッドシェル.x.1
オーディオテクニカ製 VM 型 ( デュアルマグ
ネット ) ステレオカートリッジ (AT-VM95E.
for.TEAC) を装着済み
ターンテーブル ( プラッター ).x.1
ダストカバー.x.1
ダストカバー取付用ヒンジ.x.2
GND 端子付き RCA オーディオケーブル.x.1
AC アダプター (GPE053A-V120050).x.1
取扱説明書 ( 保証書付き )( 本書 ).x.1
o
仕様及び外観は改善のため予告なく変更する
ことがあります。
o
取扱説明書のイラストが一部製品と異なる場
合があります。

11

12
IMPORTANT SAFETY INSTRUCTIONS
CAUTION: TO REDUCE THE RISK OF ELECTRIC SHOCK, DO
NOT REMOVE COVER (OR BACK). NO USER-SERVICEABLE
PARTS INSIDE. REFER SERVICING TO QUALIFIED SERVICE
PERSONNEL.
M
The lightning flash with arrowhead in an equilat-
eral triangle is intended to alert the user to the
presence of uninsulated “dangerous voltage” within
the product’s enclosure that could be of sufficient
magnitude to constitute a risk of electric shock to
persons.
V
The exclamation point in an equilateral triangle
is intended to alert the user to the presence of
important operating and maintenance (servicing)
instructions in the literature accompanying the
appliance.
WARNING: TO PREVENT FIRE OR SHOCK
HAZARD, DO NOT EXPOSE THIS APPLIANCE TO
RAIN OR MOISTURE.
CAUTION
o DO NOT REMOVE THE EXTERNAL CASES OR CABINETS TO
EXPOSE THE ELECTRONICS. NO USER SERVICEABLE PARTS
ARE INSIDE.
o IF YOU ARE EXPERIENCING PROBLEMS WITH THIS PRODUCT,
CONTACT THE STORE WHERE YOU PURCHASED THE UNIT
FOR A SERVICE REFERRAL. DO NOT USE THE PRODUCT
UNTIL IT HAS BEEN REPAIRED.
o USE OF CONTROLS OR ADJUSTMENTS OR PERFORMANCE
OF PROCEDURES OTHER THAN THOSE SPECIFIED HEREIN
MAY RESULT IN HAZARDOUS RADIATION EXPOSURE.
1) Read these instructions.
2) Keep these instructions.
3) Heed all warnings.
4) Follow all instructions.
5) Do not use this apparatus near water.
6) Clean only with dry cloth.
7) Do not block any ventilation openings. Install in accordance
with the manufacturer’s instructions.
8) Do not install near any heat sources such as radiators, heat
registers, stoves, or other apparatus (including amplifiers)
that produce heat.
9) Do not defeat the safety purpose of the polarized or
grounding-type plug. A polarized plug has two blades with
one wider than the other. A grounding type plug has two
blades and a third grounding prong. The wide blade or
the third prong are provided for your safety. If the provided
plug does not fit into your outlet, consult an electrician for
replacement of the obsolete outlet.
10) Protect the power cord from being walked on or pinched
particularly at plugs, convenience receptacles, and the
point where they exit from the apparatus.
11) Only use attachments/accessories specified by the
manufacturer.
12) Use only with the cart, stand, tripod,
bracket, or table specified by the man-
ufacturer, or sold with the apparatus.
When a cart is used, use caution when
moving the cart/apparatus combina-
tion to avoid injury from tip-over.
13) Unplug this apparatus during lightning storms or when
unused for long periods of time.
14) Refer all servicing to qualified service personnel. Servicing
is required when the apparatus has been damaged in any
way, such as power-supply cord or plug is damaged, liquid
has been spilled or objects have fallen into the apparatus,
the apparatus has been exposed to rain or moisture, does
not operate normally, or has been dropped.
o The apparatus draws nominal non-operating power
from the AC outlet with its POWER or STANDBY/ON
switch not in the ON position.
o The mains plug is used as the disconnect device, the
disconnect device shall remain readily operable.
o Caution should be taken when using earphones or
headphones with the product because excessive
sound pressure (volume) from earphones or head-
phones can cause hearing loss.
IN USA/CANADA, USE ONLY ON 120V SUPPLY.
CAUTION
o Do not expose this apparatus to drips or splashes.
o Do not place any objects filled with liquids, such as
vases, on the apparatus.
o Do not install this apparatus in a confined space such as
a book case or similar unit.
o The apparatus should be located close enough to the
AC outlet so that you can easily reach the power cord
plug at any time.
Apple, Mac, OS X and macOS are trademarks of Apple Inc.,
registered in the U.S. and other countries.
Microsoft and Windows are either registered trademarks or
trademarks of Microsoft Corporation in the United States and/
or other countries.
Other company names and product names in this document
are the trademarks or registered trademarks of their respective
owners.
Trademarks and copyrights

ENGLISH
13
Thank you for choosing TEAC.
Read this manual carefully to get the best performance from
this unit.
After reading it, keep it in a safe place for future reference.
Table of contents
IMPORTANT SAFETY INSTRUCTIONS ........................12
Before use..................................................13
Preparing the record player.................................14
Notes about record styluses ................................15
Connections ...............................................16
Names and functions of parts ..............................16
Dust cover .................................................17
Changing the cartridge ....................................17
Handling records...........................................18
Basic operation.............................................18
Recording with a computer ................................19
Troubleshooting ...........................................20
Specifications ..............................................20
Before use
Included items
Check to be sure the box includes all the supplied accessories
shown below. Please contact the store where you purchased
this unit if any of these accessories are missing or have been
damaged during transportation.
Felt mat × 1
45 RPM adapter × 1
Counterweight × 1
Headshell × 1
Audio-Technica VM type (dual magnet) stereo cartridge
(AT-VM95E) preinstalled
Turntable (platter) × 1
Dust cover × 1
Dust cover hinges × 2
RCA audio cable with grounding terminal × 1
AC adapter (GPE053A-V120050) × 1
Owner’s manual (this document, including warranty) × 1
o The warranty for the United States and Canada is on the
back cover. See page70 for warranty provisions.
See page71 for information about the warranty in Europe
and other countries or areas.
Model for USA
Supplier’s Declaration of Conformity
Model number: TN-3B
Trade name: TEAC
Responsible party:
Pioneer & Onkyo U.S.A. Corporation
Address: 22828 Lockness Avenue, Torrance, CA 90501 U.S.A.
Telephone number: 1-201-785-2600
This device complies with Part 15 of the FCC Rules.
Operation is subject to the following two conditions: (1)
this device may not cause harmful interference, and (2) this
device must accept any interference received, including
interference that may cause undesired operation.
Information
This equipment has been tested and found to comply
with the limits for a Class B digital device, pursuant to Part
15 of the FCC Rules. These limits are designed to provide
reasonable protection against harmful interference in a
residential installation. This equipment generates, uses,
and can radiate radio frequency energy and, if not installed
and used in accordance with the instructions, may cause
harmful interference to radio communications. However,
there is no guarantee that interference will not occur in a
particular installation. If this equipment does cause harmful
interference to radio or television reception, which can be
determined by turning the equipment off and on, the user
is encouraged to try to correct the interference by one or
more of the following measures:
• Reorient or relocate the equipment and/or the receiving
antenna.
• Increase the separation between the equipment and
receiver.
• Connect the equipment into an outlet on a circuit different
from that to which the receiver is connected.
• Consult the dealer or an experienced radio/TV technician
for help.
CAUTION
Changes or modifications not expressly approved by the
party responsible for compliance could void the user’s
authority to operate the equipment.
Model for Canada
Industry Canada’s Compliance Statement:
This Class B digital apparatus complies with Canadian ICES-003.
Model for Europe
This product complies with the European
Directives request, and the other Commission
Regulations.
For European Customers
Disposal of electrical and electronic equipment and
batteries and/or accumulators
a) All electrical/electronic equipment and waste batteries/
accumulators should be disposed of separately from the
municipal waste stream via collection facilities desig-
nated by the government or local authorities.
b) By disposing of electrical/electronic equipment and
waste batteries/accumulators correctly, you will help
save valuable resources and prevent any potential nega-
tive effects on human health and the environment.
c) Improper disposal of waste electrical/electronic equip-
ment and batteries/accumulators can have serious effects
on the environment and human health because of the
presence of hazardous substances in the equipment.
d) The Waste Electrical and Electronic Equipment
(WEEE) symbols, which show wheeled bins that
have been crossed out, indicate that electrical/
electronic equipment and batteries/accumulators
must be collected and disposed of separately from
household waste.
If a battery or accumulator contains more than
the specified values of lead (Pb), mercury (Hg),
and/or cadmium (Cd) as defined in the Battery
Directive (2006/66/EC, 2013/56/EU), then the
chemical symbols for those elements will be indicated
beneath the WEEE symbol.
e) Return and collection systems are available to end users.
For more detailed information about the disposal of old
electrical/electronic equipment and waste batteries/
accumulators, please contact your city office, waste
disposal service or the shop where you purchased the
equipment.
Pb, Hg, Cd

14
Before use (continued)
Keep the unit in standby while setting it up (
F
on page16).
1 Cushions are attached to the tone arm
for use during transportation. Remove
them in the directions of the arrows.
A
N
T
I
–
S
K
A
T
I
N
G
3
0
A
N
T
I
–
S
K
A
T
I
N
G
3
0
A
N
T
I
–
S
K
A
T
I
N
G
3
0
Cushion for
transportation
Cushion for
transportation
2 Place the unit on a at surface.
Place it on a flat surface so that the record can be accurately
traced.
3 Install the turntable (platter).
Align the turntable (platter) with the center shaft and
install it.
o Place the large side of the hole down.
Center shaft
Turntable (platter)
4 Loop the belt around the motor pulley.
Loop the included flat belt around the outside of the
turntable (platter), and then loop the belt around the
motor pulley.
o Be careful not to let the rubber become twisted.
o Rotate the turntable (platter) several times to make
sure that the flat belt is secure.
Motor pulley
Flat belt
5 Install the pulley cover.
Align the small cutout in the pulley cover with the small
protuberance on the pulley, as shown in the illustration
below.
o If these are not aligned, the pulley cover will slant.
Pulley cover
6 Place the felt mat on the turntable
(platter).
Place the included felt mat on the turntable (platter)
before using it.
Preparing the record player
Precautions for use
o Do not place anything on the dust cover. Objects on the
cover might cause noise due to vibrations or fall off, espe-
cially during playback.
o Avoid placing the unit in direct sunlight, close to a source
of heat or in other similar conditions. Do not place the unit
on top of an amplifier or other equipment that might gen-
erate heat that exceeds the operating temperature range of
this unit. Doing so could cause discoloration, deformation
or malfunction.
o As the unit could become warm during operation, always
leave sufficient space around it for ventilation. When
installing this unit, leave a little space (at least 20cm (8"))
between it and other devices and walls to allow good heat
dissipation.
When placing it in a rack, for example, leave at least 35cm
(133/4") open above it and 10cm (4") open behind it.
Failure to provide these gaps could cause heat to build up
inside and result in fire.
o DO NOT MOVE THE UNIT DURING PLAYBACK. During play-
back, the record rotates. Do not lift or move the unit during
playback. Doing so may damage the record, the stylus, the
cartridge or the unit.
o Always remove the record before relocating or moving this
unit. Moving the unit with a record on the turntable (plat-
ter) could damage the record, the stylus and the cartridge
or could cause a malfunction.
o The voltage supplied to the unit should match the voltage
as printed on the rear panel. If you are in any doubt regard-
ing this matter, consult an electrician.
Maintenance
If the surface of the unit gets dirty, wipe it with a soft cloth or
use diluted mild liquid soap. Allow the surface of the unit to dry
completely before using.
o Do not use chemical cleaning cloths, thinner or similar sub-
stances as they could damage the surface of the unit.
V
CAUTION
For safety, disconnect the power cord from the socket before
cleaning.
Using the TEAC Global Site
You can download updates for this unit from the TEAC Global
Site: http://teac-global.com/
In the TEAC Downloads section, click the desired language to
open the Downloads website page for that language.

ENGLISH
15
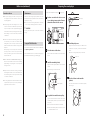
7 Install the counterweight.
Place the counterweight over the end of the tone arm,
and press it gently as you turn it right to attach it.
o When the counterweight can be moved toward the
bearing, installation is complete.
A
N
T
I
–
S
K
A
T
I
N
G
3
0
A
N
T
I
–
S
K
A
T
I
N
G
3
0
Counterweight
Bearing
8 Install the headshell.
Insert the headshell on the end of the tone arm and turn
the nut to secure it in place.
Headshell
Nut
Balancing the tone arm and adjusting
the tracking force
A
N
T
I
–
S
K
A
T
I
N
G
3
0
A
N
T
I
–
S
K
A
T
I
N
G
3
0
Anti-skating dial
Arm lifter lever
Counterweight
Tracking force adjustment ring
Center line
1 Set the anti-skating dial to zero.
2 Move the tone arm clasp to the right to
release the tone arm.
Clasp
A
N
T
I
–
S
K
A
T
I
N
G
3
0
A
N
T
I
–
S
K
A
T
I
N
G
3
0
3 Raise the arm lifter lever and shift the
tone arm to the left slightly.
4 Lower the arm lifter lever.
5 Turn the counterweight and adjust so
that the tone arm is level.
A
N
T
I
–
S
K
A
T
I
N
G
3
0
A
N
T
I
–
S
K
A
T
I
N
G
3
0
o Remove the protective cap from the cartridge stylus
before adjusting.
o Be careful not to let the cartridge stylus touch the
unit.
6 Return the tone arm to its original posi-
tion, and use the clasp to lock it.
7 Turn the tracking force adjustment ring
so that the center line aligns with 0 on
the scale.
A
N
T
I
–
S
K
A
T
I
N
G
3
0
A
N
T
I
–
S
K
A
T
I
N
G
3
0
o Only turn the ring. Be careful not to let the counter-
weight turn.
8 Turn the counterweight so that the
tracking force adjustment ring scale
matches the tracking force specied for
the cartridge.
o The tracking force of the included cartridge is 2.0 g.
So, turn it to 2.0 on the counterweight scale when
using the included cartridge.
A
N
T
I
–
S
K
A
T
I
N
G
3
0
A
N
T
I
–
S
K
A
T
I
N
G
3
0
0
2.5
2
1.5
1
0.5
o Turn it right from 0 in the direction of 0.5 and 1.0.
9 Adjust the anti-skating dial.
Start with it set at 2.0 and adjust it during record playback
(page18) to the position where the left and right volumes
are balanced.
A
N
T
I
–
S
K
A
T
I
N
G
3
0
ATTENTION
Depending on the condition of a record, the left-right
volume balance could become uneven and skipping
could occur.
In such cases, try making the following adjustments.
If the sound jumps backward (stylus skips backward)
Slightly lower the anti-skating dial setting.
If the sound jumps forward (stylus skips forward)
Slightly increase the anti-skating dial setting.
Notes about record styluses
o If the stylus becomes bent (damaged), it will no longer
be able to accurately trace the groove. Since a bent stylus
could also damage records and cause malfunction, handle
styluses carefully.
o Always use a commercially-available stylus cleaner to clean
a stylus. Use of anything other than a stylus cleaner could
damage the stylus.
Replacing the stylus
If the tip of the stylus becomes worn, not only will it worsen
the sound quality, it could also damage records. After about
300 hours of playback time, replace the stylus with one that
we specify.
Please use an Audio-Technica AT-VMN95E replacement stylus.
o An Audio-Technica AT-VM95E VM Type cartridge is installed
in this unit.
(The body of the replacement stylus for the installed cartridge
is green.)
NOTE
VM type cartridges have the same characteristics as MM
type cartridges.
o Follow the replacement instructions in the manual of the
replacement stylus.
ATTENTION
o Since loud noises could suddenly occur, put the unit into
standby before changing the stylus.
o Be careful not to hurt your hand or the equipment.
o Be careful not to allow small children to accidentally swallow
styluses.
o Be aware that bent styluses, for example, that result from
insufficient customer caution or an outside cause are not
covered by the warranty.

16
Names and functions of parts
A
N
T
I
–
S
K
A
T
I
N
G
3
0
A
N
T
I
–
S
K
A
T
I
N
G
3
0
aa
d
e
f
i
h
g
c
b
a
Turntable (platter)
Place records centered on the turntable (platter).
b
Counterweight
c
Tracking force adjustment ring
d
Anti-skating dial
e
Arm lifter lever
Use to raise and lower the tone arm.
We recommend using the arm lifter lever to avoid dam-
aging records and styluses, because it is safer and more
certain than using a finger to do so.
f
Tone arm holder
This is a rest for the tone arm. Move the clasp to the right
to release the tone arm before playing a record.
g
Tone arm
h
Rotation speed setting knob
Select the rotation speed indicated on the record to be
played.
Rotation will stop when this is set to 0.
i
Headshell
This is a universal type that allows the cartridge to be
changed easily.
Connections
A
Grounding terminal (|)
Use the grounding wire of the included RCA audio cable
to connect this connector to the grounding terminal of
the amplifier, for example.
o This is NOT an electrical safety ground.
If noise from speakers is conspicuous
If connecting the grounding wire of the audio cable
to the grounding terminal of this unit does not reduce
noise, disconnect the grounding wire and check the
sound again. Use the method (connected/disconnected)
that has the least noise.
B
Analog audio output connectors (L/R)
These output analog audio signals.
The PHONO EQ switch setting changes the type of out-
put signal.
Use the included audio cable (or commercially-available
ones) to connect other equipment to the output connec-
tors of this unit.
C
PHONO EQ (audio output setting) switch
ON
Signals that have been amplified by the built-in equalizer
amp are output from the analog audio output connectors
(L/R).
THRU
The MC or MM cartridge signal is output directly through
the analog audio output connectors (L/R).
Connect to a device with phono inputs, such as a phono
equalization preamplifier or an amplifier with phono input
connectors.
o When shipped new from the factory, this is set to ON.
o Set this to ON if a device is connected to the USB
port.
CAUTION
When set to ON, if connected to the PHONO inputs of
an amplifier, for example, the output from speakers and
headphones will be very loud, which could damage
equipment or harm hearing.
D
USB port (USB B type)
The sound of the record is converted to digital (resolution
up to 48 kHz/16-bit) and output. Recording on a com-
puter is possible by connecting this to a USB port on the
computer using a USB cable (page19).
E
DC input connector
After completing all other connections, connect the
included AC adapter to this connector.
Confirm that the power plug of the AC adapter is
plugged into a power outlet.
o Do not use any AC adapter other than the one
included.
V
Be sure to connect the power cord to
an AC outlet that supplies the correct
voltage. Connection to an outlet that
supplies incorrect voltage could cause
fire or electric shock.
V
Hold the power plug when plugging it
into an outlet or unplugging it. Never
pull or yank on the power cord.
V
Unplug the power cord from the outlet
when you are not planning to use the
unit for an extended period of time.
F
STANDBY/ON button
Press the STANDBY/ON button to turn the unit on or put
it in standby.
C D
E
A B
F
LR|
Connect to line input connectors of
amplifier, etc.
Set the PHONO EQ switch to ON.
Connect to phono input connectors
of amplifier, etc.
Set the PHONO EQ switch to THRU.
Included AC adapter
V
Precautions when making connections
o Do not plug the unit in until after making all connections.
o Carefully read the manuals of the devices that you are
connecting and follow their instructions when making
connections.
Amplifier, speaker system
with built-in amp,
recording device, etc.

ENGLISH
17
Attaching the dust cover
Hinge
Main unit
Dust cover
1 Insert the hinges completely into the
hinge holders at the left and right ends
of the back of the main unit.
2 Align the tops of the hinges with the
dust cover hinge holders and insert
them.
o Close the dust cover during playback. Since doing this pre-
vents skipping caused by unintended contact and blocks
external sound pressure, it makes noise less likely to occur.
o Do not open or close it when a record is playing. Doing so
could, for example, cause the stylus to skip.
o Keep it closed whenever possible to keep dust out.
Removing the dust cover
Hold both edges of the dust cover and lift it slowly to remove it
along with the hinges from the unit. Then, remove the hinges
from the dust cover.
Dust cover
Opening and closing the dust cover
Open
Opening
Hold the front edge of the dust cover and gently lift it open
completely until it stops.
The dust cover will stay open in this position.
Closing
Gently lower the dust cover until it is closed.
V
Be careful not to pinch your fingers, for
example, when opening and closing the
dust cover.
Changing the cartridge
To change the cartridge, first remove the headshell from the
tone arm.
o An Audio-Technica AT-VM95E VM Type cartridge is installed
in this unit.
NOTE
VM type cartridges have the same characteristics as MM
type cartridges.
o We recommend that you attach the protective cap to the
cartridge stylus before doing this task.
Headshell
CartridgeShell leads
Screws
Nuts
(embedded)
1 Disconnect the shell lead terminals from
the cartridge.
2 Loosen the screws and remove the
cartridge.
3 Attach the new cartridge and tighten
the screws.
See the illustration below for the position of the screws
when attached.
52.8 ±0.5 mm
4 Connect the shell lead terminals to the
cartridge.
o The signals and colors of the shell leads are shown
below.
Signal Color
Left channel + White
Left channel − Blue
Right channel + Red
Right channel − Green
5 Balance the tone arm and adjust the
tracking force.
Follow the procedures in “Balancing the tone arm and
adjusting the tracking force” on page15.
Precautions when changing the cartridge
The weight of cartridges that can be used with this unit is lim-
ited. See “Tone arm” on page20. Also check the acceptable
cartridge weight (with the included head shell) shown on the
same page when changing the head shell.
Using MC cartridges
The equalizer amplifier built into this unit is for MM cartridges.
It does not support MC cartridges.
To use an MC cartridge, connect this unit to a phono equalizer
amplifier that supports MC cartridges or an amplifier with an
MC phono input connector, for example. Then, set this unit’s
PHONO EQ (audio output) setting switch to THRU.

18
Basic operation
4 Select the rotation speed indicated on
the record.
The rotation speed can be set to 33 1/3 or 45 RPM.
5 Move the tone arm clasp to the right to
release the tone arm.
Clasp
A
N
T
I
–
S
K
A
T
I
N
G
3
0
A
N
T
I
–
S
K
A
T
I
N
G
3
0
6 Raise the arm lifter lever.
This raises the arm lifter, keeping the tone arm up, so the
stylus will not contact the record even if the tone arm is
moved over it.
Tone arm
Arm lifter lever
A
N
T
I
–
S
K
A
T
I
N
G
3
0
A
N
T
I
–
S
K
A
T
I
N
G
3
0
o You can also manually move the tone arm to above
the record without raising the arm lifter lever and
then slowly lower the tone arm to start playback.
7 Move the tone arm to the track where
you want to start playback.
8 Lower the arm lifter lever.
The tone arm lowers slowly until the stylus touches the
record and playback begins.
o Close the dust cover during playback. Since doing
this prevents skipping caused by unintended contact
and blocks external sound pressure, it makes noise
less likely to occur.
V
Do not place anything on the dust cover.
ATTENTION
o During playback, do not touch the tone arm or the record.
Doing so could damage the stylus tip and cause scratches
on the record.
o Do not forcibly stop turntable (platter) rotation during
playback. Since this product is not a turntable designed
for DJs (direct drive), doing something like this could cause
malfunction.
During record playback, feedback could occur if the
volume is too loud. If this happens, lower the volume of
the amplifier.
Handling records
Holding records
When holding a record or removing it from its sleeve, avoid
touching the grooves by holding the record by its label and
edge with one hand or by holding it by its edge with both
hands.
Label Grooves
Outer edge
Cleaning
o Fingerprints and dust on a record can cause noise and the
sound to skip, as well as damage the record itself and the
stylus. Use a commercially-available record cleaner to clean
records. Do not use thinner or anything other than a record
cleaner. Such chemicals could harm the surface of the record.
o When using a record cleaner, wipe the surface of the record
in a circular motion, following the grooves.
Precautions for use
o Do not leave records in places that are exposed to direct
sunlight or are very hot or very humid. Leaving a record in
such a condition for a long time could result in warping,
mold growth or other damage.
o Do not stack multiple records or place heavy objects on top
of them. Do not leave records at an angle for long amounts
of time, either. Doing so could result in warping or other
damage.
o Do not allow hard objects to directly touch the audio
grooves. Doing so could cause scratches.
o After you finish playing a record, always put it back into
its sleeve for storage. Leaving a record unprotected could
result in warping or scratching.
o Do not use cracked records.
Playing records
o Remove the protective cap from the cartridge stylus before
using the turntable.
1 Press the STANDBY/ON button on the
back of the unit to turn it on.
2 Open the dust cover slowly.
V
Be careful not to pinch your hand, for
example, when opening and closing the
dust cover.
3 Place a record on the turntable (platter).
When playing a 45 RPM large-hole single record, use the
included adapter.

ENGLISH
19
When playback finishes
1 Raise the arm lifter lever to separate the
stylus from the record, and return the
tone arm to its original position.
Tone arm
Arm lifter lever
A
N
T
I
–
S
K
A
T
I
N
G
3
0
A
N
T
I
–
S
K
A
T
I
N
G
3
0
2 Turn the rotation speed setting knob to
0 to stop the turntable (platter).
Recording with a computer
Connecting with a computer
1 Turn the computer on.
Confirm that the operating system is working correctly.
2 Use the USB cable to connect the com-
puter and this unit.
o Use a commercially-available USB cable with a ferrite
core.
3 Press this unit’s STANDBY/ON button to
turn it on.
The computer will automatically detect this unit’s USB
port and identify the unit as “USB Audio CODEC”.
o To record audio from this record player using a computer,
you must first install software that can be used for audio
recording on the computer.
You may purchase the audio recording software that
you prefer separately or download free software, such as
Audacity (http://www.audacityteam.org/), from the Internet.
As free software, Audacity is not supported by TEAC.
o When recording with a computer, do not do any of the fol-
lowing. Doing so could cause the computer to malfunction.
Always quit the computer recording software before doing
the following.
u Disconnect the USB cable
u Put the unit into standby
The sound of a record can be digitally recorded on a computer
by using a commercially-available USB cable to connect this
unit to a USB port on the computer.
o The USB port on this unit is for connecting to a computer.
Supported operating systems
Computers running the following operating systems can be
connected by USB to this unit (as of April 2019).
Windows
Windows 7 (32-bit, 64-bit)
Windows 8 (32-bit, 64-bit)
Windows 8.1 (32-bit, 64-bit)
Windows 10 (32-bit, 64-bit)
Mac
OS X Lion (10.7)
OS X Mountain Lion (10.8)
OS X Mavericks (10.9)
OS X Yosemite (10.10)
OS X El Capitan (10.11)
macOS Sierra (10.12)
macOS High Sierra (10.13)
macOS Mojave (10.14)
Use with operating systems other than these is not guaranteed.
o This unit will run with the standard Windows or Mac driver,
so there is no need to install a special driver.
Computer settings
The following example explains the settings to make using
Windows10.
1 From the Start menu, select Windows
System, then Control Panel.
2 Click “Sound”.
If the Control Panel “View by” is set to “Category”, select
“Hardware and Sound”. Then select “Sound”.
3 Click the “Recording” tab, and confirm
that “USB Audio CODEC” is set as the
“Default Device”.
4 Select “USB Audio CODEC”, and click the
Properties button.
5 Click the “Advanced” tab.
6 From the “Default Format” pull-down
menu list, select the desired recording
quality (format).
TIP
To record at the highest audio quality that this unit can
output, select “2channel, 16bit, 48000Hz”.
Lowering the sampling frequency setting value will rela-
tively reduce the size of files but also decrease the audio
quality.
7 Click “OK”.
After making the above settings, use audio recording software
to record.

20
Troubleshooting
If you experience a problem with this unit, please check the fol-
lowing items before requesting service. Something other than
this unit could also be the cause of the problem. Please also
check that the connected devices are also being used properly.
If it still does not operate correctly, contact the retailer where
you purchased the unit.
No power.
e Confirm that the AC adapter is plugged into an outlet.
Then, press the STANDBY/ON button to turn the unit on
(pages 16 and 18).
The turntable will not rotate.
e Press the STANDBY/ON button to turn the unit on
(pages16 and 18).
e Loop the belt around the motor pulley (page14).
e Adjust the rotation speed setting knob to the rotation
speed indicated on the record (page18).
The turntable rotation speed is not right.
e Confirm that the rotation speed setting knob is set to 33
and that it rotates about 100 times in 3 minutes.
The arm does not go down even when the arm lifter lever
is lowered.
e Balance the tone arm and readjust the tracking force
(page15).
Sound is odd or breaks up.
e Check the connectors connected to the amplifier, and set
the PHONO EQ (audio output) setting switch (page16).
The pitch is wrong.
e Select the rotation speed indicated on the record
(page18).
There is no sound.
e When connecting this unit’s analog audio output con-
nectors to the audio input connectors of an amplifier
or other equipment, set the PHONO EQ (audio output
setting) switch to ON (page16).
Playback is not possible; there is noise.
e Remove the protective cap from the cartridge stylus before
using the turntable.
e Reconnect RCA audio cables.
e Fingerprints and dust on a record can cause noise and
the sound to skip. Use a commercially-available record
cleaner to clean records (page18).
e Clean the stylus (page15).
e If the stylus is worn-out, replace it (page15). The need
for stylus replacement depends on use conditions, but we
recommend replacement after about 300 hours of use.
e Place the unit as far away as possible from TVs, micro-
wave ovens and other devices that emit electromagnetic
waves.
e Plug the AC adapter into a different outlet.
Noise occurs when a record is playing.
e Noise could occur if the tracking force is higher than car-
tridge’s specified value. Readjust the tracking force so that it
is the specified value (page15).
The sound is skipping.
e Vibrations will cause skipping. Place this unit in a stable
location.
e Clean the record.
e Do not use scratched records.
e Balance the tone arm and readjust the tracking force
(page15). The stylus and sound might skip if the track-
ing force is lower than the cartridge’s specified value.
e If the stylus is bent, replace it.
The unit is not recognized by the connected computer.
e Check the supported computer operating systems on
page19. Operation with unsupported operating systems
is not guaranteed.
e Connect it to a different USB port.
Specifications
General
AC adapter power
Input......................... AC 100V – AC 240V, 50/60Hz
Output..................................... DC 12V, 500mA
Power consumption
Standby........................................ 0.5W or less
On (33, 45) . . . . . . . . . . . . . . . . . . . . . . . . . . . . . . . . . . . . . 2.0W or less
Weight........................................ 5.0kg (111/8 lb)
Operating temperature range ...................... 5°C to 35°C
Dimensions (W × H × D) (including protrusions)
When the dust cover is closed
420 × 117 × 356 mm (165/8" × 45/8" × 141/8")
When the dust cover is open
420 × 381 × 402 mm (165/8" × 15" × 157/8")
When the dust cover is removed
420 × 102 × 356 mm (165/8" × 41/8" × 141/8")
o Performance data is specified at 20°C.
Included items
Felt mat × 1
45 RPM adapter × 1
Counterweight × 1
Headshell × 1
Audio-Technica VM type (dual magnet) stereo cartridge
(AT-VM95E) preinstalled
Turntable (platter) × 1
Dust cover × 1
Dust cover hinges × 2
RCA audio cable with grounding terminal × 1
AC adapter (GPE053A-V120050) × 1
Owner’s manual (this document, including warranty) × 1
o The warranty for the United States and Canada is on the
back cover. See page70 for warranty provisions.
See page 71 for information about the warranty in
Europe and other countries or areas.
o Specifications and appearance are subject to change without
notice.
o Weight and dimensions are approximate.
o Illustrations in this owner’s manual might differ slightly from
production models.
Turntable (platter)
Drive system ......................................... Belt drive
Motor............................................... DC motor
Rotation speed............................. 331/3rpm, 45rpm
Wow and flutter.................................... 0.1% or less
SN ratio ............... 67dB or higher (A-weighted, 20kHz LPF)
Turntable (platter).......................... Aluminum die-cast
30cm (12") diameter
Tone arm
Arm type...................Static-balanced S-shaped tone arm
Effective arm length................................... 223mm
Tracking force variation range ............................ 0–5g
Acceptable cartridge weight .......................... 3.0–12g
14–23g
(with the included headshell)
Cartridge
Type ....................................VM (equivalent to MM)
Output voltage.......................... 4.0mV (1kHz, 5cm/s)
Tracking force .................. 1.8–2.2g (2.0g recommended)
Cartridge weight .......................................... 6.1g
Included headshell weight
11 g (including screws, nuts and wires)
o The need for stylus replacement depends on use conditions,
but we recommend replacement after about 300 hours of
use.
o An Audio-Technica AT-VM95E VM Type cartridge is installed
in this unit.
(The body of the replacement stylus for the installed car-
tridge is green.)
Note: VM type cartridges have the same characteristics as
MM type cartridges.
o Replacement stylus model: Audio-Technica AT-VMN95E
Output voltage
PHONO EQ THRU........................ 4.0mV (1kHz, 5cm/s)
PHONO EQ ON.............................. 224mV (−13dBV)
Output connectors........................................ RCA
USB port
USB port that can receive power from computer USB buses
(Full Speed) ..............................USB connector type B
USB bus power support ............................ 5V, 500mA
Sampling frequency
8kHz, 11.025kHz, 16kHz, 22.05kHz, 32kHz, 44.1kHz, 48kHz
Quantization bit depth ...................................16-bit
Sidan laddas ...
Sidan laddas ...
Sidan laddas ...
Sidan laddas ...
Sidan laddas ...
Sidan laddas ...
Sidan laddas ...
Sidan laddas ...
Sidan laddas ...
Sidan laddas ...
Sidan laddas ...
Sidan laddas ...
Sidan laddas ...
Sidan laddas ...
Sidan laddas ...
Sidan laddas ...
Sidan laddas ...
Sidan laddas ...
Sidan laddas ...
Sidan laddas ...
Sidan laddas ...
Sidan laddas ...
Sidan laddas ...
Sidan laddas ...
Sidan laddas ...
Sidan laddas ...
Sidan laddas ...
Sidan laddas ...
Sidan laddas ...
Sidan laddas ...
Sidan laddas ...
Sidan laddas ...
Sidan laddas ...
Sidan laddas ...
Sidan laddas ...
Sidan laddas ...
Sidan laddas ...
Sidan laddas ...
Sidan laddas ...
Sidan laddas ...
Sidan laddas ...
Sidan laddas ...
Sidan laddas ...
Sidan laddas ...
Sidan laddas ...
Sidan laddas ...
Sidan laddas ...
Sidan laddas ...
Sidan laddas ...
Sidan laddas ...
Sidan laddas ...
Sidan laddas ...
-
 1
1
-
 2
2
-
 3
3
-
 4
4
-
 5
5
-
 6
6
-
 7
7
-
 8
8
-
 9
9
-
 10
10
-
 11
11
-
 12
12
-
 13
13
-
 14
14
-
 15
15
-
 16
16
-
 17
17
-
 18
18
-
 19
19
-
 20
20
-
 21
21
-
 22
22
-
 23
23
-
 24
24
-
 25
25
-
 26
26
-
 27
27
-
 28
28
-
 29
29
-
 30
30
-
 31
31
-
 32
32
-
 33
33
-
 34
34
-
 35
35
-
 36
36
-
 37
37
-
 38
38
-
 39
39
-
 40
40
-
 41
41
-
 42
42
-
 43
43
-
 44
44
-
 45
45
-
 46
46
-
 47
47
-
 48
48
-
 49
49
-
 50
50
-
 51
51
-
 52
52
-
 53
53
-
 54
54
-
 55
55
-
 56
56
-
 57
57
-
 58
58
-
 59
59
-
 60
60
-
 61
61
-
 62
62
-
 63
63
-
 64
64
-
 65
65
-
 66
66
-
 67
67
-
 68
68
-
 69
69
-
 70
70
-
 71
71
-
 72
72


Teufel TEAC TN-3B Bruksanvisningar
- Kategori
- Ljudskivspelare
- Typ
- Bruksanvisningar
- Denna manual är också lämplig för
på andra språk
- italiano: Teufel TEAC TN-3B Istruzioni per l'uso
- español: Teufel TEAC TN-3B Instrucciones de operación
- Deutsch: Teufel TEAC TN-3B Bedienungsanleitung
- français: Teufel TEAC TN-3B Mode d'emploi
- 日本語: Teufel TEAC TN-3B 取扱説明書
- English: Teufel TEAC TN-3B Operating instructions
- Nederlands: Teufel TEAC TN-3B Handleiding