Sentiotec Bracket Set Concept R Användarmanual
- Typ
- Användarmanual

Version 03/21 Ident no Y05-1042
INSTRUCTIONS FOR INSTALLATION AND USE
English
EN
DE
SV
FI
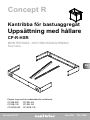
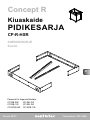
Concept R
Heater railing
BRACKET SET
CP-R-HSR
Fits the following models:
CP-RB-090 CP-RB-105
CP-RB-120 CP-RB-150
CP-RCB-090 CP-RCB-105

Table of Contents
1. About this instruction manual 2
2. Important information for your safety 3
2.1. Intended use 3
2.2. General safety information 3
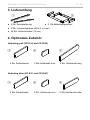
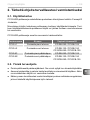
3. Scope of delivery 4
4. Optional accessories 4
5. Installation 5
5.1. Installing the railing bracket 5
5.3. Installing wooden parts on the mounting bracket 6
5.2. Installing the railing 7
6. Disposal 7
1. About this instruction manual
Read these instructions for installation carefully and keep them within reach of
the product. This ensures that you can refer to information regarding your safety
and regarding installation at any time.
Symbols
In these installation instructions, symbols and signal words are used which have
the following meanings:
ATTENTION!
This keyword is a warning that damage to property can occur.
This symbol indicates tips and useful information.

EN
Installation instructions, only for experts p. 3/8
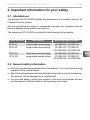
2. Important information for your safety
2.1. Intended use
The bracket set CP-R-HSR enables the attachment of a wooden railing to all
Concept R sauna heaters.
Any use exceeding this scope is considered improper use. Improper use can
result in damage to the product and injuries.
The bracket set CP-R-HSR is suitable for the following railing models:
Article number Description Matching heater models
CP-R-L1 Small linden wood railing CP-RB-090 / CP-RB-105
CP-R-L2 Large linden wood railing CP-RB-120 / CP-RB-150
CP-RCB-090 / CP-RCB-105
CP-R-N1 Small walnut wood railing CP-RB-090 / CP-RB-105
CP-R-N2 Large walnut wood railing CP-RB-120 / CP-RB-150
CP-RCB-090 / CP-RCB-105
2.2. General safety information
●Remove any packaging residue from the bracket. This could ignite during
operation of the sauna heater.
● Mount the railing bracket and the nished railing with a normal screwdriver.
The product can be damaged by a cordless drill.
●For your own safety, consult your supplier in the event of problems that are
not described in sucient detail in the operating instructions.

Instructions for installation and use p. 4/8
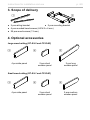
3. Scope of delivery
●2 pcs mounting bracket
●2 pcs railing bracket
●4 pcs rounded head screws (A2 M 3 x 6 mm)
●28 pcs wood screws (13 mm)
4. Optional accessories
Large wood railing (CP-R-L2 and CP-R-N2)
Small wood railing (CP-R-L1 and CP-R-N1)
1 2
4 pcs side panel 2 pcs long
wooden panel
2 pcs short
wooden panel
4 pcs side panel 2 pcs short
wooden panel 2 pcs medium
wooden panel
3 4 5
3 64

EN
Installation instructions, only for experts p. 5/8
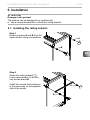
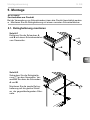
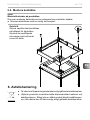
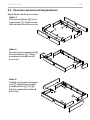
5. Installation
ATTENTION!
Damage to the product
The product can be damaged by a cordless drill.
●Use a normal screwdriver to install the railing bracket.
Remove screws A and B from the
sauna heater using a screwdriver.
Step 1
A
B
Screw the railing bracket 1
to the sauna heater. To do this,
use screws A and B.
Install the second railing bracket
in the same way on the opposite
side of the heater.
A
B
Step 2
5.1. Installing the railing bracket

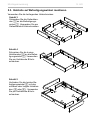
Installation instructions, only for experts p. 6/8
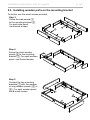
Screw the side panels 3
to the mounting bracket 2.
For each side panel,
use 4 wood screws.
Step 3
Screw the short wooden
panels 4 to the mounting
bracket 2. For each wooden
panel, use 2 wood screws.
Step 4
5.3. Installing wooden parts on the mounting bracket
To do this, use the wood screws provided.
Connect the two mounting
brackets 2 with the medium
or long wooden panels (5 or
6). For each wooden panel,
use 4 wood screws.
Step 5

EN
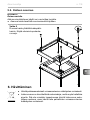
Installation instructions, only for experts p. 7/8
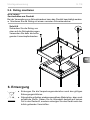
Screw the railing from above
to the railing brackets. To do
this, use the rounded head
screws provided.
5.2. Installing the railing
ATTENTION!
Damage to the product
The product can be damaged by a cordless drill.
●Use a screwdriver to install the railing.
Step 6
6. Disposal
●Please dispose of packaging materials in accordance with the
applicable disposal regulations.
●Used products contain reusable materials and hazardous
substances. Therefore, do not dispose of your used product with
household waste, but do so in accordance with the locally applicable
regulations.

NOTIZEN / APPUNTI / NOTES / NOTE / NOTITIES
………………………………………………….............………………………………………………………………...
…………………………………………………………….......……………………………………………………………...
…………………………………………………………….............………………………………………………………...
…………………………………………………….............………………………………………………………………...
……………………………………………………………......……………………………………………………………...
……………………………………………………………......……………………………………………………………...
……………………………………………………………..........…………………………………………………………...
…………………………………………………………….............………………………………………………………...
…………………………………………………………….............………………………………………………………...
…………………………………………………………….............………………………………………………………...
…………………………………………………………….............………………………………………………………...
…………………………………………………………….............………………………………………………………...
.…………………………………………………………….............………………………………………………………...
…………………………………………………………….............………………………………………………………...
…………………………………………………………….............………………………………………………………...
…………………………………………………………….............………………………………………………………...
…………………………………………………………….............………………………………………………………...
…………………………………………………………….............………………………………………………………...
…………………………………………………………….............………………………………………………………...

MONTAGEANWEISUNG
Deutsch
Version 03/21 Ident-Nr. Y05-1042
DE
Concept R
Ofenreling
HALTERUNGSSET
CP-R-HSR
Passend für folgende Modelle:
CP-RB-090 CP-RB-105
CP-RB-120 CP-RB-150
CP-RCB-090 CP-RCB-105

Inhaltsverzeichnis
1. Zu dieser Anleitung 2
2. Wichtige Hinweise zu Ihrer Sicherheit 3
2.1. Bestimmungsgemäßer Gebrauch 3
2.2. Allgemeine Sicherheitshinweise 3
3. Lieferumfang 4
4. Optionales Zubehör 4
5. Montage 5
5.1. Relinghalterung montieren 5
5.3. Holzteile auf Befestigungswinkel montieren 6
5.2. Reling montieren 7
6. Entsorgung 7
1. Zu dieser Anleitung
Lesen Sie diese Montageanweisung gut durch und bewahren Sie sie in der Nähe
des Produktes auf. So können Sie jederzeit Informationen zu Ihrer Sicherheit
und zur Montage nachlesen.
Symbole
In dieser Montageanweisung werden Symbole und Signalwörter verwendet, die
folgende Bedeutungen haben:
ACHTUNG!
Dieses Signalwort warnt Sie vor Sachschäden.
Dieses Symbol kennzeichnet Tipps und nützliche Hinweise.

DE
Montageanweisung S. 3/8
2. Wichtige Hinweise zu Ihrer Sicherheit
2.1. Bestimmungsgemäßer Gebrauch
Das Halterungsset CP-R-HSR ermöglicht die Befestigung einer Holzreling auf
allen Concept R Saunaöfen.
Jeder darüber hinausgehende Gebrauch gilt als nicht bestimmungsgemäß. Nicht
bestimmungsgemäßer Gebrauch kann zur Beschädigung des Produkts und zu
Verletzungen führen.
Das Halterungsset CP-R-HSR ist für folgende Relingmodelle geignet:
Artikelnum-
mer Beschreibung Passende Ofenmodelle
CP-R-L1 Holzreling Linde klein CP-RB-090 / CP-RB-105
CP-R-L2 Holzreling Linde groß CP-RB-120 / CP-RB-150
CP-RCB-090 / CP-RCB-105
CP-R-N1 Holzreling Walnuss klein CP-RB-090 / CP-RB-105
CP-R-N2 Holzreling Walnuss groß CP-RB-120 / CP-RB-150
CP-RCB-090 / CP-RCB-105
2.2. Allgemeine Sicherheitshinweise
●Entfernen Sie Verpackungsreste von der Halterung. Diese können sich beim
Betrieb des Saunaofens entzünden.
●Montieren Sie die Relinghalterung und die fertige Reling mit einem normalen
Schraubendreher. Bei der Verwendung von Akkuschraubern kann das Produkt
beschädigt werden.
●Bei Problemen, die in der Gebrauchsanweisung nicht ausführlich genug
behandelt werden, wenden Sie sich zu Ihrer eigenen Sicherheit an Ihren
Lieferanten.

Montage- und Gebrauchsanweisung S. 4/8
3. Lieferumfang
●2. Stk.Befestigungswinkel ●2 Stk. Relinghalterung
●4 Stk. Linsenschrauben (A2 M 3 x 6 mm)
●28 Stk. Holzschrauben (13 mm)
4. Optionales Zubehör
Holzreling groß (CP-R-L2 und CP-R-N2)
Holzreling klein (CP-R-L1 und CP-R-N1)
1 2
4 Stk. Seitenblende 2 Stk. Holzblende lang2 Stk.Holzblende kurz
4 Stk. Seitenblende 2 Stk. Holzblende kurz 2 Stk.Holzblende mittel
3 4 5
3 64

DE
Montageanweisung S. 5/8
5. Montage
ACHTUNG!
Sachschäden am Produkt
Bei der Verwendung von Akkuschraubern kann das Produkt beschädigt werden.
●Montieren Sie die Relinghalterung mit einem normalen Schraubendreher.
Entfernen Sie die Schrauben A
und B mit einem Schraubendreher
vom Saunaofen.
Schritt 1
A
B
Schrauben Sie die Relinghalte-
rung 1 an den Saunaofen. Ver-
wenden Sie dazu die Schrauben
A und B.
Montieren Sie die zweite Reling-
halterung auf die gleiche Weise
an der gegenüberliegenden Ofen-
seite.
A
B
Schritt 2
5.1. Relinghalterung montieren

Montageanweisung S. 6/8
Schrauben Sie die Seitenblen-
den 3 an die Befestigungs-
winkel 2. Verwenden Sie pro
Seitenblende 4 Holzschrauben.
Schritt 3
Schrauben Sie die kurzen
Holzblenden 4 an die Befes-
tigungswinkel 2. Verwenden
Sie pro Holzblende 2 Holz-
schrauben.
Schritt 4
5.3. Holzteile auf Befestigungswinkel montieren
Verwenden Sie die beiliegenden Holzschrauben.
Verbinden Sie die beiden Be-
festigungswinkel 2 mit den
mittleren oder langen Holzblen-
den (5 oder 6). Verwenden
Sie pro Holzblende 4 Holz-
schrauben.
Schritt 5

DE
Montageanweisung S. 7/8
Schrauben Sie die Reling von
oben auf die Relinghalterungen.
Verwenden Sie dazu die beilie-
genden Linsenkopfschrauben.
5.2. Reling montieren
ACHTUNG!
Sachschäden am Produkt
Bei der Verwendung von Akkuschraubern kann das Produkt beschädigt werden.
●Montieren Sie die Reling mit einem normalen Schraubendreher.
Schritt 6
6. Entsorgung
●Entsorgen Sie die Verpackungsmaterialien nach den gültigen
Entsorgungsrichtlinien.
●Altprodukte enthalten wiederverwendbare Materialien, aber auch
schädliche Stoe. Geben Sie Ihr Altprodukt deshalb auf keinen
Fall in den Restmüll, sondern entsorgen Sie das Gerät nach den
örtlich geltenden Vorschriften.

NOTIZEN / APPUNTI / NOTES / NOTE / NOTITIES
………………………………………………….............………………………………………………………………...
…………………………………………………………….......……………………………………………………………...
…………………………………………………………….............………………………………………………………...
…………………………………………………….............………………………………………………………………...
……………………………………………………………......……………………………………………………………...
……………………………………………………………......……………………………………………………………...
……………………………………………………………..........…………………………………………………………...
…………………………………………………………….............………………………………………………………...
…………………………………………………………….............………………………………………………………...
…………………………………………………………….............………………………………………………………...
…………………………………………………………….............………………………………………………………...
…………………………………………………………….............………………………………………………………...
.…………………………………………………………….............………………………………………………………...
…………………………………………………………….............………………………………………………………...
…………………………………………………………….............………………………………………………………...
…………………………………………………………….............………………………………………………………...
…………………………………………………………….............………………………………………………………...
…………………………………………………………….............………………………………………………………...
…………………………………………………………….............………………………………………………………...

MONTERINGS- OCH BRUKSANVISNING
Svenska
Version 03/21 Ident-Nr. Y05-1042
SV
Concept R
Kantribba för bastuaggregat
Uppsättning med hållare
CP-R-HSR
Passar ihop med de nedanstående modellerna:
CP-RB-090 CP-RB-105
CP-RB-120 CP-RB-150
CP-RCB-090 CP-RCB-105

Innehållsförteckning
1. Om monterings- och bruksanvisningen 2
2. Viktig säkerhetsinformation 3
2.1. Ändamålsenlig användning 3
2.2. Allmänna säkerhetsanvisningar 3
3. Leveransomfattning 4
4. Tillbehör 4
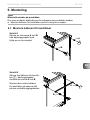
5. Montering 5
5.1. Montera hållaren för kantribbor 5
5.3. Montera trädelar på fästvinkel 6
5.2. Montera kantribba 7
6. Avfallshantering 7
1. Om monterings- och bruksanvisningen
Läs hela monteringsanvisningen noga och förvara den sedan i närheten av
produkten. Du kan då när som helst läsa de specika säkerhets- och monte-
ringsanvisningarna.
Symboler
I denna monteringsanvisning används symboler och signalord med följande
betydelse:
VARNING!
Varnar för sakskador.
Används vid tips och nyttig information.

SV
Monterings- och bruksanvisning sid. 3/8
2. Viktig säkerhetsinformation
2.1. Ändamålsenlig användning
Med hjälp av uppsättningen för hållare CP-R-HSR kan man fästa en kantribba
av trä på alla Concept R-bastuaggregat.
All annan användning betraktas som ej ändamålsenlig. Ej ändamålsenlig an-
vändning kan leda till skador på produkten och medföra personskador.
Uppsättningen med hållare CP-R-HSR kan kombineras med de nedanstående
kantribbsmodellerna:
Artikel-
nummer Beskrivning Lämpliga
aggregatmodeller
CP-R-L1 Liten kantribba av trä, lind CP-RB-090 / CP-RB-105
CP-R-L2 Stor kantribba av trä, lind CP-RB-120 / CP-RB-150
CP-RCB-090 / CP-RCB-105
CP-R-N1 Liten kantribba av trä, valnöt CP-RB-090 / CP-RB-105
CP-R-N2 Stor kantribba av trä, valnöt CP-RB-120 / CP-RB-150
CP-RCB-090 / CP-RCB-105
2.2. Allmänna säkerhetsanvisningar
●Ta bort rester från förpackningen från hållaren. Dessa kan fatta eld när bastu-
aggregatet är i drift.
●Montera hållaren för kantribbor och den färdiga kantribban med hjälp av
en vanlig skruvmejsel. Om man använder batteridrivna skruvdragare kan
produkten skadas.
●Om det uppstår problem som inte beskrivs tillräckligt detaljerat i bruksanvis-
ningen, vänd dig, för din egen säkerhets skull, till leverantören/återförsäljaren.

Monterings- och bruksanvisning sid. 4/8
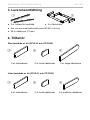
3. Leveransomfattning
●2 st. fästvinklar ●2 st. hållare för kantribba
●4 st. skruvar med linsformat huvud (A2 M 3 x 6 mm)
●28 st. träskruvar (13 mm)
4. Tillbehör
Stor kantribba av trä (CP-R-L2 och CP-R-N2)
Liten kantribba av trä (CP-R-L1 och CP-R-N1)
1 2
4 st. sidoskärmar 2 st. långa träskärmar2 st. korta träskärmar
4 st. sidoskärmar 2 st. korta träskärmar
2 st. medelstora träskärmar
3 4 5
3 64
Sidan laddas...
Sidan laddas...
Sidan laddas...
Sidan laddas...
Sidan laddas...
Sidan laddas...
Sidan laddas...
Sidan laddas...
Sidan laddas...
Sidan laddas...
Sidan laddas...
Sidan laddas...
-
 1
1
-
 2
2
-
 3
3
-
 4
4
-
 5
5
-
 6
6
-
 7
7
-
 8
8
-
 9
9
-
 10
10
-
 11
11
-
 12
12
-
 13
13
-
 14
14
-
 15
15
-
 16
16
-
 17
17
-
 18
18
-
 19
19
-
 20
20
-
 21
21
-
 22
22
-
 23
23
-
 24
24
-
 25
25
-
 26
26
-
 27
27
-
 28
28
-
 29
29
-
 30
30
-
 31
31
-
 32
32


