
ENGLISH FRANÇAIS
ESPAÑOL
DEUTSCH ITALIANO
NEDERLANDS SVENSKA
77-20P126001002
Z
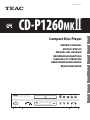
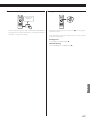
CD-P1260MK"
Compact Disc Player
OWNER’S MANUAL
MODE D’EMPLOI
MANUAL DEL USUARIO
BEDIENUNGSANLEITUNG
MANUALE DI ISTRUZIONI
GEBRUIKERSHANDLEIDING
BRUKSANVISNING

2
CAUTION: TO REDUCE THE RISK OF ELECTRIC SHOCK,
DO NOT REMOVE COVER (OR BACK). NO USER-
SERVICEABLE PARTS INSIDE. REFER SERVICING TO
QUALIFIED SERVICE PERSONNEL.
<
The lightning flash with arrowhead symbol, within an
equilateral triangle, is intended to alert the user to the
presence of uninsulated “dangerous voltage” within the
product’s enclosure that may be of sufficient magnitude
to constitute a risk of electric shock to persons.
B
The exclamation point within an equilateral triangle is
intended to alert the user to the presence of important
operating and maintenance (servicing) instructions in
the literature accompanying the appliance.
WARNING: TO PREVENT FIRE OR SHOCK HAZARD,
DO NOT EXPOSE THIS APPLIANCE TO RAIN OR
MOISTURE.
CAUTION
o DO NOT REMOVE THE EXTERNAL CASES OR CABINETS TO EXPOSE
THE ELECTRONICS. NO USER SERVICEABLE PARTS ARE INSIDE.
o IF YOU ARE EXPERIENCING PROBLEMS WITH THIS PRODUCT,
CONTACT THE STORE WHERE YOU PURCHASED THE UNIT FOR A
SERVICE REFERRAL. DO NOT USE THE PRODUCT UNTIL IT HAS BEEN
REPAIRED.
o USE OF CONTROLS OR ADJUSTMENTS OR PERFORMANCE OF
PROCEDURES OTHER THAN THOSE SPECIFIED HEREIN MAY RESULT
IN HAZARDOUS RADIATION EXPOSURE.
Model for Europe
This product complies with the European
Directives request, and the other Commission
Regulations.
CAUTION
Changes or modifications not expressly approved by the party
responsible for compliance could void the user’s authority to oper-
ate the equipment.
1) Read these instructions.
2) Keep these instructions.
3) Heed all warnings.
4) Follow all instructions.
5) Do not use this apparatus near water.
6) Clean only with dry cloth.
7) Do not block any ventilation openings. Install in accordance with
the manufacturer’s instructions.
8) Do not install near any heat sources such as radiators, heat
registers, stoves, or other apparatus (including amplifiers) that
produce heat.
9) Do not defeat the safety purpose of the polarized or grounding-
type plug. A polarized plug has two blades with one wider than
the other. A grounding type plug has two blades and a third
grounding prong. The wide blade or the third prong are provided
for your safety. If the provided plug does not fit into your outlet,
consult an electrician for replacement of the obsolete outlet.
10) Protect the power cord from being walked on or pinched par-
ticularly at plugs, convenience receptacles, and the point where
they exit from the apparatus.
11) Only use attachments/accessories specified by the manufacturer.
12) Use only with the cart, stand, tripod,
bracket, or table specified by the manufac-
turer, or sold with the apparatus. When a
cart is used, use caution when moving the
cart/apparatus combination to avoid injury
from tip-over.
13) Unplug this apparatus during lightning storms or when unused
for long periods of time.
14) Refer all servicing to qualified service personnel. Servicing is
required when the apparatus has been damaged in any way,
such as power-supply cord or plug is damaged, liquid has been
spilled or objects have fallen into the apparatus, the apparatus
has been exposed to rain or moisture, does not operate normally,
or has been dropped.
o The apparatus draws nominal non-operating power from the
AC outlet with its POWER or STANDBY/ON switch not in the ON
position.
o The mains plug is used as the disconnect device; the disconnect
device shall remain readily operable.
o Caution should be taken when using earphones or headphones
with the product because excessive sound pressure (volume) from
earphones or headphones can cause hearing loss.
IMPORTANT SAFETY INSTRUCTIONS

3
ENGLISH
CAUTION
o Do not expose this apparatus to drips or splashes.
o Do not place any objects filled with liquids, such as vases, on
the apparatus.
o Do not install this apparatus in a confined space such as a book
case or similar unit.
o The apparatus should be located close enough to the AC outlet
so that you can easily reach the power cord plug at any time.
o If the product uses batteries (including a battery pack or
installed batteries), they should not be exposed to sunshine, fire
or excessive heat.
o CAUTION for products that use replaceable lithium batteries:
there is danger of explosion if a battery is replaced with an
incorrect type of battery. Replace only with the same or equiva-
lent type.
Laser information
This product contains a semiconductor laser system inside the cabinet
and is classified as a “CLASS 1 LASER PRODUCT”.
To prevent being exposed to the laser beam, do not try to open the
enclosure.
Laser:
Type: EP-C101
Manufacturer: GUANGDONG EVER BRIGHT GROUP CO.,LTD
Laser output: Less than 1 mW on the objective lens
Wavelength: 790±25nm
V Precautions concerning batteries
Misuse of batteries could cause them to rupture or leak leading to fire,
injury or the staining of nearby things. Please read and observe the
following precautions carefully.
o Be sure to insert the batteries with correct positive (¥) and nega-
tive (^) orientations.
o Use batteries of the same type. Never use different types of batter-
ies together.
o If the remote control is not used for a long time (more than a
month), remove the batteries to prevent them from leaking.
o If the batteries leak, wipe away the leakage inside the battery com-
partment and replace the batteries with new ones.
o Do not use batteries of types other than those specified. Do not
mix new batteries with old ones or use different types of batteries
together.
o Do not heat or disassemble batteries. Never throw batteries into
fire or water.
o Do not carry or store batteries with other metallic objects. The bat-
teries could short circuit, leak or explode.
o Never recharge a battery unless it is confirmed to be a recharge-
able type.
For European Customers
Disposal of electrical and electronic equipment and
batteries and/or accumulators
a) All electrical/electronic equipment and waste batteries/accu-
mulators should be disposed of separately from the municipal
waste stream via collection facilities designated by the govern-
ment or local authorities.
b) By disposing of electrical/electronic equipment and waste
batteries/accumulators correctly, you will help save valuable
resources and prevent any potential negative effects on human
health and the environment.
c) Improper disposal of waste electrical/electronic equipment
and batteries/accumulators can have serious effects on the
environment and human health because of the presence of
hazardous substances in the equipment.
d) The Waste Electrical and Electronic Equipment (WEEE)
symbols, which show wheeled bins that have been
crossed out, indicate that electrical/electronic equip-
ment and batteries/accumulators must be collected
and disposed of separately from household waste.
If a battery or accumulator contains more than the
specified values of lead (Pb), mercury (Hg), and/or cad-
mium (Cd) as defined in the Battery Directive (2006/66/
EC), then the chemical symbols for those elements will
be indicated beneath the WEEE symbol.
e) Return and collection systems are available to end users. For
more detailed information about the disposal of old electri-
cal/electronic equipment and waste batteries/accumulators,
please contact your city office, waste disposal service or the
shop where you purchased the equipment.
Pb, Hg, Cd
This product is protected by certain intellectual property rights of Microsoft.
Use or distribution of such technology outside of this product is prohibited without a license from Microsoft.
Other company names, product names and logos in this document are the trademarks or registered trademarks of their respective owners.

4
Contents
Thank you for choosing this TEAC product. Read this manual
carefully to get the best performance from this unit.
IMPORTANT SAFETY INSTRUCTIONS ..............................2
Included accessories .............................................4
Before use ........................................................5
Remote control unit ..............................................5
Connections .....................................................6
Discs .............................................................6
Identifying the parts (main unit) ..................................8
Identifying the parts (remote control unit) ........................9
Basic operation ................................................. 10
Repeat playback .................................................13
Shuffle playback .................................................14
Intro check ......................................................14
Program playback ...............................................15
Search mode (MP3/WMA disc only) ..............................18
Troubleshooting ................................................20
Specifications .................................................. 21
MP3/WMA disc playback order ................................. 21
Included accessories
Check to be sure the box includes all the supplied accessories shown
below.
Please contact the store where you purchased this unit if any of these
accessories are missing or have been damaged during transportation.
RCA cable × 1
Remote control unit (RC-1326) × 1
Battery (AAA) for remote control × 2
Owner’s manual (this document) × 1
o Keep this manual in a safe place for future reference.
o See page 142 for warranty information.
Using the TEAC Global Site
You can download updates for this unit from the TEAC Global Site:
http://teac-global.com/
1) Open the TEAC Global Site.
2) In the TEAC Downloads section, click the desired language to
open the Downloads website page for that language.
NOTE
If the desired language does not appear, click Other Languages.
3) Click the product name in the “Products” section.
4) Select and download the updates that are needed.

5
ENGLISH
Before use
Read this before attempting any operations.
< In order to enable good heat dissipation, leave at least 20 cm (8”)
between this unit and walls and other equipment when installing
it. If you put it in a rack, take precautions to prevent overheating
by leaving at least 5 cm (2”) open above the top of the unit and at
least 10 cm (4”) open behind the unit. Failure to provide these gaps
could cause heat to build up inside and result in fire.
< Do not place anything on top of the unit.
< During playback, since the disc is revolving at high speed, do not
lift or move this unit. Doing so could damage the disc.
< Always remove the disc before relocating or moving this unit.
Moving the unit with a disc inside it could cause malfunction.
< The voltage supplied to the unit should match the voltage that is
printed on the rear panel. If you are in any doubt regarding this
matter, consult an electrician.
< Choose the installation location of your unit carefully. Avoid plac-
ing it in direct sunlight or close to a source of heat. Also avoid
locations that are subject to vibrations or excessive dust, heat, cold
or moisture.
< Do not place the unit on an amplifier or receiver or any other
device that generates heat.
< Do not open the cabinet as this might result in damage to the cir-
cuitry or cause electrical shock. If a foreign object should get into
the unit, contact your dealer.
< When removing the power plug from the wall outlet, always pull
directly on the plug. Never yank on the cord.
< To keep the laser pickup clean, do not touch it and always close
the disc tray.
< Do not attempt to clean the unit with chemical solvents as they
might damage the finish. Use a clean, dry or slightly damp cloth.
< Keep this manual in a safe place for future reference.
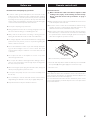
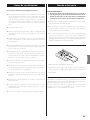
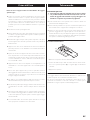
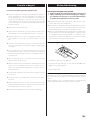
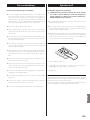
Remote control unit
Precautions for use
V
Misuse of batteries could cause them to rupture or leak
leading to fire, injury or the staining of items nearby.
Please read and observe the precautions on page 3
carefully.
< When using the remote control, point it towards the remote sensor
on the front panel of the main unit.
< Even if the remote control unit is used within its effective range,
operation by remote control might be impossible if there are any
obstructions between the unit and the remote control.
< If the remote control unit is operated near other devices that gen-
erate infrared rays, or if other remote controls that use infrared rays
are operated near the unit, this unit might operate incorrectly. The
other devices might also operate incorrectly.
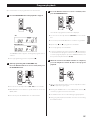
Battery Installation
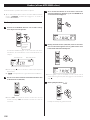
1. Remove the battery compartment cover.
2. Insert two AAA dry batteries. Make sure that they are inserted with
their positive (+) and negative (_) poles oriented correctly.
3. Close the cover.
Battery Replacement
If the distance from the main unit that the remote control works effec-
tively decreases, the batteries are probably exhausted. Replace the
batteries with new ones when this happens.
For more information about the collection of batteries, please contact
your local municipality, your waste disposal service or the place where
you purchased them.

6
Discs
Discs that can be played on this unit:
Caution:
Playback of any other type of disc could cause loud noise and
damage to speakers as well as harm hearing. Never play back any
other type of disc.
< Depending on the quality of the disc and/or the condition of the
recording, some discs might not be playable.
< Video CDs, CD-ROMs and similar types of discs can be read by the
unit, but they will make no sound when played back.
< Video and audio DVDs, DVD-ROMs and other types of DVDs can-
not be read and played back by this unit.
Caution:
If you put a video or audio DVD, DVD-ROM or other DVD into
the disc tray, the unit will attempt to read the disc and rotate at
high speed. If you accidentally insert such a disc, wait until the
unit stops spinning before ejecting it in order to avoid possibly
damaging the disc. (Do not attempt to remove the disc when
“
” appears on the screen.)
< Copy-protected discs and other discs that do not conform to the
CD standard might not play correctly in this player. If you use such
discs in this unit, TEAC Corporation and its subsidiaries will not
be responsible for any consequences or guarantee the quality of
reproduction. If you experience problems with such non-standard
discs, you should contact their issuers.
About CD-R/CD-RW discs
This unit can play back CD-R and CD-RW discs that have been
recorded in the audio CD format (CD-DA).
< Discs created by a CD recorder must be finalized before use with
this unit.
o WMA files
Windows Media Audio Professional (WMA Pro) and Windows
Media Audio Lossless (WMA Lossless) formats are not supported.
< Depending on disc quality and recording conditions, playback of
some discs might not be possible. Please see the manual for the
device that you used to create the disc.
< If you are uncertain about the handling of a CD-R or CD-RW disc,
please contact the seller of the disc directly.
CDs that bear the (12cm/8cm) “COMPACT disc DIGITAL AUDIO”
logo.
CD-R and CD-RW discs that have been correctly recorded in the
audio CD format and finalized.
Finalized CD-R and CD-RW discs that contain MP3 and WMA
files.
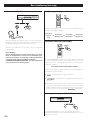
Caution:
< Turn off the power of all the equipment before making
connections.
< Read the instructions of each component that you intend to use
with this unit.
< Be sure to insert each plug securely. To prevent hum and noise, do
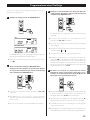
not bundle connection cords with power cords.
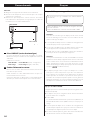
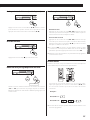
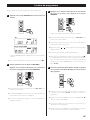
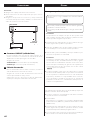
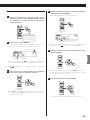
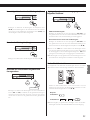
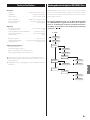
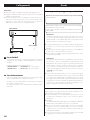
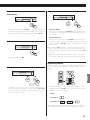
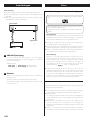
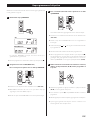
CD IN
RL
CD-P1260mkII
B
A
Wall outlet
Amplifier
A
LINE OUT jacks
An analog 2-channel audio signal is output from these jacks.
Connect it to the CD input jacks of an amplifier with RCA cables.
Be sure to connect:
White plug q White jack (L: left channel)
Red plug q Red jack (R: right channel)
B
AC Power Cord
After all other connections are complete, connect the plug to an
AC wall outlet.
Be sure to connect the power cord to an AC outlet that supplies
the correct voltage.
Hold the power plug when plugging or unplugging the power
cord. Never pull or yank on the power cord.
Connections

7
ENGLISH
Caution:
< Do not play any disc that is warped, deformed or damaged.
Playing such discs could cause irreparable harm to the playing
mechanisms.
< Printable CD-R and CD-RW discs are not recommended because
their label sides could be sticky and damage the unit.
< Do not stick papers or protective sheets on the discs and do not
use any protective coating sprays.
< Use a soft oil-based felt-tipped pen to write information on the
label side. Never use a ball-point or hard-tipped pen, as this could
cause damage to the recorded side.
< Never use a stabilizer. Using commercially available CD stabilizers
with this unit will damage the mechanisms and cause them to
malfunction.
< Do not use irregularly-shaped discs (octagonal, heart-shaped, busi-
ness card size, etc.). CDs with these shapes could damage the unit.
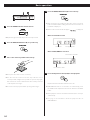
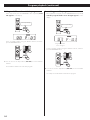
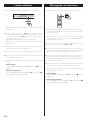
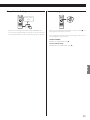
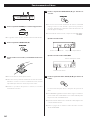
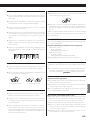
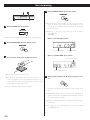
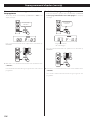
Handling precautions
< Always place the disc on the disc tray with the label side up. Only
one side of a Compact Disc can be played or used for recording.
< To remove a disc from its storage case, press down on the center
of the case and lift the disc out, holding it carefully by the edges.
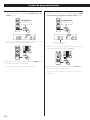
How to remove the disc How to hold the disc
Storage precautions
< Discs should be returned to their cases after use to avoid dust and
scratches that could cause the laser pickup to “skip.”
< Do not expose discs to direct sunlight or high-temperature and
humidity for extended periods. Long exposure to high tempera-
tures will warp discs.
< CD-R and CD-RW discs are more sensitive to the effects of heat
and ultraviolet rays than ordinary CDs. It is important that they are
not stored in locations where they will be exposed to direct sun-
light. They should also be kept away from sources of heat, such as
radiators and heat-generating electrical devices.
Maintenance
< If a disc becomes dirty, wipe its surface radially from the center
hole outward towards the outer edge with a soft, dry cloth.
< Never clean discs using chemicals such as record sprays, antistatic
sprays and fluids and thinner. Such chemicals will do irreparable
damage to the disc’s plastic surface.
If you are in any doubt as to the care and handling of a CD-R or
CD-RW disc, read the precautions supplied with the disc or contact
the disc manufacturer.
About MP3/WMA files
This unit can play MP3/WMA files that are on CD-R/CD-RW discs.
Audio file formats that can be played
MP3 (“.mp3” extension)
Bit rate: 8–320 kbps
Sampling frequency: 16–48 kHz
WMA (“.wma” extension)
Bit rate: 48–192 kbps
Sampling frequency: 32, 44.1, 48 kHz
DRM (digital rights management) is not supported.
File information display
The display of this unit can only show single-byte letters and numbers.
< If a file information uses Japanese, Chinese or other double-byte
characters, playback is possible but the name will not be shown
correctly. In such cases, “
” is displayed.
Cautions when preparing MP3/WMA files using a computer or
other device
< Always add the correct extension to the file name. Files without
extensions cannot be recognized.
< Always close the session (complete disc creation). This unit cannot
play discs if the session has not been closed.
< Carefully read the manual for the software that you are using when
you create an MP3/WMA disc.
Discs that are unplayable or only partially playable
< Files without extensions cannot be played. Files that are not in the
MP3/WMA format cannot be played even if they have extensions.
< Variable bit rate files might not play back correctly.
< If the disc has more than 999 files or 255 folders, this unit can only
play back the first 999 files and files in the first 255 folders.
< Depending on disc conditions, this unit might not be able to play a
disc or skipping might occur.

8
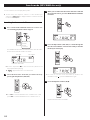
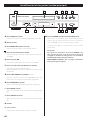
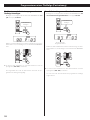
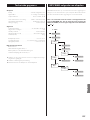
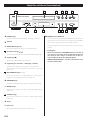
A
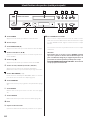
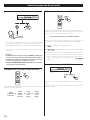
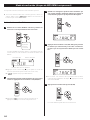
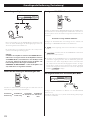
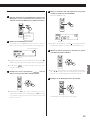
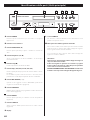
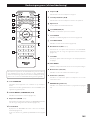
POWER button
Press this button to turn the unit on and off.
B
Disc tray button
C
OPEN/CLOSE button (
-
)
Press this button to open and close the disc tray.
D
Play/Pause button (y/J)
Press this button to start or pause CD/MP3 playback.
E
Stop button (H)
Press this button to stop CD/MP3 playback.
F
Skip buttons (.//)/Search buttons (m/,)
Press these buttons to skip through tracks/files.
Hold down these buttons to search for a part of a track/file.
G
MP3 FOLDER buttons ( j/k)
During playback of an MP3/WMA disc, use these buttons to
select folders on the disc (page 12).
H
PROGRAM button
Use this button to program tracks/files (page 15).
I
REPEAT button
Use this button to enable repeat playback (page 13).
J
SHUFFLE button
Use this button to enable shuffle playback (page 14).
K
Display
L
Remote sensor
When operating the remote control, point it towards here.
M
PHONES jack/LEVEL knob
To listen with headphones, turn the LEVEL knob to minimize the
volume level before connecting the headphones plug to the
PHONES jack. Then, adjust the volume after connecting the plug.
Connected speakers will make no sound when headphones are
plugged in.
Caution:
Do not connect headphones with the PHONES jack while
wearing them. Moreover, do not disconnect headphones
or turn the unit on or off while wearing them. Very loud
sound could be output from the headphones.
AVOID DAMAGING YOUR HEARING
-
Do not put on
headphones until after plugging them in.
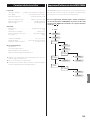
Identifying the parts (main unit)
A
BCDE F
GHI
J
KL
M

9
ENGLISH
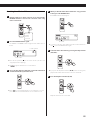
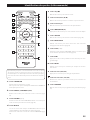
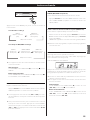
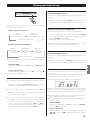
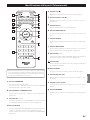
Identifying the parts (remote control unit)
When both the main unit and the remote control have buttons
with the same functions, the instructions in this manual refer to
only the main unit buttons, but the remote buttons can be used in
the same way.
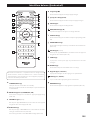
a
STANDBY/ON button
Turns the unit on and puts it into standby.
This can only be used when the POWER switch on the main unit
is set to ON.
b REPEAT buttons (1/FOLDER/ALL, A-B)
Use this button to enable repeat playback (page 13).
c
FOLDER buttons (j/k)
When playing MP3/WMA files, use these to skip to the previous
or next folder (page 12).
d
DISPLAY button
When playing an MP3/WMA disc, use this to change the display
of file information (page 12).
This button is also used in MP3/WMA search mode (page 18).
e
Stop button (H)
Use this button to stop playback.
f
Play/Pause button (y/J)
Use this button to start or pause playback.
g
Number buttons
Use these buttons to select tracks/files.
h
OPEN/CLOSE button (
-
)
Press this button to open and close the disc tray.
i
SHUFFLE button
Use this button to enable shuffle playback (page 14).
j
INTRO CHECK button
Use this button to start using the Intro Check function (page
14).
k
FILE buttons (j/k)
When playing MP3/WMA files, use these to skip to the previous
or next file (page 12).
l
TIME button
Press when playing an audio CD to change the display.
m ENTER button
Use to confirm the selection of a folder, for example.
n
Skip buttons (.//)
Press these buttons to skip through tracks/files.
o
Search buttons (m/,)
Press and hold during playback to search forward/backward.
p
PROGRAM button
Use this button to program tracks/files (page 15).
a
b
c
d
e
f
g
h
i
j
k
l
m
n
o
p

10
Basic operation
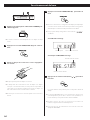
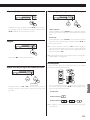
1
Press the POWER switch to turn the unit on.
< Playback begins automatically if a disc is already inserted.
2
Press the OPEN/CLOSE button (L) to open the tray.
3
Place a disc on the tray with the label side up.
< Never place more than one disc on the tray.
< The disc must be centred on the disc tray. If the disc is not
correctly loaded, it might not be possible to open the tray again
after it has been closed. Confirm that the disc is always centered
on the tray before closing it.
< Do not force the tray by hand when opening and closing it.
4
Press the OPEN/CLOSE button (L) to close the tray.
< After closing the tray, loading the disc takes a few seconds. No
buttons will work while loading. Wait until the total number of
tracks/files is displayed.
< When no disc is loaded in the CD player, “ ” is displayed.
When an audio CD is loaded
When an MP3/WMA disc is loaded
5
Press the Play/Pause button (
y
/
J
) to start playback.
Playback starts from the first track/file on the disc.
< MP3/WMA files that are not in folders are automatically put in
the “ROOT” folder. Playback starts from the first file in the ROOT
folder.
< When playback of all the tracks/files has finished, the unit stops
automatically.
< See page 21 for information about the playback order of
MP3/WMA discs.
Total tracks
Total playing time
Total number of folders
Total number of files

11
ENGLISH
Suspending playback temporarily
(Pause mode)
Press the Play/Pause button (G/J ) during playback to stop
playback at the current position. To resume playback, press the
Play/Pause button (G/J) again.
Stopping playback
Press the Stop button (H) to stop playback.
Searching for a part of a track/file
Hold down
During playback, hold down a Search button (m or ,) to
search a part of a track/file. Release it when you find the beginning
of the part you want to hear.
Skipping to an earlier or later track/file
During playback
Press a Skip button (.//) repeatedly until the desired track/
file is selected. The selected track/file will be played from the
beginning.
When playback is stopped
Press a Skip button (.//) repeatedly to select the track/file
you want to hear. Then, press the Play/Pause button (G/J) to
start playback of the selected track/file.
< If the . button is pressed once during playback, the track/file
being played will be played again from the beginning. To return
to the beginning of the previous track/file, press the . button
twice.
< During program playback, tracks/files in the program are selected
and played.
Direct Playback
When stopped or playing back, you can use the Number buttons on
the remote control to select tracks/files.
Select a track/file using the Number buttons, and press the Play/
Pause (G/J) button within 10seconds to start playback of the
selected track/file.
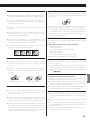
Examples:
Track/file 7:
Track/file 23:
< Direct playback is not possible during shuffle playback and
program playback.

12
Listening with headphones
To listen with headphones, turn the LEVEL knob to minimize the
volume level before connecting the headphones plug to the
PHONES jack. Then, adjust the volume after connecting the plug.
Connected speakers will make no sound when headphones are
plugged in.
Caution:
Do not connect headphones with the PHONES jack while
wearing them. Moreover, do not disconnect headphones or
turn the unit on or off while wearing them. Very loud sound
could be output from the headphones.
AVOID DAMAGING YOUR HEARING - Do not put on
headphones until after plugging them in.
Changing the playback time display
During CD playback, press the remote control TIME button to change
the display.
Song elapsed
time
e
Song
remaining
time
e
Disc elapsed
time
e
Disc
remaining
time
Displaying MP3/WMA information
During MP3/WMA playback, press the DISPLAY button to show
information about the playing file on the display. Press again to cycle
through the information shown in the following order.
File name e Song e Albume Artist
Press the DISPLAY button for more than 1second again to cancel the
MP3/WMA information mode.
< “
” appears when there is no information.
< “
” appears when the unit cannot read the information.
< The display of this unit can only show single-byte letters and num-
bers. If a file name uses Japanese, Chinese or other double-byte
characters, playback is possible but the name will not be shown
correctly. In such cases, “
” is displayed.
Skipping to the next folder (MP3/WMA)
Press the MP3 FOLDER buttons (j/k)
to skip folders.
Use the remote control FILE buttons (j/k) to skip files.
Basic operation (continued)

13
ENGLISH
Press the REPEAT button to cycle through the following playback
modes:
When an audio CD is loaded.
REPEAT
(Repeat one track/file)
REPEAT ALL
(Repeat all tracks/files)
Off (normal playback)
When an MP3/WMA disc is loaded.
REPEAT
(Repeat one
track/file)
REPEAT ALBUM
(
Repeat all the files
in the folder
)
REPEAT ALL
(Repeat all
tracks/files)
Off (normal playback)
< If one of the following buttons is pressed, the repeat mode will be
canceled:
Main unit
POWER button, OPEN/CLOSE button (L), Stop button (H),
SHUFFLE button
Remote control unit
STANDBY/ON button, OPEN/CLOSE button (L), Stop button (H),
SHUFFLE button, INTRO CHECK button
Repeat one track/file (REPEAT)
The track/file being played will be played repeatedly.
Press the REPEAT button once during ordinary playback. “REPEAT”
appears on the display.
< If you press the Skip button (. or /) to select another track/
file, the selected track/file will be played repeatedly.
< You can select a track/file to be repeated when playback is
stopped. Press the REPEAT button, select a track/file using a Skip
button (. or /), and then press the Play/Pause button
(G/J) to start playback.
Repeat all the files in the folder (REPEAT ALBUM) (MP3/WMA
only)
All the files in the selected folder will be played repeatedly.
Press the REPEAT button twice during ordinary playback. “REPEAT
ALBUM” appears on the display.
Repeat all tracks/files (REPEAT ALL)
All the tracks/files on the disc will be played repeatedly.
During audio CD playback, press the REPEAT button twice. During
MP3/WMA disc playback, press the REPEAT button three times.
Press the REPEAT button twice during ordinary playback. “REPEAT
ALL” appears on the display.
< During program playback, the programmed tracks/files will be
played repeatedly.
A–B repeat
A specific part of a song can be played back repeatedly.
Play the CD, and press the A-B button at the beginning of the part you
want to repeat (A point).
The REPEAT indicator and A appear on the display.
Press the A-B button again at the end of the part you want to repeat
(B point). Repeat playback of the specified part (A-B) starts and “b”
appears to the right of “A”.
o A-B repeat playback is possible during ordinary repeat playback or
shuffle playback.
o If one of the following buttons is pressed, the repeat mode will be
canceled:
Main unit
POWER button, OPEN/CLOSE button (L ), Skip buttons
(.//), Stop button (H), SHUFFLE button
Remote control unit
STANDBY/ON button, OPEN/CLOSE button (L), Skip buttons
(.//), Stop button (H), SHUFFLE button, A-B button, Search
buttons (m/,)
Repeat playback

14
The tracks/files on a disc can be played in random order.
Press the SHUFFLE button in the stop mode. “SHUFFLE” appears on
the display.
< If you press the / button during shuffle playback, the next
track/file will be randomly selected and played. If you press the
. button, the currently played track/file will be played from the
beginning.
Press again to return to the previous song.
During shuffle playback, a track/file that has completed playback
will not be played again.
< During shuffle playback, tracks/files cannot be selected using the
Number buttons.
< Repeat playback is not possible during shuffle playback.
< After all tracks/files have been played once, playback ends and
shuffle mode is cancelled.
< If one of the following buttons is pressed, shuffle mode will be
cancelled:
Main unit
POWER button, OPEN/CLOSE button (L), Stop button (H),
SHUFFLE button
Remote control unit
STANDBY/ON button, OPEN/CLOSE button (L), Stop button (H),
SHUFFLE button, INTRO CHECK button
Shuffle playback
Ten seconds of the beginning of each track/file can be played back in
succession.
Press the INTRO CHECK button during playback or when stopped.
The INTRO indicator appears on the display, and 10seconds of the
beginning of each tracks/files is played.
When you find the track/file that you want to hear, press the INTRO
CHECK button again to resume normal playback.
< To skip to an earlier or later track/file, press a Skip button (. or
/).
< Press the INTRO CHECK button during ordinary playback to start
checking the beginnings of tracks/files from the currently playing
track/file.
< Repeat playback and shuffle playback cannot be used with the
intro check function. (The first 10seconds of each track/file cannot
be played back repeatedly or shuffled.)
< After the beginning of every track/file has been checked, playback
stops and the intro check mode is canceled.
< If one of the following buttons is pressed, intro check mode will be
cancelled:
Main unit
POWER button, OPEN/CLOSE button (L), Stop button (H),
SHUFFLE button
Remote control unit
STANDBY/ON button, OPEN/CLOSE button (L), Stop button (H),
SHUFFLE button, INTRO CHECK button
Intro check

15
ENGLISH
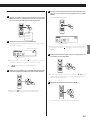
Up to 32 tracks/files can be programmed in the desired order.
1
Press the PROGRAM button when playback is stopped.
MP3/WMA disc
CD
The MEMORY indicator appears, showing that program mode is
enabled.
< To stop programming, press the Stop button (H).
2
(When programming with an MP3/WMA disc)
Press the Number buttons to select a folder, then press
the PROGRAM button.
< You can also use the Skip buttons (.//) to select folders.
< MP3/WMA files not located in a specific folder are in the “01”
(ROOT) folder.
< You can also press the ENTER button to confirm a folder.
3
Press the Number buttons to select a track/file, then
press the PROGRAM button.
The track/file is programmed, and “P-02” is displayed.
< You can also use the Skip buttons (.//) to select tracks/
files.
< You can also press the ENTER button to confirm a song number.
< Repeat steps
2
and
3
to program more tracks/files.
< You can program up to 32 tracks/files.
< To stop programming, press the Stop button (H). Programming
is cancelled, but the program contents are retained in memory.
To restart program playback, press the PROGRAM button, and
then press the Play/Pause button (G/J).
4
When the selection of track/file numbers is completed,
press the Play/Pause button (
G
/
J
) to start program
playback.
< After program playback finishes, press the Play/Pause button
(y/J) to play the program again.
< Pressing the POWER button or the OPEN/CLOSE button (L)
causes the program content to be discarded.
< The shuffle function does not work during program playback.
< During program playback, tracks/files cannot be selected using
the Number buttons.
Program playback

16
Program playback (continued)
Adding tracks/files to the end of the program
In the stop mode, press the PROGRAM button repeatedly until
“00” appears on the display.
Press repeatedly
Select a track/file number using the Number buttons, and then
press the PROGRAM button.
< You can also use the Skip buttons (.//) to select track/file
numbers.
The track/file is added to the end of the program.
Overwriting part of the program
When playback is stopped, press the PROGRAM button repeatedly
until the program number to be changed appears on the
display.
Press repeatedly
Program number
to be changed
Select a track/file number using the Number buttons, and then
press the PROGRAM button.
< You can also use the Skip buttons (.//) to select track/file
numbers.
The newly selected track/file is added to the program.

17
ENGLISH
Checking the program order
Press repeatedly
When playback is stopped, press the PROGRAM button repeatedly.
The numbers of the programmed tracks/files and their program
numbers will be shown in order.
Clearing the program contents
When playback is stopped, press the stop (8) button to clear the
program contents.
The program contents are also cleared if one of the following
buttons is pressed.
Main unit
POWER button, OPEN/CLOSE button (L)
Remote control unit
STANDBY/ON button, OPEN/CLOSE button (L)

18
Search mode (MP3/WMA disc only)
You can search for, select and play files by name.
< If a file name uses Japanese, Chinese or other double-byte
characters, “ ” is displayed and the search function will
not work accurately.
Searching for the name of a file
1
Press and hold the DISPLAY button for at least one
second during playback or when stopped.
Press and
hold for
at least
1second
The SEARCH indicator blinks, and the first letter of the file name,
the file name and the file number are shown.
File name File number
First letter of le name
< Press the Stop button (H) to exit search mode. (This does not
stop playback when playing.)
< “
” appears when there is no information.
2
Select the first letter of the file you want to hear by
pressing the Skip buttons (
.
/
/
).
< Press / to search forward from A to Z and then 0 to 9, and
press . to search backward from 9 to 0 and then Z to A.
3
When you reach the letter that is the first letter of the file
that you want to hear, press the ENTER button to blink the
first letter.
4
Press the Skip buttons (.//) to search through the
files that start with the selected letter until you find the
file that you want to play.
< To return to selection of the first letter (as shown in the
illustration in step
1
), press the ENTER button again.
5
Press the Play/Pause button (
G
/
J
).
Playback starts from the selected file.

19
ENGLISH
Searching for a file in a folder
1
During playback or when stopped, press and hold the
DISPLAY button for at least one second to enter song
name search mode.
Press and
hold for
at least
1second
2
Press the DISPLAY button again.
The SEARCH and ALBUM indicators light and the folder name is
shown.
Folder name
Folder number
< Press the Stop button (H) to exit search mode. (This does not
stop playback when playing.)
< “ ” appears when there is no information.
3
Press the Skip buttons (
.
/
/
) to find the folder that
contains the file that you want to hear.
< Press / to search forward from A to Z and then 0 to 9, and
press . to search backward from 9 to 0 and then Z to A.
4
When you find the folder that contains the song you want
to hear, press the ENTER button.
The ALBUM indicator will disappear.
File name
< To return to selection of the folder (as shown in the illustration in
step
1
), press the ENTER button again.
5
Select the file in the folder by pressing the Skip buttons
(
.
/
/
).
< If you press the Play/Pause button (y/J) before selecting a file,
playback will start from the first file in the selected folder.
6
Press the Play/Pause button (
G
/
J
).
Playback starts from the selected file.

20
If you experience a problem with this unit, please check the following
items before requesting service. If it still does not operate correctly,
contact the retailer where you purchased the unit.
General
No power
e Check the connection to the AC power source. Confirm that the
AC source is not a switched outlet, and, if it is, that the switch is
turned on. Confirm that there is power to the AC outlet by plug-
ging another item such as a lamp or a fan into the outlet.
Remote control does not work
e Press the POWER switch of the main unit to turn it on.
e If the batteries are exhausted, change the batteries.
e Use the remote control within the effective range (16ft/5m)
and point it toward the remote sensor on the front panel.
e Make sure that there are no obstructions between the remote
control and the main unit (page 5).
e Turn off any fluorescent lights near the unit.
No sound
e Check the connection to the amplifier.
e Check the operation of the amplifier.
Will not play
e Load a disc with the label side up.
e If the disc is dirty, clean its surface.
e If a blank disc has been loaded, load a prerecorded disc.
e Depending on the disc and other factors, playback of some
CD-R/RW discs might not be possible. Try again with another
disc.
e You cannot play unfinalized CD-R/RW discs. Finalize such a disc
in a CD recorder and try again.
Sound skips
e Place the unit in a stable place to avoid vibrations and shocks.
e If the disc is dirty, clean its surface.
e Do not use scratched, damaged or warped discs.
WP3, WMA files
Playback is not possible.
e Check the file extension. Files are recognized by their exten-
sions: “.mp3” for MP3 files and “.wma” for WMA files.
e The MP3/WMA file might be damaged.
e Check the file format. This unit can play MP3 and WMA files
(page 7).
The names of tracks, artists and albums are not shown.
e There is no ID3 tag information for the music file. Use a com-
puter, for example, to prepare MP3/WMA files with corrected
ID3 tag information.
Some characters are not shown correctly.
e If the file information uses Japanese, Chinese or other double-
byte characters, playback is possible but the name will not be
shown correctly.
Since this device uses a microcontroller, external noise and
other interference can cause the unit to malfunction. If this
occurs, turn the power off and restart the operation after wait-
ing about a minute.
Beware of condensation
Condensation could occur when the unit (or a disc) is moved from
a cold to a warm place, or used after a sudden temperature change.
Vapor in the air could condense on the internal mechanisms, mak-
ing correct operation erratic or impossible. To prevent this, or if this
occurs, leave the unit for one or two hours with its power turned on.
The unit will stabilize at the temperature of its surroundings.
Maintenance
If the surface of the unit gets dirty, wipe it with a soft cloth or use
diluted mild liquid soap. Never spray liquid directly on this unit. Apply
cleaner to the cleaning cloth and wipe gently. Be certain to remove
any excess completely. Do not use thinner or alcohol as they could
damage the surface of the unit. Allow the surface of the unit to dry
completely before using.
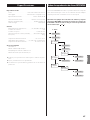
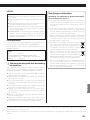
About automatic power saving function
The unit will automatically enter standby if 30 minutes pass under
the conditions shown in the table below.
To reactivate the unit after it has entered standby automatically,
press a button on the main unit or the remote control. If pressing
the POWER button on the main unit, you must press it twice.
Status CD
No disc
Stopped/paused
Playing back -
Automatic power saving function active
- Automatic power saving function active
Troubleshooting
Sidan laddas...
Sidan laddas...
Sidan laddas...
Sidan laddas...
Sidan laddas...
Sidan laddas...
Sidan laddas...
Sidan laddas...
Sidan laddas...
Sidan laddas...
Sidan laddas...
Sidan laddas...
Sidan laddas...
Sidan laddas...
Sidan laddas...
Sidan laddas...
Sidan laddas...
Sidan laddas...
Sidan laddas...
Sidan laddas...
Sidan laddas...
Sidan laddas...
Sidan laddas...
Sidan laddas...
Sidan laddas...
Sidan laddas...
Sidan laddas...
Sidan laddas...
Sidan laddas...
Sidan laddas...
Sidan laddas...
Sidan laddas...
Sidan laddas...
Sidan laddas...
Sidan laddas...
Sidan laddas...
Sidan laddas...
Sidan laddas...
Sidan laddas...
Sidan laddas...
Sidan laddas...
Sidan laddas...
Sidan laddas...
Sidan laddas...
Sidan laddas...
Sidan laddas...
Sidan laddas...
Sidan laddas...
Sidan laddas...
Sidan laddas...
Sidan laddas...
Sidan laddas...
Sidan laddas...
Sidan laddas...
Sidan laddas...
Sidan laddas...
Sidan laddas...
Sidan laddas...
Sidan laddas...
Sidan laddas...
Sidan laddas...
Sidan laddas...
Sidan laddas...
Sidan laddas...
Sidan laddas...
Sidan laddas...
Sidan laddas...
Sidan laddas...
Sidan laddas...
Sidan laddas...
Sidan laddas...
Sidan laddas...
Sidan laddas...
Sidan laddas...
Sidan laddas...
Sidan laddas...
Sidan laddas...
Sidan laddas...
Sidan laddas...
Sidan laddas...
Sidan laddas...
Sidan laddas...
Sidan laddas...
Sidan laddas...
Sidan laddas...
Sidan laddas...
Sidan laddas...
Sidan laddas...
Sidan laddas...
Sidan laddas...
Sidan laddas...
Sidan laddas...
Sidan laddas...
Sidan laddas...
Sidan laddas...
Sidan laddas...
Sidan laddas...
Sidan laddas...
Sidan laddas...
Sidan laddas...
Sidan laddas...
Sidan laddas...
Sidan laddas...
Sidan laddas...
Sidan laddas...
Sidan laddas...
Sidan laddas...
Sidan laddas...
Sidan laddas...
Sidan laddas...
Sidan laddas...
Sidan laddas...
Sidan laddas...
Sidan laddas...
Sidan laddas...
Sidan laddas...
Sidan laddas...
Sidan laddas...
Sidan laddas...
Sidan laddas...
Sidan laddas...
Sidan laddas...
Sidan laddas...
Sidan laddas...
-
 1
1
-
 2
2
-
 3
3
-
 4
4
-
 5
5
-
 6
6
-
 7
7
-
 8
8
-
 9
9
-
 10
10
-
 11
11
-
 12
12
-
 13
13
-
 14
14
-
 15
15
-
 16
16
-
 17
17
-
 18
18
-
 19
19
-
 20
20
-
 21
21
-
 22
22
-
 23
23
-
 24
24
-
 25
25
-
 26
26
-
 27
27
-
 28
28
-
 29
29
-
 30
30
-
 31
31
-
 32
32
-
 33
33
-
 34
34
-
 35
35
-
 36
36
-
 37
37
-
 38
38
-
 39
39
-
 40
40
-
 41
41
-
 42
42
-
 43
43
-
 44
44
-
 45
45
-
 46
46
-
 47
47
-
 48
48
-
 49
49
-
 50
50
-
 51
51
-
 52
52
-
 53
53
-
 54
54
-
 55
55
-
 56
56
-
 57
57
-
 58
58
-
 59
59
-
 60
60
-
 61
61
-
 62
62
-
 63
63
-
 64
64
-
 65
65
-
 66
66
-
 67
67
-
 68
68
-
 69
69
-
 70
70
-
 71
71
-
 72
72
-
 73
73
-
 74
74
-
 75
75
-
 76
76
-
 77
77
-
 78
78
-
 79
79
-
 80
80
-
 81
81
-
 82
82
-
 83
83
-
 84
84
-
 85
85
-
 86
86
-
 87
87
-
 88
88
-
 89
89
-
 90
90
-
 91
91
-
 92
92
-
 93
93
-
 94
94
-
 95
95
-
 96
96
-
 97
97
-
 98
98
-
 99
99
-
 100
100
-
 101
101
-
 102
102
-
 103
103
-
 104
104
-
 105
105
-
 106
106
-
 107
107
-
 108
108
-
 109
109
-
 110
110
-
 111
111
-
 112
112
-
 113
113
-
 114
114
-
 115
115
-
 116
116
-
 117
117
-
 118
118
-
 119
119
-
 120
120
-
 121
121
-
 122
122
-
 123
123
-
 124
124
-
 125
125
-
 126
126
-
 127
127
-
 128
128
-
 129
129
-
 130
130
-
 131
131
-
 132
132
-
 133
133
-
 134
134
-
 135
135
-
 136
136
-
 137
137
-
 138
138
-
 139
139
-
 140
140
-
 141
141
-
 142
142
-
 143
143
-
 144
144


på andra språk
- italiano: TEAC CD-P1260MKII Manuale del proprietario
- español: TEAC CD-P1260MKII El manual del propietario
- Deutsch: TEAC CD-P1260MKII Bedienungsanleitung
- français: TEAC CD-P1260MKII Le manuel du propriétaire
- English: TEAC CD-P1260MKII Owner's manual
- Nederlands: TEAC CD-P1260MKII de handleiding
Relaterade papper
Andra dokument
-
Yamaha CRX-330 Användarmanual
-
Tristar HF-1253 Bruksanvisning
-
-
-
-
-
-
Tristar CD-1589 Bruksanvisning
-
Panasonic SLSX428 Bruksanvisning
-
Roadstar PCD-498MP Användarmanual