
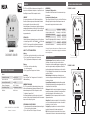
ZV-9101 är en liten Z-Wave dosdimmer som kan kopplas till och
styras med en återfjädrande strömbrytare, s.k. pushdim, och med
Nexa Bridge eller annan Z-Wave kompatibel controller.
SÄKERHET
Läs igenom hela instruktionen först. Anlita fackman vid behov.
Nexa kan ej hållas ansvarig om produkten används till annat än
den är designad för eller om instruktionen inte följs.
Anslut aldrig lampor eller utrustning som överskrider mottagarens
maximala angivna belastning, det kan leda till fel, kortslutning eller
brand. Försök inte att reparera produkten. Produkten innehåller
inga reparerbara delar.
INSTALLATION
Säkerställ att ledarna är spänningsfria genom att slå av strömmen
i elcentralen. Koppla Fas till L, Last/Tändtråd till och Noll ledare
till N. ZV-9101 kan kopplas till en återfjädrande strömbrytare för
styrning med s.k. pushdim funktion.Se även kopplingsschema.
ANSLUT TILL ETT Z-WAVE NÄTVERK.
Inklusion:
1. Sätt Z-Wave controllern i inklusionsläge (se controllerns manual)
2. Tryck 3 ggr på ”Reset” knappen inom 3 sekunder eller
Tryck 3 ggr på ansluten strömbrytare inom 3 sekunder.
Exklusion:
1. Sätt Z-Wave controllern i exklusionsläge
(se controllerns manual)
2. Tryck 3 ggr på ”Reset” knappen inom 3 sekunder.
Återställning:
Tryck och håll inne ”Reset” knappen i mer än 10 sekunder för
fabriksåterställning.
DIMMERINSTÄLLNINGAR
ZV-9101 levereras inställd för bakkantsstyrd fasdimring och kan
ställas om till framkantsstyrd fasdimring, inställning av bak- eller
framkantsdimring sker med Z-Wave konfiguration, se tabell
”Configuration Command Class”
Val av lämplig inställning beror på vilken typ av last som skall
anslutas, se tabellen nedan. Kontakta inköpsstället för din armatur/
lampa om du är osäker på typ av last.
INSTÄLLNING AV LÄGSTA DIM NIVÅ
1. Justera dimmernivån till önskad miniminivå (måste vara lägre än
50%) med controller eller strömbrytare.
2. Tryck och håll inne ”Min.Set” knappen i 4-5 sekunder.
ANVÄNDNING
Styrning med Z-Wavekontroller:
Se manualen till din Z-Wavekontroller för information hur du styr
din mottagare.
Styrning med återfjädrande brytare:
Tryck en gång för att tända. Tryck igen för att släcka. För att dimra,
håll knappen intryckt när lampan är tänd. Lampan kommer att
tändas med den ljusstyrka den hade när den släcktes.
LAST INSTÄLLNING MAX EFFEKT
Halogen- och glödlampor (230V) Bakkantsstyrd 400W /220-240V
Lågvoltshalogen med elektroniska
transformatorer Bakkantsstyrd 200W / 220-240V
Dimbara LED- & lågenergilampor (230V)*
Bakkantsstyrd 200W / 220-240V
Dimbara LED drivers Bakkantsstyrd 200W / 220-240V
Konventionella Transformatorer Framkantsstyrd 400W / 220-240V
TEKNISK DATA / TECHNICAL DATA
ZV-9101
Strömkälla / Power source 220-240 V~50 Hz
Max. last / Max. load 40–400 W R / 20–200 W RC, RL
Max. last LED / Max load LED 200 W LED
Drifttemp. / Operating temp. 0–40 °C RH 8-80%
IP klassicering / IP rating IP22 Inomhusbruk / Indoor use
Mått / Size 46 x 45 x 21 mm
ZV-9101
DOSDIMMER / DIMMER
SVENSKA
NEXA AB, DATAVÄGEN 37B, 436 32 ASKIM, SWEDEN
[email protected] | www.nexa.se
*) Observera! På grund av olika konstruktioner av LED lampor är det maximala
antalet LED-lampor och därmed effekt även avhängigt den totala effektfaktorn
vid anslutning till dimmer.
PUSHDIM, 100-240VAC
PUSHDIM, 12-24VAC
KOPPLINGSSCHEMA / WIRING DIAGRAM
N
L
L L N N
+A1 -A2
Reset Min. set
N
L
L L N N
+A1 -A2
Reset Min. set
Adapter
12-24V DC Ut
Säkerhet och information
Räckvidd inomhus: Räckvidden är starkt beroende av lokala
förhållanden, till exempel om det finns metaller i närheten.
Exempelvis har den tunna metallbeläggning i energiglas med låg
emissivitet negativ inverkan på radiosignalernas räckvidd. Det
kan finnas begränsningar för användningen av enheten utanför
EU. Om tillämpligt bör du kontrollera att enheten överensstämmer
med lokala föreskrifter.
Max belastning: Anslut aldrig lampor eller utrustning som
överskrider mottagarens maximala belastning. Det kan leda till fel,
kortslutning eller brand.
Livsuppehållande utrustning: Använd aldrig Nexas produkter
till livsuppehållande utrustning eller andra apparater där fel eller
störningar kan få livshotande följder.
Störningar: Alla trådlösa enheter kan drabbas av störningar som
kan påverka prestandan och räckvidden. Det minsta avståndet
mellan två mottagare bör därför vara åtminstone 50 cm
Reparation: Försök inte att reparera produkten. Den innehåller
inga reparerbara delar.
Vattentäthet: Produkten är inte vattentät. Se till att den alltid är
torr. Fukt gör att elektroniken inuti fräts sönder och kan leda till
kortslutning, fel och risk för elstötar.
Rengöring: Rengör produkten med en torr trasa. Använd inte
kemikalier, lösningsmedel eller starka rengöringsmedel.
Miljö: Utsätt inte produkten för stark värme eller kyla, eftersom
det kan skada eller förkorta de elektroniska kretsarnas livslängd.

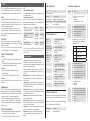
Z-WAVE TECHNICAL DATA
SUPPORTED COMMAND CLASS
CONFIGURATION COMMAND CLASS
NOTIFICATION COMMAND CLASS
The dimmer has accounted for Emergency Shutoff, when the tem-
perature rises above 90°C, Emergency Shutoff is sent to Lifeline.
Dimmern har stöd för Emergency Shutoff, när temperaturen stiger
över 90°C skickas Emergency Shutoff till Lifeline.
SDK 6.71.03
Explorer Frame Support Ye s
Device Type Light Dimmer Switch
Generic Device Class
GENERIC_TYPE_SWITCH_MULTILEVEL
Specic Device Class SPECIFIC_TYPE_POWER_SWITCH_MULTILEVEL
Role Type Always On Slave (AOS)
Routing Yes
Parameter Size Description Default
Value
2 1
Info: Saving load state before power failure
0 – shutoff load
1 – turn on load
2 – save load state before power failure
0
3 1
Info: Enable/disable to send the basic report to
the Lifeline when the load state changed
(When value set as 1, re-power on the dimmer, it
will send Basic report automatically)
0 – Disable to send Basic report
1 – Enable to send Basic report
1
4
1
Default fade time (unit is second, this value has
the same function as Duration of Multilevel)
Valid value: 0x00 - 0xFF
1
5 1
Setting minimum brightness value
Valid value: 0 - 50, the bigger the value is, the
higher the load’s minimum brightness is
Note: when configure this value, the value of
Multilevel will be configured as 1 automatically
so that users can preview the corre-sponding
effect of minimum brightness value
0
6 1
Choose MOSFET driving type
0 – trailing edge
1 – leading edge
0
7 1
Enable/disable external switch to be added to
and removed from a network (when enables this
function, triple press the external switch within
1.5 seconds to be added to or removed from a
net-work)
0 – disable
1 - enable
1
Node Info Security Command Supported Repor
COMMAND_CLASS_
ZWAVEPLUS_INFO
V2 COMMAND_CLASS_
MANUFACTURER_S PE-CIFIC V2
COMMAND_CLASS_
TRANSPORT_ SERVICE
V2 COMMAND_CLASS_VERSION V2
COMMAND_CLASS_
SECURITY
V1 COMMAND_CLASS_SWITCH_
MULTILEVEL V4
COMMAND_CLASS_
SECURITY_2
V1 COMMAND_CLASS_SCENE_
ACTIVATION V1
COMMAND_CLASS_
SUPERVISION
V1 COMMAND_CLASS_SCENE_
ACTUATOR_CONF V1
COMMAND_CLASS_NOTIFICATION V8
COMMAND_CLASS_CONFIGURATION V2
COMMAND_CLASS_ASSOCIATION_
GRP_INFO V3
COMMAND_CLASS_ASSOCIATION V2
COMMAND_CLASS_FIRMWARE_
UPDATE_MD V4
COMMAND_CLASS_POWERLEVEL V1
COMMAND_CLASS_DEVICE_RESET_
LOCALLY V1
Value Description
0x00 Instantly
0x01-0x7F 1 second to 127 seconds in
1 second resolution
0x80 0xFE 1 minute to 127 minutes in
1 minute resolution
0xFF Factory default duration. (1 sec.)
Notication type Notication
System (0x09) Emergency Shutoff status
ENGLISH
USE
Control with Z-Wave controller:
See the manual for your Z-Wave controller for information on how
to operate your receiver.
Control with retractive switch:
Press once to turn on. Press again to turn off. To dim, keep the
button pressed in when the light is on. The light comes on with the
luminance it had when it was turned off.
ZV-9101 is a small Z-Wave dimmer module which is connected to
and controlled with a retractive switch, a so-called pushdim, and
with Nexa Bridge or another controller compatible with Z-Wave.
SAFETY
Read through the entire instruction first. Engage a professional if
so required. Nexa cannot be held liable if the product is used for
any purpose other than the one for which it is designed, or if there
is failure to comply with the instruction.
Never connect bulbs or equipment exceeding the receiver’s
maximum stated load – this may lead to faults, short-circuiting or
fire. Do not attempt to repair the product. The product contains no
repairable parts.
INSTALLATION
Make sure that the conductors are powered down by turning off
the power in the distribution box. Connect Phase to L, Load to
and Zero conductor to N.
ZV-9101 can be connected to a retractive switch for control with a
so-called pushdim function. See also wiring diagram.
CONNECT TO A Z-WAVE NETWORK
Inclusion:
1. Put the Z-Wave controller in inclusion mode (see the controller’s
manual)
2. Press 3 times on the ”Reset” button within 3 seconds or Press
3 times on associated switch within 3 seconds.
Exclusion:
1. Put the Z-Wave controller in exclusion mode (see the
controller’s manual)
2. Press 3 times on the ”Reset” button within 3 seconds.
Resetting:
Press and hold in the ”Reset” button for more than 10 seconds for
factory reset.
DIMMER SETTINGS
ZV-9101 is delivered with settings for trailing edge phase control
dimming and can be set to leading edge phase control dimming,
setting of trailing or leading edge dimming is by means of Z-Wave
configuration, see table ”Configuration Command Class”
Selection of an appropriate setting is dependent on the type of
load to be connected – see the table below. Contact the point of
purchase for your luminaire/light if you are not sure what type of
load is to be used.
SETTING OF LOWEST DIM LEVEL
1. Adjust the dimmer level to minimum level required (must be
lower than 50%) with controller or switch.
2. Press and hold in the ”Min.Set” button for 4-5 seconds.
LOAD SETTING OUTPUT
Halogen lamps and bulbs (230V) Trailing edge 400W /220-240V
Low voltage halogen with electronic
transformer. Trailing edge 200W / 220-240V
Dimmable LED & Low energy bulbs
(230V)*
Trailing edge 200W / 220-240V
Dimmable LED drivers Trailing edge 200W / 220-240V
Conventional transformers Leading edge 400W / 220-240V
*) Note. Due to different designs of LED lights, the maximum number of LED
lights, and thus output, is also dependent on the total power factor when
connecting to dimmer.
Safety and information
Indoor range: The range is strongly dependent on local
conditions, such as the presence of metals. For example, the
thin metal coating in Low-emissivity (Low-E) glass has a negative
impact on the range of radio signals.
There may be restrictions on the use of this device outside the
EU. If applicable, check whether this device complies with local
directives.
Maximum load: Never connect lights or equipment that exceed
the maximum load of the receiver, as it can result in defects, a
short circuit or fire.
Life-support: Never use Nexa products for life-support systems
or other applications in which equipment malfunctions can have
life-threatening consequences.
Interference: All wireless devices may be subject to interference,
which could affect performance. The minimum distance between 2
receivers should be at least 50 cm.
Repairing: Do not attempt to repair this product. There are no
user-serviceable parts inside.
Water-resistance: This product is not water-resistant. Keep it dry.
Moisture will corrode the inner electronics and can result in a short
circuit, defects and shock hazard.
Cleaning: Use a dry cloth to clean this product. Do not use harsh
chemicals, cleaning solvents, or strong detergents.
Environment: Do not expose the product to excessive heat or
cold, as it can damage or shorten the life of electronic circuit
boards.
-
 1
1
-
 2
2

