POINT PRO POFT8043 TÅRNVIFTE Bruksanvisning
- Typ
- Bruksanvisning

Tower Fan
With Remote Control
POFT8043
User Manual

Thank you for purchasing your new POINT PRO SERIES TOWER FAN. These
operating instructions will help you use it properly and safely. We
recommend that you spend some time reading this instruction manual in
order that you fully understand all the operational features it oers. Read
all the safety instructions carefully before use and keep this instruction
manual for future reference.
GB
Takk for at du kjøpte ditt nye POINT PRO SERIES TÅRNET FAN. Denne
bruksanvisningen vil hjelpe deg med å bruke den på en trygg og riktig måte.
Vi anbefaler at du tar deg tid til å lese gjennom hele bruksanvisningen for å
bli fortrolig med alle funksjonene som tilbys. Les alle
sikkerhetsanvisningene nøye før bruk, og oppbevar bruksanvisningen for
fremtidig referanse.
ENNO
Kiitos, kun valitsit uuden POINT PRO SERIES TORNI TUULETIN. Nämä
käyttöohjeet opastavat sinua käyttämään laitetta oikein ja turvallisesti. On
suositeltavaa käyttää aikaa tämän käyttöoppaan lukemiseen, jotta
ymmärrät täysin, mitä toiminnallisia ominaisuuksia tuote tarjoaa. Lue
kaikki turvallisuusohjeet huolellisesti ennen laitteen käyttöä ja säilytä
käyttöopas myöhempää käyttöä varten.
ENFI
Tak for købet af dit nye POINT PRO SERIES TÅRN FAN. Disse
brugervejledninger hjælper dig med at bruge dette apparat rigtigt og sikkert.
Vi anbefaler, at du læser denne brugervejledning, så du får en fuld
forståelse af hvordan alle funktionerne virker. Læs sikkerhedsforskrifterne
grundigt inden brug, og gem denne brugervejledning til senere brug.
ENDK
Tack för att du har köpt ditt nya POINT PRO SERIES TORNFLÄKT. Denna
bruksanvisning hjälper dig att använda den på ett säkert och korrekt sätt. Vi
rekommenderar att du tar dig tid att läsa igenom denna bruksanvisning för
att till fullo förstå alla driftfunktioner som den erbjuder. Läs noga igenom
alla säkerhetsinstruktioner före användning och spara bruksanvisningen för
framtida bruk.
SE
2

........................ 4 - 13
........................ 14 - 23
........................ 24 - 33
........................ 34 - 43
........................ 44 - 53
Instruction manual - English
Bruksanvisning - Norsk
Käyttöopas - Suomi
Brugervejledning - Dansk
Bruksanvisning - Svenska
page
side
sivu
side
sidor
GBNOFIDKSE
3

4
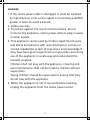
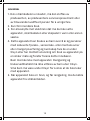
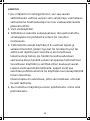
WARNING
1. If the mains power cable is damaged, it must be replaced
by manufacturer or its service agent or a similarly qualified
person in order to avoid a hazard.
2. Indoor use only.
3. To protect against the risk of electrical shock, do not
immerse the appliance, mains power cable or plug in water
or other liquids.
4. This appliance can be used by children aged from 8 years
and above and persons with reduced physical, sensory or
mental capabilities or lack of experience and knowledge if
they have been given supervision or instruction concerning
use of the appliance in a safe way and understand the
hazards involved.
Children shall not play with the appliance. Cleaning and
user maintenance shall not be made by children without
supervision.
Young children should be supervised to ensure that they
do not play with the appliance.
5. When the appliance is not in use and before cleaning,
unplug the appliance from the mains power outlet.

5
GB
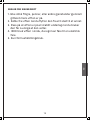
RULES FOR SAFE OPERATION
1. Never insert fingers, pencils, or any other object through
the grille when the fan is running.
2. Disconnect the fan when moving from one location to
another.
3. Be sure the fan is on a stable surface when operating to
avoid overturning.
4. DO NOT use the fan in window, rain may create electrical
hazard.
5. Household use only.

6
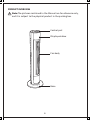
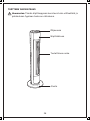
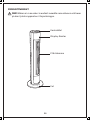
Note:
The pictures contained in the Manual are for reference only,
and it is subject to the physical product in the packing box.
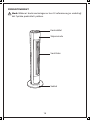
PRODUCT OVERVIEW
Control part
Display window
Fan body
Base

7
GB
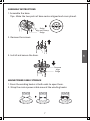
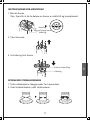
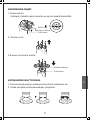
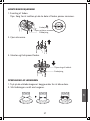
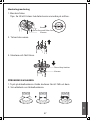
ASSEMBLY INSTRUCTIONS
MAINS POWER CABLE STORAGE
1. Assemble the base.
Tips: Make the two parts of base center aligned and cross placed.
align and clamp
Bulge
Bulge
2. Remove the screws.
3. Install and secure the base.
Bulge
Concave
align
1. Press the winding hooks at both ends to open them.
2. Wrap the mains power cable around the winding hooks.

8
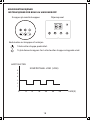
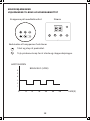
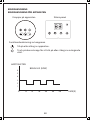
Button Function Description
Product start or stop.
Touch this button to start or stop swinging wind.
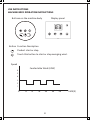
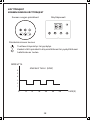
USE INSTRUCTIONS
MACHINE BODY OPERATION INSTRUCTIONS
Buttons on the machine body Display panel
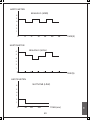
Speed
Comfortable Wind (LOW)
0 6 12 18 24 30 36 TIME(S)
6
5
4
3
2
1

GB
9
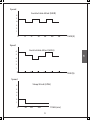
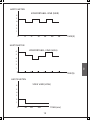
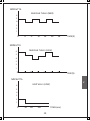
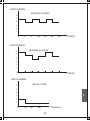
Comfortable Wind (MED)
0 6 12 18 24 30 36
Speed
TIME(S)
6
5
4
3
2
1
Comfortable Wind (HIGH)
0 6 12 18 24 30 36
Speed
TIME(S)
6
5
4
3
2
1
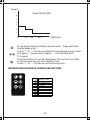
Speed
0 30 60 180
Sleep Wind (LOW)
TIME(min)
6
5
4
3
2
1

10
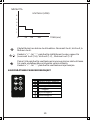
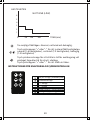
Three wind classes available: Normal windSleep wind and
Comfortable wind.
Touch “+” or “-” button to adjust the wind speed(normal wind
(1-6 gears)Sleep wind(1-2 gears) Comfortable wind
(1-3 gears)
Press this button to set the shutdown time in the start state
or set the boot time in the standby state.
Touch “+” or “-” button to set the timing time.
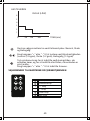
Timer key
Swing key
Function key
ON/OFF key
“+”key
“-”key
+
-
INSTRUCTIONS OF REMOTE CONTROLLER BUTTONS
Speed
0 30 60 180
Sleep Wind (LOW)
TIME(min)
6
5
4
3
2
1

11
GB
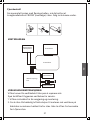
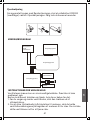
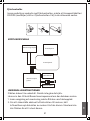
Disaseemble
protection
Power supply
board
Main motor
Synchronous
motor
control board
control board
CIRCUIT DIAGRAM
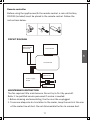
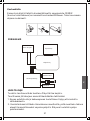
MAINTENANCE INSTRUCTION
The fan requires little maintenance. Do not try to fix it by yourself.
Refer it to qualified service personnel if service is needed.
1. Before cleaning and assembling, the fan must be unplugged.
2. To ensure adequate air circulation to the motor, keep the vents at the rear
of the motor free of dust. Do not disassemble the fan to remove dust.
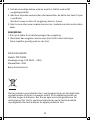
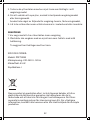
Remote controller
Before using the appliance with the remote control, a coin cell battery
CR2032 (included) must be placed in the remote control. Follow the
instructions below.
1
2
3
4

12
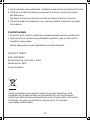
This symbol on the product or in the instructions means that your
electrical and electronic equipment should be disposed at the end of its
life separately from your household waste.There are separate collection
systems for recycling in the EU. For more information, please contact
the local authority or your retailer where you purchased the product.
CLEANING
1. Be sure to unplug from the electrical supply source before cleaning.
2. Plastic parts should be cleaned with a soft cloth moisten with mild soap.
Thoroughly remove soap film with dry cloth.
SPECIFICATION:
Model: POFT8043
Rated voltage: 220-240V~ 50Hz
Rated power: 45W
Protection class: I
3. Wipe the exterior parts with a soft cloth soaking a mild detergent.
4. Do not use any abrasive detergent or solvents to avoid scratching the
surface.
Do not use any of the following as a cleaner: gasoline, thinner,
5. Do not allow water or any other liquid into the motor housing or interior
parts.

13
GB
Imported and Exclusively marketed by:
Power International AS,
PO Box 523, N-1471 Lørenskog, Norway
Power Norge:
https://www.power.no/kundeservice/
T: 21 00 40 00
Expert Danmark:
https://www.expert.dk/kundeservice/
T: 70 70 17 07
Power Danmark:
https://www.power.dk/kundeservice/
T: 70 33 80 80
Punkt 1 Danmark:
https://www.punkt1.dk/kundeservice/
T: 70 70 17 07
Expert Finland:
https://www.expert.fi/tuki/asiakaspalvelu/
T: 020 7100 670
Power Finland:
https://www.power.fi/tuki/asiakaspalvelu/
T: 0305 0305
Power Sverige:
https://www.power.se/kundservice/
T: 08 517 66 000

14
ADVARSEL
1. Hvis strømkabelen er skadet, må den skiftes av
produsenten, av produsentens servicerepresentant eller
av tilsvarende kvalifisert person for å unngå fare.
2. Kun for innendørs bruk.
3. For å beskytte mot elektrisk støt må du ikke sette
apparatet, strømkabelen eller støpselet i vann eller annen
væske.
4. Dette apparatet kan brukes av barn over 8 år og personer
med reduserte fysiske-, sensoriske- eller mentale evner
eller mangel på erfaring og kunnskap hvis de er under
tilsyn eller har mottatt anvisning om bruk av apparatet på
en sikker måte og forstår farene dette innebærer.
Barn må ikke leke med apparatet. Rengjøring og
brukervedlikehold må ikke utføres av barn uten tilsyn.
Små barn må være under tilsyn for å sikre at de ikke leker
med apparatet.
5. Når apparatet ikke er i bruk, og før rengjøring, må du koble
apparatet fra stikkontakten.

15
NO
REGLER FOR SIKKER DRIFT
1. Ikke stikk fingre, penner, eller andre gjenstander gjennom
gitteret mens viften er på.
2. Koble fra viften når du flytter den fra ett sted til et annet.
3. Pass på at viften er på et stabilt underlag når du bruker
den for å unngå at den velter.
4. IKKE bruk viften i vindu, da regn kan føre til en elektrisk
fare.
5. Kun for husholdningsbruk.

16
Merk:
Bildene i bruksanvisningen er kun til referanse og er underlagt
det fysiske produktet i pakken.
PRODUKTOVERSIKT
Kontrolldel
Skjermvindu
Ventilator
Sokkel

17
NO
INSTRUKSJONER FOR MONTERING
OPPBEVARE STRØMLEDNINGEN
1. Monter basen.
Tips: Gjør slik at de to delene av basen er midtstilt og kryssplassert.
Utbuling
legg på linje og klem
Utbuling
2. Fjern skruene.
3. Installer og fest basen.
Utbuling
Konkav linjestilling
1. Trykk viklekrokene i begge ender for å åpne dem.
2. Kveil strømkabelen rundt viklekrokene.

18
Beskrivelse av knappens funksjon
Starte eller stoppe produktet.
Trykk denne knappen for å starte eller stoppe svingende vind.
BRUKSINSTRUKSJONER
INSTRUKSJONER FOR BRUK AV MASKINKROPP
Knapper på maskinkroppen Skjermpanel
HASTIGHETEN
KOMFORTABEL VIND (LOW)
0 6 12 18 24 30 36 TIME(S)
6
5
4
3
2
1

NO
19
KOMFORTABEL VIND (MED)
0 6 12 18 24 30 36
HASTIGHETEN
TIME(S)
6
5
4
3
2
1
KOMFORTABEL VIND (HIGH)
0 6 12 18 24 30 36
HASTIGHETEN
TIME(S)
6
5
4
3
2
1
HASTIGHETEN
0 30 60 180
SOVE VIND (LOW)
TIME(min)
6
5
4
3
2
1

20
Tre typer vind er tilgjengelige: Normal vind, sovevind og
behagelig vind.
Trykk «+» eller «-» for å justere vindhastigheten (normal vind
(nivå 1–6), sovevind (nivå 1–2), komfortabel vind (nivå 1–3)
Trykk denne knappen for å angi avslåingstid når startet eller
påslåingstid i ventemodus.
Trykk «+» eller «-» for å stille inn tid.
+
-
INSTRUKSJONER FOR FJERNKONTROLLKNAPPER
PÅ/AV-knapp
Funksjonstast
«+»-knapp
«-»-knapp
Tidtaker-knapp
Svinging-knapp
HASTIGHETEN
0 30 60 180
SOVE VIND (LOW)
TIME(min)
6
5
4
3
2
1
Sidan laddas...
Sidan laddas...
Sidan laddas...
Sidan laddas...
Sidan laddas...
Sidan laddas...
Sidan laddas...
Sidan laddas...
Sidan laddas...
Sidan laddas...
Sidan laddas...
Sidan laddas...
Sidan laddas...
Sidan laddas...
Sidan laddas...
Sidan laddas...
Sidan laddas...
Sidan laddas...
Sidan laddas...
Sidan laddas...
Sidan laddas...
Sidan laddas...
Sidan laddas...
Sidan laddas...
Sidan laddas...
Sidan laddas...
Sidan laddas...
Sidan laddas...
Sidan laddas...
Sidan laddas...
Sidan laddas...
Sidan laddas...
Sidan laddas...
Sidan laddas...
Sidan laddas...
Sidan laddas...
-
 1
1
-
 2
2
-
 3
3
-
 4
4
-
 5
5
-
 6
6
-
 7
7
-
 8
8
-
 9
9
-
 10
10
-
 11
11
-
 12
12
-
 13
13
-
 14
14
-
 15
15
-
 16
16
-
 17
17
-
 18
18
-
 19
19
-
 20
20
-
 21
21
-
 22
22
-
 23
23
-
 24
24
-
 25
25
-
 26
26
-
 27
27
-
 28
28
-
 29
29
-
 30
30
-
 31
31
-
 32
32
-
 33
33
-
 34
34
-
 35
35
-
 36
36
-
 37
37
-
 38
38
-
 39
39
-
 40
40
-
 41
41
-
 42
42
-
 43
43
-
 44
44
-
 45
45
-
 46
46
-
 47
47
-
 48
48
-
 49
49
-
 50
50
-
 51
51
-
 52
52
-
 53
53
-
 54
54
-
 55
55
-
 56
56


POINT PRO POFT8043 TÅRNVIFTE Bruksanvisning
- Typ
- Bruksanvisning
på andra språk
Relaterade papper
-
 POINT PRO POFT8008WH 8" BORDVIFTE Bruksanvisning
-
 POINT PRO POFT7500 TÅRNVIFTE Bruksanvisning
-
 POINT POFS5016 16" 2-I-1 GULVVIFTE Bruksanvisning
-
 POINT POAC6022 AIRCONDITION Bruksanvisning
-
 POINT PRO POAC8014 AIRCONDITION Användarmanual
-
 POINT POHU5055 LUFTFUKTER Bruksanvisning
-
 POINT POHU60 LUFTFUKTER Bruksanvisning
-
 POINT POAP2010 LUFTRENSER Bruksanvisning


