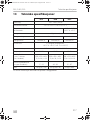
Dometic D15, D50, D52 Bruksanvisningar
- Kategori
- Drick kylare
- Typ
- Bruksanvisningar
Denna manual är också lämplig för

D15, D50, D52
Wine refrigerator
Operating manual . . . . . . . . . . . . . . . . . . . . .9
Weinkühlgerät
Bedienungsanleitung . . . . . . . . . . . . . . . . .29
Cave à vin réfrigérée
Notice d’utilisation . . . . . . . . . . . . . . . . . . .50
Enfriador de vino
Instrucciones de uso . . . . . . . . . . . . . . . . . . 71
Aparelho de refrigeração para
vinho
Manual de instruções . . . . . . . . . . . . . . . . .92
Refrigeratore per vino
Istruzioni per l’uso . . . . . . . . . . . . . . . . . . . 113
Wijnkoelkast
Gebruiksaanwijzing . . . . . . . . . . . . . . . . . 134
Vinkøleapparat
Betjeningsvejledning . . . . . . . . . . . . . . . . 155
Vinkyl
Bruksanvisning . . . . . . . . . . . . . . . . . . . . . 176
Vinkjøler
Bruksanvisning . . . . . . . . . . . . . . . . . . . . . 197
Viinijäähdytin
Käyttöohje . . . . . . . . . . . . . . . . . . . . . . . . . 218
Устройство для охлаждения
вина
Инструкция по эксплуатации . . . . . . . . . 239
EN
DE
FR
ES
PT
IT
NL
DA
SV
NO
FI
RU
REFRIGERATION
MACAVE
'''2VERRN6HLWH0LWWZRFK$XJXVW

'''2VERRN6HLWH0LWWZRFK$XJXVW

D15, D50, D52
3
D15 D50
D52
1
2
3
4
5
6
7
1
2
5
6
7
1
'''2VERRN6HLWH0LWWZRFK$XJXVW

D15, D50, D52
4
#
1 2 3 4 5 6 7 8
D15, D50
1 8 4 2 3
D52
2
3
'''2VERRN6HLWH0LWWZRFK$XJXVW

D15, D50, D52
5
54
76
98
'''2VERRN6HLWH0LWWZRFK$XJXVW

D15, D50, D52
6
0
AB
a
AB
b
'''2VERRN6HLWH0LWWZRFK$XJXVW

D15, D50, D52
7
AB
c
1
2
d
1
e
'''2VERRN6HLWH0LWWZRFK$XJXVW

D15, D50, D52
8
1
f
'''2VERRN6HLWH0LWWZRFK$XJXVW

EN
D15, D50, D52
9
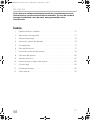
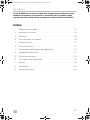
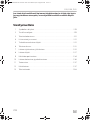
Please read this instruction manual carefully before first use, and store it in
a safe place. If you pass on the product to another person, hand over this
instruction manual along with it.
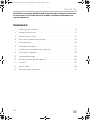
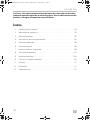
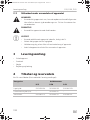
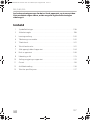
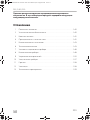
Table of contents
1 Explanation of symbols . . . . . . . . . . . . . . . . . . . . . . . . . . . . . . . . . . . . . . . . . .10
2 Safety instructions . . . . . . . . . . . . . . . . . . . . . . . . . . . . . . . . . . . . . . . . . . . . . .10
3 Scope of delivery . . . . . . . . . . . . . . . . . . . . . . . . . . . . . . . . . . . . . . . . . . . . . .12
4 Accessories and spare parts. . . . . . . . . . . . . . . . . . . . . . . . . . . . . . . . . . . . . .12
5 Intended use . . . . . . . . . . . . . . . . . . . . . . . . . . . . . . . . . . . . . . . . . . . . . . . . . .12
6 Technical description . . . . . . . . . . . . . . . . . . . . . . . . . . . . . . . . . . . . . . . . . . .13
7 Setting up and connecting the appliance . . . . . . . . . . . . . . . . . . . . . . . . . . .16
8 Using the appliance . . . . . . . . . . . . . . . . . . . . . . . . . . . . . . . . . . . . . . . . . . . .18
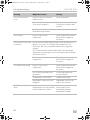
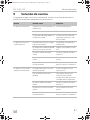
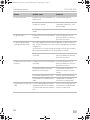
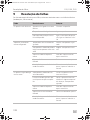
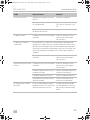
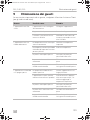
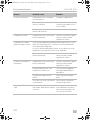
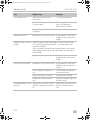
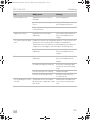
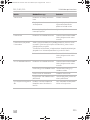
9 Troubleshooting . . . . . . . . . . . . . . . . . . . . . . . . . . . . . . . . . . . . . . . . . . . . . . 24
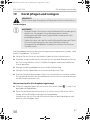
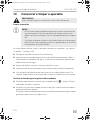
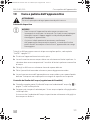
10 Maintaining and cleaning the appliance . . . . . . . . . . . . . . . . . . . . . . . . . . . 26
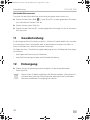
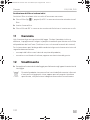
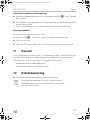
11 Warranty . . . . . . . . . . . . . . . . . . . . . . . . . . . . . . . . . . . . . . . . . . . . . . . . . . . . 27
12 Disposal. . . . . . . . . . . . . . . . . . . . . . . . . . . . . . . . . . . . . . . . . . . . . . . . . . . . . 27
13 Technical data . . . . . . . . . . . . . . . . . . . . . . . . . . . . . . . . . . . . . . . . . . . . . . . . 28
'''2VERRN6HLWH0LWWZRFK$XJXVW

EN
Explanation of symbols D15, D50, D52
10
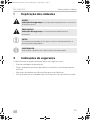
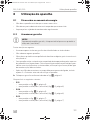
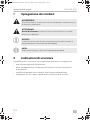
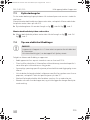
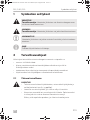
1 Explanation of symbols
!
!
A
I
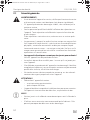
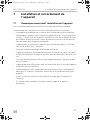
2 Safety instructions
The manufacturer accepts no liability for damage in the following cases:
Faulty assembly or connection
Damage to the product resulting from mechanical influences and incorrect
connection voltage
Alterations to the product without express permission from the manufacturer
Use for purposes other than those described in the operating manual
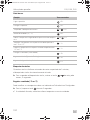
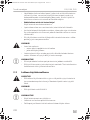
2.1 General safety
!
WARNING!
Before you use the appliance for the first time, check that the operat-
ing voltage matches the mains voltage (see type plate).
Do not operate the appliance if it is visibly damaged.
This appliance may only be repaired by qualified personnel. Inade-
quate repairs may cause serious hazards.
Should your appliance need to be repaired, please contact customer
services.
WARNING!
Safety instruction: Failure to observe this instruction can cause fatal or
serious injury.
CAUTION!
Safety instruction: Failure to observe this instruction can lead to injury.
NOTICE!
Failure to observe this instruction can cause material damage and impair
the function of the product.
NOTE
Supplementary information for operating the product.
'''2VERRN6HLWH0LWWZRFK$XJXVW

EN
D15, D50, D52 Safety instructions
11
People (including children) whose physical, sensory or mental capac-
ities prevent them from using this device safely should not be allowed
to operate it without the supervision of a responsible adult.
Electrical devices are not children’s toys!
Always keep the appliance out of the reach of children.
Children must be supervised to ensure that they do not play with the
appliance.
If this appliance’s connection cable is damaged, it must be replaced
by the manufacturer, customer service or a similarly qualified person in
order to prevent safety hazards.
Do not store any explosive substances, such as spray cans with propel-
lants, in the appliance.
!
CAUTION!
Disconnect the appliance from the mains
– Before cleaning and maintenance
–After use
The appliance should be moved and set up by at least two people.
Otherwise this could lead to back or other injuries.
A
NOTICE!
Never pull the plug out of the socket by the connection cable.
Do not use accessories that have not been recommended by the man-
ufacturer. This can lead to injury and material damage.
2.2 Operating the appliance safely
!
WARNING!
Never use the appliance in rooms where flammable materials are
stored or flammable gases have built up. Sparks from the motor could
ignite them.
!
CAUTION!
Do not use the appliance with wet hands.
A
NOTICE!
Only use the appliance indoors, never outside.
Never expose the appliance to moisture.
'''2VERRN6HLWH0LWWZRFK$XJXVW

EN
Scope of delivery D15, D50, D52
12
Keep children and animals at a safe distance when operating the appli-
ance.
Do not place any electrical devices inside the cooler.
3Scope of delivery
Wine refrigerator
Water tank
Key
Operating instructions
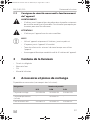
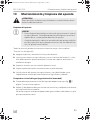
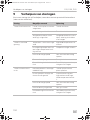
4 Accessories and spare parts
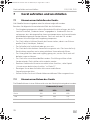
Available as accessories (not included in the scope of delivery):
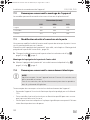
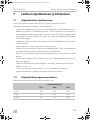
5 Intended use
The appliance is a wine refrigerator. It is only intended for storing wine.
Only bottles that are closed may be stored in the device.
Please refer to the “Country versions” table for the suitable connection voltage for
your appliance, see chapter “Technical data” on page 28.
Label Ref. number
D15 D50 D52
Storage base 9103500158 9103500159 9103500159
Presentation shelves (tilted) – 9103500157 –
Active carbon filter 9103540115 9103540115 9103540115
'''2VERRN6HLWH0LWWZRFK$XJXVW

EN
D15, D50, D52 Technical description
13
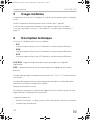
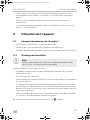
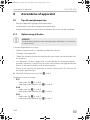
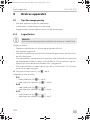
6 Technical description
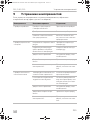
The wine refrigerator comes in three models:
D15:
with capacity for up to 23 standard Bordeaux bottles
D50:
with capacity for up to 62 standard Bordeaux bottles
D52:
with capacity for up to 67 standard Bordeaux bottles
D15, D50: The appliance has two separate adjustable temperature zones.
D52: The appliance has an adjustable temperature zone and a drinks mode.
The temperature can be set in steps of 1 °C or 1 °F using sensor buttons.
The temperature zones are chilled or heated automatically to reach or maintain the
temperature that is set.
Factory fitted with shelves.
You can increase the capacity by using the optional accessory of reinforced storage
shelves.
The appliance has:
Sensor buttons: Just touch slightly to select the required function.
automatic defrosting
a UV impervious door
An active carbon filter for improving the inner climate
a fan for maintaining a constant inner climate, such as in a wine cellar (dynamic
cooling mode)
a lockable glass door with a reversible door hinge
detachable shelves for storing the bottles
a Sabbath mode
LED interior lighting with two operating modes
a temperature memory function: The set temperature is also saved when the unit
is switched off.
a temperature monitor: A warning signal sounds and the temperature display
flashes if the interior temperature noticeably deviates from the one set.
'''2VERRN6HLWH0LWWZRFK$XJXVW

EN
Technical description D15, D50, D52
14
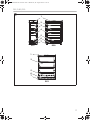
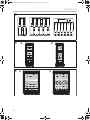
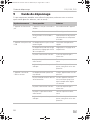
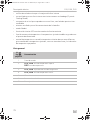
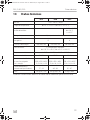
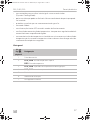
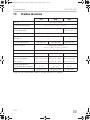
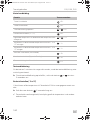
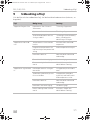
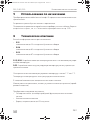
Overview:
No. in
fig. 1,
page 3
Label
1 Control panel
2
D15, D50: Upper temperature zone
D52: Temperature zone
3
D15, D50: Cooling area divider
4
D15, D50: Lower temperature zone
5Lock
6 Ventilation slots
7 Height-adjustable feet
'''2VERRN6HLWH0LWWZRFK$XJXVW

EN
D15, D50, D52 Technical description
15
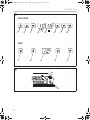
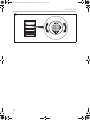
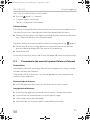
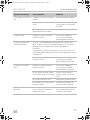
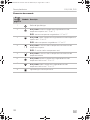
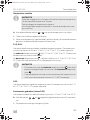
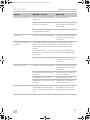
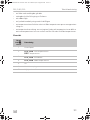
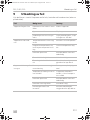
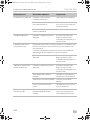
Controls:
No. in
fig. 2,
page 4
Symbol Description
1 On/off switch
2
D15, D50: Increases the set temperature of the upper
temperature zone by 1 °C or 1 °F
D52: Increases the set temperature by 1 °C or 1 °F
3
D15, D50: Reduces the set temperature of the upper
temperature zone by 1 °C or 1 °F
D52: Reduces the set temperature by 1 °C or 1 °F
4
D15, D50: Display indicates the current temperature of the upper
temperature zone
D52: Display indicates the current temperature
5
D15, D50: Display indicates the current temperature of the lower
temperature zone
6
D15, D50: Increases the set temperature of the upper
temperature zone by 1 °C or 1 °F
7
D15, D50: Reduces the set temperature of the lower temperature
zone by 1 °C or 1 °F
8 Switches the interior light on or off
'''2VERRN6HLWH0LWWZRFK$XJXVW

EN
Setting up and connecting the appliance D15, D50, D52
16
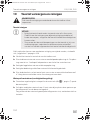
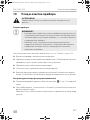
7 Setting up and connecting the
appliance
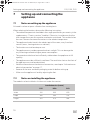
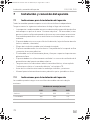
7.1 Notes on setting up the appliance
All models can be set up on a fitted or free-standing basis.
When selecting the location, observe the following instructions:
The ambient temperature should be in the range specified for your country in the
supplementary “Country versions” booklet. Otherwise, it could mean that the
inner temperature you set cannot be reached or maintained. This could also be
the case if there are extreme fluctuations in the ambient temperature
The appliance should stand in the coldest part of the room, away from heat
sources (ovens, heating devices or radiators).
The location must not be damp or wet.
The appliance must not be exposed to direct sunlight. This can damage the
acrylic coating and lead to higher power consumption.
The ground must be level and sufficiently stable to bear the appliance at full
capacity.
The appliance must be sufficiently ventilated. The ventilation slots on the front of
the appliance must not be obstructed.
Note the information on the electrical connection, see chapter “Information on
electrical connection” on page 17.
Remove all the inner and outer packaging materials before setting up.
Make sure the appliance is level by adjusting the feet.
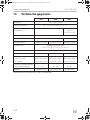
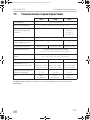
7.2 Notes on installing the appliance
The models can be installed in a kitchen unit under the counter.
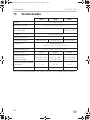
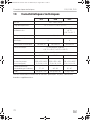
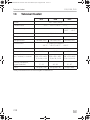
Installation size (in mm)
D15 D50 D52
Width 300 600 600
Depth 590 590 575
Height 870 870 865
'''2VERRN6HLWH0LWWZRFK$XJXVW

EN
D15, D50, D52 Setting up and connecting the appliance
17
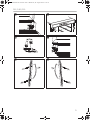
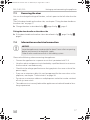
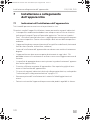
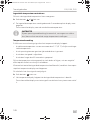
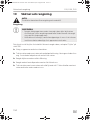
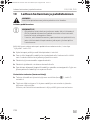
7.3 Reversing the door
You can also change the hinge of the door, so that it opens to the left rather than the
right.
Then fit the door handle on the other side, see chapter “Fitting the door handle on
the other side” on page 17.
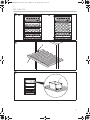
➤ Change the door as described in fig. 3, page 4 to fig. 7, page 5.
Fitting the door handle on the other side
➤ Fit the door handle on the other side as described in fig. 8, page 5 to fig. 9,
page 5.
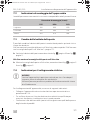
7.4 Information on electrical connection
A
Observe the following when connecting the appliance:
Connect the appliance to a separate circuit that is protected with 15 A.
Have the socket and power circuit checked by a qualified electrician to ensure
that the socket is earthed correctly.
Check that the voltage specification on the type plate is the same as that of the
power supply.
If you use an extension cable, this must be approved for the same values as the
appliance, see chapter “Technical data” on page 28.
Do not use an extension cable or a multiple power socket that can be switched
off with just one switch.
The cable must rest securely behind the appliance and not be allowed to lie or
hang unprotected.
NOTICE!
Leave the appliance to stand upright for about 2 hours after transporting,
before you connect it to the power supply.
Otherwise this could cause faults in the cooling system.
'''2VERRN6HLWH0LWWZRFK$XJXVW

EN
Using the appliance D15, D50, D52
18
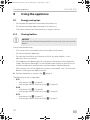
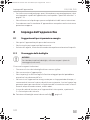
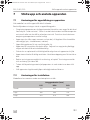
8 Using the appliance
8.1 Energy saving tips
Do not open the appliance more often than necessary.
Do not leave the door open for longer than necessary.
Clean dust and dirt from the condenser at regular intervals.
8.2 Storing bottles
A
Please note the following:
Only store wine in wine bottles that are closed and still sealed.
Do not overload the appliance.
Do not cover the shelves with aluminium foil or any other objects, as this
obstructs the air circulation.
If the appliance has been empty for a long time, disconnect it from the power
supply and clean it thoroughly. Leave the door open slightly to allow the air to
circulate and prevent condensation, mould or odours from building up.
After a power cut or if the appliance has been switched off, wait 3 to 5 minutes
before switching on the appliance again.
➤ Position the bottles as shown in fig. 0 , page 6.
The following variants are possible:
D15:
– with shelves (fig. a A, page 6)
– with storage shelves (accessory) (fig. a B, page 6)
D50:
– with shelves (fig. b A, page 6)
– with storage shelves (accessory) (fig. b B, page 6)
D52:
– with shelves (fig. c A, page 7)
– with storage shelves (accessory) (fig. c B, page 7)
NOTICE!
Be sure to use reinforced storage shelves (accessory) if you want to stack
bottles.
'''2VERRN6HLWH0LWWZRFK$XJXVW

EN
D15, D50, D52 Using the appliance
19
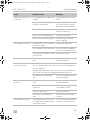
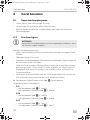
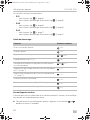
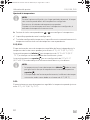
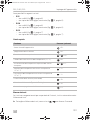
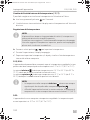
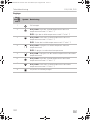
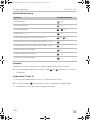
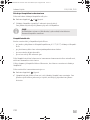
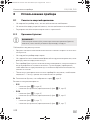
Brief instructions:
Key lock
If the buttons are not touched for 2 minutes or longer, the key lock is activated
automatically.
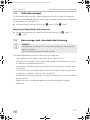
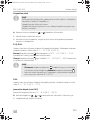
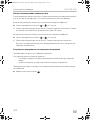
➤ To remove the key lock, press the and buttons for at least 5 seconds.
Sets the unit (°C or °F)
You can select whether the temperature is displayed in Fahrenheit or Celsius.
➤ To do this, press the button for 5 seconds.
✓ The unit is converted and the display shows the temperature in the other unit.
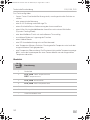
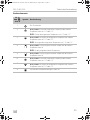
Function Press the button
Switch the appliance on
> 5 s
Switch the appliance off
> 5 s
Unlock the keypad
+ > 5 s
Changes the unit (°C/°F)
> 5 s
Indicates the set temperature of the corresponding
temperature zone
or < 1 s
Increase the temperature in the corresponding temperature
zone by 1 °C or 1 °F
< 1 s
Decreases the temperature in the corresponding
temperature zone by 1 °C or 1 °F
< 1 s
Switches off the fan (silent mode)
> 5 s
Switches on the fan (dynamic cooling)
> 5 s
Switches interior light on/off
< 1 s
'''2VERRN6HLWH0LWWZRFK$XJXVW

EN
Using the appliance D15, D50, D52
20
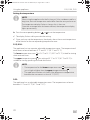
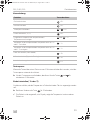
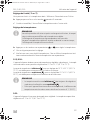
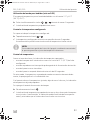
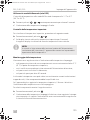
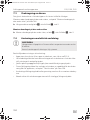
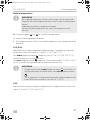
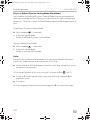
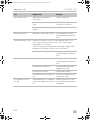
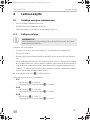
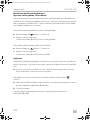
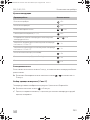
Setting the temperature
I
➤ Press the corresponding buttons or to set the temperature.
✓ The display flashes while you make the setting.
✓ Once you have set the temperature, the display shows the current temperature
of the interior for the corresponding temperature zone.
D15, D50:
The appliance has two separate adjustable temperature zones. The temperature of
each zone can be set between 5 °C and 22 °C (41 °F and 72 °F).
The lower temperature zone at 13 °C to 22 °C (55 °F to 72 °F) is ideal for storing
white and red wines.
The upper temperature zone at a setting of 5 °C to 13 °C (41 °F to 55 °F) is
suitable for storing sparkling wine and white wine.
I
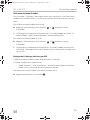
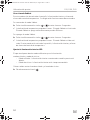
D52:
The appliance has an adjustable temperature zone. The temperature can be set
between 5 °C and 22 °C (41 °F and 72 °F).
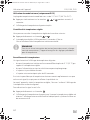
NOTE
When using the appliance for the first time or if it has not been used for a
long time, the inner temperature could differ from the one you have set.
The temperature display flashes as long as this is the case.
Once the set temperature has been reached, the temperature display
lights up constantly.
NOTE
The temperature for the lower temperature zone must always be
just as high or higher than the upper temperature zone .
The appliance functions at its best if the difference in temperature
between the two zones is at least 4 °C (39 °F).
'''2VERRN6HLWH0LWWZRFK$XJXVW
Sidan laddas...
Sidan laddas...
Sidan laddas...
Sidan laddas...
Sidan laddas...
Sidan laddas...
Sidan laddas...
Sidan laddas...
Sidan laddas...
Sidan laddas...
Sidan laddas...
Sidan laddas...
Sidan laddas...
Sidan laddas...
Sidan laddas...
Sidan laddas...
Sidan laddas...
Sidan laddas...
Sidan laddas...
Sidan laddas...
Sidan laddas...
Sidan laddas...
Sidan laddas...
Sidan laddas...
Sidan laddas...
Sidan laddas...
Sidan laddas...
Sidan laddas...
Sidan laddas...
Sidan laddas...
Sidan laddas...
Sidan laddas...
Sidan laddas...
Sidan laddas...
Sidan laddas...
Sidan laddas...
Sidan laddas...
Sidan laddas...
Sidan laddas...
Sidan laddas...
Sidan laddas...
Sidan laddas...
Sidan laddas...
Sidan laddas...
Sidan laddas...
Sidan laddas...
Sidan laddas...
Sidan laddas...
Sidan laddas...
Sidan laddas...
Sidan laddas...
Sidan laddas...
Sidan laddas...
Sidan laddas...
Sidan laddas...
Sidan laddas...
Sidan laddas...
Sidan laddas...
Sidan laddas...
Sidan laddas...
Sidan laddas...
Sidan laddas...
Sidan laddas...
Sidan laddas...
Sidan laddas...
Sidan laddas...
Sidan laddas...
Sidan laddas...
Sidan laddas...
Sidan laddas...
Sidan laddas...
Sidan laddas...
Sidan laddas...
Sidan laddas...
Sidan laddas...
Sidan laddas...
Sidan laddas...
Sidan laddas...
Sidan laddas...
Sidan laddas...
Sidan laddas...
Sidan laddas...
Sidan laddas...
Sidan laddas...
Sidan laddas...
Sidan laddas...
Sidan laddas...
Sidan laddas...
Sidan laddas...
Sidan laddas...
Sidan laddas...
Sidan laddas...
Sidan laddas...
Sidan laddas...
Sidan laddas...
Sidan laddas...
Sidan laddas...
Sidan laddas...
Sidan laddas...
Sidan laddas...
Sidan laddas...
Sidan laddas...
Sidan laddas...
Sidan laddas...
Sidan laddas...
Sidan laddas...
Sidan laddas...
Sidan laddas...
Sidan laddas...
Sidan laddas...
Sidan laddas...
Sidan laddas...
Sidan laddas...
Sidan laddas...
Sidan laddas...
Sidan laddas...
Sidan laddas...
Sidan laddas...
Sidan laddas...
Sidan laddas...
Sidan laddas...
Sidan laddas...
Sidan laddas...
Sidan laddas...
Sidan laddas...
Sidan laddas...
Sidan laddas...
Sidan laddas...
Sidan laddas...
Sidan laddas...
Sidan laddas...
Sidan laddas...
Sidan laddas...
Sidan laddas...
Sidan laddas...
Sidan laddas...
Sidan laddas...
Sidan laddas...
Sidan laddas...
Sidan laddas...
Sidan laddas...
Sidan laddas...
Sidan laddas...
Sidan laddas...
Sidan laddas...
Sidan laddas...
Sidan laddas...
Sidan laddas...
Sidan laddas...
Sidan laddas...
Sidan laddas...
Sidan laddas...
Sidan laddas...
Sidan laddas...
Sidan laddas...
Sidan laddas...
Sidan laddas...
Sidan laddas...
Sidan laddas...
Sidan laddas...
Sidan laddas...
Sidan laddas...
Sidan laddas...
Sidan laddas...
Sidan laddas...
Sidan laddas...
Sidan laddas...
Sidan laddas...
Sidan laddas...
Sidan laddas...
Sidan laddas...
Sidan laddas...
Sidan laddas...
Sidan laddas...
Sidan laddas...
Sidan laddas...
Sidan laddas...
Sidan laddas...
Sidan laddas...
Sidan laddas...
Sidan laddas...
Sidan laddas...
Sidan laddas...
Sidan laddas...
Sidan laddas...
Sidan laddas...
Sidan laddas...
Sidan laddas...
Sidan laddas...
Sidan laddas...
Sidan laddas...
Sidan laddas...
Sidan laddas...
Sidan laddas...
Sidan laddas...
Sidan laddas...
Sidan laddas...
Sidan laddas...
Sidan laddas...
Sidan laddas...
Sidan laddas...
Sidan laddas...
Sidan laddas...
Sidan laddas...
Sidan laddas...
Sidan laddas...
Sidan laddas...
Sidan laddas...
Sidan laddas...
Sidan laddas...
Sidan laddas...
Sidan laddas...
Sidan laddas...
Sidan laddas...
Sidan laddas...
Sidan laddas...
Sidan laddas...
Sidan laddas...
Sidan laddas...
Sidan laddas...
Sidan laddas...
Sidan laddas...
Sidan laddas...
Sidan laddas...
Sidan laddas...
Sidan laddas...
Sidan laddas...
Sidan laddas...
Sidan laddas...
Sidan laddas...
Sidan laddas...
Sidan laddas...
Sidan laddas...
Sidan laddas...
Sidan laddas...
Sidan laddas...
Sidan laddas...
Sidan laddas...
Sidan laddas...
Sidan laddas...
-
 1
1
-
 2
2
-
 3
3
-
 4
4
-
 5
5
-
 6
6
-
 7
7
-
 8
8
-
 9
9
-
 10
10
-
 11
11
-
 12
12
-
 13
13
-
 14
14
-
 15
15
-
 16
16
-
 17
17
-
 18
18
-
 19
19
-
 20
20
-
 21
21
-
 22
22
-
 23
23
-
 24
24
-
 25
25
-
 26
26
-
 27
27
-
 28
28
-
 29
29
-
 30
30
-
 31
31
-
 32
32
-
 33
33
-
 34
34
-
 35
35
-
 36
36
-
 37
37
-
 38
38
-
 39
39
-
 40
40
-
 41
41
-
 42
42
-
 43
43
-
 44
44
-
 45
45
-
 46
46
-
 47
47
-
 48
48
-
 49
49
-
 50
50
-
 51
51
-
 52
52
-
 53
53
-
 54
54
-
 55
55
-
 56
56
-
 57
57
-
 58
58
-
 59
59
-
 60
60
-
 61
61
-
 62
62
-
 63
63
-
 64
64
-
 65
65
-
 66
66
-
 67
67
-
 68
68
-
 69
69
-
 70
70
-
 71
71
-
 72
72
-
 73
73
-
 74
74
-
 75
75
-
 76
76
-
 77
77
-
 78
78
-
 79
79
-
 80
80
-
 81
81
-
 82
82
-
 83
83
-
 84
84
-
 85
85
-
 86
86
-
 87
87
-
 88
88
-
 89
89
-
 90
90
-
 91
91
-
 92
92
-
 93
93
-
 94
94
-
 95
95
-
 96
96
-
 97
97
-
 98
98
-
 99
99
-
 100
100
-
 101
101
-
 102
102
-
 103
103
-
 104
104
-
 105
105
-
 106
106
-
 107
107
-
 108
108
-
 109
109
-
 110
110
-
 111
111
-
 112
112
-
 113
113
-
 114
114
-
 115
115
-
 116
116
-
 117
117
-
 118
118
-
 119
119
-
 120
120
-
 121
121
-
 122
122
-
 123
123
-
 124
124
-
 125
125
-
 126
126
-
 127
127
-
 128
128
-
 129
129
-
 130
130
-
 131
131
-
 132
132
-
 133
133
-
 134
134
-
 135
135
-
 136
136
-
 137
137
-
 138
138
-
 139
139
-
 140
140
-
 141
141
-
 142
142
-
 143
143
-
 144
144
-
 145
145
-
 146
146
-
 147
147
-
 148
148
-
 149
149
-
 150
150
-
 151
151
-
 152
152
-
 153
153
-
 154
154
-
 155
155
-
 156
156
-
 157
157
-
 158
158
-
 159
159
-
 160
160
-
 161
161
-
 162
162
-
 163
163
-
 164
164
-
 165
165
-
 166
166
-
 167
167
-
 168
168
-
 169
169
-
 170
170
-
 171
171
-
 172
172
-
 173
173
-
 174
174
-
 175
175
-
 176
176
-
 177
177
-
 178
178
-
 179
179
-
 180
180
-
 181
181
-
 182
182
-
 183
183
-
 184
184
-
 185
185
-
 186
186
-
 187
187
-
 188
188
-
 189
189
-
 190
190
-
 191
191
-
 192
192
-
 193
193
-
 194
194
-
 195
195
-
 196
196
-
 197
197
-
 198
198
-
 199
199
-
 200
200
-
 201
201
-
 202
202
-
 203
203
-
 204
204
-
 205
205
-
 206
206
-
 207
207
-
 208
208
-
 209
209
-
 210
210
-
 211
211
-
 212
212
-
 213
213
-
 214
214
-
 215
215
-
 216
216
-
 217
217
-
 218
218
-
 219
219
-
 220
220
-
 221
221
-
 222
222
-
 223
223
-
 224
224
-
 225
225
-
 226
226
-
 227
227
-
 228
228
-
 229
229
-
 230
230
-
 231
231
-
 232
232
-
 233
233
-
 234
234
-
 235
235
-
 236
236
-
 237
237
-
 238
238
-
 239
239
-
 240
240
-
 241
241
-
 242
242
-
 243
243
-
 244
244
-
 245
245
-
 246
246
-
 247
247
-
 248
248
-
 249
249
-
 250
250
-
 251
251
-
 252
252
-
 253
253
-
 254
254
-
 255
255
-
 256
256
-
 257
257
-
 258
258
-
 259
259
-
 260
260


Dometic D15, D50, D52 Bruksanvisningar
- Kategori
- Drick kylare
- Typ
- Bruksanvisningar
- Denna manual är också lämplig för
på andra språk
- italiano: Dometic D15, D50, D52 Istruzioni per l'uso
- Deutsch: Dometic D15, D50, D52 Bedienungsanleitung
- português: Dometic D15, D50, D52 Instruções de operação
- français: Dometic D15, D50, D52 Mode d'emploi
- dansk: Dometic D15, D50, D52 Betjeningsvejledning
- Nederlands: Dometic D15, D50, D52 Handleiding
Relaterade papper
-
Dometic B29G, B68G, B162S, B195S, C20G, C50G, C101G, C125G, E7FG, E16FG, E18FGB, E28FG, E40FGD, E45FG, E49FGB, E91FG, E115FG Bruksanvisningar
-
-
Dometic B29G, B68G, B162S, B195S, C20G, C50G, C101G, C125G, E7FG, E16FG, E18FGB, E28FG, E40FGD, E45FG, E49FGB, E91FG, E115FG Bruksanvisningar
-
-
-
-
-
-
-
Dometic Coolair SPX1200IC Bruksanvisning