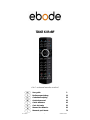
Ebode TAKE 6 IR plus RF Användarmanual
- Kategori
- Fjärrkontroller
- Typ
- Användarmanual
Denna manual är också lämplig för

16-10-2009 1 033000=15301
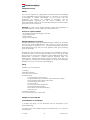
TAKE 6 IR+RF
6 in 1 universal remote control
User guide 3
Bedienungsanleitung 13
Gebruiksaanwijzing 23
Användermanual 33
Guide utilisateur 43
Guía del usario 53
Manual do utilizador 63
Manuale per l’utente 73

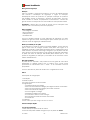
16-10-2009 2 033000=15301
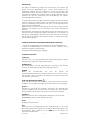
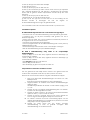
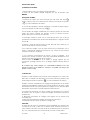
TAKE 6 IR+RF
UNIVERSAL REMOTE 6 in1
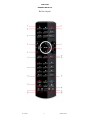
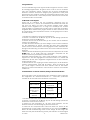
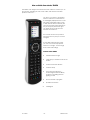
Button layout

16-10-2009 3 033000=15301
User Guide
General Security Note
Attention: For carefree and safe use of this product, please read this manual
and safety information carefully and follow the instructions. Technical
manipulation of the product or any changes to the product are forbidden,
due to security and approval issues. Please take care to set up the device
correctly - consult your user guide. Children should use the device only
under adult supervision.
Important: the TAKE 6 must be used according the instructions in this manual
and is not suitable for other purposes.
Avoid the following
• strong mechanical wear and tear
• high temperature
• strong vibrations
• high humidity
Please also respect the additional security notes in the various user guide
chapters. To ensure correct set up please read the manual and security
notes carefully.
Battery install and change
The device may only be used with CR02032 batteries - never try to connect
to another power supply. When inserting batteries be sure the right polarity is
used. Remove the batteries when the device is not used for a longer period.
Make sure that the batteries are not short circuited and are not disposed in
fire (danger of explosion). Batteries do not belong in children hands. Don’t
let batteries lay around openly – they might be swallowed by children or
animals. If this happens see a doctor immediately.
Disposal of batteries:
Batteries are special waste and do not belong in general household waste
disposal. Leaking or damaged batteries can upon contact with skin cause
burning or acid damage – if necessary use suitable gloves. Please dispose of
batteries in accordance with local bylaws.
Contents
Quick Start Guide
1. Introduction
2. Insert the batteries
3. Function of the remote’s buttons
4. Programming
4.1. Manual code entry
4.2. Automatic code search for some well-known brands
4.3. Automatic code search for all brands
4.4. Manual code search
4.5 Learning codes
4.6. Identifying codes found
4.7 Volume Control Punch Through
4.8 X10 Home Automation Control
4.9 The FAV Key
5. Troubleshooting
6. Tips & Tricks about learning IR codes to a remote
Quick start guide
a) Put the batteries in
1. Open the cover on the back of the TAKE 6
2. Insert the two CR2032 batteries. Make sure the batteries are NEW.

16-10-2009 4 033000=15301
b) Program your TAKE 6
1. Turn on the equipment that you wish to control ( TV, DVR, DVD, STB, AUX/
, AUDIO). Please note that with the TAKE 6 you can either select to
control an appliance or
, not a combination of these two.
2. The AUX key allows you to program and control any equipment such as
TV, DVR, DVD, CD, STB,
.
3. Take the code book supplied with the TAKE 6 and find the brand of the
equipment you wish to control. E.g. if you have a Thomson TV look for
Thomson under the TV section.
4. Press and hold on the key marked "S" (8) until the LED (2) stays
permanently on. This takes about 3 seconds. Release the "S key".
5. Press and release the TV, DVR, DVD, STB, AUX, AUDIO, mode key (4), in
accordance with the appliance you wish to control.
6. From the code book take the first number corresponding to your
equipment and enter the number by pressing the 0-9 key pad (14). Each
time you press a key the LED (2) will flash.
7. If the number is correctly entered the LED will turn off. If the number is
incorrect then the red LED will flash fast. If incorrect you will need to restart at
4.
Press the POWER key (1) . If your equipment switches off you have found the
right code. If it does not switch off, you will need to restart from 4.
Sometimes there are several codes that have similar features. If you find that
your TAKE 6 does not work for some functions, you may need to try another
code.
1. Introduction
The TAKE 6 is designed to control up to 6 devices: TV, DVR, DVD, STB, AUDIO
or any other device under AUX mode key (Please note that you can either
select to control an appliance or
, not a combination of these two.).
The TAKE 6 contains a library of codes that are preprogrammed into the
remote control. This library covers nearly all the audio video products on the
market today. The codes have to be programmed once before use. This
can be done in different ways:
a. Manual entry of one of the codes displayed under the related brand and
type of equipment in the attached code book (see 4.1)
b. Automatic code search for some well-known brands (4.2)
c. Automatic code search for all brands (4.3)
d. Manual search through all codes (4.4)
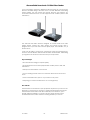
X10 IR Link
The IR Link (available separately) gives you the possibility to control all your
audio and video equipment with the TAKE 6 anywhere in your home. The
TAKE 6 transmits an RF signal to the IR Link Receiver module, which then
transforms this signal into an IR signal, which is sent to your
device.
Here are some examples of the uses of the IR Link:
• Operate the DVD and satellite receiver from the bedroom, without having
to lay any extra cables.
• Turn up the volume of the radio in the living room while you are in the
kitchen.
The RF signal travels through walls, ceilings and closet doors. Simply connect
the receiver to a wall socket within sight of your equipment: it could not be
easier. Ask your dealer about the possibilities.

16-10-2009 5 033000=15301
X10 Home Automation: control all electrical appliances with one remote
control
The TAKE 6 Remote has two transmitters: an infrared (IR) transmitter and a
radio frequency (RF) transmitter. This allows you to operate practically
anything. You can operate your TV, video etc. with the infrared (IR)
technology. The X10 radio frequency (RF) technology makes it possible to
operate lights and appliances from anywhere in the home.
Here are some examples of the uses of the X10 Home Automation feature:
• Dim the lights and switch them on and off while watching TV.
• Turn the coffee machine on from your bedroom when you wake up in the
morning.
• Turn your lights on at night to scare off intruders when you hear noises.
• Switch on your electric blanket before the movie ends, so you can enjoy a
warm bed once the movie is finished.
• Switch everything off with a single press of a button when you go to bed.
2. Insert the batteries (always use NEW CR2032 batteries)
1. Open the cover on the back of the TAKE 6 Remote.
2. Insert 2 CR2032 batteries, verify that they are placed correctly with the +
on the battery in the same position as marked inside the battery
compartment.
3. Close the battery compartment carefully.
3. Function of the remote’s buttons
[1] POWER (On/Off)
Allows you to switch off the last selected appliance. Some appliances can
also be switched on with this button.
[2] LED indicator
The indicator light flashes when the remote is operating or lights continuously
while you are programming the remote.
[3] MUTE
Allows you to turn on/off the sound. You can control the "Mute" function of
your TV even when you are in DVR, DVD or STB mode. No need to select the
TV mode.
[4] TV, DVR, DVD, STB, AUX/
, AUDIO
These keys allow you to select the appliance you wish to control.
[5] VOLUME +/-
Allows you to control the volume. You can control the volume of your TV
even when you are in DVR, DVD or STB mode. No need to select the TV
mode.
[6] CHAN +/- or PROG +/-
Select the next or the previous channel of your TV or STB.
In DVD mode: next or previous chapter.
[7] OK Confirms menu selection.
[8] S Allows you to program your remote before the first use. It also allows you
to access to secondary functions of certain A/V appliances (Shift). Press the
S key followed by the function key you desire.
[9] Navigation Keys these buttons allow you to navigate into the menu of the
selected device (if the device you selected has such a menu)
[10] Favorite button
Program this button to remember your two most often used buttons
[11] Menu Menu On
[12] Exit Menu OFF

16-10-2009 6 033000=15301
[13] -/--
In connection with the numeric keys, this button allows you with some
equipment to select directly channels higher than 9. If you are in
programming mode - automatic code search - you can confirm the code.
[14] Numeric keys 0 – 9
Work the same way as your original remote.
[15] REW, PLAY, FWD, REC, STOP, PAUSE
REW (rewind)
In DVR, DVD or CD mode: This button works the same way as in your original
remote.
IN TV mode: Coloured key (Red), control of videotext or special equipment
functions.
PLAY
In DVR, DVD or CD mode: This button works the same way as in your original
remote.
IN TV mode: Coloured key (Yellow), control of fasttext or special equipment
functions.
FF (fast forward)
In DVR, DVD or CD mode: This button works the same way as in your original
remote.
IN TV mode: Coloured key (Blue), control of fasttext or special equipment
functions.
REC (record)
This key works the same way as the one on your original remote for your DVR.
In order to avoid a mistake you have to press this key twice to activate this
feature.
STOP
In DVR, DVD or CD mode: This button works the same way as in your original
remote.
IN TV mode: Coloured key (Green), control of fasttext or special equipment
functions.
PAUSE
In DVR, DVD or CD mode: This button works the same way as in your original
remote.
IN TV mode: Coloured key (Magenta), control of fasttext or special
equipment functions.
[16] AV Selection of an external source (e.g. SCART input).
[17] INFO Displays on screen information of the selected appliance (when
available).
[18] Teletext
Teletext OFF: Stop Teletext / Fasttext.
[19] Teletext
Teletext Hold: Stop page change in Teletext / Fasttext mode.
[20] LEARN
Programming button for learning the functions of your original remote
control.
See chapter 4.5, Learning codes, for information about programming these
codes.
[21] Teletext
Teletext ON: Start/stop Teletext / Fasttext.
4. Programming
To make your remote suitable for your own equipment, you have to program
it once. You can do this by entering a code, related to the brand and type
of equipment you want to control. You can program any equipment under
any MODE key. For example, if you have three videorecorders, you can
program videorecorder 1 under DVR, videorecorder 2 under AUX and
videorecorder 3 under AUDIO.

16-10-2009 7 033000=15301
4.1. Manual code entry
Take your code book and search for the list matching the equipment you
are looking for, e.g. TV or DVR. Next, find the relevant brand (e.g. Sony). Now
you will find one or more 4-digit codes. If there is more than one code, it
depends on your equipment which code is correct. Generally, the codes
are displayed in order of age of the equipment. Older equipment first,
younger equipment at the end. Sometimes you will have to try several codes
before you find the right code for your equipment.
1. Make sure your equipment is switched on (for example TV).
2. Press and hold the S (8) key until the LED indicator lights continuously.
Release the S key.
3. Press and release the mode key (4) of the device you want to control (for
example TV).
4. Enter the 4-digit code from the Code Book by using the key pad (14). The
LED (2) turns off after the last digit is entered. If you entered a wrong code
the LED blinks for 3 seconds and then goes off. You have to repeat from step
2.
5. Point the remote in the direction of your TV and press the POWER button
(1). Your device should turn off. Check other functions (for example for a
DVR FF or REW, etc.). If certain functions are not responding, this indicates
that the entered code is not the correct one. In that case repeat the above
procedure with the next corresponding code of your brand.
6. Repeat this procedure from step 1 for the other equipment you want to
control (DVR, DVD, STB,...). If your equipment (TV, STB, etc....) does not
respond, try the other codes for your brand. If it still doesn’t respond, try the
manual code search method (4.4 Manual code search).
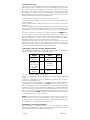
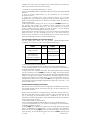
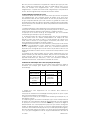
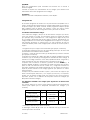
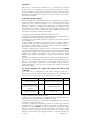
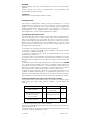
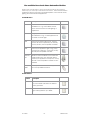
4.2. Automatic code search for some well-known brands
If your brand is listed hereafter, you can use the brand search method (faster
than the "manual" and the "automatic code search").
BRAND CODE
BRAND CODE
Philips /
Radiola
1
Telefunken / Saba
/ Normende
4
Akai /
Daewoo / JVC
/ Panasonic /
Sharp / Sony /
Toshiba
2
Grundig /
Blaupunkt
5
Brandt /
Thomson
3 Nokia / ITT 6
1. Turn on the device you want to control.
2. Press and hold S (8) until the LED indicator (2) lights steadily. Release S
button.
3. Press the mode button (4) that matches the equipment you wish to
control. The LED (2) blinks once.
4. Enter the code corresponding to your brand, point the TAKE 6 Remote in
the direction of your equipment, press CHAN+ (6) once only. Continue to
point the TAKE 6 Remote at your equipment until the equipment changes
Channel (the remote control sends an IR signal every second. Please wait
until your equipment reacts). When your equipment does react, press on the
key -/-- (13) to confirm. If you accidentally miss the code, you can stop the
autosearch by pressing CHAN- (6) and by repeatedly pressing this key return
to the right code. Press -/-- (13) to confirm.
Remark: if some functions of your equipment don’t work, you need to try
another code for your brand. The search function starts after the last
confirmed code. For example, if it was 030, the search function starts at 031,
and it will keep on trying until the last possible code.
4.3 Automatic code search for all brands
When searching an unknown code, you can step through the library
automatically (AutoSearch). When your equipment responds, you can stop
the searching process and store the code you found.

16-10-2009 8 033000=15301
Note: as you can dedicate any appliance (TV, DVD, STB...) to DVR, DVD, CD,
STB, AUDIO or AUX key, you need first to enter any 4-digit code for the kind of
appliance you wish to control (found in the code book), i.e.: If you want to
program a STB under the DVR key, enter ANY STB code found in the code
book and then follow the steps below:
1. Turn on the device you want to control.
2. Press and hold S (8) until the LED indicator (2) lights steadily. Release S
button.
3. Press the mode button (4) that matches the equipment you wish to
control. The LED (2) blinks once.
4. Press CHAN+ (6) once. After a few seconds the remote starts stepping
through the code library (fast search, 1 code per second). When the device
responds, you can press CHAN+ (6) to switch to slow search (1 code per 3
seconds). You can step back by pressing CHAN- (6) (you can step forward
by pressing CHAN+ (6) in case you went too far back). As soon as the device
responds again, press the -/-- key (13) to store the code you found.
4.4. Manual code search
Note: as you can dedicate any appliance TV, DVR, DVD, STB, AUDIO, AUX,
keys, you first need to enter any 4-digit code for the kind of appliance you
wish to control (found in the code book), i.e.: If you want to program a STB
under the AUX key, enter ANY STB code found in the code book and then
follow the steps below:
1. Make sure your equipment is switched on.
2. Press and hold S (8) until the LED indicator lights steadily. Release S
3. Press the mode key (4) that matches the equipment you want to control
(for example TV).
4. Press CHAN+ (6) repeatedly until the channel changes. If you step past the
correct code use CHAN- (6) to go back to the right code.
5. When the equipment you want to control reacts, press -/-- (13) to confirm
the code.
Note: If your equipment doesn't have CHAN+ you can use PLAY (DVR or
DVD) (15) or POWER (1) key. The search starts after the last registered code. If
that was 030, the search starts at 031 until the last possible code and then
goes from 000 to 029. Note: if certain functions of your equipment can’t be
controlled you will have to find a different code for your brand.
4.5 Learning codes
Your TAKE 6 Remote contains the codes for most TVs, videos etc. in its code
library. If a certain device is not in this library, you can learn the codes for
your existing remote control. The library may also contain a code that works
for your device, but which misses a few function buttons. You can then
select to only learn those buttons (maximum of 150 buttons).
Master clear
You can use the MASTER CLEAR method to clear the learning memory. It is
advised to execute a MASTER CLEAR before you start learning any
commands.
1. Keep the SETUP (8) pressed until the LED stays lit. Release the SETUP (8)
button.
2. Press the LEARN (20) button twice. The LED will flash every time you press
the button.
3. Press SETUP (8). The LED will extinguish after a few seconds.
Notes:
• Execute a Master Clear before you start learning (see the method above).
• Make sure both remote controls have full batteries before you start
learning codes.
• Make sure you do not move the remote controls when pressing the
buttons.
• You cannot learn any commands for the following buttons: Learn, Setup,
FAV, Source buttons TV, VCR, CBL, etc, Home Control.
• Experiment by learning two or three buttons first (to test compatibility),
before you learn all the buttons of your original remote control.
• When the memory is full, the LED will flash for 3 seconds. You cannot learn
any codes when the memory is full. You can, however, erase a mode with
codes you stored. You can only erase a full mode.

16-10-2009 9 033000=15301
• By keeping the buttons for the existing remote control pressed for a shorter
period, there will be more memory space left for learning codes on the TAKE
6 remote control. This also diminishes the chance that the remote control
learns the wrong codes.
• Experiment with the distance between the remote controls if you have
problems learning the codes.
• Some remote controls do not have the infrared LED in the centre. Try
experimenting by slightly moving the remote controls (sideways or
up/down). Tube lighting and bright sunlight can affect the procedure.
• You can only learn the codes for one original remote control per mode,
e.g. the codes for your DVD remote control under the DVD button. With
some combi devices (e.g. a TV with built-in DVD player) you first have to
learn the TV functions in TV mode and then the DVD functions in DVD mode.
Learning the commands
1. Point your existing remote control at the TAKE 6 Remote (front to front).
Keep a distance of 2,5 cm between the remote controls.
2. Press the SETUP (8) button until the LED stays lit. Release the SETUP (8)
button.
3. Press the Mode button (TV, AUDIO, SAT, etc.) for the device you want to
learn. The LED will flash once.
4. Press the LEARN (20) button. The LED will flash once.
5. Press the button on the TAKE 6 remote you want to store the new
command under. The LED will blink once.
6. Depending on the type of remote control you have, you can use one of
two methods:
a. Press the button on the existing remote control you want to learn.
Keep this button pressed until the LED on the TAKE 6 Remote
extinguishes. If the LED does not extinguish, but starts flashing, you
need to use method B. (If youhave just tried method A and want to
try method B, first repeat step 5).
b. Press the button on the existing remote control you want to learn.
Keep this button pressed as long as you would when using the
original remote control.
7. Repeat steps 5 and 6 for every button you want to learn.
8. When you have finished learning the buttons, press SETUP (8)
Erasing the commands learned per mode to clear memory space
You can erase the commands learned and saved for each separate
function (TV, VCR, etc.):
1. Keep the SETUP (8) button pressed until the LED stays lit. Release the SETUP
(8) button.
2. Press the Mode button of your choice (TV, DVR, etc.). The LED will flash
once.
3. Press the LEARN (20) button twice.
4. Press SETUP (8). The LED will extinguish after a few seconds.
5. All commands learned and saved for the selected function have now
been erased.
4.6. Identifying codes found
If you don’t know the code (for example because you found the code by
autosearch) you can identify it as described below:
1. Press and hold S (8) until the LED indicator (2) lights steadily. Release S.
2. Press the mode key (4) for the equipment you want to identify (DVR, DVD,
STB, AUDIO or AUX). The LED blinks once.
3. Press again S. The LED blinks once.
4. To identify the first digit press each number button from 0 - 9 (14) until the
LED blinks. The number you pressed is the first digit of the code.
5. Press each number key from 0 - 9 as above to find the second digit.
6. Press each number key from 0 - 9 as above to find the third digit.
7. Press each number key from 0 - 9 as above to find the fourth digit. When
the fourth digit has been found the LED will go off.
4.7 Volume Control Punch Through
The TAKE 6 remote control allows you to select which Mode controls your
volume/mute buttons. The volume buttons (5) and Mute (3) can be set for
individual control by EACH device Mode or can be set for ALL device Modes
to punch-through volume control to one specific single device Mode. The

16-10-2009 10 033000=15301
remote is initially set (Factory Default) for control by each specific device
Mode.
Adjustment of ALL volume controls to one mode.
You can allocate volume control to one of the modes of the remote control
providing that volume control exists on the corresponding device (e.g.
control of TV sound in DVR, DVD, etc... mode).
- Hold down the S (8) key until the LED remains lit.
- Release the S (8) key.
- Press and hold the MUTE (3) key until the LED flashes once, then release the
MUTE key.
- Press the required mode key, e.g. TV, corresponding to the device that will
control the VOL and MUTE buttons for ALL the device Modes.
- Press and release the MUTE (3) key and the LED turns off.
Adjustment of the volume controls for EACH mode.
You can allocate volume control to be individual for each mode selected,
providing that volume control exists on the corresponding device (e.g.
control of the television set sound in TV mode, the control of the sound of the
STB receiver in STB mode, ...).
- Hold down the S (8) key until the LED remains lit.
- Release the S (8) key.
- Press and hold the MUTE (3) key until the LED flashes once, then release the
MUTE key.
- Press the required mode key, e.g. DVD, corresponding to the device that
will control its own VOL and MUTE keys.
- Press and release the VOL - (5) key once.
- Press and release the MUTE (3) key once and the LED turns off.
4.8 X10 Home Automation Control
The TAKE 6 remote control allows you to command all electric appliances
you have in your house. Here are some examples that you can do with your
TAKE 6 remote using X10:
• Switch on/off, dim lights while you watch TV.
• Switch on the lights at night to frighten intruders when you detect
something suspicious
• Switch on your electric blanket before the film ends to have it warm when
you go to sleep
You can control the X10 Home Automation Modules as follows:
1. Press the X10
button .
2. Use the numerical keys to select the Unit Code of the Module of your
choice (1-digit codes do not have to preceded by a ‘0’).
3. Press the button of the function you want to execute (see overview
below).
Home Automation X10 functions:
On: CHANNEL +
Off: CHANNEL -
Brighter: VOLUME +
Dim: VOLUME -
All lights on: Power
All units off: Mute
Changing the X10 House Code
The TAKE 6 Remote is set to House Code A by default. In most cases you do
not need to change this setting, unless another X10 system in your area
causes interference.
1. Press the SETUP button until the LED stays lit. Release the SETUP button.
2. Press the numerical key(s) for the House Code selected (1=A, 2=B, ......
16=P).
3. Press the -/-- (13) button to confirm the House Code. The LED will
extinguish.
Note: The House Code selected must be the same as the House Code used
by your Transceiver Module.
Home Control

16-10-2009 11 033000=15301
If you want to control your lights and appliances you will also need, besides
the TAKE 6 Remote, a X10 compatible Home Automation Transceiver
Module. This can be plugged into any electrical socket. Use a Transceiver
Module (available separately) and connect your table lamp or other
electrical appliance. Switch on/off: control everything with the TAKE 6. The
Transceiver Module converts the RF signals of the TAKE 6 into an X10 signal
that is transferred via the mains power line. All other X10 modules that are
connected to your mains, are also operate able through the TAKE 6 Remote.
Contact your retailer for additional information.
4.9 The FAV key
The FAV key allows you to program two specific channels and switch
between them with a single key-press. The two channels can be up to 4
key-presses each and must be a minimum of 2. The first keypress must be a
Mode key e.g. TV with the following keys being up to 3 digits. To program
the FAV key :-
a. Press and hold the S (8) button until the LED remains on (occurring after
approximately 2-3 seconds).
b. Release S (8) button.
c. Press and release the FAV (10) key.
d. Press and release desired Mode (4) key (e.g. TV) followed by the 1, 2 or 3
digit keys in the correct order for the first channel selection. The LED will flash
for each keypress.
e. Press and release the FAV (10) key.
f. Repeat Step "d" for the second device channel selection.
g. Press and release the FAV (10) key to store the channel selections. The LED
will turn off and remote returns to normal.
To select between the two channels, press and release the FAV key.
5. Troubleshooting
The remote doesn’t work or loses codes entered
• Confirm with your original remote that the equipment works correctly.
• Make sure that you have pressed the corresponding mode key of the
equipment or device that you want to control.
• If the listed code does not work, try the AUTOSEARCH method or enter the
next code of that brand.
• Check that the batteries have the correct polarity position.
• The programming of the remote requires 2 CR2032 batteries (new).
• If the LED is lit permanently, in general it will be necessary to replace the
batteries.
• Set the remote back to factory default.
How to set the TAKE 6 Remote back to factory default
• Press and hold S (8) until the LED indicator (2) lights steadily. Release S.
• Press and hold S (8) until the LED indicator (2) lights steadily. Release S.
• Press and release the 0 key (14) once.
• Press and release the S key (8).
• The LED (2) turns off after few seconds.

16-10-2009 12 033000=15301
6. Tips & Tricks about learning IR codes to a remote
When learning IR codes always test the IR codes directly during the learning
process.
In this way you do not need to learn all the codes over and over again.
Please try the following steps when the learned IR code fail to work.
1. Make sure the original remote you are learning the code from has
a fresh set of batteries. (preferably Duracell or Energizers)
2. Increase/decrease the distance between the two remotes when
learning. (original and URC)
Try for example to double the distance, up to 4 feet is possible.
3. For ‘normal’ short burst codes, try to ‘tap’ the button instead of
press and holding it.
4. For ‘Continuous’ codes, try the ‘flicker’ technique – rapidly tap the
button while learning. (approximately 7x per second or faster.)
5. Try the ‘Swoop’ method, Start form 2’ away and then ‘swoop’ the
remote towards the learning remote.
6. Try the ‘Flasher’ method. Hold an opaque object in front of the
remote and remove it then quickly replace it.
7. Try learning the codes to another learning remote first, and then
from that remote to the required one.

16-10-2009 13 033000=15301
Bedienungsanleitung
Allgemeine Sicherheitshinweise
Achtung:
Bitte lesen Sie diese Bedienungsanleitung und Sicherheitshinweise für eine
problemlose und sichere Benutzung dieses Produktes und befolgen Sie die
Anleitung. Technische Manipulationen und Veränderungen dieses Produktes
sind aus Sicherheitsgründen und Zulassungen verboten. Bitte verwenden Sie
das Gerät korrekt – beachten Sie die Bedienungsanleitung. Kinder sollten
dieses Gerät nur unter Aufsicht von Erwachsenen benutzen.
Wichtig: Das TAKE 6 muss gemäß dieser Bedienungsanleitung benutzt
werden, für andere Einsatzzwecke ist das TAKE 6 nicht geeignet.
Vermeiden Sie folgendes:
• große Belastung und Zug
• hohe Temperatur
• starke Erschütterung
• hohe Luftfeuchtigkeit
Bitte beachten Sie auch die zusätzlichen Sicherheitsanmerkungen in den
verschiedenen Kapiteln dieser Bedienungsanleitung. Für eine korrekte
Funktion lesen Sie bitte diese Bedienungsanleitung und Sicherheitshinweise
genau durch.
Einsetzen und Wechsel der Batterie:
Dieses Gerät funktioniert nur mit CR02032 Batterien – bitte verwenden Sie
keine andere Stromversorgung. Beim Einsetzen der Batterien beachten Sie
bitte die korrekte Polarität. Entfernen Sie die Batterien, wenn Sie das Gerät
für eine längere Zeit nicht benutzen. Stellen Sie bitte sicher, dass die Batterien
nicht kurzgeschlossen und nicht dem Feuer ausgesetzt werden
(Explosionsgefahr). Batterien gehören nicht in die Hände von Kindern. Lassen
Sie Batterien nicht offen herumliegen – sie könnten von Kindern oder Tieren
geschluckt. Sollte dies passieren, suchen Sie bitte sofort einen Arzt auf.
Entsorgung von Batterien:
Batterien sind Sondermüll und gehören nicht in den normalen Hausmüll.
Leckende oder beschädigte Batterien können bei Hautkontakt Brand- oder
Säureschäden hervorrufen – wenn notwendig verwenden Sie bitte
geeignete Handschuhe.
Bitte entsorgen Sie die Batterien gemäß den örtlichen Bestimmungen.
Inhaltsverzeichnis
Anleitung zum Schnellstart
1. Einführung
2. Einlegen der Batterien
3. Funktionen der Tasten
4. Programmieren
4.1 Manuelle Code-Eingabe
4.2 Automatische Codesuche einzelner, häufig vorkommender
Marken
4.3 Automatische Codesuche alle Marken
4.4 Manuelle Codesuche
4.5 Kodes einlernen
4.6 Gespeicherten Code lesen
4.7 Lautstärken-Steuerung
4.8 X10 Bedienung
4.9 Die FAV Taste
5. Fehlersuche
Anleitung zum Schnellstart
a) Einlegen der Batterien
1. Öffnen Sie die Abdeckung auf der Rückseite der TAKE 6.
2. Legen Sie 2 Batterien (CR2032) ein. Vergewissern Sie sich, dass die
Batterien die gleiche Marke haben und dass sie NEU sind.

16-10-2009 14 033000=15301
b) Programmieren der TAKE 6
1. Schalten Sie das Gerät, das Sie bedienen möchten ein (TV,
Videorecorder, AUX/
usw.) Hinweis: mit der TAKE 6 können Sie ein Gerät
oder
bedienen, nicht eine Kombination dieser beiden.
2. Nehmen Sie das mitgelieferte Code Buch zur Hand und suchen Sie die
entsprechende Marke des zu bedienenden Gerätes. Wenn Sie z. B. einen
Thomson Fernseher haben, sehen Sie unter Thomson im TV Abschnitt nach.
3. Drücken Sie die " S " (8) Taste bis die LED Anzeige ununterbrochen
aufleuchtet. Das dauert ungefähr 3 Sekunden.
4. Drücken Sie TV, DVR, DVD, STB, AUX/
, AUDIO (4) je nachdem welches
Gerät Sie bedienen möchten.
5. Entnehmen Sie dem Code Buch die erste Nummer entsprechend der
Marke Ihres Gerätes und geben Sie die Nummer auf dem Tastenfeld (0 - 9)
ein (14). Bei jedem Drücken einer Taste leuchtet die rote LED (2) Anzeige auf.
6. Wenn die Nummer richtig eingegeben ist, schaltet die LED Anzeige aus.
Wenn die Nummer falsch eingegeben wurde, leuchtet die LED Anzeige
schnell. Wenn Sie die Nummer falsch eingegeben haben, müssen Sie wieder
bei 1. anfangen.
7. Drücken Sie POWER (1). Wenn Ihr Gerät sich abschaltet haben Sie den
richtigen Code gefunden. Falls es nicht abschaltet, müssen wieder mit 3.
beginnen.
Manchmal gibt es einige Codes, die ähnliche Funktionen haben. Wenn Sie
feststellen, dass Ihre TAKE 6 Fernbedienung einige Funktionen nicht ausführt,
müssen Sie nach einem anderen Code suchen.
1. Einführung
Die TAKE 6 Fernbedienung wurde konstruiert um bis zu 6 Geräte zu steuern:
TV, Videorecorder, DVD, STB oder ein zusätzliches Gerät mit AUX-
Modusschlüssel. Hinweis: mit der TAKE 6 können Sie ein Gerät oder
bedienen, nicht eine Kombination dieser beiden.
Die TAKE 6 Fernbedienung enthält eine große Anzahl vorprogrammierter
Codes. Diese Codebibliothek deckt nahezu alle Audio-/Video-Produkte des
aktuellen Marktes ab und muss einmalig, vor Ingebrauchnahme,
programmiert werden. Das ist auf verschiedenerlei Weise möglich:
a. Manuelle Eingabe eines Codes, welcher im mitgelieferten Codebuch bei
der zutreffenden Marke und dem Gerätetype (siehe 4.1) aufgeführt ist.
b. Sog. Autosearch für einzelne, häufig vorkommende Marken (siehe 4.2)
c. Autosearch für übrige Marken (siehe 4.3)
d. Manuell alle Codes durchsuchen (siehe 4.4)
X10 IR Link
Die IR Link (optional erhältlich) ermöglicht Ihnen, Ihre gesamten Audio- und
Videogeräte mit der TAKE 6, egal wo im Haus zu bedienen. Die TAKE 6
sendet ein RF Signal zum IR Link Modul, welches es dann in ein IR Signal
umwandelt, das zu Ihren Geräten gesendet wird.
Einige Anwendungsbeispiele des IR Link:
• Bedienen Sie den DVD-Player oder Satellitenempfänger vom Schlafzimmer
aus, ohne extra
Kabel verlegen zu müssen.
• Stellen Sie den Ton Ihres Radios im Wohnzimmer lauter, während Sie in der
Küche sind.
• Bedienen Sie Ihre Audio-/Videogeräte die sich in einem verschlossenen
Schrank befinden.
Das Signal geht durch Decken, Wände und Schranktüren hindurch. Den
Empfänger einfach in eine Steckdose geben und in Sichtweite Ihrer Geräte
aufstellen: bequemer geht’s nicht.

16-10-2009 15 033000=15301
X10 Steuerung
Die TAKE 6 Fernbedienung verfügt über zwei Sender: einen Infrarot (IR)
Sender und einen Radiofrequenz (RF) Sender. Damit haben Sie die
Möglichkeit, praktisch alles was elektrisch ist zu steuern. Mit der Infrarot (IR)
Technologie bedienen Sie Ihren TV, Video, usw. Die X10 Radiofrequenz (RF)
Technologie ermöglicht Ihnen Beleuchtung und Geräte überall im Haus zu
bedienen. Mit der X10 Technologie Ihrer Fernbedienung sind zahllose
Nutzungsmöglichkeiten denkbar.
Zur Steuerung Ihrer Beleuchtung und Geräte benötigen Sie neben der TAKE 6
zudem X10 Transceiver Module, die Sie in die Steckdose stecken. Kein Getue
mit extra Verkabelung: diese brauchen Sie nicht, da die angeschlossenen
Geräte über Ihre TAKE 6 (mit RF
Signalen) gesteuert werden. Verwenden Sie das Transceiver Modul (optional
erhältlich) und schließen Sie Ihre Stehlampe oder andere Elektrogeräte
daran an.
Ein/Ausschalten der Bedienung: Die Bedienung läuft über die TAKE 6. Das
Transceiver Modul wandelt die RF Signale der TAKE 6 in ein X10 Signal um,
das über Ihr gegenwärtiges Stromnetz verteilt wird. Wenn Sie noch weitere
X10 Module an Ihr Stromnetz angeschlossen haben, so werden auch diese
über die TAKE 6 gesteuert.
2. Einlegen der Batterien (immer NEUE CR2032 batterien verwenden)
1. Öffnen Sie die Abdeckung auf der Rückseite der TAKE 6 Fernbedienung.
2. Legen Sie 2 CR2032 batterien ein. Achten Sie auf die Polarität (+ und -)
gemäß den Angaben im Batteriefach.
3. Schließen Sie das Batteriefach sorgfältig.
3. Funktionen der Tasten
[1] (An/Aus)
Gestattet Ihnen, die zuletzt gewählte Anwendung auszuschalten. Manche
Geräte können hiermit auch eingeschaltet werden.
[2] LED-Anzeige
Die Anzeige blinkt, wenn die Fernbedienung in Betrieb ist oder leuchtet
permanent, während Sie die Fernbedienung programmieren.
[3] MUTE
Erlaubt das An-/Abschalten des Tons. Sie können die
Stummschaltungsfunktion Ihres Fernsehers bedienen, auch wenn Sie sich im
Videorecorder-, DVD- oder STB-Modus befinden. Sie brauchen dazu nicht
den TVModus auszuwählen.
[4] TV, DVR, DVD, STB, AUX, AUDIO/
Mit diesen Tasten können Sie das Gerät, welches Sie bedienen möchten,
auswählen. Für CD stehen eine begrenzte Anzahl Funktionen zur Verfügung.
[5] VOL +/-
Gestattet die Steuerung der Lautstärke. Sie können die Lautstärke Ihres
Fernsehers regulieren, auch wenn Sie sich im Videorecorder-, DVD- oder STB-
Modus befinden. Sie brauchen dazu nicht den TV-Modus auszuwählen.
[6] CHAN +/-
Wählt den nächsten oder vorhergehenden Kanal Ihres Fernsehers, STBs.
Im DVD-Modus: nächster oder vorheriger Abschnitt.
[7] OK
Bestätigt die Menüauswahl.
[8] S
Gestattet Ihnen die Programmierung der Fernbedienung vor der ersten
Anwendung. Bietet auch Zugang zu den Nebenfunktionen bestimmter A/V-
Anwendungen (Shift). Drücken Sie die SETUP-Taste und danach die
gewünschte Funktionstaste.

16-10-2009 16 033000=15301
[9] Navigationstasten
Auf, ab, rechts, links. Ermöglicht Navigation innerhalb des Menüs (TV, DVD
usw.).
[10] Bevorzugte Taste
Programmieren Sie diese Tasten, bevor Sie mit zappen beginnen zwischen den
2 meistens gebrauchten Sendern oder Funktionen.
[11] MENU Menü AN
[12] EXIT Menü AUS
[13] -/-- Mit dieser Taste können Sie bei einigen Gerätetypen Kanäle höher
als Kanal 9 auswählen (zwei Ziffern). Wenn Sie sich im Programmier-Modus
befinden - automatische Codesuche - können Sie den Code des Gerätes,
das Sie bedienen möchten, speichern.
[14] Numerische Tasten 0 – 9
Funktioniert auf dieselbe Weise wie Ihre Original-Fernbedienung.
[15] REW, PLAY, FWD, REC, STOP, PAUSE
Schnelllauf zurück
Im Videorecorder-, DVD- oder CD-Modus: Diese Schaltfläche funktioniert auf
dieselbe Weise wie bei Ihrer ursprünglichen Fernbedienung.
Im TV-Modus: farbige Taste (Rot), Steuerung des Teletextes oder spezieller
Anlagenfunktionen.
Abspielen
Im Videorecorder-, DVD- oder CD-Modus: Diese Schaltfläche funktioniert auf
dieselbe Weise wie bei Ihrer ursprünglichen Fernbedienung.
Im TV-Modus: farbige Taste (Gelb), Steuerung des Teletextes oder spezieller
Anlagenfunktionen.
Schnelllauf vorwärts
Im Videorecorder-, DVD- oder CD-Modus: Diese Schaltfläche funktioniert auf
dieselbe Weise wie bei Ihrer ursprünglichen Fernbedienung.
Im TV-Modus: farbige Taste (Blau), Steuerung des Teletextes oder spezieller
Anlagenfunktionen.
REC (Aufnahme)
Diese Taste funktioniert auf dieselbe Weise wie die auf Ihrer ursprünglichen
Fernbedienung für den Videorecorder. Um irrtümliches Aufnehmen zu
vermeiden, müssen Sie die Taste zweimal drücken, um diese Funktion zu
aktivieren.
Stopp
Im Videorecorder-, DVD- oder CD-Modus: Diese Schaltfläche funktioniert auf
dieselbe Weise wie bei Ihrer ursprünglichen Fernbedienung.
Im TV-Modus: farbige Taste (Grün), Steuerung des Teletextes oder spezieller
Anlagenfunktionen.
Pause
Im Videorecorder-, DVD- oder CD-Modus: Diese Schaltfläche funktioniert auf
dieselbe Weise wie bei Ihrer ursprünglichen Fernbedienung.
Im TV-Modus: farbige Taste (Violett), Steuerung des Teletextes oder spezieller
Anlagenfunktionen.
[16] AV Auswahl einer externen Quelle (über den A/V oder SCART-Eingang).
[17] INFO Zeigt Bildschirminformationen über die ausgewählte Anwendung
an (wenn vorhanden).
[18] Teletext
Teletext AUS: Stoppt Teletext.
[19] Teletext
Teletext Halten: Stoppt den Seitenwechsel im Teletext-Modus.
[20] LEARN
Programmiertaste zum Lernen von Funktionen Ihrer Original-Fernbedienung.
Siehe Kapitel 4.5 Codes zum Programmieren der Codes.
[21] Teletext
Teletext AN: Startet/stoppt Teletext.

16-10-2009 17 033000=15301
4. Programmieren
Um Ihre Fernbedienung für Ihre eigenen Geräte tauglich zu machen, müssen
Sie einmalig programmieren. Sie geben einen Code ein, der zu der Marke
oder dem Gerätetype gehört, welche(n) Sie mit dieser Fernbedienung
bedienen möchten. Sie können übrigens jedes gewünschte Gerät jeder
gewünschten Taste zuordnen. Haben Sie zum Beispiel 3 Videorecorder, dann
können Sie Videorecorder 1 unter DVR speichern, Videorecorder 2 unter AUX
und Videorecorder 3 unter AUDIO.
4.1 Manuelle Code-Eingabe
Suchen Sie im Codebuch die zum Gerätetype gehörende Liste (TV,
Videorecorder usw. ). Suchen Sie anschließend die betreffende Marke auf
(z.B. Sony). Sie finden nun einen oder mehrere 4-stellige Codes. Sollten
mehrere Codes aufgelistet sein, so hängt vom Gerätetype ab, welcher
Code geeignet ist. Im Allgemeinen sind die Codes je nach Alter des Gerätes
aufgelistet. Ältere Geräte zuerst, jüngere danach. Es kann vorkommen, dass
Sie verschiedene Codes ausprobieren müssen, um den geeigneten Code für
Ihr Gerät zu finden:
1. Schalten Sie zunächst Ihr Gerät ein (zum Beispiel TV).
2. Drücken und halten Sie die S-Taste (8), bis die LED-Anzeige permanent
aufleuchtet. Lassen Sie die S-Taste los.
3. Drücken Sie kurz auf die Modustaste (4) des Gerätes, das Sie bedienen
möchten (zum Beispiel TV).
4. Geben Sie mit der Tastatur (14) den 4-stelligen Code aus dem Codebuch
ein. Die LEDAnzeige (2) erlischt, nachdem die letzte Ziffer eingegeben
wurde. Wenn Sie einen falschen Code eingegeben haben, blinkt die LED-
Anzeige 3 Sekunden lang und erlischt dann. Sie müssen wieder bei Schritt 2
beginnen.
5. Richten Sie die Fernbedienung auf Ihren Fernseher und drücken Sie auf die
POWER Taste (1). Ihr Gerät sollte sich ausschalten. Überprüfen Sie die
anderen Funktionen (zum Beispiel für Videorecorder:
Schnelllauf zurück/vorwärts usw.). Wenn einige Funktionen nicht reagieren,
zeigt dies an, dass der eingegebene Code nicht korrekt ist. In diesem Fall
wiederholen Sie die oben aufgeführte Vorgehensweise mit dem nächsten
entsprechenden Code.
6. Wiederholen Sie den Vorgang für andere Gerätetypen, die Sie bedienen
möchten (Videorecorder, DVD, STB), ab Schritt 1. Wenn Ihr Gerät (TV, STB
etc...) nicht reagiert, versuchen Sie einen anderen Code für Ihre Marke.
Erfolgt noch immer keine Reaktion, versuchen Sie es mit dem “4.4 Manuelle
Codesuche”
4.2 Automatische Codesuche einzelner, häufig vorkommender Marken
Wenn Ihre Marke in der nachstehenden Liste aufgeführt ist, dann haben Sie
die Möglichkeit die Markensuchmethode zu verwenden (funktioniert
schneller als die manuelle und automatische Codesuche).
BRAND CODE
BRAND CODE
Philips / Radiola 1
Telefunken / Saba
/ Normende
4
Akai / Daewoo /
JVC / Panasonic
/ Sharp / Sony /
Toshiba
2
Grundig /
Blaupunkt
5
Brandt /
Thomson
3 Nokia / ITT 6
1. Schalten Sie das Gerät, das Sie bedienen möchten, ein.
2. Drücken und halten Sie die S-Taste (8), bis die LED-Anzeige permanent
aufleuchtet. Lassen Sie die S-Taste los.
3. Drücken Sie die Modustaste (4), die dem Gerät entspricht, das Sie
bedienen möchten. Die LEDAnzeige (2) leuchtet einmal auf.
4. Geben Sie den entsprechenden Code Ihrer Marke ein, richten Sie die
Fernbedienung auf die Anlage und drücken Sie nur einmal auf CHAN+(6).
Richten Sie die Fernbedienung weiter auf die Anlage, bis die Anlage den
Kanal wechselt (Die Fernbedienung sendet jede Sekunde ein Infrarot-Signal

16-10-2009 18 033000=15301
aus. Also warten Sie bitte, bis Ihre Anlage reagiert). Reagiert Ihre Anlage,
dann drücken Sie zur Bestätigung die Taste -/--(13). Sollten Sie den Code
versehentlich verpasst haben, können Sie die automatische Suche stoppen,
indem Sie CHAN- (6) drücken und dies wiederholen, um zum richtigen Code
zurückzukehren. Drücken Sie zur Bestätigung -/--(13).
4.3 Automatische Codesuche alle Marken
Wenn Sie einen unbekannten Code suchen, können Sie die Bibliothek
automatisch durchlaufen (AutoSearch). Reagiert Ihr Gerät, können Sie den
Suchprozess anhalten und den gefundenen Code speichern.
Hinweis: Da Sie jede Anwendung (TV, DVD, STB...) den Videorecorder-, DVD-,
CD-, STB-, oder AUX-Tasten zuordnen können, müssen Sie erst den 4-stelligen
Code für die Art der Anwendung (zu finden im Codebuch), die Sie steuern
möchten, eingeben. D.h.: Wenn Sie eine STB-Funktion für eine
Videorecorder- Taste programmieren möchten, dann geben Sie jeden im
Codebuch aufgeführten STB-Code ein und befolgen Sie dann die unten
aufgeführten Schritte:
1. Schalten Sie das Gerät, das Sie bedienen möchten, ein.
2. Drücken und halten Sie die S-Taste (8), bis die LED-Anzeige permanent
aufleuchtet. Lassen Sie S-Taste los.
3. Drücken Sie die Modustaste (4), die dem Gerät entspricht, das Sie
bedienen möchten. Die LEDAnzeige (2) leuchtet einmal auf.
4. Drücken Sie einmal auf CHAN+ (6). Nach einigen Sekunden beginnt die
Fernbedienung mit dem Durchlaufen der Codebibliothek (Schnellsuche, 1
Code pro Sekunde). Reagiert das Gerät, drücken Sie auf CHAN+ (6), um auf
langsame Suche umzuschalten (1 Code alle 3 Sekunden). Drücken Sie
CHAN- (6), um zurückzugehen (für vorwärts drücken Sie CHAN+ (6), wenn sie
zu weit zurückgegangen sind). Sobald das Gerät wieder reagiert, drücken
Sie die -/-- Taste (13), um den gefundenen Code zu speichern.
Hinweis: Wenn bestimmte Funktionen Ihres Gerätes nicht gesteuert werden
können, müssen Sie einen nächsten Code für Ihre Marke probieren. Die
Suchfunktion beginnt nach dem zuletzt bestätigten Code. Wenn dieser 030
war, beginnt die Suchfunktion bei 031 und läuft so bis zum letztmöglichen
Code durch.
4.4 Manuelle Codesuche
Hinweis: Da Sie jede Anwendung (TV, DVD, STB...) den Videorecorder-, DVD-,
CD-, STB-, AUDIO oder AUX-Tast zuordnen können, müssen Sie erst den 4-
stelligen Code für die Art der Anwendung (zu finden im Codebuch), die Sie
steuern möchten, eingeben. D.h.: Wenn Sie eine STB-Funktion für eine AUX-
Taste programmieren möchten, dann geben Sie jeden im Codebuch
aufgeführten STB-Code ein und befolgen Sie dann die unten aufgeführten
Schritte:
1. Stellen Sie sicher, dass Ihr Gerät eingeschaltet ist.
2. Drücken und halten Sie die S-Taste (8), bis die LED-Anzeige permanent
aufleuchtet. Lassen Sie die S-Taste los.
3. Drücken Sie auf die Modustaste (4), die dem Gerät entspricht, das Sie
bedienen wollen (zum Beispiel TV).
4. Drücken Sie wiederholt auf CHAN+ (6), bis der Kanal wechselt. Wenn Sie
den korrekten Code verpasst haben, verwenden Sie CHAN- (6), um zum
richtigen Code zurückzukehren.
5. Wenn das Gerät, das Sie bedienen möchten reagiert, drücken Sie -/-- (14),
um den Code zu bestätigen.
Hinweis: Sollte Ihr Gerät keine CHAN+ -Taste haben, so können Sie die PLAY-
(Videorecorder oder DVD) (15) oder POWER-Taste (1) verwenden.
Hinweis: Wenn bestimmte Funktionen Ihres Geräts nicht gesteuert werden
können, müssen Sie einen anderen Code für Ihre Gerätemarke finden. Die
Suchfunktion beginnt nach dem zuletzt bestätigtem Code. Wenn dieser 030
war, dann beginnt dieSuchfunktion bei 031 und läuft bis zum letztmöglichen
Code durch.

16-10-2009 19 033000=15301
4.5 Kodes einlernen
Ihre TAKE 6 Fernbedienung hat die Codes der meisten TV’s, Videos usw. in
seiner Codebibliothek gespeichert. Kommt jedoch ein bestimmtes Gerät
nicht in der Bibliothek
vor, dann können Sie die Codes in Ihre gegenwärtige Fernbedienung
einlernen. Es kann auch sein, dass Sie einen Code finden, der mit den
Funktionen Ihres Gerätes nahezu übereinstimmt, wobei jedoch einige Tasten
fehlen. Diese Tasten können Sie dann einfach einlernen (maximal
150 Tasten).
Master Clear
Die MASTER CLEAR Methode dient dazu, den Lernspeicher leer zu machen.
Wir empfehlen Ihnen, einen MASTER CLEAR durchzuführen, bevor Sie mit
dem Einlernen von Befehlen beginnen.
1. Halten Sie die SETUP (8) Taste gedrückt bis der LED Anzeigen anbleibt.
Lassen Sie die SETUP Taste (8) los.
2. Drücken Sie zweimal die LEARN Taste (20). Die LED Anzeige blinkt bei
jedem Tastendruck.
3. Drücken Sie die SETUP Taste (8). Die LED Anzeige erlischt nach einigen
Sekunden.
Hinweise zum Einlernen:
• Führen Sie zuerst einen Master Clear durch, bevor Sie mit dem Einlernen
beginnen (siehe oben beschriebene Methode)
• Sorgen Sie dafür, dass beide Fernbedienungen volle Batterien enthalten,
bevor Sie mit dem Einlernen beginnen.
• Achten Sie darauf, dass Sie die Fernbedienung während der Bedienung
der Tasten nicht bewegen.
• Unter nachfolgenden Tasten können keine Befehle eingelernt werden:
Learn, Setup, FAV, Modus Taste, Home Control Tasten.
• Experimentieren Sie, indem Sie zunächst 2 oder 3 Tasten einlernen (um
Vereinbarkeit zu überprüfen), bevor Sie das vollständige Display Ihrer
Original-Fernbedienung einlernen.
• Ist der Speicher voll, dann wird der LED Anzeigen während 3 Sekunden
blinken. Zusätzlichen Tasten können nunmehr nicht mehr eingelernt werden.
Sie können mögliche, zuviel gespeicherte Tasten pro Modus löschen. Sie
können nur einen kompletten Modus löschen.
• Wenn Sie die Tasten Ihrer gegenwärtigen Fernbedienung während des
Einlernens kürzer festhalten, bleibt in der TAKE 6 Fernbedienung mehr
Speicherplatz übrig. Zudem
verringern Sie die Möglichkeit eines falsch eingelernten Codes.
• Experimentieren Sie mit der Entfernung zwischen den Fernbedienungen,
wenn das Einlernen Probleme gibt.
• Bei manchen Fernbedienungen befindet sich die Infrarot LED Anzeige Ihrer
Original-Fernbedienung nicht in der Mitte. Verschieben Sie dann die
Fernbedienungen (seitlich und in
der Höhe) gegenseitig.
• Lernen Sie die Befehle nicht unter einer TL Lampe oder in direkt
einfallendem Sonnenlicht in die Fernbedienung ein.
• Sie können nur Codes einer einzigen Fernbedienung in einen bestimmten
Modus einlernen. Beispielsweise die Codes von nur Ihrer DVD-Fernbedienung
unter der Taste [DVD]. Bei manchen Kombi-Geräten (z.B. einem TV mit
eingebautem DVD-Player) müssen Sie darum zunächst die TV Funktion unter
dem Modus TV einlernen und daraufhin die DVD Funktion unter der
Modustaste DVD.
Einlernen von Befehlen:
1. Richten Sie Ihre Originalfernbedienung auf die TAKE 6 Fernbedienung
(Forderseite gegen Forderseite) mit einem Abstand von ungefähr 2,5
Zentimetern zwischen den
Fernbedienungen.
2. Halten Sie die SETUP (8) Taste gedrückt bis der LED Anzeigen anbleibt.
Lassen Sie die SETUP Taste (8) los.
3. Drücken Sie die Modustaste (TV, AUDIO, SAT usw.) entsprechend dem
Gerät, welches Sie bedienen möchten. Die LED Anzeige blinkt einmal.
4. Drücken Sie die LEARN (20) Taste. Die LED Anzeige blinkt einmal.
5. Drücken Sie auf die Taste Ihrer TAKE 6 Fernbedienung, worunter Sie einen
neuen Befehl einlernen möchten. Die LED Anzeige blinkt einmalig.

16-10-2009 20 033000=15301
6. Abhängig vom Typ Ihrer Original-Fernbedienung den Sie besitzen, sind
zwei Methoden möglich:
a. Drücken Sie auf die Taste Ihrer Originalfernbedienung, die Sie
einlernen möchten.
Halten Sie die Taste Ihrer Original-Fernbedienung gedrückt, bis die
LED Anzeige auf der TAKE 6 Fernbedienung kurz erlischt. Erlischt die
LED Anzeige nicht kurz, sondern blinkt diese, dann müssen Sie bei
Ihrer Fernbedienung Methode b anwenden. (NB. Wenn Sie gerade
Methode a versucht haben und Sie möchten nun Methode b
anwenden, fahren Sie dann zunächst mit Schritt 5 fort).
b. Drücken Sie auf die Taste Ihrer Originalfernbedienung, die Sie
einlernen möchten.
Halten Sie die Taste Ihrer Original-Fernbedienung so lang gedrückt,
wie Sie dies bei normaler Bedienung Ihrer Geräte auch tun würden.
7. Wiederholen Sie Schritt 5 und 6 für jede Taste, die Sie einlernen möchten.
8. Wenn Sie mit dem Einlernen der Tasten fertig sind, drücken Sie die SETUP
Taste (8)
Löschen von eingelernten Befehlen pro Modus, um Speicherplatz leer zu
machen Sie können die gespeicherten, eingelernten Befehle, für jede
Funktion einzeln löschen (TV, VCR, usw.):
1. Drücken Sie die SETUP (8) Taste, bis der LED Anzeigen anbleibt. Lassen Sie
die SETUP (8) Taste los.
2. Drücken Sie auf die Modustaste Ihrer Wahl (TV, DVR, usw.). Die LED
Anzeige blinkt einmal.
3. Drücken Sie zweimal auf die LEARN (20) Taste.
4. Drücken Sie auf die SETUP (8) Taste. Die LED Anzeige erlöscht nach einigen
Sekunden.
5. Alle gespeicherten, eingelernten Befehle, der von Ihnen gewählten
Funktionen sind nun gelöscht.
4.6 Gespeicherten Code lesen
Wenn Ihnen der eingestellte Code nicht bekannt ist (z.B. da Sie den Code
über Autosearch nicht gefunden haben), dann können Sie diesen
folgendermaßen lesen:
1. Drücken und halten Sie die S-Taste (8), bis die LED-Anzeige (2) permanent
aufleuchtet. Lassen Sie die S-Taste los.
2. Drücken Sie die Modustaste des Gerätetyps, den Sie identifizieren wollen
(TV, Videorecorder, DVD, STB, AUDIO oder AUX). Die LED-Anzeige (2) blinkt
einmal.
3. Drücken Sie erneut S. Die LED-Anzeige (2) blinkt einmal.
4. Zur Erkennung der ersten Ziffer drücken Sie solange auf jede
Nummerntaste 0-9 (14), bis die LED-Anzeige blinkt. Die von Ihnen gedrückte
Zahl ist die erste Stelle des Codes.
5. Drücken Sie wie oben angegeben auf jede Nummerntaste von 0-9, um
die zweite Stelle zu finden.
6. Drücken Sie wie oben angegeben auf jede Nummerntaste von 0-9, um
die dritte Stelle zu finden.
7. Drücken Sie wie oben angegeben auf jede Nummerntaste von 0-9, um
die vierte Stelle zu finden. Ist die vierte Stelle gefunden, erlischt die
LEDAnzeige.
4.7 Lautstärken-Steuerung
Die TAKE 6 Fernbedienung erlaubt es Ihnen festzulegen, welcher Modus die
Lautstärken- und Stummschaltungs-Tasten steuert. Die Lautstärken-Tasten
Lauter (5), Leiser (5) und Stumm (3) können für jeden Modus individuell oder
unabhängig vom jeweiligen Modus für nur ein Gerät programmiert werden.
Die Fernbedienung ist anfangs (Werkseinstellung) für die Steuerung des
jeweiligen Modus eingestellt.
Ändern der Lautstärken-Steuerung auf einen Modus
Sie können die Lautstärken-Steuerung für einen Modus festlegen,
vorausgesetzt dieser Modus hat auch eine Lautstärken-Steuerung (z.B.
Steuerung der Fernseher-Lautstärke im Videorecorder-Modus, im DVD-Modus
etc.).
- Drücken Sie die Taste S (8) bis die LED dauerhaft leuchtet.
- Lassen Sie die Taste S (8) los.
Sidan laddas...
Sidan laddas...
Sidan laddas...
Sidan laddas...
Sidan laddas...
Sidan laddas...
Sidan laddas...
Sidan laddas...
Sidan laddas...
Sidan laddas...
Sidan laddas...
Sidan laddas...
Sidan laddas...
Sidan laddas...
Sidan laddas...
Sidan laddas...
Sidan laddas...
Sidan laddas...
Sidan laddas...
Sidan laddas...
Sidan laddas...
Sidan laddas...
Sidan laddas...
Sidan laddas...
Sidan laddas...
Sidan laddas...
Sidan laddas...
Sidan laddas...
Sidan laddas...
Sidan laddas...
Sidan laddas...
Sidan laddas...
Sidan laddas...
Sidan laddas...
Sidan laddas...
Sidan laddas...
Sidan laddas...
Sidan laddas...
Sidan laddas...
Sidan laddas...
Sidan laddas...
Sidan laddas...
Sidan laddas...
Sidan laddas...
Sidan laddas...
Sidan laddas...
Sidan laddas...
Sidan laddas...
Sidan laddas...
Sidan laddas...
Sidan laddas...
Sidan laddas...
Sidan laddas...
Sidan laddas...
Sidan laddas...
Sidan laddas...
Sidan laddas...
Sidan laddas...
Sidan laddas...
Sidan laddas...
Sidan laddas...
Sidan laddas...
Sidan laddas...
Sidan laddas...
Sidan laddas...
Sidan laddas...
Sidan laddas...
Sidan laddas...
-
 1
1
-
 2
2
-
 3
3
-
 4
4
-
 5
5
-
 6
6
-
 7
7
-
 8
8
-
 9
9
-
 10
10
-
 11
11
-
 12
12
-
 13
13
-
 14
14
-
 15
15
-
 16
16
-
 17
17
-
 18
18
-
 19
19
-
 20
20
-
 21
21
-
 22
22
-
 23
23
-
 24
24
-
 25
25
-
 26
26
-
 27
27
-
 28
28
-
 29
29
-
 30
30
-
 31
31
-
 32
32
-
 33
33
-
 34
34
-
 35
35
-
 36
36
-
 37
37
-
 38
38
-
 39
39
-
 40
40
-
 41
41
-
 42
42
-
 43
43
-
 44
44
-
 45
45
-
 46
46
-
 47
47
-
 48
48
-
 49
49
-
 50
50
-
 51
51
-
 52
52
-
 53
53
-
 54
54
-
 55
55
-
 56
56
-
 57
57
-
 58
58
-
 59
59
-
 60
60
-
 61
61
-
 62
62
-
 63
63
-
 64
64
-
 65
65
-
 66
66
-
 67
67
-
 68
68
-
 69
69
-
 70
70
-
 71
71
-
 72
72
-
 73
73
-
 74
74
-
 75
75
-
 76
76
-
 77
77
-
 78
78
-
 79
79
-
 80
80
-
 81
81
-
 82
82
-
 83
83
-
 84
84
-
 85
85
-
 86
86
-
 87
87
-
 88
88


Ebode TAKE 6 IR plus RF Användarmanual
- Kategori
- Fjärrkontroller
- Typ
- Användarmanual
- Denna manual är också lämplig för
på andra språk
- italiano: Ebode TAKE 6 IR plus RF Manuale utente
- español: Ebode TAKE 6 IR plus RF Manual de usuario
- Deutsch: Ebode TAKE 6 IR plus RF Benutzerhandbuch
- português: Ebode TAKE 6 IR plus RF Manual do usuário
- français: Ebode TAKE 6 IR plus RF Manuel utilisateur
- English: Ebode TAKE 6 IR plus RF User manual
- Nederlands: Ebode TAKE 6 IR plus RF Handleiding
Relaterade papper
-
Ebode TAKE 6 IR Användarmanual
-
-
-
Ebode TAKE 6 IR+RF Användarmanual
-
-
-
EDOBE TAKE 6 IR/RF Bruksanvisning
-
-
EDOBE XDOM RPT Användarmanual
-
EDOBE XDOM VL58 Bruksanvisning
Andra dokument
-
Emtec H420 Bruksanvisning
-
Hama 00131867 Bruksanvisning
-
Emtec Universal Remote Control H1 Användarmanual
-
Hama 00040072 Bruksanvisning
-
Philips SRU7140 Användarmanual
-
-
Thomson ROCZ107 Bruksanvisning
-
Silvercrest KH 2157 Bruksanvisningar
-
-
Medion UNIVERSAL REMOTE CONTROL ND 4689 Bruksanvisning