Grundig GSBS 23340 FXPN SIDE BY SIDE Bruksanvisning
- Typ
- Bruksanvisning

GSBS23340FXPN
EN/ES
58 6292 0000/AB-EN-ES 1/4
Refrigerator
User Manual
Refrigerador
Manual del usuario


A
A
A
C
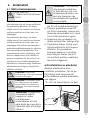
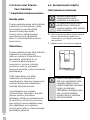
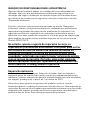
SUPPLIER’S NAME MODEL IDENTIFIER (*)
INFORMATION
C
.The model information as stored in the product data base
can be reached by entering following website and searching
for your model identifier (*) found on energy label.
https://eprel.ec.europa.eu/
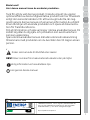
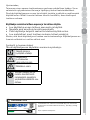
Dear Customer,
Please read this manual before using the product.
Thank you for choosing this product. We would like you to achieve the optimal
efficiency from this high quality product which has been manufactured with
state of the art technology. To do this, carefully read this manual and any other
documentation provided before using the product and keep it as a reference.
Heed all information and warnings in the user manual. This way, you will protect
yourself and your product against the dangers that may occur.
Keep the user manual. Include this guide with the unit if you hand it over to
someone else.
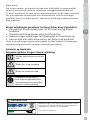
The following symbols are used in the user guide:
Hazard that may result in death or injury.
NOTICE A hazard that may cause material damage to the product or its
surroundings
Important information or useful tips on operation.
Read the user manual.

2 /35 EN Refrigerator / User Guide
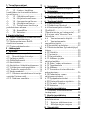
2
1 Safety Instructions 3
A1.1 Purpose of usage...............3
A1.2 Safety of children, vulnerable
persons and pets ..........................3
A1.3 Electrical safety .................4
A1.4 Handling Safety .................4
A1.5 Installation Safety ..............5
A1.6
Operational safety ...........6
A1.7 Maintenance and cleaning
safety .............................................9
A1.8HomeWhiz ..........................9
A1.9 Lighting ..............................9
2 Environmental instructions 10
2.1 Compliance with the WEEE
Directive and Disposing of the Waste
Product: .....................................10
2.2 Compliance with RoHS
Directive ......................................10
2.3 Package information ............10
3 Your Refrigerator 11
4 Installation 12
4.1 The right place for installation 12
4.2 Attaching the plastic wedges 12
4.3 Adjustment of the feet ..........13
4.4 Electrical connection ............15
4.5 Water connection .................15
4.6 Connecting water hose to the
product ........................................16
4.7 Connecting to water mains ..16
4.8. For products using water
carboy .........................................17
4.9 Water filter ............................18
4.9.1.Fixing external filter on the
wall (Optional) .............................18
4.9.2.Internal filter ......................19
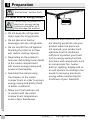
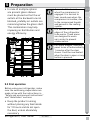
5 Preparation 21
5.1 What to do for energy saving 21
5 Preparation 22
5.2 First operation ......................22
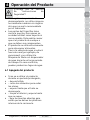
6 Operating the Product 23
6.1 Pausing the program ............23
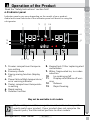
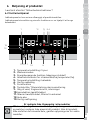
6 Operation of the Product 24
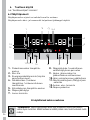
6.2 Indicator panel ...................... 24
6.3Deodoriser Module ...............27
6.4 Humidity controlled
crisper(FreSHelf) ........................28
(This feature is optional) ............28
6.5 Blue light/VitaminCare
Technology ..................................28
6.6 Using the water fountain ..29
6.7 Filling the water tank of the
water fountain.............................29
6.8 Cleaning the water tank .......30
6.9 Dairy (cold storage) bin ........31
6.10 Crisper ............................... 31
6.11 Ionizer .................................31
6.12 Odour filter .........................31
6.13 Icematic and ice storage box 31
6.14 Taking ice / water ...............32
6.15 Drip tray .............................33
6.16 Ice-maker ...........................33
6.17 Freezing fresh food ............. 36
6.18 Recommendations for storing
frozen foods ................................37
6.19 Deep freezer details ........... 37
6.20 Placing the food ..................38
6.21 Door open alert ...................38
6.22 Illumination lamp ...............38
7 Maintenance and cleaning 39
7.1 Stainless Steel External
Surfaces ...................................... 39
7 Maintenance and cleaning 40
7.2 Cleaning of the Products with
Glass Doors ................................40
7.3 Preventing Odours ............40
7.4 Protecting Plastic Surfaces 40
8 Troubleshooting 41

3 / 35EN
Refrigerator / User Guide
3
EN
SV
NO
DA
PT
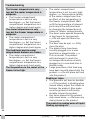
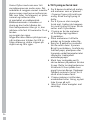
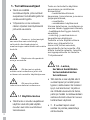
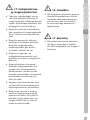
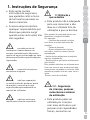
1 Safety Instructions
• This section includes the safety
instructions necessary to pre-
vent the risk of personal injury
or material damage.
• Our company shall not be held
responsible for damages that
may occur if these instructions
are not observed.
A Installation and repair opera-
tions shall always be performed by
Authorized Service.
A Always use genuine spare parts and
accessories.
AOriginal spare parts will be provided
for 10 years, following the product
purchasing date.
A Do not repair or replace any part of
the product unless specified expressly in
the user manual.
A Do not perform any modifications
on the product.
A1.1 Purpose of usage
• This product is not intended
for commercial use and it shall
not be used out of its intended
purpose.
This product is intended for opera-
ting interiors, such as households or
similar.
For example;
- In the staff kitchens of the stores,
offices and other working environ-
ments,
- In farm houses,
- In the units of hotels, motels or
other resting facilities that are used by
the customers,
- In hostels, or similar environments,
- In catering services and similar non-
retail applications.
This product shall not be used in open
or enclosed external environments
such as vessels, balconies or terraces.
Exposing the product to rain, snow,
sunlight and wind may cause risk of
fire.
A1.2 Safety of children, vulnerable
persons and pets
• This product may be used by
children aged 8 years and older
and persons with underdevelo-
ped physical, sensory or mental
capabilities or lack of experience
and knowledge if they have been
given supervision or instruction
concerning use of the appliance
in a the product safe way and the
hazards involved.
• Children between 3 and 8 years
are allowed to put and take out
food to/from the cooler product.
• Electrical products are dangero-
us for children and pets. Children
and pets must not play with,
climb on, or enter the product.
• Cleaning and user maintenan-
ce should not be performed by
children unless there is someone
overseeing them.
• Keep the packaging materials
away from children. Risk of injury
and suffocation.

4 /35 EN Refrigerator / User Guide
4
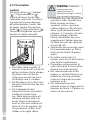
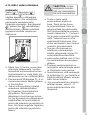
Safety instructions
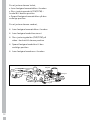
• Before disposing of old products
that shall not be used any more:
1. Unplug the power cord from the
mains socket.
2. Cut the power cord and remove it
from the appliance together with
the plug.
3. Do not remove the racks and dra-
wers from the product to prevent
children from getting inside the
appliance.
4. Remove the doors.
5. Store the product so that it shall
not be tipped over.
6. Do not allow children to play with
the scrapped product.
• Do not dispose of the product
by throwing it into fire. Risk of
explosion.
• If there is a lock available in the
product’s door, keep the key out
of children's reach.
A1.3 Electrical safety
• The product shall not be plugged
into the outlet during installation,
maintenance, cleaning, repair,
and transportation operations.
• If the power the cord is damaged,
it shall be replaced by authorized
service only to avoid any risk that
may occur.
• Do not tuck the power cord under
the product or to the rear of the
product. Do not put heavy items
on the power cord. The power
cord should not be bent, crushed,
and come into contact with any
heat source.
• Do not use an extension cord,
multi-plug or adaptor to operate
your product.
• Portable multi sockets or portab-
le power supplies may overheat
and cause fire. Thus, do not have
a multi-plug behind or in the vici-
nity of the product.
• The plug shall be easily accessib-
le. If this is not possible, a mec-
hanism that meets the electrical
legislation and that disconnects
all terminals from the mains
(fuse, switch, main switch, etc.)
shall be available on the electri-
cal installation.
• Do not touch the plug with wet
hands.
• When unplugging the appliance,
don't hold the power cord, but
the plug.
A1.4 Handling Safety
• This product is heavy, do not
handle it by yourself.
• Do not hold the product from its
door while handling the product.
• Be careful not to damage the co-
oling system and the pipes while
handling the product. Do not ope-
rate the product if the pipes are

5 / 35EN
Refrigerator / User Guide
5
EN
SV
NO
DA
PT
Safety instructions
damaged, and contact an autho-
rized service.
A1.5 Installation Safety
• Contact the Authorized Service
for the product's installation. To
prepare the product for installa-
tion, see the information in the
user guide and make sure the
electric and water utilities are
as required. If the installation
is not suitable, call a qualified
electrician and plumber to have
them make the necessary ar-
rangements. Otherwise, electric
shock, fire, issues with the pro-
duct or injuries may occur.
• Check for any damage on the
product before installing it. Do
not have the product installed if it
is damaged.
• Place the product on a level and
hard surface and balance with
the adjustable legs. Otherwise,
the refrigerator may tip over and
cause injuries.
• The product shall be installed
in a dry and ventilated environ-
ment. Do not keep carpets, rugs
or similar floor covers under the
product. This may cause risk
of fire as a result of inadequate
ventilation!
• Do not block or cover ventilation
holes. Otherwise, power con-
sumption may be increased and
damage to your product may
occur.
• Do not connect the product to
supply systems such as solar
power supplies. Otherwise, da-
mage to your product may occur
as a result of the abrupt voltage
fluctuations!
• The more refrigerant a refrige-
rator contains, the bigger its ins-
tallation room shall be. In very
small rooms, a flammable gas-
air mixture may occur in case of
a gas leak in the cooling system.
At least 1 m³ of volume is requi-
red for each 8 grams of refrige-
rant. The amount of the refrige-
rant available in your product is
specified in the Type Label.
• The installation place of the
product shall not be exposed to
direct sunlight and it shall not
be in the vicinity of a heat source
such as stoves, radiators, etc.
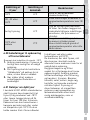
If you cannot prevent installation of the
product in the vicinity of a heat sour-
ce, you shall use a suitable insulation
plate and the minimum distance to
the heat source shall be as specified
below.
- At least 30 cm away from heat
sources such as stoves, heating units
and heaters, etc.,

6 /35 EN Refrigerator / User Guide
6
Safety instructions
- And at least 5 cm away from
electric ovens.
• Your product has the protection
class of I. Plug the product in a
grounded socket that conforms
with the Voltage, Current and
Frequency values specified in
the type label. The socket outlet
shall be equipped with a fuse
with a rating of 10 A – 16 A. Our
company shall not be responsib-
le for the damages that shall be
incurred as a result of operating
the product without ensuring
ground and electrical connecti-
ons made as per local or national
regulations.
• The product's power cable must
be unplugged during installation.
Otherwise, risk of electric shock
and injury may occur!
• Do not plug the product to loose,
broken, dirty, greasy sockets or
sockets that has come out their
seats or sockets with a risk of
water contact.
• Place the power cord and hoses
(if available) of the product so
that they shall not cause a risk of
tripping over.
• Penetration of humidity to live
parts or to the power cord may
cause short circuit. Thus, do
not use the product in humid
environments or in areas
where water may splash (e.g.
garage, laundry room, etc.)
If the refrigerator is wet by
water, unplug it and contact an
authorized service.
• Do not connect your refrigerator
to power saving devices. These
systems are harmful for the
product.
A1.6
Operational safety
• Do not use chemical solvents
on the product. These materials
contain an explosion risk.
• In case of a failure of the product,
unplug it and do not operate until
it is repaired by the authorized
service. There is a risk of electric
shock!
• Do not place a source of flame
(e.g. candles, cigarettes, etc.) on
the product or in the vicinity of it.
• Do not get on the product. Risk of
falling and injury!
• Do not cause damage to the
pipes of the cooling system using
sharp and piercing tools. The
refrigerant that sprays out in
case of puncturing the gas pipes,
pipe extensions or upper surface
coatings may cause irritation of
skin and injuries of the eyes.

7 / 35EN
Refrigerator / User Guide
7
EN
SV
NO
DA
PT
Safety instructions
• Do not place and operate
electric appliances inside the
refrigerators/deep freezer unless
it is advised by the manufacturer.
• Do not jam any parts of your
hands or your body to the moving
parts inside the product. Be
careful to prevent jamming
of your fingers between the
refrigerator and its door. Be
careful while opening or closing
the door if there are children
around.
• Do not put ice cream, ice cubes
or frozen food to your mouth as
soon as you take them out of the
freezer. Risk of frostbite!
• Do not touch the inner walls,
metal parts of the freezer or food
kept inside the refrigerator with
wet hands. Risk of frostbite!
• Do not place soda cans or cans
and bottles that contain fluids that
may be frozen to the freezer com-
partment. Cans or bottles may
explode. Risk of injury and mate-
rial damage!
• Do not use or place materials
sensitive against temperature
such as flammable sprays, flam-
mable objects, dry ice or other
chemical agents in the vicinity of
the refrigerator. Risk of fire and
explosion!
• Do not store explosive materi-
als such as aerosol cans with
flammable materials inside the
product.
• Do not place cans containing flu-
ids over the product. Splashing
of water on an electrical part
may cause the risk of an electric
shock or a fire.
• This product is not intended for
storage and cooling of medici-
nes, blood plasma, laboratory
preparations or similar materials
and products that are subject to
the Medical Products Directive.
• If the product is used against its
intended purpose, it may cause
damage to or deterioration of the
products kept inside.
• If your refrigerator is equipped
with blue light, do not look at this
light with optical devices. Do not
stare directly at UV LED light for
a long time. Ultraviolet rays may
cause eye strain.
• Do not fill the product with more
food than its capacity. Injuries
or damages may occur if the
contents of the refrigerator falls
when the door is opened. Similar
problems may occur when an
object is placed over the product.

8 /35 EN Refrigerator / User Guide
8
Safety instructions
• Ensure that you have removed
any ice or water that may have
fallen to the floor to prevent
injuries.
• Change the locations of the
racks/bottle racks on the door
of your refrigerator while the
racks are empty only. Danger of
physical injury!
• Do not place objects that may
fall/tipped over on the product.
These objects may fall while
opening or closing the door and
cause injuries and/or material
damages.
• Do not hit or exert excessive
pressure on glass surfaces.
Broken glass may cause injuri-
es and/or material damages.
• The cooling system in your pro-
duct contains R600a refrigerant.
The refrigerant type used in the
product is specified in the the
type label. This gas is flammab-
le. Therefore, be careful not to
damage the cooling system and
the pipes while operating the
product. In case of damage to
the pipes;
- do not touch the product or the
power cord,
- Keep the product away from po-
tential sources of fire that may cause
the product to catch fire.
- ventilation the area where the pro-
duct is placed. Do not use a fan.
- Contact authorized service.
• If the product is damaged and
you observe gas leak, please
stay away from the gas. Gas
may cause frostbite if it contacts
your skin.
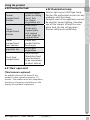
For products with a Water
Dispenser/Ice Machine
• Use only potable water.
Do not fill the water tank
with any liquids -such as
fruit juice, milk, carbona-
ted beverages or alcoholic
drinks- that are not sui-
table for use in the water
dispenser.
• There is the risk for health
and safety!
• Do not allow children play
with the water dispenser
or ice machine (Icematic)
in order to prevent acci-
dents or injuries.
• Do not insert your fingers
or other objects into the
water dispenser hole, wa-
ter channel or ice machine
container. There is the
risk of injury or material
damage!

9 / 35EN
Refrigerator / User Guide
9
EN
SV
NO
DA
PT
Safety instructions
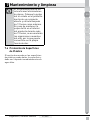
A1.7 Maintenance and cleaning
safety
• Do not pull by the door handle if
you shall move the product for
cleaning purposes. Handle may
cause injuries if it is pulled too
hard.
• Do not clean the product by
spraying or pouring water on
the product and inside the pro-
duct. Risk of electric shock and
fire.
• Do not use sharp or abrasive
tools to clean the product. Do
not use materials such as hou-
sehold cleaning agents, deter-
gents, gas, gasoline, alcohol,
wax, etc.
• Use cleaning and maintenance
agents that are not harmful for
food only inside the product.
• Do not use steam or steamed
cleaning materials for cleaning
the product and thawing the ice
inside it. Steam contacts the live
areas in your refrigerator and
causes short circuit or electric
shock!
• Take care to keep water away
from the electronic circuits or
lighting of the product.
• Use a clean, dry cloth to wipe
the dust or foreign material on
the tips of the plugs. Do not use
a wet or damp piece of cloth to
clean the plug. Otherwise, risk
of fire or electric shock may
occur.
A1.8HomeWhiz
(May not be applicable for all mo-
dels)
• Follow the safety warnings even
if you are away from the product
while operating the product via
HomeWhiz app. Also, pay atten-
tion to the warnings in the app.
A1.9 Lighting
(May not be applicable for all mo-
dels)
• Contact an authorized service
when you shall replace the LED
/ bulb using for lighting.

10 /35 EN Refrigerator / User Guide
10
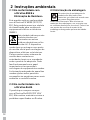
2 Environmental instructions
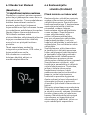
2.1 Compliance with the WEEE
Directive and Disposing
of the Waste Product:
This product complies with EU WEEE
Directive (2012/19/EU). This product
bears a classification symbol for waste
electrical and electronic equipment
(WEEE).
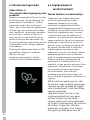
This symbol indicates that this
product shall not be disposed
with other household wastes at
the end of its service life. Used
device must be returned to
offical collection point for recycling of
electrical and electronic devices. To find
these collection systems please contact
to your local authorities or retailer
where the product was puchased. Each
household performs important role in
recovering and recycling of old
appliance. Appropriate disposal of used
appliance helps prevent potential
negative consequences for the
environment and human health.
2.2 Compliance with
RoHS Directive
The product you have purchased
complies with EU RoHS Directive
(2011/65/EU). It does not contain
harmful and prohibited materials
specified in the Directive.
2.3 Package information
Packaging materials of the
product are manufactured
from recyclable materials in
accordance with our National
Environment Regulations. Do not
dispose of the packaging materials
together with the domestic or other
wastes. Take them to the packaging
material collection points designated
by the local authorities.

11 / 35EN
Refrigerator / User Guide
11
EN
SV
NO
DA
PT
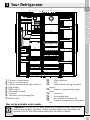
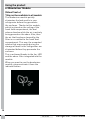
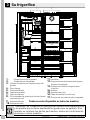
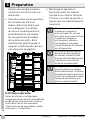
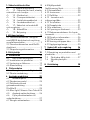
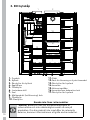
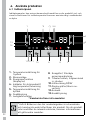
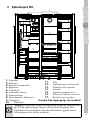
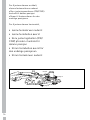
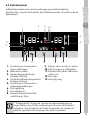
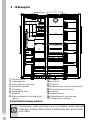
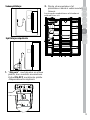
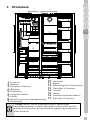
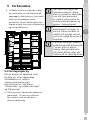
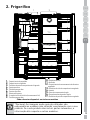
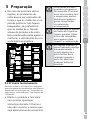
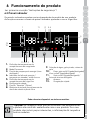
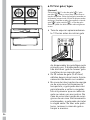
3 Your Refrigerator
C*Optional: Figures in this user guide are schematic and may not be
exactly match your product. If your product does not comprise the
relevant parts, the information pertains to other models.
May not be available in all models
1. Freezer compartment
2. Cooler compartment
3. Cooler compartment door shelves
4. Egg Holder
5. Bottle shelf
6. Adjustable stands
7. Crispers
8. The dairy (cold storage) bin
9. Bottle shelf
2
1
*3
4
6
7
7
*8
*9
6
*3
*3
5
*10
11
12
12
13
17
*15 *14
*16
*14
10. Glass shelves
11. Fan
12. Frozen food storing compart-
ments
13. Freezer compartment glass
shelf
14. Icematic
15. Ice storage box
16. Ice-maker decorative lid
17. Freezer compartment door shel-
ves

12 /35 EN Refrigerator / User Guide
12
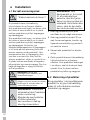
4 Installation
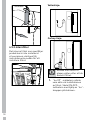
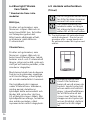
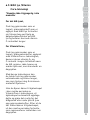
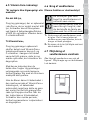
4.1 The right place for installation
ARead the “Safety
Instructions” section first!
Your product requires adequate air
circulation to function efficiently. If the
product will be placed in an alcove,
remember to leave at least 5 cm
clearance between the product and the
ceiling, rear wall and the side walls.
If the product will be placed in an
alcove, remember to leave at least 5
cm clearance between the product
and the ceiling, rear wall and the side
walls. Check if the rear wall clearance
protection component is present at its
location (if provided with the product).
If the component is not available, or if it
is lost or fallen, position the product so
that at least 5 cm clearance shall be left
between the rear surface of the product
and the wall of the room. The clearance
at the rear is important for efficient
operation of the product.
AWARNING: Do not use extension
or multi sockets in power
connection.
BWARNING: The manufacturer
assumes no responsibility for
any damage caused by the work
carried out by unauthorized
persons.
B
WARNING: The product's
power cable must
be unplugged during
installation. Failure to do
so may result in death or
serious injuries!
A
WARNING: : If the door
span is too narrow for the
product to pass, remove the
door and turn the product
sideways; if this does not
work, contact the authorized
service.
• Place the product on a flat
surface to avoid vibration.
• Place the product at least 30 cm
away from the heater, stove and
similar sources of heat and at
least 5 cm away from electric
ovens.
• Do not expose the product to
direct sunlight or keep in damp
environments.
• The product requires adequate
air circulation to function
efficiently. If the product will be
placed in an alcove, remember
to leave at least 5 cm distance
between the product and the
ceiling and the walls.
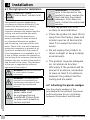
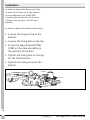
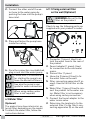
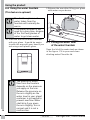
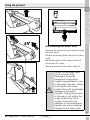
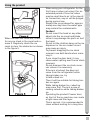
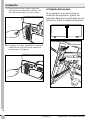
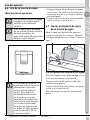
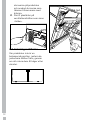
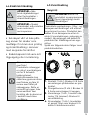
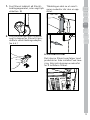
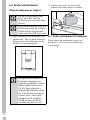
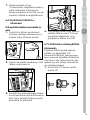
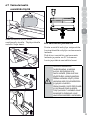
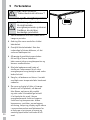
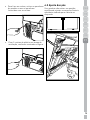
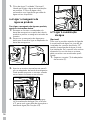
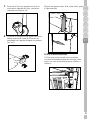
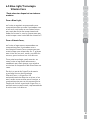
4.2 Attaching the plastic wedges
Use the plastic wedges in the
provided with the product to provide
sufficient space for air circulation
between the product and the wall.

13 / 35EN
Refrigerator / User Guide
13
EN
SV
NO
DA
PT
Installation
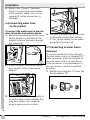
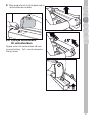
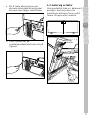
• To attach the wedges, remove the
screws on the product and use the
screws provided with the wedges.
• Attach 2 plastic wedges on the
ventilation cover as shown in the
figure.
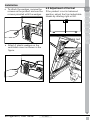
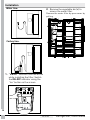
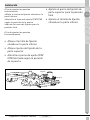
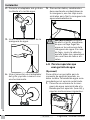
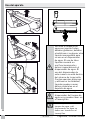
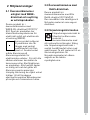
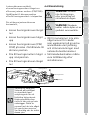
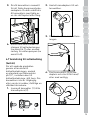
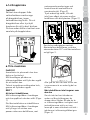
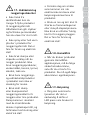
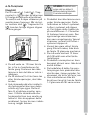
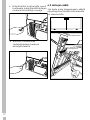
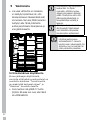
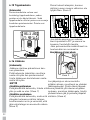
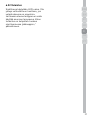
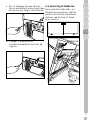
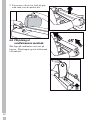
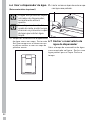
4.3 Adjustment of the feet
If the product is not in balanced
position, adjust the front adjustable
stands by rotating right or left.
Fixing nut
Fixing screw
Sabitleme somunu
Sabitleme vidası

14 /35 EN Refrigerator / User Guide
14
Installation
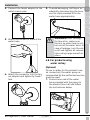
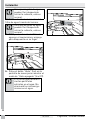
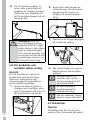
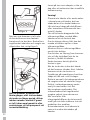
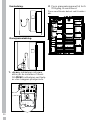
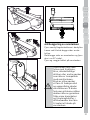
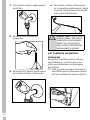
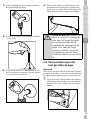
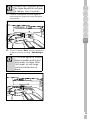
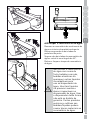
In order to adjust the doors vertically,
•Loosenthefixingnutatthebottom
•Screwadjustingnut(CW/CCW)
according to the position of the door
•Tightenthefixingnutforthefinal
position
In order to adjust the doors horizontally,
• Loosen the fixing screw at the
bottom
• Loosen the fixing bolt on the top
• Screw the adjusting bolt (CW/
CCW) on the side according to
the position of the door
• Tighten the fixing bolt on the top
for the final position
• Tighten the fixing screw at the
bottom
fixing nut
adjusting nut
adjusting bolt
fixing bolt
ayar somunu
ayar civatası
sabitleme
civatası
sabitleme somunu

15 / 35EN
Refrigerator / User Guide
15
EN
SV
NO
DA
PT
Installation
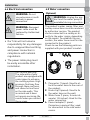
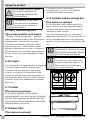
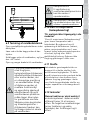
4.4 Electrical connection
AWARNING: Do not
use extension or multi
sockets in power
connection.
BWARNING: Damaged
power cable must be
replaced by Authorized
Service.
• Our firm will not assume
responsibility for any damages
due to usage without earthing
and power connection in
compliance with national
regulations.
• The power cable plug must
be easily accessible after
installation.
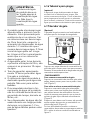
C
Hot surface warning!
The side walls of your
product are equipped with
cooler pipes to enhance
the cooling system. High
pressure fluid may flow
through these surfaces,
and cause hot surfaces
on the side walls. This
is normal and it does
not require servicing. Be
careful when you contact
these areas.
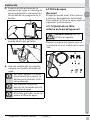
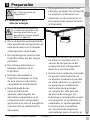
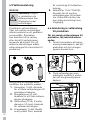
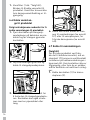
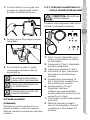
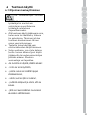
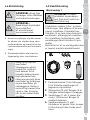
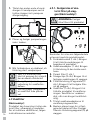
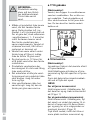
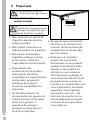
4.5 Water connection
(Optional)
AWARNING: Unplug the pro-
duct and the water pump (if
available) during connection.
The product’s water mains, filter and
carboy connections must be rendered
by authorizer service. The product
can be connected to a carboy or di-
rectly to the water mains, depending
on the model. To establish the con-
nection, the water hose must first be
connected to the product.
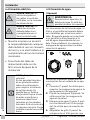
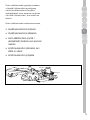
Check to see the following parts are
supplied with your product’s model:
3
1
4
2
*5
1. Connector (1 piece): Used to at-
tach the water hose to the rear of
the product.
2. Hose clip (3 pieces): Used to fix
the water hose on the wall.
3. Water hose (1 piece, 5 meter di-
ameter 1/4 inches): Used for the
water connection.
4. Faucet adapter (1 piece):
Comprises a porous filter, used
for connection to the cold water
mains.

16 /35 EN Refrigerator / User Guide
16
Installation
5. Water filter (1 piece *Optional):
Used to connect the mains water
to the product. Water filter is not
required if carboy connection is
available.
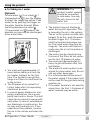
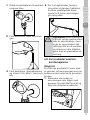
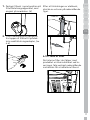
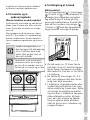
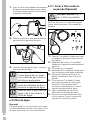
4.6 Connecting water hose
to the product
To connect the water hose to the pro-
duct, follow the instructions below.
1. Remove the connector on the hose
nozzle adaptor in the back of the
product and run the hose through
the connector.
2. Push the water hose down tightly
and connect to the hose nozzle
adaptor.
3. Tighten the connector manually to
fix on the hose nozzle adaptor. You
may also tighten the connector
using a pipe wrench or pliers.
4. Connect the other end of the hose
to the water mains (See Section
4.7) or, to use carboy, to the water
pump (See Section 4.8).
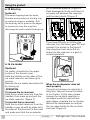
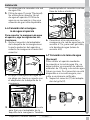
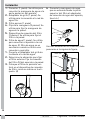
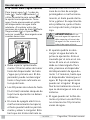
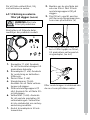
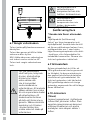
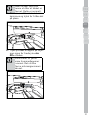
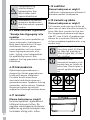
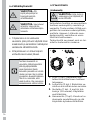
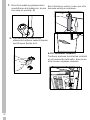
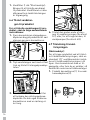
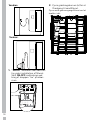
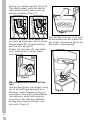
4.7 Connecting to water mains
(Optional)
To use the product by connecting to
the cold water mains, a standard 1/2”
valve connector must be installed to
the cold water mains in your home.
If the connector is not available or if
you are unsure, consult a qualified
plumber.
1. Detach the connector (1) from the
faucet adaptor (2).
1
23 1
2
3

17 / 35EN
Refrigerator / User Guide
17
EN
SV
NO
DA
PT
Installation
2. Connect the faucet adaptor to the
water mains valve.
3. Attach the connector around the
water hose.
4. Attach the connector into the fau-
cet adaptor and tighten by hand /
tool.
5. To avoid damaging, shifting or ac-
cidentally disconnecting the hose,
use the clips provided to fix the
water hose appropriately.
AWARNING: After turning
the faucet on, make sure
there is no water leak on eit-
her end of the water hose. In
case of leakage, turn the val-
ve off and tighten all connec-
tions using a pipe wrench or
pliers.
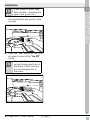
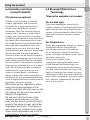
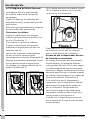
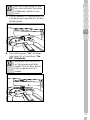
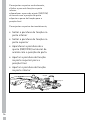
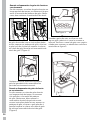
4.8. For products using
water carboy
(Optional)
To use a carboy for the product’s wa-
ter connection, the water pump re-
commended by the authorized service
must be used.
1. Connect one end of the water
hose provided with the pump to
the product (see 4.6) and follow
the instructions below.

18 /35 EN Refrigerator / User Guide
18
Installation
2. Connect the other end of the wa-
ter hose to the water pump by
pushing the hose into the pump’s
hose inlet.
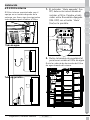
4.9.1.Fixing external filter
on the wall (Optional)
AWARNING: Do not fix the
filter on the product.
Check to see the following parts are
supplied with your product’s model:
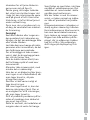
3. Place and fasten the pump hose
inside the carboy.
4. Once the connection is established,
plug in and start the water pump.
CPlease wait 2-3 minutes af-
ter starting the pump to ac-
hieve the desired efficiency.
CSee also the pump’s user
guide for water connection.
CWhen using carboy, water
filter is not required.
4.9 Water filter
(Optional)
The product may have internal or ex-
ternal filter, depending on the model.
To attach the water filter, follow the
instructions below.
123
4
5
6
1. Connector (1 piece): Used to at-
tach the water hose to the rear of
the product.
2. Faucet adapter (1 piece): Used
for connection to the cold water
mains.
3. Porous filter (1 piece)
4. Hose clip (3 pieces): Used to fix
the water hose on the wall.
5. Filter connecting apparatus (2 pi-
eces): Used to fix the filter on the
wall.
6. Water filter (1 piece): Used to con-
nect the product to the water ma-
ins. Water filter is not necessary
when using carboy connection.
1. Connect the faucet adaptor to the
water mains valve.
2. Determine the location to fix the
external filter. Fix the filter’s con-
necting apparatus (5) on the wall.
Sidan laddas ...
Sidan laddas ...
Sidan laddas ...
Sidan laddas ...
Sidan laddas ...
Sidan laddas ...
Sidan laddas ...
Sidan laddas ...
Sidan laddas ...
Sidan laddas ...
Sidan laddas ...
Sidan laddas ...
Sidan laddas ...
Sidan laddas ...
Sidan laddas ...
Sidan laddas ...
Sidan laddas ...
Sidan laddas ...
Sidan laddas ...
Sidan laddas ...
Sidan laddas ...
Sidan laddas ...
Sidan laddas ...
Sidan laddas ...
Sidan laddas ...
Sidan laddas ...
Sidan laddas ...
Sidan laddas ...
Sidan laddas ...
Sidan laddas ...
Sidan laddas ...
Sidan laddas ...
Sidan laddas ...
Sidan laddas ...
Sidan laddas ...
Sidan laddas ...
Sidan laddas ...
Sidan laddas ...
Sidan laddas ...
Sidan laddas ...
Sidan laddas ...
Sidan laddas ...
Sidan laddas ...
Sidan laddas ...
Sidan laddas ...
Sidan laddas ...
Sidan laddas ...
Sidan laddas ...
Sidan laddas ...
Sidan laddas ...
Sidan laddas ...
Sidan laddas ...
Sidan laddas ...
Sidan laddas ...
Sidan laddas ...
Sidan laddas ...
Sidan laddas ...
Sidan laddas ...
Sidan laddas ...
Sidan laddas ...
Sidan laddas ...
Sidan laddas ...
Sidan laddas ...
Sidan laddas ...
Sidan laddas ...
Sidan laddas ...
Sidan laddas ...
Sidan laddas ...
Sidan laddas ...
Sidan laddas ...
Sidan laddas ...
Sidan laddas ...
Sidan laddas ...
Sidan laddas ...
Sidan laddas ...
Sidan laddas ...
Sidan laddas ...
Sidan laddas ...
Sidan laddas ...
Sidan laddas ...
Sidan laddas ...
Sidan laddas ...
Sidan laddas ...
Sidan laddas ...
Sidan laddas ...
Sidan laddas ...
Sidan laddas ...
Sidan laddas ...
Sidan laddas ...
Sidan laddas ...
Sidan laddas ...
Sidan laddas ...
Sidan laddas ...
Sidan laddas ...
Sidan laddas ...
Sidan laddas ...
Sidan laddas ...
Sidan laddas ...
Sidan laddas ...
Sidan laddas ...
Sidan laddas ...
Sidan laddas ...
Sidan laddas ...
Sidan laddas ...
Sidan laddas ...
Sidan laddas ...
Sidan laddas ...
Sidan laddas ...
Sidan laddas ...
Sidan laddas ...
Sidan laddas ...
Sidan laddas ...
Sidan laddas ...
Sidan laddas ...
Sidan laddas ...
Sidan laddas ...
Sidan laddas ...
Sidan laddas ...
Sidan laddas ...
Sidan laddas ...
Sidan laddas ...
Sidan laddas ...
Sidan laddas ...
Sidan laddas ...
Sidan laddas ...
Sidan laddas ...
Sidan laddas ...
Sidan laddas ...
Sidan laddas ...
Sidan laddas ...
Sidan laddas ...
Sidan laddas ...
Sidan laddas ...
Sidan laddas ...
Sidan laddas ...
Sidan laddas ...
Sidan laddas ...
Sidan laddas ...
Sidan laddas ...
Sidan laddas ...
Sidan laddas ...
Sidan laddas ...
Sidan laddas ...
Sidan laddas ...
Sidan laddas ...
Sidan laddas ...
Sidan laddas ...
Sidan laddas ...
Sidan laddas ...
Sidan laddas ...
Sidan laddas ...
Sidan laddas ...
Sidan laddas ...
Sidan laddas ...
Sidan laddas ...
Sidan laddas ...
Sidan laddas ...
Sidan laddas ...
Sidan laddas ...
Sidan laddas ...
Sidan laddas ...
Sidan laddas ...
Sidan laddas ...
Sidan laddas ...
Sidan laddas ...
Sidan laddas ...
Sidan laddas ...
Sidan laddas ...
Sidan laddas ...
Sidan laddas ...
Sidan laddas ...
Sidan laddas ...
Sidan laddas ...
Sidan laddas ...
Sidan laddas ...
Sidan laddas ...
Sidan laddas ...
Sidan laddas ...
Sidan laddas ...
Sidan laddas ...
Sidan laddas ...
Sidan laddas ...
Sidan laddas ...
Sidan laddas ...
Sidan laddas ...
Sidan laddas ...
Sidan laddas ...
Sidan laddas ...
Sidan laddas ...
Sidan laddas ...
Sidan laddas ...
Sidan laddas ...
Sidan laddas ...
Sidan laddas ...
Sidan laddas ...
Sidan laddas ...
Sidan laddas ...
Sidan laddas ...
Sidan laddas ...
Sidan laddas ...
Sidan laddas ...
Sidan laddas ...
Sidan laddas ...
Sidan laddas ...
Sidan laddas ...
Sidan laddas ...
Sidan laddas ...
Sidan laddas ...
Sidan laddas ...
Sidan laddas ...
Sidan laddas ...
Sidan laddas ...
Sidan laddas ...
Sidan laddas ...
Sidan laddas ...
Sidan laddas ...
Sidan laddas ...
Sidan laddas ...
Sidan laddas ...
Sidan laddas ...
Sidan laddas ...
Sidan laddas ...
Sidan laddas ...
Sidan laddas ...
Sidan laddas ...
Sidan laddas ...
Sidan laddas ...
Sidan laddas ...
Sidan laddas ...
Sidan laddas ...
Sidan laddas ...
Sidan laddas ...
Sidan laddas ...
Sidan laddas ...
Sidan laddas ...
Sidan laddas ...
Sidan laddas ...
Sidan laddas ...
Sidan laddas ...
Sidan laddas ...
Sidan laddas ...
Sidan laddas ...
Sidan laddas ...
Sidan laddas ...
Sidan laddas ...
Sidan laddas ...
Sidan laddas ...
Sidan laddas ...
Sidan laddas ...
Sidan laddas ...
Sidan laddas ...
Sidan laddas ...
Sidan laddas ...
Sidan laddas ...
Sidan laddas ...
Sidan laddas ...
Sidan laddas ...
Sidan laddas ...
Sidan laddas ...
Sidan laddas ...
Sidan laddas ...
Sidan laddas ...
Sidan laddas ...
Sidan laddas ...
Sidan laddas ...
Sidan laddas ...
Sidan laddas ...
Sidan laddas ...
Sidan laddas ...
Sidan laddas ...
Sidan laddas ...
Sidan laddas ...
Sidan laddas ...
Sidan laddas ...
Sidan laddas ...
Sidan laddas ...
Sidan laddas ...
Sidan laddas ...
Sidan laddas ...
Sidan laddas ...
Sidan laddas ...
Sidan laddas ...
Sidan laddas ...
Sidan laddas ...
Sidan laddas ...
Sidan laddas ...
Sidan laddas ...
Sidan laddas ...
Sidan laddas ...
Sidan laddas ...
Sidan laddas ...
Sidan laddas ...
Sidan laddas ...
Sidan laddas ...
Sidan laddas ...
Sidan laddas ...
Sidan laddas ...
Sidan laddas ...
Sidan laddas ...
Sidan laddas ...
Sidan laddas ...
Sidan laddas ...
Sidan laddas ...
Sidan laddas ...
Sidan laddas ...
Sidan laddas ...
Sidan laddas ...
Sidan laddas ...
Sidan laddas ...
Sidan laddas ...
Sidan laddas ...
Sidan laddas ...
Sidan laddas ...
Sidan laddas ...
Sidan laddas ...
Sidan laddas ...
Sidan laddas ...
Sidan laddas ...
Sidan laddas ...
Sidan laddas ...
Sidan laddas ...
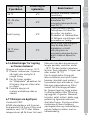
-
 1
1
-
 2
2
-
 3
3
-
 4
4
-
 5
5
-
 6
6
-
 7
7
-
 8
8
-
 9
9
-
 10
10
-
 11
11
-
 12
12
-
 13
13
-
 14
14
-
 15
15
-
 16
16
-
 17
17
-
 18
18
-
 19
19
-
 20
20
-
 21
21
-
 22
22
-
 23
23
-
 24
24
-
 25
25
-
 26
26
-
 27
27
-
 28
28
-
 29
29
-
 30
30
-
 31
31
-
 32
32
-
 33
33
-
 34
34
-
 35
35
-
 36
36
-
 37
37
-
 38
38
-
 39
39
-
 40
40
-
 41
41
-
 42
42
-
 43
43
-
 44
44
-
 45
45
-
 46
46
-
 47
47
-
 48
48
-
 49
49
-
 50
50
-
 51
51
-
 52
52
-
 53
53
-
 54
54
-
 55
55
-
 56
56
-
 57
57
-
 58
58
-
 59
59
-
 60
60
-
 61
61
-
 62
62
-
 63
63
-
 64
64
-
 65
65
-
 66
66
-
 67
67
-
 68
68
-
 69
69
-
 70
70
-
 71
71
-
 72
72
-
 73
73
-
 74
74
-
 75
75
-
 76
76
-
 77
77
-
 78
78
-
 79
79
-
 80
80
-
 81
81
-
 82
82
-
 83
83
-
 84
84
-
 85
85
-
 86
86
-
 87
87
-
 88
88
-
 89
89
-
 90
90
-
 91
91
-
 92
92
-
 93
93
-
 94
94
-
 95
95
-
 96
96
-
 97
97
-
 98
98
-
 99
99
-
 100
100
-
 101
101
-
 102
102
-
 103
103
-
 104
104
-
 105
105
-
 106
106
-
 107
107
-
 108
108
-
 109
109
-
 110
110
-
 111
111
-
 112
112
-
 113
113
-
 114
114
-
 115
115
-
 116
116
-
 117
117
-
 118
118
-
 119
119
-
 120
120
-
 121
121
-
 122
122
-
 123
123
-
 124
124
-
 125
125
-
 126
126
-
 127
127
-
 128
128
-
 129
129
-
 130
130
-
 131
131
-
 132
132
-
 133
133
-
 134
134
-
 135
135
-
 136
136
-
 137
137
-
 138
138
-
 139
139
-
 140
140
-
 141
141
-
 142
142
-
 143
143
-
 144
144
-
 145
145
-
 146
146
-
 147
147
-
 148
148
-
 149
149
-
 150
150
-
 151
151
-
 152
152
-
 153
153
-
 154
154
-
 155
155
-
 156
156
-
 157
157
-
 158
158
-
 159
159
-
 160
160
-
 161
161
-
 162
162
-
 163
163
-
 164
164
-
 165
165
-
 166
166
-
 167
167
-
 168
168
-
 169
169
-
 170
170
-
 171
171
-
 172
172
-
 173
173
-
 174
174
-
 175
175
-
 176
176
-
 177
177
-
 178
178
-
 179
179
-
 180
180
-
 181
181
-
 182
182
-
 183
183
-
 184
184
-
 185
185
-
 186
186
-
 187
187
-
 188
188
-
 189
189
-
 190
190
-
 191
191
-
 192
192
-
 193
193
-
 194
194
-
 195
195
-
 196
196
-
 197
197
-
 198
198
-
 199
199
-
 200
200
-
 201
201
-
 202
202
-
 203
203
-
 204
204
-
 205
205
-
 206
206
-
 207
207
-
 208
208
-
 209
209
-
 210
210
-
 211
211
-
 212
212
-
 213
213
-
 214
214
-
 215
215
-
 216
216
-
 217
217
-
 218
218
-
 219
219
-
 220
220
-
 221
221
-
 222
222
-
 223
223
-
 224
224
-
 225
225
-
 226
226
-
 227
227
-
 228
228
-
 229
229
-
 230
230
-
 231
231
-
 232
232
-
 233
233
-
 234
234
-
 235
235
-
 236
236
-
 237
237
-
 238
238
-
 239
239
-
 240
240
-
 241
241
-
 242
242
-
 243
243
-
 244
244
-
 245
245
-
 246
246
-
 247
247
-
 248
248
-
 249
249
-
 250
250
-
 251
251
-
 252
252
-
 253
253
-
 254
254
-
 255
255
-
 256
256
-
 257
257
-
 258
258
-
 259
259
-
 260
260
-
 261
261
-
 262
262
-
 263
263
-
 264
264
-
 265
265
-
 266
266
-
 267
267
-
 268
268
-
 269
269
-
 270
270
-
 271
271
-
 272
272
-
 273
273
-
 274
274
-
 275
275
-
 276
276
-
 277
277
-
 278
278
-
 279
279
-
 280
280
-
 281
281
-
 282
282
-
 283
283
-
 284
284
-
 285
285
-
 286
286
-
 287
287
-
 288
288
-
 289
289
-
 290
290
-
 291
291
-
 292
292
-
 293
293
-
 294
294
-
 295
295
-
 296
296
-
 297
297
-
 298
298
-
 299
299
-
 300
300
-
 301
301
-
 302
302
-
 303
303
-
 304
304
-
 305
305
-
 306
306
-
 307
307
-
 308
308
-
 309
309
-
 310
310
-
 311
311
-
 312
312
-
 313
313
-
 314
314
-
 315
315
-
 316
316
-
 317
317
-
 318
318
-
 319
319
-
 320
320
-
 321
321
-
 322
322
-
 323
323
-
 324
324
-
 325
325
-
 326
326
-
 327
327
-
 328
328
-
 329
329
-
 330
330
-
 331
331
-
 332
332
-
 333
333
-
 334
334
-
 335
335
-
 336
336
-
 337
337
-
 338
338
-
 339
339
-
 340
340
-
 341
341


Grundig GSBS 23340 FXPN SIDE BY SIDE Bruksanvisning
- Typ
- Bruksanvisning
på andra språk
Relaterade papper
-
Grundig GQN1233XN KOMBISKAP Bruksanvisning
-
-
-
-
-
-
Grundig GSNE107 Series Användarmanual