
Manual de instrucciones
en
it
Instruction Manual
Manuale di istruzioni
pt
fr
sv
es
da
fin
no
Notice d'Utilisation
Bruksanvisning
Brugsvejledning
Käyttöohje
Bruksanvisning
Gebruiksaanwijzing
nl
ar
ru
ﻡﺩﺧﺗﺳﻣﻟﺍ ﻝﻳﻟﺩ
de
pl
Bedienungsanleitung
Instrukcja użytkowania
FQ55FXE1
FQ55FX1
FQ55FX2PE
FQ55FN2PE
FQ55FNDF
FQ55FXDF

Please read this manual before using the product!
Dear Customer,
We'd like you to make the best use of our product, which has been manufactured in modern facilities
with care and meticulous quality controls.
Thus, we advice you to read the entire user manual before you use the product. In case the product
changes hands, do not forget to hand the guide to its new owner along with the product.
This guide will help you use the product quickly and safely.
Please read the user guide carefully before installing and operating the product.
Always observe the applicable safety instructions.
Keep the user guide within easy reach for future use.
Please read any other documents provided with the product.
Keep in mind that this user guide may apply to several product models. The guide clearly indicates any
variations of different models.
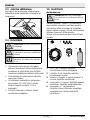
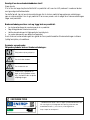
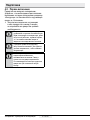
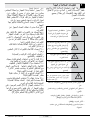
C
Important information and useful
tips.
A
Risk of life and property.
B
Risk of electric shock.
The product’s packaging is made of
recyclable materials, in accordance
with the National Environment
Legislation.
A
A
A
C
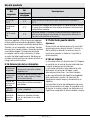
SUPPLIER’S NAME
MODEL IDENTIFIER
(*)
INFORMATION
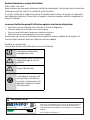
C
.The model information as stored in the product data base
can be reached by entering following website and searching
for your model identifier (*) found on energy label.
https://eprel.ec.europa.eu/

2 / 31 EN
Refrigerator / User Manual
1. Safety and environment instructions 3
1.1. General safety. . . . . . . . . . . . . . . . . . . . . . . 3
1.1.1 HC warning. . . . . . . . . . . . . . . . . . . . . . . . 5
1.1.2 For models with water dispenser . . . . . . . . 5
1.2. Intended use. . . . . . . . . . . . . . . . . . . . . . . . 5
1.3. Child safety. . . . . . . . . . . . . . . . . . . . . . . . . 5
1.4. Compliance with WEEE Directive and
Disposing of the Waste Product . . . . . . . . . 5
1.5. Compliance with RoHS Directive . . . . . . . . . 5
1.6. Package information . . . . . . . . . . . . . . . . . . 6
2 Refrigerator 7
3 Installation 8
3.1. Right place for installation . . . . . . . . . . . . . . 8
3.2. Attaching the plastic wedges . . . . . . . . . . . . 8
3.3. Adjusting the stands . . . . . . . . . . . . . . . . . . 9
3.4. Power connection . . . . . . . . . . . . . . . . . . . . 9
3.5. Water connection . . . . . . . . . . . . . . . . . . . . 9
3.6. Connecting water hose to the product . . . . 10
3.7. Connecting to water mains . . . . . . . . . . . . 10
3.8. For products using water carboy . . . . . . . . 11
3.9 Water filter . . . . . . . . . . . . . . . . . . . . . . . . . 11
3.9.1. Fixing external filter on the wall (Optional) 12
3.9.2. Internal filter . . . . . . . . . . . . . . . . . . . . . 13
4 Preparation 15
4.1. What to do for energy saving . . . . . . . . . . . 15
4.2. First use . . . . . . . . . . . . . . . . . . . . . . . . . . 15
5 Using the product 16
5.1. Indicator panel . . . . . . . . . . . . . . . . . . . . . 16
5.2. Zero degree compartment. . . . . . . . . . . . . 23
5.3. Vegetable bin . . . . . . . . . . . . . . . . . . . . 23
5.4. Blue light . . . . . . . . . . . . . . . . . . . . . . . . . 23
5.5. Description and cleaning of odour filter . . . 23
5.8. Ice maker . . . . . . . . . . . . . . . . . . . . . . . . . 24
5.9. Ice box . . . . . . . . . . . . . . . . . . . . . . . . . . . 24
5.6. Telescopic drawer . . . . . . . . . . . . . . . . . . 24
5.7. Ionizer . . . . . . . . . . . . . . . . . . . . . . . . . . . 24
5.10. Movable middle section . . . . . . . . . . . . . 25
5.11. Ice container . . . . . . . . . . . . . . . . . . . . . . 25
5.12. Humidity controlled crisper. . . . . . . . . . . . 25
5.13. Freezing fresh food . . . . . . . . . . . . . . . . . 26
5.14. Recommendations for storing frozen foods 26
5.15. Deep freezer details . . . . . . . . . . . . . . . . . 26
5.16. Placing the food. . . . . . . . . . . . . . . . . . . . 27
5.17. Door open alert . . . . . . . . . . . . . . . . . . . . 27
5.18. Interior light . . . . . . . . . . . . . . . . . . . . . . . 27
6 Maintenance and cleaning 28
6.1. Preventing malodour . . . . . . . . . . . . . . . . . 28
6.2. Protecting plastic surfaces . . . . . . . . . . . . 28
7 Troubleshooting 29

3 / 31 EN
Refrigerator / User Manual
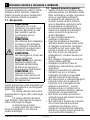
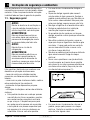
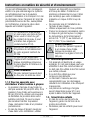
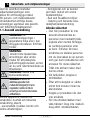
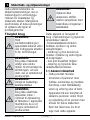
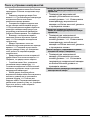
1. Safety and environment instructions
This section provides the safety instructions
necessary to prevent the risk of injury and material
damage. Failure to observe these instructions will
invalidate all types of product warranty.
Intended use
A
WARNING:
Keep ventilation openings, in the
appliance enclosure or in the built-
instructure, clear of obstruction.
A
WARNING:
Do not use mechanical
devices or other means to
accelerate the defrosting process,
other than those recommended by
the manufacturer.
A
WARNING:
Do not damage the refrigerant
circuit.
A
WARNING:
Do not use electrical
appliances inside the food
storage compartments of the
appliance, unless they are of
the type recommended by the
manufacturer.
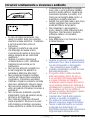
This appliance is intended to be used in household
and similar applications such as
– staff kitchen areas in shops, offices and other
working environments;
– farm houses and by clients in hotels, motels and
other residential type environments;
– bed and breakfast type environments;
– catering and similar non-retail applications.
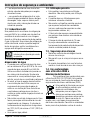
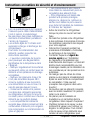
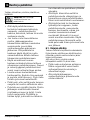
1.1. General safety
This product should not be used by
persons with physical, sensory and
mental disabilities, without sufficient
knowledge and experience or by
children. The device can only be used
by such persons under supervision
and instruction of a person responsible
for their safety. Children should not be
allowed to play with this device.
In case of malfunction, unplug the
device.
After unplugging, wait at least 5
minutes before plugging in again.
Unplug the product when not in use.
Do not touch the plug with wet hands!
Do not pull the cable to plug off, always
hold the plug.
Do not plug in the refrigerator if the
socket is loose.
Unplug the product during installation,
maintenance, cleaning and repair.
If the product will not be used for a
while, unplug the product and remove
any food inside.
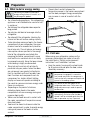
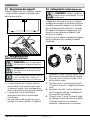
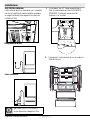
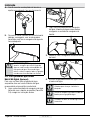
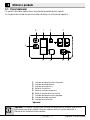
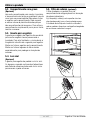
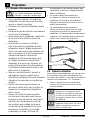
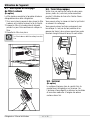
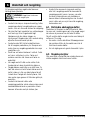
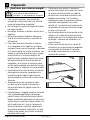
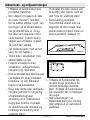
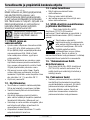
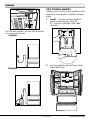
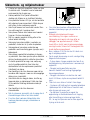
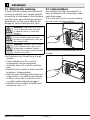
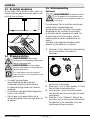
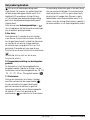
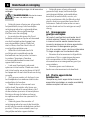
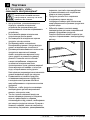
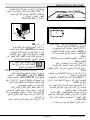
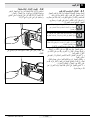
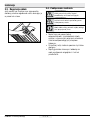
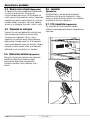
Do not use the product when the
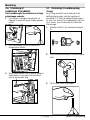
compartment with circuit cards located
on the upper back part of the product
(electrical card box cover) (1) is open.
1
1
Do not use steam or steamed cleaning
materials for cleaning the refrigerator
and melting the ice inside. Steam may
contact the electrified areas and cause
short circuit or electric shock!
Do not wash the product by spraying or
pouring water on it! Danger of electric
shock!
In case of malfunction, do not use
the product, as it may cause electric
shock. Contact the authorised service
before doing anything.

4 / 31 EN
Refrigerator / User Manual
Safety and environment instructions
Plug the product into an earthed
socket. Earthing must be done by a
qualified electrician.
If the product has LED type lighting,
contact the authorised service for
replacing or in case of any problem.
Do not touch frozen food with wet
hands! It may adhere to your hands!
Do not place liquids in bottles and cans
into the freezer compartment. They
may explode.
Place liquids in upright position after
tightly closing the lid.
Do not spray flammable substances
near the product, as it may burn or
explode.
Do not keep flammable materials and
products with flammable gas (sprays,
etc.) in the refrigerator.
Do not place containers holding liquids
on top of the product. Splashing water
on an electrified part may cause
electric shock and risk of fire.
Exposing the product to rain, snow,
sunlight and wind will cause electrical
danger. When relocating the product,
do not pull by holding the door handle.
The handle may come off.
Take care to avoid trapping any part
of your hands or body in any of the
moving parts inside the product.
Do not step or lean on the door,
drawers and similar parts of the
refrigerator. This will cause the product
to fall down and cause damage to the
parts.
Take care not to trap the power cable.
When positioning the appliance, ensure
the supply cord is not trapped or
damaged.
Do not locate multiple portable socket-
outlets or portable power supplies at
the rear of the appliance.
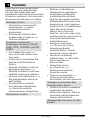
Children aged from 3 to 8 years are
allowed to load and unload refrigerating
appliances.
To avoid contamination of food, please
respect the following instructions:
Opening the door for long periods can
cause a significant increase of the
temperature in the
compartments of the appliance.
Clean regularly surfaces that can come
in contact with food and accessible
drainage systems.
Clean water tanks if they have not been
used for 48 h; flush the water system
connected to a water
supply if water has not been drawn for
5 days.
Store raw meat and fish in suitable
containers in the refrigerator, so that it
is not in contact with or drip onto other
food.
Two-star frozen-food compartments
are suitable for storing pre-frozen
food, storing or making icecream and
making ice cubes.
One-, two- and three-star
compartments are not suitable for the
freezing of fresh food.
If the refrigerating appliance is left
empty for long periods, switch off,

5 / 31 EN
Refrigerator / User Manual
Safety and environment instructions
defrost, clean, dry, and leave the door
open to prevent mould developing
within the appliance.
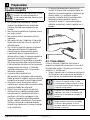
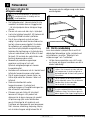
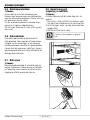
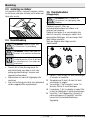
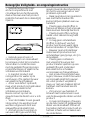
1.1.1 HC warning
If the product comprises a cooling system using
R600a gas, take care to avoid damaging the
cooling system and its pipe while using and
moving the product. This gas is flammable. If the
cooling system is damaged, keep the product
away from sources of fire and ventilate the room
immediately.
C
The label on the inner left side
indicates the type of gas used in
the product.
1.1.2 For models with
water dispenser
Pressure for cold water inlet shall be
maximum 90 psi (620 kPa). If your
water pressure exceeds 80 psi (550
kPa), use a pressure limiting valve in
your mains system. If you do not know
how to check your water pressure, ask
for the help of a professional plumber.
If there is risk of water hammer effect
in your installation, always use a water
hammer prevention equipment in
your installation. Consult Professional
plumbers if you are not sure that there
is no water hammer effect in your
installation.
Do not install on the hot water inlet.
Take precautions against of the
risk of freezing of the hoses. Water
temperature operating interval shall
be 33°F (0.6°C) minimum and 100°F
(38°C) maximum.
Use drinking water only.
1.2. Intended use
This product is designed for home use.
It is not intended for commercial use.
The product should be used to store
food and beverages only.
Do not keep sensitive products
requiring controlled temperatures
(vaccines, heat sensitive medication,
medical supplies, etc.) in the
refrigerator.
The manufacturer assumes no
responsibility for any damage due to
misuse or mishandling.
Original spare parts will be provided
for 10 years, following the product
purchasing date.
1.3. Child safety
Keep packaging materials out of
children’s reach.
Do not allow the children to play with
the product.
If the product’s door comprises a lock,
keep the key out of children’s reach.
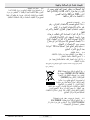
1.4. Compliance with WEEE Directive
and Disposing of the Waste Product
This product complies with EU WEEE
Directive (2012/19/EU). This product bears a
classification symbol for waste electrical and
electronic equipment (WEEE).
This product has been manufactured
with high quality parts and materials
which can be reused and are suitable
for recycling. Do not dispose of the
waste product with normal domestic
and other wastes at the end of its
service life. Take it to the collection
center for the recycling of electrical and electronic
equipment. Please consult your local authorities to
learn about these collection centers.
1.5. Compliance with RoHS Directive
This product complies with EU WEEE Directive
(2011/65/EU). It does not contain harmful and
prohibited materials specified in the Directive.

6 / 31 EN
Refrigerator / User Manual
Safety and environment instructions
1.6. Package information
Packaging materials of the product are
manufactured from recyclable materials in
accordance with our National Environment
Regulations. Do not dispose of the packaging
materials together with the domestic or other
wastes. Take them to the packaging material
collection points designated by the local
authorities.

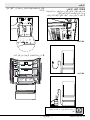
7 / 31 EN
Refrigerator / User Manual
*1
*3
*2
*5
*6
7
*8
9
4
A
B
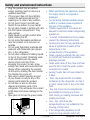
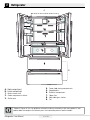
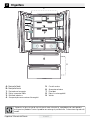
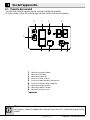
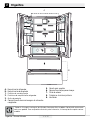
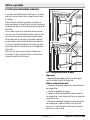
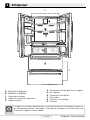
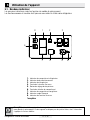
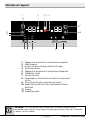
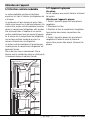
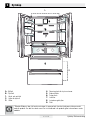
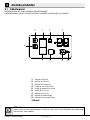
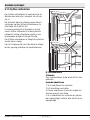
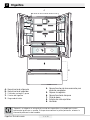
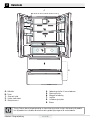
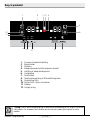
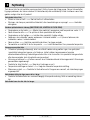
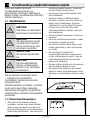
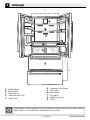
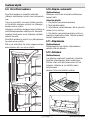
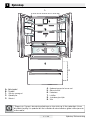
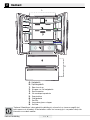
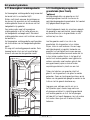
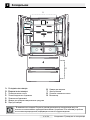
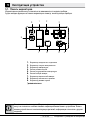
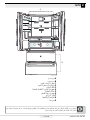
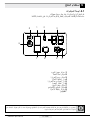
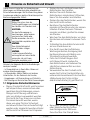
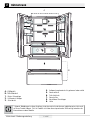
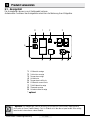
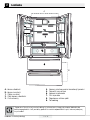
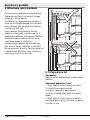
2 Refrigerator
C
*Optional: Figures in this user guide are schematic and may not exactly match your product. If your
product does not comprise the relevant parts, the information pertains to other models.
A- Cooler compartment
B- Freezer compartment
1. Butter-cheese shelf
2. Cooler compartment shelves
3. Shelter wire
4. Frozen food storing compartments
5. Vegetable bins
6. Breakfast compartment
7. Odour filter
8. Adjustable glass shelves
9. Fan

8 / 31 EN
Refrigerator / User Manual
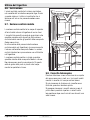
3 Installation
3.1. Right place for installation
Contact the Authorized Service for the product's
installation. To ready the product for installation,
see the information in the user guide and make
sure the electric and water utilities are as required.
If not, call an electrician and plumber to arrange
the utilities as necessary.
B
WARNING: The manufacturer assumes
no responsibility for any damage caused
by the work carried out by unauthorized
persons.
B
WARNING: The product’s power cable
must be unplugged during installation.
Failure to do so may result in death or
serious injuries!
A
WARNING: If the door span is too narrow
for the product to pass, remove the door
and turn the product sideways; if this does
not work, contact the authorized service.
vibration.
heater, stove and similar sources of heat and at
least 5 cm away from electric ovens.
keep in damp environments.
function efficiently. If the product will be placed
in an alcove, remember to leave at least 5 cm
distance between the product and the ceiling
and the walls.
temperatures below -5°C.
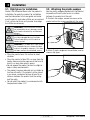
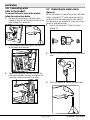
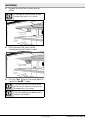
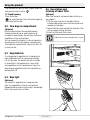
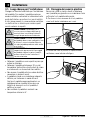
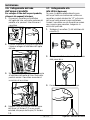
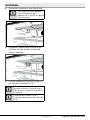
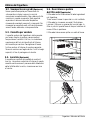
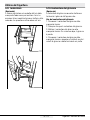
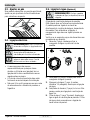
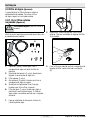
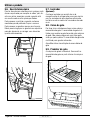
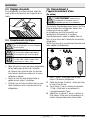
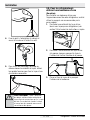
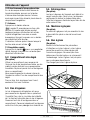
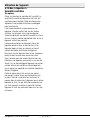
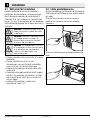
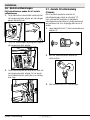
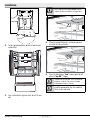
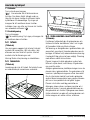
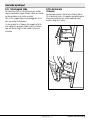
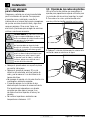
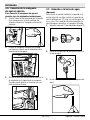
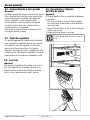
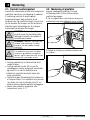
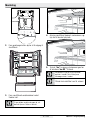
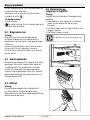
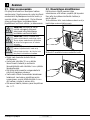
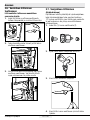
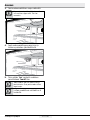
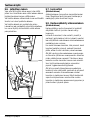
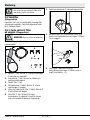
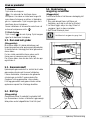
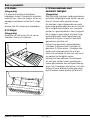
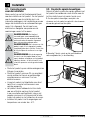
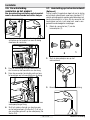
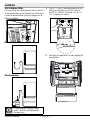
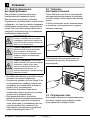
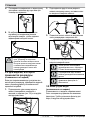
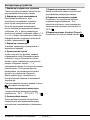
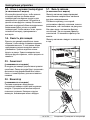
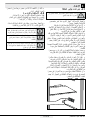
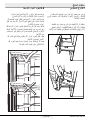
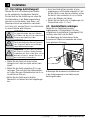
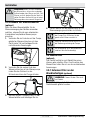
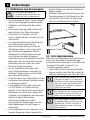
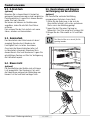
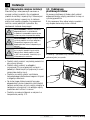
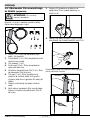
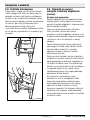
3.2. Attaching the plastic wedges
Use the plastic wedges provided with the product
to provide sufficient space for air circulation
between the product and the wall.
1.
To attach the wedges, remove the screws on the
product and use the screws provided with the wedges.
2.
Attach 2 plastic wedges on the ventilation cover as
shown in the figure.

9 / 31 EN
Refrigerator / User Manual
Installation
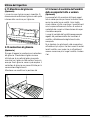
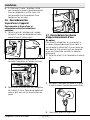
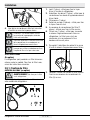
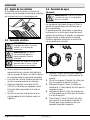
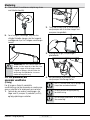
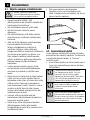
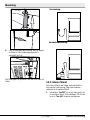
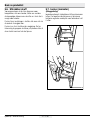
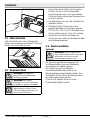
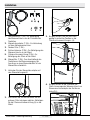
3.3. Adjusting the stands
If the product is not in balanced position, adjust the
front adjustable stands by rotating right or left.
3.4. Power connection
A
WARNING: Do not use extension or
multi sockets in power connection.
B
WARNING: Damaged power cable
must be replaced by Authorized
Service.
C
When placing two coolers in adjacent
position, leave at least 4 cm distance
between the two units.
Our firm will not assume responsibility for any
damages due to usage without earthing and
power connection in compliance with national
regulations.
The power cable plug must be easily
accessible after installation.
Do not use multi-group plug with or without
extension cable between the wall socket and
the refrigerator.
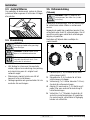
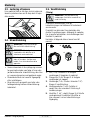
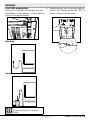
3.5. Water connection
(Optional)
A
WARNING: Unplug the product and
the water pump (if available) during
connection.
The product’s water mains, filter and carboy
connections must be rendered by authorized
service.
The product can be connected to a carboy or
directly to the water mains, depending on the
model. To establish the connection, the water hose
must first be connected to the product.
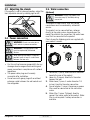
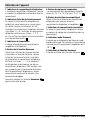
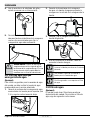
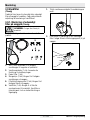
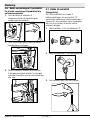
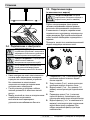
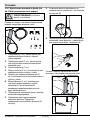
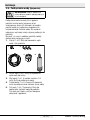
Check to see the following parts are supplied with
your product’s model:
3
1
4
2
*5
1. Connector (1 piece): Used to attach the water
hose to the rear of the product.
2. Hose clip (3 pieces): Used to fix the water
hose on the wall.
3. Water hose (1 piece, 5 meter diameter 1/4
inches): Used for the water connection.
4. Faucet adapter (1 piece): Comprises a porous
filter, used for connection to the cold water
mains.
5. Water filter (1 piece *Optional): Used to
connect the mains water to the product. Water
filter is not required if carboy connection is
available.

10 / 31 EN
Refrigerator / User Manual
Installation
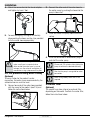
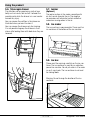
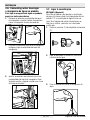
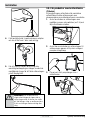
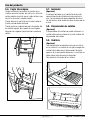
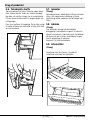
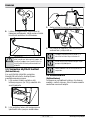
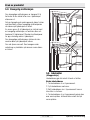
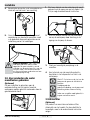
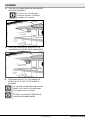
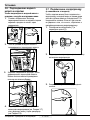
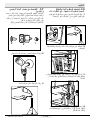
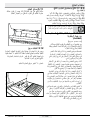
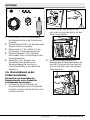
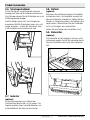
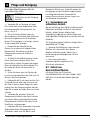
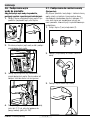
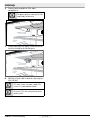
3.6. Connecting water
hose to the product
To connect the water hose to the product,
follow the instructions below.
1. Remove the connector on the hose nozzle
adaptor in the back of the product and run the
hose through the connector.
2. Push the water hose down tightly and connect
to the hose nozzle adaptor.
3. Tighten the connector manually to fix on the
hose nozzle adaptor. You may also tighten the
connector using a pipe wrench or pliers.
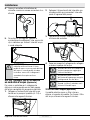
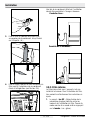
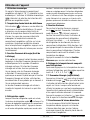
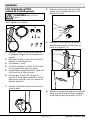
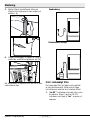
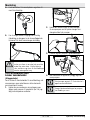
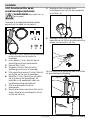
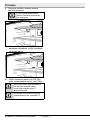
3.7. Connecting to water mains
(Optional)
To use the product by connecting to the cold water
mains, a standard 1/2” valve connector must be
installed to the cold water mains in your home. If
the connector is not available or if you are unsure,
consult a qualified plumber.
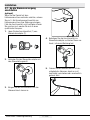
1. Detach the connector (1) from the faucet
adaptor (2).
1
23
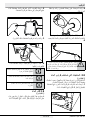
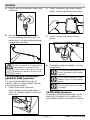
2. Connect the faucet adaptor to the water mains
valve.
3. Attach the connector around the water hose.

11 / 31 EN
Refrigerator / User Manual
Installation
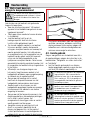
4. Attach the connector into the faucet adaptor
and tighten by hand / tool.
5. To avoid damaging, shifting or accidentally
disconnecting the hose, use the clips provided
to fix the water hose appropriately.
A
WARNING:After turning the faucet on,
make sure there is no water leak on
either end of the water hose. In case of
leakage, turn the valve off and tighten all
connections using a pipe wrench or pliers.
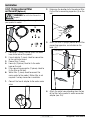
3.8. For products using water carboy
(Optional)
To use a carboy for the product’s water
connection, the water pump recommended by the
authorized service must be used.
1. Connect one end of the water hose provided
with the pump to the product (see 3. 6) and
follow the instructions below.
2. Connect the other end of the water hose to
the water pump by pushing the hose into the
pump’s hose inlet.
3. Place and fasten the pump hose inside the
carboy.
4. Once the connection is established, plug in
and start the water pump.
C
Please wait 2-3 minutes after starting the
pump to achieve the desired efficiency.
C
See also the pump’s user guide for water
connection.
C
When using carboy, water filter is not
required.
3.9 Water filter
(Optional)
The product may have internal or external filter,
depending on the model. To attach the water filter,
follow the instructions below.

12 / 31 EN
Refrigerator / User Manual
Installation
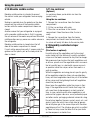
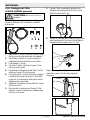
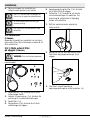
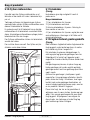
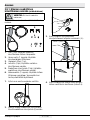
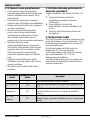
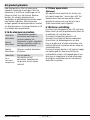
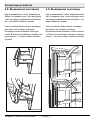
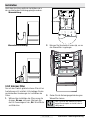
3.9.1. Fixing external filter
on the wall (Optional)
A
WARNING: Do not fix the filter on the
product.
Check to see the following parts are supplied with
your product’s model:
1
2
3
4
5
6
1. Connector (1 piece): Used to attach the water
hose to the rear of the product.
2. Faucet adapter (1 piece): Used for connection
to the cold water mains.
3. Porous filter (1 piece)
4. Hose clip (3 pieces): Used to fix the water
hose on the wall.
5. Filter connecting apparatus (2 pieces): Used to
fix the filter on the wall.
6. Water filter (1 piece): Used to connect the
mains water to the product. Water filter is not
required if carboy connection is available.
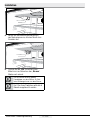
1. Connect the faucet adaptor to the water mains
valve.
2. Determine the location to fix the external filter.
Fix the filter’s connecting apparatus (5) on the
wall.
3. Attach the filter in upright position on the filter
connecting apparatus, as indicated on the
label. ( 6 ).
4. Attach the water hose extending from the top
of the filter to the product’s water connection
adaptor (see. 3 6).

13 / 31 EN
Refrigerator / User Manual
Installation
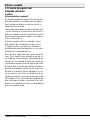
After the connection is established, it should look
like the figure below.
Water line:
Carboy line:
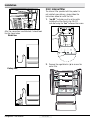
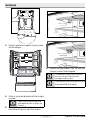
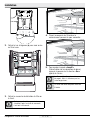
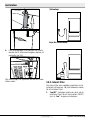
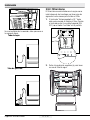
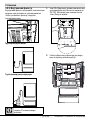
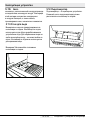
3.9.2. Internal filter
The internal filter provided with the product is
not installed upon delivery; please follow the
instructions below to install the filter.
1. “Ice Off ” indicator must be active while
installing the filter. Switch the ON-OFF
indicator using the “Ice” button on the screen.
2. Remove the vegetable bin (a) to access the
water filter.
a a

14 / 31 EN
Refrigerator / User Manual
Installation
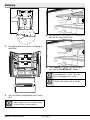
3. Remove the water filter by-pass cover by
pulling.
C
A few drops of water may flow out after
removing the cover; this is normal.
4. Place the water filter cover into the
mechanism and push to lock in place.
5. Push the “Ice” button on the screen again to
cancel the “Ice Off ” mode.
C
The water filter will clear certain foreign
particles in the water. It will not clear the
microorganisms in the water.
C
The filter replacement period of your
product is 6 months.

15 / 31 EN
Refrigerator / User Manual
4 Preparation
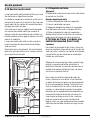
4.1. What to do for energy saving
A
Connecting the product to electronic
energy-saving systems is harmful, as it
may damage the product.
For a freestanding appliance; ‘this refrigerating
appliance is not intended to be used as a built-
in appliance’.
Do not keep the refrigerator doors open for
long periods.
Do not place hot food or beverages into the
refrigerator.
Do not overfill the refrigerator; blocking the
internal air flow will reduce cooling capacity.
To be able store maximum food in the freezer
compartment of your refrigerator, the upper
drawers have to be removed and placed on
top of wire rack. The net volume and energy
consumption values specified in the energy
label of the refrigerator was tested after
removing the freezer compartment’s upper
shelf and the ice container which can easily
be removed manually. Using the lower drawer
while loading is highly recommended.
Since hot and humid air will not directly
penetrate into your product when the doors
are not opened, your product will optimize
itself in conditions sufficient to protect your
food. Functions and components such as
compressor, fan, heater, defrost, lighting,
display and so on will operate according to
the needs to consume minimum energy under
these circumstances.
Depending on the product’s features;
defrosting frozen foods in the cooler
compartment will ensure energy saving and
preserve food quality.
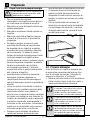
Make sure the foods are not in contact with
the cooler compartment temperature sensor
described below.
Food must be stored in drawers inside the
cooler compartment in order to provide energy
saving and preserve the food in a better
ambient.
Prevent direct contact between the
temperature sensor in the freezer compartment
and the food packages. Energy consumption
may increase in case of a contact with the
sensor.
4.2. First use
Before using your refrigerator, make sure the
necessary preparations are made in line with
the instructions in “Safety and environment
instructions” and “Installation” sections.
Keep the product running with no food inside
for 6 hours and do not open the door, unless
absolutely necessary.
C
A sound will be heard when the
compressor is engaged. It is normal to
hear sound even when the compressor is
inactive, due to the compressed liquids and
gasses in the cooling system.
C
It is normal for the front edges of the
refrigerator to be warm. These areas are
designed to warm up in order to prevent
condensation.
C
In some models, indicator panel is dimmed
automatically 5 minutes after the door is
closed. It will be activated again when the
door is opened or any key is pressed.

16 / 31 EN
Refrigerator / User Manual
C
*Optional: The figures in this user guide are intended as drafts and may not perfectly match your
product. If your product does not comprise the relevant parts, the information pertains to other models.
5 Using the product
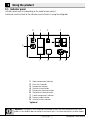
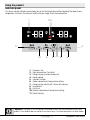
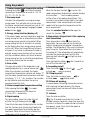
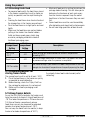
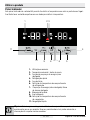
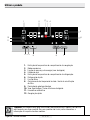
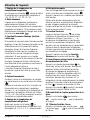
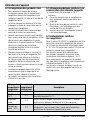
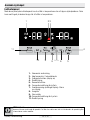
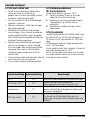
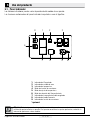
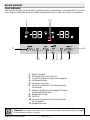
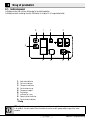
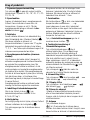
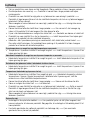
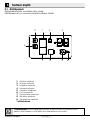
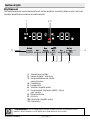
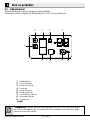
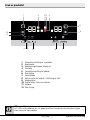
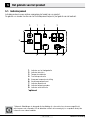
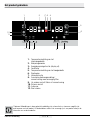
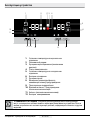
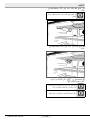
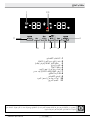
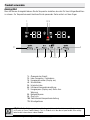
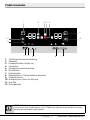
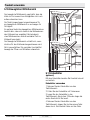
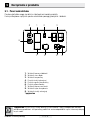
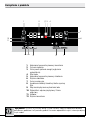
5.1. Indicator panel
Indicator panels may vary depending on the model of your product.
Audio and visual functions of the indicator panel will assist in using the refrigerator.
45
7
6
8
9
1
2
3
1. Cooler compartment indicator
2. Error status indicator
3. Temperature indicator
4. Vacation function button
5. Temperature adjustment button
6. Compartment selection button
7. Freezer compartment indicator
8. Economy mode indicator
9. Vacation function indicator
*optional

17 / 31 EN
Refrigerator / User Manual
Using the product
1. Cooler compartment indicator
The cooler compartment light will turn on when
adjusting the cooler compartment temperature.
2. Error status indicator
This sensor will activate if the refrigerator is not
cooling adequately or in case of sensor fault. When
this indicator is active, the freezer compartment
temperature indicator will display "E" and the
cooler compartment temperature indicator will
display "1, 2, 3..." etc. numbers. The numbers on
the indicator serve to inform the service personnel
about the fault. (
)
3. Temperature indicator
Indicates the temperature of the freezer and cooler
compartments.
4. Vacation function button
To activate this function, press and hold the
Vacation button for 3 seconds. When the Vacation
function is active, the cooler compartment
temperature indicator displays the inscription
"- -" and no cooling process will be active in
the cooling compartment. This function is not
suitable to keep food in the cooler compartment.
Other compartments will remain cooled with the
respective temperature set for each compartment.
Push the Vacation button (
) again to cancel
this function.
5. Temperature adjustment button
Respective compartment's temperature varies in
-24°C... -18°C and 8°C...1°C ranges. (
)
6. Compartment selection button
Use the refrigerator compartment selection
button to toggle between the cooler and freezer
compartments. (
)
7. Freezer compartment indicator
The freezer compartment light will turn on when
adjusting the freezer compartment temperature.
8. Economy mode indicator
Indicates the refrigerator is running on energy-
saving mode. This indicator will be active when the
temperature in the freezer compartment is set to
-18°C. (
)
9. Vacation function indicator
Indicates the vacation function is active. (
)

18 / 31 EN
Refrigerator / User Manual
Using the product
C
*Optional: The figures in this user guide are intended as drafts and may not perfectly match your
product. If your product does not comprise the relevant parts, the information pertains to other models.
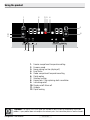
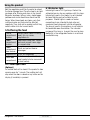
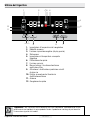
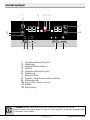
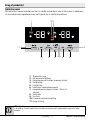
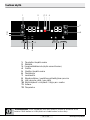
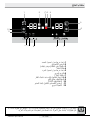
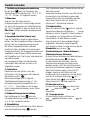
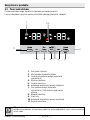
Indicator panel
This touch-control indicator panel allows you to set the temperature without opening the door of your
refrigerator. Just touch the relevant button with your finger to set the temperature.
1- Economic use
2- High temperature / fault alert
3- Energy saving function (display off)
4- Rapid cooling
5- Vacation function
6- Cooler compartment temperature setting
7- Energy saving (display off) / Alarm off warning
8- Keypad lock
9- Eco-fuzzy
10- Freezer compartment temperature setting
11- Rapid freezing

19 / 31 EN
Refrigerator / User Manual
Using the product
1. Economic use
This sign will light up when the freezer compart-
ment is set to -18°C', the most economical
setting. (
) Economic use indicator will turn off
when rapid cooling or rapid freezing function is
selected.
2. High temperature / fault alert
This indicator (
) will light up in case of tem-
perature faults or fault alerts.
This indicator illuminates during power failure, high
temperature failures and error warnings. During
sustained power failures, the highest temperature
that the freezer compartment reaches will flash on
the digital display. After checking the food located
in the freezer compartment press the alarm off
button to clear the warning.
3. Energy saving function (display off)
If the product doors are kept closed for a long time
energy saving function is automatically activated
and energy saving symbol is illuminated. When
energy saving function is activated, all symbols
on the display other than energy saving symbol
will turn off. When the Energy Saving function is
activated, if any button is pressed or the door is
opened, energy saving function will be canceled
and the symbols on display will return to normal.
Energy saving function is activated during delivery
from factory and cannot be canceled.
4. Rapid cooling
When the rapid cooling function is turned on, the rapid
cool indicator will light up (
) and the cooler com-
partment temperature indicator will display the value 1.
Push the Rapid cool button again to cancel this func-
tion. The Rapid cool indicator will turn off and return
to normal setting. The rapid cooling function will be
automatically cancelled after 1 hour, unless cancelled
by the user. Too cool a large amount of fresh food,
press the rapid cool button before placing the food in
the cooler compartment.
5. Vacation function
To activate the Vacation function, press the
button for (
) 3 seconds; this will activate the
vacation mode indicator (
). When the Vacation
function is active, the cooler compartment
temperature indicator displays the inscription
"- -" and no cooling process will be active in
the cooling compartment. This function is not
suitable to keep food in the cooler compartment.
Other compartments will remain cooled with the
respective temperature set for each compartment.
Push the vacation function button again to
cancel this function
6. Cooler compartment temperature setting
After pressing the button, the cooler compartment
temperature can be set to 8,7,6,5,4,3,2 and 1
respectively. (
)
7.1. Energy saving (display off)
Pressing this button (
) will light up the energy
saving sign ( ) and the Energy-saving function
will activate. Activating the energy-saving function
will turn off all other signs on the display. When
the energy-saving function is active, pressing any
button or opening the door will deactivate the
energy-saving function and the display signals will
return to normal. Pressing this button ( ) again
will turn off the energy-saving sign and deactivate
the energy-saving function.
7.2.Alarm off warning:
In case of power failure/high temperature alarm,
after checking the food located in the freezer
compartment press the alarm off button to clear
the warning.
8. Keypad lock
Press the keypad lock button (
) simultaneously
for 3 seconds. The keypad lock sign
(
) will light up and the keypad lock will be
activated. The buttons will be inactive when the
Keypad lock is activated. Press the Keypad lock
button again simultaneously for 3 seconds. The
keypad lock sign will turn off and the keypad lock
mode will be disengaged.
Press the keypad lock button (
) to prevent
changing the refrigerator's temperature settings.
Sidan laddas...
Sidan laddas...
Sidan laddas...
Sidan laddas...
Sidan laddas...
Sidan laddas...
Sidan laddas...
Sidan laddas...
Sidan laddas...
Sidan laddas...
Sidan laddas...
Sidan laddas...
Sidan laddas...
Sidan laddas...
Sidan laddas...
Sidan laddas...
Sidan laddas...
Sidan laddas...
Sidan laddas...
Sidan laddas...
Sidan laddas...
Sidan laddas...
Sidan laddas...
Sidan laddas...
Sidan laddas...
Sidan laddas...
Sidan laddas...
Sidan laddas...
Sidan laddas...
Sidan laddas...
Sidan laddas...
Sidan laddas...
Sidan laddas...
Sidan laddas...
Sidan laddas...
Sidan laddas...
Sidan laddas...
Sidan laddas...
Sidan laddas...
Sidan laddas...
Sidan laddas...
Sidan laddas...
Sidan laddas...
Sidan laddas...
Sidan laddas...
Sidan laddas...
Sidan laddas...
Sidan laddas...
Sidan laddas...
Sidan laddas...
Sidan laddas...
Sidan laddas...
Sidan laddas...
Sidan laddas...
Sidan laddas...
Sidan laddas...
Sidan laddas...
Sidan laddas...
Sidan laddas...
Sidan laddas...
Sidan laddas...
Sidan laddas...
Sidan laddas...
Sidan laddas...
Sidan laddas...
Sidan laddas...
Sidan laddas...
Sidan laddas...
Sidan laddas...
Sidan laddas...
Sidan laddas...
Sidan laddas...
Sidan laddas...
Sidan laddas...
Sidan laddas...
Sidan laddas...
Sidan laddas...
Sidan laddas...
Sidan laddas...
Sidan laddas...
Sidan laddas...
Sidan laddas...
Sidan laddas...
Sidan laddas...
Sidan laddas...
Sidan laddas...
Sidan laddas...
Sidan laddas...
Sidan laddas...
Sidan laddas...
Sidan laddas...
Sidan laddas...
Sidan laddas...
Sidan laddas...
Sidan laddas...
Sidan laddas...
Sidan laddas...
Sidan laddas...
Sidan laddas...
Sidan laddas...
Sidan laddas...
Sidan laddas...
Sidan laddas...
Sidan laddas...
Sidan laddas...
Sidan laddas...
Sidan laddas...
Sidan laddas...
Sidan laddas...
Sidan laddas...
Sidan laddas...
Sidan laddas...
Sidan laddas...
Sidan laddas...
Sidan laddas...
Sidan laddas...
Sidan laddas...
Sidan laddas...
Sidan laddas...
Sidan laddas...
Sidan laddas...
Sidan laddas...
Sidan laddas...
Sidan laddas...
Sidan laddas...
Sidan laddas...
Sidan laddas...
Sidan laddas...
Sidan laddas...
Sidan laddas...
Sidan laddas...
Sidan laddas...
Sidan laddas...
Sidan laddas...
Sidan laddas...
Sidan laddas...
Sidan laddas...
Sidan laddas...
Sidan laddas...
Sidan laddas...
Sidan laddas...
Sidan laddas...
Sidan laddas...
Sidan laddas...
Sidan laddas...
Sidan laddas...
Sidan laddas...
Sidan laddas...
Sidan laddas...
Sidan laddas...
Sidan laddas...
Sidan laddas...
Sidan laddas...
Sidan laddas...
Sidan laddas...
Sidan laddas...
Sidan laddas...
Sidan laddas...
Sidan laddas...
Sidan laddas...
Sidan laddas...
Sidan laddas...
Sidan laddas...
Sidan laddas...
Sidan laddas...
Sidan laddas...
Sidan laddas...
Sidan laddas...
Sidan laddas...
Sidan laddas...
Sidan laddas...
Sidan laddas...
Sidan laddas...
Sidan laddas...
Sidan laddas...
Sidan laddas...
Sidan laddas...
Sidan laddas...
Sidan laddas...
Sidan laddas...
Sidan laddas...
Sidan laddas...
Sidan laddas...
Sidan laddas...
Sidan laddas...
Sidan laddas...
Sidan laddas...
Sidan laddas...
Sidan laddas...
Sidan laddas...
Sidan laddas...
Sidan laddas...
Sidan laddas...
Sidan laddas...
Sidan laddas...
Sidan laddas...
Sidan laddas...
Sidan laddas...
Sidan laddas...
Sidan laddas...
Sidan laddas...
Sidan laddas...
Sidan laddas...
Sidan laddas...
Sidan laddas...
Sidan laddas...
Sidan laddas...
Sidan laddas...
Sidan laddas...
Sidan laddas...
Sidan laddas...
Sidan laddas...
Sidan laddas...
Sidan laddas...
Sidan laddas...
Sidan laddas...
Sidan laddas...
Sidan laddas...
Sidan laddas...
Sidan laddas...
Sidan laddas...
Sidan laddas...
Sidan laddas...
Sidan laddas...
Sidan laddas...
Sidan laddas...
Sidan laddas...
Sidan laddas...
Sidan laddas...
Sidan laddas...
Sidan laddas...
Sidan laddas...
Sidan laddas...
Sidan laddas...
Sidan laddas...
Sidan laddas...
Sidan laddas...
Sidan laddas...
Sidan laddas...
Sidan laddas...
Sidan laddas...
Sidan laddas...
Sidan laddas...
Sidan laddas...
Sidan laddas...
Sidan laddas...
Sidan laddas...
Sidan laddas...
Sidan laddas...
Sidan laddas...
Sidan laddas...
Sidan laddas...
Sidan laddas...
Sidan laddas...
Sidan laddas...
Sidan laddas...
Sidan laddas...
Sidan laddas...
Sidan laddas...
Sidan laddas...
Sidan laddas...
Sidan laddas...
Sidan laddas...
Sidan laddas...
Sidan laddas...
Sidan laddas...
Sidan laddas...
Sidan laddas...
Sidan laddas...
Sidan laddas...
Sidan laddas...
Sidan laddas...
Sidan laddas...
Sidan laddas...
Sidan laddas...
Sidan laddas...
Sidan laddas...
Sidan laddas...
Sidan laddas...
Sidan laddas...
Sidan laddas...
Sidan laddas...
Sidan laddas...
Sidan laddas...
Sidan laddas...
Sidan laddas...
Sidan laddas...
Sidan laddas...
Sidan laddas...
Sidan laddas...
Sidan laddas...
Sidan laddas...
Sidan laddas...
Sidan laddas...
Sidan laddas...
Sidan laddas...
Sidan laddas...
Sidan laddas...
Sidan laddas...
Sidan laddas...
Sidan laddas...
Sidan laddas...
Sidan laddas...
Sidan laddas...
Sidan laddas...
Sidan laddas...
Sidan laddas...
Sidan laddas...
Sidan laddas...
Sidan laddas...
Sidan laddas...
Sidan laddas...
Sidan laddas...
Sidan laddas...
Sidan laddas...
Sidan laddas...
Sidan laddas...
Sidan laddas...
Sidan laddas...
Sidan laddas...
Sidan laddas...
Sidan laddas...
Sidan laddas...
Sidan laddas...
Sidan laddas...
Sidan laddas...
Sidan laddas...
Sidan laddas...
Sidan laddas...
Sidan laddas...
Sidan laddas...
Sidan laddas...
Sidan laddas...
Sidan laddas...
Sidan laddas...
Sidan laddas...
Sidan laddas...
Sidan laddas...
Sidan laddas...
Sidan laddas...
Sidan laddas...
Sidan laddas...
Sidan laddas...
Sidan laddas...
Sidan laddas...
Sidan laddas...
Sidan laddas...
Sidan laddas...
Sidan laddas...
Sidan laddas...
Sidan laddas...
Sidan laddas...
Sidan laddas...
Sidan laddas...
Sidan laddas...
Sidan laddas...
Sidan laddas...
Sidan laddas...
Sidan laddas...
Sidan laddas...
Sidan laddas...
Sidan laddas...
Sidan laddas...
Sidan laddas...
Sidan laddas...
Sidan laddas...
Sidan laddas...
Sidan laddas...
Sidan laddas...
Sidan laddas...
Sidan laddas...
Sidan laddas...
Sidan laddas...
Sidan laddas...
Sidan laddas...
Sidan laddas...
Sidan laddas...
Sidan laddas...
Sidan laddas...
Sidan laddas...
Sidan laddas...
Sidan laddas...
Sidan laddas...
Sidan laddas...
Sidan laddas...
Sidan laddas...
Sidan laddas...
Sidan laddas...
Sidan laddas...
Sidan laddas...
Sidan laddas...
Sidan laddas...
Sidan laddas...
Sidan laddas...
Sidan laddas...
Sidan laddas...
Sidan laddas...
Sidan laddas...
Sidan laddas...
Sidan laddas...
Sidan laddas...
Sidan laddas...
Sidan laddas...
Sidan laddas...
Sidan laddas...
Sidan laddas...
Sidan laddas...
Sidan laddas...
Sidan laddas...
Sidan laddas...
Sidan laddas...
Sidan laddas...
Sidan laddas...
Sidan laddas...
Sidan laddas...
Sidan laddas...
Sidan laddas...
Sidan laddas...
Sidan laddas...
Sidan laddas...
Sidan laddas...
Sidan laddas...
Sidan laddas...
Sidan laddas...
Sidan laddas...
Sidan laddas...
Sidan laddas...
Sidan laddas...
Sidan laddas...
Sidan laddas...
Sidan laddas...
Sidan laddas...
Sidan laddas...
Sidan laddas...
Sidan laddas...
Sidan laddas...
Sidan laddas...
Sidan laddas...
Sidan laddas...
Sidan laddas...
Sidan laddas...
Sidan laddas...
Sidan laddas...
-
 1
1
-
 2
2
-
 3
3
-
 4
4
-
 5
5
-
 6
6
-
 7
7
-
 8
8
-
 9
9
-
 10
10
-
 11
11
-
 12
12
-
 13
13
-
 14
14
-
 15
15
-
 16
16
-
 17
17
-
 18
18
-
 19
19
-
 20
20
-
 21
21
-
 22
22
-
 23
23
-
 24
24
-
 25
25
-
 26
26
-
 27
27
-
 28
28
-
 29
29
-
 30
30
-
 31
31
-
 32
32
-
 33
33
-
 34
34
-
 35
35
-
 36
36
-
 37
37
-
 38
38
-
 39
39
-
 40
40
-
 41
41
-
 42
42
-
 43
43
-
 44
44
-
 45
45
-
 46
46
-
 47
47
-
 48
48
-
 49
49
-
 50
50
-
 51
51
-
 52
52
-
 53
53
-
 54
54
-
 55
55
-
 56
56
-
 57
57
-
 58
58
-
 59
59
-
 60
60
-
 61
61
-
 62
62
-
 63
63
-
 64
64
-
 65
65
-
 66
66
-
 67
67
-
 68
68
-
 69
69
-
 70
70
-
 71
71
-
 72
72
-
 73
73
-
 74
74
-
 75
75
-
 76
76
-
 77
77
-
 78
78
-
 79
79
-
 80
80
-
 81
81
-
 82
82
-
 83
83
-
 84
84
-
 85
85
-
 86
86
-
 87
87
-
 88
88
-
 89
89
-
 90
90
-
 91
91
-
 92
92
-
 93
93
-
 94
94
-
 95
95
-
 96
96
-
 97
97
-
 98
98
-
 99
99
-
 100
100
-
 101
101
-
 102
102
-
 103
103
-
 104
104
-
 105
105
-
 106
106
-
 107
107
-
 108
108
-
 109
109
-
 110
110
-
 111
111
-
 112
112
-
 113
113
-
 114
114
-
 115
115
-
 116
116
-
 117
117
-
 118
118
-
 119
119
-
 120
120
-
 121
121
-
 122
122
-
 123
123
-
 124
124
-
 125
125
-
 126
126
-
 127
127
-
 128
128
-
 129
129
-
 130
130
-
 131
131
-
 132
132
-
 133
133
-
 134
134
-
 135
135
-
 136
136
-
 137
137
-
 138
138
-
 139
139
-
 140
140
-
 141
141
-
 142
142
-
 143
143
-
 144
144
-
 145
145
-
 146
146
-
 147
147
-
 148
148
-
 149
149
-
 150
150
-
 151
151
-
 152
152
-
 153
153
-
 154
154
-
 155
155
-
 156
156
-
 157
157
-
 158
158
-
 159
159
-
 160
160
-
 161
161
-
 162
162
-
 163
163
-
 164
164
-
 165
165
-
 166
166
-
 167
167
-
 168
168
-
 169
169
-
 170
170
-
 171
171
-
 172
172
-
 173
173
-
 174
174
-
 175
175
-
 176
176
-
 177
177
-
 178
178
-
 179
179
-
 180
180
-
 181
181
-
 182
182
-
 183
183
-
 184
184
-
 185
185
-
 186
186
-
 187
187
-
 188
188
-
 189
189
-
 190
190
-
 191
191
-
 192
192
-
 193
193
-
 194
194
-
 195
195
-
 196
196
-
 197
197
-
 198
198
-
 199
199
-
 200
200
-
 201
201
-
 202
202
-
 203
203
-
 204
204
-
 205
205
-
 206
206
-
 207
207
-
 208
208
-
 209
209
-
 210
210
-
 211
211
-
 212
212
-
 213
213
-
 214
214
-
 215
215
-
 216
216
-
 217
217
-
 218
218
-
 219
219
-
 220
220
-
 221
221
-
 222
222
-
 223
223
-
 224
224
-
 225
225
-
 226
226
-
 227
227
-
 228
228
-
 229
229
-
 230
230
-
 231
231
-
 232
232
-
 233
233
-
 234
234
-
 235
235
-
 236
236
-
 237
237
-
 238
238
-
 239
239
-
 240
240
-
 241
241
-
 242
242
-
 243
243
-
 244
244
-
 245
245
-
 246
246
-
 247
247
-
 248
248
-
 249
249
-
 250
250
-
 251
251
-
 252
252
-
 253
253
-
 254
254
-
 255
255
-
 256
256
-
 257
257
-
 258
258
-
 259
259
-
 260
260
-
 261
261
-
 262
262
-
 263
263
-
 264
264
-
 265
265
-
 266
266
-
 267
267
-
 268
268
-
 269
269
-
 270
270
-
 271
271
-
 272
272
-
 273
273
-
 274
274
-
 275
275
-
 276
276
-
 277
277
-
 278
278
-
 279
279
-
 280
280
-
 281
281
-
 282
282
-
 283
283
-
 284
284
-
 285
285
-
 286
286
-
 287
287
-
 288
288
-
 289
289
-
 290
290
-
 291
291
-
 292
292
-
 293
293
-
 294
294
-
 295
295
-
 296
296
-
 297
297
-
 298
298
-
 299
299
-
 300
300
-
 301
301
-
 302
302
-
 303
303
-
 304
304
-
 305
305
-
 306
306
-
 307
307
-
 308
308
-
 309
309
-
 310
310
-
 311
311
-
 312
312
-
 313
313
-
 314
314
-
 315
315
-
 316
316
-
 317
317
-
 318
318
-
 319
319
-
 320
320
-
 321
321
-
 322
322
-
 323
323
-
 324
324
-
 325
325
-
 326
326
-
 327
327
-
 328
328
-
 329
329
-
 330
330
-
 331
331
-
 332
332
-
 333
333
-
 334
334
-
 335
335
-
 336
336
-
 337
337
-
 338
338
-
 339
339
-
 340
340
-
 341
341
-
 342
342
-
 343
343
-
 344
344
-
 345
345
-
 346
346
-
 347
347
-
 348
348
-
 349
349
-
 350
350
-
 351
351
-
 352
352
-
 353
353
-
 354
354
-
 355
355
-
 356
356
-
 357
357
-
 358
358
-
 359
359
-
 360
360
-
 361
361
-
 362
362
-
 363
363
-
 364
364
-
 365
365
-
 366
366
-
 367
367
-
 368
368
-
 369
369
-
 370
370
-
 371
371
-
 372
372
-
 373
373
-
 374
374
-
 375
375
-
 376
376
-
 377
377
-
 378
378
-
 379
379
-
 380
380
-
 381
381
-
 382
382
-
 383
383
-
 384
384
-
 385
385
-
 386
386
-
 387
387
-
 388
388
-
 389
389
-
 390
390
-
 391
391
-
 392
392
-
 393
393
-
 394
394
-
 395
395
-
 396
396
-
 397
397
-
 398
398
-
 399
399
-
 400
400
-
 401
401
-
 402
402
-
 403
403
-
 404
404
-
 405
405
-
 406
406
-
 407
407
-
 408
408
-
 409
409
-
 410
410
-
 411
411
-
 412
412
-
 413
413
-
 414
414
-
 415
415
-
 416
416
-
 417
417
-
 418
418
-
 419
419
-
 420
420
-
 421
421
-
 422
422
-
 423
423
-
 424
424
-
 425
425
-
 426
426
-
 427
427
-
 428
428
-
 429
429
-
 430
430
-
 431
431
-
 432
432
-
 433
433
-
 434
434
-
 435
435
-
 436
436
-
 437
437
-
 438
438
-
 439
439
-
 440
440
-
 441
441
-
 442
442
-
 443
443
-
 444
444
-
 445
445
-
 446
446
-
 447
447
-
 448
448
-
 449
449
-
 450
450
-
 451
451
-
 452
452
-
 453
453
-
 454
454
-
 455
455
-
 456
456
-
 457
457
-
 458
458
-
 459
459
-
 460
460
-
 461
461
-
 462
462
-
 463
463


på andra språk
- italiano: Smeg FQ55FXDF Manuale utente
- español: Smeg FQ55FXDF Manual de usuario
- français: Smeg FQ55FXDF Manuel utilisateur
- dansk: Smeg FQ55FXDF Brugermanual
- Nederlands: Smeg FQ55FXDF Handleiding
Andra dokument
-
Beko GNE60530DXN Bruksanvisning
-
Grundig GQN1233XN KOMBISKAP Bruksanvisning
-
-
-
-
Blomberg KQD 1360X A++ Användarmanual
-
Electrolux LNC7ME34W2 Användarmanual
-
AEG RCB736E5MB Användarmanual
-
AEG RCB736D5MB Användarmanual
-
AEG RCB736E5MX Användarmanual