Chef Matteo EPICURE KAFFETRAKTER Bruksanvisning
- Kategori
- Mixer / matberedare tillbehör
- Typ
- Bruksanvisning

EPICURE
User Manual
Coffee Maker

Thank you for purchasing your new POINT Refrigerator. These
operating instructions will help you use it properly and safely. We
recommend that you spend some time reading this instruction
manual in order that you fully understand all the operational features
this instruction manual for future reference.
Takk for at du kjøpte ditt nye POINT kjøleskap. Denne
bruksanvisningen vil hjelpe deg med å bruke den på en trygg og
riktig måte. Vi anbefaler at du tar deg tid til å lese gjennom hele
bruksanvisningen for å bli fortrolig med alle funksjonene som tilbys.
Les alle sikkerhetsanvisningene nøye før bruk, og oppbevar
bruksanvisningen for fremtidig referanse.
Kiitos, kun valitsit uuden POINT-jääkaappi. Nämä käyttöohjeet
opastavat sinua käyttämään laitetta oikein ja turvallisesti. On
suositeltavaa käyttää aikaa tämän käyttöoppaan lukemiseen, jotta
ymmärrät täysin, mitä toiminnallisia ominaisuuksia tuote tarjoaa. Lue
kaikki turvallisuusohjeet huolellisesti ennen laitteen käyttöä ja säilytä
käyttöopas myöhempää käyttöä varten.
Tak for købet af dit nye køleskab fra POINT. Disse brugervejledninger
hjælper dig med at bruge dette apparat rigtigt og sikkert. Vi
anbefaler, at du læser denne brugervejledning, så du får en fuld
forståelse af hvordan alle funktionerne virker. Læs
sikkerhedsforskrifterne grundigt inden brug, og gem denne
Tack för att du har köpt ditt nya kylskåp från POINT. Denna
bruksanvisning hjälper dig att använda den på ett säkert och korrekt
sätt. Vi rekommenderar att du tar dig tid att läsa igenom denna
bruksanvisning för att till fullo förstå alla driftfunktioner som den
erbjuder. Läs noga igenom alla säkerhetsinstruktioner före
användning och spara bruksanvisningen för framtida bruk.
Thank you for purchasing your new Chef Matteo Coffee Maker.
These operating instructions will help you use it properly and safely.
We recommend that you spend some time reading this instruction
manual in order that you fully understand all the operational features
it offers. Read all the safety instructions carefully before use and
keep this instruction manual for future reference.
Takk for at du kjøpte din nye Chef Matteo kaffetrakter.
Denne bruksanvisningen vil hjelpe deg med å bruke den på en trygg
og riktig måte. Vi anbefaler at du tar deg tid til å lese gjennom
hele bruksanvisningen for å bli fortrolig med alle funksjonene som
tilbys. Les alle sikkerhetsanvisningene nøye før bruk, og oppbevar
bruksanvisningen for fremtidig referanse.
Kiitos, kun valitsit uuden Chef Matteo -kahvinkeittimen.
Nämä käyttöohjeet opastavat sinua käyttämään laitetta oikein ja
turvallisesti. On suositeltavaa käyttää aikaa tämän käyttöoppaan
lukemiseen, jotta ymmärrät täysin, mitä toiminnallisia ominaisuuksia
tuote tarjoaa. Lue kaikki turvallisuusohjeet huolellisesti ennen laitteen
käyttöä ja säilytä käyttöopas myöhempää käyttöä varten.
Tak for købet af dit nye kaffemaskine fra Chef Matteo.
Disse brugervejledninger hjælper dig med at bruge dette apparat
rigtigt og sikkert. Vi anbefaler, at du læser denne brugervejledning,
så du får en fuld forståelse af hvordan alle funktionerne virker.
Læs sikkerhedsforskrifterne grundigt inden brug, og gem denne
brugervejledning til senere brug.
Tack för att du har köpt din nya droppbryggare från Chef Matteo.
Denna bruksanvisning hjälper dig att använda den på ett säkert och
korrekt sätt. Vi rekommenderar att du tar dig tid att läsa igenom
denna bruksanvisning för att till fullo förstå alla driftfunktioner som
den erbjuder. Läs noga igenom alla säkerhetsinstruktioner före
användning och spara bruksanvisningen för framtida bruk.

3
4
14
24
34
44
13
23
33
43
53
-
-
-
-
-
Instruction manual - English ............................. page
Bruksanvisning - Norsk ........................................side
Käyttöopas - Suomi ...............................................sivu
Brugervejledning - Dansk .....................................side
Bruksanvisning - Svenska ...................................sida
3

4
IMPORTANT SAFEGUARDS
When using electrical appliances, basic precautions
should always be followed, including the following:
1. Read all instructions.
2. Make sure that your outlet voltage corresponds to the
voltage stated on the rating label of the appliance.
3. To protect against fire, electric shock and injury to
persons do not immerse the mains power cable or
plug in water or other liquid.
4. Close supervision is necessary when any appliance
is used by or near children.
5. Unplug the appliance from the mains power outlet
when not in use and before cleaning. Allow to
completely cool before putting on or taking off parts,
and before cleaning the appliance.
6. Do not operate any appliance with a damaged
mains power cable or plug or after the appliance
malfunctions, or has been damaged in any manner.
Return the appliance to an authorized service facility
for examination, repair or adjustment.
7. The use of accessories not recommended by the
appliance manufacturer may result in fire, electric
shock or injury to persons.
8. Do not use outdoors.
9. Do not let the mains power cable hang over the edge
of a table or counter, or touch hot surfaces.
10. Do not place on or near a hot gas or electric burner,
or in a heated oven.
11. Do not use the appliance for any other use than its
intended use.
4

5
5
12. The coffee jug is designed for use with this appliance.
It must never be used on a range top.
13. Do not clean coffee jug with cleansers, steel wool
pads, or other abrasive material.
14. To disconnect, turn any control to “Off” and remove
the plug from the mains power outlet. Always hold
the plug when removing it, never pull on the mains
power cable to remove the plug.
15. Scalding may occur if the cover is removed during
the brewing cycles. Be careful not to get burned by
the steam.
16. Some parts of appliance are hot when operated, so
do not touch with your hands. Use handles or knobs
only.
17. Never leave the empty carafe on the warming plate
otherwise the carafe is liable to crack.
18. Never use the appliance if the carafe shows any signs
of cracks or if the carafe has a loose or weakened
handle. Only use the carafe with this appliance. Use
carefully as the carafe is very fragile.
19. The appliance can be used by children aged from 8
years and above and persons with reduced physical,
sensory or mental capabilities or lack of experience
and knowledge if they have been given supervision or
instruction concerning use of the appliance in a safe
way and understand the hazards involved. Children
shall not play with the appliance. Cleaning and user
maintenance shall not be made by children unless
they are older than 8 and supervised.
20. Keep the appliance and its mains power cable out of
the reach of children less than 8 years.

6
21. This appliance has been incorporated with a
grounded plug. Ensure that the mains power outlet in
your house is well earthed.
22. Do not set a hot coffee jug on a hot or cold surface.
23. Do not operate the appliance without water.
24. If the mains power cable is damaged, it must be
replaced by the manufacturer, its service agent or
similarly qualified persons in order to avoid a hazard.
25. The appliance must not be immersed in water.
26. This appliance is intended to be used in household
and indoor only.
27. Save these instructions.
6

7
7
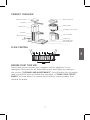
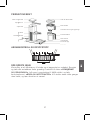
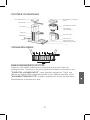
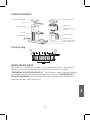
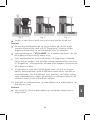
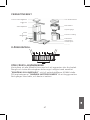
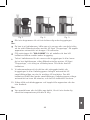
PRODUCT OVERVIEW
Water tank lid Filter holder lid
Filter holder
Strength control valve
Carafe handle
Coffee jug
Warming plate
On/Off button
Sprayer
Water tank
Bracket
Main housing
Base
FLOW CONTROL
BEFORE FIRST TIME USE
Check that all accessories are complete and the appliance is not
damaged. Clean and dry all detachable parts thoroughly according to
the section “CLEANING AND MAINTENANCE”, then fill water into the water
tank to the MAX level and follow the operation of “USING YOUR COFFEE
MAKER” to brew water for several times without coffee powder, then
discard the water.

8
OPERATION
WARNING:
The sprayer, filter holder and coffee jug must be assembled correctly
in position before brewing.
Do not remove the sprayer, filter holder and coffee jug during brewing.
1. Open the water tank lid and fill the water tank with fresh cold water
and then close the water tank lid.
Note:
The water level should not exceed MAX level as indicated on the
water gauge.
If you press the On/Off button without water in the water tank the
blue indicator will flash and the appliance will not operate. Therefore,
make sure the water tank is filled with water before brewing.
2. Place the filter holder into the bracket, and then turn it clockwise until
it is locked into the bracket, make sure it is assembled correctly.
Place 1x4 paper filter in the filter holder.
3. Add coffee powder into the paper filter. Use desired amount of coffee
in the filter. Depending on personal preference, we recommend to
use ground coffee, 60 gram per liter of water. Close the filter lid
completely.
4. Insert the coffee jug onto the warming plate horizontally. Remember
to open the flow control valve clockwise to avoid water spill before
brewing. You can adjust the coffee strength using the flow control
valve based on your personal taste.
5. The coffee maker will go to a “keep warm” mode of 40 minutes after
the brewing process has stopped.
6. Plug the mains power cable into the mains power outlet.
7. Press the On/OFF button once, the blue indicator illuminates and
then the appliance will begin working. The brewing process can be
interrupted by pressing the On/Off button again.
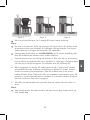
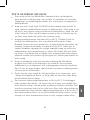
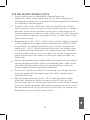
WARNING:
If the end user removes the sprayer during brewing, hot water will
splash and harm people (see Fig.1).
When the end user removes the filter holder during brewing, hot
water will splash from the sprayer and harm people (see Fig.2).
8

9
9
When the end user removes the filter holder and coffee jug during
brewing, hot water will spray out and harm people (see Fig.3).
Fig. 1 Fig. 2 Fig. 3
Do not touch the sprayer to avoid being burnt during brewing.
Note:
You can just take out the coffee jug, pour and serve at any time after
turning the flow control valve anticlockwise to “Drip stop” position.
At that time, the appliance will stop dripping automatically for 30
seconds.
Follow the operation of “DESCALING” to perform descaling when the
blue indicator flashes fast during brewing.
8. Remove the coffee jug to serve when brewing is complete. Before
removing the coffee jug, close the flow control valve anticlockwise to
“Drip stop” position and then turn off the On/Off button, at that time,
the blue indicator will turn off.
9. We recommend to enjoy the freshly brewed coffee after the brewing
process is finished. The coffee maker will enter “keep warm” mode
automatically if it is connected to power. The blue indicator keeps
illuminating during the “keep warm” process. The coffee maker will
cut power automatically within 40 minutes and then the blue indicator
will turn off.
10. Always turn the coffee maker off and disconnect the mains power
supply when not in use.
Note:
Pay attention while pouring the coffee out, otherwise you may be hurt
as the temperature of coffee is high.

10
CLEANING
1. We recommend to use cleaning products made for coffee makers.
2. Wipe the coffee maker's exterior surface with a soft, damp cloth to
remove stains.
3. All detachable parts can be washed in hot soapy water or in the
dishwasher drawer. Do not wash other parts of the coffee maker in
the dish washer.
4. Do not use strong detergents or steel wool on any parts of the coffee
maker. Use a damp cloth to gently wipe the warming plate. Never use
an abrasive cleaner to clean it.
Filter holder lid
Filter holder
5. Replace all parts and keep for next use.
DESCALING
10
To keep the appliance operating efficiently, you should clean away the
mineral deposits left by the water regularly according to the water quality
in your area and the frequency that you use the appliance, as follows:
1.
a)
b)
2.
3.
4.
5.
6.
7.
Fill the water tank with cleaning solution to Max level in 2 options:
option 1: Add water and descaler (cleaning detergent specially for
coffee machine) in the ratio of 4:1;
option 2: Add water and citric acid in the ratio of 100:3.
Push the carafe on the warming plate, pay attention to let the center
line of the carafe align with that of the funnel.
Auto clean :Hold and press the On/Off button for about 3 seconds, the
blue indicator will be flashing and then the appliance will begin
working.
The descaling is finished when the cleaning solution in the water tank
has boiled away. Empty the cleaning solution in the boiler as per the
operation mentioned above.
Then turn off the appliance and refill the water tank with clean water
to MAX level, operate the appliance to enter auto clean mode and the
water in water tank will be boiled away when it is finish, repeat this
operation for at least 3 times.
We recommend to use descaling products made for coffee makers.
Descaling should be done regularly to maintain perfect coffee
experience.

11
11
3. Brewing temperature 92° - 96 °C. Congratulations! Because you
have purchased a brewer approved by the European Coffee Brewing
Center, you have a guarantee that the temperature of the water that
comes into contact with the coffee is between 92° - 96 °C. Then the
water attracts exactly the right amount of flavors and aromas from
the ground coffee. If the temperature is lower, the coffee does not get
the fullness and aroma the coffee has to offer. If it gets higher, the
water will extract more caffeine and chlorogenic acid, which gives
the coffee a bitter taste.
4. Use the correct degree of grinding the coffee. When filter brewing,
the contact time is 4-6 minutes. If you buy ready-ground coffee in a
grocery store, it is usually marked with a degree of grinding. If you
have your own grinder, you must remember to adapt the degree of
grinding to filter coffee.
5. Dose correctly. How strong you want the coffee is a matter of taste
- but in Norway most people prefer approx. 60g of coffee per liter of
water. Always use coffee measure or weight.
6. Proper storage temperature 80° - 85 °C. Freshly brewed coffee
always tastes best - so serve it as fast as you can! If this is not
possible, be sure to store the coffee properly and serve it preferably
within half an hour. After this, the taste is noticeably lost. The correct
storage temperature is 80° - 85 °C. If the temperature becomes too
low, the coffee becomes dull in color and it tastes sour. If it gets too
high, the coffee tastes bitter.
TIPS FOR A PERFECT CUP OF COFFEE
1. Start with a completely clean filter holder. Old coffee and coffee
grounds quickly put a bad taste on new coffee. We recommend
using cleaning/descaling products that are ment for cleaning coffee
makers.
2. Use fresh, cold water. Since 98.5% of the finished coffee consists of
water, the water quality means a lot to the coffee taste. Fresh water
is rich in the oxygen needed to release the taste and aroma from the
ground coffee. Water that has stood for a long time, or that has been
heated before, is poor in oxygen and has a flat taste. The coffee will
then have the same taste.

12
SPECIFICATIONS
Model: EPICURE
Rated voltage: 220-240V~ 50-60Hz
Rated power: 1550W
This symbol on the product or in the instructions means that your
electrical and electronic equipment should be disposed at the end of its
life separately from your household waste. There are separate collection
systems for recycling in the EU. For more information, please contact the
local authority or your retailer where you purchased the product.
12

13
13
Power International AS,
PO Box 523, N-1471 Lørenskog, Norway
Power Norge:
https://www.power.no/kundeservice/
T: 21 00 40 00
Expert Danmark:
https://www.expert.dk/kundeservice/
T: 70 70 17 07
Power Danmark:
https://www.power.dk/kundeservice/
T: 70 33 80 80
Punkt 1 Dan mark:
https://www.punkt1.dk/kundeservice/
T: 70 70 17 07
Expert Finland:
https://www.expert.fi/tuki/asiakaspalvelu/
020 7100 670
Power Finland:
https://www.power.fi/tuki/asiakaspalvelu/
0305 0305
Power Sverige:
https://www.power.se/kundservice/
T: 08 517 66 000

14
GENERELL SIKKERHET
Ved bruk av elektriske apparater må alltid grunnleggende
forholdsregler følges, blant annet følgende:
1. Les alle instruksjonene.
2. Sørg for at spenningen i stikkontakten tilsvarer
spenningen på merkeetiketten til apparatet.
3. For å beskytte mot brann, elektrisk støt og
personskade må strømledningen eller støpselet ikke
dyppes i vann eller annen væske.
4. Barn må holdes under strengt oppsyn når de bruker
apparatet.
5. Koble apparatet fra stikkontakten når det ikke er i
bruk og før rengjøring. Du må alltid la apparatet kjøle
seg helt ned før deler settes på eller tas av og før
rengjøring eller lagring av apparatet.
6. Ikke bruk et apparat med en skadet strømkabel eller
støpsel eller hvis apparatet har en feil eller har blitt
skadet på noen måte. Send apparatet til et autorisert
serviceverksted for undersøkelse, reparasjon eller
justering.
7. Bruk av tilbehør som ikke anbefales av produsenten,
kan føre til brann, elektrisk støt eller personskade.
8. Ikke bruk den utendørs.
9. Ikke la strømkabelen henge over kanten av et bord
eller en benk eller komme nær varme overflater.
10. Ikke plasser på eller nær en varm gass- eller elektrisk
komfyr eller i en oppvarmet ovn.
11. Ikke bruk apparatet til noe annet enn hva det er
beregnet til.
14

15
15
12. Beholderen er laget for bruk med dette apparatet.
Den skal ikke brukes på koketopp.
13. Ikke rengjør beholderen med rengjøringsmidler, stålull
eller andre skurende materialer.
14. Når du skal koble fra, slår du først av, så tar du
støpselet ut fra stikkontakten. Hold alltid i støpselet
når du tar det ut; trekk aldri i strømkabelen for å ta ut
støpselet.
15. Hvis lokket tas av mens kaffe traktes, kan det føre
til brannskader. Vær forsiktig så du ikke blir brent av
dampen.
16. Noen deler av apparatet er varme under bruk, så
pass på hvor du setter hendene. Bruk kun håndtak
eller knotter.
17. Ikke la kannen stå på varmeplaten når den er tom,
ellers kan den sprekke.
18. Bruk aldri apparatet hvis kannen viser tegn på
sprekker eller har et løst eller svekket håndtak. Bruk
kun kannen med dette apparatet. Bruk med omhu, da
kannen er svært skjør.
19. Apparatet kan brukes av barn fra 8 år og oppover
hvis de får tilsyn eller fått instruksjon om bruk av
apparatet på en sikker måte, og forstår farene som er
involvert. Rengjøring og vedlikehold skal ikke utføres
av barn.
20. Hold apparatet og strømkabelen utilgjengelige for
barn under 8 år.
21. Dette apparatet bruker et jordet støpsel. Sørg for at
stikkontakten du bruker, er jordet.
22. Ikke sett en varm kanne på en varm eller kald
overflate.

16
23. Bruk aldri apparatet når det er tomt for vann.
24. Hvis strømkabelen er skadet, må den skiftes av
produsenten, av produsentens servicerepresentant
eller av en tilsvarende kvalifisert person for å unngå
fare.
25. Apparatet må ikke dyppes i vann.
26. Dette apparatet er beregnet for bruk innedørs i
husholdninger.
27. Ta vare på disse instruksjonene.
16

17
17
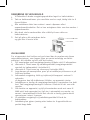
PRODUKTOVERSIKT
Lokk til vanntank Lokk til filterholder
Filterholder
Aromakontroll og dryppstopp
Kannehåndtak
Glasskanne
Varmeplate
På/av-knapp
Sprederarm
Vanntank
Brakett
Hovedkabinett
Sokkel
AROMAKONTROLL OG DRYPPSTOPP
FØR FØRSTE BRUK
Kontroller at alt tilbehør er til stede og at apparatet er uskadet. Rengjør
og tørk alle avtakbare deler grundig i henhold til delen «RENGJØRING
OG VEDLIKEHOLD», fyll vann i vanntanken til MAX-nivået, og følg
beskrivelsene i «BRUK AV KAFFETRAKTER» til å trakte vann noen ganger
uten kaffe, og tøm deretter ut vannet.

18
BRUK
ADVARSEL:
Sprederarm, filterholder og kannen må monteres riktig på plass før
du trakter kaffe.
Ikke ta av sprederarm, filterholder og kannen under trakting.
1. Åpne lokket til vanntanken, fyll vanntanken med rent, friskt vann, og
lukk lokket til vanntanken.
Merk:
Mengden vann skal ikke overstige MAX-mengden som står på
vannmåleren.
Hvis du trykker av/på-knappen uten at det er vann i vanntanken,
blinker den blå indikatoren, og apparatet vil ikke fungere. Sørg for at
vanntanken er fylt med vann før du trakter.
2. Plasser filteret i filterholderen, og drei den med klokken til den er låst
i filterholderen. Sørg for at den er satt riktig sammen. Plasser
kaffefilter størrelse 1x4 i filterholderen.
3. Legg til kvernet kaffe i kaffefilteret. Som regel kan du bruke 60 gram
kaffe per 1 liter vann, men du kan justere dette etter personlig smak.
Lukk lokket til filterholder helt.
4. Sett kannen vannrett på varmeplaten. Husk å åpne aromakontroll
ventilen med klokken for å unngå at det søler vann før trakting.
Ordmellomrom justere styrken til kaffen med aromakontrollen basert
på dinpersonlige smak.
5. Koble strømkabelen til en stikkontakt.
6. Trykk av/på-knappen én gang; den blå indikatoren lyser, så starter
apparatet. Du kan slutte å trakte ved å trykke av/på-knappen igjen.
ADVARSEL:
Hvis sprederarmen fjernes under trakting, vil det sprute varmt vann,
som kan gjøre skade. (Se figur 1.)
Hvis filterholderen fjernes under trakting, vil det sprute varmt vann
fra sprederarmen, som kan skade. (Se figur 2.)
Hvis filterholderen og glasskannen fjernes under trakting, vil det
sprute varmt vann fra sprederarmen, som kan skade. (Se figur 3.)
18

19
19
Figur 1 Figur 2 Figur 3
Ikke ta på sprederarm, for å unngå bli brent under trakting.
Merk:
Du kan ta ut kannen, helle og servere når som helst når du har dreid
aromakontrollen mot klokken til stillingen «Dryppstopp». Da slutter
kaffetrakteren å dryppe automatisk i 30 sekunder.
Følg bruken beskrevet for «AVKALKNING» for å utføre avkalking når
den blå indikatoren blinker raskt under trakting.
7. Ta vekk kannen for servering når kaffen er klar. Før du tar ut kannen,
må du lukke aromakontrollen mot klokken til stillingen «Dryppstopp»,
så slår du av av/på-knappen. Da slukkes den blå indikatoren.
8. Når bryggingen er ferdig, vil kaffetrakteren gå i "hold varm" modus
automatisk dersom trakteren fremdeles er koblet til strøm. Kaffen
holdes da varm på varmeplaten. Den blå indikatoren lyser mens
kaffen holdes varm. Trakteren slår av strømmen automatisk etter 40
minutter, og den blå indikatoren slukkes. For perfekt smak på kaffen,
bør den serveres like etter brygging.
9. Slå alltid av kaffetrakteren og koble den fra strøm når den ikke er i
bruk
Merk:
Vær forsiktig når du heller kaffen, da den har en høy temperatur og
kan skade deg.

20
RENGJØRING OG VEDLIKEHOLD
1. Vi anbefaler å bruke rengjøringsprodukter laget for kaffetraktere.
2. Tørk av kaffemaskinens ytre overflate med en myk, fuktig klut for å
fjerne flekker.
3. Alle avtakbare deler kan vaskes i varmt såpevann eller i
oppvaskmaskinskuffen. Det er kun avtagbare deler som kan vaskes i
oppvaskmaskin.
4. Ikke bruk sterke vaskemidler eller stålull på noen deler av
kaffetrakteren.
Lokk til filterholder
Filterholder
5.
Sett på plass alle avtagbare deler
og gjør klar til neste bruk.
AVKALKNING
20
For at apparatet skal holdes ved god stand bør du regelmessig fjerne
mineralavsetninger, som legges igjen av vannet avhengig av vannk-
valiteten i ditt område og hvor ofte det brukes.
Fyll vanntanken med rengjøringsløsning til Maks nivå i 2 alternativer:
alternativ 1: Tilsett vann og avkalkingsmiddel (rengjøringsmiddel
spesielt for kaffemaskin) i forholdet 4:1;
alternativ 2: Tilsett vann og sitronsyre i forholdet 100:3.
Legg kannen på varmeplaten; pass på at midtlinjen på kannen er på
linje med trakten.
Automatisk rengjøring: Hold og trykk av/på-knappen i omtrent 3
sekunder,
så begynner den blå indikatoren å blinke, og apparatet starter.
Avkalkingen er ferdig når rengjøringsløsningen i vanntanken har kokt
bort. Tøm rengjøringsløsningen i kokeren i henhold til det som står
ovenfor.
Slå deretter av apparatet, og fyll på vanntanken med rent vann til
MAX-nivå, bruk apparatet for å gå inn i automatisk ren modus, og
vannet i vanntankenvil bli kokt bort når det er ferdig, gjenta denne
operasjonen i minst 3 ganger.
Vi anbefaler rengjørings-og avkalkningsmiddel til bruk for
kaffetraktere.
Avkalkning bør gjøres jevning etter behov for å opprettholde en
perfekt kopp kaffe.
1.
a)
b)
2.
3.
4.
5.
6.
7.
Sidan laddas...
Sidan laddas...
Sidan laddas...
Sidan laddas...
Sidan laddas...
Sidan laddas...
Sidan laddas...
Sidan laddas...
Sidan laddas...
Sidan laddas...
Sidan laddas...
Sidan laddas...
Sidan laddas...
Sidan laddas...
Sidan laddas...
Sidan laddas...
Sidan laddas...
Sidan laddas...
Sidan laddas...
Sidan laddas...
Sidan laddas...
Sidan laddas...
Sidan laddas...
Sidan laddas...
Sidan laddas...
Sidan laddas...
Sidan laddas...
Sidan laddas...
Sidan laddas...
Sidan laddas...
Sidan laddas...
Sidan laddas...
Sidan laddas...
Sidan laddas...
Sidan laddas...
Sidan laddas...
-
 1
1
-
 2
2
-
 3
3
-
 4
4
-
 5
5
-
 6
6
-
 7
7
-
 8
8
-
 9
9
-
 10
10
-
 11
11
-
 12
12
-
 13
13
-
 14
14
-
 15
15
-
 16
16
-
 17
17
-
 18
18
-
 19
19
-
 20
20
-
 21
21
-
 22
22
-
 23
23
-
 24
24
-
 25
25
-
 26
26
-
 27
27
-
 28
28
-
 29
29
-
 30
30
-
 31
31
-
 32
32
-
 33
33
-
 34
34
-
 35
35
-
 36
36
-
 37
37
-
 38
38
-
 39
39
-
 40
40
-
 41
41
-
 42
42
-
 43
43
-
 44
44
-
 45
45
-
 46
46
-
 47
47
-
 48
48
-
 49
49
-
 50
50
-
 51
51
-
 52
52
-
 53
53
-
 54
54
-
 55
55
-
 56
56


Chef Matteo EPICURE KAFFETRAKTER Bruksanvisning
- Kategori
- Mixer / matberedare tillbehör
- Typ
- Bruksanvisning
på andra språk
Relaterade papper


Andra dokument
-
 POINT POHS09 HÅNDHOLDT KLESDAMPER, MINTGRØNN Bruksanvisning
-
OBH Nordica 2314 Användarmanual
-
 POINT POCM501BL KAFFETRAKTER, SVART Bruksanvisning
-
Menuett Kaffetrakter Bruksanvisningar
-
Kompernass KH 1114 Användarmanual
-
Tefal PRINCIPIO Bruksanvisning
-
Sandstrom S10GC13E Användarmanual
-
Philips HD5405/60 Användarmanual
-
Wilfa CM8B-A100 Användarmanual
-
Philips HD 5400 Användarmanual

