
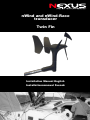
nWind and nWind-Race
transducer
Twin Fin
Installation Manual English
Installationsmanual Svensk

nWIND English
12-1

English nWIND
12-2
This manual is written for nWind transducer 1.00
Edition: Jan 2011

nWIND English
12-3
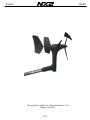
nWind transducer
Installation Manual
Thank you for choosing a Nexus product. Through this manual we would like to help
you to install your new product. Please read through this manual carefully before
starting your installation. This unique wind transducer provides both wind speed and
wind angle relative the boat. If a Speed transducer is connected to the system, true
wind speed and angle is computed. In addition, a compass or GPS antenna may be
used to compute true wind direction relative North
1 Installation
1.1 Location
The transducer should be mounted on a horizontal surface in the mast head. If the
masthead is not horizontal a shim has to be added. A 15 shim for Seldén masts is
available (art.no 67400-15).
2 Part specification
1# Mounting instruction
1# Warranty card
1# Calibration certificate
1# Wind transducer with 25 m cable
1# Bracket
5# Cable protectors (0,25 mm)
1# Representation list
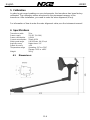
3 INSTALLATION
The transducer permits any type of horizontal mounting angle.
Mount the unit by directing the pipe (1) down and backwards in the bracket (2). Secure
the nut (3) towards the attachment BY HAND (tools can be needed when demounting).
Attach the security clamp (4) behind the nut.
The wind transducer connects to the Nexus Server.

English nWIND
12-4
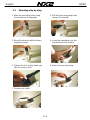
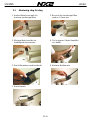
3.1 Mounting step by step
1. Mark the mounting holes using
the bracket as an template
3. Mount the bracket with the three
supplied screws
5. Tighten the lock nut by hand only
(do not use any tool)
7. Connect the cable
2. Drill the three mounting holes
using a 3,2mm drill
4. Insert the transducer into the
bracket from front to back
6. Attach the security clamp

nWIND English
12-5
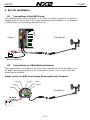
4 Electric installation
4.1 Connections to the NX2 Server
If you already have a Nexus Network i.e. a Server, it is more practical to connect the
transducer to the Server due to the single instrument cable installation. For calibration
of nWind Race, see manual for NexusRace SW.
4.2 Connections to a Wind Data instrument
The power cable is connected via a 3A fuse and a on/off switch from the battery or at
the boats fuse panel and direct to the instrument or Server. One red and one black
power wire is included.
Always connect a 3 AMP fuse between Power supply and instrument.
+12V
0V
OUTPUT A
OUTPUT B
GREEN
YELLOW
WHI TE
SCREEN
+12V
INPUT A
INPUT B
0V
LIGHT ON
M.O.B.
SET STEER
BUZZER
N E T W O R KN M E A G PSA U X IL IAR Y
1
2
3
4
5
6
7
8
9
10
11
12
13
14
15
16
N M E A
5
12V
3A Fuse
Black
Screen
Red
Green
Yellow
White
Transducer
Server
Transducer
Nexus Network

English nWIND
12-6
5 Calibration
In order to get correct readings on your instruments, the transducer has been factory
calibrated. The calibration values are stored in the permanent memory of the
transducer. After installation, you need to enter the miss alignment (if any).
For information of how to enter the miss alignment value, see the instrument manual.
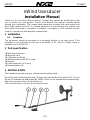
6 Specifications
Transducer cable 25 m
Power supply 12V DC (10-16V)
Power consumption 0,24 W
Current consumption: 20mA @12V
Wind speed range 0.8-90 knots, 0.4-50 m/s
Angle Accuracy Better than ± 1.5°
Speed Accuracy ± 3%
Temperature range Operating -5ºC to +70ºC
Storage -20ºC to +80ºC
Weight 260 g.
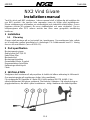
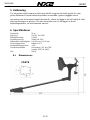
6.1 Dimensions:
50mm

nWIND English
12-7
4 Warranty

English nWIND
12-8

nWIND English
12-9
NX2 Vind Givare
Installationsmanual
Tack för att du valt NX2 vindgivare. I denna manual skall vi hjälpa dig att installera din
nya NX2 produkt. Läs igenom hela manualen innan du börjar med installationen.
Denna vindgivare ger information om vindhastighet och vindvinkel relativt båten. Om en
loggivare ansluts till systemet, fås sann vindhastighet och sann vindvinkel. Om en
kompassgivare eller GPS antenn ansluts kan även sann geografisk vindriktning
beräknas.
1 Installation
1.1 Placering
Givaren skall monteras på en horisontell yta i masttoppen. Om masttoppen lutar, måste
en kil användas mellan givarfästet och underlaget. För Seldénmaster med 15 lutning
finns en kil som tillbehör: (art.nr 67400-15).
2 Part specifikation
Monteringssats givare
Ändhylseset 5x0.75/0.25
Kabel Mast 25m
Mastenhet kpl
Monteringsinstruktion
Garantisedel Marin. Engelsk
Representations lista Marin
Kalibrerings etikett tryckt
Fäste
3 INSTALLATION
Vindgivare skall monteras så att propellern är lodrät när båtens akterstag är fullt ansatt.
Om monteringsytan på masttoppen sluttar, kilas mastfästet.
För vindgivaren (1) framifrån in i fästet (2). Vrid åt muttern (3) FÖR HAND. Fäst
säkerhetsklämman (4) bakom muttrarna. Fäst kabeln i klämman. Vid isärplockning av
pluggkontakterna, dra alltid i själva kontakterna - aldrig i kablarna eller kabelskydden.
Svenska

English nWIND
12-10
3.1 Montering steg för steg
1. Använd fästet som mall och
markera monteringshålen
3. Montera fästet med de tre
medföljande skruvarnma
5. Dra åt låsmuttern med handkraft
7. Anslut kabeln
2. Borra de tre monteringshålen
med en 3,2mm borr
4. För in givaren I fästet framifrån
och bakåt
6. Montera låsklämman
Svenska

nWIND English
12-11
4 Anslutning av givaren
4.1 Inkoppling i ett Nexus nätverk.
Om du redan har ett Nexus nätverk, dvs. en Server, kan du ansluta givaren var som
helst i nätverket. OBS! Sätt C71 i winddatainstrumentet till OFF
4.2 Installera kablarna
Spänningskabel dras direkt och så kort som möjligt från den säkrade elpanelen. Den
tremeters spännings kabel som ingår är komplett med ändhylsor och därmed färdig att
kopplas in. OBS! Sätt C71 i winddatainstrumentet till ON.
Anslut alltid en 3A säkring mellan batteri och instrument
+12V
0V
OUTPUT A
OUTPUT B
GREEN
YELLOW
WHI TE
SCREEN
+12V
INPUT A
INPUT B
0V
LIGHT ON
M.O.B.
SET STEER
BUZZER
N E T W O R KN M E A G PSA U X IL IAR Y
1
2
3
4
5
6
7
8
9
10
11
12
13
14
15
16
N M E A
5
12V
Server
Givare
3A Säkring
Röd
Svart
Skärm
Gul
Grön
Vit
Givare
Svenska

English nWIND
12-12
5 Kalibrering
För att givaren skall fungera korrekt samt att full noggrannhet skall uppnås är varje
givare kalibrerad. Dessa kalibreringsvärden är sparade i givare inbyggda minne.
om givaren inte är monterad exakt rakt framåt, måste du lägga in det så kallade A-felet
eller uppriktningen av givaren För mer information om hur du lägger in dessa
kalibreringsvärden, se instrumentets manual.
6 Specifikationer
Givarkabel 25 m
Spänning: 12V DC (10-16V)
Effektförbrukning: 0,24 W
Strömförbrukning: 20mA (vid 12V)
Mätområde vindhastighet: 0.9-90 knop, 0.5-50 m/s
Vinkelnoggrannhet: Bättre än ± 2°
Hastighetsnoggrannhet: ± 5%
Temperaturområde: Användning -5ºC till +70ºC
Lagring -20ºC till +80ºC
Vikt: 260 g.
6.1 Dimensioner:
50mm
FÄSTE
Svenska

nWIND English
12-13
8. GARANTI
Svenska
Svenska

English nWIND
12-14

nWIND English
12-15
Copyright ©:
Nexus Marine AB
Karlsbodavägen 20B, 161 02 Bromma, Sweden
Tel: +46 -(0) 8 – 506 939 00. Fax: +46 -(0) 8 – 506 939 01
www.nexusmarine.se.se
22489-12 Edition 1
-
 1
1
-
 2
2
-
 3
3
-
 4
4
-
 5
5
-
 6
6
-
 7
7
-
 8
8
-
 9
9
-
 10
10
-
 11
11
-
 12
12
-
 13
13
-
 14
14
-
 15
15
-
 16
16


