hidealite Moon Slim Bruksanvisningar
- Kategori
- Rörelsedetektorer
- Typ
- Bruksanvisningar

I
P44
DIM
LED
Microwave
sensor
DIP
SWITCH
COLOUR
TEMP
230V
120°
+40ºC
-20ºC
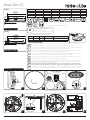
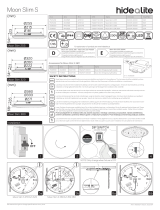
E-nr Snro El.nr GTIN Name LED Color Total Eect
7508331 4143800 3207097 7392971145327 Moon Slim SC 320 3000K;4000K 18W
7508332 4143801 3207098 7392971145334 Moon Slim SC 380 3000K;4000K 23W
7508552 4143827 3207111 7392971145570 Moon Slim SC EM 320* 3000K;4000K 21W
7508553 4143828 3207113 7392971145587 Moon Slim SC EM 380* 3000K;4000K 26W
Moon Slim SC
(mm)
Ø320
66 35
Ø270
Ø235
(mm)
Ø380
66 35
Ø333
Ø271
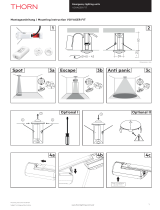
Installation
Moon Slim SC 320
Moon Slim SC 380
OFF
I
0
NLX
S+
S-
0-10V Driver
NLX
S+
S-
SYNC
GND
GND
1-10V
Ľ
N
N
L
0-10V Driver
Dim+
Dim-
L
N
4000K
3000K
DIP SWITCH
4000K
3000K
DIP SWITCH
on LED module
NLX
S+
S-
0-10V Driver
1
5
2
6
3
7 8
4
Artnr: IM00559 Version: 2022/04
We reserve the right to change specifications at any time.
NOTE! Only change when fixture is OFF
+
-
1.5h
*
E-nr Snro El.nr GTIN Name
7508558 4143833 3207135 7392971145631 Moon Slim Emergency light module
7508559 7112601 3207136 7392971145648 Moon Slim Emergency light battery
Accessories for Moon Slim SC 320 & 380
E-nr: 7508558
SAFETY INSTRUCTIONS
Read these instructions carefully before commencing installation and retain for future reference. The luminaire should be installed by a licen-
sed electrician and in accordance with local regulations. Make sure that the power is o before installation or maintenance.
en
Läs dessa instruktioner före installationen påbörjas och lämna den vidare till brukaren av anläggningen. Armaturen skall installeras av behörig
installatör och enligt gällande föreskrifter. Se till att spänningen är frånslagen före installation eller underhåll.
sv
Lue nämä ohjeet ennen asentamista ja luovuta ohjeet valaisimen seuraavalle käyttäjälle. Valaisimen saa asentaa valtuutettu asentaja voimas-
sa olevien määräysten mukaisesti. Varmista, että jännite on kytketty päältä ennen asennusta ja huoltoa.
fi
da
Læs denne vejledning omhyggeligt, før installationen udføres og gem den til fremtidig brug. Armaturet skal installeres af en autoriseret instal-
latør i henhold til gældende love og regler. Sørg strømmen er afbrudt før installation og vedligeholdelse.
de
Lesen Sie diese Anweisungen sorgfältig, bevor Sie mit der Installation beginnen, und bewahren Sie sie für späteres Nachschlagen auf. Dieses
Leuchtmittel muss durch einen lizenzierten Elektriker im Einklang mit den örtlichen Vorschriften installiert werden. Stellen Sie vor Installati-
ons- oder Wartungsarbeiten sicher, dass keine Spannung mehr anliegt.
pl
Przed przystąpieniem do instalacji należy się uważnie zapoznać z instrukcją i zachować ją na przyszłość. Oprawę oświetleniową
powinien zainstalować uprawniony elektryk zgodnie z miejscowymi przepisami. Przed instalacją lub konserwacją wyłączyć zasilanie.
fr
Lisez attentivement ces consignes avant de commencer l’installation. Pensez également à vous y reporter ultérieurement. Le luminaire doit être installé
par un électricien agréé, conformément à la réglementation locale. Veillez à couper le courant avant l’installation et toute opération de maintenance.
Les disse instruksjonene før du starter installeringen, og gi den deretter videre til anleggets bruker. Armaturen skal installeres av en godkjent
installatør og i henhold til gjeldende lover og regler. Sørg for at strømmen er koblet fra før installering og ved vedlikehold.
no
Denna produkt innehåller en ljuskälla med
energieektivitetsklass D enligt förordning (EU) 2019/2015.
This product contains a light source of
energy eciency class D to Regulation (EU) No 2019/2015.
D
For explanation of symbols see www.hidealite.se
*
+40ºC
-0ºC

1
2
9
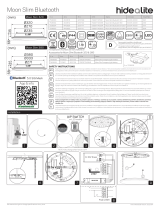
Function motion sensor
100%
75%
50%
10%
1 2
Switch UP
Hold-time
Detection area
Daylight threshold
Stand-by period
Stand-by dimming level
Switch DOWN
1 2 3 4 5 6 7 8 9
10 11 12
Disable
50lux
10lux
2lux
6 7
1
i
3
Detection area - Detection area can be reduced by selecting the
combination on the DIP switches to fit precisely each application .
Detektionsområde - Detekteringsområdet kan minskas genom att välja
kombinationen på DIP-switchar för att passa just varje applikation.
Daylight sensor - The sensor can be set to only allow the lamp to
illuminate below a defined ambient brightness threshold.
When set to Disable mode, the daylight sensor will switch on the lamp
when motion is detected regardless of ambient light level.
50lux: twilight operation, 10lux, 2lux: darkness operation only. Note that
daylight sensor is active only when lamp totally switches o.
Skymningsnivå - Skymningsnivån ställs in enligt DIP-switch för olika
tillslagsnivåer. Armaturen fungerar enligt inställningarna nedan:
Disable: Sensor är alltid aktiv, även i dagsljus. 50lux: Sensor aktiv
från lätt skymning. 10Lux,2lux: Sensor aktiv från dunkel/mörker. Notera att
skymningsrelät enbart är aktivt då armaturen släcks helt.
5S
30S
1min
5min
10min
20min
30min
3 4 5
8 9 10
0S
10S
1min
10min
30min
1h
10%
20%
30%
50%
11 12
2
4 5 i
Hold Time - Refers to the time period the lamp remains at 100%
illumination after no motion detected.
Tidsfördröjning - Tidsfördröjning innebär den tiden du vill behålla
armaturen tänd 100% efter att personen har lämnat räckviddens område.
Well covered
Covered
Ceiling Mounted(m)
2 4 6 82468
1
2
3
4
Mounting
height
Stand-by period - Refers to the time period the lamp remains at a low light
level before it completely switches o in the long absence of people. When set
to “+ ” mode, the low light is maintained until motion is detected.
Standby tid - Detta är inställning av hur länge du vill ha den valbara
grundljusnivån tänd innan armaturen slocknar helt. Vid inställning “+ ” är
grundljusnivån tänd tills nästa rörelse detekteras.
8
8
Stand-by dimming level - The low light level you would like to have
after the hold time in the long absence of people.
Standby dimningsnivå - Dimningsnivån du vill att armaturen ska ha
efter tidsfördröjningen.
With insucient ambient light, the sensor switches on the lamp when
motion is detected.
Med otillräcklig belysning tänder sensorn armaturen när rörelse upptäcks.
Range -
Ceiling mounting pattern (Unit: m)
Highest mounting height is 4m
Räckvidd
-
Takmontering (Enhet: m)
Högsta monteringshöjd är 4m
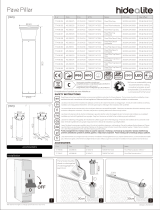
N
L
L X S+ S- S+ S- S+ S- S+ S-
N
Moon Slim SC
L XN
Moon Slim SC
L XN
Moon Slim SC
L XN
Moon Slim SC
Synkkabel min 0,5mm² max 100m
Max antal i ett system - 20st
Sync cable min 0,5mm² max 100m
System max 20pcs.
Make sure that L and N are correctly connected, otherwise the sensor will break
Säkerställ att L och N är installerat korrekt, annars kommer sensorn att gå sönder
!i

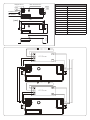
Microwave AntennaDaylight Sensor
Output
DIP Swiches
27.5 40.7
89.2
99
SYNC
GND
GND
1-10V
Ľ
N
N
L
1 2 3 4 5 6 7 8 9
10
1112
Input
Installation Hole
1-10V
SYNC
(mm)
LED Driver
L N
N
L
LED Driver
SYNC
GND
GND
1-10V
Ľ
N
N
L
SYNC
GND
GND
1-10V
Ľ
N
N
L
HN263-SC
Operating voltage 220-240VAC, 50Hz/60Hz
Switching capacity Max 400W
Stand-by power <1W
Detection area 10% / 50% / 75% / 100%
Hold time 5s/30s/1min/5min/10min/20min/30min
Daylight threshold 2Lux/10Lux/50Lux/Disable
Microwave frequency 5,8GHz ± 75MHz
Microwave power <0,3mW
Mounting height Max.4m (ceiling mounted)
Detection range Max.Ø12m (ceiling mounted)
Motion detection 0,5~1,5m/s
Case temperature (Max.) Tc: +70°C
Operating temperature -25°C ~ +60°C
IP rating IP20

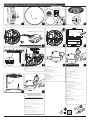
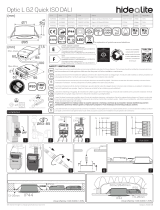
Installation Moon Slim SC EM 320 & 380 and 320 & 380 with EM accessories
OFF
I
0
Battery
INSTALLED
DATE
SIGN
4000K
3000K
DIP SWITCH
4000K
3000K
DIP SWITCH
on LED module
L
Test switch
Output LED
Battery
N
1
2
NLX
S+
S-
0-10V Driver
Emergency light 1,5 hour
NLX
S+
S-
x2
0-10V Driver
NLX
S+
S-
0-10V Driver
N
L
NLX
S+
S-
Constant
Current to EM
Constant
Current to EM
Neutral to EM
1
5i
2
6
7
3
98
10
4
NOTE! Only change when fixture is OFF
Mounting instruction for Moon Slim SC 320 & 380
NOTE! Installation example, the emergency light module
requires connection to neutral and constant current.
OBS! Installationsexempel, nödljusmodulen kräver anslutning
till neutral och konstantström.
230V
LED
Replaceable control gear by a professional
LEDLED
Replaceable (LED only) light source by a professional
Elektro Elco AB, Tallvägen 5, SE-56435 Bankeryd, Sweden | [email protected] | www.hidealite.se | www.hidealite.uk | www.hidealite.fi | www.hidealite.no | www.hidealite.dk
Connect battery
When voltage is applied - the emergency light module starts
self-test.
Flashing green light:
Battery is charging/normal operation
Permanent green light:
Battery fully charged/normal operation
Anslut batteri
Vid spänningssättning - nödljusmodul startar självtest.
Blinkande grönt ljus:
Batteriet laddar och normal drift
Fast grönt ljus:
Batteri fulladdat och normal drift
Suggestion
L
Test switch
Output LED
Battery
N
5
10
60
30
35
15
20
25
45
50
55
40
Press down for 1-5sec
i
Manual self test:
1. Press and hold the test button for 1-5sec.
2. LED of the emergency light module lights up.
Every 30 days - automatic self-test
Every 180 days - The LED of the emergency light module
lights up for 1,5 hours for a complete battery and module
test.
Manuellt självtest.
1. Tryck och håll ner testknappen i 1-5 sekunder.
2. Nödljusmodulens LED lyser upp.
Var 30:e dag - automatiskt självtest.
Var 180:e dag - nödljusmodulens LED lyser i 1,5h för
komplett test av batteri och modul.
Emergency light module performs automatic
self-test every 30 and 180 days.
Nödljusmodulen genomför automatiskt
självtest var 30:e och 180:e dag.
L
Test switch
Output LED
Battery
N
5
10
60
30
35
15
20
25
45
50
55
40
Press down for 10sec
Troubleshooting i
Flashing red light
1. Check the connection cable between the battery and the
module.
2. Press and hold the test button for 10sec.
3. The emergency light module resets and starts self-test.
Flashing / Permanent green:
Normal operation on module and battery
Flashing red light:
Battery not connected/Battery defective.
Replace battery - Press and hold the test button for 10sec.
Solid red light:
Defective emergency light module
Replace emergency light module and battery
Blinkande/Fast rött ljus
1. Kontrollera anslutningskabel mellan batteri och modul.
2. Tryck och håll ner testknappen i 10 sekunder.
3. Nödljusmodul återställs och startar självtest.
Blinkande/Fast grönt ljus:
Normal drift på modul och batteri
Blinkande rött ljus:
Batteri ej anslutet/Batteri defekt.
Ersätt batteri - Tryck och håll ner testknappen i 10 sekunder.
Fast rött ljus:
Defekt nödljusmodul
Ersätt nödljusmodul och batteri
Factory reset:
For factory reset press and hold the test button for 15 sec.
NOTE: Automatic self-test cycle is reset.
Fabriksåterställning:
För fabriksåterställning håll ner testknappen i 15sekunder.
OBS:Automatisk självtestcykel nollställs
-
 1
1
-
 2
2
-
 3
3
-
 4
4


hidealite Moon Slim Bruksanvisningar
- Kategori
- Rörelsedetektorer
- Typ
- Bruksanvisningar
på andra språk
Relaterade papper
-
 hidealite 20688917 Bruksanvisningar
-
 hidealite 320, 380 Moon Slim Bluetooth Installationsguide
-
hidealite Moon Slim Installationsguide
-
-
hidealite Liteline IP65 Bruksanvisningar
-
 hidealite 77 496 54 Användarmanual
-
hidealite 7766694 Användarmanual
-
 hidealite 202308 Användarguide