
DW60H9970 Series
DW60H9950 Series
DW60J9960 Series
Dishwasher
installation guide
STOP
These installation instructions are intended for
use by qualifi ed installers.
If you are having problems installing this dishwasher, contact a
service center as referring to the contact list on the back cover.
For assistance: www.samsung.com
imagine the possibilities
Thank you for purchasing this Samsung product.
BU-Install_DD68-00160B-07_EN.indd 1BU-Install_DD68-00160B-07_EN.indd 1 2017-02-08 1:28:382017-02-08 1:28:38

2_ Safety instructions
Safety instructions
Congratulations on your new Samsung dishwasher. This manual contains important
information on the installation, use and care of your appliance. Please take time
to read this manual to take full advantage of your dishwasher’s many benefi ts and
features.
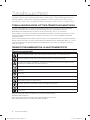
WHAT YOU NEED TO KNOW ABOUT SAFETY INSTRUCTIONS
Please read this manual thoroughly to ensure that you know how to safely and e ciently operate the
extensive features and functions of your new appliance and retain it in a safe place near the appliance for
your future reference. Use this appliance only for its intended purpose as described in this user manual.
Warning and important safety instructions in this manual do not cover all possible conditions and
situations that may occur. It is your responsibility to use common sense, caution, and care when installing,
maintaining, and operating your dishwasher.
Because the following operating instructions cover various models, the characteristics of your dishwasher
may di er slightly from those described in this manual and not all warning signs may be applicable. If you
have any questions or concerns, contact your nearest service center or fi nd help and information online at
www.samsung.com.
IMPORTANT SAFETY SYMBOLS AND PRECAUTIONS
Important safety symbols
WARNING
Hazards or unsafe practices that may result in severe personal injury and/or property damage.
CAUTION
Hazards or unsafe practices that may result in personal injury and/or property damage.
CAUTION
To reduce the risk of fi re, explosion, electric shock, or personal injury when using your
dishwasher, follow these basic safety precautions:
Do NOT attempt.
Do NOT disassemble.
Do NOT touch.
Follow directions explicitly.
Unplug the power plug from the wall socket.
Make sure the appliance is grounded to prevent electric shock.
Call the service centre for help.
Note
These warning symbols are here to prevent injury to you and others.
Please follow them explicitly.
Keep these instructions in a safe place and ensure that new users are familiar with the content. Pass them
on to any future owner.
BU-Install_DD68-00160B-07_EN.indd 2BU-Install_DD68-00160B-07_EN.indd 2 2017-02-08 1:28:442017-02-08 1:28:44

Safety instructions _3
Important safety precautions
This appliance conforms to current safety requirements. Inappropriate use can, however, lead to
personal injury and damage to property.
To avoid the risk of accidents and damage to the appliance, please read these instructions carefully
before using it for the fi rst time. They contain important information on its safety, use and maintenance.
As with any equipment using electricity and moving parts, potential hazards exist. To safely operate
this appliance, become familiar with its operation and exercise care when using it.
Do not let children (or pets) play on or in your dishwasher. The dishwasher door does not open easily
from the inside, and children may be seriously injured if trapped inside.
Children should be supervised to ensure that they do not play with the appliance.
If the plug (power supply cord) is damaged, it must be replaced by the manufacturer or its service
agent or a similarly qualifi ed person in order to avoid a hazard.
This appliance must be positioned to be accessible to the power plug after installation, the water
supply tabs and the drain pipes.
For information on Samsung’s environmental commitments and product specifi c regulatory obligations e.g.
REACH visit: samsung.com/uk/aboutsamsung/samsungelectronics/corporatecitizenship/data_corner.html
INSTRUCTION ABOUT THE WEEE MARK
Correct Disposal of This Product (Waste Electrical & Electronic Equipment)
(Applicable in countries with separate collection systems)
This marking on the product, accessories or literature indicates that the product and its electronic
accessories (e.g. charger, headset, USB cable) should not be disposed of with other household
waste at the end of their working life. To prevent possible harm to the environment or human
health from uncontrolled waste disposal, please separate these items from other types of waste and recycle
them responsibly to promote the sustainable reuse of material resources.
Household users should contact either the retailer where they purchased this product, or their local
government o ce, for details of where and how they can take these items for environmentally safe
recycling.
Business users should contact their supplier and check the terms and conditions of the purchase contract.
This product and its electronic accessories should not be mixed with other commercial wastes for disposal.
CAUTION
WARNING
WARNING
CAUTION
BU-Install_DD68-00160B-07_EN.indd 3BU-Install_DD68-00160B-07_EN.indd 3 2017-02-08 1:28:442017-02-08 1:28:44

4_ Safety instructions
INSTRUCTIONS WHEN USING YOUR DISHWASHER
This dishwasher is not designed for commercial use. It is intended for use in domestic households and
in similar working and residential environments such as:
• Shops
• O ces and showrooms
and by residents in establishments such as:
• Hostels and guest houses.
It must only be used as a domestic appliance as specifi ed in these user manual, for cleaning domestic
crockery and cutlery.
Any other usage is not supported by the manufacturer and could be dangerous.
The manufacturer cannot be held liable for damage resulting from incorrect or improper use or
operation.
Do not use solvents in the dishwasher. Danger of explosion.
Do not inhale or ingest dishwasher detergent. Dishwasher detergents contain irritant or corrosive
ingredients which can cause burning in the nose, mouth and throat if swallowed, or inhibit breathing.
Consult a doctor immediately if detergent has been swallowed or inhaled.
Avoid leaving the door open unnecessarily, as you could trip over it.
Do not sit or lean on the opened door. This could cause the dishwasher to tip and be damaged, and
you could get injured.
Only use detergent and rinse aid formulated for domestic dishwashers. Do not use washing‐up liquid.
Do not fi ll the rinse aid reservoir with powder or liquid detergent. This will cause serious damage to the
reservoir.
Inadvertently fi lling the salt reservoir with powder or liquid dishwasher detergent will damage the water
softener. Make sure you have picked up the correct packet of dishwasher salt before fi lling the salt
reservoir.
Please only use special coarse grained dishwasher salt for reactivation, as other salts may contain
insoluble additives which can impair the functioning of the softener.
In an appliance with a cutlery basket (depending on model), cutlery is cleaned and dried more if placed
in e ciently the basket with the handles downwards. However, to avoid the risk of injury, place knives
and forks etc. with the handles upwards.
Plastic items which cannot withstand being washed in hot water, such as disposable plastic
containers, or plastic cutlery and crockery should not be cleaned in the dishwasher.
The high temperatures in the dishwasher may cause them to melt or lose shape.
On models with Delay Start function, make sure that the dispenser is dry before adding detergent.
Wipe dry if necessary. Detergent will clog if poured into a damp dispenser and may not be thoroughly
dispersed.
Knives and other utensils with sharp points must be loaded in the basket with their points down or
placed in a horizontal position.
INSTRUCTIONS FOR PROTECTING YOUR CHILDREN
This appliance is not a toy! To avoid the risk of injury, keep children well away and do not allow them to
play in or around the dishwasher or to use the controls. They will not understand the potential dangers
posed by it. They should be supervised whenever you are working in the kitchen.
There is also a danger that children playing might shut themselves in the dishwasher.
WARNING
WARNING
CAUTION
CAUTION
CAUTION
CAUTION
WARNING
WARNING
Safety instructions
BU-Install_DD68-00160B-07_EN.indd 4BU-Install_DD68-00160B-07_EN.indd 4 2017-02-08 1:28:442017-02-08 1:28:44

Safety instructions _5
This appliance can be used by children aged from 8 years and above and persons with reduced
physical, sensory or mental capabilities or lack of experience and knowledge if they have been given
supervision or instruction concerning use of the appliance in a safe way and understand the hazards
involved. Children shall not play with the appliance.
Cleaning and user maintenance shall not be made by children without supervision.
Older children may only use the dishwasher when its operation has been clearly explained to them and
they are able to use it safely, recognising the dangers of misuse.
KEEP CHILDREN AWAY FROM DETERGENTS! Dishwasher detergents contain irritant and corrosive
ingredients which can cause burning in the mouth, nose and throat if swallowed, or inhibit breathing.
Keep children away from the dishwasher when the door is open.
There could still be detergent residues in the cabinet.
Consult a doctor immediately if your child has swallowed or inhaled detergent.
INSTRUCTIONS FOR INSTALLING YOUR DISHWASHER
Before setting up the appliance, check it for any externally visible damage. Under no circumstances
should you use a damaged appliance. A damaged appliance could be dangerous.
The dishwasher must only be plugged into the electricity supply via a suitable switched socket.
The electrical socket must be easily accessible after the dishwasher is installed so that it can be
disconnected from the electricity supply at any time.
There must be no electrical sockets behind the dishwasher. Danger of overheating and fi re risk if the
dishwasher were to be pushed up against a plug.
The dishwasher must not be installed under a hob. The high radiant temperatures which are
sometimes generated by a hob could damage the dishwasher. For the same reason it should not be
installed next to open fi res or other appliances which give o heat, such as heaters etc.
Do not connect the dishwasher to the mains supply until it has been fully installed and any adjustment
has been made to the door springs.
Before connecting the appliance, check that the connection data on the data plate (voltage and
connected load) match the mains electricity supply. If in any doubt, consult a qualifi ed electrician.
The electrical safety of this appliance can only be guaranteed when continuity is complete between it
and an e ective grounding system. It is most important that this basic safety requirement is present
and regularly tested and where there is any doubt the electrical system in the house should be
checked by a qualifi ed electrician.
The manufacturer cannot be held liable for the consequences of an inadequate grounding system (e.g.
electric shock).
Do not connect the appliance to the mains electricity supply by a multi‐socket unit or an extension
lead. These do not guarantee the required safety of the appliance (e.g. danger of overheating).
This appliance may only be installed in mobile installations such as ships if a risk assessment of the
installation has been carried out by a suitably qualifi ed engineer.
The plastic housing of the water connection contains an electrical component. The housing must not
be submerged in water.
There are electrical wires in the hose of Aqua-Stop. Never cut the water inlet hose, even if it is too long.
Installation, maintenance and repairs may only be carried out by a suitably qualifi ed and competent
person in strict accordance with current national and local safety regulations. Repairs and other work
by unqualifi ed persons can be dangerous. The manufacturer cannot be held liable for unauthorised
work.
Do not push the appliance into a built-in closet or cabinet using your knees or legs. This may damage
the appliance.
WARNING
WARNING
WARNING
WARNING
CAUTION
WARNING
WARNING
CAUTION
CAUTION
CAUTION
CAUTION
BU-Install_DD68-00160B-07_EN.indd 5BU-Install_DD68-00160B-07_EN.indd 5 2017-02-08 1:28:452017-02-08 1:28:45

6_ Safety instructions
The integrated waterproof system o ers protection from water damage, provided the following
conditions are met:
• The dishwasher is correctly installed and plumbed in.
• The dishwasher is properly maintained and parts are replaced where it can be seen that this is
necessary.
• The stopcock has been turned o when the appliance is not used for a longer period of time (e.g.
during holidays).
• The waterproof system will work even if the appliance is switched o . However, the appliance must
remain connected to the electricity supply.
A damaged appliance can be dangerous. If the dishwasher gets damaged, switch it o at the mains
and call your dealer or the service department.
Unauthorised repairs could result in unforeseen dangers for the user, for which the manufacturer
cannot accept liability. Repairs should only be undertaken by an approved service technician.
Faulty components must only be replaced by original spare parts. Only when these parts are fi tted can
the safety of the appliance can be guaranteed.
Always disconnect the dishwasher from the electrical supply for maintenance work (switch o at the
wall socket and remove the plug).
If the connection cable is damaged it must be replaced with a special cable, available from the
manufacturer. For safety reasons, this must only be fi tted by the service department or an authorised
service technician.
In countries where there are areas which may be subject to infestation by cockroaches or other
vermin, pay particular attention to keeping the appliance and its surroundings in a clean condition at all
times. Any damage which may be caused by cockroaches or other vermin will not be covered by the
guarantee.
In the event of a fault or for cleaning purposes, the appliance is only completely isolated from the
electiricity supply when:
• it is switched o at the wall socket and the plug is withdrawn, or
• it is switched o at the mains, or
• the mains fuse is disconnected, or
• the screw-out fuse is removed (in countries where this is applicable).
Do not make any alterations to the appliance, unless authorised to do so by the manufacturer.
Never open the casing/housing of the appliance.
Tempering with electrical connections or components and mechanical parts is highly dangerous and
can cause operational faults or electric shock.
While the appliance is under guarantee, repairs should only be undertaken by a service technician
authorised by the manufacturer. Otherwise the guarantee will be invalidated.
When installing the product, make sure there is space at the top, left, right and back of the product to
ensure proper ventilation.
CAUTION
WARNING
CAUTION
WARNING
CAUTION
CAUTION
CAUTION
Safety instructions
BU-Install_DD68-00160B-07_EN.indd 6BU-Install_DD68-00160B-07_EN.indd 6 2017-02-08 1:28:452017-02-08 1:28:45

Contents _7
PREPARING THE DISHWASHER
ENCLOSURE
8
8 Product and enclosure dimensions
BEFORE INSTALLING YOUR
DISHWASHER
9
9 Checking the parts and tools
INSTALLING YOUR DISHWASHER
11
11 STEP1. Selecting the best location for
the dishwasher
12 STEP2. Checking water supply and
electrical requirements
13 STEP3. Preparing the dishwasher
14 STEP4. Leveling the dishwasher
15 STEP5. Securing the dishwasher
18 STEP6. Connecting the drain hose
19 STEP7. Completing the installation
SPECIFICATIONS
20
20 Specifi cations
Contents
BU-Install_DD68-00160B-07_EN.indd 7BU-Install_DD68-00160B-07_EN.indd 7 2017-02-08 1:28:462017-02-08 1:28:46

8_ Preparing the dishwasher enclosure
Preparing the dishwasher
enclosure
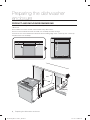
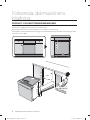
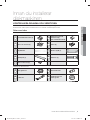
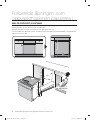
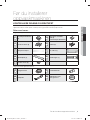
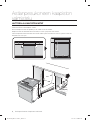
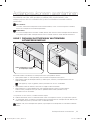
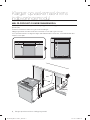
PRODUCT AND ENCLOSURE DIMENSIONS
This dishwasher is designed to be enclosed on the top and on both sides by a standard residential kitchen
cabinet unit.
The installation enclosure must be clean and free of any obstructions.
The enclosure must be at least 600mm wide, 575mm deep, and 820mm high.
For the front door of the dishwasher to be fl ush with the leading edge of the counter top, the counter top
must be at least 575mm deep.
max. 720
max. 720
594
594
820-890 mm
820-890 mm
817-875 mm
817-875 mm
575
575
53
53
598
598
575
575
600
600
100 x 50 mm
100 x 50 mm
BU-Install_DD68-00160B-07_EN.indd 8BU-Install_DD68-00160B-07_EN.indd 8 2017-02-08 1:28:462017-02-08 1:28:46

Before installing your dishwasher _9
02 BEFORE INSTALLING
Before installing your
dishwasher
CHECKING THE PARTS AND TOOLS
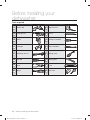
Before starting on the installation, prepare all the necessary tools and parts required to install the
dishwasher. This will save installation time and simplify the installation process.
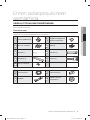
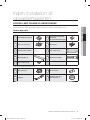
Parts required
Provided with the dishwasher. Check when you unpack your dishwasher.
1
Installation brackets (2)
6
Torx Flat Head Screws
(2) (For the installation
bracket)
2
Ø4 X 12 screws (6)
7
Bracket (2)
3
Protective sticker
8
Felt Lower (1)
4
Kick plate (1)
9
Foot Sub (1)
5
Ø4 X 8 screws (2)
Not provided with the dishwasher.
10
Hose clamp
12
Rubber connector
11
Air gap
13
Tefl on® tape or sealing
compound
BU-Install_DD68-00160B-07_EN.indd 9BU-Install_DD68-00160B-07_EN.indd 9 2017-02-08 1:28:462017-02-08 1:28:46

10_ Before installing your dishwasher
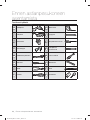
Tools required
14
Electric drill
22
Tape measure
15
Safety glasses
23
Pencil
16
Gloves
24
Phillips screwdriver
17
Flashlight
25
Flat screwdriver
18
Adjustable wrench
26
Tubing cutter
19
Torx T20
27
Cutting knife
20
Pliers
28
Level
21
Nipper
29
Hole saw
Before installing your
dishwasher
BU-Install_DD68-00160B-07_EN.indd 10BU-Install_DD68-00160B-07_EN.indd 10 2017-02-08 1:28:462017-02-08 1:28:46

Installing your dishwasher _11
03 INSTALLING
Installing your dishwasher
Be sure that you or your installer follow these instructions closely so that your
new dishwasher works properly and that you’re not at risk of injury when washing
dishes.
New installation
If the dishwasher is a new installation, most of the installation work must be done before the
dishwasher is moved into place.
Replacement
If the dishwasher is replacing an old dishwasher, you must check the exising dishwasher connections
for compatibility with the new dishwasher. Replace the existing connections as necessary.
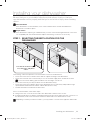
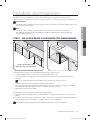
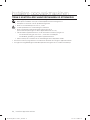
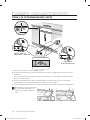
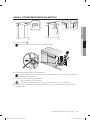
STEP1. SELECTING THE BEST LOCATION FOR THE
DISHWASHER
The hole for the water supply
line, drain hose and power
cables.
The following criteria are important to ensure the best location for the dishwasher:
• The location must have a solid fl oor that is able to support the weight of the dishwasher.
• The location must be near a sink with easy access to the water supply, drain, and electrical outlet.
To ensure smooth draining, place the drain hose at a height of 30-80cm.
• The location must let you load your dishes into the dishwasher easily.
• The location must have su cient space for the dishwasher door to open easily and provide enough
space between the dishwasher and the cabinet sides (at least 2mm).
• The wall at the back must be free of obstructions.
If this is a new installation, follow these steps:
1. Using a hole saw, cut a hole into the side of the cabinet that holds the sink as shown.
2. If the base inside the sink cabinet is raised above the kitchen fl oor and is higher than the connections on
the dishwasher, make a hole in the base inside the cabinet and in the cabinet side as shown.
Depending on where your electrical outlet is, you may need to cut a hole in the opposite cabinet side.
BU-Install_DD68-00160B-07_EN.indd 11BU-Install_DD68-00160B-07_EN.indd 11 2017-02-08 1:28:472017-02-08 1:28:47

12_ Installing your dishwasher
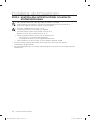
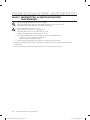
STEP2. CHECKING WATER SUPPLY AND ELECTRICAL
REQUIREMENTS
• The water supply line pressure must be between 0.05-0.8MPa.
• Supply cold water only. Make sure that the water temperature does not exceed 60˚C.
• Do not supply hot water. Otherwise, the product may malfunction.
• Use a rated power of 220-240 V~, 50Hz.
• Install the product while the power cord is unplugged.
• Use a power outlet with a maximum allowable current of 16A. (The maximum current for this dish
washer is 11A.)
• When powering the dishwasher, ensure that your power supply has:
- An 220-240 V~, 50 Hz fuse or circuit breaker.
- An individual branch circuit serving your dishwasher.
• After the installation, check if the power cord is not bent or damaged.
• Ensure that the water supply valve is turned o before connecting the water supply line to the
dishwasher.
• Seal the water supply line connections using tefl on tape or sealing compound to stop any water
leakage.
CAUTION
WARNING
Installing your dishwasher
BU-Install_DD68-00160B-07_EN.indd 12BU-Install_DD68-00160B-07_EN.indd 12 2017-02-08 1:28:472017-02-08 1:28:47

Installing your dishwasher _13
03 INSTALLING
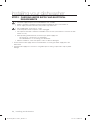
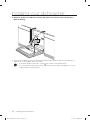
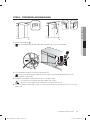
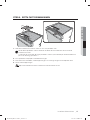
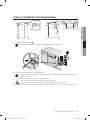
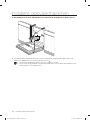
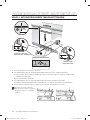
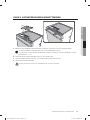
STEP3. PREPARING THE DISHWASHER
1. Install the Protective sticker
3
.
Attach the Protective sticker to the bottom of the counter top as shown in the picture.
2. Push half the product into the space under the counter top.
If you push the entire product under the counter top, you will not be able to adjust both the front
legs of the product in the next STEP.
3. Prepare the power cord, water supply hose and drain hose.
• Take care that you do not bend or fold the cord or hose.
• Do not connect the power cord until the installation of the dishwasher is complete.
4. Pull the power cord, water supply hose and drain hose through the hole to the sink as shown by the
fi gure above.
CAUTION
BU-Install_DD68-00160B-07_EN.indd 13BU-Install_DD68-00160B-07_EN.indd 13 2017-02-08 1:28:472017-02-08 1:28:47

14_ Installing your dishwasher
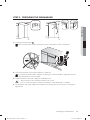
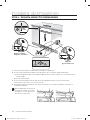
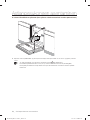
STEP4. LEVELING THE DISHWASHER
3
0-60mm
Min.
4mm
4
2
30-60mm
Normal : 0-30 mm
Tall-kitchen : 30-60 mm
Tall-kitchen
(Change to the Foot Sub)
1. Make sure that the product is level using the leveler.
2. You can adjust the height of the front of the product by turning the legs at both ends of the bottom front
of the product.
1) Slightly lift up the front of the product (when put in half way) and turn the legs to adjust the height.
2) You can adjust the height.
3. You can adjust the height of the front of the product by turning the legs with a Torx T20 screwdriver.
Turn it clockwise to lower the height or turn it counterclockwise to raise the height.
4. Install the product so that there is a space of at least 4mm between the top of the product and the
bottom of the counter top.
When the leveling is complete,
check if the inner door opens and
closes without interfering with the
tub.
Installing your dishwasher
BU-Install_DD68-00160B-07_EN.indd 14BU-Install_DD68-00160B-07_EN.indd 14 2017-02-08 1:28:472017-02-08 1:28:47

Installing your dishwasher _15
03 INSTALLING
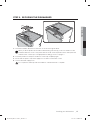
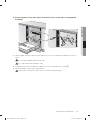
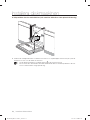
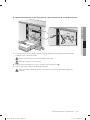
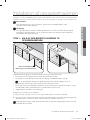
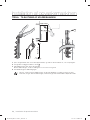
STEP5. SECURING THE DISHWASHER
1
1. Hook the installation brackets into the holes as shown in the fi gure above.
When you fi x the product at the sides instead of fi xing it at the top, you do not need to use the
installation brackets. In this case, please refer to the “B. To fi x the product at the sides (when the
material of the counter top is not appropriate for drilling)” section on page 17.
2. Insert the product into the place under the counter top completely again.
3. Ensure that the power cord, water supply hose or drain hose are bent or fold.
4. Connect the water supply hose.
Do not open the water tap until the installation of the dishwasher is complete.
CAUTION
BU-Install_DD68-00160B-07_EN.indd 15BU-Install_DD68-00160B-07_EN.indd 15 2017-02-08 1:28:472017-02-08 1:28:47

16_ Installing your dishwasher
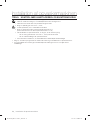
A. When the product is fi xed to the counter top (when the material of the counter top is
ideal for drilling)
1. Pre-drill the overlapping holes of the installation brackets and the protector top with a 2-pi drill bit to a
depth of 10-12mm and then fasten the screws.
• If you fi x the product to the top, 2 screws
6
out of the 6 screws will be remain.
• You can discard the remaining 2 screws or use them to fi x the sides of the product for a more
solid installation as following step.
Installing your dishwasher
Ø2
~12
6
BU-Install_DD68-00160B-07_EN.indd 16BU-Install_DD68-00160B-07_EN.indd 16 2017-02-08 1:28:482017-02-08 1:28:48

Installing your dishwasher _17
03 INSTALLING
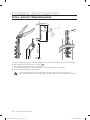
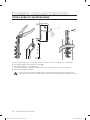
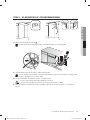
B. To fi x the product at the sides (when the material of the counter top is not appropriate
for drilling)
2
1. Remove upper and lower caps from both side with a tool such as a fl at-head screwdriver as shown in
fi gure.
Do not remove middle caps from both side.
Do not discard the removed plastic caps.
2. Pre-drill the holes with a 2-pi drill bit to a depth of 10-12mm and fasten the 4 screws
2
.
3. Reinstall the plastic caps to their original position.
Failing to do so may result in fi re or electric shock due to water leakage.
CAUTION
CAUTION
CAUTION
BU-Install_DD68-00160B-07_EN.indd 17BU-Install_DD68-00160B-07_EN.indd 17 2017-02-08 1:28:482017-02-08 1:28:48

18_ Installing your dishwasher
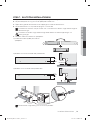
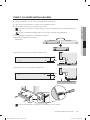
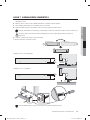
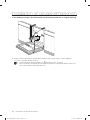
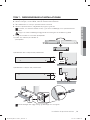
STEP6. CONNECTING THE DRAIN HOSE
2
2
Min.
30cm
Max.
80cm
Max. 80cm
1. Remove the hose holder which is attached to the product and cut o part of the holder as shown in the
fi gure.
2. Fix it to the wall by fastening the 2 screws
2
.
3. Insert the drain hose into the fi xed hose holder.
Install the drain hose so that it is placed within a range of 30cm to 80cm from the bottom.
4. Connect the drain hose to the drain outlet.
• Take care when you connect the drain hose that it does not move during a draining cycle.
• Confi rm that no parts of the drain hose, supply hose or power cord are bent or folded.
CAUTION
Installing your dishwasher
BU-Install_DD68-00160B-07_EN.indd 18BU-Install_DD68-00160B-07_EN.indd 18 2017-02-08 1:28:482017-02-08 1:28:48

Installing your dishwasher _19
03 INSTALLING
STEP7. COMPLETING THE INSTALLATION
1. Open the door and remove all foam, paper packaging, and unnecessary parts.
2. Turn on the circuit breaker you turned o before you began the installation.
3. Open the water supply valve to supply water to the dishwasher.
4. Turn on the dishwasher, and then select and run a cycle.
Check if the power turns on correctly and if there is any water leakage while the dishwasher is
operating.
Make sure to check for water leakage on both ends of the water supply line and drain hose
connector.
5. To install the kick plate, refer to the fi gure below.
1) Install the ‘Felt Lower’ onto the inside of the
‘Kick Plate’.
2) Models that are not equipped with the adjustable leg
3) Models that are equipped with the adjustable leg
Assemble the bracket in the right direction and order as shown in the fi gure.
CAUTION
7
7
5
5
48
small
Big
Big
Small
Install over 96.5mm
small
Big
Big
Small
Install over
96.5mm
BU-Install_DD68-00160B-07_EN.indd 19BU-Install_DD68-00160B-07_EN.indd 19 2017-02-08 1:28:482017-02-08 1:28:48

20_ Specifi cations
Specifi cations
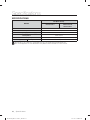
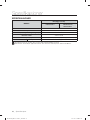
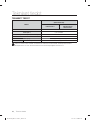
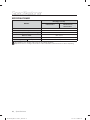
SPECIFICATIONS
MODEL
BU (Built Under)
DW60H9970US
DW60H9950US
DW60H9950UW
DW60J9960US
Power
220-240 V~, 50 Hz
Water pressure
0.05-0.8 Mpa
Wash capacity (place settings)
14
Rated power
2000-2300 W
Dimension (mm)
598 (W) x 817 (H) x 575 (D)
Weight Unpacked
45.0 kg
Specifi cations are subject to change without notice for quality improvement purposes.
The actual appearance of the dishwasher may di er from the illustrations in this manual.
BU-Install_DD68-00160B-07_EN.indd 20BU-Install_DD68-00160B-07_EN.indd 20 2017-02-08 1:28:482017-02-08 1:28:48
Sidan laddas...
Sidan laddas...
Sidan laddas...
Sidan laddas...
Sidan laddas...
Sidan laddas...
Sidan laddas...
Sidan laddas...
Sidan laddas...
Sidan laddas...
Sidan laddas...
Sidan laddas...
Sidan laddas...
Sidan laddas...
Sidan laddas...
Sidan laddas...
Sidan laddas...
Sidan laddas...
Sidan laddas...
Sidan laddas...
Sidan laddas...
Sidan laddas...
Sidan laddas...
Sidan laddas...
Sidan laddas...
Sidan laddas...
Sidan laddas...
Sidan laddas...
Sidan laddas...
Sidan laddas...
Sidan laddas...
Sidan laddas...
Sidan laddas...
Sidan laddas...
Sidan laddas...
Sidan laddas...
Sidan laddas...
Sidan laddas...
Sidan laddas...
Sidan laddas...
Sidan laddas...
Sidan laddas...
Sidan laddas...
Sidan laddas...
Sidan laddas...
Sidan laddas...
Sidan laddas...
Sidan laddas...
Sidan laddas...
Sidan laddas...
Sidan laddas...
Sidan laddas...
Sidan laddas...
Sidan laddas...
Sidan laddas...
Sidan laddas...
Sidan laddas...
Sidan laddas...
Sidan laddas...
Sidan laddas...
Sidan laddas...
Sidan laddas...
Sidan laddas...
Sidan laddas...
Sidan laddas...
Sidan laddas...
Sidan laddas...
Sidan laddas...
Sidan laddas...
Sidan laddas...
Sidan laddas...
Sidan laddas...
Sidan laddas...
Sidan laddas...
Sidan laddas...
Sidan laddas...
Sidan laddas...
Sidan laddas...
Sidan laddas...
Sidan laddas...
Sidan laddas...
Sidan laddas...
Sidan laddas...
Sidan laddas...
Sidan laddas...
Sidan laddas...
Sidan laddas...
Sidan laddas...
Sidan laddas...
Sidan laddas...
Sidan laddas...
Sidan laddas...
Sidan laddas...
Sidan laddas...
Sidan laddas...
Sidan laddas...
Sidan laddas...
Sidan laddas...
Sidan laddas...
Sidan laddas...
-
 1
1
-
 2
2
-
 3
3
-
 4
4
-
 5
5
-
 6
6
-
 7
7
-
 8
8
-
 9
9
-
 10
10
-
 11
11
-
 12
12
-
 13
13
-
 14
14
-
 15
15
-
 16
16
-
 17
17
-
 18
18
-
 19
19
-
 20
20
-
 21
21
-
 22
22
-
 23
23
-
 24
24
-
 25
25
-
 26
26
-
 27
27
-
 28
28
-
 29
29
-
 30
30
-
 31
31
-
 32
32
-
 33
33
-
 34
34
-
 35
35
-
 36
36
-
 37
37
-
 38
38
-
 39
39
-
 40
40
-
 41
41
-
 42
42
-
 43
43
-
 44
44
-
 45
45
-
 46
46
-
 47
47
-
 48
48
-
 49
49
-
 50
50
-
 51
51
-
 52
52
-
 53
53
-
 54
54
-
 55
55
-
 56
56
-
 57
57
-
 58
58
-
 59
59
-
 60
60
-
 61
61
-
 62
62
-
 63
63
-
 64
64
-
 65
65
-
 66
66
-
 67
67
-
 68
68
-
 69
69
-
 70
70
-
 71
71
-
 72
72
-
 73
73
-
 74
74
-
 75
75
-
 76
76
-
 77
77
-
 78
78
-
 79
79
-
 80
80
-
 81
81
-
 82
82
-
 83
83
-
 84
84
-
 85
85
-
 86
86
-
 87
87
-
 88
88
-
 89
89
-
 90
90
-
 91
91
-
 92
92
-
 93
93
-
 94
94
-
 95
95
-
 96
96
-
 97
97
-
 98
98
-
 99
99
-
 100
100
-
 101
101
-
 102
102
-
 103
103
-
 104
104
-
 105
105
-
 106
106
-
 107
107
-
 108
108
-
 109
109
-
 110
110
-
 111
111
-
 112
112
-
 113
113
-
 114
114
-
 115
115
-
 116
116
-
 117
117
-
 118
118
-
 119
119
-
 120
120


Samsung DW60J9960US/EE Användarmanual
- Typ
- Användarmanual
- Denna manual är också lämplig för
på andra språk
Relaterade papper
-
Samsung DW60J9960US/EE Installationsguide
-
Samsung DW-BG970B Installationsguide
-
Samsung DW-UG921W/XEE Bruksanvisning
-
Samsung DV90H8000HW/EE Användarmanual
-
Samsung WF1704WSW Användarmanual
-
-
Samsung WD0704EEC Bruksanvisning
-
-
-
Samsung DW60M6040UW Användarmanual