
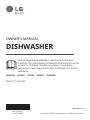
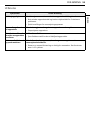
OWNER'S MANUAL
DISHWASHER
Before beginning installation, read these instructions
carefully. This will simplify installation and ensure that the
product is installed correctly and safely. Leave these
instructions near the product after installation for future
reference.
ENGLISH DANSK SUOMI NORSK SVENSKA
SDU527** / DU325**
MFL70282452
Rev.02_081820
www.lg.com
Copyright © 2020 LG Electronics Inc. All Rights Reserved.

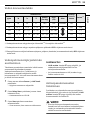
TABLE OF CONTENTS
This manual may contain images or
content that may be different from the
model you purchased.
This manual is subject to revision by the
manufacturer.
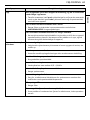
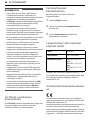
SAFETY INSTRUCTIONS
READ ALL INSTRUCTIONS BEFORE USE...........................................................4
WARNING STATEMENTS....................................................................................4
CAUTION STATEMENTS .....................................................................................9
CARING FOR THE ENVIRONMENT..................................................................11
INSTALLATION
Parts and Specifications ..................................................................................12
Preparing Cabinet Opening............................................................................14
Levelling the Appliance ...................................................................................15
Installing the Drain Hose ................................................................................18
Preparing Water and Electrical Connections................................................19
Final Installation Check ...................................................................................20
OPERATION
Operation Overview.........................................................................................22
Before Using.....................................................................................................23
Control Panel ....................................................................................................27
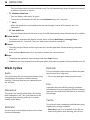
Wash Cycles ......................................................................................................28
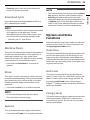
Options and Extra Functions ..........................................................................29
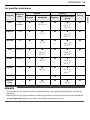
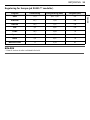
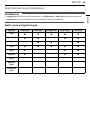
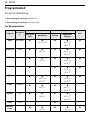
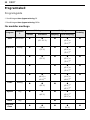
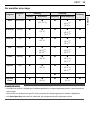
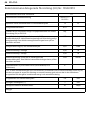
Programme Table ............................................................................................32
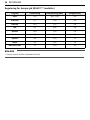
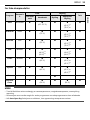
Information for Energy Test (EN60436) ........................................................38
Loading the Dishwasher .................................................................................39
Adding Cleaning Agents..................................................................................44
Refilling..............................................................................................................46
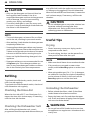
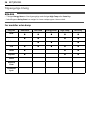
Useful Tips.........................................................................................................46
SMART FUNCTIONS
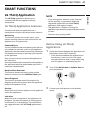
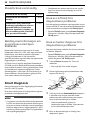
LG ThinQ Application.......................................................................................47
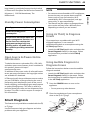
Smart Diagnosis ...............................................................................................49
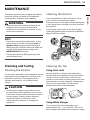
MAINTENANCE
Cleaning and Caring ........................................................................................51


4
SAFETY INSTRUCTIONS
SAFETY INSTRUCTIONS
READ ALL INSTRUCTIONS BEFORE USE
The following safety guidelines are intended to prevent unforeseen
risks or damage from unsafe or incorrect operation of the appliance.
The guidelines are separated into ‘WARNING’ and ‘CAUTION’ as
described below.
Safety Messages
WARNING STATEMENTS
WARNING
• To reduce the risk of explosion, fire, death, electric shock, injury or
scalding to persons when using this product, follow basic
precautions, including the following:
Technical Safety
• This appliance is not intended for use by persons (including children)
with reduced physical, sensory or mental capabilities, or lack of
experience and knowledge, unless they have been given supervision
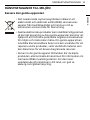
This symbol is displayed to indicate matters and operations that
can cause risk.
Read the part with this symbol carefully and follow the
instructions in order to avoid risk.
WARNING
This indicates that the failure to follow the instructions can cause
serious injury or death.
CAUTION
This indicates that the failure to follow the instructions can cause
minor injury or damage to the product.

5
SAFETY INSTRUCTIONS
ENGLISH
or instruction concerning use of the appliance by a person
responsible for their safety. Children should be supervised to ensure
that they do not play with the appliance.
• Observe the information given in Specifications regarding the
maximum number of place settings to be washed of the dishwasher.
• The water pressure must be between 0.05 MPa and 0.6 MPa.
Installation
• Never attempt to operate the appliance if it is damaged,
malfunctioning, partially disassembled, or has missing or broken
parts, including a damaged cord or plug.
• If the power cord is damaged or the hole of the socket outlet is loose,
do not use the power cord and contact an authorized service centre.
• Do not modify the power cord provided with the appliance. Please
contact the LG Customer information centre to advise of its
incompatibility.
• This appliance should only be transported by two or more people
holding the appliance securely.
• Do not install the appliance in a damp and dusty place. Do not install
or store the appliance in any outdoor area, or any area that is subject
to weathering conditions such as direct sunlight, wind, or rain or
temperatures below freezing.
• Do not plug multiple socket outlets, an extension power cable or
adapter with this appliance.
• Disconnect the power cord, house fuse or circuit breaker before
installing or servicing the appliance.
• When moving or installing the product in a different location, call
qualified service personnel for installation and service.
• Fix the drain hose securely in place.
• This appliance is not designed for maritime use or for mobile
installations such as in RVs, trailers, or aircraft.
• This appliance must be positioned near to an electrical power supply.

6
SAFETY INSTRUCTIONS
• When installing or moving the appliance, be careful not to pinch,
crush, or damage the power cord.
• Use new hose or hose-set supplied with the appliance. Reusing old
hoses can cause a water leak and subsequent property damage.
• Improper connection of the equipment-grounding conductor can
result in risk of electric shock. Check with a qualified electrician or
service personnel if you are in doubt as to whether the appliance is
properly grounded.
• This appliance must be grounded. In the event of malfunction or
breakdown, grounding will reduce the risk of electric shock by
providing a path of least resistance for electric current.
• This appliance is equipped with a power cord having an equipment-
grounding conductor and a grounding power plug. The power plug
must be plugged into an appropriate socket outlet that is installed
and grounded in accordance with all local codes and ordinances.
• After installing, check the hose connection for leaks before moving
the appliance into the cabinet opening.
• Do not damage or place heavy items on the power cord of the
appliance.
• This appliance is intended to be used in household and domestic
applications only and must not be used for commercial purposes.
• For a permanently connected dishwasher: This appliance must be
connected to a grounded metal, permanent wiring system, or an
equipment-grounding conductor must be run with the circuit
conductors and connected to the equipment-grounding terminal or
lead to the appliance.
• Connect the ground wire to the green ground connector in the
terminal box.
Operation
• Immediately unplug the power plug and contact an LG Electronics
customer information centre if you detect a strange sound, odour, or
smoke coming from the appliance.

7
SAFETY INSTRUCTIONS
ENGLISH
• Do not repair or replace any part of the appliance. All repairs and
servicing must be performed by qualified service personnel unless
specifically recommended in this Owner’s Manual. Use only
authorized factory parts.
• Do not leave the appliance door open. Children may hang on the door
or crawl inside the appliance, causing damage or injury.
• Do not use flammable gas and combustible substances (benzene,
gasoline, thinner, petroleum, alcohol, etc.) near the appliance.
• Do not attempt to separate any panels or disassemble the appliance.
Do not apply any sharp objects to the control panel in order to
operate the appliance.
• Do not bend the power cable excessively or place a heavy object on it.
• Do not put animals, such as pets into the appliance.
• Do not touch the power plug or the appliance controls with wet
hands.
• If there is a gas leakage (isobutane, propane, natural gas, etc.), do not
touch the appliance or power plug and ventilate the area
immediately.
• In case of flood, disconnect the power plug and contact the LG
Electronics Customer Information Centre.
• Under certain conditions, hydrogen gas may be produced in a hot-
water system that has not been used for two weeks or more.
HYDROGEN GAS IS EXPLOSIVE. If the hot-water system has not been
used for such a period, before using the appliance turn on all hot
water tap and let the water flow from each for several minutes. This
will release any accumulated hydrogen gas. As the gas is flammable,
do not smoke or use an open flame during this time.
• Keep the area underneath and around your appliances free of
combustible materials such as lint, paper, rags, chemicals, etc.
• Some dishwasher detergents are strongly alkaline. They can be
extremely dangerous if swallowed. Avoid contact with the skin and
eyes and keep children away from the dishwasher when the door is
open. Check that the detergent receptacle is empty after completion
of the wash cycle.

8
SAFETY INSTRUCTIONS
• Do not operate the appliance unless all enclosure panels are properly
in place.
• Use only detergents or wetting agents recommended for use in a
appliance and keep them out of the reach of children.
• Do not wash and dry articles that have been soaked in explosive
substances such as gasoline, solvents, solvent-based detergent.
• When loading items to be washed:
- Locate sharp items so that they are not likely to damage the door
seal.
- Load sharp knives with the handles up to reduce the risk of cut-type
injuries.
• Do not wash plastic items unless they are marked “dishwasher safe”
or the equivalent. For plastic items not so marked, check the
manufacturer’s recommendations.
• Do not touch any heating element (where it is exposed) during or
immediately after use.
• Do not abuse, sit on, or stand on the door or dish rack of the
dishwasher.
• After cleaning the dishes, turn off the tap. Turn on the tap again and
check the connection status of water supply hose before cleaning.
• Do not open the door while the appliance is in operation. Water will
splash out and could cause a slipping hazard.
• Be careful not to catch your hand when closing the door of the
appliance.
• Do not wash and dry articles that have been soaked in explosive
substances such as gasoline, solvents, solvent-based detergent.
• Do not come into contact with any fitted steam outlet.
• Small parts, such as rack clips and filter retaining posts can be a choke
hazard to small children if removed from the dishwasher. Keep out of
reach of small children.
• Knives and other utensils with sharp points must be loaded in the
basket with their points down or placed in a horizontal position.

9
SAFETY INSTRUCTIONS
ENGLISH
• The door should not be left in the open position since this could
present a tripping hazard.
Maintenance
• Never unplug the appliance by pulling on the power cable. Always
grip the power plug firmly and pull straight out from the socket
outlet.
• Securely plug the power plug in the socket outlet after completely
removing any moisture and dust.
• Do not spray water inside or outside the appliance to clean it.
• Disconnect the appliance from the power supply before cleaning the
appliance. Setting the controls to the OFF or stand by position does
not disconnect this appliance from the power supply.
Disposal
• Before discarding an old appliance, unplug it. Cut off the cable
directly behind the appliance to prevent misuse.
• Dispose of all packaging materials (such as plastic bags and
styrofoam) away from children. The packaging materials can cause
suffocation.
• Remove the door before disposing of or discarding this appliance to
avoid the danger of children or small animals getting trapped inside.
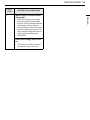
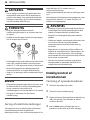
CAUTION STATEMENTS
CAUTION
• To reduce the risk of fire, electric shock, or injury to persons when
using your product, basic safety precautions should be followed,
including the following:
Installation
• Install the product on a firm and level floor.
• Do not put the drain hose under the dishwasher during installation.

10
SAFETY INSTRUCTIONS
Operation
• Turn off the water tap and unplug the appliance if the appliance is to
be left for an extended period of time, such as during vacations.
• Do not place objects on the top of the appliance.
• Do not wipe or coat the surface of the product with liquid detergent
or bleach (chlorine bleach, oxygen bleach, etc). Failure to follow these
instructions may result in corrosion or discoloration of the coating.
• Do not touch water draining from the machine as it may be hot.
• If the drain hose and the water supply hose are frozen in winter,
defrost before using.
• Do not put hands, feet, or metal objects below or behind the
appliance.
• Do not wash dishes stained with chemical products such as oil, cream
or lotions used in a massage parlor, skin care shop, beauty shop or
barber shop.
Maintenance
• If cooking oil is spilled on the exterior of the product, wipe it off
immediately. Do not clean the exterior of the product with cleaners
which contain alcohol, thinners, bleach, benzene, flammable liquids,
or abrasives. These substances may discolor or damage the
appliance.

11
SAFETY INSTRUCTIONS
ENGLISH
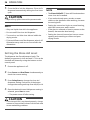
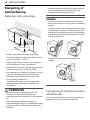
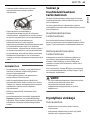
CARING FOR THE ENVIRONMENT
Disposal of Your Old Appliance
• This crossed-out wheeled bin symbol indicates that waste
electrical and electronic products (WEEE) should be
disposed of separately from the municipal waste stream.
• Old electrical products can contain hazardous substances
so correct disposal of your old appliance will help prevent
potential negative consequences for the environment and
human health. Your old appliance may contain reusable
parts that could be used to repair other products, and
other valuable materials that can be recycled to conserve
limited resources.
• You can take your appliance either to the shop where you
purchased the product, or contact your local government
waste office for details of your nearest authorised WEEE
collection point. For the most up to date information for
your country, please see www.lg.com/global/recycling.

12
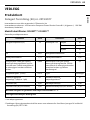
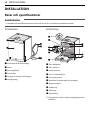
INSTALLATION
INSTALLATION
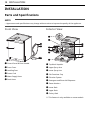
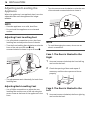
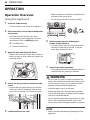
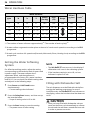
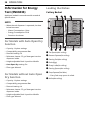
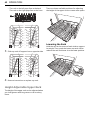
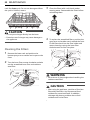
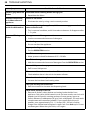
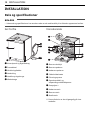
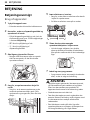
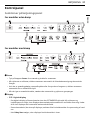
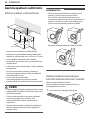
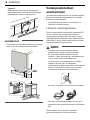
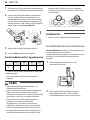
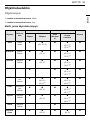
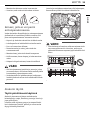
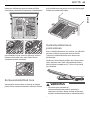
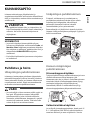
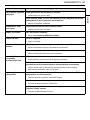
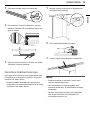
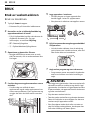
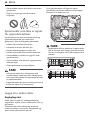
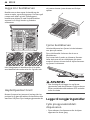
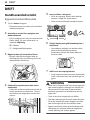
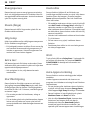
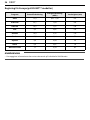
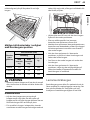
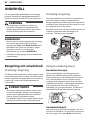
Parts and Specifications
NOTE
• Appearance and specifications may change without notice to improve the quality of the appliance.
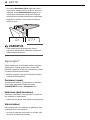
Front View
a
Control Panel & Door Handle
b
Front Cover
c
Levelling Feet
d
Power Cord
e
Water Supply Hose
f
Drain Hose
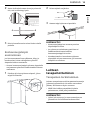
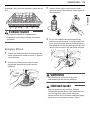
Interior View
a
Top Wash Impeller
b
Upper Spray Arm
c
Lower Spray Arm
d
Salt Container Cap
e
Filtration System
f
Detergent and Rinse Aid Dispenser
g
Steam Nozzle
*1
h
Lower Rack
i
Upper Rack
j
Cutlery Rack
*1 This feature is only available on some models.

13
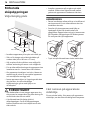
INSTALLATION
ENGLISH
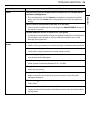
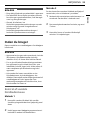
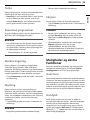
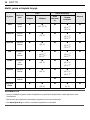
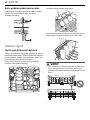
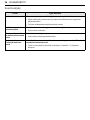
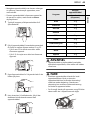
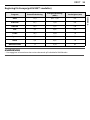
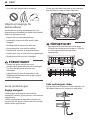
Accessories
a
Funnel
b
Noise Strap (Side)
c
Moisture Barrier Tape (Aluminum tape)
d
Side Fixable Screws(Φ 4.5 x 12 mm)
e
Installation Brackets
f
Bracket Fixing Screws (Φ 4 x 14 mm)
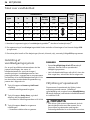
Specifications
Model SDU527** DU325**
Power Supply 220 - 240 V~, 50 Hz
Dimension
(Width X Depth X Height)
600 mm X 567 mm X 815 mm
Product Weight Approx. 44 kg Approx. 43 kg
Max. Capacity 14 Place Settings
Permissible Inlet Water Pressure 0.05 - 0.6 MPa
Power Consumption 1600 - 1800 W

14
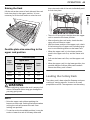
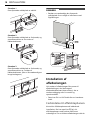
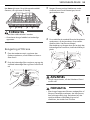
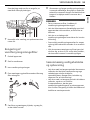
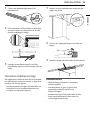
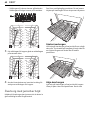
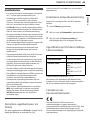
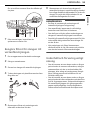
INSTALLATION
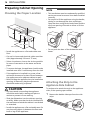
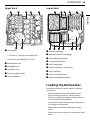
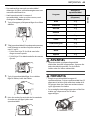
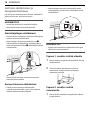
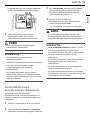
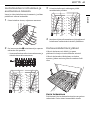
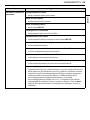
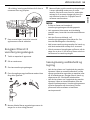
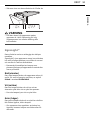
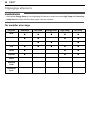
Preparing Cabinet Opening
Choosing the Proper Location
• Install the appliance on a flat and stable area
floor.
• Cut out for hoses and electrical cables on either
side. (Approximately 100 mm X 75 mm)
• Select a location as close to the sink as possible
for ease of connection to the water and drain
pipes.
• To ensure drainage, the appliance should not be
installed more than 1 metre away from the sink.
• If the appliance is installed in a corner, allow
minimum clearance of at least 50 mm between
the appliance and an adjacent cabinet or wall.
• Before sliding the appliance into the installation
opening, all necessary height adjustments
should be made using a spanner.
CAUTION
• Any bare wood surrounding the appliance
should be sealed with a waterproof paint or
sealant to prevent it from swelling.
• Slide the dishwasher into the cabinet, opening
carefully. Make sure that the drain hose behind
the machine and inside the cabinet is not kinked
or stretched.
• Install the appliance on a flat and stable area. Do
not place any objects in-between the floor and
base or leg off the appliance.
NOTE
• This installation must be conducted by qualified
service personnel to ensure it has been installed
correctly.
• Do not pull or lift the appliance using the handle;
dosing so can damage the door and hinges.
Open the door and grab the body frame and the
top front opening of the tub to move or lift the
appliance.
• Do not push the door of the dishwasher with
knees.
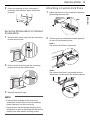
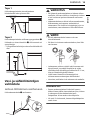
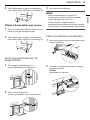
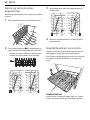
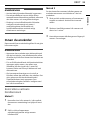
Attaching the Strip to the
Appliance Side Cabinet
To reduce noise attach the strip to the appliance
sides, if the opening space allows.
1
Remove the double-side tape from the side
strips.
Min 600 mm
820 - 880 mm
100 mm
600 - 605 mm
75 mm

15
INSTALLATION
ENGLISH
2
Attach the side strip to the front of the side
cabinet and then push down the side strip so
that the side strip adheres well to the cabinet.
3
Repeat the above steps for attaching the
opposite side strip to the opposite side cabinet.
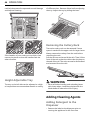
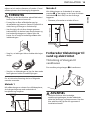
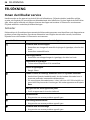
Installing Moisture Barrier Tape
When the appliance is installed without the top
cover, the counter top underside may be damaged
by steam or condensation when the door is
opened.
• Install the moisture barrier tape to the underside
of counter top to protect the counter top from
condensation when the appliance opened.
1
Clean and dry the underside of the counter top
on which the tape will be attached.
2
Remove the protective film from the tape.
3
Install the tape to the underside of the counter
top.
NOTE
• Moisture barrier tape is included in the manual
assembly bag.
• If the counter top is made of granite or
waterproof materials, the moisture barrier tape
is not required.
• Condensation may occur on the underside or
along the front edge of the counter top when the
room temperature is low.
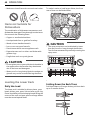
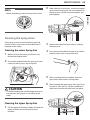
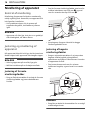
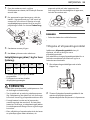
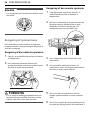
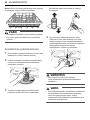
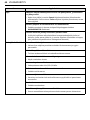
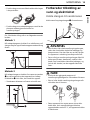
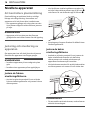
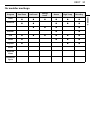
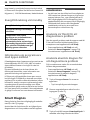
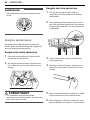
Levelling the Appliance
Checking the Level
Levelling the appliance prevents unnecessary
leakage and poor washing. Check whether the
appliance is perfectly level after installation.
• If the appliance rocks when pushing the top
plate of the appliance diagonally, adjust the feet
again.
NOTE
• The appliance is not level if there is a rubbing
sound or stickiness when the door is opened.

16
INSTALLATION
Adjusting and Leveling the
Appliance
When the appliance is not perfectly level, turn the
adjustable feet until the appliance no longer
wobbles.
NOTE
• Place the appliance on a solid, level floor.
• Do not install the appliance on an elevated
surface.
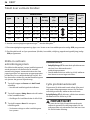
Adjusting Front Levelling Feet
• Use a flat-blade screwdriver to turn the front
levelling feet and adjust the front of the tub.
• Turn the front levelling feet clockwise to raise the
front of the tub up to 60 mm
a
and
counterclockwise to lower it up to 60 mm
a
.
• The adjustments work identically for both front
levelling feet.
Adjusting Back Levelling Feet
• Use a Phillips screwdriver to adjust the rear
levelling foot and the rear of the tub using the
centre screw at the base of the appliance in the
front.
• Turn the centre screw clockwise to raise the rear
of the tub and counterclockwise to lower it.
NOTE
• To avoid damaging the screw, do not use an
electric screwdriver.
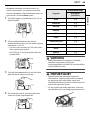
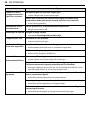
Case 1. The Door is Slanted to the
Right
1
Unscrew (counter-clockwise) the front left leg
and correct the level.
2
Check the opening of door and repeat if
necessary until the door opens and closes
properly.
Case 2. The Door is Slanted to the
Left
1
Unscrew (counter-clockwise) the front right leg
and correct the level.

17
INSTALLATION
ENGLISH
2
Check the opening of door and repeat if
necessary until the door opens and closes
properly.
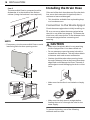
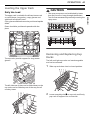
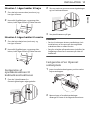
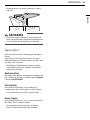
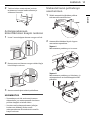
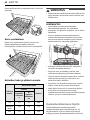
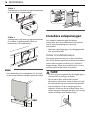
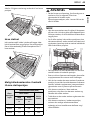
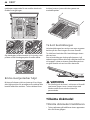
Securing Dishwasher to Cabinet
Framework
1
Remove the 2 plastic caps from the mounting
bracket access holes.
2
Drive a wood screw through the mounting
bracket and into the cabinet frame.
3
Reinstall the plastic caps.
NOTE
• External water leakage could result if the
installation of the screws to the surrounding
timber cabinet is not done correctly.
• Please ensure that the height levelling of the
dishwasher is done by adjusting the feet before
installing the side cabinet securing screws.
Attaching a Custom Kick Plate
1
Adjust the position of the installation brackets
by bending the metal tab.
2
The fitting of the installation bracket depends
on each of the following cases.
Case 1
The custom Kick Plate is seperated.
Case 2
The custom Kick Plate is connected and the
dishwasher is at the end of the kitchen cabinet.
487.5 mm

18
INSTALLATION
Case 3
The custom Kick Plate is connected, and the
dishwasher is in the middle of the kitchen
cabinet. (Using the brackets is not required.)
NOTE
• If necessary, trim the custom Kick Plate to avoid
interfering with the door opening action.
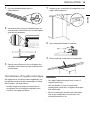
Installing the Drain Hose
If the end of the drain hose does not fit to the drain
line, use a drain extension kit (optional) that is
resistant to heat and detergent.
• This should be available from a plumbing shop
or a hardware store.
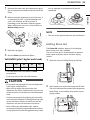
Connection to the Waste Spigot
Check the waste spigot when initially installing. An
OE
error can occur when the waste spigot below
the sink is not drilled out properly. To connect the
drain hose, drill out at least a 15 mm diameter hole
in the waste spigot before connecting and
securing.
CAUTION
• Make sure that plastic debris is not remaining
inside of spigot after it has been drilled out.
• Do not attempt to open the waste hole with a
screwdriver and hammer. This will induce debris
to become stuck and cause a malfunction.
• Caution should be taken when passing hoses
through Cabinetry holes as they may have sharp
edges and could damage the hoses. Smooth or
sand edges to avoid damaging the drain or inlet
hose.
• Make sure that the line is not kinked or sharply
bent.
• Make sure the drain hose is straight before
feeding the end of it through the hole for the
water supply.
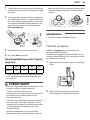
To prevent siphoning, one of the following
methods must be used.
= d(= d(≥≥20) 20)
Max 60 mm

19
INSTALLATION
ENGLISH
Method 1
When the drain hose is connected to a waste
spigot, the hose must be looped up to the
underside of the bench top and secured.
Method 2
When the drain hose is connected to a separate
standpipe
a
, it is essential that an airtight
connection
b
be made. If not, it can induce odours.
• Standpipe diameter is at least 40 mm.
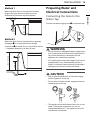
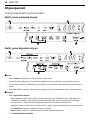
Preparing Water and
Electrical Connections
Connecting the Hose to the
Water Tap
Connect the water supply hose
a
to the water tap.
WARNING
• Do not shorten or damage the water supply hose
as it contains electrical wires and components. It
can not be detached or removed from the
appliance for installation purposes.
• It is important that the water supply hose not be
tampered with, cut, disassembled, pulled, or
kinked. It contains electrical wiring inside and if
damaged, can cause an electrical hazard.
CAUTION
• Only use the threaded nut of the water supply
hose to tighten it to the tap.
• Do not twist or kink the water supply hose when
connecting it to the tap.
• This appliance may be fed with either hot or cold
water. If the water connection can not be
maintained below 65ºC, the appliance must be
connected to cold water.
≤ 300 mm
700 – 1000 mm
700 – 1000 mm
≤ 300 mm

20
INSTALLATION
CAUTION
• Use sealant tape or sealing compound on the
tap’s thread to avoid water leaks.
• Make sure that the line is not kinked or sharply
bent.
NOTE
• Before connecting the water supply hose to the
tap, turn on the tap to flush out foreign
substances (dirt, sand or sawdust) in the water
lines. Let water drain into a bucket.
• It takes about 3 – 4 minutes for the first supply
water.
Routing Electrical Wiring
Connect the appliance to an earthed socket in
accordance with the current wiring regulations,
protected by a minimum 15 amp circuit breaker or
time delay fuse.
Wiring must be two wires with earth.
The power cord should not be positioned behind
the appliance but within 1.2 meters of the side so
that the plug is easily accessible.
WARNING
• For personal safety, remove house fuse or open
circuit breaker or switch off power plug before
installation.
• Do not use an extension cord or double adapter.
• The plug must be plugged into an appropriate
outlet that is properly installed and grounded in
accordance with all local codes and ordinances.
• Repairs to the appliance must only be carried out
by qualified service personnel. Repairs carried
out by inexperienced persons may cause injury
or serious malfunctioning. Contact our local
service centre.
• Connect to a properly rated, protected, and sized
power circuit to avoid electrical overload.
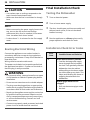
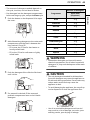
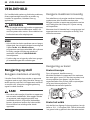
Final Installation Check
Testing the Dishwasher
1
Turn on electrical power.
2
Turn on house water supply.
3
The door should open and close smoothly and
without harsh noises, if the unit has been
levelled correctly.
4
Run the appliance on a
Rinse
cycle to verify
proper operation and check for leaks.
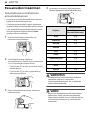
Installation Check Error Codes
Error
Code
Possible Cause and Solution
OE
Drain hose kinked or pinched.
• Feed the drainage and supply
hoses through the hole under
the sink. Then gradually slide the
dishwasher into the cabinet
while pulling on the hoses under
the sink to take up any slack. This
helps avoid kinking the hoses or
trapping them beneath the
dishwasher.
Waste spigot under sink is
clogged.
• Drill out the waste spigot under
the sink.
Sidan laddas...
Sidan laddas...
Sidan laddas...
Sidan laddas...
Sidan laddas...
Sidan laddas...
Sidan laddas...
Sidan laddas...
Sidan laddas...
Sidan laddas...
Sidan laddas...
Sidan laddas...
Sidan laddas...
Sidan laddas...
Sidan laddas...
Sidan laddas...
Sidan laddas...
Sidan laddas...
Sidan laddas...
Sidan laddas...
Sidan laddas...
Sidan laddas...
Sidan laddas...
Sidan laddas...
Sidan laddas...
Sidan laddas...
Sidan laddas...
Sidan laddas...
Sidan laddas...
Sidan laddas...
Sidan laddas...
Sidan laddas...
Sidan laddas...
Sidan laddas...
Sidan laddas...
Sidan laddas...
Sidan laddas...
Sidan laddas...
Sidan laddas...
Sidan laddas...
Sidan laddas...
Sidan laddas...
Sidan laddas...
Sidan laddas...
Sidan laddas...
Sidan laddas...
Sidan laddas...
Sidan laddas...
Sidan laddas...
Sidan laddas...
Sidan laddas...
Sidan laddas...
Sidan laddas...
Sidan laddas...
Sidan laddas...
Sidan laddas...
Sidan laddas...
Sidan laddas...
Sidan laddas...
Sidan laddas...
Sidan laddas...
Sidan laddas...
Sidan laddas...
Sidan laddas...
Sidan laddas...
Sidan laddas...
Sidan laddas...
Sidan laddas...
Sidan laddas...
Sidan laddas...
Sidan laddas...
Sidan laddas...
Sidan laddas...
Sidan laddas...
Sidan laddas...
Sidan laddas...
Sidan laddas...
Sidan laddas...
Sidan laddas...
Sidan laddas...
Sidan laddas...
Sidan laddas...
Sidan laddas...
Sidan laddas...
Sidan laddas...
Sidan laddas...
Sidan laddas...
Sidan laddas...
Sidan laddas...
Sidan laddas...
Sidan laddas...
Sidan laddas...
Sidan laddas...
Sidan laddas...
Sidan laddas...
Sidan laddas...
Sidan laddas...
Sidan laddas...
Sidan laddas...
Sidan laddas...
Sidan laddas...
Sidan laddas...
Sidan laddas...
Sidan laddas...
Sidan laddas...
Sidan laddas...
Sidan laddas...
Sidan laddas...
Sidan laddas...
Sidan laddas...
Sidan laddas...
Sidan laddas...
Sidan laddas...
Sidan laddas...
Sidan laddas...
Sidan laddas...
Sidan laddas...
Sidan laddas...
Sidan laddas...
Sidan laddas...
Sidan laddas...
Sidan laddas...
Sidan laddas...
Sidan laddas...
Sidan laddas...
Sidan laddas...
Sidan laddas...
Sidan laddas...
Sidan laddas...
Sidan laddas...
Sidan laddas...
Sidan laddas...
Sidan laddas...
Sidan laddas...
Sidan laddas...
Sidan laddas...
Sidan laddas...
Sidan laddas...
Sidan laddas...
Sidan laddas...
Sidan laddas...
Sidan laddas...
Sidan laddas...
Sidan laddas...
Sidan laddas...
Sidan laddas...
Sidan laddas...
Sidan laddas...
Sidan laddas...
Sidan laddas...
Sidan laddas...
Sidan laddas...
Sidan laddas...
Sidan laddas...
Sidan laddas...
Sidan laddas...
Sidan laddas...
Sidan laddas...
Sidan laddas...
Sidan laddas...
Sidan laddas...
Sidan laddas...
Sidan laddas...
Sidan laddas...
Sidan laddas...
Sidan laddas...
Sidan laddas...
Sidan laddas...
Sidan laddas...
Sidan laddas...
Sidan laddas...
Sidan laddas...
Sidan laddas...
Sidan laddas...
Sidan laddas...
Sidan laddas...
Sidan laddas...
Sidan laddas...
Sidan laddas...
Sidan laddas...
Sidan laddas...
Sidan laddas...
Sidan laddas...
Sidan laddas...
Sidan laddas...
Sidan laddas...
Sidan laddas...
Sidan laddas...
Sidan laddas...
Sidan laddas...
Sidan laddas...
Sidan laddas...
Sidan laddas...
Sidan laddas...
Sidan laddas...
Sidan laddas...
Sidan laddas...
Sidan laddas...
Sidan laddas...
Sidan laddas...
Sidan laddas...
Sidan laddas...
Sidan laddas...
Sidan laddas...
Sidan laddas...
Sidan laddas...
Sidan laddas...
Sidan laddas...
Sidan laddas...
Sidan laddas...
Sidan laddas...
Sidan laddas...
Sidan laddas...
Sidan laddas...
Sidan laddas...
Sidan laddas...
Sidan laddas...
Sidan laddas...
Sidan laddas...
Sidan laddas...
Sidan laddas...
Sidan laddas...
Sidan laddas...
Sidan laddas...
Sidan laddas...
Sidan laddas...
Sidan laddas...
Sidan laddas...
Sidan laddas...
Sidan laddas...
Sidan laddas...
Sidan laddas...
Sidan laddas...
Sidan laddas...
Sidan laddas...
Sidan laddas...
Sidan laddas...
Sidan laddas...
Sidan laddas...
Sidan laddas...
Sidan laddas...
Sidan laddas...
Sidan laddas...
Sidan laddas...
Sidan laddas...
Sidan laddas...
Sidan laddas...
Sidan laddas...
Sidan laddas...
Sidan laddas...
Sidan laddas...
Sidan laddas...
Sidan laddas...
Sidan laddas...
Sidan laddas...
Sidan laddas...
Sidan laddas...
Sidan laddas...
Sidan laddas...
Sidan laddas...
Sidan laddas...
Sidan laddas...
Sidan laddas...
Sidan laddas...
Sidan laddas...
Sidan laddas...
Sidan laddas...
Sidan laddas...
Sidan laddas...
Sidan laddas...
Sidan laddas...
Sidan laddas...
Sidan laddas...
Sidan laddas...
Sidan laddas...
Sidan laddas...
Sidan laddas...
Sidan laddas...
Sidan laddas...
Sidan laddas...
Sidan laddas...
Sidan laddas...
Sidan laddas...
Sidan laddas...
Sidan laddas...
Sidan laddas...
Sidan laddas...
Sidan laddas...
Sidan laddas...
Sidan laddas...
Sidan laddas...
Sidan laddas...
Sidan laddas...
Sidan laddas...
Sidan laddas...
Sidan laddas...
Sidan laddas...
Sidan laddas...
Sidan laddas...
Sidan laddas...
Sidan laddas...
Sidan laddas...
Sidan laddas...
Sidan laddas...
-
 1
1
-
 2
2
-
 3
3
-
 4
4
-
 5
5
-
 6
6
-
 7
7
-
 8
8
-
 9
9
-
 10
10
-
 11
11
-
 12
12
-
 13
13
-
 14
14
-
 15
15
-
 16
16
-
 17
17
-
 18
18
-
 19
19
-
 20
20
-
 21
21
-
 22
22
-
 23
23
-
 24
24
-
 25
25
-
 26
26
-
 27
27
-
 28
28
-
 29
29
-
 30
30
-
 31
31
-
 32
32
-
 33
33
-
 34
34
-
 35
35
-
 36
36
-
 37
37
-
 38
38
-
 39
39
-
 40
40
-
 41
41
-
 42
42
-
 43
43
-
 44
44
-
 45
45
-
 46
46
-
 47
47
-
 48
48
-
 49
49
-
 50
50
-
 51
51
-
 52
52
-
 53
53
-
 54
54
-
 55
55
-
 56
56
-
 57
57
-
 58
58
-
 59
59
-
 60
60
-
 61
61
-
 62
62
-
 63
63
-
 64
64
-
 65
65
-
 66
66
-
 67
67
-
 68
68
-
 69
69
-
 70
70
-
 71
71
-
 72
72
-
 73
73
-
 74
74
-
 75
75
-
 76
76
-
 77
77
-
 78
78
-
 79
79
-
 80
80
-
 81
81
-
 82
82
-
 83
83
-
 84
84
-
 85
85
-
 86
86
-
 87
87
-
 88
88
-
 89
89
-
 90
90
-
 91
91
-
 92
92
-
 93
93
-
 94
94
-
 95
95
-
 96
96
-
 97
97
-
 98
98
-
 99
99
-
 100
100
-
 101
101
-
 102
102
-
 103
103
-
 104
104
-
 105
105
-
 106
106
-
 107
107
-
 108
108
-
 109
109
-
 110
110
-
 111
111
-
 112
112
-
 113
113
-
 114
114
-
 115
115
-
 116
116
-
 117
117
-
 118
118
-
 119
119
-
 120
120
-
 121
121
-
 122
122
-
 123
123
-
 124
124
-
 125
125
-
 126
126
-
 127
127
-
 128
128
-
 129
129
-
 130
130
-
 131
131
-
 132
132
-
 133
133
-
 134
134
-
 135
135
-
 136
136
-
 137
137
-
 138
138
-
 139
139
-
 140
140
-
 141
141
-
 142
142
-
 143
143
-
 144
144
-
 145
145
-
 146
146
-
 147
147
-
 148
148
-
 149
149
-
 150
150
-
 151
151
-
 152
152
-
 153
153
-
 154
154
-
 155
155
-
 156
156
-
 157
157
-
 158
158
-
 159
159
-
 160
160
-
 161
161
-
 162
162
-
 163
163
-
 164
164
-
 165
165
-
 166
166
-
 167
167
-
 168
168
-
 169
169
-
 170
170
-
 171
171
-
 172
172
-
 173
173
-
 174
174
-
 175
175
-
 176
176
-
 177
177
-
 178
178
-
 179
179
-
 180
180
-
 181
181
-
 182
182
-
 183
183
-
 184
184
-
 185
185
-
 186
186
-
 187
187
-
 188
188
-
 189
189
-
 190
190
-
 191
191
-
 192
192
-
 193
193
-
 194
194
-
 195
195
-
 196
196
-
 197
197
-
 198
198
-
 199
199
-
 200
200
-
 201
201
-
 202
202
-
 203
203
-
 204
204
-
 205
205
-
 206
206
-
 207
207
-
 208
208
-
 209
209
-
 210
210
-
 211
211
-
 212
212
-
 213
213
-
 214
214
-
 215
215
-
 216
216
-
 217
217
-
 218
218
-
 219
219
-
 220
220
-
 221
221
-
 222
222
-
 223
223
-
 224
224
-
 225
225
-
 226
226
-
 227
227
-
 228
228
-
 229
229
-
 230
230
-
 231
231
-
 232
232
-
 233
233
-
 234
234
-
 235
235
-
 236
236
-
 237
237
-
 238
238
-
 239
239
-
 240
240
-
 241
241
-
 242
242
-
 243
243
-
 244
244
-
 245
245
-
 246
246
-
 247
247
-
 248
248
-
 249
249
-
 250
250
-
 251
251
-
 252
252
-
 253
253
-
 254
254
-
 255
255
-
 256
256
-
 257
257
-
 258
258
-
 259
259
-
 260
260
-
 261
261
-
 262
262
-
 263
263
-
 264
264
-
 265
265
-
 266
266
-
 267
267
-
 268
268
-
 269
269
-
 270
270
-
 271
271
-
 272
272
-
 273
273
-
 274
274
-
 275
275
-
 276
276
-
 277
277
-
 278
278
-
 279
279
-
 280
280
-
 281
281
-
 282
282
-
 283
283
-
 284
284
-
 285
285
-
 286
286
-
 287
287
-
 288
288
-
 289
289
-
 290
290
-
 291
291
-
 292
292
-
 293
293
-
 294
294
-
 295
295
-
 296
296
-
 297
297
-
 298
298
-
 299
299
-
 300
300
-
 301
301
-
 302
302
-
 303
303
-
 304
304
-
 305
305
-
 306
306
-
 307
307
-
 308
308
-
 309
309
-
 310
310
-
 311
311
-
 312
312
-
 313
313
-
 314
314
-
 315
315
-
 316
316
-
 317
317
-
 318
318
-
 319
319
-
 320
320
-
 321
321
-
 322
322
-
 323
323
-
 324
324


LG SDU527HS Användarmanual
- Kategori
- Mixer / matberedare tillbehör
- Typ
- Användarmanual
på andra språk
- English: LG SDU527HS User manual
- dansk: LG SDU527HS Brugermanual
- suomi: LG SDU527HS Ohjekirja
Relaterade papper
Andra dokument
-
Electrolux ESI45010X Användarmanual
-
ELEKTRO HELIOS DI8526 Användarmanual
-
-
Samsung DW60M6070IB Bruksanvisningar
-
-
-
Samsung DW60M6040UW Användarmanual
-
Samsung DW60A6092UW Användarmanual
-
Whirlpool ADPU 3004 Bruksanvisning
-
Samsung DW60J9960US/EE Användarmanual