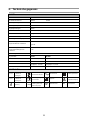
GETINGE GROUP ARJOHUNTLEIGH ALPHA ACTIVE 4 Instructions For Use Manual
- Typ
- Instructions For Use Manual

ALPHA ACTIVE 4
Instructions for Use • Brugsvejledning
Instrucciones de uso • Mode d'emploi
Istruzioni per l'uso • Gebruiksaanwijzing • Bruksanvisning


English
Français
Dansk
Español
Italiano
Nederlands
Svensk


English


(i)
Contents
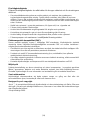
General Safety . . . . . . . . . . . . . . . . . . . . . . . . . . . . . . . . . . . . . . . . . . . . . . . . . . . . . iii
Introduction . . . . . . . . . . . . . . . . . . . . . . . . . . . . . . . . . . . . . . . . . . . . . . . . . . . . . . .1
About this Manual . . . . . . . . . . . . . . . . . . . . . . . . . . . . . . . . . . . . . . . . . . . . . . . 1
About Alpha Active 4 . . . . . . . . . . . . . . . . . . . . . . . . . . . . . . . . . . . . . . . . . . . . . 1
Alpha Active 4 Pump . . . . . . . . . . . . . . . . . . . . . . . . . . . . . . . . . . . . . . . . . . . . . 1
Alpha Active 4 Mattress Replacement. . . . . . . . . . . . . . . . . . . . . . . . . . . . . . . . 2
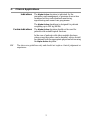
Clinical Applications . . . . . . . . . . . . . . . . . . . . . . . . . . . . . . . . . . . . . . . . . . . . . . . .3
Indications . . . . . . . . . . . . . . . . . . . . . . . . . . . . . . . . . . . . . . . . . . . . . . . . . . . . . 3
Contra-Indications . . . . . . . . . . . . . . . . . . . . . . . . . . . . . . . . . . . . . . . . . . . . . . . 3
Installation . . . . . . . . . . . . . . . . . . . . . . . . . . . . . . . . . . . . . . . . . . . . . . . . . . . . . . . .4
Preparing the Alpha Active 4 system for use. . . . . . . . . . . . . . . . . . . . . . . . . . . 4
Installing the Alpha Active 4 Mattress . . . . . . . . . . . . . . . . . . . . . . . . . . . . . . . . 4
Controls, Alarms and Indicators . . . . . . . . . . . . . . . . . . . . . . . . . . . . . . . . . . . . . . .6
Controls . . . . . . . . . . . . . . . . . . . . . . . . . . . . . . . . . . . . . . . . . . . . . . . . . . . . . . . 6
Alarms and Indicators . . . . . . . . . . . . . . . . . . . . . . . . . . . . . . . . . . . . . . . . . . . . 7
Operation . . . . . . . . . . . . . . . . . . . . . . . . . . . . . . . . . . . . . . . . . . . . . . . . . . . . . . . . . .8
Quick Start. . . . . . . . . . . . . . . . . . . . . . . . . . . . . . . . . . . . . . . . . . . . . . . . . . . . . 8
Support Setting Procedure . . . . . . . . . . . . . . . . . . . . . . . . . . . . . . . . . . . . . . . . 8
Changes in Patient Position. . . . . . . . . . . . . . . . . . . . . . . . . . . . . . . . . . . . . . . . 9
To Deflate and Store the Alpha Active 4 Mattress. . . . . . . . . . . . . . . . . . . . . . 10
CPR Control. . . . . . . . . . . . . . . . . . . . . . . . . . . . . . . . . . . . . . . . . . . . . . . . . . . 11
To activate CPR. . . . . . . . . . . . . . . . . . . . . . . . . . . . . . . . . . . . . . . . . . . . . . . . 11
To reset CPR. . . . . . . . . . . . . . . . . . . . . . . . . . . . . . . . . . . . . . . . . . . . . . . . . . 11
Decontamination . . . . . . . . . . . . . . . . . . . . . . . . . . . . . . . . . . . . . . . . . . . . . . . . . . .12
Routine Maintenance . . . . . . . . . . . . . . . . . . . . . . . . . . . . . . . . . . . . . . . . . . . . . . .14
Alpha Active 4 System. . . . . . . . . . . . . . . . . . . . . . . . . . . . . . . . . . . . . . . . . . . 14
Alpha Active 4 Pump . . . . . . . . . . . . . . . . . . . . . . . . . . . . . . . . . . . . . . . . . . . . 14
Alpha Active 4 Mattress Replacement. . . . . . . . . . . . . . . . . . . . . . . . . . . . . . . 14
Serial Labels . . . . . . . . . . . . . . . . . . . . . . . . . . . . . . . . . . . . . . . . . . . . . . . . . . 14
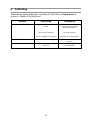
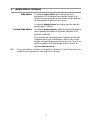
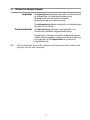
Troubleshooting . . . . . . . . . . . . . . . . . . . . . . . . . . . . . . . . . . . . . . . . . . . . . . . . . . .15
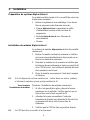
Technical Description . . . . . . . . . . . . . . . . . . . . . . . . . . . . . . . . . . . . . . . . . . . . . . .16
Pump . . . . . . . . . . . . . . . . . . . . . . . . . . . . . . . . . . . . . . . . . . . . . . . . . . . . . . . . 16
Mattress. . . . . . . . . . . . . . . . . . . . . . . . . . . . . . . . . . . . . . . . . . . . . . . . . . . . . . 17
Mattress Size Information . . . . . . . . . . . . . . . . . . . . . . . . . . . . . . . . . . . . . . . . 17
Cover Specification . . . . . . . . . . . . . . . . . . . . . . . . . . . . . . . . . . . . . . . . . . . . . 17
Cleaning Symbols . . . . . . . . . . . . . . . . . . . . . . . . . . . . . . . . . . . . . . . . . . . . . . 18

(ii)

(iii)
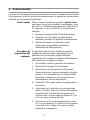
GENERAL SAFETY
Before you connect the system pump to a mains socket, read carefully all the installation
instructions contained within this manual.
The system has been designed to comply with regulatory safety standards including:
• EN60601-1:1990/A13:1996 and IEC 60601-1:1988/A2:1995
• UL60601-1 and CAN/CSA C22.2 No. 601.1-M90
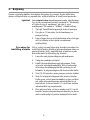
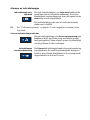
Safety Warnings
• It is the responsibility of the care giver to ensure that the user can use this product
safely.
• Whilst the patient is unattended, safety sides should be used based on clinical
assessment and in line with local policy.
• Alignment of the bed frame, safety sides and the mattress should leave no gap
wide enough to entrap a patient's head or body, or to allow egress to occur in a
hazardous manner where entanglement with the mains power cable and tubeset or
air hoses may result. Care should be exercised to prevent occurrence of gaps by
compression or movement of the mattress. Death or serious injury may occur.
• Make sure that the mains power cable and tubeset or air hoses are positioned to
avoid causing a trip or other hazard, and are clear of moving bed mechanisms or
other possible entrapment areas. Where cable management flaps are provided
along the sides of the mattress, these should be used to cover the mains power
cable.
• Electrical equipment may be hazardous if misused. There are no user-serviceable
parts inside the pump. The pump's case must only be removed by authorised
technical personnel. No modification of this equipment is allowed.
• The mains power socket/plug must be accessible at all times. To disconnect the
pump completely from the electricity supply, remove the plug from the mains
power socket.
• The CPR control and/or the CPR indicator tag must be visible and accessible at all
times.
• Disconnect the pump from the mains power socket before cleaning and inspecting.
• Keep the pump away from sources of liquids and do not immerse in water.
• Do not use the pump in the presence of uncontained flammable liquids or gasses.
• The cover of this product is vapour permeable but not air permeable and may
present a suffocation risk.
• Only the pump and mattress combination as indicated by ArjoHuntleigh should be
used. The correct function of the product cannot be guaranteed if incorrect pump
and mattress combinations are used.

(iv)
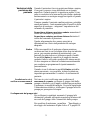
Precautions
For your own safety and the safety of the equipment, always take the following
precautions:
• Placing extra layers between the patient and the mattress potentially reduces the benefits
provided by the mattress and should be avoided or kept to a minimum. As part of sensible
pressure area care, it is advisable to avoid wearing clothing which may cause areas of
localised high pressure due to creases, seams, etc. Placing objects in pockets should be
avoided for the same reason.
• Do not expose the system, especially the mattress, to naked flames, such as cigarettes,
etc.
• Do not store the system in direct sunlight.
• Do not use phenol-based solutions to clean the system.
• Make sure the system is clean and dry prior to use or storage.
• Never use sharp objects or electrically heated under blankets on or under the system.
• Store the pump and mattress in the protective bags supplied.
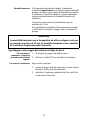
Electromagnetic Compatibility (EMC)
This product complies with the requirements of applicable EMC Standards. Medical electrical
equipment needs special precautions regarding EMC and needs to be installed in accordance
with the following instructions:
• The use of accessories not specified by the manufacturer may result in increased
emissions by, or decreased immunity of, the equipment, affecting its performance.
• Portable and mobile radio frequency (RF) communications equipment (e.g. mobile/cell
phones) can affect medical electrical equipment.
• If this equipment needs to be used adjacent to other electrical equipment, normal
operation must be checked before use.
• For detailed EMC information contact ArjoHuntleigh service personnel.
Environmental Protection
Incorrect disposal of this equipment and its component parts, particularly batteries or other
electrical components, may produce substances that are hazardous to the environment. To
minimise these hazards, contact ArjoHuntleigh for information on correct disposal.
Service Information
ArjoHuntleigh recommend that this system should be serviced every 12 calendar months or,
where applicable, when the service indicator is illuminated.
Design Policy and Copyright
® and ™ are trademarks belonging to the ArjoHuntleigh group of companies. As our policy is
one of continuous improvement, we reserve the right to modify designs without prior notice.
© ArjoHuntleigh 2009.

1
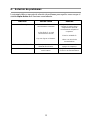
1. Introduction
About this Manual This manual is your introduction to the Alpha Active 4.
Use it to initially set up the mattress and keep it as a
reference for day-to-day routines and as a guide to
maintenance.
About Alpha Active 4 The
Alpha Active 4 systems comprise of a mattress
replacement and pump. The support system can be used
on hospital and domestic beds.
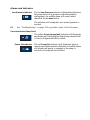
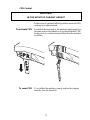
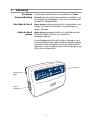
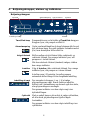
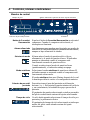
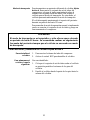
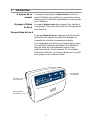
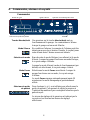
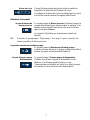
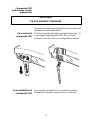
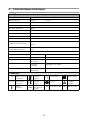
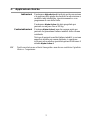
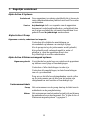
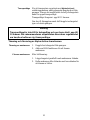
Alpha Active 4 Pump The
Alpha Active 4 pump comprises of a moulded case
with non slip feet on the base and integral hanging
brackets.
The controls are situated on the front of the pump and a
sophisticated alarm system differentiates between
normal operation and genuine system faults. If an alarm
situation is detected an indicator will illuminate on the
front of the pump and an audible warning will sound.
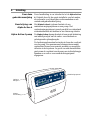
Control Panel
Hanging
Mattress
Brackets
Connection

2
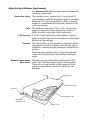
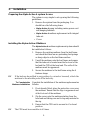
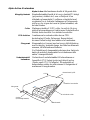
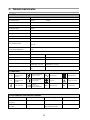
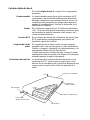
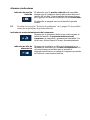
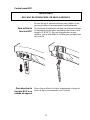
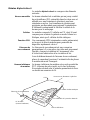
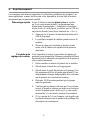
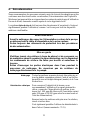
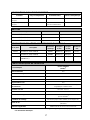
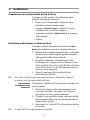
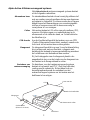
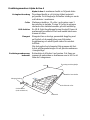
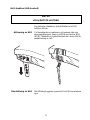
Alpha Active 4 Mattress Replacement
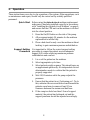
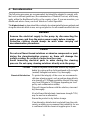
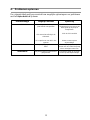
The
Alpha Active 4 mattress replacement comprises the
following components:
Detachable Cover The standard cover comprises of a 2-way stretch PU
(polyurethane) coated knitted fabric zipped to a durable
nylon base. The zips are protected by flaps to prevent
ingress of contaminants and allow easy removal of the
cover for cleaning.
Cells The mattress comprises of 19 PU cells, 16 providing
support to the user in either Alternating (Active) or
Static (Reactive) mode and 3 Static head cells.
CPR function A CPR (Cardio-Pulmonary Resuscitation) control is
positioned at the head end of the mattress to allow rapid
deflation of the mattress.
Tube-set The tube-set has a 3-way pneumatic connection which
incorporates a flexible, compact anti-kink tube that is
resistant to crushing and any subsequent obstruction of
air flow.
When disconnecting the tube-set, place the attached
cover over the end to place the mattress in transport
mode.
Mattress Replacement
Base Cover
The base cover for the mattress replacement is PVC
(Polyvinyl Chloride) coated nylon on the underside.
There are six straps located on the underside of the
mattress replacement to secure the mattress to the
bedframe.
Zipped Cover
3 Static Head Cells
16 Alternating Cells
Tubeset
Serial No.
Base Cover
(Inside cover)
CPR

3
2. Clinical Applications
Indications The Alpha Active 4 system is indicated for the
prevention and management of pressure ulcers when
combined with an individualised monitoring,
repositioning and wound care programme.
The
Alpha Active 4 mattress is designed for patients
weighting up to 200 kg (440lb).
Contra-Indications The
Alpha Active 4 system should not be used for
patients with unstable spinal fractures.
In the case of patients with other unstable fractures,
where a moving surface can be harmful, advice should
be obtained from the appropriate physician before using
the
Alpha Active 4 system.
The above are guidelines only and should not replace clinical judgement or
experience.

4
3. Installation
Preparing the Alpha Active 4 system for use
The system is very simple to set up using the following
guidelines:
1. Remove the system from the packaging. You
should have the following items:
•
Alpha Active 4 pump including mains power cord
and hanging brackets.
•
Alpha Active 4 mattress replacement with integral
tube-set.
•Cover.
Installing the Alpha Active 4 Mattress
The
Alpha Active 4 mattress replacement system should
be installed as follows:
1. Remove the existing mattress from the bed frame
and check that there are no protruding bed springs
or sharp objects on the bed frame surface.
2. Unroll the mattress onto the bed frame and ensure
that the tube-set is located near the foot end of the
bed and the CPR at the head end. The cells of the
mattress must be uppermost.
3. Secure the mattress to the bed frame using the 6
fastener straps.
If the bed can be profiled to any position (i.e. raised or lowered), attach the
mattress to the movable parts of the bed only.
To Complete the
Mattress Installation
Complete the installation of the mattress replacement as
follows:
1. If not already fitted, place the protective cover over
the mattress. Ensure that the logo is uppermost and
at the foot end of the mattress.
2. Zip the cover onto the mattress starting from the
head end and taking care not to trap any material in
the zip.
3. Ensure that the CPR unit is secured in it’s closed
position.
The CPR must be accessible at all times.

5
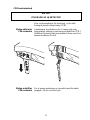
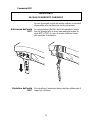
Installing the Pump The pump should be installed as follows:
1. Position the pump, feet down, on any convenient
horizontal surface or alternatively suspend from the
bed foot rail by means of the integral hanging
brackets.
2. Ensure that the mattress tube-set is not "kinked" or
twisted and connect it to the pump until it clicks
into place. Ensure that the tube-set is securely
connected to the pump.
3. Insert the mains power plug into a suitable mains
power socket.
System Operation The system is now ready for use. See “Operation” on
page 8 for day-to-day operating instructions.
WARNING
Make sure that the mains power cable is positioned to avoid
causing a hazard and is clear of moving bed mechanisms or other
possible entrapment areas.

6
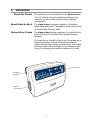
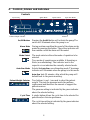
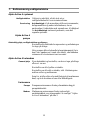
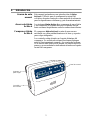
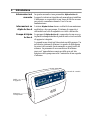
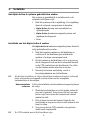
4. Controls, Alarms and Indicators
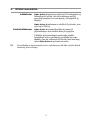
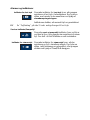
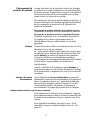
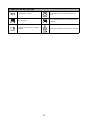
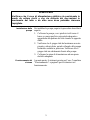
Controls
On/Off Button Pressing the On/Off button will activate the pump.The
switch will illuminate when the pump is on.
Alarm Mute During an alarm condition the sound of the alarm can be
muted by pressing this button. The yellow indicator will
then remain on but the alarm will be muted.
Mode Select The mode selector allows the mode of operation to be
selected.
Two modes of operation are available, Alternating or
Static (non-alternating). The indicator next to the
respective icon indicates the currently selected mode.
Auto-firm Mode Selects the Auto-firm, non-alternating mode. The orange
indicator will illuminate when the pump is in this mode.
Auto-firm lasts 30 minutes, after which the pump will
default back to the previous setting.
Patient Weight Selector Two buttons (+ and -) are used to select the patient
weight. This sets the pressure inside the mattress
replacement and therefore the amount of support the
patient receives.
The pressure setting is indicated by the green indicator
above the selected setting.
Cycle Time A single button allows the cycle time to be selected for
patient and/or clinician preference.
The cycle time setting is indicated by the green indicator
above the selected setting.
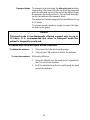
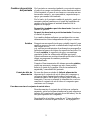
AlarmsPatient Weight Selector
Cycle Time Alarm Mute Mode Select Auto-firm Mode

7
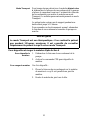
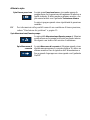
Alarms and Indicators
Low Pressure Indicator The red Low Pressure indicator is illuminated whenever
the pump detects low pressure within the mattress
replacement. An audible alarm will sound unless
cancelled by the
mute button.
The indicator will extinguish once normal pressure is
reached.
See “Troubleshooting” on page 15 for possible causes of Low Pressure.
Service Indicator/Pump Fault
The yellow Service/pump fault indicator will illuminate
and remain on if the pump has detected an internal fault.
A Service Engineer should be called.
Power Fail Indicator The red Power Fail indicator will illuminate when a
mains power failure has been detected. An audible alarm
will sound until power is resumed or the pump is
switched off using the on/off button.

8
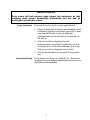
5. Operation
These instructions cover day-to-day operation of the system. Other operations, such
as maintenance and repair, should only be carried out by suitably qualified
personnel.
Quick Start Before using the
Alpha Active 4 mattress replacement
make sure it has been installed correctly in accordance
with “Installing the Alpha Active 4 Mattress” on page 4,
and ensure that the CPR unit on the mattress is clicked
into the closed position.
1. Press the On/Off button on the side of the pump.
2. Allow approximately 30 minutes for the mattress
replacement to inflate fully.
3. Place a bed sheet loosely over the mattress without
tucking, to gain maximum pressure redistribution.
Support Setting
Procedure
It is important to follow the correct support setting
procedure to ensure the patient receives adequate
support (lift) while achieving maximum pressure
redistribution and comfort.
1. Lie or sit the patient on the mattress.
2. Select appropriate cycle time.
3. Select patient weight on pump. This should serve as
an approximate guide only. An independent clinical
determination needs to confirm that the patient is
properly supported.
4. Wait 10/20 minutes while the pump adjusts the
pressures.
5. Ensure that the patient is not ‘bottoming out’. To do
this, unfasten the cover and slide a hand beneath the
patients sacral area to ensure at least 2.5cm
clearance between the sacrum and bed base.
6. If the caregiver feels less than 2.5cm of support
material, the patient has bottomed out and the
support pressures should be adjusted accordingly.

9
Changes in Patient
Position
When a patient is in the lying or supine position, their
body weight is dispersed over a large area. When in the
sitting position, their body weight is concentrated within
a much smaller area and therefore will require more
support than in the lying position.
Therefore, when the patient changes position, it may be
necessary, in order to maximise the benefit of the
support surface, to make adjustments to the setting of the
patient weight selector.
From Lying to Sitting - Increase weight selector setting.
From Sitting to Lying - Decrease weight selector setting.
This adjustment should be in conjunction with
independent clinical determination of appropriate
support.
Static Provides a stable, non-moving support surface for
instances where active therapy is not indicated
e.g. to carry out nursing procedures or for patients
unable to tolerate a moving surface. In
Static mode the
support surface remains constant (all cells are equally
inflated). Additional nursing assessment must be
undertaken in order to direct an individualised
repositioning programme.
When operating the system in
Static mode it may be
necessary, where possible, to reduce the pressure setting
to increase patient comfort and safety.
Power Fail Condition If a Power Fail condition arises disconnect the tubeset
from the pump and place the attached cap over the end
of the tubeset to put the mattress into transport mode.
Once power is resumed, re-connect the tubeset to the
pump to continue therapy.
To Disconnect the Tube-set
To disconnect the tube-set at any time, depress the
buttons on the top and bottom of the tubeset connector
pull the tube-set connector away from the pump.
To deflate the mattress Refer to “To Deflate and Store
the Alpha Active 4 Mattress” on page 10.

10
Transport Mode To transport a patient using the Alpha Active 4 mattress
replacement, disconnect the tube-set from the pump and
place the attached cap over the end of the tubeset to put
the mattress into transport mode. This will automatically
switch the mattress into transport mode.
The patient will remain supported by the mattress for up
to 12 hours.
To resume normal operation, simply reconnect the tube-
set and run the pump.
To Deflate and Store the Alpha Active 4 Mattress
To deflate the mattress: 1. Disconnect the tube-set from the pump.
2. Activate the CPR control to deflate the mattress.
To store the mattress Following deflation:
1. Bring the tubeset over the mattress to lie parallel to
the foot end of the mattress.
2. Roll the mattress from the foot end toward the head
end of the mattress.
Caution
Transport mode is non-therapeutic offering support only for up to
12 hours. It is recommended that when in transport mode the
patient is frequently monitored.
Sidan laddas...
Sidan laddas...
Sidan laddas...
Sidan laddas...
Sidan laddas...
Sidan laddas...
Sidan laddas...
Sidan laddas...
Sidan laddas...
Sidan laddas...
Sidan laddas...
Sidan laddas...
Sidan laddas...
Sidan laddas...
Sidan laddas...
Sidan laddas...
Sidan laddas...
Sidan laddas...
Sidan laddas...
Sidan laddas...
Sidan laddas...
Sidan laddas...
Sidan laddas...
Sidan laddas...
Sidan laddas...
Sidan laddas...
Sidan laddas...
Sidan laddas...
Sidan laddas...
Sidan laddas...
Sidan laddas...
Sidan laddas...
Sidan laddas...
Sidan laddas...
Sidan laddas...
Sidan laddas...
Sidan laddas...
Sidan laddas...
Sidan laddas...
Sidan laddas...
Sidan laddas...
Sidan laddas...
Sidan laddas...
Sidan laddas...
Sidan laddas...
Sidan laddas...
Sidan laddas...
Sidan laddas...
Sidan laddas...
Sidan laddas...
Sidan laddas...
Sidan laddas...
Sidan laddas...
Sidan laddas...
Sidan laddas...
Sidan laddas...
Sidan laddas...
Sidan laddas...
Sidan laddas...
Sidan laddas...
Sidan laddas...
Sidan laddas...
Sidan laddas...
Sidan laddas...
Sidan laddas...
Sidan laddas...
Sidan laddas...
Sidan laddas...
Sidan laddas...
Sidan laddas...
Sidan laddas...
Sidan laddas...
Sidan laddas...
Sidan laddas...
Sidan laddas...
Sidan laddas...
Sidan laddas...
Sidan laddas...
Sidan laddas...
Sidan laddas...
Sidan laddas...
Sidan laddas...
Sidan laddas...
Sidan laddas...
Sidan laddas...
Sidan laddas...
Sidan laddas...
Sidan laddas...
Sidan laddas...
Sidan laddas...
Sidan laddas...
Sidan laddas...
Sidan laddas...
Sidan laddas...
Sidan laddas...
Sidan laddas...
Sidan laddas...
Sidan laddas...
Sidan laddas...
Sidan laddas...
Sidan laddas...
Sidan laddas...
Sidan laddas...
Sidan laddas...
Sidan laddas...
Sidan laddas...
Sidan laddas...
Sidan laddas...
Sidan laddas...
Sidan laddas...
Sidan laddas...
Sidan laddas...
Sidan laddas...
Sidan laddas...
Sidan laddas...
Sidan laddas...
Sidan laddas...
Sidan laddas...
Sidan laddas...
Sidan laddas...
Sidan laddas...
Sidan laddas...
Sidan laddas...
Sidan laddas...
Sidan laddas...
Sidan laddas...
Sidan laddas...
Sidan laddas...
Sidan laddas...
Sidan laddas...
Sidan laddas...
Sidan laddas...
Sidan laddas...
Sidan laddas...
Sidan laddas...
Sidan laddas...
Sidan laddas...
Sidan laddas...
Sidan laddas...
Sidan laddas...
Sidan laddas...
Sidan laddas...
Sidan laddas...
Sidan laddas...
Sidan laddas...
Sidan laddas...
Sidan laddas...
Sidan laddas...
Sidan laddas...
Sidan laddas...
Sidan laddas...
Sidan laddas...
Sidan laddas...
Sidan laddas...
-
 1
1
-
 2
2
-
 3
3
-
 4
4
-
 5
5
-
 6
6
-
 7
7
-
 8
8
-
 9
9
-
 10
10
-
 11
11
-
 12
12
-
 13
13
-
 14
14
-
 15
15
-
 16
16
-
 17
17
-
 18
18
-
 19
19
-
 20
20
-
 21
21
-
 22
22
-
 23
23
-
 24
24
-
 25
25
-
 26
26
-
 27
27
-
 28
28
-
 29
29
-
 30
30
-
 31
31
-
 32
32
-
 33
33
-
 34
34
-
 35
35
-
 36
36
-
 37
37
-
 38
38
-
 39
39
-
 40
40
-
 41
41
-
 42
42
-
 43
43
-
 44
44
-
 45
45
-
 46
46
-
 47
47
-
 48
48
-
 49
49
-
 50
50
-
 51
51
-
 52
52
-
 53
53
-
 54
54
-
 55
55
-
 56
56
-
 57
57
-
 58
58
-
 59
59
-
 60
60
-
 61
61
-
 62
62
-
 63
63
-
 64
64
-
 65
65
-
 66
66
-
 67
67
-
 68
68
-
 69
69
-
 70
70
-
 71
71
-
 72
72
-
 73
73
-
 74
74
-
 75
75
-
 76
76
-
 77
77
-
 78
78
-
 79
79
-
 80
80
-
 81
81
-
 82
82
-
 83
83
-
 84
84
-
 85
85
-
 86
86
-
 87
87
-
 88
88
-
 89
89
-
 90
90
-
 91
91
-
 92
92
-
 93
93
-
 94
94
-
 95
95
-
 96
96
-
 97
97
-
 98
98
-
 99
99
-
 100
100
-
 101
101
-
 102
102
-
 103
103
-
 104
104
-
 105
105
-
 106
106
-
 107
107
-
 108
108
-
 109
109
-
 110
110
-
 111
111
-
 112
112
-
 113
113
-
 114
114
-
 115
115
-
 116
116
-
 117
117
-
 118
118
-
 119
119
-
 120
120
-
 121
121
-
 122
122
-
 123
123
-
 124
124
-
 125
125
-
 126
126
-
 127
127
-
 128
128
-
 129
129
-
 130
130
-
 131
131
-
 132
132
-
 133
133
-
 134
134
-
 135
135
-
 136
136
-
 137
137
-
 138
138
-
 139
139
-
 140
140
-
 141
141
-
 142
142
-
 143
143
-
 144
144
-
 145
145
-
 146
146
-
 147
147
-
 148
148
-
 149
149
-
 150
150
-
 151
151
-
 152
152
-
 153
153
-
 154
154
-
 155
155
-
 156
156
-
 157
157
-
 158
158
-
 159
159
-
 160
160
-
 161
161
-
 162
162
-
 163
163
-
 164
164
-
 165
165
-
 166
166
-
 167
167
-
 168
168
-
 169
169
-
 170
170
-
 171
171
-
 172
172
-
 173
173
-
 174
174


GETINGE GROUP ARJOHUNTLEIGH ALPHA ACTIVE 4 Instructions For Use Manual
- Typ
- Instructions For Use Manual
på andra språk
- italiano: GETINGE GROUP ARJOHUNTLEIGH ALPHA ACTIVE 4
- español: GETINGE GROUP ARJOHUNTLEIGH ALPHA ACTIVE 4
- français: GETINGE GROUP ARJOHUNTLEIGH ALPHA ACTIVE 4
- English: GETINGE GROUP ARJOHUNTLEIGH ALPHA ACTIVE 4
- dansk: GETINGE GROUP ARJOHUNTLEIGH ALPHA ACTIVE 4
- Nederlands: GETINGE GROUP ARJOHUNTLEIGH ALPHA ACTIVE 4
Andra dokument
-
Invacare Softform Premier Active 2S Användarmanual
-
-
-
Hillrom NP100 Användarmanual
-
Hillrom NP50 Bruksanvisningar
-
-
-
-
-