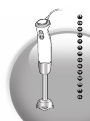
Tefal HB860138 Användarmanual
- Kategori
- Mixer / matberedare tillbehör
- Typ
- Användarmanual

EN
F
R
DE
ES
IT
AR
F
I
FA
SV
NO
NL
DA
EL
PT

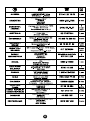
E
B1
A
E4
E3
E2
E1
F2
F1
B2
B3
B
D
C
G1
G2
F
F3
F4

3
4
56
7
1
2
3
4
3
4
1
2
1
2
1
2
500 ml
18 fl oz
MAX

7
1
2
3

5
FR
Nous vous remercions d'avoir choisi un appareil de la gamme qui est
exclusivement prévu pour la préparation des aliments et à un usage
domestique.
• Lisez attentivement le mode d'emploi avant la
première utilisation de votre appareil : une
utilisation non conforme au mode d'emploi
dégagerait le fabricant de toute responsabilité.
• Vérifiez que la tension d'alimentation de votre appareil
correspond bien à celle de votre installation électrique.
Toute erreur de branchement annule la garantie.
• Votre appareil est destiné uniquement à un usage
domestique et à l'intérieur de la maison.
• Toujours déconnecter l'appareil de l'alimentation si on
le laisse sans surveillance et avant montage,
démontage ou nettoyage.
• N'utilisez pas votre appareil s'il ne fonctionne pas
correctement ou s'il a été endommagé. Dans ce cas,
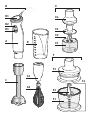
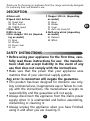
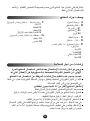
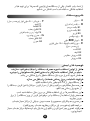
A Bloc Moteur
B Boutons de mise en marche
B1 Sélecteur de vitesse
B2 Mise en marche
B3 Turbo
C Pied Mixeur
D Gobelet 800 ml
E Mini hachoir 150 ml (selon
modèle)
E1 Bol
E2 Couteau
E3 Contre couvercle
E4 Couvercle
F Hachoir 500 ml (selon mo-
dèle)
F1 Bol
F2 Couteau
F3 Réducteur
F4 Base antidérapante/couvercle
G Fouet multibrins (selon
modèle)
G1 Réducteur
G2 Fouet
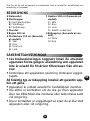
DESCRIPTION
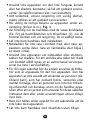
CONSEILS DE SECURITE

6
adressez-vous à un centre service agréé (voir liste dans
le livret service).
• Toute intervention autre que le nettoyage et l'entretien
usuel par le client doit être effectuée par un centre
service agréé.
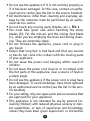
• Ne touchez jamais les pièces en mouvement
(couteaux…). Fig. 1
• Des précautions doivent êtres prises lors de la
manipulation des couteaux affûtés (E2, F2) des
hachoirs et du couteau du pied mixeur (C), lorsqu’on
vide le bol et lors du nettoyage. Ils sont extrêmement
aiguisés.
• Ne mettez pas l'appareil, le câble d'alimentation ou la
fiche dans l'eau ou tout autre liquide.
• Ne laissez pas pendre le câble d'alimentation à portée
de mains des enfants.
• Le câble d'alimentation ne doit jamais être à proximité
ou en contact avec les parties chaudes de votre
appareil, près d'une source de chaleur ou sur angle vif.
• Si le câble d'alimentation ou la fiche sont
endommagés, n'utilisez pas l'appareil. Afin d'éviter tout
danger, faites-les obligatoirement remplacer par un
centre service agréé (voir liste dans le livret service).
• Pour votre sécurité, n'utilisez que des accessoires et
des pièces détachées adaptés à votre appareil.
• Cet appareil n’est pas prévu pour être utilisé par des
personnes (y compris les enfants) dont les capacités
physiques, sensorielles ou mentales sont réduites, ou
par des personnes dénuées d’expérience ou de
connaissance, sauf si elles ont pu bénéficier, par
l’intermédiaire d’une personne responsable de leur

7
FR
sécurité, d’une surveillance ou d’instructions préalables
concernant l’utilisation de l’appareil.
• Il convient de surveiller les enfants pour s’assurer qu’ils
ne jouent pas avec l’appareil.
• Ne pas laisser les enfants utiliser le pied mixeur sans
surveillance.
• Ne laissez pas pendre les cheveux longs, écharpes,
cravates etc. au dessus de l'appareil ou des accessoires
en fonctionnement.
• Si votre appareil ‘’se bloque’’ pendant une de vos
préparation, arrêter l’appareil, débranchez-le et
vérifiez que l’accessoire utilisé n’est pas encombré.
Dans ce cas, dégagez les aliments bloquant en
faisant bien attention aux couteaux.
• Votre appareil est équipé d’une sécurité anti-
surchauffe. Dans le cas d’une surchauffe, votre
appareil se coupera. Laissez l’appareil refroidir
environ 20 minutes puis, reprenez votre utilisation.
• Mettez l'appareil à l'arrêt et déconnectez-le de
l'alimentation avant de changer les accessoires ou
d'approcher les parties qui sont mobiles lors du
fonctionnement.
• Avant la première utilisation, nettoyez les accessoires à l’eau savonneuse. Rincez et
séchez soigneusement.
• Il est important de vous assurez de l’hygiène de votre plan de travail.
• Mettez les aliments dans un récipient suffisamment haut pour éviter les écla-
boussures.
• Ne pas remplir le gobelet au-delà de 500 ml (18 fl oz) pour éviter les éclabous-
sures.
MISE EN SERVICE

8
• Pied Mixeur : Fig. 2 à 4
- Vissez le bloc moteur (A) sur le pied mixeur (C), s’assurer que le bloc moteur est
bien vissé jusqu’en butée, puis branchez l’appareil. Fig. 2 et 3.
- Plongez le pied mixeur (C) à mi-hauteur du récipient Fig. 4 et appuyez sur le
bouton de mise en marche (B2), après avoir sélectionné la vitesse souhaitée à
l’aide du sélecteur de vitesse (B1).
- Votre appareil est équipé d’une commande Turbo qui vous permet en appuyant
sur le bouton (B3) de disposer instantanément de toute la puissance.
ATTENTION : Ne pas faire fonctionner l’appareil à vide.
- Retirez le récipient de cuisson de la source de chaleur pour mixer des prépara-
tions chaudes. Pour une plus grande efficacité, il est inutile de déplacer le pied
mixeur dans la préparation. Laissez-le à mi-hauteur et au centre du récipient.
- Pour les aliments filandreux (poireaux, céleris, etc.…), nettoyez le pied régu-
lièrement en cours de préparation en suivant bien les consignes de sécurité pour
le démontage et le nettoyage du produit.
- Pour les préparations à base de fruits, coupez et dénoyautez les fruits préala-
blement.
- N’utilisez pas le mixeur pour des préparations à base d’aliments durs (sucre, cho-
colat, café, glaçons).
- Ne pas utiliser le pied mixeur (C) plus de 20 secondes en vitesse TURBO.
• Mini Hachoir 150 ml (Selon modèle) : Fig. E & 5
- Placez le couteau (E2) sur l’axe du bol (E1).
- Placez les aliments dans le bol (E1) puis placez le contre couvercle (E3) puis, le
couvercle (E4).
- Placez le bloc moteur (A) sur le couvercle (E4).
- Branchez le bloc moteur (A) et appuyez sur le bouton de mise en marche (B2).
- Retirez le bloc moteur (A) puis le couvercle (E4) puis, le contre couvercle (E3).
- Retirez le couteau (E2) en le manipulant par la partie plastique.
- Après utilisation, retirez la nourriture.
- Ne pas faire fonctionner cet accessoire à vide ou plus de 10 secondes.
• Hachoir 500 ml (Selon modèle) : Fig. F & 6
- Placez le bol (F1) sur le la base antidérapante (F4).
- Placez le couteau (F2) sur l’axe du bol (F1).
- Placez les aliments dans le bol (F1) puis placez le couvercle (F3).
- Placez le bloc moteur (A) sur le couvercle (F3).
- Branchez le bloc moteur (A) et appuyez sur le bouton de mise en marche (B2).
- Retirez le bloc moteur (A) puis le couvercle (F3).
- Retirez le couteau (F2) en le manipulant par la partie plastique.
- Ne pas faire fonctionner cet accessoire à vide ou plus de 30 secondes.
• Fouet multibrins (Selon modèle) : Fig. G & 7
- Assemblez le fouet multibrins (G2) avec le réducteur (G1).
- Placez le réducteur (G1) sur le bloc moteur (A).

9
FR
- Vissez jusqu’à la butée.
- Après utilisation, dévissez le réducteur (G1) et retirez le fouet (G2).
- Cet accessoire n'est pas prévu pour pétrir des pâtes lourdes ou mélanger des
pâtes légères.
- Ne pas utiliser le fouet multibrins plus de 3 minutes.
• Toutes les pièces et accessoires de votre mixeur passent au lave-vaisselle
à l’exception du bloc moteur (A), des réducteurs (E4, F3, G1), vous pouvez les
nettoyer avec une éponge légèrement humide.
• Déconnectez l'appareil de l'alimentation avant toutes opérations de nettoyage.
• N’utilisez pas d’éponges abrasives ou d’objets contenant des parties métalliques.
• Ne plongez jamais le bloc moteur (A) dans l’eau. Essuyez-le avec un chiffon sec
ou à peine humide.
• En cas de coloration de vos accessoires par les aliments (carottes, oranges...) frot-
tez-les avec un chiffon imbibé d’huile alimentaire puis procédez au nettoyage ha-
bituel.
• Manipulez le couteau ou les lames avec précaution; ils sont extrêmement aiguisés.
Mini hachoir 150 ml (Selon modèle) Fig. E :
• Avec cet accessoire, vous pouvez hacher :
Ail, Fines herbes, Oignons.
70 g de bœuf découpé en cube de 1 cm x 1 cm x 1 cm en 3 secondes. Vitesse
Turbo.
Hachoir 500 ml (Selon modèle) Fig. F :
• Avec cet accessoire, vous pouvez hacher :
Ail, Fines herbes, Oignons.
200 g de bœuf dénervé et découpé en cube de 1 cm x 1 cm x 1 cm en
10 secondes. Vitesse Turbo.
Fouet Multibrins (Selon Modèle) Fig. G :
Blancs en neige.
4 blancs en 3 minutes. Vitesse 8-20.
• Vérifiez :
Que votre appareil est bien connecté au secteur.
Que le cordon est en bon état.
NETTOYAGE
RECETTES
SI VOTRE APPAREIL NE FONCTIONNE PAS, QUE
FAIRE ?

10
Votre appareil est équipé d'une sécurité anti-surchauffe. Dans le cas d'un usage
excessif (quantité et/ou temps trop importants), votre appareil s'arrêtera. Dé-
branchez l'appareil du secteur, laissez-le refroidir environ 20 minutes puis repre-
nez votre utilisation, en veillant à diminuer la quantité d'ingrédients et en
respectant les temps d'utilisation indiqués.
Votre appareil ne fonctionne toujours pas ?
Adressez-vous à un centre service agréé (voir liste dans le livret service).
• Vous pouvez vous procurer auprès de votre revendeur ou d’un centre agrée (voir
liste dans le livret service) les articles suivants :
Mini hachoir 150 ml :
Avec cet accessoire, vous pourrez hacher 70 g de bœuf en 3 secondes.
Hachoir 500 ml :
Avec cet accessoire, vous pourrez hacher 200 g de bœuf en 10 secondes.
Pied mayonnaise express :
Avec cet accessoire vous pourrez réaliser tout type de sauce froide rapidement
(mayonnaise, tartare, aïoli, vinaigrette, sauces à base de yaourt...).
Pied Purée, pour réaliser vos purées de légumes.
Participons à la protection de l’environnement !
i
Votre appareil contient de nombreux matériaux valorisables ou
recyclables.
‹ Confiez celui-ci dans un point de collecte pour que son traitement
soit effectué.
ACCESSOIRE(S)
Attention, afin de vous voir délivrer un accessoire, veuillez vous prémunir de la
présente notice ou de communiquer le code type de votre appareil DDXXXXXX ou
HBXXXXXX.

11
EN
Thank you for choosing an appliance from the range, exclusively designed
for preparing food and domestic use.
• Before using your appliance for the first time, care-
fully read these instructions for use: the manufac-
turer shall not accept liability in the event of any
use that does not comply with the instructions.
• Make sure that the power that your appliance uses
matches that of your electrical supply system.
Any error in connection will negate the guarantee.
• This product has been designed for domestic use only.
Any commercial use, inappropriate use or failure to com-
ply with the instructions, the manufacturer accepts no
responsibility and the guarantee will not apply.
• Always disconnect the appliance from the mains power
supply when it is unattended and before assembling,
dismantling or cleaning it.
• Always unplug the appliance when you have finished
using it and when you are cleaning it.
A Motor unit
B Speed start buttons
B1 Speed dial
B2 Start button
B3 TURBO speed
C Mixer foot
D 800 mL jug
E Mini chopper 150 mL (depend-
ing on model)
E1 Bowl
E2 Blades
E3 Inner cover
E4 Lid
F Chopper 500 mL (depending
on model)
F1 Bowl
F2 Blades
F3 Cover
F4 Anti-slip base/lid
G Multi-wire whisk (depending
on model)
G1 Reducer
G2 Whisk
DESCRIPTION
SAFETY INSTRUCTIONS

• Do not use the appliance if it is not working properly or
if it has been damaged. In this case, contact an autho-
rised service centre (see the list in the service booklet).
• All maintenance other than cleaning and everyday up-
keep by the customer must be performed by an autho-
rised service centre.
• Do not touch any moving parts (blades, etc.). FIG 1
• You must take great care when handling the sharp
blades (E2, F2) the mincers and the mixing foot blade
(C), when you are emptying the bowl and during clean-
ing. They are extremely sharp.
• Do not immerse the appliance, power cord or plug in
any liquid.
• Ensure that long hair is tied back and that any scarves
or ties do not come into contact with the moving parts
of your appliance.
• Do not leave the power cord hanging within reach of
children.
• Do not leave the power cord close to or in contact with
the hot parts of the appliance, near a source of heat or
a sharp angle.
• Do not use the appliance if the power cord or plug have
been damaged. To avoid all danger, have them replaced
by an authorised service centre (see the list in the serv-
ice booklet).
• For your safety, only use spare parts and accessories that
are approved for your appliance.
• This appliance is not intended for use by persons (in-
cluding children) with reduced physical, sensory or men-
tal capabilities, or lack of experience and knowledge,
unless they have been given supervision or instruction
12

13
EN
concerning use of the appliance by a person responsible
for their safety.
• Children should be supervised to ensure that they do
not play with the appliance.
• Do not allow children to use the mixing foot without
surveillance.
• Do not allow long hair, scarves, ties etc. to hang over
the appliance or attachment when either is in use.
• If your appliance "jams" during processing, switch it
off and check that the accessory used is not over-
loaded with ingredients. Carefully remove the ingre-
dients obstructing the blades.
• Your appliance is equipped with a device to protect
against overheating. If your appliance overheats, it
will switch itself off. Leave it to cool down for about
20 minutes then start using it again.
• Switch off the appliance and unplug it from the electri-
cal power supply before changing the accessories or
handling the parts which move when in operation.
• Before using your appliance for the first time, clean the accessories using warm
water and washing-up liquid. Rinse and dry them carefully.
• Ensure that your work top is stable and dry.
• Place the ingredients in a container that is tall enough to avoid splashing.
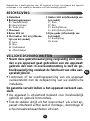
• Do not fill the jug (D) to more than 500 ml (18 fl oz) to avoid splashing.
• Mixer foot: FIG 2 - 4
- Screw the motor unit (A) onto the blender shaft (C) making sure that the motor
unit is properly and securely attached, then plug in the appliance. Fig. 2 and 3.
- Insert the shaft (C) in the beaker to mid-height Fig. 4, then press the Start But-
ton (B2) after having selected the desired speed by using the Speed dial (B1).
- Your device is equipped with a Turbo function that allows you to use it in full
power mode by pressing the corresponding button (B3).
USING THE APPLIANCE

IMPORTANT: Do not operate the appliance when empty.
- Before mixing hot preparations, remove the container from the heat source. For
best results, there is no need to move the blender shaft around in the prepara-
tion. Instead insert the shaft in the centre of the container with the blender
head submerged halfway down in the food.
- For stringy ingredients (leeks, celery, etc.), clean the shaft regularly during the
preparation, ensuring that you follow the safety instructions for dismantling
and cleaning the appliance.
- When making fruit-based preparations, slice the fruit and remove the cores and
any stones beforehand.
- Do not operate the appliance to prepare hard ingredients (sugar, chocolate, cof-
fee, ice-cubes).
- Do not operate the mixing foot (C) at TURBO speed for more than 20 seconds.
• Mini chopper 150 mL (depending on model): FIG E & 5
- Fit the blades (E2) onto the drive pin of the bowl (E1).
- Place the ingredients in the bowl (E1) then fit the inner cover (E3) then the lid
(E4).
- Fit the motor unit (A) onto the lid (E4).
- Plug in the motor unit (A) and press the speed start button (B2) and process
food.
- Remove the motor unit (A) then the lid (E4) then the inner cover (E3).
- Remove the blades (E2), holding it by its plastic part.
- After use, remove the ingredients.
- Do not operate this accessory when empty or for more than 10 seconds.
• Chopper 500 mL (depending on model): FIG F & 6
- Place the bowl (F1) on the anti-slip base (F4).
- Fit the blades (F2) onto the drive pin of the bowl (F1).
- Place the ingredients in the bowl (F1) then fit the cover (F3).
- Fit the motor unit (A) onto the cover (F3).
- Plug in the motor unit (A) and press the speed start button (B2).
- Remove the motor unit (A) then the cover (F3).
- Remove the blades (F2) holding it by its plastic part.
- After use, remove the ingredients.
- Do not operate this accessory when empty or for more than 30 seconds.
• Multi-wire whisk (depending on model): Fig G & 7
- Fit the multi-wire whisk (G2) onto the reducer (G1).
- Fit the reducer (G1) onto the motor unit (A).
- Turn until it is locked in place.
- After use, unscrew the reducer (G1) and remove the whisk (G2).
14

15
EN
- This appliance is not designed to knead dough mixtures or heavy cake mix-
tures.
- Do not operate the multi-wire whisk for more than 3 minutes.
• All of the parts and accessories of your mixer can be cleaned in the dishwasher
except for the motor unit (A) and the reducers (E4, F3, G1), they can only be
cleaned with a damp cloth.
• Unplug the appliance from the electrical power supply before cleaning.
• Do not use abrasive scourers or objects containing metal parts.
• Do not immerse the motor unit (A) in water. Wipe it clean with a dry or slightly
damp cloth.
• If your accessories are discoloured by food (carrots, oranges, etc.) rub them with
a cloth soaked in cooking oil and then clean them as usual. Some staining may
occur over time but this will not affect the performance of the appliance.
• Handle the blades with care; they are extremely sharp.
Mini chopper 150 mL (depending on model) FIG E:
• With this accessory, you can mince or chop:
Garlic, Fresh herbs, Onions.
70 g of beef with the sinew removed cut into 1 cm square cubes in
3 seconds. TURBO speed.
Chopper 500 mL (depending on model) FIG F:
• With this accessory, you can mince or chop:
Garlic, Fresh herbs, Onions.
200 g of beef with the sinew removed cut into 1 cm square cubes in 10 seconds.
TURBO speed.
Multi-wire whisk (depending on model) Fig. G:
Whisked egg whites.
4 egg whites in 3 minutes. Speed 8-20.
• Check:
That your appliance is plugged in correctly to the mains.
That the power cord is in good condition.
CLEANING
RECIPES
IF YOUR APPLIANCE WILL NOT WORK, WHAT
SHOULD YOU DO?

Your appliance is equipped with an anti-overheating system. If the appliance is
used in excess of its capacity (with too many ingredients or for too long a time)
it will stop automatically. Unplug the appliance from the mains, let it cool for
about 20 minutes and then continue using it making sure to decrease the amount
of ingredients in the bowl and follow the use times indicated in the performance
table.
Your appliance will still not work?
HELPLINE:
If you have any product problems or queries, please contact our Customer Relations
Team first for expert help and advice: See contact list attached.
• You can purchase the following accessories from your dealer or an authorised serv-
ice centre (see the list in the service booklet):
Mini chopper 150 ml:
With this accessory, you can mince 70 g beef in 3 seconds.
Chopper 500 ml:
With this accessory, you can mince 200 g beef in 10 seconds.
Express mayonnaise accessory :
This accessory will allow you to quickly whip up any type of cold sauce (mayonnaise,
tartar, aïoli, salad dressings, yoghurt-based sauces…).
Potato Purée Foot, for making your vegetable purées.
Environment protection first !
i Your appliance contains valuable materials which can be
recovered or recycled.
‹ Leave it at a local civic waste collection point.
ACCESSORIES
Important, if you want to dispose of an attachment, please refer to this in-
struction leaflet first and contact an approved service centre (see list at the
end) giving the product code for your appliance DDXXXXXX or HBXXXXXX.
16

17
DE
Wir freuen uns, dass Sie sich für den Kauf dieses Gerätes entschieden haben.
Bitte bedenken Sie, dass dieses Gerät ausschließlich der Zubereitung von Speisen dient
und nur für den Hausgebrauch im Gebäudeinneren bestimmt ist.
• Lesen Sie die Bedienungsanleitung vor der ersten In-
betriebnahme Ihres Geräts aufmerksam durch: Bei un-
sachgemäßem Gebrauch unter Nichtbeachtung der Be-
dienungsanleitung übernimmt der Hersteller keine Haf-
tung.
• Überprüfen Sie, dass die Betriebsspannung Ihres Geräts mit
der Spannung Ihrer Elektroinstallation übereinstimmt.
Bei falschem Anschluss erlischt die Garantie.
• Ihr Gerät ist ausschließlich für den Hausgebrauch und den
Betrieb in geschlossenen Räumen bestimmt.
• Trennen Sie das Gerät immer vom Stromnetz, wenn Sie es
unbeaufsichtigt lassen und vor der Montage, Demontage
oder Reinigung.
• Ziehen Sie nach der Benutzung, vor jedem Wechseln des
Zubehörs und vor der Reinigung den Netzstecker.
A Motorblock
B Einschalttasten
B1 Geschwindigkeitswählschalter
B2 Einschaltknopf
B3 Turbo-Taste
C Mixfuß
D Mixkrug 800 ml
E Mini-Zerkleinerer 150 ml (je
nach Modell)
E1 Schüssel
E2 Messer
E3 Gegendeckel
E4 Deckel
F Zerkleinerer 500 ml (je nach
Modell)
F1 Schüssel
F2 Messer
F3 Deckel mit Getriebe
F4 Rutschsicherer Boden/Deckel
G Quirl (je nach Modell)
G1 Getriebe
G2 Schneebesen
BESCHREIBUNG
SICHERHEITSHINWEISE

• Das Gerät darf nicht benutzt werden, wenn es nicht rich-
tig funktioniert oder beschädigt wurde. Wenden Sie sich
in diesem Fall an ein autorisiertes Servicecenter (siehe Lis-
te im Serviceheft).
• Alle Eingriffe, die über die Reinigung und die normale Pfle-
ge durch den Kunden hinausgehen, müssen von einem au-
torisierten Servicecenter vorgenommen werden.
• Berühren Sie keine Teile, die sich in Bewegung befinden
(Messer…). ABB. 1
• Gehen Sie beim Leeren des Behälters oder Reinigen vor-
sichtig mit den scharfen Hack- (E2, F2) und Messerklin-
gen des Pürierstabs (C) um. Sie sind extrem scharf.
• Tauchen Sie das Gerät, das Stromkabel und den Stecker nicht
ins Wasser oder sonstige Flüssigkeiten.
• Lassen Sie das Stromkabel nicht in Reichweite von Kindern
herunterhängen.
• Das Stromkabel darf nicht in die Nähe der sich drehenden
oder scharfen Teile des Gerätes geraten oder mit ihnen in
Berührung kommen; es muss von Hitzequellen und schar-
fen Kanten fern gehalten werden.
• Wenn das Stromkabel oder der Stecker beschädigt sind, darf
das Gerät nicht benutzt werden. Um jedwede Gefahr aus-
zuschließen, muss das Stromkabel in einem autorisierten
Servicecenter ausgetauscht werden (siehe Liste im Ser-
viceheft).
• Verwenden zu Ihrer eigenen Sicherheit nur für Ihr Gerät
geeignete Zubehör- und Ersatzteile.
• Dieses Gerät kann von Kindern ab 8 Jahren und Personen,
denen es an Erfahrung und Kenntnissen mangelt oder de-
ren physische, sensorische oder mentale Fähigkeiten ver-
ringert sind, verwendet werden, wenn sie bezüglich der si-
18

19
DE
cheren Verwendung des Gerätes unterrichtet und betreut
werden und die Risiken kennen. Reinigungsarbeiten dür-
fen von Kindern ab 8 Jahren nur unter Beaufsichtigung
durchgeführt werden.
• Kinder müssen beaufsichtigt werden, um zu gewährleis-
ten, dass sie nicht mit dem Gerät spielen.
• Lassen Sie Kinder den Mixerfuß nicht unbeaufsichtigt
verwenden.
• Lassen Sie keine langen Haare, Schals, Krawatten, etc. über
das in Betrieb befindliche Gerät oder Zubehör hängen.
• Wenn Ihr Gerät während der Zubereitung der Speisen
„blockiert”, muss es ausgeschaltet und ausgesteckt wer-
den, um zu überprüfen, ob das Zubehör nicht durch Le-
bensmittel blockiert ist. Entfernen Sie in diesem Fall
die feststeckenden Lebensmittel und gehen Sie dabei
vorsichtig mit den Messern um. Das Gerät darf nicht auf
dem Mixfuß abgestellt werden. Verwenden Sie den Mix-
fuß nie in heißem Fett. (Spritz und Verbrennungsge-
fahr). Vorsicht beim Umgang mit heißen Speisen.
• Ziehen Sie den Stecker nicht am Kabel aus der Steck-
dose. Verwenden Sie ein Verlängerungskabel nur dann,
wenn es in ordnungsgemäßem Zustand ist.
• Das Gerät ist mit einem Überhitzungsschutz ausge-
stattet. Wenn das Gerät überhitzt, schaltet es sich au-
tomatisch aus. Lassen Sie es in diesem Fall 20 Minu-
ten lang abkühlen und nehmen Sie es anschließend wie-
der in Betrieb.
• Reinigen Sie die Zubehörteile vor der ersten Inbetriebnahme mit Wasser und etwas Spül-
mittel. Spülen Sie sie und trocknen Sie sie sorgfältig ab.
• Die Arbeitsfläche muss stets hygienisch sauber sein.
INBETRIEBNAHME / GEBRAUCH

• Geben Sie die Lebensmittel in ein Gefäß, das hoch genug ist, um Spritzer zu vermei-
den.
• Der Mixkrug darf höchstens bis zu 500 ml (18 Oz) befüllt werden, um ein Heraussprit-
zen des Inhalts zu vermeiden.
• Mixfuß: ABB. 2 - 4
- Schrauben Sie den Motorblock (A) auf den Mixfuß (C). Achten Sie dabei darauf, dass
der Motorblock richtig bis zum Anschlag aufgeschraubt ist. Stecken Sie dann den Netz-
stecker in die Steckdose. Abb. 2 und 3.
- Positionieren Sie den Mixfuß (C) auf halber Höhe des Behälters Abb. 4 und drücken
Sie auf den Einschaltknopf (B2), nachdem Sie vorher die gewünschte Geschwindig-
keitswählschalter (B1) eingestellt haben.
- Ihr Gerät verfügt über eine Turbo-Taste. Bei Betätigen dieser Taste (B3) schaltet das
Gerät sofort auf die oberste Leistungsstufe.
VORSICHT: - Nehmen Sie das Gerät nie leer in Betrieb.
- Beim Mixen von heißen Zubereitungen muss das Kochgefäß von der Hitzequelle ge-
nommen werden. Es ist nicht nötig, den Mixfuß bei der Zubereitung der Speisen hin-
und her zu bewegen, da dies die Wirksamkeit des Geräts nicht erhöht. Belassen Sie
ihn auf halber Höhe in der Mitte des Behälters.
- Bei der Zubereitung von faserigen Lebensmitteln (Lauch, Sellerie, etc.) muss der Mix-
fuß regelmäßig gereinigt werden. Beachten Sie dabei die Sicherheitsanweisungen be-
züglich der Demontage und Reinigung des Geräts.
- Zur Zubereitung von Früchten müssen diese vorher klein geschnitten und entkernt wer-
den.
- Verwenden Sie den Mixer nicht für Zubereitungen aus harten Lebensmitteln (Zucker,
Schokolade, Kaffee, Eiswürfel).
• Verwenden Sie den Mixerfuß (C) in der TURBO-Geschwindigkeit nicht länger als
20 Sekunden.
• Mini-Zerkleinerer 150 ml (je nach Modell): ABB. E - 5
- Setzen Sie das Messer (E2) auf die Achse der Schüssel (E1).
- Geben Sie die Lebensmittel in die Schüssel (E1) und setzen Sie den Gegendeckel (E3)
und den Deckel (E4) darauf.
- Stellen Sie den Motorblock (A) auf den Deckel (E4).
- Schließen Sie den Motorblock (A) an und drücken Sie die Einschalttaste (B2)
- Nach der Zubereitung:
- Nehmen Sie erst den Motorblock (A) und dann den Deckel (E4) und den Gegendeckel
(E3) ab.
- Nehmen Sie das Messer (E2) ab und fassen Sie es dabei an seinen Kunststoffteilen an.
- Nehmen Sie nach dem Gebrauch des Geräts die Lebensmittel heraus.
- Nehmen Sie dieses Zubehörteil nicht leer oder länger als 10 Sekunden in Betrieb.
• Zerkleinerer 500 ml (je nach Modell): ABB. F - 6
- Stellen Sie die Schüssel (F1) auf den rutschsicheren Boden (F4).
- Setzen Sie das Messer (F2) auf die Achse der Schüssel (F1).
20
Sidan laddas ...
Sidan laddas ...
Sidan laddas ...
Sidan laddas ...
Sidan laddas ...
Sidan laddas ...
Sidan laddas ...
Sidan laddas ...
Sidan laddas ...
Sidan laddas ...
Sidan laddas ...
Sidan laddas ...
Sidan laddas ...
Sidan laddas ...
Sidan laddas ...
Sidan laddas ...
Sidan laddas ...
Sidan laddas ...
Sidan laddas ...
Sidan laddas ...
Sidan laddas ...
Sidan laddas ...
Sidan laddas ...
Sidan laddas ...
Sidan laddas ...
Sidan laddas ...
Sidan laddas ...
Sidan laddas ...
Sidan laddas ...
Sidan laddas ...
Sidan laddas ...
Sidan laddas ...
Sidan laddas ...
Sidan laddas ...
Sidan laddas ...
Sidan laddas ...
Sidan laddas ...
Sidan laddas ...
Sidan laddas ...
Sidan laddas ...
Sidan laddas ...
Sidan laddas ...
Sidan laddas ...
Sidan laddas ...
Sidan laddas ...
Sidan laddas ...
Sidan laddas ...
Sidan laddas ...
Sidan laddas ...
Sidan laddas ...
Sidan laddas ...
Sidan laddas ...
Sidan laddas ...
Sidan laddas ...
Sidan laddas ...
Sidan laddas ...
Sidan laddas ...
Sidan laddas ...
Sidan laddas ...
Sidan laddas ...
Sidan laddas ...
Sidan laddas ...
Sidan laddas ...
Sidan laddas ...
Sidan laddas ...
Sidan laddas ...
Sidan laddas ...
Sidan laddas ...
Sidan laddas ...
Sidan laddas ...
Sidan laddas ...
Sidan laddas ...
Sidan laddas ...
Sidan laddas ...
-
 1
1
-
 2
2
-
 3
3
-
 4
4
-
 5
5
-
 6
6
-
 7
7
-
 8
8
-
 9
9
-
 10
10
-
 11
11
-
 12
12
-
 13
13
-
 14
14
-
 15
15
-
 16
16
-
 17
17
-
 18
18
-
 19
19
-
 20
20
-
 21
21
-
 22
22
-
 23
23
-
 24
24
-
 25
25
-
 26
26
-
 27
27
-
 28
28
-
 29
29
-
 30
30
-
 31
31
-
 32
32
-
 33
33
-
 34
34
-
 35
35
-
 36
36
-
 37
37
-
 38
38
-
 39
39
-
 40
40
-
 41
41
-
 42
42
-
 43
43
-
 44
44
-
 45
45
-
 46
46
-
 47
47
-
 48
48
-
 49
49
-
 50
50
-
 51
51
-
 52
52
-
 53
53
-
 54
54
-
 55
55
-
 56
56
-
 57
57
-
 58
58
-
 59
59
-
 60
60
-
 61
61
-
 62
62
-
 63
63
-
 64
64
-
 65
65
-
 66
66
-
 67
67
-
 68
68
-
 69
69
-
 70
70
-
 71
71
-
 72
72
-
 73
73
-
 74
74
-
 75
75
-
 76
76
-
 77
77
-
 78
78
-
 79
79
-
 80
80
-
 81
81
-
 82
82
-
 83
83
-
 84
84
-
 85
85
-
 86
86
-
 87
87
-
 88
88
-
 89
89
-
 90
90
-
 91
91
-
 92
92
-
 93
93
-
 94
94


Tefal HB860138 Användarmanual
- Kategori
- Mixer / matberedare tillbehör
- Typ
- Användarmanual
på andra språk
- italiano: Tefal HB860138 Manuale utente
- português: Tefal HB860138 Manual do usuário
- français: Tefal HB860138 Manuel utilisateur
- dansk: Tefal HB860138 Brugermanual
- Nederlands: Tefal HB860138 Handleiding