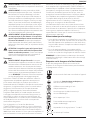
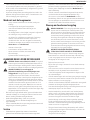
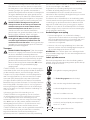
Stanley SFMCPS620B Bruksanvisning
- Kategori
- Sladdlösa motorsågar
- Typ
- Bruksanvisning
Denna manual är också lämplig för

SFMCPS620
www.stanleytools.eu

B
Copyright 2019
English (original instructions) 5
Deutsch (Übersetzung der Originalanweisung) 19
Français (traduction de la notice d’instructions originale) 36
Italiano (tradotto dalle istruzioni originali) 52
Nederlands (vertaald vanuit de originele instructies) 68
Español (traducido de las instrucciones originales) 84
Português (traduzido das instruções originais) 100
Svenska (översatt från de ursprungliga instruktionerna) 116
Norsk (oversatt fra de originale instruksjonene) 130
Dansk (oversat fra original brugsvejledning) 144
Suomi (käännetty alkuperäisestä käyttöohjeesta) 158
Ελληνικά (μετάφραση από τις πρωτότυπες οδηγίες) 172

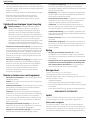
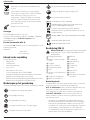
1
Fig. A
Fig. B
27
4
5
6
7
8
9
18
14
13
16
17
15
3
2
1
11
12
6
24
10
20

2
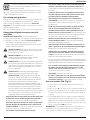
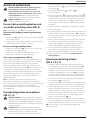
Fig. C
Fig. E
Fig. G
Fig. D
Fig. F
Fig. H
11 12
10
19
20
14
13
12
14
13

3
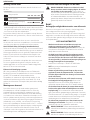
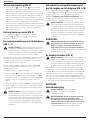
Fig. I
Fig. K
Fig. M
Fig. J
Fig. L
Fig. N
1
21
22
3
9
1
2

4
Fig. O Fig. P
Fig. Q
26
4
5
7
23

ENGLISH
5
Battery
Cat #
Output
Voltage
Charger
SFMCB12
SFMCB202 18 X
SFMCB204 18 X
SFMCB206 18 X
“X” Indicates that the battery pack is compatible with that
specific charger. Read the instruction manual for more
specificinformation.
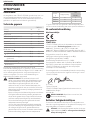
EC-Declaration of Conformity
Machinery Directive
Pole Saw
SFMCPS620
STANLEYFATMAX declares that these products described under
Technical Data are in compliance with:
2006/42/EC, EN 62841-1:2015; ENISO11680-1:2011, 2000/14/
EC , Annex V DEKRA Certification B.V., Meander 1051 / P.O. Box
5185 6825 MJ ARNHEM / 6802 ED ARNHEM Netherlands
Notified Body ID No.: 0344
LWA (guaranteed sound power) 94 dB(A)
LPA (measured sound pressure level) 78 dB(A)
Uncertainty for sound pressure level, K= 2,5 dB(A)
These products also comply with Directive 2014/30/EU
and 2011/65/EU. For more information, please contact
STANLEYFATMAX at the following address or refer to the back
of themanual.
The undersigned is responsible for compilation of the technical
file and makes this declaration on behalf ofSTANLEYFATMAX.
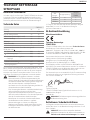
A. P. Smith
Technical Director
STANLEYFATMAX Europe, Egide Walschaertsstraat14-18,
2800 Mechelen, Belgium
2019-08-30
WARNING: To reduce the risk of injury, read the
instructionmanual.
The vibration and/or noise emission level given in this
information sheet has been measured in accordance with a
standardised test given in ENISO11680-1:2011 and may be
used to compare one tool with another. It may be used for a
preliminary assessment ofexposure.
WARNING: The declared vibration and/or noise emission
level represents the main applications of the tool. However
if the tool is used for different applications, with different
accessories or poorly maintained, the vibration and/or
noise emission may differ. This may significantly increase
the exposure level over the total workingperiod.
An estimation of the level of exposure to vibration and/
or noise should also take into account the times when the
tool is switched off or when it is running but not actually
doing the job. This may significantly reduce the exposure
level over the total workingperiod.
Identify additional safety measures to protect the
operator from the effects of vibration and/or noise such
as: maintain the tool and the accessories, keep the
hands warm (relevant for vibration), organisation of
workpatterns.
English (original instructions)
Congratulations!
You have chosen a STANLEYFATMAX tool. Years of experience,
thorough product development and innovation make
STANLEYFATMAX one of the most reliable partners for
professional power toolusers.
Technical Data
POLE SAW
SFMCPS620
SFMCPS620
Voltage V
DC
18
Battery type Li-Ion
Bar Length cm 20
Maximum Chain Speed (no-load) m/s 1.9
Maximum Cutting Length cm 15
Oil Capacity ml 40
Weight (without battery pack) kg 3.5
Noise values and vibration values (triax vector sum)
according to EN ISO 11680-1:2011.
L
PA
(emission sound pressure level) dB(A) 78
L
WA
(sound power level) dB(A) 89.5
K (uncertainty for the given sound level) dB(A) 3,9
Vibration emission value a
h
= m/s
2
<2,5
Uncertainty K = m/s
2
1,5

6
ENGLISH
parts. Damaged or entangled cords increase the risk of
electricshock.
e ) When operating a power tool outdoors, use an
extension cord suitable for outdoor use. Use of a cord
suitable for outdoor use reduces the risk of electricshock.
f ) If operating a power tool in a damp location is
unavoidable, use a residual current device (RCD)
protected supply. Use of an RCD reduces the risk of
electricshock.
3) Personal Safety
a ) Stay alert, watch what you are doing and use
common sense when operating a power tool. Do not
use a power tool while you are tired or under the
influence of drugs, alcohol or medication. A moment
of inattention while operating power tools may result in
serious personalinjury.
b ) Use personal protective equipment. Always wear eye
protection. Protective equipment such as a dust mask,
non-skid safety shoes, hard hat or hearing protection used
for appropriate conditions will reduce personalinjuries.
c ) Prevent unintentional starting. Ensure the switch
is in the off-position before connecting to power
source and/or battery pack, picking up or carrying
the tool. Carrying power tools with your finger on the
switch or energising power tools that have the switch on
invitesaccidents.
d ) Remove any adjusting key or wrench before turning
the power tool on. A wrench or a key left attached
to a rotating part of the power tool may result in
personalinjury.
e ) Do not overreach. Keep proper footing and balance
at all times. This enables better control of the power tool
in unexpectedsituations.
f ) Dress properly. Do not wear loose clothing or
jewellery. Keep your hair and clothing away from
moving parts. Loose clothes, jewellery or long hair can be
caught in movingparts.
g ) If devices are provided for the connection of dust
extraction and collection facilities, ensure these are
connected and properly used. Use of dust collection can
reduce dust-relatedhazards.
h ) Do not let familiarity gained from frequent use of
tools allow you to become complacent and ignore
tool safety principles. A careless action can cause severe
injury within a fraction of asecond.
4) Power Tool Use and Care
a ) Do not force the power tool. Use the correct power
tool for your application. The correct power tool
will do the job better and safer at the rate for which it
wasdesigned.
b ) Do not use the power tool if the switch does not turn
it on and off. Any power tool that cannot be controlled
with the switch is dangerous and must berepaired.
c ) Disconnect the plug from the power source and/
or remove the battery pack, if detachable, from
the power tool before making any adjustments,
changing accessories, or storing power tools. Such
Definitions: Safety Guidelines
The definitions below describe the level of severity for each
signal word. Please read the manual and pay attention to
thesesymbols.
DANGER: Indicates an imminently hazardous
situation which, if not avoided, will result in death or
seriousinjury.
WARNING: Indicates a potentially hazardous situation
which, if not avoided, could result in death or
seriousinjury.
CAUTION: Indicates a potentially hazardous situation
which, if not avoided, may result in minor or
moderateinjury.
NOTICE: Indicates a practice not related to
personal injury which, if not avoided, may result in
propertydamage.
Denotes risk of electricshock.
Denotes risk offire.
GENERAL POWER TOOL SAFETY WARNINGS
WARNING: Read all safety warnings, instructions,
illustrations and specifications provided with this
power tool. Failure to follow all instructions listed below
may result in electric shock, fire and/or seriousinjury.
SAVE ALL WARNINGS AND INSTRUCTIONS
FOR FUTUREREFERENCE.
The term “power tool” in the warnings refers to your mains-
operated (corded) power tool or battery-operated (cordless)
powertool.
1) Work Area Safety
a ) Keep work area clean and well lit. Cluttered or dark
areas inviteaccidents.
b ) Do not operate power tools in explosive
atmospheres, such as in the presence of flammable
liquids, gases or dust. Power tools create sparks which
may ignite the dust orfumes.
c ) Keep children and bystanders away while operating
a power tool. Distractions can cause you to losecontrol.
2) Electrical Safety
a ) Power tool plugs must match the outlet. Never
modify the plug in any way. Do not use any adapter
plugs with earthed (grounded) power tools.
Unmodified plugs and matching outlets will reduce risk of
electricshock.
b ) Avoid body contact with earthed or grounded
surfaces such as pipes, radiators, ranges and
refrigerators. There is an increased risk of electric shock if
your body is earthed orgrounded.
c ) Do not expose power tools to rain or wet conditions.
Water entering a power tool will increase the risk of
electricshock.
d ) Do not abuse the cord. Never use the cord for
carrying, pulling or unplugging the power tool. Keep
cord away from heat, oil, sharp edges or moving

7
ENGLISH
preventive safety measures reduce the risk of starting the
power toolaccidentally.
d ) Store idle power tools out of the reach of children
and do not allow persons unfamiliar with the power
tool or these instructions to operate the power tool.
Power tools are dangerous in the hands of untrainedusers.
e ) Maintain power tools and accessories. Check for
misalignment or binding of moving parts, breakage
of parts and any other condition that may affect the
power tool’s operation. If damaged, have the power
tool repaired before use. Many accidents are caused by
poorly maintained powertools.
f ) Keep cutting tools sharp and clean. Properly
maintained cutting tools with sharp cutting edges are less
likely to bind and are easier tocontrol.
g ) Use the power tool, accessories and tool bits, etc.
in accordance with these instructions, taking into
account the working conditions and the work to be
performed. Use of the power tool for operations different
from those intended could result in a hazardoussituation.
h ) Keep handles and grasping surfaces dry, clean and
free from oil and grease. Slippery handles and grasping
surfaces do not allow for safe handling and control of the
tool in unexpectedsituations.
5) Battery Tool Use and Care
a ) Recharge only with the charger specified by the
manufacturer. A charger that is suitable for one type
of battery pack may create a risk of fire when used with
another batterypack.
b ) Use power tools only with specifically designated
battery packs. Use of any other battery packs may create
a risk of injury andfire.
c ) When battery pack is not in use, keep it away from
other metal objects, like paper clips, coins, keys,
nails, screws or other small metal objects, that can
make a connection from one terminal to another.
Shorting the battery terminals together may cause burns
or afire.
d ) Under abusive conditions, liquid may be ejected
from the battery; avoid contact. If contact
accidentally occurs, flush with water. If liquid
contacts eyes, additionally seek medical help. Liquid
ejected from the battery may cause irritation orburns.
e ) Do not use a battery pack or tool that is damaged
or modified. Damaged or modified batteries may exhibit
unpredictable behaviour resulting in fire, explosion or risk
ofinjury.
f ) Do not expose a battery pack or tool to fire or
excessive temperature. Exposure to fire or temperature
above 130 °C may causeexplosion.
g ) Follow all charging instructions and do not charge
the battery pack or tool outside the temperature
range specified in the instructions. Charging
improperly or at temperatures outside the specified range
may damage the battery and increase the risk of fire.
6) Service
a ) Have your power tool serviced by a qualified repair
person using only identical replacement parts. This
will ensure that the safety of the power tool ismaintained.
b ) Never service damaged battery packs. Service
of battery packs should only be performed by the
manufacturer or authorized serviceproviders.
IMPORTANT SAFETY INSTRUCTIONS
WARNING: To reduce risk of injury:
• Before any use, be sure everyone using this unit reads
and understands all safety instructions and other
information contained in this manual.
• Save these instructions and reviewfrequently.
WARNING: When using electric gardening appliances,
basic safety precautions should always be followed to
reduce risk of fire, electric shock, and personal injury,
including thefollowing.
1 . Avoid Dangerous Environment – Don’t use appliances in
damp or wetlocations.
2 . Don’t Use InRain.
3 . Keep Children Away – All visitors should be kept at a
distance from workarea.
4 . Dress Properly – Do not wear loose clothing or jewelry.
They can be caught in moving parts. Use of rubber gloves
and substantial footwear is recommended when working
outdoors. Wear protective hair covering to contain longhair.
5 . Use Safety Glasses – Always use face or dust mask if
operation isdusty.
6 . Use Right Appliance – Do not use appliance for any job
except that for which it isintended.
7 . Don’t grasp the exposed cutting blades or cutting edges
when picking up or holding the appliance.
8 . Don’t Force Appliance – It will do the job better and
with less likelihood of a risk of injury at the rate for which it
wasdesigned.
9 . Don’t Overreach – Keep proper footing and balance at
alltimes.
10 . Stay Alert – Watch what you are doing. Use common sense.
Do not operate appliance when you aretired.
11 . Disconnect Appliance – Remove the battery when not in
use, before servicing, when changing accessories such as
blades, and thelike.
12 . Store Idle Appliances Indoors – When not in use, appliances
should be stored indoors in dry, and high or locked-up place –
out of reach ofchildren.
13 . Maintain Appliance With Care – Keep cutting edge sharp
and clean for best performance and to reduce the risk of injury.
Follow instructions for lubricating and changing accessories.
Inspect appliance power source periodically, and if damaged,
have it repaired by an authorized service facility. Keep handles
dry, clean, and free from oil andgrease.
14 . Check Damaged Parts – Before further use of the appliance,
a guard or other part that is damaged should be carefully
checked to determine that it will operate properly and perform

8
ENGLISH
its intended function. Check for alignment of moving parts,
binding of moving parts, breakage of parts, mounting, and
any other condition that may affect its operation. A guard
or other part that is damaged should be properly repaired
or replaced by an authorized service center unless indicated
elsewhere in thismanual.
SAVE THESE INSTRUCTIONS
WARNING - Do not operate near electrical power
lines. The unit has not been designed to provide
protection from electric shock in the event of contact with
overhead electric lines, Consult local regulations for safe
distances from overhead electric power lines and ensure
that the operating position is safe and secure before
operating the saw chain polepruner.
• Keep all parts of the body away from the saw chain. Do
not remove cut material or hold material to be cut when
blades are moving. Make sure the switch is off when
clearing jammed material. Blades coast after turn off.
A moment of inattention while operating the pole saw may
result in serious personalinjury.
• Carry the pole saw by the handle with the saw chain
stopped. When transporting or storing the pole saw always
fit the saw chain device cover. Proper handling of the pole saw
will reduce possible personal injury from the sawchain.
• Hold the power tool by insulated gripping surfaces only,
because the cutter blade may contact hidden wiring.
A saw chain contacting a “live” wire may make exposed
metal parts of the tool “live” and could give the operator an
electricshock.
• Do not use the pole saw in bad weather conditions,
especially when there is a risk of lightning. This decreases
the risk of being struck bylightning.
• Always use two hands when operating the pole saw.
Hold the pole saw with both hands to avoid lossofcontrol.
• Always use head protection when operating the
pole saw overhead. Falling debris can result in serious
personalinjury.
SPECIFIC SAFETY RULES
WARNING: Some dust contains chemicals known to
State of California to cause cancer, birth defects or other
reproductive harm. Some examples of these chemicals are:
• compounds in fertilizers,
• compounds in insecticides, herbicides andpesticides,
• arsenic and chromium from chemically
treatedlumber.
To reduce your exposure to these chemicals, wear
approved safety equipment such as dust masks that are
specially designed to filter out microscopicparticles.
• Avoid prolonged contact with dust from power sanding,
sawing, grinding, drilling, and other construction
activities. Wear protective clothing and wash exposed
areas with soap and water. Allowing dust to get into your
mouth, eyes, or lay on the skin may promote absorption of
harmfulchemicals.
WARNING: Use of this tool can generate and/
or disburse dust, which may cause serious and
permanent respiratory or other injury. Always use
approved respiratory protection appropriate for the dust
exposure. Direct particles away from face andbody.
CAUTION: Wear appropriate personal hearing protection
during use. Under some conditions and duration of use,
noise from this product may contribute to hearingloss.
Before Operating Pole Saw
• For safe operation, read and understand all instructions
before using the pole saw. Follow all safety instructions.
Failure to follow all safety instructions listed below, can result
in serious personalinjury.
• Watch what you are doing. Use common sense. Do not
operate pole saw when you aretired.
• Use pole saw for cutting tree branches only. Do not use
pole saw for purposes not intended. Do not use for cutting
otheritems.
• Only well-instructed adults should operate pole saw.
Never allow children tooperate.
• Do not allow children or untrained individuals to use
thisunit.
• Wear the following safety gear when operating pole saw:
- heavy-duty gloves
- steel-toed safety footwear with non-skid soles
- safety glasses, goggles or face screen
- safety hard hat
- ear mufflers or ear plugs
- face or dust mask (if working in dusty areas)
• Wear heavy long pants and boots. Do not wear loose
fitting clothing, short pants, jewelry of any kind, or gobarefoot.
• Secure long hair so it is above shoulder level to prevent
entanglement in any movingparts.
• Before cutting, always provide the following:
- clear work area
- secure footing
- planned retreat path from falling limbs
• Inspect tree before trimming. Make allowance for branches to
fall freely to theground.
• Do not use your pole saw to fellsaplings.
While Operating Pole Saw
DANGER: To reduce the risk of electric shock do no
use on wet surfaces. Do not expose to rain. Storeindoors.
DANGER: Avoid Unintentional Starting – with battery
installed, don’t carry appliance with with finger on switch.
Be sure switch is off when installingbattery.
• Stay alert. Use common sense while operating theunit.
• Keep work area clean. Cluttered areas inviteinjuries.
• Always remove battery from pole saw when finished cutting or
when leftunattended.
• Keep children, animals and bystanders at least 15 m away
from pole saw. Only pole saw user should be in workarea.

9
ENGLISH
• Do not use the pole saw to cut downtrees.
• Do not grasp the exposed saw chain when picking up or
holding the polesaw.
• Grip pole saw securely - one hand on the pole, the other on
thehandle.
• Keep finger off trigger until ready to makecut.
• Before starting pole saw, make sure chain is not
touchinganything.
• Keep all parts of body away from chain when pole saw
isrunning.
• Do not force pole saw while cutting. Apply light pressure.
It will do the job better and safer at the rate for which it
wasintended.
• Carry pole saw from one place to another:
- with battery removed,
- fingers off/away from trigger,
- by holding pole at balance point, and
- with guide bar and chain to rear and with
scabbardattached.
• Do not cut small brush and saplings with the pole saw. Slender
matter may catch in the chain and be whipped toward you.
This could also pull you offbalance.
• Do not operate in poorlighting.
• Keep firm footing and balance. Do not overreach.
Overreaching can result in loss of balance or exposure to
hotsurfaces.
• Keep all parts of your body away from any movingpart.
• Do not, under any circumstance, use any attachment or
accessory on this product, which was not provided with the
product, or identified as appropriate for use with this product
in this instructionmanual.
• Inspect pole saw before each use and after dropping or other
impacts. Ensure there are no significant defects ordamage.
Do Not Operate Pole Saw:
- while under the influence of alcohol, medication, ordrugs.
- in rain or in damp or wetareas.
- where highly flammable liquids or gases arepresent.
- if pole saw is damaged, adjusted incorrectly, or not fully
and securelyassembled.
- if trigger does not turn pole saw on and off. Chain must
stop moving when you release trigger. Have faulty switch
replaced by authorized service center. See Accessories
underMaintenance.
- while in ahurry.
- while in a tree or on aladder.
- while on aerial booms, buckets orplatforms.
- during high wind or stormingweather.
GENERAL SAFETY RULES
DANGER: Shock Hazard. Serious injury or death from
electrocution if power lines are contacted. Never use near
any electrical source, wires, or powerlines.
WARNING: For safe operation read and understand
owner’s manual. Wear face shield (and/or safety glasses)
and hard hat to protect against falling debris. Always have
a clear work area, retreat path, and be aware of limb/
branch location to avoid falling limbs and debris. Keep
bystanders 15 m away when operating saw. To reduce the
risk of electric shock do not use on wet surfaces. Do not
expose to rain. Storeindoors.
• To protect yourself from falling branches do not stand directly
under the branch or limb being cut. This unit should not be held at
an angle over
60°
from groundlevel.
• Keep the handles dry, clean, and free ofoil.
• Before you start the unit, make sure the chain is not contacting
anyobject.
• Make sure the cutting chain has stopped before setting the
unitdown.
Service
• Tool service must be performed only by qualified repair
personnel. Service or maintenance performed by unqualified
personnel could result in a risk of injury. Refer to the
Maintenance section of thismanual.
• When servicing a tool, use only identical replacement
parts. Follow instructions in the Maintenance section of
this manual. Use of unauthorized parts or failure to follow
maintenance instructions may create a risk of electric shock
orinjury.
Guard Against Kickback
WARNING: KICKBACK may occur when the nose or tip of
the guide bar touches an object, or when the wood closes
in and pinches the saw chain in the cut. Tip contact in
some cases may cause a lightning fast reverse reaction,
kicking the guide bar up and back towards the operator.
Pinching the saw chain along the top of the guide bar
may push the guide bar rapidly back towards the operator.
Either of these reactions may cause you to lose control of
the saw which could result in serious injury touser.
THE FOLLOWING PRECAUTIONS SHOULD BE
FOLLOWED TO MINIMIZE KICKBACK:
• Grip pole saw firmly. Hold the saw firmly with both hands
when the unit is running. Use a firm grip with thumbs and
fingers encircling the saw handle andpole.
• Do notoverreach.
• Keep proper footing and balance at alltimes.
• Don’t let the nose of the guide bar contact a log, branch,
ground or otherobstruction.
• Do not extend pole saw handle above shoulderheight.
• Use devices such as reduced kickback chain, chain braking
system and special guide bars that reduce the risks associated
withkickback.
• Only use replacement bars and chains specified by the
manufacturer or theequivalent.
• Never let the moving chain contact any object at the tip of the
guidebar.

10
ENGLISH
• Keep the working area free from obstructions such as other
trees, branches, rocks, fences, stumps, etc. Eliminate or avoid
any obstruction that your saw chain could hit while you are
cutting through a particular log orbranch.
• Keep your saw chain sharp and properly tensioned. A loose
or dull chain can increase the chance of kickback. Check
tension at regular intervals with the motor stopped and
batteryremoved.
• Begin and continue cutting only with the chain moving at
full speed. If the chain is moving at a slower speed, there is a
greater chance for kickback tooccur.
• Cut one branch at atime.
• Use extreme caution when re-entering a previous cut. Engage
spiked bumpers into wood and allow chain to reach full speed
before proceeding withcut.
• Do not attempt plunge cuts or borecuts.
• Watch for shifting branches or other forces that could close a
cut and pinch or fall intochain.
Kickback Safety Features
WARNING: The following features are included on your
pole saw to help reduce the hazard of kickback; however
such features will not totally eliminate this dangerous
reaction. As a pole saw user do not rely only on safety
devices. You must follow all safety precautions, instructions,
and maintenance in this manual to help avoid kickback
and other forces which can result in seriousinjury.
• Reduced-Kickback Guide Bar, designed with a small
radius tip which reduces the size of the kickback danger zone
on bar tip. A reduced- kickback guide bar is one which has
been demonstrated to significantly reduce the number and
seriousness of kickbacks when tested in accordance with safety
requirements for electric chainsaws.
• Reduced Kickback Chain, designed with a contoured depth
gauge and guard link which deflect kickback force and allow
wood to gradually ride into the cutter. A reduced-kickback
chain is a chain which has met kickback performance
requirements when tested on the representative sample of
chainsaws.
Pole Saw Names and Terms
• Drive Sprocket or Sprocket - The toothed part that drives
the sawchain.
• Guide Bar - A solid railed structure that supports and guides
the sawchain.
• Guide Bar Scabbard - Enclosure fitted over guide bar to
prevent tooth contact when saw is not inuse.
• Kickback - The backward or upward motion, or both of the
guide bar occurring when the saw chain near the nose of the
top area of the guide bar contacts any object such as a log or
branch, or when the wood closes in and pinches the saw chain
in thecut.
• Reduced Kickback Chain - A chain that complies with
the kickback performance requiremens. (when tested on a
representative sample of chainsaws.
• Reduced Kickback Guide Bar - A guide bar which has been
demonstrated to reduce kickbacksignificantly.
• Replacement Saw Chain - A chain that complies with
kickback performance requirements when tested with specific
chain saws. It may not meet performance requirements when
used with othersaws.
• Saw Chain - A loop of chain having cutting teeth, that cut the
wood, and that is driven by the motor and is supported by the
guidebar.
• Spiked Bumper (Spike) - The pointed tooth or teeth for
use when pruning to pivot the saw and maintain position
whilesawing.
• Switch - A device that when operated will complete or
interrupt an electrical power circuit to the motor of the
chainsaw.
• Switch Lockout - A movable stop that prevents the
unintentional operation of the switch until manuallyactuated.
• Trimming (Pruning) - Process of cutting limbs from atree.
• Undercut - An upward cut from underside of a log or limb.
This is done while in normal cutting position and cutting with
top of guidebar.
Storage
1 . Store indoors. The best storage place is one that is cool and
dry away from direct sunlight, excess heat or cold and out of
the reach ofchildren.
2 . Always reduce the tension off the chain again after
finishing work. The chain contracts as it cools down. If
tension is not reduced, it can damage thesaw.
Residual Risks
In spite of the application of the relevant safety regulations
and the implementation of safety devices, certain residual risks
cannot be avoided. These are:
• Impairment ofhearing.
• Risk of personal injury due to flyingparticles.
• Risk of burns due to accessories becoming hot
duringoperation.
• Risk of personal injury due to prolongeduse.
SAVE THESE INSTRUCTIONS
Chargers
STANLEYFATMAX chargers require no adjustment and are
designed to be as easy as possible tooperate.
Electrical Safety
The electric motor has been designed for one voltage only.
Always check that the battery pack voltage corresponds to the
voltage on the rating plate. Also make sure that the voltage of
your charger corresponds to that of yourmains.
Your STANLEYFATMAX charger is double insulated
in accordance with EN60335; therefore no earth wire
isrequired.

11
ENGLISH
If the supply cord is damaged, it must be replaced by a specially
prepared cord available through the STANLEYFATMAX
serviceorganisation.
Mains Plug Replacement
(U.K. & Ireland Only)
If a new mains plug needs to be fitted:
• Safely dispose of the oldplug.
• Connect the brown lead to the live terminal in theplug.
• Connect the blue lead to the neutralterminal.
WARNING: No connection is to be made to the
earthterminal.
Follow the fitting instructions supplied with good quality plugs.
Recommended fuse: 3A.
Using an Extension Cable
An extension cord should not be used unless absolutely
necessary. Use an approved extension cable suitable for
the power input of your charger (see Technical Data). The
minimum conductor size is 1mm
2
; the maximum length
is30m.
When using a cable reel, always unwind the cablecompletely.
Important Safety Instructions for All Battery
Chargers
SAVE THESE INSTRUCTIONS: This manual contains important
safety and operating instructions for compatible battery
chargers (refer to TechnicalData).
• Before using charger, read all instructions and cautionary
markings on charger, battery pack, and product using
batterypack.
WARNING: Shock hazard. Do not allow any liquid to get
inside charger. Electric shock mayresult.
WARNING: We recommend the use of a residual current
device with a residual current rating of 30mA orless.
CAUTION: Burn hazard. To reduce the risk of injury,
charge only STANLEYFATMAX rechargeable batteries.
Other types of batteries may burst causing personal injury
anddamage.
CAUTION: Children should be supervised to ensure that
they do not play with theappliance.
NOTICE: Under certain conditions, with the charger
plugged into the power supply, the exposed charging
contacts inside the charger can be shorted by foreign
material. Foreign materials of a conductive nature such as,
but not limited to, steel wool, aluminum foil or any buildup
of metallic particles should be kept away from charger
cavities. Always unplug the charger from the power supply
when there is no battery pack in the cavity. Unplug charger
before attempting to clean
• DO NOT attempt to charge the battery pack with any
chargers other than the ones in this manual. The charger
and battery pack are specifically designed to worktogether.
• These chargers are not intended for any uses other than
charging STANLEYFATMAX rechargeable batteries.
Any other uses may result in risk of fire, electric shock
orelectrocution.
• Do not expose charger to rain orsnow.
• Pull by plug rather than cord when disconnecting
charger. This will reduce risk ofdamage to electric plug
andcord.
• Make sure that cord is located so that it will not be
stepped on, tripped over, or otherwise subjected to
damage orstress.
• Do not use an extension cord unless it is absolutely
necessary. Use of improper extension cord could result in risk
of fire,electric shock, orelectrocution.
• Do not place any object on top of charger or place
the charger on a soft surface that might block the
ventilation slots and result in excessive internal heat.
Place the charger in a position away from any heat source. The
charger is ventilated through slots in the top and the bottom
of thehousing.
• Do not operate charger with damaged cord or plug—
have them replacedimmediately.
• Do not operate charger if it has received a sharp blow,
been dropped, or otherwise damaged in any way. Take it
to an authorised servicecentre.
• Do not disassemble charger; take it to an authorised
service centre when service or repair is required. Incorrect
reassembly may result in a risk of electric shock, electrocution
orfire.
• In case of damaged power supply cord the supply cord must be
replaced immediately by the manufacturer, its service agent or
similar qualified person to prevent anyhazard.
• Disconnect the charger from the outlet before
attempting any cleaning. This will reduce the risk of
electric shock. Removing the battery pack will not reduce
thisrisk.
• NEVER attempt to connect two chargerstogether.
• The charger is designed to operate on standard
230V household electrical power. Do not attempt to
use it on any other voltage. This does not apply to the
vehicularcharger.
Charging a Battery (Fig. B)
1. Plug the charger into an appropriate outlet before inserting
batterypack.
2. Insert the battery pack
6
into the charger, making sure the
battery pack is fully seated in the charger. The red (charging)
light will blink repeatedly indicating that the charging
process hasstarted.
3. The completion of charge will be indicated by the red light
remaining ON continuously. The battery pack is fully charged
and may be used at this time or left in the charger. To
remove the battery pack from the charger, push the battery
release button
24
on the batterypack.
NOTE: To ensure maximum performance and life of lithium-ion
battery packs, charge the battery pack fully before firstuse.

12
ENGLISH
Charger Operation
Refer to the indicators below for the charge status of the
batterypack.
Charge Indicators
Charging
Fully Charged
Hot/Cold Pack Delay*
* The red light will continue to blink, but a yellow indicator light
will be illuminated during this operation. Once the battery pack
has reached an appropriate temperature, the yellow light will
turn off and the charger will resume the chargingprocedure.
The compatible charger(s) will not charge a faulty battery pack.
The charger will indicate faulty battery by refusing tolight.
NOTE: This could also mean a problem with acharger.
If the charger indicates a problem, take the charger and battery
pack to be tested at an authorised servicecentre.
Hot/Cold Pack Delay
When the charger detects a battery pack that is too hot or too
cold, it automatically starts a Hot/Cold Pack Delay, suspending
charging until the battery pack has reached an appropriate
temperature. The charger then automatically switches to the
pack charging mode. This feature ensures maximum battery
packlife.
A cold battery pack will charge at a slower rate than a warm
battery pack. The battery pack will charge at that slower rate
throughout the entire charging cycle and will not return to
maximum charge rate even if the battery packwarms.
Electronic Protection System
XR Li-Ion tools are designed with an Electronic Protection
System that will protect the battery pack against overloading,
overheating or deepdischarge.
The tool will automatically turn off if the Electronic Protection
System engages. If this occurs, place the lithium-ion battery
pack on the charger until it is fullycharged.
Wall Mounting
These chargers are designed to be wall mountable or to sit
upright on a table or work surface. If wall mounting, locate the
charger within reach of an electrical outlet, and away from a
corner or other obstructions which may impede air flow. Use
the back of the charger as a template for the location of the
mounting screws on the wall. Mount the charger securely using
drywall screws (purchased separately) at least 25.4mm long
with a screw head diameter of 7–9mm, screwed into wood to
an optimal depth leaving approximately 5.5mm of the screw
exposed. Align the slots on the back of the charger with the
exposed screws and fully engage them in theslots.
Charger Cleaning Instructions
WARNING: Shock hazard. Disconnect the charger
from the AC outlet before cleaning. Dirt and grease
may be removed from the exterior of the charger using a
cloth or soft non-metallic brush. Do not use water or any
cleaning solutions. Never let any liquid get inside the tool;
never immerse any part of the tool into aliquid.
Battery Packs
Important Safety Instructions for All Battery
Packs
When ordering replacement battery packs, be sure to include
catalogue number andvoltage.
The battery pack is not fully charged out of the carton. Before
using the battery pack and charger, read the safety instructions
below. Then follow charging proceduresoutlined.
READ ALL INSTRUCTIONS
• Do not charge or use battery in explosive atmospheres,
such as in the presence of flammable liquids, gases or
dust. Inserting or removing the battery from the charger may
ignite the dust orfumes.
• Never force battery pack into charger. Do not modify
battery pack in any way to fit into a non-compatible
charger as battery pack may rupture causing serious
personalinjury.
• Charge the battery packs only in STANLEYFATMAXchargers.
• DO NOT splash or immerse in water or otherliquids.
• Do not store or use the tool and battery pack in
locations where the temperature may reach or exceed
40 ˚C (104 ˚F) (such as outside sheds or metal buildings
in summer).
• Do not incinerate the battery pack even if it is severely
damaged or is completely worn out. The battery pack can
explode in a fire. Toxic fumes and materials are created when
lithium-ion battery packs areburned.
• If battery contents come into contact with the skin,
immediately wash area with mild soap and water. If
battery liquid gets into the eye, rinse water over the open eye
for 15 minutes or until irritation ceases. If medical attention
is needed, the battery electrolyte is composed of a mixture of
liquid organic carbonates and lithiumsalts.
• Contents of opened battery cells may cause respiratory
irritation. Provide fresh air. If symptoms persists, seek
medicalattention.
WARNING: Burn hazard. Battery liquid may be flammable
if exposed to spark orflame.
WARNING: Never attempt to open the battery pack for
any reason. If battery pack case is cracked or damaged,
do not insert into charger. Do not crush, drop or damage
battery pack. Do not use a battery pack or charger that
has received a sharp blow, been dropped, run over or
damaged in any way (i.e., pierced with a nail, hit with
a hammer, stepped on). Electric shock or electrocution
may result. Damaged battery packs should be returned to
service centre forrecycling.
WARNING: Fire hazard. Do not store or carry the
battery pack so that metal objects can contact
exposed battery terminals. For example, do not place
the battery pack in aprons, pockets, tool boxes, product kit
boxes, drawers, etc., with loose nails, screws, keys,etc.

13
ENGLISH
Labels on Charger and Battery Pack
In addition to the pictographs used in this manual, the labels
on the charger and the battery pack may show the following
pictographs:
Read instruction manual beforeuse.
See Technical Data for chargingtime.
Do not probe with conductiveobjects.
Do not charge damaged batterypacks.
Do not expose to water.
Have defective cords replacedimmediately.
Charge only between 4 ˚C and 40 ˚C.
Only for indooruse.
Discard the battery pack with due care for
theenvironment.
Charge STANLEYFATMAX battery packs only
with designated STANLEYFATMAX chargers.
Charging battery packs other than the
designated STANLEYFATMAX batteries with a
STANLEYFATMAX charger may make them burst or
lead to other dangeroussituations.
Do not incinerate the batterypack.
Battery Type
The SFMCPS620 operates on a 18 volt batterypack.
These battery packs may be used: SFMCB202, SFMCB204,
SFMCB206. Refer to Technical Data for moreinformation.
Date Code Position (Fig. A)
The date code
20
, which also includes the year of manufacture,
is printed into thehousing.
Example:
2019 XX XX
Year of Manufacture
Package Contents
The package contains:
1 Pole saw
1 Shoulder strap
CAUTION: When not in use, place tool on its side on
a stable surface where it will not cause a tripping
or falling hazard. Some tools with large battery packs
will stand upright on the battery pack but may be easily
knockedover.
Transportation
WARNING: Fire hazard. Transporting batteries can
possibly cause fire if the battery terminals inadvertently
come in contact with conductive materials. When
transporting batteries, make sure that the battery
terminals are protected and well insulated from
materials that could contact them and cause a short
circuit. NOTE: Lithium-ion batteries should not be put in
checkedbaggage.
STANLEYFATMAX batteries comply with all applicable shipping
regulations as prescribed by industry and legal standards which
include UN Recommendations on the Transport of Dangerous
Goods; International Air Transport Association (IATA) Dangerous
Goods Regulations, International Maritime Dangerous Goods
(IMDG) Regulations, and the European Agreement Concerning
The International Carriage of Dangerous Goods by Road (ADR).
Lithium-ion cells and batteries have been tested to section 38.3
of the UN Recommendations on the Transport of Dangerous
Goods Manual of Tests andCriteria.
In most instances, shipping a STANLEYFATMAX battery pack
will be excepted from being classified as a fully regulated Class
9 Hazardous Material. In general, only shipments containing a
lithium-ion battery with an energy rating greater than 100 Watt
Hours (Wh) will require being shipped as fully regulated Class
9. All lithium-ion batteries have the Watt Hour rating marked
on the pack. Furthermore, due to regulation complexities,
STANLEYFATMAX does not recommend air shipping lithium-ion
battery packs alone regardless of Watt Hour rating. Shipments of
tools with batteries (combo kits) can be air shipped as excepted
if the Watt Hour rating of the battery pack is no greater than
100Whr.
Regardless of whether a shipment is considered excepted
or fully regulated, it is the shipper's responsibility to consult
the latest regulations for packaging, labeling/marking and
documentationrequirements.
The information provided in this section of the manual is
provided in good faith and believed to be accurate at the time
the document was created. However, no warranty, expressed or
implied, is given. It is the buyer’s responsibility to ensure that its
activities comply with the applicableregulations.
Storage Recommendations
1. The best storage place is one that is cool and dry away
from direct sunlight and excess heat or cold. For optimum
battery performance and life, store battery packs at room
temperature when not inuse.
2. For long storage, it is recommended to store a fully charged
battery pack in a cool, dry place out of the charger for
optimalresults.
NOTE: Battery packs should not be stored completely depleted
of charge. The battery pack will need to be recharged beforeuse.

14
ENGLISH
1 Instruction manual
1 Li-Ion battery pack**
1 Li-Ion battery charger**
**Included with SFMCPS620M1 Only
• Check for damage to the tool, parts or accessories which may
have occurred duringtransport.
• Take the time to thoroughly read and understand this manual
prior tooperation.
Markings on Tool
The following pictograms are shown on the tool:
Read instruction manual beforeuse.
Wear eyeprotection.
Wear earprotection.
Do not leave inrain.
Wear headprotection.
Wear protectivegloves.
Cut hazard. Keep fingers away fromslot.
Wear protectivefootwear.
Rotational direction of the sawchain.
Electrocution hazard. Keep at least 10 m away from
overheadlines.
Switch the tool off. Before performing any maintenance
on the tool, remove the battery from thetool.
94
Directive 2000/14/EC guaranteed soundpower.
Keep bystandersaway.
Keep bystandersaway.
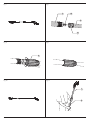
Description (Fig. A)
WARNING: Never modify the power tool or any part of it.
Damage or personal injury couldresult.
1
Handle assembly
2
Center extension pole
3
Saw head assembly
4
Trigger switch
5
Lock button
6
Battery
7
Foam gripper
8
Threaded pole
9
Threaded sleeve
10
Bar clamp
11
Sprocket cover
12
Hex head screws
13
Guide bar
14
Saw chain
15
Scabbard
16
Hex wrench
17
Oil bottle
18
Branch removal hook
Intended Use
This pole saw is ideal for pruning applications and cutting limbs
up to 203 mm indiameter.
DO NOT use under wet conditions or in the presence of
flammable liquids orgases.
This pole saw is a professional powertool.
DO NOT let children come into contact with the tool.
Supervision is required when inexperienced operators use
thistool.
• Young children and the infirm. This appliance is not
intended for use by young children or infirm persons
withoutsupervision.
• This product is not intended for use by persons (including
children) suffering from diminished physical, sensory or
mental abilities; lack of experience, knowledge or skills
unless they are supervised by a person responsible for their
safety. Children should never be left alone with thisproduct.
ASSEMBLY AND ADJUSTMENTS
WARNING: To reduce the risk of serious personal
injury, turn tool off and disconnect battery pack
before making any adjustments or removing/
installing attachments or accessories. An accidental
start-up can causeinjury.
WARNING:Use only STANLEYFATMAX battery packs
andchargers.
Inserting and Removing the Battery Pack
from the Tool (Fig. B)
NOTE: Make sure your battery pack
6
is fullycharged.
To Install the Battery Pack into the Tool Handle
1. Align the battery pack
6
with the rails inside the tool’s
handle (Fig. B).
2. Slide it into the handle until the battery pack is firmly seated
in the tool and ensure that you hear the lock snap intoplace.
To Remove the Battery Pack from the Tool
1. Press the release button
24
and firmly pull the battery pack
out of the toolhandle.
2. Insert battery pack into the charger as described in the
charger section of thismanual.
Fuel Gauge Battery Packs (Fig. B)
Some STANLEYFATMAX battery packs include a fuel gauge
which consists of three green LED lights that indicate the level of
charge remaining in the batterypack.
To actuate the fuel gauge, press and hold the fuel gauge
button
27
. A combination of the three green LED lights will
illuminate designating the level of charge left. When the level of
charge in the battery is below the usable limit, the fuel gauge
will not illuminate and the battery will need to berecharged.

15
ENGLISH
5. Once saw chain tension is correct, tighten hex head
screws
12
to clampbar.
6. When the saw chain is new check the tension frequently
(after disconnecting battery) during the first 2 hours of use
as a new chain stretchesslightly.
NOTE: Saw chain tension should be adjustedregularly.
Chain Oiling (Fig.H)
1. A high quality bar and chain oil or SAE30 weight motor
oil should be used for saw chain
14
and guide bar
13
lubrication. The use of a vegetable based bar and chain
oil is recommended when pruning trees. Mineral oil is not
recommended because it may harm trees. Never use waste
oil or very thick oil. These may damage your polesaw.
2. Lubricate the whole saw chain evenly before each use as
shown in FigureH. Also lubricate the saw chain whenever
replacing a fully discharged battery with a fully chargedone.
Transporting Pole Saw (Fig. A)
Always remove the battery pack
6
from the handle and cover
the saw chain
14
with the scabbard
15
when transporting the
pole saw.
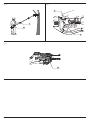
Joining Saw Head Module to HandleModule
(Fig. I–L)
WARNING: Sharp moving blade. To prevent accidental
operation, insure that battery is disconnected from the
handle and that the protective scabbard is in place on the
chain before performing the following operations. Failure
to do this could result in serious personal injury.
The three assembliess which make up the pole saw are keyed
to insure correct assembly. If an assembly does not smoothly
attach to another do not force fit.
Combining the handle assembly
1
to the saw head
assembly
3
creates a pole saw that is approximately 1.8m in
length as shown in Fig. I.
To attach the handle assembly to the saw head assembly:
1. Align the groove
21
on the outside of the coupling end of
the handle assembly
1
with the tongue
22
on the inside
of the coupling end of the saw head assembly
3
. Refer to
Fig.J. Push the two sections completelytogether. Refer to
Fig.K.
2. Slide the threaded sleeve
9
on the saw head assembly
down as far as possible and rotate the sleeve clockwise
until it stops and completely covers the threads as shown
in Fig.L.
WARNING: Always check to make sure that the sleeve
is completely threaded on and that the red threads are
no longer visible. Not threading the sleeve completely
on could result in the assemblys becoming disconnected
creating a hazardous condition. Periodically check the
connections to insure that no red threads arevisible.
NOTE: The fuel gauge is only an indication of the charge left on
the battery pack. It does not indicate tool functionality and is
subject to variation based on product components, temperature
and end-userapplication.
Installing and Removing Saw Chain
(Fig. A, C–E)
WARNING: Sharp moving blade. To prevent accidental
operation, insure that battery is disconnected from the
handle before performing the following operations. Failure
to do this could result in serious personal injury.
CAUTION: Sharp moving blade. Always wear protective
gloves when installing or removing the chain. The chain is
sharp and can cut you when it is notrunning.
1. Place the pole saw on a firm surface. Rotate the two
hex head screws
12
counterclockwise with the hex
wrench
16
provided.
2. Remove sprocket cover
11
, bar clamp
10
, and hex
headscrews.
3. To remove the saw chain
14
, rotate the screw
19
in the
front of the housing using the flat screwdriver end of the
wrench. Turning the screw counterclockwise allows the
guide bar
13
to recede and reduces the tension on the
chain so that it may beremoved.
4. Lift the worn saw chain out of the groove in the guidebar.
5. Flip guide barover.
6. To replace the saw chain, check to make sure that the slot in
the guide bar is over the location pins
20
shown in Fig.E and
that hole below the slot is located over the adjustmentpin.
7. Place new chain in groove of guide bar and around
sprocket. Make sure saw teeth are facing correct direction by
matching the graphic onhousing or guidebar.
8. Rotate the screw in the front of the housing clockwise to
increase the chaintension.
9. Replace sprocket cover, bar clamp, and hex headscrews.
10. Follow the instructions in the section Adjusting
ChainTension.
Adjusting Chain Tension (Fig. A,C,D,F,G)
1. With the pole saw still on a firm surface check the saw
chain
14
tension. The tension is correct when the saw chain
snaps back after being pulled 3 mm away from the guide
bar
13
with light force from the middle finger and thumb
as shown in Fig.F. There should be no “sag” between the
guide bar and the saw chain on the underside as shown in
Fig.G.
2. To adjust saw chain tension, loosen hex head
screws
12
.
3. Rotate the screw
19
in the front of the housing using the
flat screwdriver end of thewrench.
4. Do not over-tension the saw chain as this will lead to
excessive wear and will reduce the life of the guide bar and
saw chain. Overtensioning also reduces the amount of cuts
you will get per batterycharge.

16
ENGLISH
Joining Center Extension to Saw Head
Module and Handle Module (Fig. A, M)
Adding the center extension
2
to the handle assembly
1
and
saw head assembly
3
creates a pole saw that is approximately
2.7 m in length as shown in Fig.M.
Refer to to Joining Saw Head Module to HandleModule for
directions on how to attach the middle assembly to the handle
assembly and saw headassembly.
WARNING: Always check to make sure that the sleeve
is completely threaded on and that the red threads are
no longer visible. Not threading the sleeve completely
on could result in the assemblys becoming disconnected
creating a hazardous condition. Periodically check the
connections to insure that no red threads arevisible.
DISASSEMBLY
WARNING: To reduce the risk of serious personal
injury, turn unit off and remove the battery pack
before making any adjustments or removing/
installing attachments or accessories. An accidental
start-up can causeinjury.
Detaching Saw Head Module (Fig. N)
WARNING: Sharp moving blade. To prevent accidental
operation, insure that battery is disconnected from the
handle and that the protective scabbard is in place on the
chain before performing the following operations. Failure
to do this could result in serious personal injury.
When detaching the assemblies, whether it is in the two
assembly or three assembly mode, always detach the saw head
assembly
3
first. To do this, rest the handle assembly
1
on the
ground and grasp the center of the saw head assembly with
one hand as shown in Fig.N. Use your other hand to loosen the
threaded sleeve and then pull the two halves apart. Repeat this
process if the center extension wasattached.
OPERATION
Instructions for Use
WARNING: Always observe the safety instructions and
applicableregulations.
WARNING: To reduce the risk of serious personal
injury, turn tool off and disconnect battery pack
before making any adjustments or removing/
installing attachments or accessories. An accidental
start-up can causeinjury.
Proper Hand Position (Fig. O)
WARNING: To reduce the risk of serious personal injury,
ALWAYS use proper hand position asshown.
WARNING: To reduce the risk of serious personal
injury, ALWAYS hold securely in anticipation of a
suddenreaction.
Proper hand position requires one hand on the main handle
28
and one hand on the foam gripper
7
.
Operating the Pole Saw (Fig. A)
WARNING: Read and understand all instructions. Failure
to follow all instructions listed below may result in electric
shock, fire and/or serious personalinjury.
CAUTION: Always reduce the tension off the chain again
after finishing work. The chain contracts as it cools down.
If it is not slackened off, it can damage the polesaw.
IMPORTANT: Never operate a pole saw that is damaged or
improperly adjusted or that is not completely and securely
assembled. Be sure that the saw chain
14
stops moving when
the trigger switch is released. Never adjust the guide bar
13
or
saw chain when the motor is operating or the battery isattached.
Pole Saw Trimming/Pruning
WARNINGS:
• Never stand directly under the limb you are cutting.
Always position yourself out of the path of fallingdebris.
• Always wear head, eye, foot and body protection.
Wearing body protection helps reduce the risk of injury when
operating thisunit.
• Never stand on a ladder or other unstable support while
using the pole saw. Always avoid any position which can
cause you to loose your balance and cause severeinjury.
• Keep other persons at least 15 m from the work area.
Distractions can cause you to losecontrol.
• Electrocution Hazard. To prevent shock, do not operate
within 15 m of overhead electrical lines. Always check
surrounding area for hidden electricallines.
• Do not extend pole saw switch handle above
shoulderheight.
On/Off Switch (Fig. P)
Always be sure of your footing and grip the pole saw firmly with
both hands with the thumb and fingers encircling the handle. To
turn the tool ON pull the lock button
5
back with your thumb
and then squeeze the trigger switch
4
with your fingers as
shown in Fig.P. (Once the tool is running you can release the
lock button.) To turn the tool OFF, release the trigger.
Branch Removal Hook (Fig. A)
CAUTION: The branch removal hook is not a belt hook.
Your pole saw includes a branch removal hook
18
for the
intended purpose of helping to remove small to moderately sized
prunedbranches.
Pruning With the Pole Saw (Fig. A, O, Q)
WARNING: Let the tool work at its own pace. Do
notoverload.
WARNING: When pruning trees: guard against kickback
which can result in severe injury or death. See Guard
Against Kickback, to avoid the risk of kickback. Do not
overreach. Make sure your footing is firm. Keep feet apart.
Divide your weight evenly on both feet.

17
ENGLISH
1. Use both hands to grip pole saw as shown in FigureO. Use
a firm grip. Thumbs and fingers must wrap around pole saw
handle and pole. Keep fingers away from sawdust exhaust
chute
26
shown in FigureQ.
2. Never operate while in a tree, in any awkward position or on
a ladder or other unstable surface. You may lose control of
pole saw causing severe injury.
3. Follow directions below to trim atee.
a. Make sure pole saw is running at full speed before
making a cut. When starting a cut, place moving saw
chain
14
against limb. Hold pole saw firmly in place to
avoid possible bouncing or skating (sideways movement)
of polesaw.
b. Guide pole saw using light pressure. Make first cut
152mm from tree trunk on underside of limb. Use top of
guide bar
13
to make this cut. Cut 1/3 through diameter
of limb. Then make the finish cut from the top. If you try
to cut off thick branches from the bottom, the branch
may close in and pinch the saw chain in the cut. If you try
to cut off thick branches from the top, without a shallow
undercut, the branch may splinter. Do not force pole saw.
The motor will overload and can burn out. It will do the
job better and safer at the rate for which it wasintended.
c. Remove pole saw from cut while it is running at full
speed. Stop pole saw by releasing trigger switch
4
.
Make sure saw chain has stopped before setting pole
sawdown.
Saw Chain Sharpness
CAUTION: Sharp chain. Always wear protective gloves
when handling the chain. The chain is sharp and can cut
you when it is notrunning.
IMPORTANT: The chain cutters will dull immediately if they
touch the ground, stones, masonry or a nail whilecutting.
To get the best possible performance from your chain saw
it is important to keep the teeth of the saw chain sharp.
Chain sharpening services are available from your nearest
STANLEYFATMAX servicecenter.
NOTE: Each time the saw chain is sharpened, it loses some
of the reduced kickback qualities and extra caution should be
used. It is recommended that a saw chain be sharpened no
more than fourtimes.
MAINTENANCE
Your power tool has been designed to operate over a long
period of time with a minimum of maintenance. Continuous
satisfactory operation depends upon proper tool care and
regularcleaning.
WARNING:To reduce the risk of serious personal
injury, turn tool off and disconnect battery pack
before making any adjustments or removing/
installing attachments or accessories. An accidental
start-up can causeinjury.
The charger and battery pack are notserviceable.
Regular maintenance ensures a long effective life for the tool.
After every 10 minutes of use be sure to remove the battery (be
aware the chain and bar can be hot!) check the bar and chain for
correct tension and lubricate per Adjusting Chain Tension and
ChainOiling.
Lubrication
Your power tool requires no additionallubrication.
Cleaning
WARNING: Blow dirt and dust out of the main housing
with dry air as often as dirt is seen collecting in and around
the air vents. Wear approved eye protection and approved
dust mask when performing thisprocedure.
WARNING: Never use solvents or other harsh chemicals
for cleaning the non-metallic parts of the tool. These
chemicals may weaken the materials used in these parts.
Use a cloth dampened only with water and mild soap.
Never let any liquid get inside the tool; never immerse any
part of the tool into aliquid.
Optional Accessories
WARNING: Since accessories, other than those offered by
STANLEYFATMAX, have not been tested with this product,
use of such accessories with this tool could be hazardous.
To reduce the risk of injury, only STANLEYFATMAX
recommended accessories should be used with
thisproduct.
Consult your dealer for further information on the
appropriateaccessories.
Replacement chain and bar are available from your
nearest STANLEYFATMAX servicecenter.
• SFMCPS620 requires replacement chain service part
number STZCS220
. Replacement 20 cm bar, service part
numberSTZCS1220.
Protecting the Environment
Separate collection. Products and batteries marked
with this symbol must not be disposed of with normal
householdwaste.
Products and batteries contain materials that can
be recovered or recycled reducing the demand for raw
materials. Please recycle electrical products and batteries
according to local provisions. Further information is available at
www.2helpU.com.
Rechargeable Battery Pack
This long life battery pack must be recharged when it fails
to produce sufficient power on jobs which were easily done
before. At the end of its technical life, discard it with due care for
ourenvironment:

18
ENGLISH
• Run the battery pack down completely, then remove it from
thetool.
• Li-Ion cells are recyclable. Take them to your dealer or a
local recycling station. The collected battery packs will be
recycled or disposed ofproperly.
Guarantee
1 Year Guarantee
All STANLEY FATMAX power tool products include a 1 year
guarantee as standard. In the unlikely event that your powertool
becomes defective due to faulty materials or worksmanship
within 1 year of purchase, STANLEY guarantees to replace or
repair all defective parts free of charge, or – at our discretion –
replace the item free ofcharge.
3 Year Guarantee
Register your STANLEY FATMAX power tool within 4 weeks
of purchase and qualify for an additional 2 year guarantee.
Having registered your power tool, in the unlikely event that
your powertool becomes defective due to faulty materials or
worksmanship, STANLEY guarantees to replace or repair all
defective parts free of charge, or – at our discretion – replace the
item free ofcharge.
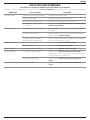
TROUBLESHOOTING GUIDE
BE SURE TO FOLLOW SAFETY RULES AND INSTRUCTIONS
For assistance with your product, visit our website at www.stanleytools.eu for a list of servicecenters.
PROBLEM POSSIBLE CAUSE SOLUTION
Unit will not start. Battery pack not installed properly. Check battery pack installation.
Battery pack not charged. Check battery pack charging requirements.
Lock button not actuated. Pull back on lock button/actuate trigger.
Pole connections not properly tightened. Refer to Joining Saw Head Module to Handle Module.
Battery pack will not charge. Battery pack not inserted into charger. Insert battery pack into charger until LED illuminates.
Charger not plugged in. Plug charger into a working outlet. Refer to Charging a Battery for
more details.
Surrounding air temperature too hot or
too cold.
Move battery pack to a surrounding air temperature of above 40 °F
(4.5 °C) or below 104 °F (+40 °C).
Bar/chain overheated. Chain too tight. Refer to Adjusting Chain Tension.
Lubrication needed. Refer to Chain Oiling.
Chain is loose. Chain tension set incorrectly. Refer to Adjusting Chain Tension.
Poor cut quality. Chain tension set incorrectly. Refer to Adjusting Chain Tension. NOTE: Excessive tension leads to
excessive wear and reduction in life of bar & chain. Lubricate after every
10 minutes of use.
Chain needs replacement. Refer to Installing and Removing Saw Chain.
Unit runs but does not cut. Chain installed backwards. Refer to Installing and Removing Saw Chain.
Sidan laddas...
Sidan laddas...
Sidan laddas...
Sidan laddas...
Sidan laddas...
Sidan laddas...
Sidan laddas...
Sidan laddas...
Sidan laddas...
Sidan laddas...
Sidan laddas...
Sidan laddas...
Sidan laddas...
Sidan laddas...
Sidan laddas...
Sidan laddas...
Sidan laddas...
Sidan laddas...
Sidan laddas...
Sidan laddas...
Sidan laddas...
Sidan laddas...
Sidan laddas...
Sidan laddas...
Sidan laddas...
Sidan laddas...
Sidan laddas...
Sidan laddas...
Sidan laddas...
Sidan laddas...
Sidan laddas...
Sidan laddas...
Sidan laddas...
Sidan laddas...
Sidan laddas...
Sidan laddas...
Sidan laddas...
Sidan laddas...
Sidan laddas...
Sidan laddas...
Sidan laddas...
Sidan laddas...
Sidan laddas...
Sidan laddas...
Sidan laddas...
Sidan laddas...
Sidan laddas...
Sidan laddas...
Sidan laddas...
Sidan laddas...
Sidan laddas...
Sidan laddas...
Sidan laddas...
Sidan laddas...
Sidan laddas...
Sidan laddas...
Sidan laddas...
Sidan laddas...
Sidan laddas...
Sidan laddas...
Sidan laddas...
Sidan laddas...
Sidan laddas...
Sidan laddas...
Sidan laddas...
Sidan laddas...
Sidan laddas...
Sidan laddas...
Sidan laddas...
Sidan laddas...
Sidan laddas...
Sidan laddas...
Sidan laddas...
Sidan laddas...
Sidan laddas...
Sidan laddas...
Sidan laddas...
Sidan laddas...
Sidan laddas...
Sidan laddas...
Sidan laddas...
Sidan laddas...
Sidan laddas...
Sidan laddas...
Sidan laddas...
Sidan laddas...
Sidan laddas...
Sidan laddas...
Sidan laddas...
Sidan laddas...
Sidan laddas...
Sidan laddas...
Sidan laddas...
Sidan laddas...
Sidan laddas...
Sidan laddas...
Sidan laddas...
Sidan laddas...
Sidan laddas...
Sidan laddas...
Sidan laddas...
Sidan laddas...
Sidan laddas...
Sidan laddas...
Sidan laddas...
Sidan laddas...
Sidan laddas...
Sidan laddas...
Sidan laddas...
Sidan laddas...
Sidan laddas...
Sidan laddas...
Sidan laddas...
Sidan laddas...
Sidan laddas...
Sidan laddas...
Sidan laddas...
Sidan laddas...
Sidan laddas...
Sidan laddas...
Sidan laddas...
Sidan laddas...
Sidan laddas...
Sidan laddas...
Sidan laddas...
Sidan laddas...
Sidan laddas...
Sidan laddas...
Sidan laddas...
Sidan laddas...
Sidan laddas...
Sidan laddas...
Sidan laddas...
Sidan laddas...
Sidan laddas...
Sidan laddas...
Sidan laddas...
Sidan laddas...
Sidan laddas...
Sidan laddas...
Sidan laddas...
Sidan laddas...
Sidan laddas...
Sidan laddas...
Sidan laddas...
Sidan laddas...
Sidan laddas...
Sidan laddas...
Sidan laddas...
Sidan laddas...
Sidan laddas...
Sidan laddas...
Sidan laddas...
Sidan laddas...
Sidan laddas...
Sidan laddas...
Sidan laddas...
Sidan laddas...
Sidan laddas...
Sidan laddas...
Sidan laddas...
Sidan laddas...
Sidan laddas...
Sidan laddas...
Sidan laddas...
Sidan laddas...
Sidan laddas...
Sidan laddas...
Sidan laddas...
Sidan laddas...
Sidan laddas...
Sidan laddas...
-
 1
1
-
 2
2
-
 3
3
-
 4
4
-
 5
5
-
 6
6
-
 7
7
-
 8
8
-
 9
9
-
 10
10
-
 11
11
-
 12
12
-
 13
13
-
 14
14
-
 15
15
-
 16
16
-
 17
17
-
 18
18
-
 19
19
-
 20
20
-
 21
21
-
 22
22
-
 23
23
-
 24
24
-
 25
25
-
 26
26
-
 27
27
-
 28
28
-
 29
29
-
 30
30
-
 31
31
-
 32
32
-
 33
33
-
 34
34
-
 35
35
-
 36
36
-
 37
37
-
 38
38
-
 39
39
-
 40
40
-
 41
41
-
 42
42
-
 43
43
-
 44
44
-
 45
45
-
 46
46
-
 47
47
-
 48
48
-
 49
49
-
 50
50
-
 51
51
-
 52
52
-
 53
53
-
 54
54
-
 55
55
-
 56
56
-
 57
57
-
 58
58
-
 59
59
-
 60
60
-
 61
61
-
 62
62
-
 63
63
-
 64
64
-
 65
65
-
 66
66
-
 67
67
-
 68
68
-
 69
69
-
 70
70
-
 71
71
-
 72
72
-
 73
73
-
 74
74
-
 75
75
-
 76
76
-
 77
77
-
 78
78
-
 79
79
-
 80
80
-
 81
81
-
 82
82
-
 83
83
-
 84
84
-
 85
85
-
 86
86
-
 87
87
-
 88
88
-
 89
89
-
 90
90
-
 91
91
-
 92
92
-
 93
93
-
 94
94
-
 95
95
-
 96
96
-
 97
97
-
 98
98
-
 99
99
-
 100
100
-
 101
101
-
 102
102
-
 103
103
-
 104
104
-
 105
105
-
 106
106
-
 107
107
-
 108
108
-
 109
109
-
 110
110
-
 111
111
-
 112
112
-
 113
113
-
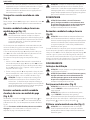 114
114
-
 115
115
-
 116
116
-
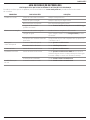 117
117
-
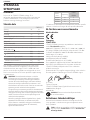 118
118
-
 119
119
-
 120
120
-
 121
121
-
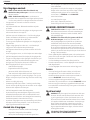 122
122
-
 123
123
-
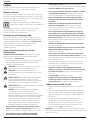 124
124
-
 125
125
-
 126
126
-
 127
127
-
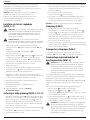 128
128
-
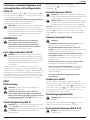 129
129
-
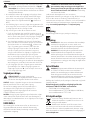 130
130
-
 131
131
-
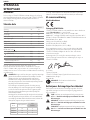 132
132
-
 133
133
-
 134
134
-
 135
135
-
 136
136
-
 137
137
-
 138
138
-
 139
139
-
 140
140
-
 141
141
-
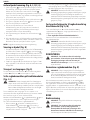 142
142
-
 143
143
-
 144
144
-
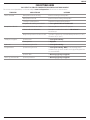 145
145
-
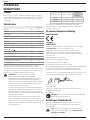 146
146
-
 147
147
-
 148
148
-
 149
149
-
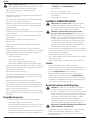 150
150
-
 151
151
-
 152
152
-
 153
153
-
 154
154
-
 155
155
-
 156
156
-
 157
157
-
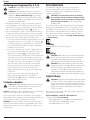 158
158
-
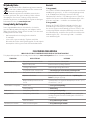 159
159
-
 160
160
-
 161
161
-
 162
162
-
 163
163
-
 164
164
-
 165
165
-
 166
166
-
 167
167
-
 168
168
-
 169
169
-
 170
170
-
 171
171
-
 172
172
-
 173
173
-
 174
174
-
 175
175
-
 176
176
-
 177
177
-
 178
178
-
 179
179
-
 180
180
-
 181
181
-
 182
182
-
 183
183
-
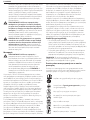 184
184
-
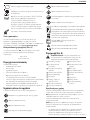 185
185
-
 186
186
-
 187
187
-
 188
188
-
 189
189
-
 190
190
-
 191
191
-
 192
192


Stanley SFMCPS620B Bruksanvisning
- Kategori
- Sladdlösa motorsågar
- Typ
- Bruksanvisning
- Denna manual är också lämplig för
på andra språk
- italiano: Stanley SFMCPS620B Manuale del proprietario
- español: Stanley SFMCPS620B El manual del propietario
- Deutsch: Stanley SFMCPS620B Bedienungsanleitung
- português: Stanley SFMCPS620B Manual do proprietário
- français: Stanley SFMCPS620B Le manuel du propriétaire
- English: Stanley SFMCPS620B Owner's manual
- dansk: Stanley SFMCPS620B Brugervejledning
- suomi: Stanley SFMCPS620B Omistajan opas
- Nederlands: Stanley SFMCPS620B de handleiding
Relaterade papper
-
Stanley SFMCBLB76 Bruksanvisning
-
-
-
-
Stanley SFMCHT855 Bruksanvisning
-
-
-
-
-
Andra dokument
-
Gardena CST 3518 Bruksanvisning
-
DeWalt DCMPS567 Användarmanual
-
FLORABEST FHEHS 900 A1 Bruksanvisning
-
BLACK+DECKER BCASK61D Användarmanual
-
BLACK+DECKER BCASCS61B Användarmanual
-
BLACK+DECKER BCASK861D Användarmanual
-
BLACK+DECKER BCASK8967D2 Användarmanual
-
-
Toro PowerPlex 35cm 40V MAX Chainsaw Användarmanual
-
Makita UC 120D Bruksanvisning