Stanley SFMCSTB963 Bruksanvisning
- Kategori
- Grästrimmare
- Typ
- Bruksanvisning
Denna manual är också lämplig för

SFMCSTB963
Final page size: A5 (148mm x 210mm)
www.stanleytools.eu

B
Copyright STANLEYFATMAX
English (original instructions) 4
Deutsch (übersetzt von den originalanweisungen) 14
Français (traduction de la notice d’instructions originale) 26
Italiano (tradotto dalle istruzioni originali) 37
Nederlands (vertaald vanuit de originele instructies) 48
Español (traducido de las instrucciones originales) 59
Português (traduzido das instruções originais) 70
Svenska (översatt från de ursprungliga instruktionerna) 81
Norsk (oversatt fra de originale instruksjonene) 91
Dansk (oversat fra original brugsvejledning) 101
Suomi (käännetty alkuperäisestä käyttöohjeesta) 111
Ελληνικά (μετάφραση από τις πρωτότυπες οδηγίες) 121

1
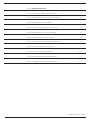
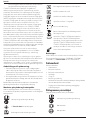
Fig.A
1
2
3
4
5
6
8
9
11
10
13
12
7
Fig.B
8
Fig.C
17
18
14
15
6
14
Fig.D

2
Fig.E
15
17
18
Fig.F
19
4
6
31
32
4
13
Fig.H
Fig.I
3
Fig.J
Fig.G
11
12
23

3
Fig.K
Minimum
610 mm
Fig.L
22
20
21
Fig.M
21
29
Fig.N
Fig.O
26
20
9
24
25
30
27
Fig.P
26
30

4
ENGLISH
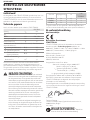
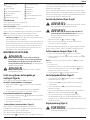
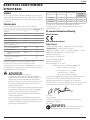
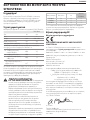
Battery
Cat #
Output
Voltage
Ah
Charger
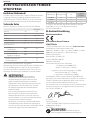
SFMCB6012
SFMCB6025 54 2.5 X
SFMCB605 54 5 X
SFMCB6075 54 7.5 X
“X” Indicates that the battery pack is compatible with that
specific charger. Read the instruction manual for more
specificinformation.
EC-Declaration of Conformity
Machinery Directive
Brushless Grass Trimmer
SFMCSTB963
STANLEYFATMAX declares that these products described under
Technical Data are in compliance with:
2006/42/EC, EN60335-1:2012 + A11:2014, EN50636-2-91:2014.
2000/14/EC, Lawn Trimmer, L ≤ 50 cm, Annex VI
DEKRA Certification B.V.
Meander 1051 / P.O. box 5185
6525 MJ ARNHEM / 6802 ED
ARNHEM, Netherlands
Notified Body ID No.: 0344
Level of accoustic power according to 2000/14/EC
(Article 12, Annex III, L ≤ 50 cm):
L
PA
(measured sound pressure level) 79.5 dB(A)
uncertainty (K) = 1.9 dB (A)
L
WA
(guaranteed sound power) 96 dB(A)
These products also comply with Directive 2014/30/EU
and 2011/65/EU. For more information, please contact
STANLEYFATMAX at the following address or refer to the back
of themanual.
The undersigned is responsible for compilation of the technical
file and makes this declaration on behalf ofSTANLEYFATMAX.
A. P. Smith
Technical Director
STANLEYFATMAX Europe, Egide Walschaertsstraat14-18,
2800 Mechelen, Belgium
10.11.2019
Congratulations!
You have chosen a STANLEYFATMAX tool. Years of experience,
thorough product development and innovation make
STANLEYFATMAX one of the most reliable partners for
professional power toolusers.
Technical Data
Batteries & Chargers sold separately (SFMCSTB963N)
SFMCSTB963
Voltage V
DC
54V
UK & Ireland V
DC
54V
Type 1
RPM /min 5200 - 5500
Cutting Swath Size mm 330
Weight (without battery pack) kg 3.7
Noise values and vibration values (triax vector sum). Grass Trimmer mode
according to EN50636-2-91:
L
PA
(emission sound pressure
level)
dB(A) 79.5
L
WA
(sound power level) dB(A) 93
K (uncertainty for the given
sound level)
dB(A) 1.9
Vibration emission value a
h
= 3.5
Uncertainty K = m/s
2
2.1
The vibration emission level given in this information sheet has
been measured in accordance with a standardised test given in
EN50636 and may be used to compare one tool with another. It
may be used for a preliminary assessment ofexposure.
WARNING: The declared vibration emission
level represents the main applications of the tool. However
if the tool is used for different applications, with different
accessories or poorly maintained, the vibration emission
may differ. This may significantly increase the exposure
level over the total workingperiod.
An estimation of the level of exposure to vibration should
also take into account the times when the tool is switched
off or when it is running but not actually doing the job.
This may significantly reduce the exposure level over the
total workingperiod.
Identify additional safety measures to protect the operator
from the effects of vibration such as: maintain the tool
and the accessories, keep the hands warm, organisation of
workpatterns.
English (original instructions)
BRUSHLESS GRASS TRIMMER
SFMCSTB963

5
ENGLISH
WARNING: To reduce the risk of injury, read
the instructionmanual.
Definitions: Safety Guidelines
The definitions below describe the level of severity for each
signal word. Please read the manual and pay attention to
thesesymbols.
DANGER: Indicates an imminently hazardous
situation which, if not avoided, will result in death or
seriousinjury.
WARNING: Indicates a potentially hazardous
situation which, if not avoided, could result in death or
seriousinjury.
CAUTION: Indicates a potentially hazardous
situation which, if not avoided, may result in minor or
moderateinjury.
NOTICE: Indicates a practice not related to
personal injury which, if not avoided, may result in
propertydamage.
Denotes risk of electricshock.
Denotes risk offire.
SAFETY INSTRUCTIONS
WARNING: When using mains-powered
appliances, basic safety precautions, including the
following, should always be followed to reduce the risk of
fire, electric shock, personal injury and materialdamage.
WARNING: When using the machine the
safety rules must be followed. For your own safety and
bystanders please read these instructions before operating
the machine. Please keep the instructions safe for lateruse.
• Read all of this manual carefully before operating theappliance.
• The intended use is described in this manual. The use of any
accessory or attachment or the performance of any operation
with this appliance other than those recommended in this
instruction manual may present a risk of personalinjury.
• Retain this manual for futurereference.
IMPORTANT
READ CAREFULLY BEFORE USE
KEEP FOR FUTURE REFERENCE
SAFE OPERATING PRACTICES
Training
a ) Read the instructions carefully. Be familiar with the
controls and the correct use of themachine.
b ) Never allow children or people unfamiliar with these
instructions to use the machine. Local regulations can
restrict the age of theoperator.
c ) Keep in mind that the operator or user is responsible
for accidents or hazards occurring to other people or
theirproperty.
Preparation
a ) Before use, always visually inspect the machine for
damaged, missing or misplaced guards orshields.
b ) Never operate the machine while people, especially
children, or pets are nearby.
Operation
a ) Wear eye protection and stout shoes at all times while
operating themachine.
b ) Avoid using the machine in bad weather conditions
especially when there is a risk oflightning.
c ) Use the machine only in daylight or good artificiallight.
d ) Never operate the machine with damaged guards or
shields or without guards or shields inplace.
e ) Switch on the motor only when the hands and feet are
away from the cuttingmeans.
f ) Always disconnect the machine from the power
supply (i.e. remove the plug from the mains, remove the
disabling device or removable battery)
• whenever the machine is left unattended;
• before clearing a blockage;
• before checking, cleaning or working on the machine;
• after striking a foreign object;
• whenever the machine starts vibratingabnormally.
g ) Take care against injury to feet and hands from the
cuttingmeans.
h ) Always ensure that the ventilation openings are kept clear
ofdebris.
i ) Remove any objects that may cause kickback, such as
branches androcks.
j ) Check for loose fasteners and damaged parts, such as cracks in
the cuttingattachment.
Maintenance and Storage
a ) Disconnect the machine from the power supply
(i.e. remove the plug from the mains, remove the
disabling device or removable battery) before carrying out
maintenance or cleaningwork.
b ) Use only the manufacturer’s recommended replacement
parts andaccessories.
c ) Inspect and maintain the machine regularly. Have the
machine repaired only by an authorizedrepairer.

6
ENGLISH
d ) When not in use, store the machine out of the reach
ofchildren.
e ) Use blade cover for metal blades during transport
andstorage.
f ) Clean before storing, including the use of guards on
cutting attachments with metalblades.
ADDITIONAL SAFETY INSTRUCTIONS FOR
GRASS TRIMMERS
WARNING: Cutting elements continue to
rotate after the motor is switchedoff.
• Wear long trousers to protect yourlegs.
• Before using the appliance, check that your cutting path is free
from sticks, stones, wire and any otherobstacles.
• Only use the appliance in the upright position, with the cutting
line near the ground. Never switch the appliance on in any
otherposition.
• Move slowly when using the appliance. Be aware that freshly
cut grass is damp andslippery.
• Do not work on steep slopes. Work across the face of slopes,
not up anddown.
• Never cross gravel paths or roads while the appliance
isrunning.
• Never touch the cutting line while the appliance isrunning.
• Do not put the appliance down until the cutting line has come
to a completestandstill.
• Use only the appropriate type of cutting line. Never use metal
cutting line or fishingline.
• Keep hands and feet away from the cutting line and blade at
all times, especially when switching on themotor.
• Before using the appliance and after any impact, check for
signs of wear or damage and repair asnecessary.
• Take care against injury from any device fitted for trimming
the filament line length. After extending new cutter line always
return the machine to its normal operating position before
switchingon.
• Close supervision is necessary when the appliance is used
nearchildren.
• This appliance is not intended for use by young or infirm
persons withoutsupervision.
• This appliance is not to be used as atoy.
• Use in a dry location only. Do not allow the appliance to
becomewet.
• Do not immerse the appliance inwater.
• Do not open the body casing. There are not user-serviceable
parts inside
• Do not operate the appliance in explosive atmospheres, such
as in the presence of flammable liquids, gases ordust.
• When the appliance is stored or transported in a vehicle
it should be placed in the boot or restrained to prevent
movement following sudden changes in speed ordirection.
• When not in use, the appliance should be stored in a dry, well
ventilated place out of reach ofchildren.
• Children should not have access to storedappliances.
Safety of Others
• This appliance is not intended for use by persons (including
children) with reduced physical, sensory or mental capabilities,
or lack of experience and knowledge, unless they have been
given supervision or instruction concerning use of the appliance
by a person responsible for theirsafety.
• Children must be supervised to ensure that they do not play
with theappliance.
Residual Risks
To ensure you have good footing on slopes, do not overreach.
Keep your balance at all times. Always walk, do notrun.
Additional residual risks may arise when using the tool which
may not be included in the enclosed safety warnings. These risks
can arise from misuse, prolonged useetc.
Even with the application of the relevant safety regulations and
the implementation of safety devices, certain residual risks can
not be avoided. These include:
• Injuries caused by touching any rotating/movingparts.
• Injuries caused when changing any parts, blades
oraccessories.
• Injuries caused by prolonged use of a tool. When using any
tool for prolonged periods ensure you take regularbreaks.
• Impairment ofhearing.
• Health hazards caused by breathing dust developed when
using your tool (example: working with wood, especially oak,
beech and MDF.)
Electrical Safety
The electric motor has been designed for one voltage only.
Always check that the battery pack voltage corresponds to the
voltage on the rating plate. Also make sure that the voltage of
your charger corresponds to that of yourmains.
Your STANLEYFATMAX charger is double insulated
in accordance with EN60335; therefore no earth wire
isrequired.
WARNING: 115 V units have to be operated
via a fail-safe isolating transformer with an earth screen
between the primary and secondary winding.
If the supply cord is damaged, it must be replaced by a specially
prepared cord available through the STANLEYFATMAX
serviceorganisation.
Mains Plug Replacement
(U.K. & Ireland Only)
If a new mains plug needs to be fitted:
• Safely dispose of the oldplug.
• Connect the brown lead to the live terminal in theplug.
• Connect the blue lead to the neutralterminal.

7
ENGLISH
WARNING: No connection is to be made to
the earthterminal.
Follow the fitting instructions supplied with good quality plugs.
Recommended fuse: 3A..
Using an Extension Cable
An extension cord should not be used unless absolutely
necessary. Use an approved extension cable suitable for
the power input of your charger (see Technical Data). The
minimum conductor size is 1mm
2
; the maximum length
is30m.
When using a cable reel, always unwind the cablecompletely.
SAVE THESE INSTRUCTIONS
Chargers
STANLEYFATMAX chargers require no adjustment and are
designed to be as easy as possible tooperate.
Important Safety Instructions for All Battery
Chargers
SAVE THESE INSTRUCTIONS: This manual contains important
safety and operating instructions for compatible battery
chargers (refer to TechnicalData).
• Before using charger, read all instructions and cautionary
markings on charger, battery pack, and product using
batterypack.
WARNING: Shock hazard. Do not allow any
liquid to get inside charger. Electric shock mayresult.
WARNING: We recommend the use of a
residual current device with a residual current rating of
30mA orless.
CAUTION: Burn hazard. To reduce the risk
of injury, charge only STANLEYFATMAX rechargeable
batteries. Other types of batteries may burst causing
personal injury anddamage.
CAUTION: Children should be supervised to
ensure that they do not play with theappliance.
NOTICE: Under certain conditions, with the
charger plugged into the power supply, the exposed
charging contacts inside the charger can be shorted by
foreign material. Foreign materials of a conductive nature
such as, but not limited to, steel wool, aluminum foil or
any buildup of metallic particles should be kept away
from charger cavities. Always unplug the charger from the
power supply when there is no battery pack in the cavity.
Unplug charger before attempting to clean
• DO NOT attempt to charge the battery pack with any
chargers other than the ones in this manual. The charger
and battery pack are specifically designed to worktogether.
• These chargers are not intended for any uses other
than charging STANLEYFATMAX rechargeable batteries.
Any other uses may result in risk of fire, electric shock
orelectrocution.
• Do not expose charger to rain orsnow.
• Pull by plug rather than cord when disconnecting
charger. This will reduce risk ofdamage to electric plug
andcord.
• Make sure that cord is located so that it will not be
stepped on, tripped over, or otherwise subjected to
damage orstress.
• Do not use an extension cord unless it is absolutely
necessary. Use of improper extension cord could result in risk
of fire,electric shock, orelectrocution.
• Do not place any object on top of charger or place
the charger on a soft surface that might block the
ventilation slots and result in excessive internal heat.
Place the charger in a position away from any heat source. The
charger is ventilated through slots in the top and the bottom
of thehousing.
• Do not operate charger with damaged cord or plug—
have them replacedimmediately.
• Do not operate charger if it has received a sharp blow,
been dropped, or otherwise damaged in any way. Take it
to an authorised servicecentre.
• Do not disassemble charger; take it to an authorised
service centre when service or repair is required. Incorrect
reassembly may result in a risk of electric shock, electrocution
orfire.
• In case of damaged power supply cord the supply cord must be
replaced immediately by the manufacturer, its service agent or
similar qualified person to prevent anyhazard.
• Disconnect the charger from the outlet before
attempting any cleaning. This will reduce the risk of
electric shock. Removing the battery pack will not reduce
thisrisk.
• NEVER attempt to connect two chargerstogether.
• The charger is designed to operate on standard
230V household electrical power. Do not attempt to
use it on any other voltage. This does not apply to the
vehicularcharger.
Charging a Battery (Fig.B)
1. Plug the charger into an appropriate outlet before inserting
batterypack.
2. Insert the battery pack
7
into the charger, making sure the
battery pack is fully seated in the charger. The red (charging)
light will blink repeatedly indicating that the charging
process hasstarted.
3. The completion of charge will be indicated by the red light
remaining ON continuously. The battery pack is fully charged
and may be used at this time or left in the charger. To
remove the battery pack from the charger, push the battery
release button
8
on the batterypack.
Note: To ensure maximum performance and life of lithium-ion
battery packs, charge the battery pack fully before firstuse.

8
ENGLISH
Charger Operation
Refer to the indicators below for the charge status of the
batterypack.
Charge Indicators
Charging
Fully Charged
Hot/Cold Pack Delay*
* The red light will continue to blink, but a yellow indicator light
will be illuminated during this operation. Once the battery pack
has reached an appropriate temperature, the yellow light will
turn off and the charger will resume the chargingprocedure.
The compatible charger(s) will not charge a faulty battery pack.
The charger will indicate faulty battery by refusing to light or by
displaying problem pack or charger blinkpattern.
NOTE: This could also mean a problem with acharger.
If the charger indicates a problem, take the charger and battery
pack to be tested at an authorised servicecentre.
Hot/Cold Pack Delay
When the charger detects a battery pack that is too hot or too
cold, it automatically starts a Hot/Cold Pack Delay, suspending
charging until the battery pack has reached an appropriate
temperature. The charger then automatically switches to the
pack charging mode. This feature ensures maximum battery
packlife.
A cold battery pack will charge at a slower rate than a warm
battery pack. The battery pack will charge at that slower rate
throughout the entire charging cycle and will not return to
maximum charge rate even if the battery packwarms.
Wall Mounting
These chargers are designed to be wall mountable or to sit
upright on a table or work surface. If wall mounting, locate the
charger within reach of an electrical outlet, and away from a
corner or other obstructions which may impede air flow. Use
the back of the charger as a template for the location of the
mounting screws on the wall. Mount the charger securely using
drywall screws (purchased separately) at least 25.4mm long
with a screw head diameter of 7–9mm, screwed into wood to
an optimal depth leaving approximately 5.5mm of the screw
exposed. Align the slots on the back of the charger with the
exposed screws and fully engage them in theslots.
Charger Cleaning Instructions
WARNING: Shock hazard. Disconnect the
charger from the AC outlet before cleaning. Dirt and
grease may be removed from the exterior of the charger
using a cloth or soft non-metallic brush. Do not use water
or any cleaning solutions. Never let any liquid get inside
the tool; never immerse any part of the tool into aliquid.
Battery Packs
Important Safety Instructions for All Battery
Packs
When ordering replacement battery packs, be sure to include
catalogue number andvoltage.
The battery pack is not fully charged out of the carton. Before
using the battery pack and charger, read the safety instructions
below. Then follow charging proceduresoutlined.
READ ALL INSTRUCTIONS
• Do not charge or use battery in explosive atmospheres,
such as in the presence of flammable liquids, gases or
dust. Inserting or removing the battery from the charger may
ignite the dust orfumes.
• Never force battery pack into charger. Do not modify
battery pack in any way to fit into a non-compatible
charger as battery pack may rupture causing serious
personalinjury.
• Charge the battery packs only in STANLEYFATMAXchargers.
• DO NOT splash or immerse in water or otherliquids.
• Do not store or use the tool and battery pack in
locations where the temperature may reach or exceed
40 ˚C (104 ˚F) (such as outside sheds or metal buildings
in summer).
• Do not incinerate the battery pack even if it is severely
damaged or is completely worn out. The battery pack can
explode in a fire. Toxic fumes and materials are created when
lithium-ion battery packs areburned.
• If battery contents come into contact with the skin,
immediately wash area with mild soap and water. If
battery liquid gets into the eye, rinse water over the open eye
for 15 minutes or until irritation ceases. If medical attention
is needed, the battery electrolyte is composed of a mixture of
liquid organic carbonates and lithiumsalts.
• Contents of opened battery cells may cause respiratory
irritation. Provide fresh air. If symptoms persists, seek
medicalattention.
WARNING: Burn hazard. Battery liquid may be flammable
if exposed to spark orflame.
WARNING: Never attempt to open the
battery pack for any reason. If battery pack case is cracked
or damaged, do not insert into charger. Do not crush,
drop or damage battery pack. Do not use a battery pack
or charger that has received a sharp blow, been dropped,
run over or damaged in any way (i.e., pierced with a
nail, hit with a hammer, stepped on). Electric shock or
electrocution may result. Damaged battery packs should
be returned to service centre forrecycling.
WARNING: Fire hazard. Do not store or carry the
battery pack so that metal objects can contact
exposed battery terminals. For example, do not place
the battery pack in aprons, pockets, tool boxes, product kit
boxes, drawers, etc., with loose nails, screws, keys,etc.

9
ENGLISH
CAUTION: When not in use, place tool on
its side on a stable surface where it will not cause a
tripping or falling hazard. Some tools with large battery
packs will stand upright on the battery pack but may be
easily knockedover.
Transportation
WARNING: Fire hazard. Transporting
batteries can possibly cause fire if the battery terminals
inadvertently come in contact with conductive materials.
When transporting batteries, make sure that the battery
terminals are protected and well insulated from materials
that could contact them and cause a shortcircuit.
STANLEYFATMAX batteries comply with all applicable shipping
regulations as prescribed by industry and legal standards which
include UN Recommendations on the Transport of Dangerous
Goods; International Air Transport Association (IATA) Dangerous
Goods Regulations, International Maritime Dangerous Goods
(IMDG) Regulations, and the European Agreement Concerning
The International Carriage of Dangerous Goods by Road (ADR).
Lithium-ion cells and batteries have been tested to section 38.3
of the UN Recommendations on the Transport of Dangerous
Goods Manual of Tests andCriteria.
In most instances, shipping a STANLEYFATMAX battery pack
will be excepted from being classified as a fully regulated Class
9 Hazardous Material. In general, only shipments containing a
lithium-ion battery with an energy rating greater than 100 Watt
Hours (Wh) will require being shipped as fully regulated Class
9. All lithium-ion batteries have the Watt Hour rating marked
on the pack. Furthermore, due to regulation complexities,
STANLEYFATMAX does not recommend air shipping lithium-ion
battery packs alone regardless of Watt Hour rating. Shipments of
tools with batteries (combo kits) can be air shipped as excepted
if the Watt Hour rating of the battery pack is no greater than
100Whr.
Regardless of whether a shipment is considered excepted
or fully regulated, it is the shipper's responsibility to consult
the latest regulations for packaging, labeling/marking and
documentationrequirements.
The information provided in this section of the manual is
provided in good faith and believed to be accurate at the time
the document was created. However, no warranty, expressed or
implied, is given. It is the buyer’s responsibility to ensure that its
activities comply with the applicableregulations.
Storage Recommendations
1. The best storage place is one that is cool and dry away
from direct sunlight and excess heat or cold. For optimum
battery performance and life, store battery packs at room
temperature when not inuse.
2. For long storage, it is recommended to store a fully charged
battery pack in a cool, dry place out of the charger for
optimalresults.
Note: Battery packs should not be stored completely depleted of
charge. The battery pack will need to be recharged beforeuse.
Labels on Charger and Battery Pack
In addition to the pictographs used in this manual, the labels
on the charger and the battery pack may show the following
pictographs:
Read instruction manual beforeuse.
See Technical Data for chargingtime.
Do not probe with conductiveobjects.
Do not charge damaged batterypacks.
Do not expose towater.
Have defective cords replacedimmediately.
Charge only between 4 ˚C and 40 ˚C.
Only for indooruse.
Discard the battery pack with due care for
theenvironment.
Charge STANLEYFATMAX battery packs only
with designated STANLEYFATMAX chargers.
Charging battery packs other than the
designated STANLEYFATMAX batteries with a
STANLEYFATMAX charger may make them burst or
lead to other dangeroussituations.
Do not incinerate the batterypack.
Battery Type
The SFMCSTB963 operates on a 54 volt batterypack.
These battery packs may be used: SFMCB6025, SFMCB605,
SFMCB6075. Refer to Technical Data for moreinformation.
Package Contents
The package contains:
1 Grass Trimmer
1 Guard
4 Guard screws
1 Nut wrench
1 Rod, lock
1 Instruction manual
• Check for damage to the tool, parts or accessories which may
have occurred duringtransport.

10
ENGLISH
• Take the time to thoroughly read and understand this manual
prior tooperation.
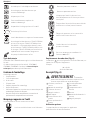
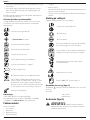
Markings on Tool
The following pictograms are shown on the tool:
Read instruction manual beforeuse.
Wear earprotection.
Wear eyeprotection.
Do not expose the tool to rain or high
humidity
or leave outdoors while it israining.
Switch the tool off. Before performing any
maintenance on the tool, remove the battery
from thetool.
Keep people and animals at least 6 m away
from the workarea.
Keep bystandersaway.
96
Directive 2000/14/EC guaranteed soundpower.
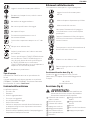
Date Code Position (Fig.A)
The date code
33
, which also includes the year of manufacture,
is printed into thehousing.
Example:
2019 XX XX
Year of Manufacture
Description (Fig.A)
WARNING: Never modify the power tool or
any part of it. Damage or personal injury couldresult.
1
Variable speed trigger
2
Lock-off button
3
Speed control switch
4
Auxiliary handle
5
Motor housing
6
Lower trimmer pole
7
Upper trimmer pole
8
Guard
9
Spool housing
10
Battery housing
11
Battery
12
Battery release button
13
Main handle
Intended Use
This Grass Trimmer is designed for professional
trimmingapplications.
DO NOT use under wet conditions or in the presence of
flammable liquids orgases.
This is not an edger and is not intended to be used foredging.
DO NOT let children come into contact with the tool.
Supervision is required when inexperienced operators use
thistool.
• Young children and the infirm. This appliance is not
intended for use by young children or infirm persons
withoutsupervision.
• This product is not intended for use by persons (including
children) suffering from diminished physical, sensory or
mental abilities; lack of experience, knowledge or skills
unless they are supervised by a person responsible for their
safety. Children should never be left alone with thisproduct.
ASSEMBLY AND ADJUSTMENTS
WARNING: To reduce the risk of serious
personal injury, turn tool off and disconnect battery
pack before making any adjustments or removing/
installing attachments or accessories. An accidental
start-up can causeinjury.
WARNING: Use only STANLEYFATMAX
battery packs andchargers.
Inserting and Removing the Battery Pack
from the Tool (Fig.G)
NOTE: Make sure your battery pack
11
is fullycharged.
To Install the Battery Pack into the Tool
1. Align the battery pack
11
with the rails inside the tool
(Fig.G).
2. Slide it into the tool until the battery pack is firmly seated
and ensure that you hear the lock snap intoplace.
To Remove the Battery Pack from the Tool
1. Press the release button
12
and firmly pull the battery pack
out of the toolhandle (Fig.G).
2. Insert battery pack into the charger as described in the
charger section of thismanual.
Fuel Gauge Battery Packs (Fig.G)
Some STANLEYFATMAX battery packs include a fuel gauge
which consists of three green LED lights that indicate the level of
charge remaining in the batterypack.
To actuate the fuel gauge, press and hold the fuel gauge
button
30
. A combination of the three green LED lights will
illuminate designating the level of charge left. When the level of
charge in the battery is below the usable limit, the fuel gauge
will not illuminate and the battery will need to berecharged.
NOTE: The fuel gauge is only an indication of the charge left on
the battery pack. It does not indicate tool functionality and is

11
ENGLISH
subject to variation based on product components, temperature
and end-userapplication.
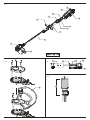
Assembling the Guard (Fig.D, E)
WARNING: Never remove the guard. Damage
or personal injury couldresult.
WARNING: NEVER OPERATE APPLIANCE
WITHOUT GUARD FIRMLY IN PLACE. The guard must
always be properly attached on the appliance to protect
theuser.
1. Assemble the guard
8
to the motor housing
5
.
2. Using a crosshead screwdriver, insert the 4 guard screws and
tightensecurely.
An extended coverage guard is available (sold separately) for
extra coverage if desired. Use STANLEYFATMAX replacement
guard.
Assembling the Pole (Fig.C–E)
1. Do not remove the zip tie until the pole isassembled.
2. Ensure that the sleeve
14
on the lower trimmer
pole
6
is fully extended.
NOTE: To adjust the sleeve, release the sleeve latch
15
and
move the sleeve intoposition.
3. Lock the sleeve latch.
4. With the sleeve latch closed, slide the upper trimmer pole
into the sleeve lower trimmer pole. The latching button
17
will click into position when it engages the latchhole.
5. Tighten the top screw
18
with a crossheadscrewdriver.
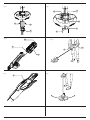
Attaching the Auxiliary Handle (Fig.F)
1. Place the auxiliary handle
4
onto the top of the upper
trimmer pole
6
as shown in FigureF.
2. Slide the bracket
31
of the auxiliary handle onto the
bottom of thehandle.
3. Thread the handle bolts
32
through the handle and into
the bracket fromabove.
4. Tighten the handle bolts. Ensure the handle is securely
attached by closing the handle clamp
19
.
5. To adjust the position of the auxiliary handle, open the
handle clamp and slide the handle up and down the pole
until it is in the desired location. Close the clamp to lock the
handle inplace.
Height Adjustment (Fig.E)
CAUTION: Adjust the length of the trimmer to
obtain proper workingpositions.
1. The overall height of the trimmer can be adjusted by
loosening the height-adjust collar
6
by rotating it in the
direction of the arrow shown in Figure E.
2. Move the upper housing straight up or down. When the
desired height is achieved, tighten the collar by rotating it
opposite of the direction shown in FigureE.
Releasing the Cutting Line (Fig.A)
In transit, the cutting line is taped to the spool housing
10
.
• Remove the tape holding the cutting line to the
spoolhousing.
OPERATION
Instructions for Use
WARNING: Always observe the safety
instructions and applicableregulations.
WARNING: To reduce the risk of serious
personal injury, turn tool off and disconnect battery
pack before making any adjustments or removing/
installing attachments or accessories. An accidental
start-up can causeinjury.
Proper Hand Position (Fig.A, I)
WARNING: To reduce the risk of serious
personal injury, ALWAYS use proper hand position
asshown.
WARNING: To reduce the risk of serious
personal injury, ALWAYS hold securely in anticipation of a
suddenreaction.
Proper hand position requires one hand on the main
handle
13
and one hand on the auxiliary handle
4
.
Switching Trimmer On and Off (Fig.A)
To turn the appliance on, squeeze the lock-off lever
2
and then
the variable speed trigger
1
. Once the unit is running, you may
release the lock off lever. To turn the appliance off, release the
variable speedtrigger.
WARNING: Never attempt to lock the trigger
in the onposition.
Speed Control Switch (Fig.A)
This string trimmer gives you the choice to operate at a
more efficient speed to extend the runtime for larger jobs, or
accelerate the trimmer speed for high-performancecutting.
To extend runtime, pull the speed control switch back toward
the battery housing
10
into the "LO" position. This mode is best
for larger projects that require more time tocomplete.
To accelerate the trimmer, push the speed control switch
3
forward toward the auxillary handle
4
into the "HI" position.
This mode is best to cut through heavier growth and for
applications that need higherRPM.
NOTE: When in "HI" mode, runtime will be decreased as
compared to when trimmer is in "LO"mode.

12
ENGLISH
Trimming (Fig.J, K)
With the trimmer on, angle it and swing side to side as shown
in FigureJ.
Maintain a minimum distance of 610 mm between the guard
and your feet as shown in FigureK.
WARNING: Keep the rotating string roughly
parallel with the ground (tilted no more than 30°). This
trimmer is not an edger. DO NOT TILT the trimmer so that
the string is spinning near a right angle to the ground.
Flying debris can cause seriousinjury.
Bump Feed Trimmer Line Feed
Your trimmer uses 2 mm diameter line that is spiral-shaped with
smooth round edges. Cutting line will wear faster and require
more feeding if the cutting is done along sidewalks or other
abrasive surfaces or heavier weeds are beingcut.
As you use the trimmer, the string will get shorter due to wear.
Gently bump the trimmer on the ground while running at
normal speed and the line willfeed.
NOTE: Extending nylon line beyond the 381mm swath will
negatively affect performance, runtime, and the life of the
trimmer due to potential of damaging motor. Doing so may void
thewarranty.
Helpful Cutting Tips (Fig.M)
• Use the tip of the string to do the cutting; do not force string
head into uncutgrass.
• Wire and picket fences cause extra string wear, even
breakage. Stone and brick walls, curbs, and wood may wear
stringrapidly.
• Do not allow spool cap
29
to drag on ground or
othersurfaces.
• In long growth, cut from the top down and do not exceed
305 mmhigh.
• Keep trimmer tilted toward the area being cut; this is the
best cuttingarea.
• The trimmer cuts when passing the unit from the left to
right. This will avoid throwing debris at theoperator.
• Avoid trees and shrubs. Tree bark, wood moldings, siding,
and fence posts can easily be damaged by thestring.
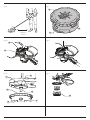
Reloading the Cutting Line (Fig.L–N)
WARNING: To reduce the risk of serious personal
injury, turn unit off and remove the battery pack
before making any adjustments or removing/
installing attachments or accessories, when
replacing line, or prior to cleaning. An accidental start-
up can causeinjury.
CAUTION:Use only STANLEYFATMAX
replacement spools and line. Using any other
manufacturer's line can reduce performance, damage the
trimmer or cause personalinjury.
Your trimmer uses 2 mm or 2.4mm diameter line that is
spiral-shaped with smooth round edges. Do not use other
size lines. This can degrade performance, cause damage to
the unit orinjury.
CAUTION: To avoid appliance damage, if the
cutting line protrudes beyond the trimming blade, cut it off
so that it just reaches theblade.
Use only STANLEYFATMAX replacementline.
1. Removebattery.
2. Cut a max of 20' (6 m) length of of 2mm trimmerline.
3. Align spool housing eyelets
21
with the arrow
22
on the
spool grip cover
20
as shown in FigureL.
4. Thread one end of the trimmer line through an eyelet. Guide
the line through to the second eyelet and continue to pull
the line through until there are equal lengths of string on
each side of the spool housing as shown in FigureM.
5. Secure the spool cap
29
from moving with one hand.
Using your other hand, wind the string onto the spool by
rotating the spool grip cover counterclockwise. Continue
winding until 154mm of string remain on each side of the
spoolhousing.
MAINTENANCE
Your STANLEYFATMAX power tool has been designed
to operate over a long period of time with a minimum of
maintenance. Continuous satisfactory operation depends upon
proper tool care and regularcleaning.
WARNING: To reduce the risk of serious
personal injury, turn tool off and disconnect battery
pack before making any adjustments or removing/
installing attachments or accessories. An accidental
start-up can causeinjury.
The charger and battery pack are notserviceable.
Replacement Accessories
WARNING: To reduce the risk of serious
personal injury, turn appliance off and remove
battery before making any adjustments or
removing/installing attachments oraccessories.
WARNING: The use of any accessory not
recommended by STANLEYFATMAX for use with this
appliance could behazardous.
WARNING: Do not use any blades, or any
accessory or attachment other than those recommended
by STANLEYFATMAX on this trimmer. Serious injury or
product damage mayresult.
When replacing the line, use 2 mm diameter line. Use
STANLEYFATMAX replacement line Model No. STZST1226.
Other sizes may degrade performance or cause damage to
thetrimmer.

13
ENGLISH
Replacing Spool Assembly (Fig.O, P)
1. Rotate the spool housing
9
until the hole
24
in the
spindle plate aligns with notch
25
in the housing. Insert a
screwdriver through the notch and into the hole, to prevent
the spindle
26
fromturning.
2. Unscrew and remove the spool housing by turning the
spool grip cover
20
clockwise.
NOTE: Do not try to remove the spool housing by turning the
spool head
30
.
3. Remove spindle plate
27
before installing a new housing.
Remove any dirt and grass from the motor housing and
spindleplate.
4. Install spindle plate onto the spindle, so the double D
shaped retaining nut on the spindle sits inside the base of
the spindleplate.
5. Align the spindle plate hole and notch, insert a screwdriver
back into the hole and thread the new spool housing
counterclockwise. Securely tighten the new spool housing
onto thespindle.
Recommended accessories for use with your tool are available
at extra cost from your local dealer or authorized service center.
If you need assistance in locating any accessory, please visit our
website www.stanley.eu/3.
Use STANLEYFATMAX Model No.STZST1169.
Lubrication
Your power tool requires no additionallubrication.
Cleaning
WARNING: Blow dirt and dust out of the
main housing with dry air as often as dirt is seen collecting
in and around the air vents. Wear approved eye protection
and approved dust mask when performing thisprocedure.
WARNING: Never use solvents or other harsh
chemicals for cleaning the non-metallic parts of the
tool. These chemicals may weaken the materials used in
these parts. Use a cloth dampened only with water and
mild soap. Never let any liquid get inside the tool; never
immerse any part of the tool into aliquid.
Optional Accessories
WARNING: Since accessories, other than
those offered by STANLEYFATMAX, have not been tested
with this product, use of such accessories with this tool
could be hazardous. To reduce the risk of injury, only
STANLEYFATMAX recommended accessories should be
used with thisproduct.
Consult your dealer for further information on the
appropriateaccessories.
Protecting the Environment
Separate collection. Products and batteries marked
with this symbol must not be disposed of with normal
householdwaste.
Products and batteries contain materials that can
be recovered or recycled reducing the demand for raw
materials. Please recycle electrical products and batteries
according to local provisions. Further information is available at
www.2helpU.com.
Rechargeable Battery Pack
This long life battery pack must be recharged when it fails to
produce sufficient power on jobs which were easily done before.
At the end of its technical life, discard it with due care for our
environment:
• Run the battery pack down completely, then remove it from
thetool.
• Li-Ion cells are recyclable. Take them to your dealer or a
local recycling station. The collected battery packs will be
recycled or disposed ofproperly.
Guarantee
1 Year Guarantee
All STANLEY FATMAX power tool products include a 1 year
guarantee as standard. In the unlikely event that your powertool
becomes defective due to faulty materials or worksmanship
within 1 year of purchase, STANLEY guarantees to replace or
repair all defective parts free of charge, or – at our discretion –
replace the item free ofcharge.
3 Year Guarantee
Register your STANLEY FATMAX power tool within 4 weeks
of purchase and qualify for an additional 2 year guarantee.
Having registered your power tool, in the unlikely event that
your powertool becomes defective due to faulty materials or
worksmanship, STANLEY guarantees to replace or repair all
defective parts free of charge, or – at our discretion – replace the
item free ofcharge.

14
DEUTSCH
Akku Katalognr. Ausgangsspannung Ah
Ladegerät
SFMCB6012
SFMCB6025 54 2,5 X
SFMCB605 54 5 X
SFMCB6075 54 7,5 X
"X" Zeigt an, dass der Akku mit diesem speziellen Ladegerät
kompatibel ist. Lesen Sie die Betriebsanleitung für
genauereInformationen.
EG-Konformitätserklärung
Maschinenrichtlinie
Bürstenloser Rasen-Trimmer
SFMCSTB963
STANLEYFATMAX erklärt, dass diese unter Technische Daten
beschriebenen Geräte übereinstimmen mit:
2006/42/EC, EN60335-1:2012 + A11:2014, EN50636-2-91:2014.
2000/14/EG, Rasentrimmer, L ≤ 50 cm, Anhang VI
DEKRA Certification B.V.
Meander 1051 / P.O. Box 5185
6525 MJ ARNHEM / 6802 ED
ARNHEM, Niederlande
Kennnummer der benannten Stelle: 0344
Schallpegel gemäß 2000/14/EG
(Artikel 12, Anhang III, L ≤ 50 cm):
L
PA
(gemessener Schallleistungspegel) 79,5 dB(A)
Unsicherheitsfaktor (K) = 1,9 dB (A)
L
WA
(garantierte Schallleistung) 96 dB(A)
Diese Produkte erfüllen auch die Richtlinie 2014/30/EU und
2011/65/EU. Für weitere Informationen wenden Sie sich bitte an
STANLEYFATMAX unter der folgenden Adresse oder schauen
Sie auf der Rückseite dieser Betriebsanleitungnach.
Der Unterzeichnete ist verantwortlich für die Zusammenstellung
des technischen Dossiers und gibt diese Erklärung im Namen
von STANLEYFATMAXab.
A. P. Smith
Technical Director
STANLEYFATMAX Europe, Egide Walschaertsstraat14-18,
2800 Mechelen, Belgien
10.11.2019
WARNUNG: Zur Reduzierung der
Verletzungsgefahr bitte die Betriebsanleitunglesen.
Herzlichen Glückwunsch!
Sie haben sich für ein Gerät von STANLEYFATMAX entschieden.
Langjährige Erfahrung, sorgfältige Produktentwicklung und
Innovation machen STANLEYFATMAX zu einem zuverlässigen
Partner für professionelle Anwender vonElektrowerkzeugen.
Technische Daten
Akkus & Ladegeräte sind separat erhältlich (SFMCSTB963N)
SFMCSTB963
Spannung V
DC
54V
Typ 1
U/min /min 5200 - 5500
Schnittlänge mm 330
Gewicht (ohne Akku) kg 3,7
Lärmwerte und Vibrationswerte (Triax-Vektorsumme). Rasen-Trimmer-Modus
gemäß EN50636-2-91:
L
PA
(Emissions-
Schalldruckpegel)
dB(A) 79,5
L
WA
(Schallleistungspegel) dB(A) 93
K (Unsicherheit für den
angegebenen Schallpegel)
dB(A) 1,9
Vibrationsemissionswert a
h
= 3,5
Unsicherheitsfaktor K = m/s² 2,1
Der in diesem Informationsblatt angegebene
Vibrationsemissionswert wurde gemäß einem standardisierten
Test laut EN50636 gemessen und kann für einen Vergleich
zwischen zwei Geräten verwendet werden. Er kann zu einer
vorläufigen Einschätzung der Exposition verwendetwerden.
WARNUNG: Der angegebene
Vibrationsemissionswert bezieht sich auf die
Hauptanwendung des Gerätes. Wenn das Gerät
jedoch für andere Anwendungen, mit anderem
Zubehör oder schlecht gewartet eingesetzt wird, kann
die Vibrationsemission verschieden sein. Dies kann
den Expositionsgrad über die Gesamtbetriebszeit
erheblicherhöhen.
Eine Schätzung der Vibrationsstärke sollte auch
berücksichtigen, wie oft das Gerät ausgeschaltet
wird oder über welche Zeit es zwar läuft, aber nicht
wirklich in Betrieb ist. Dies kann die Exposition über die
Gesamtbetriebszeit erheblichmindern.
Identifizieren Sie zusätzliche Sicherheitsmaßnahmen,
um den Bediener vor den Vibrationsauswirkungen zu
schützen, wie: Erhalt des Werkzeugs und Zubehörs, Hände
warm halten, Organisation vonArbeitsmustern.
BÜRSTENLOSER RASENTRIMMER
SFMCSTB963
Deutsch (übersetzt von den originalanweisungen)

15
DEUTSCH
FÜR ZUKÜNFTIGE BEZUGNAHME AUFBEWAHREN
SICHERE BETRIEBSPRAKTIKEN
Schulung
a ) Lesen Sie die Bedienungsanleitung sorgfältig durch.
Machen Sie sich mit den Bedienelementen und dem
korrekten Gebrauch der Maschinevertraut.
b ) Das Gerät darf nicht von Kindern oder Personen, die
die vorliegenden Anleitungen nicht gelesen haben,
genutzt werden. Örtliche Bestimmungen können das
Alter des Bedienerseinschränken.
c ) Beachten Sie, dass der Bediener bzw. Benutzer für
eventuelle Personen- oder Sachschäden verantwortlichist.
Vorbereitung
a ) Führen Sie vor dem Gebrauch der Maschine immer
eine Sichtprüfung auf beschädigte, fehlende oder
falsch angebrachte Schutzvorrichtungen oder
Abschirmungendurch.
b ) Es sollte stets ein Sicherheitsabstand zu anderen Personen,
insbesondere Kindern, und Haustieren eingehaltenwerden.
Betrieb
a ) Tragen Sie während des Betriebs der Maschine stets einen
Augenschutz und festeSchuhe.
b ) Vermeiden Sie, das Gerät bei schlechtem Wetter zu
verwenden, vor allem, wenn das Risiko von Blitzenbesteht.
c ) Betreiben Sie das Gerät nur bei Tageslicht oder bei
ausreichenderBeleuchtung.
d ) Betreiben Sie das Gerät keinesfalls, wenn die
Schutzvorrichtungen oder Abschirmungen beschädigt
oder nicht ordnungsgemäß angebrachtsind.
e ) Schalten Sie das Gerät nur ein, wenn Hände und Füße die
Schneidmesser nichtberühren.
f ) Trennen Sie die Maschine immer von der
Stromversorgung (d.h. ziehen Sie den Stecker aus der
Steckdose, entfernen Sie das Deaktivierungsgerät oder den
austauschbaren Akku).
• wenn die Maschine unbeaufsichtigt gelassen wird;
• bevor Blockaden entfernt werden;
• bevor Sie die Maschine überprüfen, reinigen oder an
ihr arbeiten;
• nach dem Überfahren eines Fremdkörpers;
• wenn das Gerät ungewöhnlich stark zu
vibrierenbeginnt.
g ) Schützen Sie Füße und Hände vor Verletzungen durch
dieSchneidmesser.
h ) Stellen Sie stets sicher, dass die Lüftungsöffnungen frei von
Verschmutzungensind.
i ) Entfernen Sie alle Objekte, die einen Rückschlag
verursachen könnten, beispielsweise Äste undSteine.
j ) Suchen Sie nach losen Befestigungselementen
und beschädigten Teilen, beispielsweise Risse in
derSchneideinrichtung.
Definitionen: Sicherheitsrichtlinien
Im Folgenden wird die Relevanz der einzelnen Warnhinweise
erklärt. Bitte lesen Sie die Betriebsanleitung und achten Sie auf
dieseSymbole.
VORSICHT: Weist auf eine unmittelbar
drohende gefährliche Situation hin, die, sofern nicht
vermieden, zu tödlichen oder schweren Verletzungen
führenwird.
WARNUNG: Weist auf eine möglicherweise
gefährliche Situation hin, die, sofern nicht vermieden, zu
tödlichen oder schweren Verletzungen führenkann.
VORSICHT: Weist auf eine möglicherweise
gefährliche Situation hin, die, sofern nicht vermieden,
zu leichten oder mittelschweren Verletzungen
führenkann.
HINWEIS: Weist auf ein Verhalten hin, das
nichts mit Verletzungen zu tun hat, aber, wenn es nicht
vermieden wird, zu Sachschäden führenkann.
Weist auf ein Stromschlagrisikohin.
Weist auf eine Brandgefahrhin.
SICHERHEITSHINWEISE
WARNUNG: Beachten Sie beim Umgang mit
netzstrombetriebenen Geräten stets die grundlegenden
Sicherheitshinweise, die im Folgenden beschrieben
werden. Dadurch verhindern Sie Brände, Stromschläge
sowie Sach- undPersonenschäden.
WARNUNG: Beachten Sie beim Verwenden
des Geräts unbedingt die Sicherheitsregeln. Lesen Sie
zu Ihrer eigenen Sicherheit und zum Schutz in der Nähe
befindlicher Personen vor Gebrauch des Geräts die
folgende Bedienungsanleitung. Heben Sie diese Anleitung
zur späteren Verwendung gutauf.
• Lesen Sie diese Anleitung vollständig und aufmerksam durch,
bevor Sie das Gerätverwenden.
• Der vorgesehene Verwendungszweck ist in dieser Anleitung
beschrieben. Bei Verwendung von Zubehör oder Anbauteilen,
die nicht in dieser Anleitung empfohlen werden, sowie bei
der Verwendung des Geräts in Abweichung von den in dieser
Anleitung beschriebenen Verfahren bestehtVerletzungsgefahr.
• Bewahren Sie diese Anleitungauf.
WICHTIG
VOR DER VERWENDUNG SORGFÄLTIG DURCHLESEN

16
DEUTSCH
Handhabung und Lagerung
a ) Trennen Sie die Maschine von der Stromversorgung
(d.h. ziehen Sie den Stecker aus der Steckdose,
entfernen Sie das Deaktivierungsgerät oder den
austauschbaren Akku), bevor Sie Wartungs- oder
Reinigungsarbeitendurchführen.
b ) Verwenden Sie nur vom Hersteller empfohlene Ersatz-
undZubehörteile.
c ) Kontrollieren und warten Sie das Gerät
regelmäßig. Lassen Sie das Gerät nur in autorisierten
Werkstättenreparieren.
d ) Bewahren Sie das Gerät bei Nichtgebrauch außerhalb der
Reichweite von Kindernauf.
e ) Verwenden Sie für Transport und Lagerung eine
Klingenabdeckung fürMetallklingen.
f ) Vor der Lagerung reinigen und Schutzvorrichtungen für
Schneidwerkzeuge mit Metallklingenanbringen.
ZUSÄTZLICHE SICHERHEITSHINWEISE FÜR
RASENTRIMMER
WARNUNG: Die Messer laufen nach dem
Abschalten des Motors nochaus.
• Tragen Sie lange Hosen, um Ihre Beine zuschützen.
• Vergewissern Sie sich vor Verwenden des Geräts, dass die
zu beschneidende Fläche frei von Ästen, Steinen, Draht und
anderen Objektenist.
• Verwenden Sie das Gerät ausschließlich in aufrechter Stellung
und mit Schneidfaden in Bodennähe. Schalten Sie das Gerät
keinesfalls in einer anderen Stellungein.
• Achten Sie bei Verwendung des Geräts auf langsame
Bewegungen. Achten Sie darauf, dass frisch gemähtes Gras
feucht und rutschig seinkann.
• Arbeiten Sie nie an steilen Hängen. Arbeiten Sie mit dem Gerät
immer parallel zum Hang, nie den Hang hinauf oderhinunter.
• Schalten Sie das Gerät vor dem Überqueren von Kieswegen
und Straßenaus.
• Berühren Sie niemals den Schneidfaden, während sich das
Gerät in Betriebbefindet.
• Warten Sie stets, bis der Schneidfaden vollständig zum
Stillstand gekommen ist, bevor Sie das Gerätabsetzen.
• Verwenden Sie ausschließlich geeignete Schneidfäden.
Verwenden Sie keinesfalls Schneidfäden aus Metall
oderAngelschnur.
• Halten Sie Hände und Füße stets von Schneidfaden und -klinge
fern, insbesondere beim Einschalten desGeräts.
• Überprüfen Sie das Gerät vor Gebrauch und nach Stößen
auf Beschädigungen und Verschleiß, und veranlassen Sie
notwendigeReparaturmaßnahmen.
• Schützen Sie sich vor Verletzungen beim Verwenden von
Geräten zum Verkürzen des Schneidfadens. Bringen Sie nach
Herausziehen des neuen Schneidfadens das Gerät vor dem
Einschalten in die normaleBetriebsposition.
• Seien Sie besonders vorsichtig, wenn Sie das Gerät in der Nähe
von Kindernverwenden.
• Das Gerät ist nicht für die unbeaufsichtigte Verwendung durch
Kinder oder gebrechliche Personenvorgesehen.
• Das Gerät ist keinSpielzeug.
• Verwenden Sie das Gerät nur in trockener Umgebung. Achten
Sie darauf, dass das Gerät nicht nasswird.
• Tauchen Sie das Gerät nicht inWasser.
• Versuchen Sie nicht, das Gehäuse zu öffnen. Im Inneren
befinden sich keine zu wartendenTeile.
• Betreiben Sie das Gerät nicht in explosionsgefährdeter
Umgebung, in der sich brennbare Flüssigkeiten, Gase oder
Staubbefinden.
• Wenn das Gerät in einem Fahrzeug transportiert oder gelagert
wird, bewahren Sie es im Kofferraum oder einer geeigneten
Ablage auf, damit es bei plötzlichen Geschwindigkeits- oder
Richtungsänderungen nicht in Bewegung geratenkann.
• Bewahren Sie das Gerät bei Nichtgebrauch an einem
trockenen, gut belüfteten Ort außerhalb der Reichweite von
Kindernauf.
• Kinder sollten keinen Zugang zu aufbewahren Gerätenhaben.
Sicherheit anderer Personen
• Dieses Gerät darf nicht von Personen (einschließlich Kindern)
mit eingeschränkten physischen, sensorischen oder mentalen
Fähigkeiten oder ohne ausreichende Erfahrung oder
Kenntnisse verwendet werden, außer wenn diese Personen von
einer Person, die für ihre Sicherheit verantwortlich ist, bei der
Verwendung des Geräts beaufsichtigt oder mit ihm vertraut
gemachtwerden.
• Kinder müssen beaufsichtigt werden, um sicherzustellen, dass
sie nicht mit dem Gerätspielen.
Restrisiken
Damit Sie an Hängen guten Stand haben, sollten Sie keine
anormale Körperhaltung einnehmen. Halten Sie jederzeit
das Gleichgewicht. Beim Umgang mit dem Gerät nur gehen,
nichtrennen.
Zusätzliche Restrisiken können auftreten, wenn das
Werkzeug verwendet wird, das möglicherweise nicht in den
Sicherheitswarnungen enthalten ist. Diese Risiken können aus
Missbrauch, verlängerter Nutzung usw.resultieren.
Selbst unter Beachtung der geltenden Sicherheitsvorschriften
und des Einsatzes von Schutzvorrichtungen können bestimmte
Risiken nicht vermieden werden. Diese sind:
• Verletzungen, die durch das Berühren von sich drehenden/
bewegenden Teilen verursachtwerden.
• Verletzungen, die durch das Austauschen von Teilen, Messern
oder Zubehör verursachtwerden.
• Verletzungen, die durch längeren Gebrauch eines Geräts
verursacht werden. Bei der längeren Verwendung eines
Werkzeugs ist sicherzustellen, dass regelmäßig Pausen
eingelegtwerden.Schwerhörigkeit.
• Gesundheitsrisiken durch das Einatmen von Staub beim
Gebrauch des Geräts (Beispielsweise bei Holzarbeiten,
insbesondere Eiche, Buche und Pressspan).

17
DEUTSCH
Elektrische Sicherheit
Der Elektromotor wurde für eine einzige Spannung konstruiert.
Überprüfen Sie immer, dass die Spannung des Akkus der
Spannung auf dem Typenschild entspricht. Überprüfen
Sie auch, dass die Spannung des Ladegeräts der Ihres
Stromnetzesentspricht.
Ihr STANLEYFATMAX-Ladegerät ist gemäß
EN60335 doppelt isoliert. Es muss deshalb nicht
geerdetwerden.
WARNUNG: 115V-Geräte müssen
über einen ausfallsicheren Trenntransformator mit
einer Abschirmung gegen Erde zwischen Primär- und
Sekundärwicklung betrieben werden.
Wenn das Stromversorgungskabel beschädigt ist, muss es durch
ein speziell ausgestattetes Kabel ersetzt werden, das bei der
STANLEYFATMAX Kundendienstorganisation erhältlichist.
Verwendung eines Verlängerungskabels
Ein Verlängerungskabel sollte nur wenn unbedingt nötig
verwendet werden. Verwenden Sie ein zugelassenes
Verlängerungskabel, das für die Leistungsaufnahme Ihres
Ladegeräts geeignet ist (siehe Technische Daten). Der
Mindestquerschnitt der Leitungen beträgt 1mm
2
; die
Höchstlänge beträgt30m.
Wenn Sie eine Kabeltrommel verwenden, wickeln Sie das Kabel
vollständigab.
BEWAHREN SIE DIESE ANWEISUNGEN AUF
Ladegeräte
An STANLEYFATMAX-Ladegeräten müssen keine Einstellungen
vorgenommen werden, und sie wurden für eine möglichst
einfache Bedienungkonzipiert.
Wichtige Sicherheitsvorschriften für alle
Batterieladegeräte
BEWAHREN SIE DIESE ANWEISUNGEN AUF: Dieses Handbuch
enthält wichtige Sicherheits- und Betriebsanweisungen für
kompatible Ladegeräte (siehe Technische Daten).
• Lesen Sie vor der Verwendung des Ladegeräts alle
Anweisungen und Warnhinweise auf dem Ladegerät und
demAkku.
WARNUNG: Stromschlaggefahr. Keine
Flüssigkeiten in das Ladegerät gelangen lassen. Dies kann
einen elektrischen Schlag zur Folgehaben.
WARNUNG: Wir empfehlen die Verwendung
eines Fehlerstromschutzgeräts mit einem Fehlerstrom von
maximal 30mA.
VORSICHT: Verbrennungsgefahr. Zur
Reduzierung der Verletzungsgefahr sollten nur Akkus
von STANLEYFATMAX verwendet werden. Andere
Akkutypen können bersten und Verletzungen und
Sachschädenverursachen.
VORSICHT: Lassen Sie nicht zu, dass Kinder
mit dem Gerätspielen.
HINWEIS: Wenn das Ladegerät in die
Steckdose gesteckt wird, können die Ladekontakte
im Ladegerät unter bestimmten Bedingungen durch
Fremdmaterial kurzgeschlossen werden. Leitfähige
Fremdmaterialien, z.B. unter anderem Stahlwolle,
Alufolie oder angesammelte Metallpartikel, sollten von
Hohlräumen des Ladegeräts ferngehalten werden. Ziehen
Sie den Netzstecker des Ladegerätes immer aus der
Steckdose, wenn kein Akku in der Vertiefung steckt. Ziehen
Sie den Netzstecker des Ladegerätes vor dem Reinigen aus
derSteckdose.
• Versuchen Sie NICHT, den Akku mit anderen
Ladegeräten aufzuladen als die in diesem Handbuch
angegebenen. Das Ladegerät und der Akku wurden speziell
zur gemeinsamen Verwendungkonzipiert.
• Diese Ladegeräte sind ausschließlich zum Laden von
STANLEYFATMAX-Akkus bestimmt. Eine anderweitige
Verwendung kann zu Brand führen oder gefährliche oder
tödliche Verletzungen durch Stromschlagverursachen.
• Setzen Sie das Ladegerät weder Regen noch Schneeaus.
• Ziehen Sie am Stecker und nicht am Kabel, wenn Sie das
Ladegerät von der Steckdose trennen. Dadurch wird das
Risiko einer Beschädigung von Stecker und Kabelreduziert.
• Stellen Sie sicher, dass das Kabel so verlegt wird, dass
nicht darauf getreten bzw. darüber gestolpert oder es
anderweitig beschädigt oder belastetwird.
• Verwenden Sie kein Verlängerungskabel, wenn es
nicht unbedingt erforderlich ist. Ein ungeeignetes
Verlängerungskabel kann zu Brand führen oder
gefährliche oder tödliche Verletzungen durch einen
Stromschlagverursachen.
• Stellen Sie keine Gegenstände auf das Ladegerät
bzw. stellen Sie das Ladegerät nicht auf eine weiche
Oberfläche. Dadurch könnten die Lüftungsschlitze
blockiert und das Gerät überhitzt werden. Stellen Sie das
Ladegerät von Hitzequellen entfernt auf. Das Ladegerät ist
oben und unten am Gehäuse mit Lüftungsschlitzenversehen.
• Betreiben Sie das Ladegerät nicht mit beschädigtem
Kabel oder Stecker – lassen Sie die Teile ggf.
sofortaustauschen.
• Benutzen Sie das Ladegerät nicht, wenn es einen
harten Stoß erlitten hat, fallen gelassen oder
anderweitig beschädigt wurde. Bringen Sie es zu einer
autorisiertenKundendienststelle.
• Das Ladegerät darf nicht zerlegt werden. Bringen Sie
es zu einer autorisierten Kundendienststelle, wenn es
gewartet oder repariert werden muss. Ein unsachgemäßer
Zusammenbau kann gefährliche oder tödliche Verletzungen
durch Stromschlag verursachen oder zu Brandführen.

18
DEUTSCH
• Zur Vermeidung von Gefahren muss ein beschädigtes
Netzkabel unverzüglich vom Hersteller, einer
Kundendienststelle oder einer anderen qualifizierten Person
ausgetauschtwerden.
• Trennen Sie das Ladegerät von der Steckdose, bevor Sie
es reinigen. Dadurch wird das Risiko eines Stromschlags
reduziert. Durch alleiniges Herausnehmen des Akkus wird
dieses Risiko nichtreduziert.
• Versuchen Sie NIEMALS, zwei Ladegeräte miteinander
zuverbinden.
• Das Ladegerät ist für den Betrieb mit einer
230V-Haushaltsstromversorgung ausgelegt. Es darf mit
keiner anderen Spannung verwendet werden. Dies gilt
nicht für dasFahrzeugladegerät.
Laden des Akkus (Abb.B)
1. Stecken Sie das Ladegerät in eine geeignete Steckdose,
bevor Sie das Akkupackeinsetzen.
2. Legen Sie das Akkupack
7
in das Ladegerät ein und
vergewissern Sie sich, dass es vollständig eingerastet ist. Die
rote Leuchte (Aufladen) blinkt wiederholt und zeigt dadurch
an, dass der Ladevorgang begonnenwurde.
3. Der Abschluss des Ladevorgangs wird dadurch angezeigt,
dass das rote Licht dauerhaft leuchtet. Der Akku ist
vollständig aufgeladen und kann jetzt verwendet oder in
der Ladestation gelassen werden. Um das Akkupack aus
dem Ladegerät zu entnehmen, drücken Sie den Akku-
Löseknopf
8
amAkkupack.
Hinweis: Um die maximale Leistung und Lebensdauer der
Li-Ionen-Akkus zu gewährleisten, laden Sie das Akkupack vor
der ersten Verwendung vollständigauf.
Bedienung des Ladegeräts
Siehe Anzeigen unten zum Ladezustand derAkkus.
Anzeigen am Ladegerät
Laden
Vollständig aufgeladen
Verzögerung heißer/kalter Akku*
* Die rote Leuchte blinkt in der Zeit weiter, aber eine gelbe
Anzeige leuchtet bei diesem Vorgang dauerhaft. Sobald der
Akku eine angemessene Temperatur erreicht hat, geht die
gelbe Leuchte aus und das Ladegerät nimmt den Ladevorgang
wiederauf.
Diese/s kompatible/n Ladegerät/e lädt keine defekten Akkus
auf. Das Ladegerät zeigt einen defekten Akku an, indem es nicht
leuchtet oder indem das Blinkmuster für Probleme mit dem
Akku oder dem Ladegerät angezeigtwerden.
HINWEIS: Dies kann auch auf ein Problem mit dem
Ladegeräthinweisen.
Wenn das Ladegerät auf ein Problem hinweist, bringen
Sie es zusammen mit dem Akku zur Überprüfung zu einer
autorisiertenServicestelle.
Verzögerung heißer/kalter Akku
Wenn das Ladegerät erkennt, dass ein Akku zu heiß oder zu kalt
ist, startet es automatisch eine "Verzögerung heißer/kalter Akku",
bis der Akku eine angemessene Temperatur erreicht hat. Das
Ladegerät schaltet dann automatisch in den Lademodus. Diese
Funktion gewährleistet eine maximale Lebensdauer desAkkus.
Ein kalter Akku wird mit einer geringeren Geschwindigkeit
geladen als ein warmer Akku. Der Akku wird während des
gesamten Ladevorgangs mit der geringeren Geschwindigkeit
geladen, die sich auch nicht erhöht, wenn der Akku
wärmerwird.
Wandmontage
Diese Ladegeräte sind so konzipiert, dass sie an der Wand oder
aufrecht auf einem Tisch oder einer Arbeitsoberfläche montiert
werden. Positionieren Sie das Ladegerät bei Wandmontage
in Reichweite einer Steckdose und abseits von Kanten oder
anderen Hindernissen, die den Luftstrom beeinträchtigen
könnten. Nutzen Sie die Rückseite des Ladegeräts als Schablone
für die Position der Montageschrauben an der Wand.
Montieren Sie das Ladegerät mit Schnellbauschrauben (separat
erhältlich), die mindestens 25,4mm lang sind und einen
Schraubenkopfdurchmesser von 7-9mm haben. Diese müssen
in optimaler Tiefe in das Holz geschraubt werden, sodass ca.
5,5mm der Schraube frei liegen. Richten Sie die Schlitze auf der
Rückseite des Ladegeräts mit den frei liegenden Schrauben aus,
und führen Sie diese vollständig in die Schlitzeein.
Anweisungen zur Reinigung des Ladegeräts
WARNUNG: Stromschlaggefahr. Trennen
Sie das Gerät vor der Reinigung von der Steckdose.
Schmutz und Fett können mit einem Tuch oder einer
weichen, nicht-metallischen Bürste vom Äußeren des
Ladegeräts entfernt werden. Keinesfalls Wasser oder
irgendwelche Reinigungslösungen verwenden. Achten
Sie darauf, dass niemals Flüssigkeiten in das Gerät
eindringen. Tauchen Sie niemals irgendein Teil des Gerätes
in eineFlüssigkeit.
Akkus
Wichtige Sicherheitsvorschriften für alle Akkus
Achten Sie bei der Bestellung von Ersatzakkus darauf,
Katalognummer und Spannunganzugeben.
Der Akku ist bei der Lieferung nicht vollständig aufgeladen.
Lesen Sie die folgenden Sicherheitsvorschriften, bevor Sie den
Akku und das Ladegerät verwenden. Befolgen Sie dann die
beschriebenenLadeverfahren.
LESEN SIE SÄMTLICHE ANWEISUNGEN
• Laden oder verwenden Sie Akkus nicht in
explosionsgefährdeten Umgebungen, in denen sich z.B.
brennbare Flüssigkeiten, Gase oder Staub befinden.
Beim Einsetzen und Herausnehmen des Akkus aus dem
Ladegerät können sich Staub oder Dämpfeentzünden.
• Setzen Sie Akkus niemals mit Gewalt in das Ladegerät
ein. Nehmen Sie an Akkus keine Veränderungen vor,
damit sie in ein nicht kompatibles Ladegerät passen;
Sidan laddas...
Sidan laddas...
Sidan laddas...
Sidan laddas...
Sidan laddas...
Sidan laddas...
Sidan laddas...
Sidan laddas...
Sidan laddas...
Sidan laddas...
Sidan laddas...
Sidan laddas...
Sidan laddas...
Sidan laddas...
Sidan laddas...
Sidan laddas...
Sidan laddas...
Sidan laddas...
Sidan laddas...
Sidan laddas...
Sidan laddas...
Sidan laddas...
Sidan laddas...
Sidan laddas...
Sidan laddas...
Sidan laddas...
Sidan laddas...
Sidan laddas...
Sidan laddas...
Sidan laddas...
Sidan laddas...
Sidan laddas...
Sidan laddas...
Sidan laddas...
Sidan laddas...
Sidan laddas...
Sidan laddas...
Sidan laddas...
Sidan laddas...
Sidan laddas...
Sidan laddas...
Sidan laddas...
Sidan laddas...
Sidan laddas...
Sidan laddas...
Sidan laddas...
Sidan laddas...
Sidan laddas...
Sidan laddas...
Sidan laddas...
Sidan laddas...
Sidan laddas...
Sidan laddas...
Sidan laddas...
Sidan laddas...
Sidan laddas...
Sidan laddas...
Sidan laddas...
Sidan laddas...
Sidan laddas...
Sidan laddas...
Sidan laddas...
Sidan laddas...
Sidan laddas...
Sidan laddas...
Sidan laddas...
Sidan laddas...
Sidan laddas...
Sidan laddas...
Sidan laddas...
Sidan laddas...
Sidan laddas...
Sidan laddas...
Sidan laddas...
Sidan laddas...
Sidan laddas...
Sidan laddas...
Sidan laddas...
Sidan laddas...
Sidan laddas...
Sidan laddas...
Sidan laddas...
Sidan laddas...
Sidan laddas...
Sidan laddas...
Sidan laddas...
Sidan laddas...
Sidan laddas...
Sidan laddas...
Sidan laddas...
Sidan laddas...
Sidan laddas...
Sidan laddas...
Sidan laddas...
Sidan laddas...
Sidan laddas...
Sidan laddas...
Sidan laddas...
Sidan laddas...
Sidan laddas...
Sidan laddas...
Sidan laddas...
Sidan laddas...
Sidan laddas...
Sidan laddas...
Sidan laddas...
Sidan laddas...
Sidan laddas...
Sidan laddas...
Sidan laddas...
Sidan laddas...
Sidan laddas...
Sidan laddas...
Sidan laddas...
Sidan laddas...
Sidan laddas...
-
 1
1
-
 2
2
-
 3
3
-
 4
4
-
 5
5
-
 6
6
-
 7
7
-
 8
8
-
 9
9
-
 10
10
-
 11
11
-
 12
12
-
 13
13
-
 14
14
-
 15
15
-
 16
16
-
 17
17
-
 18
18
-
 19
19
-
 20
20
-
 21
21
-
 22
22
-
 23
23
-
 24
24
-
 25
25
-
 26
26
-
 27
27
-
 28
28
-
 29
29
-
 30
30
-
 31
31
-
 32
32
-
 33
33
-
 34
34
-
 35
35
-
 36
36
-
 37
37
-
 38
38
-
 39
39
-
 40
40
-
 41
41
-
 42
42
-
 43
43
-
 44
44
-
 45
45
-
 46
46
-
 47
47
-
 48
48
-
 49
49
-
 50
50
-
 51
51
-
 52
52
-
 53
53
-
 54
54
-
 55
55
-
 56
56
-
 57
57
-
 58
58
-
 59
59
-
 60
60
-
 61
61
-
 62
62
-
 63
63
-
 64
64
-
 65
65
-
 66
66
-
 67
67
-
 68
68
-
 69
69
-
 70
70
-
 71
71
-
 72
72
-
 73
73
-
 74
74
-
 75
75
-
 76
76
-
 77
77
-
 78
78
-
 79
79
-
 80
80
-
 81
81
-
 82
82
-
 83
83
-
 84
84
-
 85
85
-
 86
86
-
 87
87
-
 88
88
-
 89
89
-
 90
90
-
 91
91
-
 92
92
-
 93
93
-
 94
94
-
 95
95
-
 96
96
-
 97
97
-
 98
98
-
 99
99
-
 100
100
-
 101
101
-
 102
102
-
 103
103
-
 104
104
-
 105
105
-
 106
106
-
 107
107
-
 108
108
-
 109
109
-
 110
110
-
 111
111
-
 112
112
-
 113
113
-
 114
114
-
 115
115
-
 116
116
-
 117
117
-
 118
118
-
 119
119
-
 120
120
-
 121
121
-
 122
122
-
 123
123
-
 124
124
-
 125
125
-
 126
126
-
 127
127
-
 128
128
-
 129
129
-
 130
130
-
 131
131
-
 132
132
-
 133
133
-
 134
134
-
 135
135
-
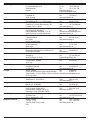 136
136


Stanley SFMCSTB963 Bruksanvisning
- Kategori
- Grästrimmare
- Typ
- Bruksanvisning
- Denna manual är också lämplig för
på andra språk
- italiano: Stanley SFMCSTB963 Manuale del proprietario
- español: Stanley SFMCSTB963 El manual del propietario
- Deutsch: Stanley SFMCSTB963 Bedienungsanleitung
- português: Stanley SFMCSTB963 Manual do proprietário
- français: Stanley SFMCSTB963 Le manuel du propriétaire
- English: Stanley SFMCSTB963 Owner's manual
- dansk: Stanley SFMCSTB963 Brugervejledning
- suomi: Stanley SFMCSTB963 Omistajan opas
- Nederlands: Stanley SFMCSTB963 de handleiding
Relaterade papper
-
Stanley FATMAX SFMCST933 Bruksanvisning
-
-
-
-
-
-
-
Stanley SFMCHT855 Bruksanvisning
-
-