
KABA2
INSTALLATION
AND OPERATING
MANUAL
A NEW GENERATION THAT TURNS EVOLUTION INTO A REVOLUTION CLASS I – 230V & 400V – 50 HZ
INSTALLATION
OCH
BRUKSANVISNING
EN NY GENERATION SOM FÖRVANDLAR EVOLUTIONEN TILL EN REVOLUTION KLASS I - 230V & 400V - 50 HZ
INSTALLASJON
OG
BRUKSANVISNING
EN NY GENERASJON SOM GJØR EVOLUSJON TIL EN REVOLUSJON SKLASSE I – 230V & 400V – 50 HZ
INSTALLATIONS-
OG
BETJENINGSVEJLEDNING
EN NY GENERATION, DER GÅR EVOLUTION TIL EN REVOLUTION KLASSE I – 230V & 400V – 50 HZ
ASENNUS-
JA
K
Ä
YTT
Ö
OHJE
UUSI SUKUPOLVI, JOKA MUUTTAA EVOLUUTIOSTA VALLANKKUUKSEN CLASS I – 230V – 50 HZ
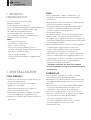
GB
1

1
2
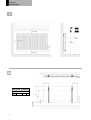
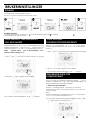
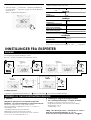
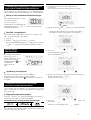
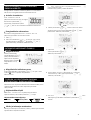
A
H
(mm)
A
(mm)
B
(mm)
C
(mm)
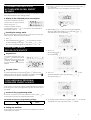
300
100 - 150
46
173
500
100 - 150
46
373
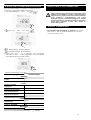
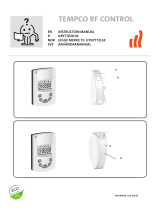
PRODUCT
INFORMATION
2

2B
2C
PRODUCT
INFORMATION
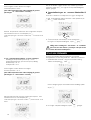
3

3
NO
PRODUCT
INFORMATION
4

SAFETY
INFORMATION
Due to the safety standard EN 60335,
the text below is obligatory for all electric
products, not only radiators.
This appliance can be used by children
aged from 8 years and above and persons
with reduced physical, sensory or mental
capabilities or lack of experience and
knowledge if they have been given
supervision or instruction concerning
use of the appliance in a safe way and
understand the hazards involved. Children
shall not play with the appliance. Cleaning
and user maintenance shall not be made
by children unless they are older than 8
and supervised. Keep the appliance and
its cord out of reach of children aged less
than 8 years. Children of less than 3 years
should be kept away from the unit unless
continuously supervised. Children aged
from 3 years and less than 8 years shall
only switch on/off the appliance provided
that it has been placed or installed in its
normal operating position and they have
been given supervision or instruction
concerning use of the appliance in a safe
way and understand the hazards involved.
Children aged from 3 years and less than 8
years shall not plug in, regulate and clean
the appliance or perform user maintenance.
CAUTION
THIS PRODUCT MUST NOT BE INSTALLED IN A BATHROOM OR OTHER
SIMILAR HIGH HUMIDITY AREA.
CAUTION
SOME PARTS OF THIS PRODUCT CAN BECOME VERY HOT AND CAUSE BURNS.
PARTICULAR ATTENTION HAS TO BE GIVEN WHERE CHILDREN AND VULNERABLE
PEOPLE ARE PRESENT. IN ORDER TO AVOID OVERHEATING, DO NOT COVER THE
RADIATOR. ”DO NOT COVER” MEANS THAT THE RADIATOR MUST NOT BE USED
FOR DRYING CLOTHES, FOR EXAMPLE, BY PLACING THEM DIRECTLY ON THE
RADIATOR.
WASTE DISPOSAL ACCORDING TO WEEE DIRECTIVE
(2012/19/EU)
WASTE DISPOSAL ACCORDING TO THE WEEE DIRECTIVE (2012/19/EU). THE SYMBOL
ON THE PRODUCT LABEL INDICATES THAT THE PRODUCT MAY NOT BE HANDLED AS
DOMESTIC WASTE, BUT MUST BE SORTED SEPARATELY. WHEN IT REACHES THE END OF
ITS USEFUL LIFE, IT SHALL BE RETURNED TO A COLLECTION FACILITY FOR ELECTRICAL
AND ELECTRONIC PRODUCTS. BY RETURNING THE PRODUCT, YOU WILL HELP TO
PREVENT POSSIBLE NEGATIVE EFFECTS ON THE ENVIRONMENT AND HEALTH TO
WHICH THE PRODUCT CAN CONTRIBUTE IF IT IS DISPOSED OF AS ORDINARY DOMESTIC
WASTE. FOR INFORMATION ABOUT RECYCLING AND COLLECTION FACILITIES, YOU
SHOULD CONTACT YOUR LOCAL AUTHORITY/MUNICIPALITY OR REFUSE COLLECTION
SERVICE OR THE BUSINESS FROM WHICH YOU PURCHASED THE PRODUCT. APPLICABLE
TO COUNTRIES WHERE THIS DIRECTIVE HAS BEEN ADOPTED.
GB
GB
GB
GB
5
GB
SAFETY
INFORMATION

1.
GENERAL
INFORMATION
•
This appliance is a sealed electric radiator.
•
This appliance conforms to the standards EN 60335-1
and EN 60335-2-30.
•
This appliance is insulation class I and has electrical
protection level IP21.
•
This appliance complies with the European Directive
2014/30/EU (CE Marking on all appliances).
•
KABA2:
-
for wall mounting or freestanding positioning.
-
230 V – 50 Hz supply.
-
Supplied with 3 core cable and fitted with an earthed
plug, wall brackets and screws.
-
or 400 V – 50 Hz supply.
-
for wall mounting only.
-
Supplied with 3 core cable, wall brackets and screws.
2.
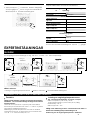
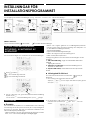
INSTALLATION
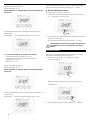
POSITIONING
•
The radiator must be positioned horizontally in order for
it to function correctly.
•
The radiator must be positioned according to the
applicable standards. The minimum distances as
specified in picture 1 should be carefully observed.
•
The radiator must be fixed to the wall using the wall
brackets supplied.
•
The radiator must not be located underneath an electrical
socket.
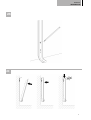
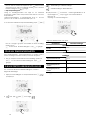
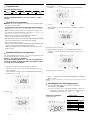
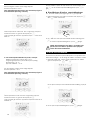
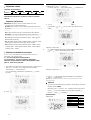
FIXING
•
Mark out the distance between the brackets and the
positions of the screw holes as shown in the table in
picture
2A
.
•
Note that the brackets can be used to measure the height of
the bottom fixing hole, see picture
2B
.
•
For
the correct installation of
radiators it is essential
that
the
fixing of the radiator is carried out in such a way that
it is suitable for intended use AND predictable misuse.
A number of elements need to be taken into consideration
including the fixing method used to secure the radiator
to the wall, the type and condition of the wall itself, and any
additional potential forces, or weights, prior to finalizing
installation.
•
The fixing materials provided are only intended for
installation on walls made of solid wood, bricks, concrete or
on timber-frame stud walls where the fixing is directly into
the timber. All walls being considered should have no more
than a maximum of 3 mm wall finishing. For walls made of
other materials, for example hollow bricks; please consult
your installer and/or specialist supplier.
In all cases it is strongly recommended that a suitably
qualified professional installer or similar tradesperson
carries out the installation.
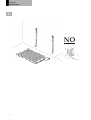
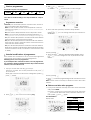
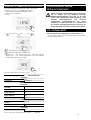
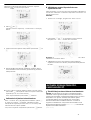
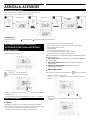
CONNECTION
•
The electrical installation must comply with local or
national regulations.
•
The radiator must be connected to the electrical supply
using the supply cable fitted to the unit.
•
The radiator is equipped with a non-resettable overheat
protection that trips off if the radiator overheats. If the
radiator is removed from the wall brackets, even for a
short time, it must without exception be switched off, see
picture
3
. This may even trip the non-resettable overheat
protection. If the overheat protection trips, its thermal fuse
must be replaced; contact your supplier.
6
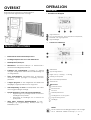
GB GENERAL
INFORMATION

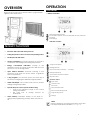
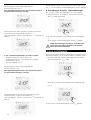
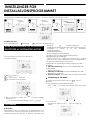
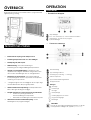
OVERVIEW
Electronic PlD control unit for electric radiator, programmable
digital control, white color.
PRODUCT PLUS POINTS
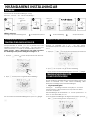
OPERATION
DIAGRAM
• Buttons
overview
Selecting operating modes
Plus and minus buttons, used to set temperatures, time, date and
programs
Save
settings
Indicator overview
Electronic PID control with microprocessor.
Setting temperature can be viewed in all operating modes.
Double
pole
ON/OFF
switch.
Gauge consumption:
Automatic indication of the level of
consumption
according to the setting temperature.
Energy consumption indication: posting of the
estimated
amount of energy consumed in kWh since the
last reset to 0 of
the energy meter.
Open window detection:
Automatic switching to frost
protection mode when the device detect a significant
drop in tem
perature.
7 day program: you have the option, for each day of
the week, of assigning five different program profiles.
Child anti-tamper: The control panel can be locked,
making changes impossible.
Special safety for social or private rental housing:
o
Limits of the adjustment range of the Comfort
setting tem
perature.
o
PIN code lock of settings reserved for
professionals.
Active
memory:
Permanent
backup
of
the
whole
of
settings
and programming, backup date and time of
3h.
Gauge
consumption
Heating
indicator
Days of the week (1=Monday … 7= Sunday)
Setting
temperature
Open window detection indicator
Keypad
locked
Operation
modes:
Auto
mode
Comfort
mode
Eco
mode
Frost protection mode
Time and date setting mode
Programming mode
Settings
Note
Before carrying out any setting procedures, ensure that
the keypad is indeed unlocked (see page 10).
7

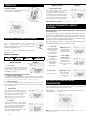
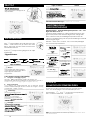
• Auto
mode
In Automatic Mode, the device will
automatically change from
Comfort
mode to Eco mode according to
the
established program.
3
• Frost protection mode
This mode enables you to protect
your home against the effects of
cold
weather
(frozen
pipes,
etc.),
by
maintaining a minimum temperature of
7°C in it at all times. Select this mode
when you will be away from your home
for a
long time (more than 5 days).
GAUGE CONSUMPTION, ENERGY
SAVINGS
SETTING THE COMFORT MODE
TEMPERATURE
POWER
ON
Mode
overview Display
Restoring factory settings
See pages 15, 17 and 20.
SELECTING THE OPERATING MODE
The button allows you to adapt the
operating
schedule of your device to your
needs, depend
ing on the season, whether your
home is occu
pied or not.
Press the button several times to select the
required mode.
Mode
sequence:
R
ecommended Comfort setting temperature should be lower
or
equal to 19°C.
In
the
device
display,
a
selector
indicates
the
energy
comsump-
tion level by positioning it in front of the color: red, orange or
green. So, depending on the setting temperature, you can
choose your level of energy usage. As the temperature setting
increases, the consumption will be higher.
The gauge appears in Auto, Comfort, Eco and Frost protection
modes and whatever the temperature level.
Mode
overview Display
2
different
cases
depending
on
your
set-up
:
A. 7 day and daily program
Your
device
has
been
programmed
and
is
executing
Comfort
and
Eco
mode orders in line with the settings and time periods you have selected
(see "7 day and daily program integrated" chapter page 10).
B. Without program
if the 7 day and daily program is not enabled, then your device’s
factory settings mean that it will operate in nonstop Comfort mode, 7
days of the week.
You can access the Comfort temperature set up from the Auto
and Comfort Mode. It is preset to 19°C.
Using
and
you can adjust the temperature from 7°C to
30°C by intervals of 0.5° C.
Note: you can limit the Comfort temperature, see page 14
for more details.
Auto
Comfort
Eco
Frost Protection
Power on switch
Set the switch in ON position in order
to power up the appliance.
3
• Comfort
mode
Non-stop Comfort mode. The device
will operate 24 hours a day to achieve
the temperature which has been set
(e.g. 19°C). The Comfort mode
temperature level can be set by the
user
(see Setting the comfort mode
temperature page 9).
• Eco
mode
Eco,
which
means
the
Comfort
Mode
temperature minus 3.5°C. This enables
you to lower the temperature
without
having to reset the Comfort Mode
tem
perature.
Select
this
mode
for
short term
absenc
es (between 2 and
24h) and during
the
night.
C - Red color
High Temperature
level: it is advisa
ble
to significantly
reduce the setting
temperature.
Setting
temp.
> 22°C
When the setting
temperature is
higher than 22°C
B -
Orange
color
Average
tempe
rature level: it
is
advisable
to slightly reduce
the setting
temper
ature.
19°C < Setting
Temp.
≤ 22°C
When the setting
temperature is
higher than 19°C
and lower or equal
to
22°C.
A - Green color
Setting temp. ≤ 19°C
When the setting
Ideal temperature. temperature is
lower or equal to
19°C
8

1-
From Auto, Comfort, Eco or Frost protection mode, press
for 5 seconds.
The cursor moves to the setting day and time mode.
It is possible to see the estimation of energy consumption in kWh
since the last reset of the energy meter.
Display of the estimated power consumption
To see this estimation, from Auto,
Comfort, Eco or Frost protection
mode, then press .
To exit the display mode of
consumption: press
or , the device is automatically in
the previous active mode.
2-
Select
using
or . The two hour figures will flash.
Resetting the energy meter
To reset the energy meter, from Auto, Comfort, Eco or Frost pro-
tection mode, then proceed as follows.
1-
Press
.
2-
Press
simultaneously
and
for more
than 5 seconds.
To exit resetting the energy meter, press or , the
de- vice is automatically in the previous active mode.
The hours will scroll quickly, if you press the or
and hold
them.
Save by pressing .
Keypad lock
To lock the keypad, press the
and buttons and hold
them down for 10 seconds. The
padlock symbol appears
on the display, the keypad is
locked.
3-
The two minute figures will flash.
Select
using or .
Save by pressing
.
Keypad
unlock
To unlock the keypad, press the and buttons and
hold
them down for 10 seconds again. The padlock symbol
disappears from the display, keypad is unlocked.
4-
The courser above the number 1 (which represents the
Monday) will flash. Select the day using or .
Seve by pressing .
1
In this mode, you have the option of programming your device,
by setting one of the five programmes on offer for each day of
the week.
Access to the programming mode
From Auto, Comfort, Eco or Frost protection mode, press
for
5 seconds to enter into the programming mode.
Schematic sequence of programming settings:
5-
To
change
and/or
allocate
programs
press
. To exit the
Setting day and time
In this mode, you can set day and time to program your device
in line with your needs.
setting the time and day mode, press
3 times.
1 2 3 4 5 6 7
3
Setting
time
Setting
day
Programmes
choice
1
5 sec.
7 DAY AND DAILY PROGRAM
INTEGRATED, ENERGY SAVINGS
CHILD ANTI-TAMPER,
KEYPAD LOCK/UNLOCK
CONSUMPTION INDICATION
ACCUMULATED IN KWH, ENERGY
SAVINGS
9

Choices
programmes
Schematic sequence of programmes:
Your
device’s
default
setting
is
non-stop
Comfort
for
7 days a
week.
3-
With
or , select P1.
P1 will flash. Press
for 5 seconds to make changes.
Programmes overview
-
Comfort:
your device will operate in Comfort mode, 24 hours a
day, as regards each day selected.
Note:
You can set the Comfort mode temperature to the tem-
perature you require (see Setting the comfort mode tempera-
ture page 9).
-
Eco: The device will operate 24 hours a day in Eco mode.
Note:
You can set the temperature-lowering parameters (see
Setting the Eco mode temperature lowering-level page 14).
-
P1: your device will operate in Comfort mode from 06:00 to
22:00 (and in Eco mode from 22:00 to 06:00).
-
P2: your device will operate in Comfort mode from 06:00 to
09:00 and from 16:00 to 22:00 (and in Eco mode from 09:00 to
16:00 and from 22:00 to 06:00).
-
P3: your device will operate in Comfort mode from 06:00 to
08:00, from 12:00 to 14:00 and from 18:00 to 23:00 (and in Eco
mode
from
23:00
to
06:00,
from
08:00
to
12:00
and
from
14:00
to 18:00).
Potential modifications of programmes
If the default time schedules for the P1, P2 and P3 programmes
does not suit your routines, you can change them.
Modifying the P1, P2 or P3 programmes.
If you modify the time schedules for the P1, P2 or P3 programmes,
the schedules will be modified for all the days of the week for
which P1, P2 or P3 had been set.
1-
If you just set the time and day, go to step 2.
From Auto, Comfort, Eco or Frost protection mode, press
for 5 seconds.
When the cursor moves above the setting time symbol ,
press shortly.
4-
The P1 start time (which by default is 06:00) will flash.
Using
or , you can change this time, by increments of
30 minutes.
Save by pressing .
5-
The P1 end time (which by default is 22:00) will flash. Using
or
, you can change this time, by increments of 30
minutes.
Save by pressing
.
2-
Press or
. The cursor moves above
prog
.
6-
Press to exit the programming Mode and return to Auto
Mode.
Note:
without action on the keys, it will return to Auto after a few
minutes.
Choices and allocation programs
1-
If you just set the time and day, the cursor moves automati-
cally under PROG.
From Auto, Comfort, Eco or Frost protection mode, then press
for 5 seconds. When the cursor positioned under the set
time symbol , press
again.
Prior
information:
display
area
Correspondence days /
numbers
Monday
1
Tuesday
2
Wednesday
3
Thursday
4
Friday
5
Saturday
6
Sunday
7
2
Comfort
Eco
P1
P2
P3
10

The days of the week will scroll on display with the programmes
that you set for them, meaning Comfort
every day.
Manual and temporary exemption from a running
program
This function allows you to change the Eco mode temperature
temporarily until the next scheduled change in temperature or
the transition to 0:00.
Example:
1-
The device is in Auto mode, the running programme is Eco
15,5°C.
2-
Press or .
The programme set for day 1 (1= Monday, 2 = Tuesday, etc.)
will flash.
2-
By pressing
or , you can change temporarily the de-
sired temperature up to 18°C for example.
3-
Chose the program you want for this day with
or .
Save by pressing
.
1 2
4-
The programme assigned to the second day of the week
(Tuesday) will flash.
Repeat the procedure described previously (in point 3) for
each day of the week.
Note:
The cursor corresponding to the operating mode, i.e Eco
mode in our example, is blinking during the duration of the tem-
porary
derogation.
3-
This change will be automatically cancelled at the next
change of program or transition to 0:00.
5-
Once you have chosen a programme for each day, confirm
your selection by pressing
.
The
days
of
the
week
will
suc-
cessively scroll on display with the programmes that you set
for them (P1, P2, P3, CONF or ECO).
To exit the Programming mode, press
twice.
Viewing the programs that you have selected
-
From
Auto,
Comfort,
Eco
or
Frost
protection
mode,
press
for 5 seconds. Press twice, the programme for each
day
of the week (Comfort, Eco, P1, P2 or P3) will scroll on
display in
front of you.
-
To exit the programme viewing mode, press twice.
Important information about the open window
detection
Important: the open window detection is sensitive to temper-
ature
variations.
The
device
will
react
to
the
window
openings
in accordance with different parameters: temperature setting,
rise and fall of temperature in the room, outside temperature,
location of the device...
If the device is located close to a front door, the detection
may be disturbed by the air caused by opening door. If this is a
problem,
we
recommend
that
you
disable
the
automatic
mode
open window detection (see page 16). You can, however, use
the manual activation (see page 13).
OPEN WINDOW DETECTION, ENERGY
SAVINGS
1
3
3
11

Overview
Lowering temperature cycle by setting frost protection dur-
ing
ventilation
of
a
room
by
opened
window.
You
can
access
the open window detection from the Comfort, Eco and Auto
modes. Two ways to enable the detector:
-
Automatic activation,
the lowering temperature cycle starts as
soon as the device detects a temperature change.
-
Manual activation,
the cycle of lowering temperature starts by
pressing a button.
Automatic activation (factory settings)
To disable this mode, see page 16.
The device detects a temperature fall. An opened window, a
door to the outside, can cause this temperature fall.
Note: The difference between the air from the inside and the
outside must cause a significant temperature fall
to be percep-
tible by the device.
This
temperature
drop
detection
triggers
the
change
to
Frost
Protection mode.
Manual
activation
By pressing for
more than 5 seconds,
the device will switch
on Frost protection
mode.
Principe
In Comfort, Eco and Frost protection modes,
only orders of the
open window sensor will be considered.
In Auto mode,
the device can receive different orders coming
from :
-
7 day and daily programming integrated (Comfort or Eco
orders);
-
Open window detector.
In general, it is the lowest received order which prevails.
If an open window is detecting, switching to frost protection takes
precedence
•
Example
7 day and daily programming
= Eco
Open window detector
= Frost protection
Frost
protection
Frost protection digital meter
When the device performs a lower temperature cycle due to
opened window, a meter appears on the display to show the
cycle time. The counter is automatically reset at the next
time to Frost protection by opened window (automatic or
manual activation).
Stop the Frost protection mode
By pressing one button, you stop the Frost protection mode.
Note: if a temperature rise is detected, the device may return
to
the previous mode (active mode before the open window
detection).
INFORMATION ABOUT PRIORITIES BE-
TWEEN THE DIFFERENT MODES
Legend
= the favored
location
= another location
12

1
Information
display
2
Information
display
User
= User settings
3
Press for 5
seconds
Press briefly
twice
Press briefly
1
1
SETTING THE ECO MODE TEMPERATURE
LOWERING-LEVEL
SETTING THE FROST PROTECTION
TEMPERATURE
COMFORT SETPOINT TEMPERATURE
LIMIT
USER
SETTINGS
ACCESS
You access to user settings in 3 steps:
From Auto, Comfort, Eco or Frost protection mode :
Setting
sequence:
Eco
mode
temperature
lowering-level
Frost
protection
temperature
Comfort
setting
temperature
limit
Temperature
unit
The drop in temperature is set at -3.5°C compared to the set
temperature of the Comfort mode. You can adjust the lowered
level from -1°C to -8°C, by intervals of 0.5°C.
Important: whatever the lowering level set, the Eco setting tem-
-
perature will never exceed 19°C.
1-
Press or
to obtain the temperature level you require.
2-
Press to save and move to the next setting.
To exit the user settings, press
twice.
Your device is preset at 7°C. You can adjust the Frost protection
temperature from 5°C to 15°C, by intervals of 0.5°C.
3-
Press or to obtain the temperature you require.
4-
Press
to save and move to the next setting.
To exit the user settings, press
twice.
You can limit the setting temperature range by introducing a
maximum and / or minimum setting, preventing unintentional
changes in temperature.
•
Low temperature limit
Locking of the setting range using a minimum temperature stop,
preventing
the
temperature
from
being
set
below
that
temper-
ature.
The minimum setting is preset to 7°C. You can adjust from 7°C to
15°C by intervals of 1°C.
5-
To change the minimum temperature setting, press or
then save by pressing .
1 2
13

5
sec.
If you do not want to change it, press : the device
chang
es automatically to set the maximum setting. To exit
the user
settings, press twice.
•
High temperature limit
Locking of the setting range using a maximum temperature in-
crease, preventing the temperature from being set above that
temperature.
The maximum setting is preset to 30°C. You can adjust from 19°C
to 30°C by intervals of 1°C.
6-
To change the maximum temperature setting, press
or
.
To save and move automatically to the next setting, press
. To exit the user settings, press
twice.
SETTING THE TEMPERATURE UNIT
The pre-set temperature unit is degrees Celsius. This setting can-
not be changed on this version.
=
Factory settings reset
=
Factory settings not reset
3-
Press the key
for 5 seconds. The device returns to its initial
configuration and
goes
back
automatically
to
the
home
dis-
play of the user settings.
The following factory values will be effective:
Operating
User settings
7-
To move automatically to the next setting, press .
To exit the user settings, press twice.
RESTORING FACTORY SETTINGS
In order to a coming back to factory settings, proceed in the
following order:
1-
From the setting of the temperature unit, press .
appears on the display
.
Press
to exit the
user
settings.
2-
appears.
Press
or to select .
Parameters
Factory
settings
Comfort setting
temperature
19°C
Keypad
lock Disabled
Eco mode temperature
lowering-level
-
3,5°C
Frost protection temperature
7°C
Minimum set of Comfort
setting temperature 7°C
Maximum set of Comfort
setting temperature 30°C
Temperature
unit °C
14

1
Information
display
2
Information
displays
3
InSt = Installer settings
4
Press for 5
seconds
1
Press briefly
twice
1
Press
for
10
seconds
Press briefly
INSTALLER SETTINGS
ACCESS
You access to installer settings in 4 steps:
From Auto, Comfort, Eco or Frost protection mode :
Setting
sequence:
Open window detection
PIN code lock
Restoring factory settings
-
Minimum and maximum Limits of the setting temperature
range (the Comfort temperature modification is forbidden out
of the authorised setting range).
- Programming
mode.
- Open window detection settings.
- Setting the Eco mode temperature lowering-level.
The automatic mode enabled is the default setting.
1-
Press or .
=
automatic mode enabled.
=
automatic mode disabled.
2-
To save and move automatically to the next setting, press
. To exit the user settings, press
3 times.
PIN CODE LOCK
Overview
Your heating device is protected by a safety code against
nonauthorized use. The PIN code (Personal Identity Number) is a
customisable 4 numbers code. When enabled, it prevents
access to the following settings:
-
Selecting the Comfort mode : The access to the Comfort mode
is forbidden, only the Auto, Eco and Frost protection modes
are available.
- Setting the Frost protection temperature.
3 important steps are needed for the first use of the PIN code
lock:
1 - PIN code initialisation, enter the pre-set PIN code (0000)
to
access to the feature.
2 - Activation of the PIN Code to lock settings which will be
protected by the PIN code.
3 - Customizing the PIN code, replace 0000 by the customized
code.
PIN code initialisation
By default, the PIN code is not enabled. appears on the
display.
1-
By default registered PIN code is 0000.
Press or
to select 0. It is blinking. Save by pressing .
1 2
2-
For others numbers, select 0 by press .
When 0000 appears, press on
again to save and exit.
OPEN WINDOW DETECTION,
ACTIVATION/ DEACTIVATION OF THE
AUTO MODE
15

The PIN code is initialized, the next setting automatically appears:
PIN Code activation.
Activation/deactivation of the PIN Code
1-
appears
on
the
display.
Press
or
to enable
PIN
code.
appears
on
the
display.
=
PIN code enabled
=
PIN code disabled
3-
Press
to confirm. The new code is now saved.
4-
Press again on to exit setting PIN code mode and go
back to the home display of the installer settings.
2-
Press to save and return to the home installer settings
display.
The PIN code is enabled. Any modification of reserved settings
listed in "Overview" is now impossible.
Customizing the PIN code
If you have just activated the PIN code, follow the stages de-
scribed below.
Alternatively, you must copy the steps 1 and 2 of the initialization
process as well as the steps 1 and 2 of the activation process
before personalizing the PIN code.
Please remember that the personalization of the PIN code can
only be set once the initialization and activation of the PIN code
has been completed.
1-
When appears, press
for at least 5 seconds.
To exit the Installer settings, press
twice.
RESTORING FACTORY SETTINGS
If the PIN code protection is disabled, the user and installer settings
are re-initialized:
1-
From the PIN code setting, press . appears
briefly on the display.
2-
appears.
Press
or to select .
2-
The
0000
code
appears
and
the
first
number
blinks.
Press
or
to select the first desired number then press
to
save
and exit. Repeat this operation
for remaining
3 numbers.
=
Factory settings reset
=
Factory settings not reset
16

5
sec.
1
Information
display
2
Information
displays
3
Press for 5
seconds
1
Press briefly
twice
1
Press
for
10
seconds
Information
display
4
Pro
=
Expert
settings
5
Long
and
simultaneous
10
seconds press
Press briefly
3-
Press the key for 5 seconds. The device returns to its initial
configuration and goes back automatically to the home dis-
play of the installer settings.
The following factory values will be effective:
Operating
User settings
Installer
settings
To exit the installer settings, press
twice.
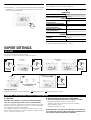
EXPERT
SETTINGS
ACCESS
You access to expert settings in 5 steps.
From Auto, Comfort, Eco or Frost protection mode :
Setting
sequence:
Ambient temperature sensor adjustment
Setting the power
Restoring factory settings
AMBIENT TEMPERATURE SENSOR ADJUSTEMENT
Overview
Important:
This
operation
is
reserved
for
professional
installers
only; any wrong changes would result in control anomalies.
In which case if the temperature measured (measured by relia-
ble
thermometer)
is
different
by
at
least
1°C
or
2°C
compared
to
the setting temperature of the radiator.
The calibration adjusts the temperature measured by the am-
bient temperature sensor to compensate for a deviation from +
5°C to - 5°C by intervals of 0.1°C.
Ambient
temperature
sensor
adjustment
1-
If the room temperature difference is negative, example :
Setting temperature (what you want) = 20°C.
Ambient temperature (what you read on a reliable
thermometer) = 18°C.
Difference measured = -2°C.
Important:
Before carrying out the calibration it is recommend-
ed
to wait for 4h after the setting temperature modification to
insure that the ambient temperature is stabilized.
Settings
Factory
settings
Comfort
setting
temperature
19°C
Keypad
lock
Disabled
Eco mode
temperature
lowering-
level
-
3,5°C
Frost protection temperature
7°C
Minimum set of Comfort
setting temperature
7°C
Maximum set of Comfort
setting temperature
30°C
Temperature
unit
°C
Automatic open window
detection Enabled
PIN code protection
Disabled
Value
of
the
PIN
code
0000
17

3 sec
.
To correct, then proceed as follows :
Sensor temperature = 24°C
(The measured temperature may be different due to the loca-
tion of the thermostat in the room).
Decrease the temperature measured by the ambient tempera-
ture sensor by 2°C by pressing .
In our example the measured temperature by the sensor goes
from 24°C to 22°C.
To validate, save the new value and exit the mode, press . To
exit the Expert settings, press 3 times.
The reset
to
zero of the
sensor
calibration
To put the value of the correction to "0", do the following :
1-
When the temperature measured by the sensor appears,
press or for at least 3 seconds.
2-
To
save
and
move
automatically
to
the
next
setting
press .
To exit the Expert settings, press
3 times.
Important: These changes should be performed by
a
qualified staff, it should be performed in production or
on site during the first installation
SETTING THE POWER
2- If the room temperature difference is positive, example :
Setting temperature (what you want) = 19°C.
Ambient temperature (what you read on a reliable
thermometer) = 21°C.
Difference measured = +2 °C.
To correct, then proceed as follows :
Sensor temperature= 21°C.
(The measured temperature may be different due to the loca-
tion of the thermostat in the room).
To have a controller adapted to the radiator and estimate the
energy consumed, it is essential to set the power of the device.
1-
Pre-set value: 0W. Select a value between 0W and 1250W by
pressing or .
Increase the temperature measured by the ambient tempera-
ture sensor by 2°C by pressing .
In our example the measured temperature by the sensor goes
from 21°C to 23°C.
To
save
and
move
automatically
to
the
next
setting
press .
2-
To save the Expert settings, press
3 times.
18

5
sec
.
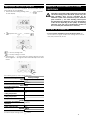
RESTORING FACTORY SETTINGS
If the PIN code protection is disabled, the user, installer and ex-
pert settings are re-initialized:
1-
From the Power setting setting, press . appears
on the display. Important : The power supply of the device should be
cut when working on the electrical system only. The
load shedding does not be operated by an
additional system with mechanized power shutdown
(with contac
tor…). The load shedding with frequent
mechanized power shutdowns can cause deterioration
of
the
device
depending
of
the quality of switching
elements used. This type of deterioration would not
be covered by the manufacturer’s warranty.
IN CASE OF POWER CUT
2-
appears.
Press
or
to select
.
- In case of power shutdown or power off by the switch,
the
clock must be set again. All the other settings are automati-
cally and permanently saved.
=
Factory settings reset
=
Factory settings not reset
3-
Press the key for 5 seconds. The device returns to its ini-
tial configuration and goes back automatically to the Auto
mode.
The following factory values will be effective:
Operating
User
settings
Installer
settings
Experts
settings
To exit the Expert settings, press
3 times.
REMOTELY MANAGEMENT BY POWER
SHUTDOWN
Settings
Factory
settings
Comfort setting
temperature
19°C
Keypad
lock
Disabled
Eco mode
temperature
lowering-
level
-
3,5°C
Frost protection temperature
7°C
Minimum set of Comfort
setting temperature
7°C
Maximum set of Comfort
setting temperature
30°C
Temperature
unit
°C
Automatic open window
detection Enabled
PIN code protection
Disabled
Value
of
the
PIN
code
0000
Power
0W
19

5.
MAINTENANCE,
REPAIR AND DISPOSAL
•
WARNING: Disconnect electrical supply before carrying
out any maintenance activity.
•
The product can be cleaned using a soft damp cloth.
Do NOT use chemical or abrasive cleaners as they will
damage the surface finish.
•
The radiator is equipped with an overheat protection
that cannot be reset (melt fuse). This overheat protection
disconnects the current if the radiator becomes too hot
(e.g. when covered) or if, when freestanding, is knocked
over and left in this position.
•
If the supply cord is damaged, it must be replaced by
the manufacturer, his service agent or similar qualified
persons in order to avoid a hazard.
•
The radiator is filled with an exact amount of
environmental friendly vegetable oil. Any repairs that
require the radiator to be opened shall therefore only
be carried out by the manufacturer or his approved
agent. Please contact the manufacturer or his agent
in case of leakage.
•
When scrapping the radiator, follow the regulations
concerning the disposal of oil.
6.
WARRANTY
The product is covered by a 10 year warranty except for
the electrical and electronic components that are covered
by a 2 year warranty.
7.
TECHNICAL
CHARACTERISTICS
ENVIRONMENTAL
CONDITIONS:
-
Operating
temperature
-
Storage temperature
-30°C to +50°C
-30°C to +70°C
SETTING TEMPERATURE RANGE
-
Comfort mode
-
Frost protection mode
+5°C to +30°C
+7°C
ELECTRICAL INSULATION
Class I
ELECTRICAL
PROTECTION
IP
21
POWER SUPPLY
230 VAC – 50 Hz or 400
VAC - 50 Hz according to the
product rating label.
DIRECTIVES & STANDARDS:
The product has been designed
to comply with the following
Directives and Standards.
20
• EN 60730-1
• EN 60335-1
• EN 60335-2-30
• EN 62233
• EN 55014-1
• EN 55014-2
• EN 61000-3-2
• EN 61000-3-3
• EN 60529
• LV Directive 2014/35/EU
•EMC Directive 2014/30/EU
•RoHS Directive 2011/65/EU
•ECO Directive 2015/1188
GB GENERAL
INFORMATION
Sidan laddas ...
Sidan laddas ...
Sidan laddas ...
Sidan laddas ...
Sidan laddas ...
Sidan laddas ...
Sidan laddas ...
Sidan laddas ...
Sidan laddas ...
Sidan laddas ...
Sidan laddas ...
Sidan laddas ...
Sidan laddas ...
Sidan laddas ...
Sidan laddas ...
Sidan laddas ...
Sidan laddas ...
Sidan laddas ...
Sidan laddas ...
Sidan laddas ...
Sidan laddas ...
Sidan laddas ...
Sidan laddas ...
Sidan laddas ...
Sidan laddas ...
Sidan laddas ...
Sidan laddas ...
Sidan laddas ...
Sidan laddas ...
Sidan laddas ...
Sidan laddas ...
Sidan laddas ...
Sidan laddas ...
Sidan laddas ...
Sidan laddas ...
Sidan laddas ...
Sidan laddas ...
Sidan laddas ...
Sidan laddas ...
Sidan laddas ...
Sidan laddas ...
Sidan laddas ...
Sidan laddas ...
Sidan laddas ...
Sidan laddas ...
Sidan laddas ...
Sidan laddas ...
Sidan laddas ...
Sidan laddas ...
Sidan laddas ...
Sidan laddas ...
Sidan laddas ...
Sidan laddas ...
Sidan laddas ...
Sidan laddas ...
Sidan laddas ...
Sidan laddas ...
Sidan laddas ...
Sidan laddas ...
Sidan laddas ...
Sidan laddas ...
Sidan laddas ...
Sidan laddas ...
Sidan laddas ...
Sidan laddas ...
Sidan laddas ...
Sidan laddas ...
Sidan laddas ...
-
 1
1
-
 2
2
-
 3
3
-
 4
4
-
 5
5
-
 6
6
-
 7
7
-
 8
8
-
 9
9
-
 10
10
-
 11
11
-
 12
12
-
 13
13
-
 14
14
-
 15
15
-
 16
16
-
 17
17
-
 18
18
-
 19
19
-
 20
20
-
 21
21
-
 22
22
-
 23
23
-
 24
24
-
 25
25
-
 26
26
-
 27
27
-
 28
28
-
 29
29
-
 30
30
-
 31
31
-
 32
32
-
 33
33
-
 34
34
-
 35
35
-
 36
36
-
 37
37
-
 38
38
-
 39
39
-
 40
40
-
 41
41
-
 42
42
-
 43
43
-
 44
44
-
 45
45
-
 46
46
-
 47
47
-
 48
48
-
 49
49
-
 50
50
-
 51
51
-
 52
52
-
 53
53
-
 54
54
-
 55
55
-
 56
56
-
 57
57
-
 58
58
-
 59
59
-
 60
60
-
 61
61
-
 62
62
-
 63
63
-
 64
64
-
 65
65
-
 66
66
-
 67
67
-
 68
68
-
 69
69
-
 70
70
-
 71
71
-
 72
72
-
 73
73
-
 74
74
-
 75
75
-
 76
76
-
 77
77
-
 78
78
-
 79
79
-
 80
80
-
 81
81
-
 82
82
-
 83
83
-
 84
84
-
 85
85
-
 86
86
-
 87
87
-
 88
88


på andra språk
- eesti: Purmo Kaba2 paigaldusjuhend
- English: Purmo Kaba2 Installation guide
- dansk: Purmo Kaba2 Installationsvejledning
Relaterade papper
Andra dokument
-
OJ Electronics OCC4 Användarmanual
-
Uponor I-35 Användarmanual
-
Panasonic CUNZ50VKE Bruksanvisningar
-
MILL GENTLE AIR 1500W OLJEOVN, HVIT Användarmanual
-
Panasonic CUHZ25UKE Bruksanvisningar
-
-
Regin OPTIGO OP10 Bruksanvisningar
-