Metabo STS 7000 Bruksanvisningar
- Kategori
- Tillbehör för kaffebryggning
- Typ
- Bruksanvisningar

115 170 0108/ 1610 - 3.0
STS 7000
Originalbetriebsanleitung. . . . . . . . . . . . . . 3
Original operating instructions
. . . . . . . . . . 6
Instructions d’utilisation originales
. . . . . . . 9
Origineel gebruikaanwijzing
. . . . . . . . . . . 12
Manuale d’uso originale. . . . . . . . . . . . . .
15
Manual de instrucciones original
. . . . . . . 18
Original brugsvejledning . . . . . . . . . . . . .
21
Original bruksanvisning . . . . . . . . . . . . . .
24
K0062_30IVZ.fm

!"#!$%!&'('))*#'+!,!'-#'#,
./)!,,!0,('1)!,,+'$%!00
%"!%'$#+)#)2#)/!3!%!!%)2#'+$!$#,2)"!%!%-##"
)!'')0$$#'$"!%!%+!#)#-!%+',!#'$!4)00
5
#+)'6$#)&)#+)#!)+)2#)/!6&7+$2#'+!)!$#-#,!64$)
#,)#+'#$+,!)#,!-))+4!)04!+')')2#)!#)')'$!4)00
84)4!"##'8&'!'!2#'+$!#4)!,,),!'
4#'#,0$#-#,'/24'$%!800
*9
:;
#'$%,#)#!!##)!)$+)4)2#)/!<$%2)!2#'#!!#=$#-#,
)+!#,0$#-#,!<$#')2#)>#'#,!400
$,#)/8#+)!?$+)4)2#)/''&7+2)!2#'+$!#$+,2$#)
)+!)#,)0'$+'##')2+)!#)'$!$)00
*@
5A
B
B
$,#))#/#)))2#)/''7+)!2#'+!#)!C'$#'#$#,))+!)
#,)0'$#'#$#,)'$!>)'#)+,!#)00
-D)2E!)4!!'2#'+!D4))!,,,'-D8')!''0!
/)!,,)'!400
F
++!,,&!!!,!+#!4)!)+4#,80#'!4,3)!,+00 G+'!)4!'!!2#'+!),)4,'-H'#,0%%#'!
/)!,,)'!400
*
I::I
,'G42E!)4&!'!!2#'+!)!,,#4),'-H')!''0
%!/)!,,)'!400
J"'$>,3>2KL#'2#"'>#J$L&M8)>32#'+!#'2#"'"3,##,
)!N2+8L$3$%#,0"'K++)!O"3!3$>3$%00
PQQRSTUVW
XYZ[\Y]^_`\_a`bP`]\ :cd:
XRQeSfghihiTjkligmnSRopTpfqrfsoSlgpolSpTtpfTuiktpTWlUoQfgmiWqrfjTlvrlwVW0
tnhwxSlhipTWjTlpyziTWpxSfjRvTeS00
>C{#)-|))6.!+'!C/>>#8+&%#3>!,66}!>C//
)>/4C3#/-!!!!D4!,63!0,->C//C34|}C)00
~!
!+4
#+%)62#%C} !/)!/)'$8
},!#4)!}>#'2#4'#)!2#%+8,&!!#4#/)2+8}+4'6#,30
#,!4}}>}00
)&22)!8+)&#'8,2+!/'/+&)2#'+!)!/)!',
)!'!,0))>,,!#!4+#'8+,,00
#4)
:
2###'#4##)!8#>848,#&')#)!#8>'>+2#!48+)!''#40>
+2#!48,+!4#44'%4!4%00
¡¢££¢¤¥¢¦§¨¦©ª¥¢§©«§ª§£¥§¦©&¬©§®£§¯©ª¦°§©ª©¦©ª¦°¦
¦¡¥©¥§£¤0¦°«¡¢¦¥§®£®¦¢¥±©¢¥¢£©ª00
)! !4+
+',+,#!)
)#4',!+'4)!+!+)&!)!##'#4)!4+))8,)!
)!''!04)!4!,!!+''!4')00
)42+)!+#8,&')2#'+!)!!)²+))!'!+)02,+
,,)+#)!!)00
)#4² #,³´
#-#,62%C) $!'$#-#,!!
*%)+8,)2#+>#'2#4'#)µ#+&!!#4#/#>#'2#4'C)'#4,#,C,0
2#'¶+)!#4}),}$00
$,22#2)2+'$$)!2#'+)$#)2+'+,!###,0&$#-#,
')2#>!#'$!4#00
Volker Siegle
D - 72622 Nürtingen
Nürtingen, 20.04.2010 1001398
STABSCHLEIFER/ AIR DIE GRINDER/ MEULEUSE DROITE
STS 7000
** 2006/42/EC
EN ISO 12100-1+A1:2009, EN ISO 12100-2+A1:2009, EN ISO 14121-1:2007, EN 792-9+A1:2008, EN ISO 15744:2008, EN ISO 8662-13:1998
Dokumentationsbevollmächtigter/ responsible person for documentation/ Chargé de la documentation
Metabowerke GmbH
Metabo-Allee 1
Director Innovation, Research and Development
U2K0062_30.fm
2

3
DEUTSCH
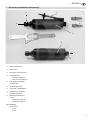
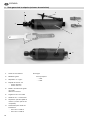
1. Das Gerät im Überblick (Lieferumfang)
1
9
4
8
3
6
2
7
5
1 Werkzeugaufnahme
2 Klemmfutter
3 Abzugshebel mit Sicherung
4 Stecknippel 1/4"
deu
tsche Ausführung
französische Ausführung
5 Kugelgrafitguss-Zylinder,
hochbelastbar
6 Drehzahlregulierung
7 Luftaustritt, schallgedämpft
8 Aufnahme für Stecknippel
(Druckluft-Anschluss)
9 Werkzeug für Werkzeug-
wechsel
Maulschlüssel SW 13
Maulschlüssel SW 16
Ohne Abbildung:
Spannzange
3 mm
6 mm
XK0036D2.fm Originalbetriebsanleitung DEUTSCH

4
DEUTSCH
1. Das Gerät im Überblick (Lieferum-
fang)...............................................3
2. Zuerst lesen!.................................4
3. Sicherheit......................................4
3.1 Bestimmungsgemäße
Verwendung ...................................4
3.2 Allgemeine Sicherheitshinweise.....4
4. Betrieb...........................................5
4.1 Vor dem ersten Betrieb ..................5
4.2 Werkzeug benutzen .......................5
5. Wartung und Pflege .....................5
6. Lieferbares Zubehör.....................5
7. Reparatur ......................................5
8. Umweltschutz ...............................5
9. Technische Daten.........................5
Diese Betriebsanleitung wurde so
erstell
t, dass Sie schnell und sicher mit
Ihrem Werkzeug arbeiten können. Hier
ein kleiner Wegweiser, wie Sie diese
Betriebsanleitung lesen sollten:
Lesen Sie diese Betriebsanleitung
vor der Inbetriebnahme ganz durch.
Beachten Sie insbesondere die
Sicherheitshinweise.
Wen
n Sie beim Auspacken einen
Transportschaden feststellen,
benachrichtigen Sie umgehend
Ihren Händler. Nehmen Sie das
Werkzeug nicht in Betrieb!
Diese Betriebsanleitung richtet sich
an Personen mit technischen
Grundkenntnissen im Umgang mit
Werkzeugen wie dem hier beschrie-
benen. Wenn Sie keinerlei Erfah-
rung mit solchen Werkzeugen
hab
en, sollten Sie zunächst die Hilfe
von erfahrenen Personen in
Anspruch nehmen.
Bewahren Sie alle mit diesem Werk-
zeug gelieferten Unterlagen auf,
damit Sie
sich bei Bedarf informie-
ren können. Bewahren Sie den
Kaufbel
eg für eventuelle Garantie-
fälle auf.
Wen
n Sie das Werkzeug einmal
verleihen oder verkaufen, geben Sie
alle mitgelieferten Unterlagen mit.
Für Schäden, die entstehen, weil diese
Betrieb
sanleitung nicht beachtet wurde,
übernimmt der Hersteller keine Haftung.
Die Informationen in dieser Betriebsan-
leitung sind wie folgt gekennzeichnet:
Gefahr!
Warnung vor Personen-
schäden oder Umwelt-
schäden.
Achtung!
Warnung vor Sach-
schäden.
Zah
len in Abbildungen (1, 2, 3, ...)
kennze
ichnen Einzelteile;
sind fortlau
fend durchnumme-
riert.
Hand
lungsanweisungen, bei denen
die Reihenfolge beachtet werden
muss, sind durchnummeriert.
Handlungsanweisungen mit belie-
biger Reihenfolge sind mit einem
Punkt g
ekennzeichnet.
Auflistunge
n sind mit einem Strich
gekennzeichnet.
3.1 Bestimmungsgemäße
Verwendung
Der Stabschleifer ist ein druckluftbetrie-
benes Werkzeug für den handwerk-
lichen Einsatz. Er kann für Arbeiten wie
Schleifen, Entgraten, Entrosten und Frä-
sen eingesetzt werden.
Dieses Werkzeug darf nur durch einen
Druckluftkompressor angetrieben wer-
den. Der in den Technischen Daten
an
gegebene maximal zulässige Arbeits-
druck darf nicht überschritten werden.
Di
eses Werkzeug darf nicht mit explo-
siven, brennbaren oder gesundheitsge-
fährdenden Gasen betrieben werden.
Jede andere Verwendung ist bestim-
mungswidrig. Durch bestimmungswid-
rige Verwendung, Veränderungen am
W
erkzeug oder durch den Gebrauch von
Teilen, die nicht vom Hersteller geprüft
und freigegeben sind, können unvorher-
sehbare Schäden entstehen!
3.2 Allgemeine Sicherheits-
hinweise
Beachten Sie beim Gebrauch
dieses Werkzeugs die folgenden
Sicherheitshinweise, um Gefahren
für Personen oder Sachschäden
auszuschließen.
Beachten
Sie die speziellen Sicher-
heitshinweise in den jeweiligen
Kapiteln.
Beachten Sie gegebenenfalls spezi-
elle Arbeitsschutz- oder Unfallverhü-
tungs-Vorschriften für den Umgang
mi
t Kompressoren und Druckluft-
Werkzeugen.
A
Allgemeine Gefahren!
Halten
Sie Ihren Arbeitsbereich in
Ordnung – Unordnung im Arbeitsbe-
reich kann Unfälle zur Folge haben.
Seien Sie aufmerksam. Benutzen
Sie dieses Werkzeug nicht, wenn
Sie unkonzentriert sind.
Halten Sie Kinder und andere Per-
sonen vom Arbeitsbereich fern.
Bewahren Sie Druckluftwerkzeuge
für Kinder unerreichbar auf.
Schließen Sie dieses Werkzeug nur
über eine Schnellkupplung an einen
Kompressor an.
Bearbeiten Sie keine gesundheits-
gefährdenden Stoffe.
Beim Arbeiten mit dem Werk
zeug
kann Funkenschlag entstehen. Ver-
wenden Sie das Werkzeug nicht in
der N
ähe brennbaren Materialien,
Flüssigkeiten oder Gasen.
Berühren Sie keine rotierenden
Teile.
Tren
nen Sie dieses Werkzeug vom
Druckluftanschluss, bevor Sie:
Sc
hleifstifte wechseln,
Störu
ngen beseitigen oder
wenn
das Werkzeug unbeauf-
sichtigt ist.
Verwenden Sie nur Schleifstifte, die
vom Hersteller für dieses Werkzeug
vorgesehen sind.
A
Gefahr durch unzureichende
persönliche Schutzausrüstung!
Tragen Sie einen Gehörschutz.
Trag
en Sie eine Schutzbrille.
Tragen Sie eine Atemschutzmaske.
Trag
en Sie Schutzhandschuhe.
A
Gefahr durch Mängel am
Gerät!
Reparieren Sie dieses Werkzeug
nicht selbst! Nur Fachleute dürfen
Reparaturen an Kompressoren,
Druckbehältern und Druckluft-Werk-
zeugen durchführen.
A
Achtung!
Sch
ützen Sie das Gerät, insbeson-
dere den Druckluftanschluss, die
Werkzeu
gaufnahme und die
Bedienelemente vor Staub und
Schmutz.
Stellen Sie sicher, dass der in den
Technischen Daten angegebene
maximal zulässige Arbeitsdruck
nicht überschritten wird.
Der Arbeitsdruck muss über einen
Druckminde
rer eingestellt werden.
Überlasten Sie dieses Werkzeug
nicht – benutzen Sie dieses Werk-
zeug nur im Leistungsbereich, der in
den
Technischen Daten angegeben
ist.
Werkzeug nur kurzfristig im Leerlauf
laufen lassen.
Inhaltsverzeichnis
2. Zuerst lesen!
3. Sicherheit

5
DEUTSCH
4.1 Vor dem ersten Betrieb
Stecknippel einschrauben.
4.2 Werkzeug benutzen
A
Achtung:
Damit dieses Werkzeug lange
eins
atzbereit bleibt, muss es ausrei-
chend mit Pneumatiköl versorgt wer-
den. Dies kann wie folgt geschehen:
Über eine Wartungseinheit mit
Öler am Kompressor.
Über einen Anbauöler, der in die
Druckluftleitung oder direkt am
Druckluftwerkzeug installiert ist.
Pr
o 15 Betriebsminuten (Dauer-
einsatz) etwa 3 bis 5 Tropfen
Pneumatiköl von Hand in den
D
ruckluftanschluss geben.
1. Klemmmutter lösen:
Gegenhalten: Maulschlüssel (13)
an der Werkzeugwelle ansetzen.
Lösen: Klem
mmutter mit Maul-
schlüssel (16) gegen den Uhrzei-
gersinn drehen.
2. Schleifstift einsetzen oder wechseln.
3. Klemmmutter im Uhrzeigersinn fest-
drehen.
4. Arbeitsdruck am Kompressor ein-
stellen (maximal zulässiger Arbeits-
druck siehe Technische Daten).
5. Werkzeug über Schnellkupplung an
d
ie Druckluftversorgung anschlie-
ßen.
6. Gewünschte Drehzahl über die
Schraube zur Luftregulierung ein-
stellen.
7. Zum Einschalten:
Si
cherung nach vorne drücken.
Ab
zughebel ganz niederdrücken.
A
Gefahr!
Vor allen Arbeiten am Werk-
zeug Druckluftanschluss trennen.
Weitergehende Wartungs- oder Repa-
raturarbeiten, als die in diesem Kapi-
tel beschriebenen, dürfen nur Fach-
kräfte durchführen.
Ve
rschraubungen auf festen Sitz
prüfen, ggf. festziehen.
W
enn das Werkzeug nicht durch
eine Wartungseinheit oder einen
Anbauöler geölt wird, pro 15
Betriebsminuten (Dauereinsatz)
etwa 3 bis 5 Tropfen Pneumatiköl
von Hand in den Druckluftan-
schluss geben.
Werkzeug nicht ungeschützt im
Freien oder in feuchter Umgebung
aufbewahren.
Pn
eumatiköl 0,5 Liter
Spezialöl für Druckluftwerkzeuge,
Wartungseinheiten und Anbauöler.
Art.-Nr. 090 100 8540
An
bauöler R3/8" Innengewinde
Zur Installation direkt an Druckluft-
werkzeugen. Stets sichtbarer
Ölstand
durch Schauglas.
Art.-Nr. 090 105 4592
A
Gefahr!
Reparaturen an D
ruckluftwerk-
zeugen dürfen nur durch eine Fach-
kraft ausgeführt werden!
Reparaturbedürftige Druckluftwerkzeuge
können an die Service-Niederlassung
Ihres Landes eingesandt werden. Die
Adresse finden Sie bei der Ersatz-
teilliste.
Bitte beschreiben Sie bei der Einsen-
dung zur Reparatur den festgestellten
Fe
hler.
Das Verpackungsmaterial der Maschine
ist zu 100 % recyclingfähig.
Ausgediente Maschinen und Zubehör
en
thalten große Mengen wertvoller Roh-
und Kunststoffe, die ebenfalls einem
Recyclingprozess zugeführt werden
können.
Die Anleitung wurde auf chlorfrei
ge
bleichtem Papier gedruckt.
4. Betrieb
5. Wartung und Pflege
6. Lieferbares Zubehör
7. Reparatur
8. Umweltschutz
9. Technische Daten
Modell STS 7000
Luftbedarf l/min 570
Maximal zulässiger Arbeitsdruck bar 6,2
Drehzahl min
-1
20000
Minimaler Schlauchdurchmesser (innen) mm 9
Vibration (gewichteter Effektivwert der Beschleunigung)
Unsicherheit K
m/s
2
m/s
2
3,15
<2,5
EN ISO 15744
Schallleistungspegel L
WA
Schalldruckpegel L
PA
Unsicherheit K
dB (A)
dB (A)
dB (A)
97,3
86,3
4
Abmessungen:
Länge x Breite x Höhe mm 165 x 42 x 56
Gewicht kg 0,55

6
ENGLISH
1. Overview (standard delivery)
1
9
4
8
3
6
2
7
5
1 Collet
2 Chuck
3 Throttle lever with safety
4 Plug, 1/4" male
Germ
an version
Fr
ench version
5 Spheroidal graphite cast iron
cyl
inder,
high stability under load
6 Speed regulator
7 Exhaust port with muffler
8 Plug nipple on air inlet
9 Spanners for tool change
op
en jaw wrench 13 mm
op
en jaw wrench 16 mm
Not shown:
Collet chuck
3 mm
6 mm
XK0036E2.fm Original operating instructions ENGLISH

7
ENGLISH
1. Overview (standard delivery).....6
2. Please Read First!.......................
7
3. Safety...........................................7
3.1 Specified conditions of use ...........7
3.2 General safety instructions ...........7
4. Operation.....................................7
4.1 Before initial operation..................7
4.2 Using the tool................................7
5. Care and Maintenance................8
6. Available Accessories
................8
7. Repairs.........................................8
8. Environmental Protection ..........8
9. Technical Specifications............8
These instructions are written in a way to
let you
work with the tool quickly and
safely. Here is how to use the instruc-
tions:
R
ead these instructions fully before
operating the tool. Pay special
attention to the safety information.
If you notice transport damage while
unpacking, notify your supplier
immediately. Do not operate the
tool!
The
se instructions are intended for
individuals having a basic technical
knowledge in the handling of tools
like the one described herein. If you
have no experience whatsoever with
such tool, we strongly recommend
to seek the advise of experienced
individuals.
Ke
ep all documents supplied with
this tool for future reference. Also,
retain proof of purchase in case of a
warranty claim.
Sh
ould you rent or sell the tool, pass
on all documents supplied with the
tool.
The manufacturer is not liable for any
damage arising from neglect of these
operating instructions.
Information in these instructions is
de
noted as under:
Danger!
Risk of personal injury or
environmental damage.
Caution!
Risk of material damage.
Numbers in illustrations (1, 2, 3, ...)
d
enote component parts;
a
re consecutively numbered;
Instructions to be carried out in a
certain sequence are numbered.
Instructions whi
ch can be carried
out in any sequence are indicated
by a bullet.
Listings are indicated by an En Dash.
3.1 Specified conditions of
use
This die grinder is an air tool for use by
craftsmen. It can be used for grinding,
deburring, derusting and milling.
This tool shall only be powered by an air
compressor. The max. permissible work-
ing pressure stated in the Technical
Speci
fications must not be exceeded.
This tool must not be operated with
gases that are explosive, combustible or
detrimental to health.
Any other use is not as specified. Use
no
t as specified, modification of the tool
or use of parts not approved by the
equipment manufacturer can cause
unforeseeable damage!
3.2 General safety instruc-
tions
When using this air tool follow the
safety instructions given below, to
exclude the risk of personal injury or
material damage.
Please also observe the special
safety instructions in the respective
chapters.
Observe the statuary accident insur-
ance institution regulations and reg-
ulations for the prevention of acci-
dents pertaining to the operation of
a
ir compressors and air tools, where
applicable.
A
General hazards!
Ke
ep your work area tidy – a messy
work area invites accidents.
Be
alert. Do not operate this tool
while under the influence of drugs,
alcohol or medication.
Keep children and bystanders away
from the work area.
Store air tools out of the reach of
children.
Al
ways use a quick coupler to con-
nect this air tool to a compressor.
D
o not work materials detrimental to
health.
Working with this tool may generate
sparks. Do not use the tool near
flammable materials, liquids or
gases.
Do not touch any rotating parts.
Dsconnect from air supply before
ch
anging grinding points,
se
rvicing or
w
hen tool is left unattended.
Use only grinding points approved
for this tool by the manufacturer.
A
Hazard generated by insuffi-
cient personal protection gear!
Wear hearing protection.
Wear safety
glasses.
Wear dust mask.
W
ear safety gloves.
A
Hazard generated by tool
defects!
Do not attempt to repair the tool
yourself! Only trained specialists are
permitted to service or repair com-
pressors, pressure vessels and air
tools.
A
Caution!
Protect the
tool, air inlet, collet
chuck and operating elements in
particular, from dust and dirt.
Make sure that the max. permissible
working pressure stated in the Tech-
nical Specifications is not exceeded.
The working pressure must be
a
djusted by a pressure regulator.
D
o not overload tool – use it only
within the performance range it was
designed for (see Technical Specifi-
cations).
Let t
ool run idle only for a short time
only.
4.1 Before initial operation
Screw the plug nipple in.
4.2 Using the tool
A
Caution:
To ensure a long service life of
th
is tool, it needs to be supplied with
sufficient quantities of pneumatic oil.
This can be achieved by:
a service unit with oiler at the
compressor.
a
lubricator, installed in the air
line or directly on the air tool.
adding approx. 3-5 drops of pneu-
matic oil by hand every 15 min-
utes of use (constant operation)
to
the air inlet.
1. To loosen the collet nut:
C
ounter tool shaft with 13 mm
open jaw wrench.
Turn coll
et nut with 16 mm open
jaw wrench counter-clockwise.
2. Install or change grinding point.
3. Turn collet nut clockwise to tighten.
Table of Contents
2. Please Read First!
3. Safety
4. Operation

8
ENGLISH
4. Adjust working pressure at the com-
pressor (see Technical Specifica-
tions for max. permissible working
pressure).
5. Connect tool with quick coupler to
th
e air supply.
6. Set desired speed with the regulator
sc
rew.
7. To start:
Push safet
y forward.
Pr
ess throttle fully down.
A
Danger!
Always disconnect from air
supply before servicing.
Repair and maintenance work other
than
described in this section must
be carried out by qualified specialists
only .
Check al
l screwed connections for
tightness, tighten if necessary.
If the tool is not lubricated by a serv-
ice unit or line lubricator, add 3-5
drops p
neumatic oil to the air inlet
every 15 minutes of use (constant
operation).
Do not store tool unprotected out-
doors or in damp environment.
Pneumatic oil 0.5 litre
Special lubricant for air tools, serv-
ice units and line oilers.
Stock-no. 090 100 8540
Lin
e oiler R3/8" female
For fitting directly to air tools. Oil
level can always be checked
through sight glass.
Stock-no. 090 105 4592
A
Danger!
Repairs to air tools must be
carried out by qualified specialists
ONLY!
Air tools in need of repair can be send to
the service centre in your country. See
Spare Parts List for address.
Please attach a description of the fault to
the power tool.
The tool's packaging can be 100 % recy-
cled.
Worn out machines and accessories
contain considerable amounts of valua-
ble raw and plastic materials, which can
be
recycled.
These instructions are printed on paper
pro
duced with elemental chlorine free
bleaching process.
5. Care and Maintenance
6. Available Accessories
7. Repairs
8. Environmental Protection
9. Technical Specifications
Model STS 7000
Air consumption l/min 570
Max. permissible working pressure bar 6,2
Speed min
-1
20000
Minimum hose size (inner) mm 9
Vibration (effective value of weighted acceleration)
Uncertainty K
m/s
2
m/s
2
3,15
<2,5
EN ISO 15744
Sound power level L
WA
Sound pressure level L
PA
Uncertainty K
dB (A)
dB (A)
dB (A)
97,3
86,3
4
Dimensions:
length x width x height mm 165 x 42 x 56
Weight kg 0,55

9
FRANÇAIS
1. Vue d'ensemble de l'outil (fourniture à la livraison)
1
9
4
8
3
6
2
7
5
1 Porte-outil
2 Mandrin de serrage
3 Levier de sécurité
4 Embout 1/4"
modèl
e allemand
modèl
e français
5 Cylindre en fonte de graphite
sph
éroïdal,
hautement résistant
6 Réglage du régime
7 Sortie d'air insonorisée
8 Logement pour embout (raccor-
dement air comprimé)
9 Outil pour changement d'outil
Clé pl
ate de 13
Clé pl
ate de 16
Sans illustration :
Pince
3 mm
6 mm
XK0036F2.fm Instructions d’utilisation originales FRANÇAIS

10
FRANÇAIS
1. Vue d'ensemble de l'outil
(fourniture à la livraison)............9
2. À lire en premier !......................10
3. Sécurité......................................10
3.1 Utilisation conforme aux
prescriptions................................10
3.2 Consignes de sécurité
générales ....................................10
4. Fonctionnement ........................11
4.1 Avant la première mise en
service.........................................11
4.2 Utilisation de l'outil.......................11
5. Maintenance et entretien..........11
6. Accessoires disponibles ..........11
7. Réparations ...............................11
8. Protection de l'environnement.11
9. Caractéristiques techniques ....11
Ces instructions ont été conçues de
façon
à permettre à l'utilisateur de tra-
vailler rapidement et sûrement avec son
ou
til. Voici quelques indications de lec-
ture de ces instructions :
Lire entièrement ces instructions
avant de mettre en marche l'outil.
Respecter en particulier les instruc-
tions de sécurité.
Si des dommages dus au transport
sont constatés pendant le déballa-
ge, en informer aussitôt le reven-
deur. Ne pas mettre
l'outil en mar-
che !
Ces i
nstructions d'utilisation s'adres-
sent à des personnes possédant
des connaissances de base techni-
ques concernant le maniement
d'outils tels q
ue celui décrit ici. Nous
recommandons aux personnes ne
disposant pas de ces bases de se
faire assister par des personnes
plus expérimentées.
Conse
rver toute la documentation
fournie avec l'appareil afin de pou-
voir la consulter ultérieurement en
cas
de besoin. Conserver le justifi-
catif de paiement pour éventuelle-
ment faire appel à la garantie.
En cas de vente ou de location de
l'appareil, fournir également ces ins-
tructions.
Le fabricant décline toute responsabilité
en cas de dommages dus au non-res-
pect de ces instructions.
Les informations des prés
entes instruc-
tions sont caractérisées comme suit :
Danger !
Avertissement d'un ris-
que de blessure ou de
po
llution.
Attention !
Avertissement d'un ris-
que de dommage maté-
riel.
Les nu
méros des illustrations (1, 2,
3, ...)
caractérisent les différentes piè-
ces ;
se
suivent en ordre croissant.
Les man
ipulations à effectuer dans
un ordre précis sont numérotées.
Les manipulations à effectuer sans
ordre précis sont précédées d'un
point.
Les listes sont caractérisées par des
tirets.
3.1 Utilisation conforme aux
prescriptions
Cette ponceuse droite est un outil pneu-
matique destiné à un usage artisanal. Il
pe
ut être utilisé pour les travaux
suivants : ponçage, ébavurage, décapa-
ge et fraisage.
Cet appareil ne doit être entraîné que
par un compresseur à air comprimé. La
pression de travail maximale indiquée
dans les caractéristiques techniques ne
doit pas être dépassée. Ne pas faire
fonctionner cet appareil avec des gaz
explosibles, combustibles ou présentant
un danger pour la santé.
Toute autre utilisation est contraire aux
pre
scriptions. Une utilisation non
conforme aux prescriptions, des modifi-
cations apportées à l'appareil ou l'emploi
de
pièces qui n'ont pas été contrôlées ni
approuvées par le fabricant peuvent
entraîner des dommages imprévisibles !
3.2 Consignes de sécurité
générales
Tenir compte des consignes de
sécurité suivantes afin d'exclure les
risques de blessures ou de domma-
ges matériels.
Respecter les consignes de sécurité
particulières dans les différents cha-
pitres.
Tenir compte le cas échéant des
prescriptions relatives à la sécurité
du travail ou à la prévention des
accidents concernant le maniement
des compresseurs et des outils à air
comprimé.
A
Principaux dangers !
Ma
intenir le lieu de travail en ordre –
un désordre sur le lieu de travail
peut entraîner des accidents.
Il convient de rester vigilant. N'utili-
sez pas cet outil si vous n'êtes pas
concen
tré.
Ma
intenir les enfants et les autres
personnes à distance du poste de
travail.
Les outils pneumatiques doivent
être conservés hors de la portée des
enfants.
Cet outil ne doit être raccordé à un
compresseur que par un raccord
rapide.
Ne travailler aucune matière dange-
reuse pour la santé.
Des étincelles peuvent se produire
lorsque vous utilisez l'outil. Ne pas
s'en servir à proximité de matériaux,
de liquides ou de gaz inflammables.
Ne pa
s toucher de pièce en rotation.
Débra
ncher l'alimentation en air
comprimé :
avant de cha
nger de meule sur
tige,
avant de remédier à une
défaillance ou
lorsqu
e l'outil est laissé sans sur-
veillance.
N'utiliser que les meules sur tige
destinées à cet outil.
A
Danger dû à un équipement de
prot
ection personnel insuffisant !
Porte
r une protection acoustique.
Porte
r des lunettes de protection.
Porte
r un masque de protection res-
piratoire.
Porte
r des gants de protection.
A
Danger dû à une défaillance de
l'outil !
Ne pas répa
rer l'outil soi-même !
Les travaux de réparation sur les
compresseurs, les ballons et les
appareils pneumatiques doivent être
exécutés par des professionnels.
A
Attention !
Protéger l'appareil de la poussière
et des saletés ; cela concerne en
particuli
er l'alimentation en air com-
primé, le porte-outil et les éléments
de commande
.
S'assurer que la pression de travail
maximale indiquée dans les carac-
téristiques techniques n'est pas
dép
assée.
La pression de travail doit être
réglé
e au moyen d'un détendeur.
Table de Matières
2. À lire en premier !
3. Sécurité

11
FRANÇAIS
Ne pas surcharger l'outil – ne l'utili-
ser que dans la plage de puissance
i
ndiquée dans les caractéristiques
techniques.
Ne jamais laisser l'outil tourner à
vide de manière prolongée.
4.1 Avant la première mise
en service
Visser l'embout.
4.2 Utilisation de l'outil
A
Attention :
Bien lubrifier l'outil avec de
l'huile pneumatique afin de prolonger
sa durée de vie. Cela peut se faire de
la manière suivante :
au moyen d'une unité d'entretien
avec graisseur sur le compres-
seur ;
a
u moyen d'un lubrificateur ins-
tallé dans la conduite à air com-
primé ou directement sur l'outil à
air comprimé.
Mettre environ 3 à 5 gouttes
d'huile pneumatique dans l'ali-
mentation à air comprimé pour 15
mi
nutes de service (utilisation
continue).
1. Défaire l'écrou de serrage :
Bl
oquer l'arbre à l'aide de la clé
plate (13).
Desserrer l'écrou d
e serrage en
tournant avec la clé plate (16)
dans le sens contraire des
aiguilles d'une montre.
2. Insérer ou remplacer la meule sur
tige.
3. Serrer à fond l'écrou dans le sens
des aiguilles d'une montre.
4. Régler la pression de travail sur le
compresseur (consulter les caracté-
ristiques techniques pour connaître
la pression de travail admissible).
5. Relier l'outil à l'alimentation en air
comprimé par le raccordement
rapide.
6. Régler le régime souhaité à l'aide de
la vis de régulation de l'arrivée d'air.
7. Pour mettre en marche :
Amen
er le dispositif de sécurité
vers l'avant.
En
foncer complètement le levier.
A
Danger !
Avant toute intervention de
mai
ntenance, débrancher l'alimenta-
tion en air comprimé.
Les travaux de maintenance et de
réparati
on autres que ceux décrits
dans ce chapitre ne doivent être exé-
cutés que par du personnel compé-
tent.
Contrôler les assemblages par vis et
les resserrer à fond en cas de
besoin.
Si l'outil n'est pas lubrifié au moyen
d'une unité d'entretien ou d'un lubri-
ficateur, ajouter manuellement 3 à 5
g
outtes d'huile pneumatique par le
raccord d'air comprimé toutes les 15
minutes (utilisation continue).
Ne
pas laisser l'outil sans protection
en plein air ou dans un environne-
ment humide.
H
uile pneumatique 0,5 litre
Huile spéciale pour outils pneumati-
ques, unités d'entretien et lubrifica-
teurs.
Numéro d'article 090 100 8540
Lubrificateur de filet intérieur R3/8"
À installer directeme
nt sur les outils
pneumatiques. Le niveau d'huile
sera toujours visible à travers le
regard.
Numéro d'article 090 105 4592
A
Danger !
Les travaux de réparation des
outils pneumatiques doivent être
effectués exclusivement par des élec-
triciens spécialisés !
Les outils qui nécessitent une réparation
pe
uvent être envoyés à la succursale du
service après-vente de votre pays dont
l'adresse figure avec la liste des pièces
de rechange.
Prière de joindre une description du
dé
faut constaté à l'outil expédié.
Le matériau d'emballage de la machine
est re
cyclable à 100 %.
Les machines et accessoires électriques
qui ne sont plus utilisés contiennent de
grandes quantités de matières premiè-
res et de matières plastiques précieuses
po
uvant être également recyclées.
Ces instructions ont été imprimées sur
pa
pier blanchi sans chlore.
4. Fonctionnement
5. Maintenance et entretien
6. Accessoires disponibles
7. Réparations
8. Protection de l'environ-
nement
9. Caractéristiques techniques
Modèle STS 7000
Consommation d'air l/min 570
Pression maximale admissible bar 6,2
Vitesse de rotation min
-1
20000
Diamètre (intérieur) minimal de flexible mm 9
Vibration (valeur efficace pondérée de l’accélération)
Incertitude K
m/s
2
m/s
2
3,15
<2,5
EN ISO 15744
Niveau de puissance acoustique L
WA
Niveau sonore L
PA
Incertitude K
dB (A)
dB (A)
dB (A)
97,3
86,3
4
Dimensions :
longueur x largeur x hauteur mm 165 x 42 x 56
Poids kg 0,55

12
NEDERLANDS
1. Het toestel in overzicht (leveromvang)
1
9
4
8
3
6
2
7
5
1 Werktuigopname
2 Klemvoering
3 Aftrekhendel met zekering
4 Steeknippel 1/4"
Dui
tse uitvoering
Fra
nse uitvoering
5 Kogelgrafiet-cilinder, hoog
b
elastbaar
6 Toerentalregeling
7 Luchtuittreding, geluidsisoleerd
8 Opname voor steeknippel (per-
slucht-aansluiting)
9 Werktuig voor we
rktuigwissel
Steeksleu
tel SW 13
Steeksleu
tel SW 16
Geen tekening:
Spantang
3 mm
6 mm
XK0036H2.fm Origineel gebruikaanwijzing NEDERLANDS

13
NEDERLANDS
1. Het toestel in overzicht
(leveromvang)..........................12
2. Lees dit eerst! ..........................13
3. Veiligheid..................................13
3.1 Voorgeschreven gebruik van
het systeem ...............................13
3.2 Algemene veiligheidsinstructies 13
4. Bediening .................................14
4.1 Vóór het eerste bedrijf ...............14
4.2 Gereedschap gebruiken ............14
5. Service en onderhoud.............14
6. Beschikbare accessoires........14
7. Reparatie ..................................14
8. Milieubescherming ..................14
9. Technische gegevens .............14
Deze gebruiksaanwijzing werd zo ver-
vaardigd, dat u snel en veilig met uw
ge
reedschap kunt werken. Hier een
kleine wegwijzer, hoe u deze gebruiks-
aanwijzing dient te lezen:
Lees deze gebruiksaanwijzing vóór
de ingebruikneming geheel door
Besteed daarbij vooral aandacht
aan het hoofdstuk „veiligheidsvoor-
schriften”.
Al
s u bij het uitpakken van het appa-
raat transportschade vaststelt, dan
moet u daar onmiddellijk uw leve-
rancier van op de hoogte stellen.
N
eem het gereedschap niet in
bedrijf!
D
eze gebruiksaanwijzing richt zich
aan personen met technische basis-
kennis in de omgang met gereed-
schap zoals het hier beschreven.
Ind
ien u generlei ervaring met zulk
gereedschap heeft, dient u eerst
beroep te doen op de hulp van erva-
ren personen.
Be
waar alle met dit gereedschap
geleverde documenten op, opdat u
zich desgewenst kunt informeren.
Bewaar het koopbewijs voor moge-
lijke garantiegevallen op.
Als u het gereedschap verleent of
verkoopt, geef dan alle meegele-
verde documenten mee.
Voor schade die ontstaat, omdat deze
ge
bruiksaanwijzing niet werd opgevolgd,
overneemt de fabrikant geen aansprake-
lijkheid.
De informaties in deze gebruiksaanwij-
zing zijn op de volgende manier geken-
merkt:
Gevaar!
Waarschuwing voor
lichamelijk
letsel of
milieuschade.
Attentie!
Waarschuwing voor
materiële schade.
Getall
en in afbeeldingen (1, 2, 3, ...)
ke
nmerken afzonderlijke delen;
zi
jn doorlopend genummerd.
H
andelingsinstructies, waarbij op de
volgorde dient te worden gelet, zijn
doorgenummerd.
Handelingsinstructies met willekeu-
rige volgorde zijn met een punt
ge
kenmerkt.
Opsommin
gen zijn met een streep
gekenmerkt.
3.1 Voorgeschreven gebruik
van het systeem
De stafslijpmachine is een perslucht
bedreven werktuig voor de vakkundige
inzet. Hij kan voor werkzaamheden als
slijpen, ontbramen, ontroesten en frezen
worden ingezet.
Dit gereedschap mag uitsluitend door
een persluchtcompressor worden aan-
gedreven. De maximaal toegelaten
werkdru
k vermeld in de technische
gegevens mag niet worden overschre-
den. Dit gereedschap mag niet met
expl
osieve, brandbare of gezondheids-
bedreigende gassen worden geëxploi-
teerd.
Elk ander gebruik is verboden. Door
on
reglementair gebruik, veranderingen
aan het gereedschap of door gebruik
van onderdelen, die niet door de fabri-
kant werden gekeurd en vrijgegeven,
kan on
voorziene schade ontstaan!
3.2 Algemene veiligheidsin-
structies
Houdt u zich bij gebruik van dit
gereedschap aan de volgende vei-
ligheidsvoorschriften om gevaar
vo
or personen of materiële schade
te voorkomen.
Houd rekening met de bijzondere
veiligheidsinstructies in de desbe-
treffende hoofdstukken.
Houdt u zich eventueel aan de bij-
zondere wettelijke maatregelen ter
bescherming van de werknemer of
de ongevallenpreventievoorschriften
inzake de omgang met compresso-
ren en persluchtgereedschap.
A
Algemene gevaren!
H
oud uw werkplek in orde – een
wanordelijke werkplek kan ongeval-
len tot gevolg hebben.
Wees aandachtig. Gebruik dit
gereedschap niet, wanneer u niet
geconcentreerd bent.
Houd kinderen en andere personen
van het arbeidsbereik vandaan.
Bewaar persluchtgereedschap voor
kinderen ontoegankelijk op.
Sluit dit gereedschap uitsluitend via
een snelkoppeling aan op een com-
pressor.
Bewerk geen de gezondheid bedrei-
gende stoffen.
Bi
j het werken met het werktuig kan
vonkenslag ontstaan. Gebruik het
werktuig niet in de buurt van brand-
bare materialen, vloeistoffen of gas-
sen.
R
aak geen roterende onderdelen
aan.
Scheid dit werktuig van de per-
sluchtaansluiting, alvorens u:
sl
ijppennen wisselt,
storin
gen verhelpt of
w
anneer het werktuig zonder toe-
zicht is.
Maak uitsluitend gebruik van slijp-
pennen die door de fabrikant van dit
werktuig werden geadviseerd.
A
Gevaar door ontoereikende
persoonlijke veiligheidsuitrusting!
Draag oordoppen.
D
raag een veiligheidsbril.
D
raag een ademveiligheidsmasker.
D
raag veiligheidshandschoenen.
A
Gevaar door gebreken aan het
toestel!
Voer nooit zelf reparaties aan het
gereedschap uit! Reparaties van
compressoren, drukvaten en per-
sluchtgereedschap mogen uitslui-
tend door gekwalificeerd personeel
u
itgevoerd worden.
A
Attentie!
Bescherm het toestel, vooral de per-
sluchtaansluiting, de werktuigop-
name en de bedieningselementen
teg
en stof en vuil.
Ve
rgewis u ervan dat de maximaal
toegelaten werkdruk vermeld in de
technische gegevens niet over-
schreden wordt.
De arbeidsdruk moet via een druk-
verlager worden ingesteld.
Zorg d
at u dit gereedschap niet
overbelast – gebruik dit gereed-
schap uitsluitend binnen het vermo-
Inhoudstafel
2. Lees dit eerst!
3. Veiligheid

14
NEDERLANDS
gensbereik dat in de technische
gegevens vermeld wordt.
Het werktuig alleen kort in de leeg-
loop laten draaien.
4.1 Vóór het eerste bedrijf
Steeknippel inschroeven.
4.2 Gereedschap gebruiken
A
Attentie:
Opdat dit gereedschap lange
tijd klaar voor gebruik blijft, moet het
voldoende met pneumatische olie
worden verzorgd. Dit kan als volgt
gebeuren:
Via
een onderhoudseenheid met
doorsmeerapparaat aan de com-
pressor.
Via een opbouwsmeerpot die in
de persluchtleiding of onmiddel-
lijk aan het persluchtgereedschap
geïnstalle
erd is.
Doe per 15 bedrijfsminuten (lang-
durig gebruik) ca. 3 tot 5 druppels
pneumatische olie met de hand in
de persluchtaansluiting.
1. Klemmoer losmaken:
Teg
enhouden: steeksleutel (13)
aan de werktuigas aanzetten.
Losmaken: klemmoer met steek-
sleutel (16) tegen de wijzers van
de klok in draaien.
2. Slijppen inzetten of vervangen.
3. Klemmoer in richting van de wijzers
van de klok vastdraai
en.
4. Stel de werkdruk op de compressor
in (maximaal toegelaten werkdruk
zie Technische gegevens).
5. Werktuig via snelkoppeling aan de
persluchtverzorging aansluiten.
6. Gewenst toerental via de schroef ter
luchtregeling instellen.
7. Voor het inschakelen:
zekering
naar voren drukken.
aftrekh
endel geheel omlaag druk-
ken.
A
Gevaar!
Koppel de persluchtaanslui-
ting los vóór alle werkzaamheden aan
het gereedschap.
Service en/of onderhoudswerkzaam-
heden die niet in dit hoofdstuk
besc
hreven staan mogen uitsluitend
door vaklui uitgevoerd worden.
Controleer of de schroefverbindin-
gen vast zitten, en draai ze vast
indien nodig.
Wanneer het gereedschap niet door
een onderhoudsmodule of een aan-
bouwsmeerpot wordt geolied, doe
dan elke 15 bedrijfsminuten (langdu-
rig gebruik) ca. 3 tot 5 druppels
pne
umatische olie met de hand in
de persluchtaansluiting.
Het gereedschap mag niet in de
open lucht of in een vochtige ruimte
opgeborgen worden.
Pneuma
tische olie 0,5 l
speciale olie voor persluchtgereed-
schap, onderhoudsmodules en aan-
bouwsmeerpotten.
Art.-nr. 090 100 8540
Aanbouwsmeerpot R3/8" binnen-
schroefdraad
Voor installatie direct op perslucht-
gereedschap. Steeds zichtbaar olie-
peil dankzij het peilglas.
Art.-nr. 090 105 4592
A
Gevaar!
Reparaties aan persluchtge-
reedschap mogen uitsluitend door
va
kmensen worden uitgevoerd!
De persluchtmachines kunnen voor
rep
aratie verzonden worden naar de
Service-vestiging in uw land. Het adres
vindt u terug bij de lijst met onderdelen.
Geef bij inzending voor reparatie een
omschrij
ving van het vastgestelde
defect.
Het verpakkingsmateriaal van de
machi
ne is 100 % recycleerbar.
Afgedankte machines en accessoires
be
vatten grote hoeveelheden waarde-
volle grond- en kunststoffen die even-
eens gerecycleerd kunnen worden.
De gebruiksaanwijzing werd op chloor-
vrij gebleekt papier gedrukt.
4. Bediening
5. Service en onderhoud
6. Beschikbare accessoires
7. Reparatie
8. Milieubescherming
9. Technische gegevens
Model STS 7000
Luchtbehoefte l/min 570
Maximaal toegelaten werkdruk bar 6,2
Toerental min
-1
20000
Minimale slangdoorsnede (binnen) mm 9
Trilling (geschatte effectieve waarde van de versnelling)
Onzekerheid K
m/s
2
m/s
2
3,15
<2,5
EN ISO 15744
Geluidsdrukniveau L
WA
Geluidsdruknivau L
PA
Onzekerheid K
dB (A)
dB (A)
dB (A)
97,3
86,3
4
Afmetingen:
lengte x breedte x hoogte mm 165 x 42 x 56
Gewicht kg 0,55

15
ITALIANO
1. Visione d'insieme dell'apparecchio (ambito della fornitura)
1
9
4
8
3
6
2
7
5
1 Alloggiamento apparecchio
2 Pinza di serraggio
3 Levetta di estrazione con sicura
4 Raccordo filettato da 1/4"
Ve
rsione tedesca
Versione franc
ese
5 Cilindro in ghisa sferoidale,
per servizio pesante
6 Regolazione numero di giri
7 Uscita dell'aria, antiacustica
8 Sede per raccordo filettato
(attacco di erog
azione dell'aria
compressa)
9 Attrezzi per la sostituzione
d
ell'apparecchio
Chiave a bocca CH 13
Chia
ve a bocca CH 16
Particolari non illustrati:
Pinza
3 mm
6 mm
XK0036I2.fm Manuale d’uso originale ITALIANO

16
ITALIANO
1. Visione d'insieme
dell'apparecchio (ambito
della fornitura) ...........................15
2. Istruzioni obbligatorie...............16
3. Sicurezza....................................16
3.1 Utilizzo appropriato .....................16
3.2 Istruzioni generali per
la sicurezza .................................16
4. Messa in funzione .....................17
4.1 Prima della prima messa
in funzione...................................17
4.2 Utilizzo dell'apparecchio..............17
5. Manutenzione ............................17
6. Accessori disponibili
su richiesta ................................17
7. Riparazione................................17
8. Rispetto dell'ambiente..............17
9. Dati tecnici .................................17
Queste istruzioni per l'uso sono state
rea
lizzate per consentire un utilizzo
rapido e sicuro dell'apparecchio. Di
seguito vengono fornite brevi indicazioni
sulla modalità di lettura delle istruzioni.
Prima di mettere in funzione l'appa-
recchio, leggere interamente le
istru
zioni prestando particolare
attenzione alle indicazioni sulla sicu-
rezza.
Se, al momento dell’apertura
dell’imballaggio, si notano danni
provocati dal trasporto, mettersi
immediatamente in contatto col
rivenditore. Non mettere in fun-
zione l'apparecchio.
Qu
este istruzioni per l'uso sono
destinate a persone con cono-
scenze tecniche sugli apparecchi
descritti
. Se non si ha alcun tipo di
esperienza con questo tipo di appa-
recchio, richiedere l'aiuto di esperti.
Tenere a portata di mano tutta la
documentazione fornita con l'appa-
recchio per poterla consultare se
necessa
rio. Conservare la prova
d'acquisto per eventuali richieste di
intervento in garanzia.
Se si presta o si vende l'apparec-
chio, includere anche la relativa
documentazione.
Per eventuali danni derivanti dalla man-
cata osservanza di queste istruzioni per
l'uso
, il produttore declina ogni respon-
sabilità.
Le informazioni contenute in queste
istruzio
ni per l'uso utilizzano i simboli illu-
strati di seguito.
Pericolo!
Avvertenza per possibili
da
nni alle persone e
all'ambiente.
Attenzione!
Avvertenza per possibili
danni materiali.
I
numeri nelle figure (1, 2, 3, ecc.)
indi
cano i singoli pezzi;
usano
una numerazione progres-
siva.
Le istruzioni per l'uso per le quali è
necessario seguire la sequenza
indicata sono numerate in ordine
progressivo.
Le istruzioni per l'uso in cui la
sequenza può essere stabilita a
discrezione dell'operatore sono con-
trassegnate da un punto.
Gli
elenchi sono contrassegnati da
un trattino.
3.1 Utilizzo appropriato
Questa smerigliatrice a nastro sottile è
un apparecchio ad aria compressa
ideato per un uso artigianale che può
essere impiegato in lavori di smeriglia-
tura, sbavatura, fresatura e di rimozione
de
lla ruggine.
Questo apparecchio deve essere azio-
nato solo tramite un compressore pneu-
matico. La pressione di esercizio mas-
sima consentita indicata al paragrafo
"D
ati tecnici" non deve essere superata.
Questo apparecchio non deve essere
utilizzato con gas esplosivi, infiammabili
o nocivi per la salute.
Qualsiasi altro utilizzo non è idoneo. In
caso
di utilizzo improprio, di modifiche
all'apparecchio o di impiego di parti non
controllate e autorizzate dal produttore si
possono verificare danni imprevedibili.
3.2 Istruzioni generali per la
sicurezza
Durante l'uso dell'apparecchio,
osservare le seguenti istruzioni rela-
tive alla sicurezza per evitare even-
tuali pericoli per le persone o danni
ma
teriali.
Osservare
in particolare le istruzioni
relative alla sicurezza contenute
nelle singole sezioni.
Rispe
ttare scrupolosamente le
eventuali norme antinfortunistiche e
di sicurezza specifiche per l'uso di
compressori e apparecchi pneuma-
tici.
A
Pericolo generico!
Ten
ere sempre in ordine l'ambiente
di lavoro per evitare il rischio di inci-
denti causati da oggetti fuori posto.
Agire con la massima attenzione.
Evitare di azionare l'apparecchio in
momenti di scarsa concentrazione.
Tenere lontano dall'ambiente di
lavoro il personale non autorizzato e
i bambini.
Tenere fuori dalla portata dei bam-
bini gli apparecchi pneumatici.
L'apparecchio deve essere colle-
gato ad un compressore esclusiva-
mente mediante un innesto rapido.
Non utilizzare materiali nocivi alla
salute.
Qua
ndo si lavora con l'apparecchio
possono verificarsi delle scintille.
Pertanto non utilizzarlo in prossimità
di materiali, liquidi o gas infiamma-
bili.
Non toccare la pa
rti rotanti.
Sta
ccare l'apparecchio dall'attacco
di erogazione dell'aria compressa
prima di eseguire quanto segue:
sostituire le punte,
elimin
are i guasti oppure
se
l'apparecchio è incustodito.
Uti
lizzare esclusivamente le punte
previste dal produttore per questo
apparecchio.
A
Pericolo causato da protezione
personale insufficiente!
Munirsi di paraorecchie.
Indossare occhial
i protettivi.
Indossare la
mascherina.
In
dossare guanti protettivi.
A
Pericolo causato da eventuali
anomalie dell'apparecchio!
Si ra
ccomanda di astenersi
dall'effettuare personalmente qual-
siasi riparazione. Solo tecnici spe-
cializzati possono eseguire ripara-
zioni su compressori, serbatoi a
pression
e e apparecchi pneumatici.
A
Attenzione!
Pro
teggere dalla polvere e dallo
sporco l'apparecchio, in particolare
l'attacco di erogazione dell'aria com-
pressa, l'alloggiamento dell'appa-
recchio e gli elementi principali.
Acce
rtarsi che la pressione di eser-
cizio massima consentita indicata al
parag
rafo "Dati tecnici" non venga
superata.
Il riduttore della pressione consente
di reg
olare la pressione di esercizio.
Non sovraccarica
re l'apparecchio e
usarlo esclusivamente con la
Sommario
2. Istruzioni obbligatorie
3. Sicurezza

17
ITALIANO
potenza indicata nella sezione "Dati
tecnici".
Lasciare girare a vuoto l'apparec-
chio solo per breve tempo.
4.1 Prima della prima messa
in funzione
Avvitare il raccordo filettato.
4.2 Utilizzo dell'apparecchio
A
Attenzione!
Per prolungare la perfetta effi-
cienza dell'apparecchio, è necessario
lu
brificarlo con una quantità ade-
guata di olio per apparecchi pneuma-
tici. La lubrificazione può essere
effettuata nel modo
seguente:
tramite un
'unità di manutenzione
con oliatore nel compressore;
tramite un oliatore applicato
installato nel condotto dell'aria
compressa oppure direttamente
sull'apparecchio;
og
ni 15 minuti di funzionamento
(continuo) applicare manual-
mente 3-5 gocce di olio per appa-
recchi pneumatici nell'attacco di
e
rogazione dell'aria compressa.
1. Allentare il dado autobloccante.
Tratte
nere: applicare la chiave a
bocca (13) nell'albero dell'appa-
recchio.
Al
lentare: ruotare in senso antio-
rario il dado autobloccante con la
chiave a bocca
(16).
2. Inserire o sostituire la punta.
3. Serrare il dado autobloccante in
se
nso orario.
4. Regolare la pressione del compres-
sore. Per la pressione massima
co
nsentita, vedere il paragrafo "Dati
tecnici".
5. Collegare l'apparecchio all'alimenta-
zione dell'aria compressa utiliz-
zando l'innesto rapido.
6. Regolare il numero di giri desiderato
dalla vite di regolazione dell'aria.
7. Per l'accensione, procedere come
i
ndicato di seguito.
Premere la sicura in avanti.
Pre
mere completamente la
levetta d'estrazione.
A
Pericolo!
Prima di qualsiasi attività, scol-
legare l'attacco di erogazione dell'aria
compr
essa.
Gli interventi di manu
tenzione o di
riparazione non descritti nel presente
capitolo devono essere effettuati
esclusivamente da personale specia-
lizzato.
Verificare che i raccordi a vite siano
serrati saldamente, provvedendo
eventualmente a stringerli.
Se l'apparecchio non viene lubrifi-
cato tramite un'unità di manuten-
zione o un oliatore, lubrificare
man
ualmente l'attacco di eroga-
zione dell'aria compressa ogni 15
min
uti di funzionamento (uso conti-
nuato) con 3-5 gocce di olio per
apparecchi pneumatici.
L'apparecchio non va lasciato incu-
stodito all'aperto né conservato in
luogo umido.
Olio
per apparecchi pneumatici (0,5
litri)
Olio speciale per apparecchi pneu-
matici, unità di manutenzione e olia-
tori.
N° art. 090 100 8540
Olia
tore R3/8" con filettatura interna
Per l'installazione diretta in apparec-
chi pneumatici. Livello dell'olio
costantemente visibile dall'apposito
vetrino.
N° art. 090 105 4592
A
Pericolo!
Le riparazioni di apparecchi
pneumatici devono esse
re effettuate
esclusivamente da tecnici specializ-
zati.
Gli apparecchi da riparare possono
essere in
viati al centro di assistenza del
proprio paese. L'indirizzo è indicato
nell'elenco dei pezzi di ricambio.
Quando si spedisce un apparecchio per
la ripa
razione, descrivere l'errore accer-
tato.
Il materiale utilizzato per l'imballaggio
dell'apparecchio è riciclabile al 100%.
Gli apparecchi e gli accessori fuori uso
contengono grandi quantità di materie
prime e di altri materiali che possono
essere sottoposti ad un processo di rici-
claggio.
Queste istruzioni sono state stampate su
carta sb
iancata senza cloro.
4. Messa in funzione
5. Manutenzione
6. Accessori disponibili su
richiesta
7. Riparazione
8. Rispetto dell'ambiente
9. Dati tecnici
Modello STS 7000
Fabbisogno d'aria l/min 570
Pressione di esercizio massima consentita bar 6,2
Numero di giri min
-1
20000
Diametro tubi flessibili min. (interno) mm 9
Vibrazione (valore effettivo pon
derato dell'accelerazione)
Incertezza K
m/s
2
m/s
2
3,15
<2,5
EN ISO 15744
Livello di potenza acustica L
WA
Livello di pressione acustica L
PA
Incertezza K
dB (A)
dB (A)
dB (A)
97,3
86,3
4
Dimensioni:
lunghezza x larghezza x altezza mm 165 x 42 x 56
Peso kg 0,55

18
ESPAÑOL
1. Vista general de la máquina (volumen de suministro)
1
9
4
8
3
6
2
7
5
1 Asiento de herramienta
2 Mandril de garras
3 Disparador con seguro
4 Boquilla de enchufe 1/4"
Versió
n alemana
Versió
n francesa
5 Cilindro de fundición de grafito
esfe
roidal,
altamente resistente
6 Regulación de la velocidad
7 Salida de aire, con silenciador
8 Alojamiento para la boquilla de
enchu
fe (conexión para el aire
comprimido)
9 Herramienta para cambio de
herramienta
Ll
ave de boca SW 13
Ll
ave de boca SW 16
Sin imagen:
Pinza portapieza
3 mm
6 mm
XK0036S2.fm Manual de instrucciones original ESPAÑOL

19
ESPAÑOL
1. Vista general de la máquina
(volumen de suministro)..........18
2. ¡Leer esto en primer lugar! ......19
3. Seguridad ..................................19
3.1 Uso según su fina
lidad ...............19
3.2 Recomendaciones
generales de seguridad ..............19
4. Funcionamiento ........................20
4.1 Antes de la primera puesta
en funcionamiento ......................20
4.2 Empleo de la herramienta...........20
5. Conservación y
mantenimiento ..........................20
6. Accesorios disponibles ...........20
7. Reparación ................................20
8. Protección medioambiental.....20
9. Características técnicas...........20
Este manual de uso ha sido elaborado
pa
ra que el usuario pueda trabajar con
su herramienta de forma rápida y
segura. A continuación presentamos
algunas indicaciones que le ayudarán a
leerlo:
An
tes de poner en funcionamiento
la máquina, léase todo el manual de
uso. Observe especialmente las ins-
trucciones de seguridad.
Si
al desembalar la máquina
encuentra daños producidos
durante el transporte, informe inme-
diatamente a su suministrador. ¡No
p
onga la herramienta en funciona-
miento!
Este manual de uso está dirigido a
personas con conocimientos bási-
cos en el manejo de aparatos como
e
l que aquí se describe. Si no tiene
experiencia con este tipo de herra-
mientas, antes que nada, pida
a
yuda a alguien que sepa usarlas.
Gua
rde toda la documentación que
acompaña a esta herramienta para
que pueda informarse en caso
necesario. Guarde también el com-
probante de la compra para posi-
bles reclamaciones de garantía.
Si
presta o vende la herramienta a
otra persona, proporciónele también
toda la documentación que la acom-
paña.
El fabricante no se responsabilizará de
los
daños ocasionados por no haber leí-
do este manual de uso.
La información de este manual está
seña
lada del siguiente modo:
¡Peligro!
Advertencia ante daños
per
sonales o medioam-
bientales.
¡Atención!
Advertencia ante daños
materiales.
Nú
meros de las ilustraciones (1, 2,
3, ...)
se
refieren a piezas individuales;
e
stán numeradas correlativa-
mente.
Las instrucciones de uso cuyo
orden debe ser tenido en cuenta
están numeradas correlativamente.
Las instrucciones de uso cuyo
orden es indiferente van precedidas
de un punto.
Los elementos de una lista van pre-
cedidos de un guión.
3.1 Uso según su finalidad
El desbarbador de varilla es una herra-
mienta accionada por aire comprimido
pa
ra el uso profesional. Puede
emplearse para trabajos como esmeri-
lar, desbarbar, desoxidar y fresar.
Sólo se puede accionar mediante un
compresor de aire comprimido. No se
debe sobrepasar la presión efectiva
máxima especificada en las Característi-
cas técnicas. Esta herramienta no se
pu
ede emplear con gases explosivos,
inflamables o tóxicos.
Cualquier otra aplicación será conside-
rada contraria a su finalidad. El uso con-
trario a su finalidad,
los cambios en la
herramienta o el uso de piezas que no
hayan sido comprobadas y autorizadas
por el fabricante, podrían ocasionar
daños imprevistos.
3.2 Recomendaciones gene-
rales de seguridad
Respete las siguientes instruccio-
nes de seguridad al usar esta herra-
mienta, a fin de evitar peligros para
p
ersonas o daños materiales.
Tenga en cuenta las recomendacio-
nes de seguridad especiales que se
encuentran en cada capítulo.
Dado el caso, respete las normas
especiales de protección laboral o
de prevención de accidentes para el
uso con compresores y herramien-
tas neumáticas.
A
¡Situaciones de peligro!
Man
tenga el lugar de trabajo orde-
nado – El desorden en las zonas de
trab
ajo puede provocar accidentes.
Ten
ga cuidado. No utilice la herra-
mienta en momentos de falta de
co
ncentración.
Man
tenga alejados de la zona de
trabajo a los niños y a las personas
ajenas.
Guarde las herramientas de aire
comprimido fuera del alcance de los
niños.
Conecte esta herramienta a un
compresor sólo mediante el acopla-
miento rápido.
No emplee materiales perjudiciales
para la salud.
Al trabajar con la herramienta pue-
den producirse chispas. No utilice la
herramienta cerca de materiales,
líquidos o gases inflamables.
No toque ninguna pieza en rotación.
Se
pare esta herramienta de la
conexión del aire comprimido antes
de:
cam
biar las barritas de abrasivo,
re
parar las averías, o bien
cu
ando la herramienta esté sin
vigilancia.
U
tilice sólo las barritas de abrasivo
indicadas por el fabricante para esta
herramienta.
A
¡Peligro por protección perso-
nal insuficiente!
Utilice una protección acústica.
U
tilice gafas protectoras.
Utilice una máscara de protección
respiratoria.
U
tilice guantes de protección.
A
¡Peligro por errores en el
aparato!
¡Nu
nca repare Vd. mismo esta
herramienta! Las reparaciones de
compresores, depósitos a presión y
herramientas neumáticas deben ser
llevadas a cabo exclusivamente por
especialistas.
A
¡Atención!
Proteja el aparato del polvo y la
suciedad, especialmente la
conexión del aire comprimido, el
asiento de herramienta y los ele
-
mentos de manejo.
Asegúrese de que no se supera la
presión efectiva máxima especifi-
cada en las Características técni-
cas.
La presión efectiva debe ajustarse
med
iante un manorreductor.
Evite sobrecargas de la herramienta
– Utilice esta herramienta sólo den-
tro de los márgenes de potencia
e
specificados en las Característi-
cas técnicas.
Indice del contenido
2. ¡Leer esto en primer
lugar!
3. Seguridad

20
ESPAÑOL
Haga funcionar la herramienta sin
carga sólo por poco tiempo.
4.1 Antes de la primera
puesta en funciona-
miento
Enrosque la boquilla de enchufe.
4.2 Empleo de la herramienta
A
Atención:
Para que la herramienta esté
lis
ta para usar durante mucho tiempo,
debe proveerla con suficiente aceite
neumático. Este proceso puede reali-
zarse de la siguiente manera:
Mediante una unidad de manteni-
miento con lubricador en el com-
presor.
Mediante un lubricador adosado,
instalado en el conducto de aire
comprimido o directamente en la
herramienta de aire comprimido.
I
ntroduzca manualmente de 3 a 5
gotas de aceite neumático por
cada 15 minutos de servicio (uso
continuado) en la conexión de
aire comprimido.
1. Suelte la tuerca de apriete:
Sufrir: Sujete la llave de boca
(13) en el eje de la herramienta.
So
ltar: Gire la tuerca de apriete
con la llave de boca (16) en el
sentido contrario a las agujas del
reloj.
2. Introduzca o cambie la barrita de
abrasi
vo.
3. Apriete fuerte la tuerca de apriete en
el sentid
o de las agujas del reloj.
4. Ajuste la presión de trabajo en el
compresor (para la
presión de tra-
bajo máxima admitida, véanse las
Características técnic
as).
5. Acople la herramienta mediante
acoplamiento rápido al suministro
de aire comprimido.
6. Ajuste la velocidad deseada
mediante el tornillo para la regula-
ción del aire.
7. Para conectar:
Pulse ha
cia delante el seguro.
Emp
uje hacia abajo del todo la
palanca de extracción.
A
¡Peligro!
Antes de iniciar el trabajo con
esta herramienta, retire la conexión
del aire comprimido.
Cualquier trabajo de reparación o de
ma
ntenimiento diferente a los descri-
tos en este capítulo deberá ser lle-
vado a cabo exclusivam
ente por
especialistas.
Comprue
be que las atornilladuras
estén debidamente ajustadas y,
dado el caso, apriételas.
Si no se lubrica la herramienta
mediante una unidad de manteni-
miento o un lubricador, introduzca
ma
nualmente cada 15 minutos de
funcionamiento (funcionamiento
continuo) de 3 a 5 gotas de aceite
neumático en la conexión del aire
comprimido.
No g
uarde nunca la herramienta al
aire libre o en un ambiente húmedo
sin protección.
Ace
ite neumático de 0,5 litros
Aceite especial para herramientas
neumáticas, unidades de manteni-
miento y lubricadores.
N.º artículo 090 100 8540
Rosca interior R3/8" del lubricador
Para ser instalada directamente en
las he
rramientas neumáticas. Nivel
de aceite siempre visible a través de
la mirilla.
N.º artículo 090 105 4592
A
¡Peligro!
¡Los trabajos de reparación en
herramientas neumáticas deben ser
llevados a cabo exclusivamente por
electricistas especializados!
Las herramientas de aire comprimido
qu
e requieran reparación pueden
enviarse al centro de servicio técnico del
país. La dirección está indicada en la
lista de piezas de recambio.
Cuando envíe la herramienta eléctrica
pa
ra su reparación, deberá incluir una
descripción de la anomalía en cuestión.
El material de embalaje utilizado para la
má
quina es cien por cien reciclable.
Las máquinas y sus accesorios contie-
nen grandes cantidades de materia
prima y plásticos que también pueden
ser reciclados.
Este manual de uso ha sido impreso en
pa
pel blanqueado exento de cloro.
4. Funcionamiento
5. Conservación y manteni-
miento
6. Accesorios disponibles
7. Reparación
8. Protección medioam-
biental
9. Características técnicas
Modelo STS 7000
Cantidad de aire l/min 570
Presión efectiva máxima admisible bar 6,2
Velocidad min
-1
20000
Diámetro mínimo del tubo (interior) mm 9
Vibración (valor efectivo ponderado de la aceleración)
Inseguridad K
m/s
2
m/s
2
3,15
<2,5
EN ISO 15744
Nivel de potencia acústica L
WA
Nivel de presión acústica L
PA
Inseguridad K
dB (A)
dB (A)
dB (A)
97,3
86,3
4
Dimensiones:
longitud x anchura x altura mm 165 x 42 x 56
Peso kg 0,55
Sidan laddas...
Sidan laddas...
Sidan laddas...
Sidan laddas...
Sidan laddas...
Sidan laddas...
-
 1
1
-
 2
2
-
 3
3
-
 4
4
-
 5
5
-
 6
6
-
 7
7
-
 8
8
-
 9
9
-
 10
10
-
 11
11
-
 12
12
-
 13
13
-
 14
14
-
 15
15
-
 16
16
-
 17
17
-
 18
18
-
 19
19
-
 20
20
-
 21
21
-
 22
22
-
 23
23
-
 24
24
-
 25
25
-
 26
26


Metabo STS 7000 Bruksanvisningar
- Kategori
- Tillbehör för kaffebryggning
- Typ
- Bruksanvisningar
på andra språk
- italiano: Metabo STS 7000 Istruzioni per l'uso
- español: Metabo STS 7000 Instrucciones de operación
- Deutsch: Metabo STS 7000 Bedienungsanleitung
- français: Metabo STS 7000 Mode d'emploi
- English: Metabo STS 7000 Operating instructions
- dansk: Metabo STS 7000 Betjeningsvejledning
- Nederlands: Metabo STS 7000 Handleiding
Relaterade papper
-
Metabo WS 7400 Bruksanvisningar
-
-
-
-
-
-
-
-
-
