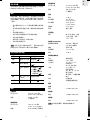
Oregon Scientific BAR289 Användarmanual
- Kategori
- Väckarklockor
- Typ
- Användarmanual

Jumbo Weather Station with Remote Control
Model: BAR289
User Manual
BAR289 Cover R7 OP 8/20/04, 11:00 PM1
Black

1
EN
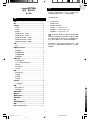
CONTENTS
Contents ................................................................... 1
Introduction .............................................................. 1
Product Overview .................................................... 2
Front View.............................................................. 2
Back View .............................................................. 2
LCD Display ........................................................... 3
Remote Control (RE289) - Front View ................... 3
Remote Control (RE289) - Back View ................... 4
Remote Sensor (RTHR328N) - Front View ........... 4
Remote Sensor (RTHR328N) - Back View ............ 4
Remote Sensor (RTHR328N) - LCD Display ......... 4
Getting Started ......................................................... 5
Batteries ................................................................. 5
Remote Sensor (RTHR328N) ................................... 5
Sensor Set Up ....................................................... 5
Sensor Data Transmission .................................... 6
Select Sensor Channel .......................................... 6
Search for Sensor .................................................. 6
Clock and Calendar ................................................. 6
Radio-Controlled Clock .......................................... 6
Turn Radio-Controlled Clock ON / OFF ................. 6
Set Clock ............................................................... 6
Switch Clock Display ............................................. 7
Hourly Chime ......................................................... 7
Alarm ......................................................................... 7
View Alarm Settings ............................................... 7
Set Alarm ............................................................... 7
Activate Alarm ........................................................ 7
Silence Alarm ......................................................... 7
Weather Forecast ..................................................... 8
Weather Forecast Icons ......................................... 8
Temperature .............................................................. 8
Maximum / Minimum Records ............................... 8
Select Measurement Unit ...................................... 8
Backlight ................................................................... 8
Reset System ........................................................... 8
Remote Control (RE289) .......................................... 8
Safety and Care ........................................................ 9
Warnings ................................................................... 9
Troubleshooting ....................................................... 9
Specifications ........................................................... 9
About Oregon Scientific ........................................ 10
EC-Declaration of Conformity ............................... 10
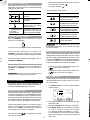
INTRODUCTION
Thank you for selecting the Oregon Scientific
TM
Jumbo
Weather Station with Remote Control (BAR289). This
powerful device bundles time keeping, weather forecast,
indoor and outdoor temperature, with remote control
facility, into a single tool you can use from the
convenience of your home.
In this box, you will find:
• Main unit (BAR289)
• Remote control (RE289)
• Remote sensor (RTHR328N)
• Main unit batteries, 4 x UM-3 (AA) 1.5V
• Remote control batteries, 2 x UM-4 (AAA) 1.5V
• Remote sensor batteries, 2 x UM-3 (AA) 1.5V
The THGR328N (5-Channel) and THR228N
(3-Channel) remote sensors are also compatible with
this weather station. If you purchase the THGR328N
sensor, the humidity reading will not show on the
BAR289. Additional sensors are sold separately. Please
contact your local stockist for more information.
Keep this manual handy as you use your new product.
It contains practical step-by-step instructions, as well
as technical specifications and warnings you should
know.
NOTE
Jumbo Weather Station
with Remote Control
Model: BAR289
User Manual
BAR289 ENG R7 OP 8/20/04, 11:00 PM1
Black

2
EN
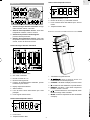
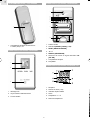
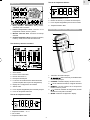
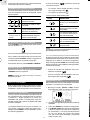
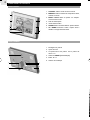
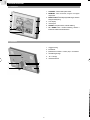
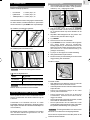
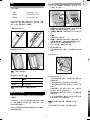
1. CHANNEL: Switch remote sensor display
2. MEMORY: View current, maximum and minimum
temperature readings
3. MODE / LIGHT: Change settings / display; activate
backlight
4. LCD display
5. Infrared window
6. ALARM: View alarm status; set alarm
7. UP / DOWN: Increase / decrease setting; activate /
deactivate radio-controlled clock
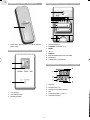
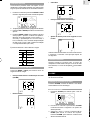
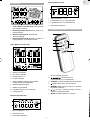
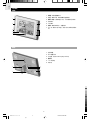
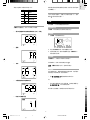
PRODUCT OVERVIEW
FRONT VIEW
BACK VIEW
1. Wall mount
2. Table stand
3. Battery compartment: Uses 4 x UM-3 (AA) 1.5V
4. RESET hole
5. °C / °F button
6. Ventilation holes
1
2
3
4
5
6
7
1
2
3
4
5
6
BAR289 ENG R7 OP 8/20/04, 11:00 PM2
Black

3
EN
2
1
3
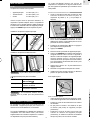
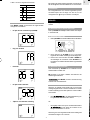
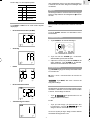
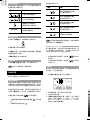
LCD DISPLAY
1. Clock / Alarm / Calendar Area: Radio-controlled
clock; alarm; calendar
2. Indoor Temperature Area: Maximum, minimum,
and current readings
3. Weather Forecast Area: Animated weather forecast
4. Outdoor Temperature Area: Maximum, minimum,
and current readings; sensor channel number
Clock / Alarm / Calendar Area
1. Time Zone Hour Offset
2. Time / date / calendar
3. Channel number 1-5
4. RF clock reception
5. Backlight function is deactivated
(under low battery condition)
6. Alarm setting display
7. Alarm is activated
8. Low battery icon for main unit
9. Hourly chime icon
Indoor Temperature Area
1. Indoor temperature - °C / °F
2. Indoor icon
3. MAX / MIN temperature
Outdoor Temperature Area
1. Outdoor temperature - °C / °F
2. Channel number (1-5) / reception status
3. Low battery icon for remote sensor
4. MAX / MIN temperature
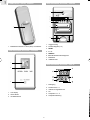
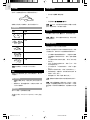
REMOTE CONTROL (RE289) - FRONT VIEW
1. Infrared signal transmitter
2.
:
Activates snooze and backlight on
the main unit
3. CHANNEL: Switch remote sensor display
4.
: View alarm status; set alarm
5. MEMORY: View current, maximum and minimum
temperature readings
6.
/
: Increase / decrease setting; activate /
deactivate radio-controlled clock
7. MODE: Change settings / display
1
2
3
4
2
1
4
3
1
2
3
4
5
6
7
1
2
3
4
5
6
7
8
9
BAR289 ENG R7 OP 8/20/04, 11:00 PM3
Black

4
EN
1
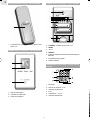
REMOTE CONTROL (RE289) - BACK VIEW
1. Battery compartment: Uses 2 x UM-4 (AAA) 1.5V
REMOTE SENSOR (RTHR328N) - FRONT VIEW
1. LCD display
2. LED status indicator
3. Ventilation duct
1
2
3
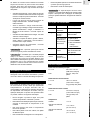
REMOTE SENSOR (RTHR328N) - BACK VIEW
1. Wall mount
2. CHANNEL switch (1-5)
3. RESET
4. °C / °F
5. SEARCH
6. EU / UK radio signal format switch
7. Battery compartment
8. Fold-out stand
REMOTE SENSOR (RTHR328N) - LCD DISPLAY
1
2
3
4
5
6
7
8
1. Reception
2. Channel number (1-5)
3. Low battery indicator
4. Time
5. Temperature - °C or °F
6. Temperature reading
BAR289 ENG R7 OP 8/20/04, 11:00 PM4
Black

5
EN
GETTING STARTED
BATTERIES
Batteries are supplied with this product:
• Main unit 4 x UM-3 (AA) 1.5V
• Remote control 2 x UM-4 (AAA) 1.5V
• Remote sensor 2 x UM-3 (AA) 1.5V
Insert batteries before first use, matching the polarity
as shown in the battery compartment. For best results,
install batteries in the remote sensor before the main
unit. Press RESET after each battery change.
To install the main unit batteries:
To install the remote control batteries:
NOTE
UNIT
LOCATION
Main Clock / Alarm / Calendar Area
Remote Sensor Outdoor Temperature Area
REMOTE SENSOR (RTHR328N)
This product is shipped with the RTHR328N Remote
Sensor. The main unit can collect data from up to
5 sensors.
The THGR328N and THR228N sensors are also
compatible with this weather station. (Additional sensors
are sold separately. Contact your local stockist for more
information.)
The RTHR328N sensor collects temperature readings
and signals from official time-keeping organizations for
the radio-controlled clock.
Do not use rechargeable batteries.
shows when batteries are low.
It is recommended that you use alkaline
batteries with this product for longer performance.
NOTE
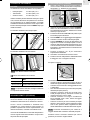
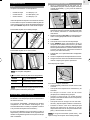
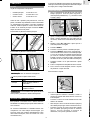
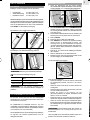
SENSOR SET UP
1. Open the battery compartment with a small Phillips
screwdriver and insert the batteries matching the
polarity (+ and -) as shown below.
2. Set the channel by pressing the CHANNEL button
to the required number. If you are using more than
one sensor, select a different channel for each
sensor.
3. Slide the EU / UK switch to the setting which best
suits your location.
4. Press RESET.
5. Place the sensor near the main unit.
6. Press SEARCH to manually initiate signal sending
between the sensor and the main unit. The reception
icon on the main unit will blink for approximately
3 minutes while it is searching for the sensor. (Refer
to the "Sensor Data Transmission" section for more
information.)
7. Press the °C / °F button to select the setting you want.
8. Close the remote sensor battery compartment.
9. Secure the sensor in the desired location using the
wall mount or table stand.
To fold out the stand:
1
2
For best results:
• Insert the batteries and select the unit, channel, and
radio signal format before you mount the sensor.
• Place the sensor out of direct sunlight and moisture.
• Do not place the sensor more than 30 metres
(100 feet) from the main (indoor) unit.
• Position the sensor so that it faces the main (indoor)
unit, minimizing obstructions such as doors, walls,
and furniture.
• Place the sensor in a location with a clear view to
the sky, away from metallic or electronic objects.
• Position the sensor close to the main unit during cold
winter months as below-freezing temperatures may
affect battery performance and signal transmission.
The transmission range may vary and is subject
to the receiving range of the main unit.
You may need to experiment with various locations to
get the best results.
NOTE
BAR289 ENG R7 OP 8/20/04, 11:00 PM5
Black

6
EN
SENSOR DATA TRANSMISSION
Data is sent from the sensor(s) every 60 Seconds. The
reception icon shown in the Outdoor Temperature Area
indicates the status.
NOTE
SELECT SENSOR CHANNEL
Press CHANNEL on the main unit, to switch between
sensors 1-5.
The house icon shows the selected remote sensor.
To auto-scan between sensors, press and hold
CHANNEL for 2 seconds. Each sensor's data will be
displayed for 3 seconds.
To end auto-scan, press CHANNEL or MEMORY.
SEARCH FOR SENSOR
To search for a Thermo sensor, simultaneously press
and hold CHANNEL and MEMORY for 2 seconds.
If the sensor is still not found, check the
batteries.
CLOCK AND CALENDAR
This product tracks the time and date based on radio-
controlled signals from the RTHR328N remote sensor,
or manual settings that you enter.
RADIO-CONTROLLED CLOCK
The time and date are automatically updated by radio-
controlled clock signals from official time-keeping
organizations in Frankfurt (Germany) and Rugby
(England) unless you disable this feature. The signals
are collected by the remote sensor (RTHR328N)
whenever it is within 1500 km (932 miles) of a signal.
Initial reception takes 2-10 minutes, and is initiated when
you first set up the unit, and whenever you press RESET.
Once complete, the reception icon will stop blinking.
The reception icon
shown in the Clock Area
indicates 2 factors:
• Connection between the main unit and the sensor
that collects RF signals (
)
• RF signal reception (
)
How these signals work together:
To force a manual search for the RF clock
reception, press and hold SEARCH on the sensor
(RTHR328N).
TURN RADIO-CONTROLLED CLOCK ON / OFF
If you wish to manually set the clock, you must first
disable the radio-controlled feature. To do this, make
sure you are not in Setting Mode, then press and hold
DOWN on the main unit for 2 seconds. To enable it,
hold UP for 2 seconds.
• When the RF clock is enabled this icon
will
appear on the display.
• When the RF clock is disabled this icon
will
NOT appear on the display.
SET CLOCK
You only need to do this if you have disabled the radio-
controlled clock, or if you are too far from a RF signal.
1. Press and hold MODE / LIGHT for 2 seconds to enter
Setting Mode.
2. The setting will blink to indicate it can now be changed.
3. Press UP or DOWN to change the setting.
4. Press MODE / LIGHT to confirm the setting and
move to the next one. The order of the settings is:
time zone hour offset (+ / -23 hours), 12 / 24 hour
format, hour, minute, year, date / month format,
month, date, display language and hourly chime
(ON / OFF).
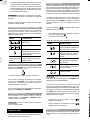
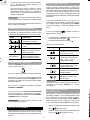
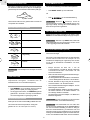
Main unit is searching for
sensors.
At least 1 channel has been
found.
Sensor 1 is sending data. (The
number shows which sensor is
selected.)
The selected sensor cannot be
found. Search for the sensor or
check batteries.
ICON DESCRIPTION
--- shows in Temp
Area
ICON MEANING
The unit has contact with the
remote sensor and has
synchronized the time.
The unit has contact with the
remote sensor but the time has
not been synchronized.
The unit has lost contact with
the remote sensor but the time
is synchronized.
The unit has lost contact with
the remote sensor and the time
is not synchronized.
The unit cannot reach the
remote sensor.
NOTE
BAR289 ENG R7 OP 8/20/04, 11:00 PM6
Black

7
EN
Each display will be backlit for 5 seconds and will return
to the main screen display after 10 seconds.
HOURLY CHIME
The hourly chime function when set to ON will beep once
at the beginning of every hour, and the chime icon
will show on the display.
ALARM
This product is equipped with a 2-minute crescendo
alarm.
VIEW ALARM SETTINGS
Press ALARM. The alarm time and status will show in
the Clock Area.
SET ALARM
1. Press ALARM to switch to alarm display.
NOTE
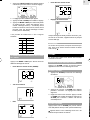
You can select 1 of the 5 following languages:
SWITCH CLOCK DISPLAY
Press MODE / LIGHT to toggle between the following
clock displays:
• RF time with hour-offset time (HH:MM)
• Day of the week
• Calendar
• RF time without offset
• Time-zone hour-offset setting
2. Press and hold ALARM again, for 2 seconds. The
alarm settings will blink.
3. Select the hour and minute. Press UP or DOWN to
change settings. Press ALARM to confirm. The
alarm will be activated automatically.
ACTIVATE ALARM
Press ALARM twice to start toggling between alarm ON
and alarm OFF.
shows in the Clock / Alarm Area when the alarm is
activated.
Press MODE, or wait 1 minute to return to clock
display.
SILENCE ALARM
When the alarm time is reached, the crescendo alarm
will sound for 2 minutes and the backlight will turn on for
5 seconds. To silence the alarm:
• Press
on the remote control to
silence it for 8 minutes.
OR
• Press any key on the main unit or remote control
except
to mute the alarm and
activate it again after 24 hours.
If no button is pressed, the alarm will automatically
silence after 2 minutes.
SYMBOL LANGUAGE
English
German
French
Italian
Spanish
BAR289 ENG R7 OP 8/20/04, 11:00 PM7
Black

8
EN
NOTE
NOTE
NOTE
NOTE
The LCD display shows an animated icon indicating the
forecasted weather.
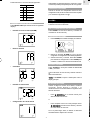
WEATHER FORECAST ICONS
ICON DESCRIPTION
Clear
Partly cloudy
Cloudy
Rainy
Snowy
Day / Night
Day / Night
WEATHER FORECAST
This product forecasts the next 12 to 24 hours of weather
within a 30-50 km (19-31 mile) radius. The forecast is
based on barometric pressure trend readings.
VIEW BAROMETER AREA
The night time icon displays from 6 PM to 6 AM.
TEMPERATURE
This product can display maximum, minimum and
current temperatures collected by the remote sensors
and main (indoor) unit.
MAXIMUM / MINIMUM RECORDS
• Press MEMORY to toggle between maximum (MAX),
minimum (MIN) and current records.
• To clear the records, press and hold MEMORY for
2 seconds. A beep will sound to confirm that the
memory has been cleared.
SELECT MEASUREMENT UNIT
Press the °C / °F button to choose the setting you want.
The display can show indoor temperatures ranging
from -5°C to +50°C (23°F to +122°F).
NOTE
BACKLIGHT
To turn on the backlight for 5 seconds:
• Press MODE / LIGHT on the main unit.
OR
• Press
on the remote control.
When
appears, the backlight function is
deactivated due to low-battery power. Replace with new
batteries to operate this function again.
RESET SYSTEM
Insert a thin blunt instrument into the hole below RESET
to return to the default settings.
When you press RESET, all settings will return
to default value, and you will lose all stored information.
REMOTE CONTROL (RE289)
The remote control interacts with the main unit using
infrared technology.
The buttons on the remote control complete the same
functions as the buttons on the front of the main unit.
Refer to the following list of functions and see the relevant
section headings for further information:
• Manually view 1 of 5 sensor channel's data or view
each channel for 3 seconds using auto-scan - see
"Select Sensor Channel".
• Force a manual search for the RF clock reception -
see "Radio-Controlled Clock".
• Enable / disable the radio-controlled clock - see "Turn
Radio-Controlled Clock On / Off".
• Manually set the clock, calendar and day of the week
language - see "Set Clock".
• View the 5 different clock displays - see "Switch Clock
Display".
• View the alarm settings, set the alarm, activate the
alarm and silence the alarm - see all of "Alarm"
section.
• View temperature records - see "Maximum /
Minimum Records".
The sensor auto-search function cannot be
operated by the remote control.
The main unit must be no more than 4 metres
(13 feet) from the remote control for a successful
connection to take place. Point the remote control directly
at the infrared window on the main unit for optimal
performance. The remote control cannot perform when
there is an obstacle between the 2 units.
BAR289 ENG R7 OP 8/20/04, 11:00 PM8
Black

9
EN
SAFETY AND CARE
Clean the product with a slightly damp cloth and alcohol-
free, mild detergent. Avoid dropping the product or
placing it in a high-traffic location.
WARNINGS
This product is designed to give you years of service if
handled properly. Oregon Scientific will not be
responsible for any deviations in the usage of the device
from those specified in the user instructions or any
unapproved alterations or repairs of the product.
Observe the following guidelines:
• Never immerse the product in water. This can cause
electrical shock and damage the product.
• Do not subject the main unit to extreme force, shock,
or fluctuations in temperature or humidity.
• Do not tamper with the internal components.
• Do not mix new and old batteries or batteries of
different types.
• Do not use rechargeable batteries with this product.
• Remove the batteries if storing this product for a long
period of time.
• Do not scratch the LCD display.
The technical specification of this product and
contents of this user manual are subject to change
without notice. Images not drawn to scale.
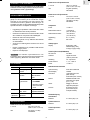
TROUBLESHOOTING
NOTE
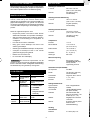
PROBLEM SYMPTOM
REMEDY
Calendar
Strange date /
month
Change language
(
6)
Clock
Cannot adjust
clock
Disable radio-
controlled clock (
6)
Cannot auto-
synch
1. Adjust batteries
(
5)
2. Press RESET
(
8)
3. Manually activate
radio-controlled
clock (
6)
Temp
Shows "LLL" or
"HHH"
Temperature is out-of-
range
Remote
sensor
Cannot locate
remote sensor
Check batteries (
5)
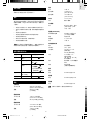
SPECIFICATIONS
Main Unit Dimensions
L x W x H 225 x 24 x 141 mm
(8.86 x 0.94 x 5.55 inches)
Weight 542 grams (1.19 lbs)
without battery
Remote Control Dimensions
L x W x H 108 x 17 x 39 mm
(4.25 x 0.67 x 1.54 inches)
Weight 34 grams (0.08 lbs)
without battery
Remote Sensor Dimensions
L x W x H 70 x 24.5 x 116 mm
(2.76 x 0.96 x 4.57 inches)
Weight 108 grams (0.24 lbs)
without battery
Temperature
Unit °C or °F
Indoor Range -5°C to 50°C
(23°F to 122°F)
Outdoor Range -20°C to 60°C
(-4°F to 140°F)
Resolution 0.1°C (0.2°F)
Memory Min / Max
Weather Forecast
Display Sunny (day / night),
partly cloudy (day /
night), cloudy, rainy,
snowy
Remote Unit (RTHR328N)
RF frequency 433 MHz
Range Up to 30 metres
(100 feet) with
no obstructions
Transmission Approx. every 1 minute
Channel No. 1, 2, 3, 4 or 5
Unit °C or °F
Radio-Controlled Clock
Synchronization Auto or disabled
Clock display HH:MM
Hour format 12hr AM / PM
(MSF format)
24hr (DCF format)
Calendar DD / MM or MM / DD;
Day of the week in 1 of 5
languages (E, G, F, I, S)
Alarm Daily with 2-minute
crescendo
Snooze 8-minute snooze
(operated by remote
control only)
Power
Main unit
Batteries 4 x UM-3 (AA) 1.5V
Remote Control
Batteries 2 x UM-4 (AAA) 1.5V
Remote Sensor
Batteries 2 x UM-3 (AA) 1.5V
BAR289 ENG R7 OP 8/20/04, 11:00 PM9
Black

10
EN
EC-DECLARATION OF CONFORMITY
This product contains the approved transmitter module
that complies with the essential requirements of
Article 3 of the R&TTE 1999 / 5 / EC Directive, if used
as intended and the following standards have been
applied:
Safety of information technology equipment
(Article 3.1.a of the R&TTE Directive)
Applied Standard EN 60950: 2000
Electromagnetic compatibility
(Article 3.1.b of the R&TTE Directive)
Applied Standards
ETSI EN 301 489-1-3 (Ver.1.4.1): 2002-08
Efficient use of radio frequency spectrum
(Article 3.2 of the R&TTE Directive)
Applied Standards
ETSI EN 300 220-3 (Ver1.1.1): 2000-09
Additional information:
The product herewith complies with the requirements of
the Low Voltage Directive 73 / 23 / EC, the EMC Directive
89 / 336 / EC and carries the CE marking accordingly.
Carmelo Cubito
Agrate Brianza (MI) / Italy January 2004
Manufacturer's EU R&TTE Representative
COUNTRIES RTTE APPROVAL COMPLIED
All EC countries, Switzerland CH
and Norway N
NOTE
It is recommended that you use alkaline
batteries with this product for longer performance.
ABOUT OREGON SCIENTIFIC
Visit our website (www.oregonscientific.com) to learn
more about Oregon Scientific products such as digital
cameras; MP3 players; children's electronic learning
products and games; projection clocks; health and
fitness gear; weather stations; and digital and conference
phones. The website also includes contact information
for our customer care department in case you need to
reach us, as well as frequently asked questions and
customer downloads.
We hope you will find all the information you need on
our website, however if you'd like to contact the Oregon
Scientific Customer Care department directly, please
visit:
www2.oregonscientific.com/service/support
OR
Call 949-608-2848 in the US.
For international enquiries, please visit:
www2.oregonscientific.com/about/international/
default.asp
BAR289 ENG R7 OP 8/20/04, 11:00 PM10
Black

1
IT
INDICE
Contents ................................................................... 1
Introduzione ............................................................. 1
Caratteristiche del prodotto .................................... 2
Vista anteriore ........................................................ 2
Vista posteriore ...................................................... 2
Display LCD ........................................................... 3
Telecomando (RE289) - vista anteriore ................. 3
Telecomando (RE289) - vista posteriore ............... 4
Sensore remoto (RTHR328N) - vista anteriore ..... 4
Sensore remoto (RTHR328N) - vista posteriore.... 4
Sensore remoto (RTHR328N) - display LCD ......... 4
Operazioni preliminari ............................................. 5
Batterie .................................................................. 5
Sensore remoto (RTHR328N) .................................. 5
Configurazione del Sensore .................................. 5
Trasmissione dei dati dal sensore ......................... 6
Selezione del canale del sensore .......................... 6
Ricerca del sensore ............................................... 6
Orologio e calendario .............................................. 6
Orologio radiocontrollato ........................................ 6
Attivazione / disattivazione dell'orologio
radiocontrollato ...................................................... 6
Impostazione dell'orologio ..................................... 6
Informazioni visualizzabili sul display
dell'orologio ............................................................ 7
Segnale acustico orario ......................................... 7
Allarme ...................................................................... 7
Visualizzazione delle impostazioni dell'allarme ..... 7
Impostazione dell'allarme ...................................... 7
Attivazione dell'allarme .......................................... 7
Disattivazione dell'allarme .................................... 7
Previsioni meteorologiche ...................................... 8
Icone delle previsioni meteorologiche .................... 8
Temperatura .............................................................. 8
Valori massimi e minini
memorizzati ........................................................... 8
Selezione dell’unità di misura ................................ 8
Retroilluminazione ................................................... 8
Funzione RESET ...................................................... 8
Telecomando (RE289) .............................................. 8
Sicurezza e manutenzione ...................................... 9
Avvertenze ................................................................ 9
Soluzione dei problemi ............................................ 9
Specifiche ................................................................. 9
Informazioni su Oregon Scientific ........................ 10
Dichiarazioni di conformità ................................... 10
INTRODUZIONE
Grazie per avere scelto la stazione meteorologica con
telecomando Oregon Scientific
TM
modello BAR289.
Questo efficiente dispositivo consente di visualizzare
sull'ampio display l'ora, le previsioni meteorologiche, le
temperature interna ed esterna e di accendere la
retroilluminazione del display o impostare gli allarmi
tramite il telecomando incluso nella confezione.
Contenuto della confezione:
• Unità principale (BAR289)
• Telecomando (RE289)
• Sensore remoto (RTHR328N)
• Batterie dell'unità principale: 4 x UM-3 (AA) 1,5 V
• Batterie del telecomando: 2 x UM-4 (AAA) 1,5 V
• Batterie del sensore remoto: 2 x UM-3 (AA) 1,5 V
Anche i sensori remoti THGR328N (a 5 canali)
e THR228N (a 3 canali) sono compatibili con questa
stazione meteorologica. Se si utilizza il sensore
THGR328N, i valori dell'umidità non verranno visualizzati
sul display della stazione meteorologica BAR289. È
possibile acquistare altri sensori separatamente. Per
ulteriori informazioni contattare il rivenditore locale.
Durante l'utilizzo di questo nuovo prodotto consultare il
presente manuale che contiene istruzioni dettagliate,
specifiche tecniche e avvertenze importanti.
NOTA
Stazione Meteorologica con
Telecomando
Modello: BAR289
Manuale d'uso
BAR289 IT R2 OP 8/23/04, 8:09 PM1
Black

2
IT
1. CHANNEL: attiva la visualizzazione dei dati rilevati
dal sensore remoto sul display
2. MEMORY: visualizza i valori delle temperature
massima, minima e corrente
3. MODE / LIGHT: modifica le impostazioni/i valori
visualizzati sul display; attiva la retroilluminazione
4. Display LCD
5. Finestra infrarossi
6. ALARM: visualizza lo stato dell'allarme; imposta
l'allarme
7. UP / DOWN: aumenta/diminuisce i valori impostati;
attiva/disattiva l'orologio radio-controllato
CARATTERISTICHE DEL PRODOTTO
VISTA ANTERIORE
VISTA POSTERIORE
1. Attacco per il fissaggio a muro
2. Supporto da tavolo
3. Vano batterie: accoglie 4 batterie UM-3 (AA) da 1,5 V
4. Foro RESET
5. Pulsante °C / °F
6. Fori di aerazione
1
2
3
4
5
6
7
1
2
3
4
5
6
BAR289 IT R2 OP 8/23/04, 8:09 PM2
Black

3
IT
1
2
3
4
5
6
7
2
1
3
DISPLAY LCD
1. Sezione Orologio / Allarme / Calendario: orologio
radiocontrollato; allarme; calendario
2. Sezione della temperatura interna: valori delle
temperature massima, minima e corrente
3. Sezione delle previsioni meteorologiche:
previsioni del tempo animate
4. Sezione della temperatura esterna: valori delle
temperature massima, minima e corrente rilevate dai
sensori; numero di canale del sensore
Sezione Orologio / Allarme / Calendario
1. Offset dell'ora del fuso orario
2. Ora / Data / Calendario
3. Numeri di canale da 1 a 5
4. Ricezione del segnale RF
5. Funzione di retroilluminazione disattivata, quando
la batteria è quasi scarica
6. Display impostazione allarme
7. Allarme attivato
8. Icona di bassa carica della batteria per l'unità
principale
9. Icona segnale acustico orario
Sezione della temperatura interna
1. Temperatura interna: °C / °F
2. Icona Interno
3. Temperatura MAX / MIN
Sezione della temperatura esterna
1. Temperatura esterna: °C / °F
2. Numero di canale (1-5) / stato della ricezione
3. Icona di bassa carica della batteria per il sensore
remoto
4. Temperatura MAX / MIN
TELECOMANDO (RE289) - VISTA ANTERIORE
1. Trasmettirore segnale infrarossi
2.
:
attiva la funzione snooze e la
retroilluminazione nell'unità principale
3. CHANNEL: visualizza sul display il sensore remoto
4.
: visualizza lo stato dell'allarme; imposta l'allarme
5. MEMORY: visualizza i valori delle temperature
massima, minima e corrente
6.
/
: aumenta/diminuisce i valori impostati; attiva/
disattiva l'orologio radio-controllato
7. MODE: modifica le impostazioni/i valori visualizzati
sul display
1
2
3
4
2
1
4
3
1
2
3
4
5
6
7
8
9
BAR289 IT R2 OP 8/23/04, 8:09 PM3
Black

4
IT
1
TELECOMANDO (RE289) - VISTA POSTERIORE
1. Vano batterie: accoglie 2 batterie UM-4 (AAA) da 1,5 V
SENSORE REMOTO (RTHR328N) - VISTA ANTERIORE
1. Display LCD
2. Indicatore LED
3. Fori di aerazione
1
2
3
SENSORE REMOTO (RTHR328N) - VISTA POSTERIORE
1. Attacco per fissaggio a muro
2. Interruttore CHANNEL (1-5)
3. RESET
4. °C / °F
5. SEARCH
6. Interruttore formato del segnale radio EU / UK
7. Vano batterie
8. Supporto pieghevole
SENSORE REMOTO (RTHR328N) - DISPLAY LCD
1
2
3
4
5
6
7
8
1. Stato della ricezione
2. Numero canale (1-5)
3. Indicatore del livello di bassa carica della batteria
4. Ora
5. Unità di visualizzazione della temperatura: °C o °F
6. Valori delle temperature
BAR289 IT R2 OP 8/23/04, 8:09 PM4
Black

5
IT
1
2
OPERAZIONI PRELIMINARI
BATTERIE
Le batterie sono fornite in dotazione con il prodotto:
• Unità principale 4 x UM-3 (AA) 1,5 V
• Telecomando 2 x UM-4 (AAA) 1,5 V
• Sensore remoto 2 x UM-3 (AA) 1,5 V
Inserire le batterie prima di utilizzare l'unità per la prima
volta, facendo attenzione alle polarità come mostrato
nel vano batterie. Per un migliore risultato, si consiglia
di installare le batterie nel sensore remoto dopo averle
inserite nell'unità principale. Premere RESET dopo ogni
cambio di batterie.
Per installare le batterie nell'unità principale:
Per installare le batterie nel telecomando:
UNITÀ
SEZIONE
Principale Sezione Orologio/Allarme/Calendario
Sensore remoto Sezione della temperatura esterna
Non utilizzare batterie ricaricabili.
indica che le batterie sono scariche.
Per prestazioni ottimali si consiglia di utilizzare
con il prodotto batterie alcaline.
SENSORE REMOTO (RTHR328N)
Con il prodotto viene fornito in dotazione il sensore
remoto RTHR328N. L'unità principale può ricevere e
visualizzare i dati rilevati da un massimo di 5 sensori.
Anche i sensori THGR328N e THR228N sono
compatibili con questa stazione meteorologica. È
possibile acquistare altri sensori separatamente. Per
ulteriori informazioni, contattare il rivenditore locale.
Il sensore RTHR328N rileva i valori delle temperature e
riceve il segnale orario radiocontrollato che poi invia in
frequenza all'unità principale.
NOTA
CONFIGURAZIONE DEL SENSORE
1. Aprire il vano batterie con un piccolo cacciavite a
croce e inserire le batterie facendole corrispondere
alle polarità + e - illustrate nel vano batterie.
Per risultati ottimali:
• Inserire le batterie e selezionare l'unità, il canale e il
formato del segnale radio prima di installare il sensore.
• Collocare il sensore lontano dai raggi diretti del sole
e dall'umidità.
• Non collocare il sensore a più di 30 metri (100 piedi)
dall'unità principale (interno).
• Collocare il sensore in modo che sia rivolto verso
l'unità principale (interno), riducendo al minimo gli
ostacoli come porte, muri e mobili.
• Collocare il sensore in un luogo in cui abbia una
buona visibilità verso il cielo, lontano da oggetti
metallici o elettronici.
• Collocare il sensore più vicino all'unità principale
durante i mesi invernali, poiché temperature rigide
sotto lo zero possono influire negativamente sulla
durata della batteria e sulla trasmissione del segnale.
L'intervallo di trasmissione può variare ed è
soggetto all'intervallo di ricezione dell'unità principale.
Potrebbe essere necessario cambiare più volte la
posizione per ottenere i migliori risultati.
NOTA
NOTA
2. Impostare il canale premendo il pulsante CHANNEL
finché non viene visualizzato il numero desiderato.
Se si utilizza più di un sensore, selezionare un canale
diverso per ogni sensore.
3. Posizionare l'interruttore EU / UK sulla posizione più
idonea alla propria ubicazione.
4. Premere RESET con un oggetto leggermente appuntito.
5. Collocare il sensore accanto all'unità principale.
6. Premere SEARCH per avviare la trasmissione del
segnale tra il sensore e l'unità principale. L'icona di
ricezione dell'unità principale lampeggerà per circa
3 minuti durante la ricerca del sensore. Per ulteriori
informazioni, consultare la sezione "Trasmissione dei
dati dal sensore".
7. Premere il pulsante ° C / ° F per selezionare
l'impostazione desiderata.
8. Chiudere il vano batterie del sensore remoto.
9. Fissare il sensore nella posizione desiderata tramite
il fissaggio a muro o il supporto da tavolo.
Per aprire il supporto:
BAR289 IT R2 OP 8/23/04, 8:09 PM5
Black

6
IT
TRASMISSIONE DEI DATI DAL SENSORE
I dati vengono inviati dal sensore o dai sensori ogni minuto
circa. L'icona di ricezione visualizzata nella sezione della
temperatura esterna mostra lo stato di trasmissione.
SELEZIONE DEL CANALE DEL SENSORE
Premere CHANNEL nell'unità principale per alternare
l'attivazione dei sensori, da 1 a 5.
L'icona della casa mostra il sensore remoto selezionato.
Per avviare la funzione di scansione automatici dei
sensori, tenere premuto CHANNEL per 2 secondi. I dati
di ciascun sensore verranno visualizzati per 3 secondi.
Per terminare la ricerca automatica, premere CHANNEL
o MEMORY.
RICERCA DEL SENSORE
Per cercare un sensore, tenere premuto CHANNEL e
MEMORY contemporaneamente per 2 secondi.
Se Il sensore non viene trovato, verificare le
batterie.
OROLOGIO E CALENDARIO
L'orario ed il calendario del prodotto vengono aggiornati
in continuazione grazie ai segnali radiocontrollati ricevuti
dal sensore remoto RTHR328N, ma è anche possibile
impostare ora e data manualmente, disattivando la
funzione di radiocontrollo.
OROLOGIO RADIOCONTROLLATO
La data e l'ora vengono aggiornate-automaticamente
in base ai segali radio-controllati ricevuti dalle
organizzazioni dell'ora ufficiali di Francoforte (Germania)
e Rugby (Inghilterra), purché non si disabiliti questa
funzione. I segnali vengono rilevati dal sensore remoto
(RTHR328N) purché questo sia collocato entro un raggio
di 1.500 km (932 miglia) dal segnale.
Per la ricezione iniziale sono necessari 2-10 minuti. La
ricerca automatica del segnae avviene dopo la prima
configurazione dell'unità e ogni volta che si premere il
pulsante RESET. Al termine dell'operazione, l'icona della
ricezione smetterà di lampeggiare.
NOTA
Per forzare una ricerca manuale del segnale di
ricezione dell'orologio RF, tenere premuto SEARCH sul
sensore (RTHR328N).
ATTIVAZIONE / DISATTIVAZIONE DELL'OROLOGIO
RADIOCONTROLLATO
Per impostare l'orologio manualmente, è innanzitutto
necessario disabilitare la funzione di radiocontrollo. Per
disattivare la funzione tenere premuto DOWN nell'unità
principale per 2 secondi. Per attivare nuovamente la funzione
di radiocontrollo, tenere premuto UP per 2 secondi.
• Quando l'orologio RF è abilitato, sul display verrà
visualizzata l'icona
.
• Quando la funzione RF è disabilitata, sul display
NON verrà visualizzata l'icona
.
IMPOSTAZIONE DELL'OROLOGIO
È necessario impostare l'orologio solo se è stata
disabilitata la funzione di radiocontrollo o se si è troppo
distanti da un segnale RF.
1. Tenere premuto MODE / LIGHT per 2 secondi per
attivare la modalità d'impostazione.
2. Il valore lampeggerà per indicare che è possibile modificarlo.
3. Premere UP o DOWN per modificare l'impostazione.
4. Premere MODE / LIGHT per confermare
l'impostazione e avanzare alla posizione successiva.
L'ordine delle impostazioni è il seguente: offset
dell'ora del fuso orario (+ / -23 ore), formato dell'ora
(12 / 24 ore), ora, minuti, anno, formato data/mese,
mese, data, lingua visualizzata e allarme orario
(ON / OFF).
L'unità principale è in fase di
ricerca
È stato trovato almeno
1 sensore.
Il sensore 1 sta inviando i dati. Il
numero cambierà a seconda
del sensore selezionato.
Non è possibile trovare il
sensore selezionato. Cercare il
sensore o controllare le batterie.
ICONA DESCRIZIONE
--- indicato nella
sezione della
Temperatura Esterna
ICONA SIGNIFICATO
L'unità è entrata in contatto
con il sensore remoto e ha
sincronizzato l'ora.
L'unità è entrata in contatto con
il sensore remoto ma l'ora non
è stata sincronizzata.
L'unità ha perso il contatto con
il sensore remoto ma l'ora è
stata sincronizzata.
L'unità ha perso il contatto con
il sensore remoto e l'ora non è
stata sincronizzata.
L'unità non può entrare in
contatto con il sensore remoto.
NOTA
L'icona di ricezione
visualizzata nella sezione
dell'orologio indica 2 fattori:
• Connessione tra l'unità principale e il sensore che
rileva i segnali RF (
)
• Ricezione del segnale RF (
)
Modalità d'interazione tra i segnali:
BAR289 IT R2 OP 8/23/04, 8:09 PM6
Black

7
IT
Ognuno di questi valori verrà retroilluminato per 5 secondi.
Dopo 10 secondi verrà ripristinata la schermata
principale del display.
SEGNALE ACUSTICO ORARIO
La funzione di segnale acustico orario, quando impostata
su ON, emette ad ogni ora un segnale acustico (beep).
In questo caso, sul display è visualizzata l'icona
.
ALLARME
Questo prodotto è dotato di un allarme da 2 minuti in
crescendo.
VISUALIZZAZIONE DELLE IMPOSTAZIONI
DELL'ALLARME
Premere ALARM. Nella sezione dell'orologio verranno
visualizzati lo stato e l'ora dell'allarme.
IMPOSTAZIONE DELL'ALLARME
1. Premere ALARM per attivare la visualizzazione
dell'allarme sul display.
INFORMAZIONI VISUALIZZABILI SUL DISPLAY
DELL'OROLOGIO
Premere MODE / LIGHT per alternare la visualizzazione
dei valori seguenti sul display dell'orologio:
• Ora RF con offset dell'ora (HH:MM)
• Giorno della settimana
• Calendario
• Ora RF senza offset
• Impostazione dell'offset dell'ora del fuso orario
2. Tenere premuto ancora ALARM per 2 secondi. Le
impostazioni dell'allarme lampeggeranno.
3. Selezionare l'ora e i minuti. Premere UP o DOWN
per modificare le impostazioni. Premere ALARM per
confermare l'impostazione. L'allarme verrà attivato
automaticamente.
ATTIVAZIONE DELL'ALLARME
Premere due volte ALARM per alternare l'attivazione e
la disattivazione dell'allarme.
è visualizzato nella sezione dell'orologio/allarme
quando l'allarme è attivato.
Per tornare al display dell'orologio, premere
MODE oppure attendere 1 minuto.
DISATTIVAZIONE DELL'ALLARME
Una volta raggiunta l'ora impostata, l'allarme in
crescendo suonerà per 2 minuti e la retroilluminazione
si attiverà per 5 secondi. Per disattivare l'allarme:
• Premere
sul telecomando per
disattivare il suono per 8 minuti.
OPPURE
• Premere un tasto qualsiasi sull'unità principale o sul
telecomando, ad eccezione di
, per
disattivare l'allarme e riattivarlo dopo 24 ore.
Se non si preme alcun pulsante, l'allarme verrà
disattivato automaticamente dopo 2 minuti.
SYMBOL
Inglese
Tedesco
Francese
Italiano
Spagnolo
È possibile selezionare una delle 5 lingue seguenti:
NOTA
LINGUA
BAR289 IT R2 OP 8/23/04, 8:09 PM7
Black

8
IT
Sul display LCD viene visualizzata un'icona animata che
indica il tempo previsto.
ICONE DELLE PREVISIONI METEOROLOGICHE
ICONA DESCRIZIONE
Sereno
Parzialmente nuvoloso
Nuvoloso
Pioggia
Neve
Giorno / Notte
Giorno / Notte
PREVISIONI METEOROLOGICHE
Il prodotto è in grado di prevedere il tempo delle prossime
12 - 24 ore, per le zone entro un raggio di 30-50 km
(19-31 miglia). Le previsioni si basano sulle letture delle
tendenze della pressione barometrica.
VIEW BAROMETER AREA
L'icona delle ore notturne viene visualizzata
dalle 6 PM (del pomeriggio) alle 6 AM (del mattino).
TEMPERATURA
Questo prodotto può visualizzare le temperature
massima, minima e corrente rilevate dai sensori remoti
e dall'unità principale (interno).
VALORI MASSIMI E MINIMI MEMORIZZATI
• Premere MEMORY per alternare la visualizzazione
delle registrazioni massima (MAX), minima (MIN) e
corrente.
• Per cancellare le registrazioni, tenere premuto
MEMORY per 2 secondi. Verrà emesso un segnale
acustico (beep) per confermare che le registrazioni
sono state cancellate dalla memoria.
SELEZIONE DELL'UNITÀ DI MISURA
Premere il pulsante °C / °F per scegliere l'impostazione
desiderata.
Sul display verranno visualizzati i valori delle temperature
interne, compresi tra -5 °C e +50 °C (23 °F e +122 °F).
RETROILLUMINAZIONE
Per attivare la retroilluminazione per 5 secondi:
• Premere MODE / LIGHT nell'unità principale.
OPPURE
• Premere SNOOZE / LIGHT
sul
telecomando.
Quando appare l'icona
, la funzione di
retroilluminazione viene disattivata perché la batteria è
quasi scarica. Per riattivare questa funzione, sostituire
le batterie.
FUNZIONE RESET
Inserire un oggetto leggermente appuntito nel foro sotto
a RESET per ripristinare i valori predefiniti.
Quando si preme RESET, verranno ripristinati
tutti i valori predefiniti e le informazioni memorizzate
verranno cancellate.
TELECOMANDO (RE289)
Il telecomando interagisce con l'unità principale tramite
la tecnologia a infrarossi.
I pulsanti del telecomando eseguono le stesse funzioni
dei pulsanti disponibili della parte anteriore dell'unità
principale. Per ulteriori informazioni, consultare l'elenco
delle funzioni seguenti e le intestazioni della sezione
corrispondente:
• Visualizzazione dei dati del canale assegnato
al sensore, da 1 a 5, oppure visualizzazione di
ciascun canale per 3 secondi tramite la funzione
di scansione automatica, vedere "Selezione del
canale del sensore".
• Imposizione di una ricerca manuale per la
ricezione dall'orologio radio-controllato, vedere
"Orologio radio-controllato".
• Attivazione / disattivazione dell'orologio radio-
controllato, vedere "Attivazione/Disattivazione
dell'orologio radio-controllato".
• Impostazione manuale dell'orologio, del
calendario e della lingua del giorno della
settimana, vedere "Impostazione dell'orologio".
• Visualizzazione dei 5 diversi display dell'orologio,
vedere "Informazioni visualizzabili sul display
dell'orologio".
• Visualizzazione delle impostazioni dell'allarme,
impostazione dell'allarme, attivazione e
disattivazione dell'allarme, vedere l'intera
sezione "Allarme".
• Visualizzazione delle registrazioni della
temperatura, vedere "Valori minimi e massimi
memorizzati".
La funzione di ricerca automatica del sensore
non può essere attivata dal telecomando.
NOTA
NOTA
NOTA
NOTA
BAR289 IT R2 OP 8/23/04, 8:09 PM8
Black

9
IT
Per una corretta connessione tra l'unità principale
e il telecomando, non collocare l'unità principale a una
distanza maggiore di 4 metri (13 piedi) dal telecomando.
Per prestazioni ottimali, puntare il telecomando
direttamente verso la finestra a infrarossi dell'unità
principale. Se tra il telecomando e l'unità principale è
presente un ostacolo, il telecomando non funzionerà.
SICUREZZA E MANUTENZIONE
Pulire il prodotto usando un panno leggermente inumidito
e un detergente delicato senza alcool. Evitare di versare
liquidi nell'unità o di collocare l'apparecchio in punti di
maggior passaggio.
AVVERTENZE
Il presente prodotto è progettato per offrire un funzionamento
soddisfacente e duraturo a condizione che venga
maneggiato con cura. Oregon Scientific declina ogni
responsabilità per danni derivanti da un utilizzo
dell'apparecchio diverso da quello specificato nel presente
manuale d'uso, o da qualsiasi alterazione o riparazione non
autorizzata del prodotto. Attenersi alle seguenti istruzioni:
• Non immergere mai il prodotto nell'acqua. Ciò potrebbe
causare scosse elettriche e danneggiare il prodotto.
• Non sottoporre l'unità principale a forza eccessiva,
urti o oscillazioni di temperatura o umidità.
• Non manomettere i componenti interni.
• Non mischiare batterie vecchie e nuove o batterie di
tipo diverso.
• Non utilizzare batterie ricaricabili con questo
apparecchio.
• Rimuovere le batterie se si prevede di non utilizzare
l'apparecchio per un lungo periodo di tempo.
• Non graffiare il display LCD.
Le specifiche di questo prodotto e il contenuto
del presente manuale d'uso sono soggetti a modifiche
senza preavviso. Le immagini non sono riprodotte in
scala.
SOLUZIONE DEI PROBLEMI
NOTA
NOTA
PROBLEMA MANIFES-
TAZIONE
POSSIBILI
SOLUZIONI
Calendario
Data / mese non
comprensibili
Cambiare la lingua
Orologio
Non è possibile
modificare
l'orologio
Disabilitare l'orologio
radio-controllato
Non è possibile
effettuare la
sincronizzazione
automatica
1. Sostituire le
batterie
2. Premere RESET
3. Attivare
manualmente
l'orologio radio-
controllato
Temperatura
Appare "LLL" o
"HHH"
La temperatura è fuori
gamma
Sensore
remoto
Non è possibile
individuare il
sensore remoto
Controllare le batterie
SPECIFICHE
Dimensioni dell'unità principale
B x A x P 225 x 24 x 141 mm
(8,86 x 0,94 x 5,55 pollici)
Peso 542 grammi (1,19 libbre)
senza batterie
Dimensioni del telecomando
B x A x P 108 x 17 x 39 mm
(4,25 x 0,67 x 1,54 pollici)
Peso 34 grammi (0.,8 libbre)
senza batterie
Dimensioni del sensore remoto
B x A x P 70 x 24,5 x 116 mm
(2,76 x 0,96 x 4,57 pollici)
Peso 108 grammi (0,24 libbre)
senza batterie
Temperatura
Unità °C o °F
Range interno da -5 °C a 50 °C
(da 23 °F a 122 °F)
Range esterno da -20 °C a 60 °C
(da -4 °F a 140 °F)
Risoluzione 0,1 °C (0,2 °F)
Memoria Min / Max
Previsioni meteorologiche
Display Sereno (giorno / notte),
parzialmente nuvoloso
(giorno / notte), nuvoloso,
pioggia, neve
Unità remota (RTHR328N)
Frequenza RF 433 MHz
Range fino a 30 metri (100 piedi)
senza ostacoli
Trasmissione Ogni minuto circa
N° canale 1, 2, 3, 4 o 5
Unità °C o °F
Orologio radio-controllato
Sincronizzazione Automatica o disabilitata
Display orologio HH:MM
Formato dell'ora 12 ore AM / PM (formato MSF)
24 ore (formato DCF)
Calendario GG/MM o MM/GG;
Giorno della settimana in
una delle 5 lingue
disponibili (E, G, F, I, S)
Allarme Giornaliero con
crescendo da 2 minuti
Snooze Snooze da 8 minuti
(attivabile solo dal
telecomando)
Alimentazione
Unità principale
Batterie 4 x UM-3 (AA) 1,5 V
BAR289 IT R2 OP 8/23/04, 8:09 PM9
Black
Sidan laddas...
Sidan laddas...
Sidan laddas...
Sidan laddas...
Sidan laddas...
Sidan laddas...
Sidan laddas...
Sidan laddas...
Sidan laddas...
Sidan laddas...
Sidan laddas...
Sidan laddas...
Sidan laddas...
Sidan laddas...
Sidan laddas...
Sidan laddas...
Sidan laddas...
Sidan laddas...
Sidan laddas...
Sidan laddas...
Sidan laddas...
Sidan laddas...
Sidan laddas...
Sidan laddas...
Sidan laddas...
Sidan laddas...
Sidan laddas...
Sidan laddas...
Sidan laddas...
Sidan laddas...
Sidan laddas...
Sidan laddas...
Sidan laddas...
Sidan laddas...
Sidan laddas...
Sidan laddas...
Sidan laddas...
Sidan laddas...
Sidan laddas...
Sidan laddas...
Sidan laddas...
Sidan laddas...
Sidan laddas...
Sidan laddas...
Sidan laddas...
Sidan laddas...
Sidan laddas...
Sidan laddas...
Sidan laddas...
Sidan laddas...
Sidan laddas...
Sidan laddas...
Sidan laddas...
Sidan laddas...
Sidan laddas...
Sidan laddas...
Sidan laddas...
Sidan laddas...
Sidan laddas...
Sidan laddas...
Sidan laddas...
Sidan laddas...
Sidan laddas...
Sidan laddas...
Sidan laddas...
Sidan laddas...
Sidan laddas...
Sidan laddas...
Sidan laddas...
Sidan laddas...
Sidan laddas...
Sidan laddas...
Sidan laddas...
Sidan laddas...
Sidan laddas...
Sidan laddas...
Sidan laddas...
Sidan laddas...
Sidan laddas...
Sidan laddas...
Sidan laddas...
Sidan laddas...
Sidan laddas...
Sidan laddas...
Sidan laddas...
Sidan laddas...
-
 1
1
-
 2
2
-
 3
3
-
 4
4
-
 5
5
-
 6
6
-
 7
7
-
 8
8
-
 9
9
-
 10
10
-
 11
11
-
 12
12
-
 13
13
-
 14
14
-
 15
15
-
 16
16
-
 17
17
-
 18
18
-
 19
19
-
 20
20
-
 21
21
-
 22
22
-
 23
23
-
 24
24
-
 25
25
-
 26
26
-
 27
27
-
 28
28
-
 29
29
-
 30
30
-
 31
31
-
 32
32
-
 33
33
-
 34
34
-
 35
35
-
 36
36
-
 37
37
-
 38
38
-
 39
39
-
 40
40
-
 41
41
-
 42
42
-
 43
43
-
 44
44
-
 45
45
-
 46
46
-
 47
47
-
 48
48
-
 49
49
-
 50
50
-
 51
51
-
 52
52
-
 53
53
-
 54
54
-
 55
55
-
 56
56
-
 57
57
-
 58
58
-
 59
59
-
 60
60
-
 61
61
-
 62
62
-
 63
63
-
 64
64
-
 65
65
-
 66
66
-
 67
67
-
 68
68
-
 69
69
-
 70
70
-
 71
71
-
 72
72
-
 73
73
-
 74
74
-
 75
75
-
 76
76
-
 77
77
-
 78
78
-
 79
79
-
 80
80
-
 81
81
-
 82
82
-
 83
83
-
 84
84
-
 85
85
-
 86
86
-
 87
87
-
 88
88
-
 89
89
-
 90
90
-
 91
91
-
 92
92
-
 93
93
-
 94
94
-
 95
95
-
 96
96
-
 97
97
-
 98
98
-
 99
99
-
 100
100
-
 101
101
-
 102
102
-
 103
103
-
 104
104
-
 105
105
-
 106
106


Oregon Scientific BAR289 Användarmanual
- Kategori
- Väckarklockor
- Typ
- Användarmanual
på andra språk
- italiano: Oregon Scientific BAR289 Manuale utente
- español: Oregon Scientific BAR289 Manual de usuario
- Deutsch: Oregon Scientific BAR289 Benutzerhandbuch
- português: Oregon Scientific BAR289 Manual do usuário
- français: Oregon Scientific BAR289 Manuel utilisateur
- English: Oregon Scientific BAR289 User manual
- Nederlands: Oregon Scientific BAR289 Handleiding
Relaterade papper
-
 Oregon Scientific BAR28 3 Användarmanual
-
 Oregon Scientific BAR816HG Användarmanual
-
 Oregon Scientific BAR826HG Användarmanual
-
 Oregon Scientific AWS888N Bruksanvisning
-
 Oregon Scientific BAR 926HG Wetterstation Användarmanual
-
 Oregon Scientific BAR638HG / BAR638HG-2 / BAR638HGU / BAR638HGU-2 Användarmanual
-
 Oregon Scientific AWS899 Bruksanvisning
-
Oregon Scientific BAR908HG / BAR908HGU / BAR908HGA Användarmanual
-
 Oregon Scientific BAR629HG / BAR629HGU Användarmanual
-
 Oregon Scientific BAR913 Bruksanvisning


