
FM Mattsson
Box 480
SE-792 27 MORA
SWEDEN
www.fmmattsson.com
INSTRUKTION / INSTRUCTION
FMM 9000E 40c/c
Rev. 004 – 19.05.08 - FMM nr 1003401
1
[2]
[2]
[3]
[3]
[1]
[3]
[2]
X2
3 mm
10 mm
5 mm
A
[1]
[1]
EB EN 1717
PS 1396
A:1 A:2
A:3 A:4
A:5 A:6
Silikon

2
INSTRUKTION / INSTRUCTION
FMM 9000E 40c/c Rev. 004 – 19.05.08 - FMM nr 1003401
C D
2
1
(b)
(a) [1]
[1]
[4]
[3]
(a) (b)
(d)
(c) [2]
[3]
[4]
[5]
[6]
[7]
[8]
[11]
[12] [9]
[10]
B:3
B
[10]
[1]
[9]
B:1 B:2
ALCOHOL
SOAP
(pH 6-9)
0°C

3
INSTRUKTION / INSTRUCTION
FMM 9000E 40c/c Rev. 004 – 19.05.08 - FMM nr 1003401
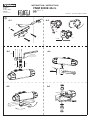
A MONTERING
Vi rekommenderar att du anlitar professionell VVS-installatör.
OBS! Vid ny rörinstallation måste ledningarna fram till blandarna renspolas,
innan blandaren monteras.
Skador som orsakas till följd av spänningskorrosion som uppstår på grund av vattnets
eller den omgivande miljöns beskaenhet samt felaktig montering inkluderas inte i
produktansvaret.
Vid risk för frost:
Om blandaren kommer att utsättas för yttre temperaturer lägre än 0 °C (t.ex. i
ouppvärmda fritidshus) ska vattenledningar och blandare tömmas på vatten. Lämna
blandaren i öppet läge. Alternativt kan blandaren demonteras och förvaras i uppvärmt
utrymme.
A:1 Montera väggfästet med medföljande skruv så att fästet hamnar dikt mot väg-
gen. Vid användning av skruvplugg, se till att pluggen inte sticker ut utanför väggen.
A:2 [1] Förmontera, för hand, fästskruven i blandaren med ca 2 varv.
[2] Montera blandaren över väggfästet enligt bild.
[3] Dra åt fästskruven med en 5 mm insexnyckel. Kontrollera att blandaren sitter rakt
och stabilt.
A:3 Montering av blandare med duschutlopp och inlopp uppåt:
För att enklare komma åt att montera inloppsrören börja med att demontera ut-
loppsnippeln. Använd en 10 mm insexnyckel för att lossa nippel och täckring [1]. Mon-
tera sedan inloppsrören på blandaren [2]. Återmontera nippel och täckring i omvänd
ordning [3].
A:4 Montering av badkarspip: För enklare montering, montera blandaren på väggen
först enligt A:1 och A:2. Sätt badkarspipen på blandarens utlopp [1]. Tryck upp pipen
mot blandaren och skruva fast den, pekande åt höger, parallellt med blandaren [2],
med insexnyckeln 3 mm [3].
A:5 Omkastare: När badkarspipen pekar rakt fram, kommer vatten ut ur badkarspipen.
Vrider man pipen åt vänster eller höger kommer vatten ut ur duschen.
A:6 Ombyggnad av inlopp: För att skifta inlopp från ovansida till undersida eller tvärt
om, börja med att lossa blandaren från väggen. Lossa täckpluggen [1] genom att
sticka in en liten skruvmejsel enligt bild. Skifta därefter nippel och plugg till önskad
konguration. Tryck fast täckpluggen.
OBS: Genomgående vattenväg (Vaska) är ej möjlig.
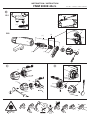
FELSÖKNING/SERVICE
B Dåligt öde:
B:1 Demontera strålsamlaren [1] och rengör den.
B:2 Om det inte hjälper, rengör ltren i inloppsnipplarna [2]: Stäng först av inkommande
vatten. Vid behov, demontera blandaren från väggfästet. Rengör ltren.
B:3 Om det fortfarande blir dåligt öde rengör reglerpaketets lter [12]. Om det inte
hjälper byt reglerpaketet [3]: Lossa täcklocket med skruvmejsel vid markering [4].
Skruva ut skruven [5] och dra loss ratten [6]. Ta bort skållningsskyddsringen [7]. Skruva
loss överdelen [8] enligt följande: Tryck in spindeln [9] och håll fast den så att den inte
roterar med, samtidigt som muttern [10] skruvas med FM Mattssons serviceverktyg
(Art.nr. 6077-0000). Dra ut reglerpaketet [11] och montera den nya i omvänd ordning.
C Läckage ur badkarspip/dusch när blandaren är stängd:
Byt överstycke: Stäng först av inkommande vatten. Demontera mängdratten [1] och
byt överstycket [2]. Skruva loss överstycket med hjälp av en skiftnyckel.
Inställning av ECO-stopp. Demontera mängdratten [1]. Drag av stoppringen (a) och
vrid den medsols (c) för mindre öde, och motsols (d) för större öde. Vrid överstycket
mot stängt läge och montera därefter ödesregleringsratten med tryckknappen [3] i
linje med markeringen på blandarhuset [4].
Ger endast kallt eller varmt vatten. Blandaren reagerar inte vid
temperaturreglering:
Blandaren är felinkopplad. Stäng först av inkommande vatten. Varmvatten ska kopplas
in på blandarens vänstra sida (vid mängdreglering).
D Kalibrering av temperatur
Kalibrera blandaren: Demontera temperaturratten [1]. Vrid spindeln (b) medurs för kall-
lare vatten och moturs för varmare vatten. När den önskade temperaturen är inställd
på ca 38 °C, monteras skållningsskyddsringens stoppklack 1 så att den kommer i
linje med markeringen 2 på blandarhuset. Montera sedan tillbaka temperaturratten
i omvänd ordning. Kontrollera att spärrknappen på ratten hamnar i linje med 38°C
markeringen på blandarhuset.
(a) skållningsskyddsring, (b) spindel.
RESERVDELAR
www.fmmattsson.com
Uttjänta produkter kan återlämnas till FM Mattsson för återvinning.
SVENSKA
ENGLISH
A INSTALLATION
Installation should be carried out by a professional water and sanitation expert.
NOTE! When installing new tubes, the tubes leading to the mixer must be thoroughly
ushed clean before the mixer is connected.
Freeze damage risks:
If the mixer will be subjected to external temperatures below 0°C (e.g. in an unheated
summer house), empty the water out of the mixer and the water supply lines. Leave
the mixer in the open position. Alternatively, you can disconnect the mixer and store it
in a heated place.
A:1 Connect the wall bracket with the enclosed screw so that the bracket is ush with
the wall. If using a screw plug, make sure the plug does not protrude beyond the wall.
A:2 [1] Loosely connect the fastening screw to the mixer and tighten it by hand about
2 turns.
[2] Connect the mixer over the wall bracket as shown in the picture.
[3] Tighten the fastening screw with a 5 mm Allen key. Check that the mixer is stable
and straight.
A:3 Installation of mixer with shower outlet and inlet on top:
To provide easier access for installing the inlet tubes, start by dismantling the outlet
nipple. Use a 10 mm Allen key to unfasten the nipple and cover ring [1]. Then connect
the inlet tubes to the mixer [2]. Reconnect the nipple and cover ring in reverse order
[3].
A:4 Connection of bath spout: For easier installation, start by connecting the mixer to
the wall according to A:1 and A:2. Attach the bath spout to the mixer outlet [1]. Press it
upwards towards the mixer and screw it into place, pointing right, parallel to the mixer
[2], using the 3 mm Allen key [3].
A:5 Diverter: When the spout is pointing forward, water is emitted from the spout [4].
When the spout is turned to the left or right, water is emitted from the shower.
A:6 Conversion of inlet: To move the inlet from the top to the bottom or vice versa, start
by disconnecting the mixer from the wall. Loosen the cover [1] by inserting a small
screwdriver as shown in the picture. Then reposition the nipple and plug in the desired
conguration. Press the cover into place.
Note: Waterway through the mixer is not possible.
TROUBLESHOOTING/SERVICE
B Weak ow:
B:1 Dismantle the aerator [1] and clean it.
B:2 If this does not help, clean the lters in the inlet nipples [2]: First turn o the incom-
ing water supply. If necessary, disconnect the mixer from the wall bracket. Clean the
lters.
B:3 If the ow is still weak, clean the lter in the regulator cartridge [12]. If this does
not help, replace the regulator cartridge [3]: Loosen the cover at the mark [4], using a
screwdriver. Undo the screw [5] and pull o the knob [6]. Remove the scalding protec-
tion ring [7]. Screw the cover [8] o as follows: Press in the spindle [9] and hold it rmly
in place to prevent it from rotating. At the same time, screw the nut [10] into place us-
ing an FM Mattsson servicing tool (Art. No. 6077-0000). Pull out the regulator cartridge
[11] and install the new one in reverse order.
C The bath spout/shower leaks when the mixer is closed:
Replace the head piece: First turn o the incoming water supply. Dismantle the ow
control knob [1] and replace the headwork [2]. Unscrew the headwork using a spanner.
Setting the ECO stop function. Dismantle the ow control knob [1]. Pull o the stop
ring (a) and turn it clockwise (c) to reduce the ow, or anti-clockwise (d) to increase the
ow. Turn the headwork spindle to closed position and then install the ow control knob
[3], making sure that the push button is aligned with the mark on the mixer body [4].
The mixer only emits cold or hot water. The temperature does not change when the
temperature control knob is turned:
The mixer is incorrectly connected. First turn o the incoming water supply. The hot
water should be connected on the left-hand side of the mixer (for ow control).
D Calibration of temperature
How to calibrate the mixer: Disconnect the handle [1]. Turn the spindle (b) clockwise
for cooler water and anti-clockwise for warmer water. When the desired temperature is
set at approximately 38°C, mount the stop lug for the scalding protection ring 1 so that
it aligns with the mark 2 on the mixer body. Then reconnect the temperature control
knob in reverse order. Check that the override button on the knob is aligned with the
38°C mark on the mixer body.
(a) scalding protection ring, (b) spindle.
SPARE PARTS
www.fmmattsson.com
Disused products can be returned to FM Mattsson for recycling.
-
 1
1
-
 2
2
-
 3
3


FM Mattsson 9000E shower set Bruksanvisningar
- Typ
- Bruksanvisningar
- Denna manual är också lämplig för
på andra språk
Relaterade papper
-
FM Mattsson Connecting hose Bruksanvisningar
-
-
-
-
-
-
-
-
-