Pioneer X-SMC02 Användarmanual
- Kategori
- Mottagare för bilmedia
- Typ
- Användarmanual
Denna manual är också lämplig för

X-SMC02/
X-SMC02D
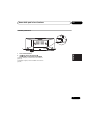
SLIM CD MICRO SYSTEM
Operating Instructions
Mode d’emploi
Manual de instrucciones
Istruzioni per l’uso
Bedienungsanleitung
Handleiding
Bruksanvisning
Register your product on/ Enregistrez votre produit sur / Registre su producto en
Registrare il proprio prodotto su / Registrieren Sie hier Ihr Produkt /
Registreer uw product op / Registrera din produkt på
http://www.pioneer.eu
(Europe / Europe / Europa / Europa / Europa / Europa / Europa)

2
En
Thank you for buying this Pioneer product.
Please read through these operating instructions so that you will know how to operate your model properly.
Contents
01 Before you start
What’s in the box . . . . . . . . . . . . . . . . . . . . . . . . . . . . . . . .3
Loading the batteries in the remote control . . . . . . . . . . . .3
Using the remote control . . . . . . . . . . . . . . . . . . . . . . . 3
Hang from the wall to use . . . . . . . . . . . . . . . . . . . . . . . . .3
02 Part names and functions
Remote control . . . . . . . . . . . . . . . . . . . . . . . . . . . . . . . . .5
Top panel/Front panel . . . . . . . . . . . . . . . . . . . . . . . . . . . .6
Rear panel . . . . . . . . . . . . . . . . . . . . . . . . . . . . . . . . . . . . .7
03 Connections
Connecting antennas . . . . . . . . . . . . . . . . . . . . . . . . . . . . .8
Using external antennas . . . . . . . . . . . . . . . . . . . . . . . 8
Plugging in . . . . . . . . . . . . . . . . . . . . . . . . . . . . . . . . . . . . .8
04 Getting started
Setting the clock . . . . . . . . . . . . . . . . . . . . . . . . . . . . . . . .9
Sound controls . . . . . . . . . . . . . . . . . . . . . . . . . . . . . . . . . .9
Equalizer . . . . . . . . . . . . . . . . . . . . . . . . . . . . . . . . . . . 9
P.BASS control . . . . . . . . . . . . . . . . . . . . . . . . . . . . . . 9
BASS/TREBLE control. . . . . . . . . . . . . . . . . . . . . . . . . 9
Using the wake-up timer . . . . . . . . . . . . . . . . . . . . . . . . .10
Setting . . . . . . . . . . . . . . . . . . . . . . . . . . . . . . . . . . . . 10
Switching the wake-up timer ON/OFF . . . . . . . . . . . . 10
Using the sleep timer . . . . . . . . . . . . . . . . . . . . . . . . . . . .10
Auto power off setting . . . . . . . . . . . . . . . . . . . . . . . . . . .10
05 Disc playback
Playing discs or files . . . . . . . . . . . . . . . . . . . . . . . . . . . .11
Load the disc . . . . . . . . . . . . . . . . . . . . . . . . . . . . . . . 11
Play tracks on a CD . . . . . . . . . . . . . . . . . . . . . . . . . . 11
Play MP3 music files . . . . . . . . . . . . . . . . . . . . . . . . . 11
Advanced CD or MP3 disc playback . . . . . . . . . . . . . . . .12
Repeat play . . . . . . . . . . . . . . . . . . . . . . . . . . . . . . . . 12
Random play . . . . . . . . . . . . . . . . . . . . . . . . . . . . . . . 12
Programmed play (CD) . . . . . . . . . . . . . . . . . . . . . . . 13
Switch the display contents . . . . . . . . . . . . . . . . . . . . 13
06 USB playback
Playing USB storage devices . . . . . . . . . . . . . . . . . . . . .14
Repeat play . . . . . . . . . . . . . . . . . . . . . . . . . . . . . . . . 14
Random play . . . . . . . . . . . . . . . . . . . . . . . . . . . . . . . 14
Switch the display contents . . . . . . . . . . . . . . . . . . . . 15
07 Using the tuner
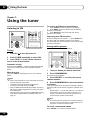
Listening to FM . . . . . . . . . . . . . . . . . . . . . . . . . . . . . . . . 16
Tuning. . . . . . . . . . . . . . . . . . . . . . . . . . . . . . . . . . . . . 16
Saving station presets. . . . . . . . . . . . . . . . . . . . . . . . . 16
Using the Radio Data System (RDS) . . . . . . . . . . . . . 17
Listening to the DAB+ (X-SMC02D only) . . . . . . . . . . . . 19
Tuning. . . . . . . . . . . . . . . . . . . . . . . . . . . . . . . . . . . . . 19
Changing the information display . . . . . . . . . . . . . . . . 20
Memorising a station. . . . . . . . . . . . . . . . . . . . . . . . . . 20
DAB Frequency table (BAND III) . . . . . . . . . . . . . . . . 20
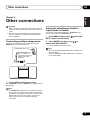
08 Other connections
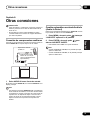
Connecting auxiliary components . . . . . . . . . . . . . . . . . . 21
Automatic switching to Audio In input
(Audio In Detect) . . . . . . . . . . . . . . . . . . . . . . . . . . . . . . . 21
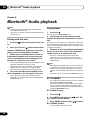
09 Bluetooth
®
Audio playback
Pairing with the unit . . . . . . . . . . . . . . . . . . . . . . . . . . . . 22
Playing Back . . . . . . . . . . . . . . . . . . . . . . . . . . . . . . . . . . 22
BT STANDBY . . . . . . . . . . . . . . . . . . . . . . . . . . . . . . . . . 22
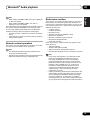
Remote control operation . . . . . . . . . . . . . . . . . . . . . . . . 23
Radio wave caution . . . . . . . . . . . . . . . . . . . . . . . . . . . . 23
Scope of operation . . . . . . . . . . . . . . . . . . . . . . . . . . . 24
Radio wave reflections . . . . . . . . . . . . . . . . . . . . . . . . 24
Precautions regarding connections to products
supported by this unit . . . . . . . . . . . . . . . . . . . . . . . . . 24
10 Additional information
Troubleshooting . . . . . . . . . . . . . . . . . . . . . . . . . . . . . . . 25
Playable discs and formats . . . . . . . . . . . . . . . . . . . . . . . 28
Regarding copy protected CDs. . . . . . . . . . . . . . . . . . 28
Supported audio file formats . . . . . . . . . . . . . . . . . . . . 28
Cautions on use . . . . . . . . . . . . . . . . . . . . . . . . . . . . . . . 28
When moving this unit. . . . . . . . . . . . . . . . . . . . . . . . . 28
Place of installation. . . . . . . . . . . . . . . . . . . . . . . . . . . 28
Do not place objects on this unit . . . . . . . . . . . . . . . . . 29
About condensation . . . . . . . . . . . . . . . . . . . . . . . . . . 29
Cleaning the product. . . . . . . . . . . . . . . . . . . . . . . . . . 29
Cleaning the lens . . . . . . . . . . . . . . . . . . . . . . . . . . . . 29
Handling discs . . . . . . . . . . . . . . . . . . . . . . . . . . . . . . . . 29
Storing. . . . . . . . . . . . . . . . . . . . . . . . . . . . . . . . . . . . . 29
Cleaning discs. . . . . . . . . . . . . . . . . . . . . . . . . . . . . . . 29
About specially shaped discs . . . . . . . . . . . . . . . . . . . 29
Restoring all the settings to the defaults . . . . . . . . . . . . . 30
Specifications . . . . . . . . . . . . . . . . . . . . . . . . . . . . . . . . . 31
License and Trademark . . . . . . . . . . . . . . . . . . . . . . . . . 31

Before you start 01
3
En
English Français Español
Deutsch
Italiano
Nederlands
Svenska
Chapter 1:
Before you start
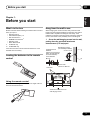
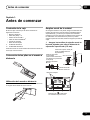
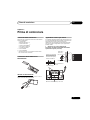
What’s in the box
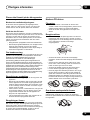
Please confirm that the following accessories are in the box
when you open it.
• Remote Control
• AAA batteries (R03) k 2
• FM wire antenna*
1
• DAB/FM wire antenna*
2
• Warranty card
• Quick Start Guide
*1 X-SMC02 only
*2 X-SMC02D only
*This document is an online instruction manual. It is not
included as an accessory.
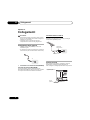
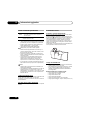
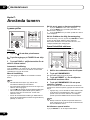
Loading the batteries in the remote
control
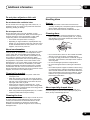
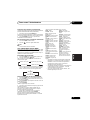
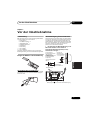
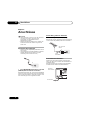
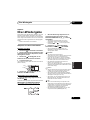
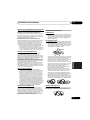
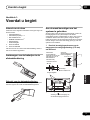
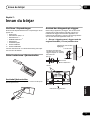
Using the remote control
The remote has a range of about 7 m at an angle of about
30º from the remote sensor.
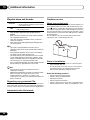
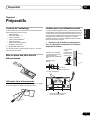
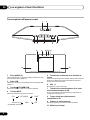
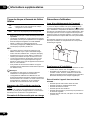
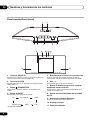
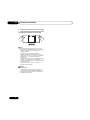
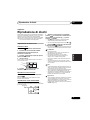
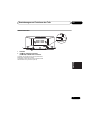
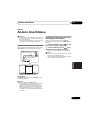
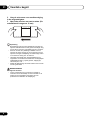
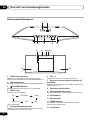
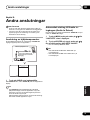
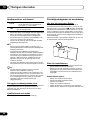
Hang from the wall to use
When hanging the unit from a wall, firmly screw the wall
hanging screws (sold separately) into the wall, and confirm
that the wall is capable of holding the unit safely. If the
materials or strength of the wall cannot support the weight of
the unit, then there is the possibility of the unit falling off.
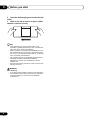
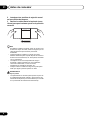
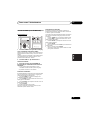
1 Screw the wall hanging screws into the wall,
putting them the specified attachment
measurement (172 mm) apart.
30°
7 m
30°
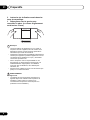
Lock holes
Wall hanging screws
(commercially available)
8 mm to 9 mm
2 mm to 3 mm
139.5 mm
172 mm
Attachment measurement for
wall hanging screws
Screw head
ø9 mm to ø12 mm
Screw diameter
ø4 mm
Suggested screw
diameter
(Please use screws that
match the wall strength
and wall materials)
139.5 mm

Before you start01
4
En
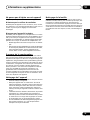
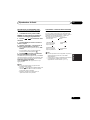
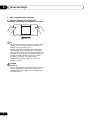
2 Insert the wall hanging screws into the lock
holes.
3
Slide to the left to secure in place.
(Slide
distance is around 10 mm)
Note
• When attaching the unit to the wall, there is the
possibility of it falling depending on how it is attached.
Take due care to avoid any accidents.
• Select a location for the placement/installation of unit
that is sufficiently strong enough to hold the weight of
the unit. If you do not know the strength etc. of the wall,
then consult with a professional.
• The company bears no responsibility for accidents or
damages caused by inadequate installation/
attachment, incorrect use, modifications, natural
disasters etc.
• Place all cables along the wall to prevent anyone from
tripping over them.
WARNING
Wall mounting
• A mounting screw's ability to support a unit depends on
the material and the position of studs of the wall (We
recommend that you consult a home installation
professional).

Part names and functions 02
5
En
English Français Español
Deutsch
Italiano
Nederlands
Svenska
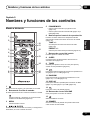
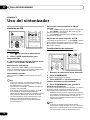
Chapter 2:
Part names and functions
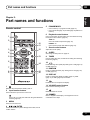
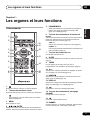
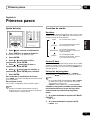
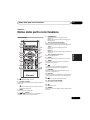
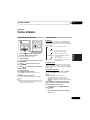
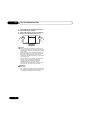
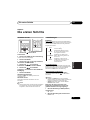
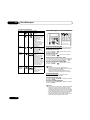
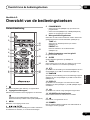
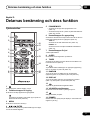
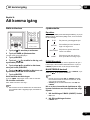
Remote control
1 Í
Switches the unit between standby and on.
2 Input function buttons
Use to select the input source to this unit.
Use to set up or play the audio file using the Bluetooth
network (page 22).
3MENU
Use to access the menu.
4
/
/
/
, ENTER
Use to select/switch system settings and modes, and to
confirm actions.
5PGM/MEMORY
• Use to memory or program the CD (page 13).
• Use to store FM (page 16) or DAB (page 20) stations in
memory.
6 Playback control buttons
Use to control each function after you have selected it using
the input function buttons (page 12).
TUNE +/–
Use to find radio frequencies (page 16).
PRESET +/–
Use to select preset radio stations (page 16).
7 Sound control buttons
Adjust the sound quality.
8 SLEEP
See Using the sleep timer on page 10.
9TIMER
Use for setting the clock, as well as for setting and checking
the timers (page 9).
10
Press to change the repeat play setting from a CD (page 12)
or USB (page 14).
11 RANDOM
Press to randomize order play setting from a CD (page 12)
or USB (page 14).
12 DISPLAY
Press to change the display for MP3 (page 13), RDS
(page 17) or DAB (page 20) information.
13
Press to return to the previous display.
14 VOLUME control buttons
Use to set the listening volume.
15
Mutes/unmutes the sound.
16 DIMMER
Dims or brightens the display. The brightness can be
controlled in four steps.
1
2
3
6
4
7
8
9
5
11
12
13
14
10
15
16

Part names and functions02
6
En
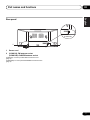
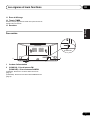
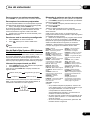
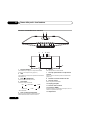
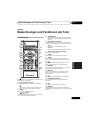
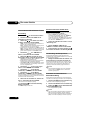
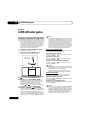
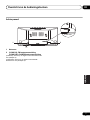
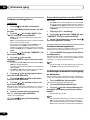
Top panel/Front panel
1 AUDIO IN socket
Use to connect an auxiliary component using a stereo
minijack cable (page 21).
2USB terminal
Use to connect your USB mass storage device (page 14).
3
Í
STANDBY/ON button
Switches the unit between standby and on.
4 INPUT
button
Selects the input source.
* X-SMC02D only
5 Playback control buttons
Use to control each function after you have selected it using
the input function buttons.
6VOL –/+
Use to set the listening volume.
7
Electric slide CD door
open/close button
Use to open or close the electric slide CD door (page 11).
8 Electric slide CD door
9 Remote sensor
Receives the signals from the remote control.
10 Main display
11 Display panel
12 TIMER indicator
Lit when the unit power is off but when the timer setting is
activated.
13 Speaker
13 13
8 10 11 129
34 5 6 7
12
*
CD
BT AUDIO DAB
FMAUDIO IN
USB

Part names and functions 02
7
En
English Français Español
Deutsch
Italiano
Nederlands
Svenska
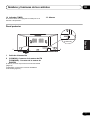
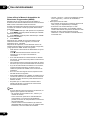
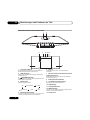
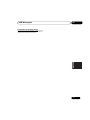
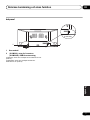
Rear panel
1Power cord
2 (X-SMC02): FM antenna socket
(X-SMC02D): DAB/FM antenna socket
(X-SMC02): Connect provided FM wire antenna here
(page 8).
(X-SMC02D): Connect provided DAB/FM wire antenna here
(page 8).
X-SMC02D
1
2

Connections03
8
En
Chapter 3:
Connections
CAUTION
• Be sure to turn off the power and unplug the power cord
from the power outlet whenever making or changing
connections.
• Connect the power cord after all the connections
between devices have been completed.
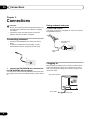
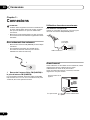
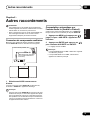
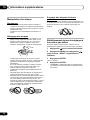
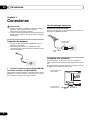
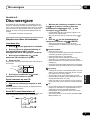
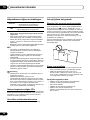
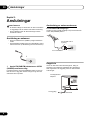
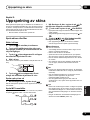
Connecting antennas
• Connect the FM (DAB/FM) wire antenna as shown
below.
• To improve reception and sound quality, connect
external antennas (see Using external antennas).
1 Connect the FM (DAB/FM) wire antenna into
the FM (DAB/FM) antenna socket.
For best results, extend the FM (DAB/FM) antenna fully and
fix to a wall or door frame. Don’t drape loosely or leave coiled
up.
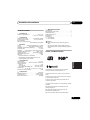
Using external antennas
To improve FM reception
Use a PAL connector (not supplied) to connect an external
FM (DAB/FM) antenna.
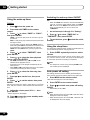
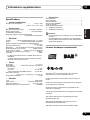
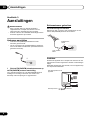
Plugging in
Before making or changing the connections, switch off the
power and disconnect the power cord from the AC outlet.
After you’ve finished making all connections, plug the unit
into an AC outlet.
1
One-touch PAL
connector
75 Ω coaxial
cable
To AC outlet
This unit’s rear panel
Power cord

Getting started 04
9
En
English Français Español
Deutsch
Italiano
Nederlands
Svenska
Chapter 4:
Getting started
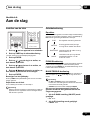
Setting the clock
1 Press
Í
to turn the power on.
2 Press TIMER on the remote control.
“CLOCK” is shown on the main display.
3 Press ENTER.
4 Press
/
to set the day, then press
ENTER.
5 Press
/
to set the hour, then press
ENTER.
6 Press
/
to set the minute, then press
ENTER to confirm.
7 Press ENTER.
To confirm the time display:
Press the TIMER. The time display will appear for about 10
seconds.
To readjust the clock:
Perform “Setting the clock” from step 1.
Note
• When power supply is restored after unit is plugged in
again or after a power failure, reset the clock.
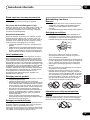
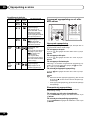
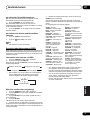
Sound controls
Equalizer
When the EQ is pressed, the current mode setting will be
displayed. To change to a different mode, press the EQ
repeatedly until the desired sound mode appears.
P.BASS control
When the power is first turned on, the unit will enter the
P.bass mode which emphasises the bass frequencies. To
cancel the P.bass mode, press the P.BASS on the remote
control.
BASS/TREBLE control
Press the SOUND to select “BASS” or “TREBLE”, then
press
/
to adjust the bass or treble.
Note
• The EQ and P.BASS cannot operate simultaneously.
The most recently selected of these two functions will
be the one used.
• SOUND can operate alongside either the EQ or
P.BASS.
When one of the above two functions is selected,
the function that is not selected will be displayed
as follows.
1 When P.BASS setting (ON/OFF) is changed
• EQ : FLAT
2 When EQ setting is changed
• P.BASS : OFF
NIGHT
FLAT A flat and basic sound
ACTIVE
DIALOGUE
A sound that can be enjoyed
at night even with lower volume
A powerful sound that
emphasizes low and high tones
A sound that allows the radio o
r
vocals to be heard more easily

Getting started04
10
En
Using the wake-up timer
Setting
1 Press
Í
to turn the power on.
2 Press and hold TIMER on the remote
control.
3 Press
/
to select “ONCE” or “DAILY”,
then press ENTER.
ONCE – Once timer play works for one time only at a
preset time.
DAILY – Daily timer play works at the same preset time
and days of week.
• You can make one timer setting with ONCE and one
timer setting with DAILY. Note that if the start time is set
to the same day of the week and time for both the
ONCE timer and DAILY timer, priority is given to the
ONCE.
4 Press
/
to select “TIMERSET”, then
press ENTER.
5 Press
/
to select the timer playback
source, then press ENTER.
• CD, DAB (X-SMC02D only), FM and USB can be
selected as the playback source.
• Some discs may not be played automatically at the
wake-up time.
• When DAB or FM is selected as the source, the station
received before setting the timer is played.
6 Press
/
to select the timer day, then
press ENTER.
7 Press
/
to set the hour, then press
ENTER.
8 Press
/
to set the minute, then press
ENTER.
Set the time to finish as in steps 7 and 8 above. If you set the
timer, take one minute or more between the start and end
time.
9 Adjust the volume press VOL +/– , then
press ENTER.
“SAVE” appears on the display.
10 Press
Í
to enter the power standby mode.
The TIMER indicator lights up.
Switching the wake-up timer ON/OFF
If the timer is already set, you can turn the function ON or
OFF.
• When the ONCE timer finishes, the timer automatically
turns off. To use the same settings again, set “TIMER
ON”. Even when the DAILY timer finishes, the timer
does not automatically turn off. To cancel, set
“TIMEROFF”.
1 As well as steps 1 through 3 in “Setting”.
2Press
/
to select “TIMER ON” or
“TIMEROFF”, then press ENTER.
3 To use the timer, press
Í
and set the unit to
standby.
Using the sleep timer
The sleep timer switches off the unit after a specified time so
you can fall asleep without worrying about it.
1 Press SLEEP repeatedly to select a switch
off time.
Choose between 10 min, 20 min, 30 min, 60 min, 90 min, 120
min, 150 min, 180 min or OFF. The newly set value displays
for 3 seconds, and then the setting is completed.
Note
• The sleep timer can be set by pressing SLEEP while
the remaining time is displayed.
Auto power off setting
This setting places the unit on standby automatically for
more than 20 minutes of inactivity without any audio input.
1 Press MENU on the remote control.
“APD” will be displayed on the main display.
2 Press ENTER on the remote control.
3Press
/
to switch auto power off setting
ON/OFF.
• Initial setting is set to
ON
.
Note
• When the auto power off is set to
ON
, “APD ON” will be
displayed on the main display.
• When the auto power off is set to
OFF
, “APD OFF” will
be displayed on the main display.

Disc playback 05
11
En
English Français Español
Deutsch
Italiano
Nederlands
Svenska
Chapter 5:
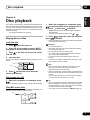
Disc playback
This system can play back a standard CD, CD-R/RW in the
CD format and CD-R/RW with MP3 files, but cannot record
on them. Some audio CD-R and CD-RW discs may not be
playable due to the state of the disc or the device that was
used for recording.
• For details about MP3, see page 28.
Playing discs or files
Load the disc
1 Press
Í
to turn the power on.
2 Press CD on the remote control or INPUT
repeatedly on the main unit to select CD input.
3Press
<
on the main unit to open the electric
slide CD door.
4 Insert the disc.
Inset the disc with the printed label facing outward (you can
see it).
5 Press
<
on the main unit to close the
electric slide CD door
.
Play tracks on a CD
1 When the recognition is completed, press
1;
.
After the last track is played, the unit will stop automatically.
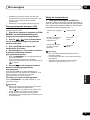
Play MP3 music files
MP3 track data is called “music file” and the location they are
stored is called a “folder” in this document.
1 When the recognition is completed, press
/
to select the folder where the music file is
stored ([F_
]), then press
or ENTER.
• Repeat this step if there are other folders inside the
selected folder.
• To return to the previous folder, press
or .
2 Press
/
to select the music file, and then
press
1;
or ENTER.
• Once play starts, only music files inside the same folder
can be played continuously.
CAUTION
• Do not touch the lens.
• Be careful not to get your hand caught when opening
and closing the slide door.
• Do not place two discs in one disc tray.
• Do not play discs of special shapes (heart, octagon,
etc). It may cause malfunctions.
• Do not touch the electric slide CD door when it is
moving.
• If power is lost while the electric slide CD door is open,
wait until the power is restored.
Note
• Due to the structure of the disc information, it takes
longer to read an MP3 disc than a normal CD
(approximately 20 to 90 seconds).
• When the beginning of the first track is reached during
fast reverse, the unit will enter the playback mode (only
for CD).
• If TV or radio interference occurs during CD operation,
move the unit away from the TV or radio.
Tip
• When no operation has done in CD mode and the audio
file is not played for more than 20 minutes, the power
will automatically turn off. In this case it is required that
the Auto power off is switched to ON.
• Auto power off can be switched to ON/OFF (page 10).
e.g.,

Disc playback05
12
En
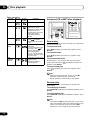
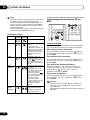
Basic operations
Advanced CD or MP3 disc playback
Repeat play
Repeat play can play one track, all tracks or a programmed
sequence continuously.
To repeat one track:
Press repeatedly until “RPT ONE” appears. Press
ENTER.
To repeat all tracks:
Press repeatedly until “RPT ALL” appears. Press
ENTER.
To repeat desired tracks:
Perform steps 1 - 5 in “Programmed play (CD)” section
(page 13) and then press repeatedly until “RPT ALL”
appears. Press ENTER.
To cancel repeat play:
Press repeatedly until “RPT OFF” appears. Press
ENTER.
Note
• After performing repeat play, be sure to press ∫.
Otherwise, the disc will play continuously.
• During repeat play, random play is not possible.
Random play
The tracks on the disc can be played in random order
automatically.
To random play all tracks:
Press RANDOM repeatedly until “RDM ON” appears. Press
ENTER.
To cancel random play:
Press RANDOM repeatedly until “RDM OFF” appears. Press
ENTER.
Note
• If you press the 9 during random play, you can move
to the track selected next by the random operation. Play
returns to the beginning of the track when : is
pressed (you cannot return to the previous track).
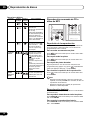
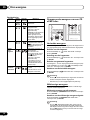
Function Main unit Remote
control
Operation
Play
Press in the stop mode.
Stop
Press in the playback mode.
(when playing a CD)
“RESUME” is displayed and
the place where you
stopped play is memorized.
Press again and the
memorized position is
cleared.
Pause
Press in the playback mode.
Press
1;
to resume
playback from the paused
point.
Track up/
down
Press in the playback or
stop mode.
If you press the button in the
stop mode, press
1;
to
start the desired track.
(when playing MP3)
You can only skip forward
or back to music files inside
the same folder.
Fast
forward/
reverse
Press and hold down in the
playback mode.
Release the button to
resume playback.

Disc playback 05
13
En
English Français Español
Deutsch
Italiano
Nederlands
Svenska
• In random play, the unit will select and play tracks
automatically. (You cannot select the order of the
tracks.)
• During random play, repeat play is not possible.
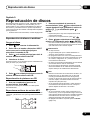
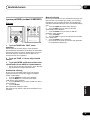
Programmed play (CD)
You can choose up to 24 selections for playback in the order
you like.
1 Whilst in the stop mode, press PGM/
MEMORY on the remote control to enter the
programming save mode.
2 Press
:
/
9
to select the desired
tracks.
3 Press ENTER to save track number.
4 Repeat steps 2 - 3 for other tracks. Up to 24
tracks can be programmed.
• If you want to check the programmed tracks, press
PGM/MEMORY.
• If you make a mistake, the last programmed tracks will
be canceled by pressing .
5 Press
1;
to start playback.
To cancel the programmed play mode:
To cancel the programmed play, press twice ∫ on the
remote control. The display will show “PRG CLR” and all the
programmed contents will be cleared.
Adding tracks to the program:
Press the PGM/MEMORY. Then follow steps 2 - 3 to add
tracks.
Note
• When a disc is ejected, the program is automatically
cancelled.
• If you press the Í to enter the standby mode or change
the function from CD to another, the programmed
selections will be cleared.
• During the program operation, random play is not
possible.
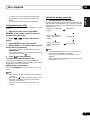
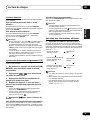
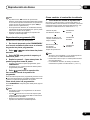
Switch the display contents
1 Press DISPLAY during playback.
If the title, artist and album name has been written to the file,
that information will be displayed. (The unit can only display
alphanumeric characters. Non- alphanumeric character are
displayed in the “*”.)
Note
• “Not supported playback file” can not be playback. In
this case, will be skipped automatically.
• There may be cases where no information can be
displayed.
• Displaying title, artist, and albums is only supported with
ID3 Version 1 (1.0 or 1.1).
Title display
Number of the track, title
display
Artist display
Album display
Number of the track in
a folder, playback time
display
Number of the track in a
folder, remaining time
display

USB playback06
14
En
Chapter 6:
USB playback
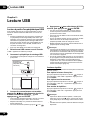
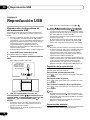
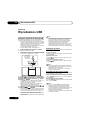
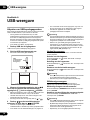
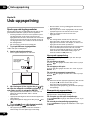
Playing USB storage devices
It is possible to listen to two-channel audio using the USB
interface with MP3 files on the top of this unit.
• Pioneer does not guarantee that any file recorded on a
USB storage device will play or that power will be
supplied to a USB storage device. Also note that
Pioneer will accept no responsibility whatsoever for loss
of files on USB storage devices caused by connection
to this unit.
• For details about MP3, see page 28.
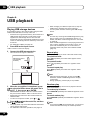
1 Press USB as the input source.
“USB” is shown on the main display.
2 Connect the USB storage device.
• This unit does not support a USB hub.
3 When the recognition is completed, press
/
to select the folder where the music file is
stored ([F_ ]), then press
or ENTER.
• MP3 track data is called “music file” and the location
they are stored is called a “folder” in this document.
• Repeat this step if there are other folders inside the
selected folder.
• To return to the previous folder, press
or .
4 Press
/
to select the music file, and then
press
1;
or ENTER.
• Once play starts, only music files inside the same folder
can be played continuously.
• For details about the basic operations, see page 12.
• When changing to a different input source, stop the
USB memory playback first, before changing.
• Turn the power off before removing the USB storage
device.
Note
• This unit may not recognize a USB storage device, play
files or supply power to a USB storage device. For
details, see When a USB storage device is connected
on page 26.
• When a USB storage device is not playing and the unit
has not been operated for 20 minutes or more, the
power will automatically turn off. In this case it is
required that the Auto power off is switched to ON
(page 10).
Repeat play
Repeat play can play one track or all tracks continuously.
To repeat one track:
Press repeatedly until “RPT ONE” appears. Press
ENTER.
To repeat all tracks:
Press repeatedly until “RPT ALL” appears. Press
ENTER.
To cancel repeat play:
Press repeatedly until “RPT OFF” appears. Press
ENTER.
Note
• After performing repeat play, be sure to press ∫.
Otherwise, the file of USB storage device will play
continuously.
• During repeat play, random play is not possible.
Random play
The file of USB storage device can be played in random
order automatically.
To random play all tracks:
Press RANDOM repeatedly until “RDM ON” appears. Press
ENTER.
To cancel random play:
Press RANDOM repeatedly until “RDM OFF” appears. Press
ENTER.
Note
• If you press the 9 during random play, you can move
to the track selected next by the random operation.
USB storage device
(commercially
available)

USB playback 06
15
En
English Français Español
Deutsch
Italiano
Nederlands
Svenska
• In random play, the unit will select and play tracks
automatically. (You cannot select the order of the
tracks.)
• During random play, repeat play is not possible.
Switch the display contents
This unit can switch the information recorded in the USB
storage device. For details, see Switch the display contents
on page 13.

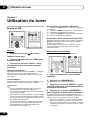
Using the tuner07
16
En
Chapter 7:
Using the tuner
Listening to FM
Tuning
1 Press the
Í
to turn the power on.
2 Press TUNER repeatedly to select FM.
3 Press TUNE +/– on the remote control to
tune in to the desired station.
Automatic tuning:
Press and hold TUNE +/–, scanning will start automatically
and the tuner will stop at the first receivable broadcast
station.
Manual tuning:
Press the TUNE +/– repeatedly to tune in to the desired
station.
Note
• When radio interference occurs, automatic tuning may
stop automatically at that point.
• Automatic tuning will skip weak signal stations.
• To stop the automatic tuning, press ∫.
• When an RDS (Radio Data System) station is tuned in,
the frequency will be displayed first. Finally, the station
name will appear.
• Full auto tuning can be achieved for RDS stations using
Auto Station Program Memory (ASPM) mode, see
page 18.
To receive an FM stereo transmission:
1 Press TUNER until “FM” appears on the display.
2 Press MENU and then press / until “ST/MONO”
appears on the display.
3 Press ENTER and then press / until “AUTO”
appears on the display.
Improving poor FM reception:
After performing the above steps 1 - 2, press ENTER and
then press / until “MONO” appears on the display.
This will change the tuner from stereo to mono and usually
improve the reception.
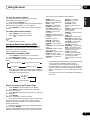
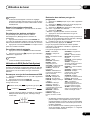
Saving station presets
This unit can memorize up to 30 stations.
1 Tune to a station you want to memorize.
2 Press PGM/MEMORY.
The preset number will flash.
3 Press PRESET +/– to select the preset
channel number.
4 Press PGM/MEMORY to store that station
in memory.
If the preset number has changed from flashing to lighting,
before the station is memorised, repeat the operation from
step 2.
• Repeat steps 1 - 4 to set other stations, or to change a
preset station. When a new station is stored in the
memory, the station previously memorised for that
preset channel number will be erased.
Note
• The backup function protects the memorised stations
for a few hours should there be a power failure or the
AC power cord become disconnected.
To recall a memorised station
Press PRESET +/– to select the desired station.

Using the tuner 07
17
En
English Français Español
Deutsch
Italiano
Nederlands
Svenska
To scan the preset stations
The stations saved in the memory can be scanned
automatically. (Preset memory scan)
1 Press and hold PRESET +/–.
The preset number will appear and the programmed stations
will be tuned in sequentially, for 5 seconds each.
2 Press PRESET +/– again when the desired station is
located.
To erase entire preset memory
1 Press TUNER on the remote control.
2 Press until “MEM CLR” appears.
Note
• All stations will be erased.
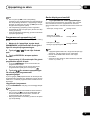
Using the Radio Data System (RDS)
Radio Data System (RDS) is a system used by most FM
radio stations to provide listeners with various kinds of
information—the name of the station and the kind of show
they’re broadcasting, for example.
Information provided by RDS
1 Press TUNER until “FM” appears on the display.
2 Press DISPLAY repeatedly.
Each time the DISPLAY is pressed, the display will switch as
follows:
• When tuning in to a station other than an RDS station or
to an RDS station which sends weak signal, the display
will change in the following order:
Search for stations by Program Type
1 Press TUNER until “FM” appears on the display.
2 Press MENU and then press / until “FM RDS”
appears on the display.
3 Press ENTER and then press / until “PTY” appears
on the display.
4 Press ENTER.
“SELECT” will appear for about 5 seconds.
5 Press / to select the program type you want to hear.
Each time the button is pressed, the program type will
appear. If the button is held down, the program type will
appear continuously.
6 Whilst the selected program type is displayed (within 5
seconds), press ENTER.
After the selected program type has been lit for 2 seconds,
“SEARCH” will appear, and the search operation will start.
The Program Types displayed are as follows:
• If the display has stopped flashing, start again from step
2. If the unit finds a desired program type, the
corresponding channel number will lit for about 8
seconds, and then the station name will be displayed.
• If you want to listen to the same program type of another
station, repeat steps 2 - 6. The unit will look for the next
station.
• If no station can be found, “NO FOUND” will appear for
5 seconds.
Station name (PS) Programme type (PTY)
Frequency Radio text (RT)
NO RDS
FM 98.80 MHz
NEWS – News
AFFAIRS – Current Affairs
INFO – General Information
SPORT – Sport
EDUCATE – Educational
DRAMA – Radio plays, etc.
CULTURE – National or
regional culture, theater, etc.
SCIENCE – Science and
technology
VARIED – Usually talk-based
material, such as quiz shows or
interviews.
POP M – Pop music
ROCK M – Rock music
EASY M – Easy listening
LIGHT M – ‘Light’ classical
music
CLASSICS – ‘Serious’ classical
music
OTHER M – Music not fitting
above categories
WEATHER – Weather reports
FINANCE – Stock market
reports, commerce, trading, etc.
CHILDREN – Programs for
children
SOCIAL – Social affairs
RELIGION – Programs
concerning religion
PHONE IN – Public
expressing their views by
Phone
TRAVEL – Holiday-type travel
rather than traffic
announcements
LEISURE – Leisure interests
and hobbies
JAZZ – Jazz
COUNTRY – Country music
NATION M – Popular music in
a language other than English
OLDIES M – Popular music
from the ‘50s and’ 60s
FOLK M – Folk music
DOCUMENT – Documentary
TEST – Broadcasting when
testing emergency broadcast
equipment or receivers.
ALARM – Emergency
announcement made under
exceptional circumstances to
give warning of events
causing danger of a general
nature.

Using the tuner07
18
En
Using the Auto Station program Memory
(ASPM)
Whilst in the ASPM operation mode, the tuner will
automatically search for new RDS stations. Up to 30 stations
can be stored.
If you have already stored some stations in memory, the
number of new stations you can store will be less.
1 Press TUNER until “FM” appears on the display.
2 Press MENU and then press / until “FM RDS”
appears on the display.
3 Press ENTER and then press / until “ASPM”
appears on the display.
4 Press ENTER.
After “ASPM” has flashed for about 4 seconds, scanning will
start (87.5 - 108 MHz).
After scanning, the number of stations stored in memory will
be displayed for 4 seconds, and then “END” will appear for 4
seconds.
• To stop the ASPM operation before it is complete:
Press ∫ whilst it is scanning for stations. The stations
which are already stored in memory will be kept there.
• If the same station is broadcasting on different frequencies,
the strongest frequency will be stored in memory.
• Any station which has the same frequency as the one
stored in memory will not be stored.
• If 30 stations have already been stored in memory, the
scan will be aborted. If you want to redo the ASPM
operation, erase the preset memory.
• If no station have been stored in memory, “NO FOUND”
will appear for about 5 seconds.
• If the RDS signals are very weak, station names may
not be stored in memory.
• The same station name can be stored in different
channels.
• In a certain area or during certain time periods, the
station names may temporarily be different.
Note
• If any of the following events occur, it does not mean
that the unit is faulty:
- “PS”, “NO PS” and a station name appear alternately,
and properly.
- If a particular station is not broadcasting properly or a
station is conducting tests, the RDS reception
function may not work properly.
- When you receive an RDS station whose signal is too
weak, information like the station name may not be
displayed.
- “NO PS”, “NO PTY” or “NO RT” will flash for about 5
seconds, and then the frequency will be displayed.
• Notes for radio text:
- The first 8 characters of the radio text will appear and
then they will scroll across the display.
- If you tune in to an RDS station which is not
broadcasting any radio text, “NO RT” will be displayed
when you switch to the radio text position.
- Whilst radio text data is received or when the text
contents change, “RT” will be displayed.

Using the tuner 07
19
En
English Français Español
Deutsch
Italiano
Nederlands
Svenska
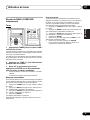
Listening to the DAB+ (X-SMC02D
only)
Tuning
1 Press the TUNER until “DAB” appears on
the display.
When turned on for the first time, the unit scans radio
stations automatically to create a station list.
The stations will be stored in alphanumeric order and the first
station on the list will be selected and you will hear it through
the speakers.
2 Press the TUNE +/– to select the desired
station.
3 Within 10 seconds, press the ENTER on
the remote control to tune into the desired
station.
• If no station is found, “NO SIG” appears.
• Up to 100 appears for total received stations.
Auto Scan
You can make the auto scan again when you move the unit
to other areas or add multiplex channels to the station list.
1 Press the TUNER until “DAB” appears on the display.
2 Press MENU and then press / until “DAB SCAN”
appears on the display.
3 Press ENTER and then press / until “AUTO”
appears on the display.
4 Press ENTER.
Auto Scan scanning begins.
After the scanning process is complete, the first station that
was detected is selected.
Manual tune
You can manually store stations which Auto Scan cannot
find. If reception is poor, you can adjust the sensitivity.
Manual tune is only available after Auto tune. Perform Auto
Scan first.
1 Press the TUNER until “DAB” appears on the display.
2 Press MENU and then press / until “DAB SCAN”
appears on the display.
3 Press ENTER and then press / until “MANUAL”
appears on the display.
4 Press ENTER.
5 Within 10 seconds, press the TUNE +/– to select the
DAB+ frequency.
6 Within 10 seconds, press the ENTER.
• If the level is too low, move the aerial or unit to improve
reception.

Using the tuner07
20
En
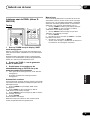
Changing the information display
You can switch DAB+ display information.
Press the DISPLAY button.
Each time the button is pressed, the information display
changes in the following order.
When “NO SIG” appears, the DISPLAY button does not
allow you to change the display.
[Programme Name]
Station name is displayed. (set by default)
[Scrolling text]
Information scrolls across the display when sent from the
station.
[Programe type]
A description of the type of content being broadcast by the
station.
[Multiplex name]
The name of the multiplex (ensemble) which provides the
current service.
[Frequency]
The DAB+ frequency for the station.
[Stereo mode]
Display stereo mode.
[Transfer speed]
The data transfer speed.
[Signal quality]
The signal quality is displayed as a number (0 - 100).
[85-100: Good, 70-84: Fair, 0-69: Poor]
Memorising a station
You can store 10 DAB stations in memory and recall them at
the push of a button. (Preset tuning)
1 Tune to the desired DAB station.
2 Press the PGM/MEMORY.
The preset number will flash.
3 Within 10 seconds, press the PRESET +/–
to select the preset channel number.
Store the stations in memory, in order, starting with preset
channel 1.
4 Within 10 seconds, press the PGM/
MEMORY to store that station in memory.
If the preset number indicators disappear before the station
is memorised, repeat the operation from step 2.
5 Repeat steps 1 - 4 to set other stations, or
to change a preset station.
When a new station is stored in the memory, the station
previously memorised for that preset channel number will be
erased.
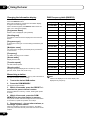
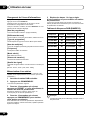
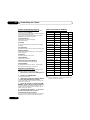
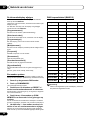
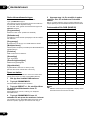
DAB Frequency table (BAND III)
Note
• Label is not displayed on the main display. Will
displayed only frequency.
Frequency Label Frequency Label
174.928 MHz 5A 208.064 MHz 9D
176.640 MHz 5B 209.936 MHz 10A
178.352 MHz 5C 211.648 MHz 10B
180.064 MHz 5D 213.360 MHz 10C
181.936 MHz 6A 215.072 MHz 10D
183.648 MHz 6B 216.928 MHz 11A
185.360 MHz 6C 218.640 MHz 11B
187.072 MHz 6D 220.352 MHz 11C
188.928 MHz 7A 222.064 MHz 11D
190.640 MHz 7B 223.936 MHz 12A
192.352 MHz 7C 225.648 MHz 12B
194.064 MHz 7D 227.360 MHz 12C
195.936 MHz 8A 229.072 MHz 12D
197.648 MHz 8B 230.784 MHz 13A
199.360 MHz 8C 232.496 MHz 13B
201.072 MHz 8D 234.208 MHz 13C
202.928 MHz 9A 235.776 MHz 13D
204.640 MHz 9B 237.488 MHz 13E
206.352 MHz 9C 239.200 MHz 13F
Sidan laddas...
Sidan laddas...
Sidan laddas...
Sidan laddas...
Sidan laddas...
Sidan laddas...
Sidan laddas...
Sidan laddas...
Sidan laddas...
Sidan laddas...
Sidan laddas...
Sidan laddas...
Sidan laddas...
Sidan laddas...
Sidan laddas...
Sidan laddas...
Sidan laddas...
Sidan laddas...
Sidan laddas...
Sidan laddas...
Sidan laddas...
Sidan laddas...
Sidan laddas...
Sidan laddas...
Sidan laddas...
Sidan laddas...
Sidan laddas...
Sidan laddas...
Sidan laddas...
Sidan laddas...
Sidan laddas...
Sidan laddas...
Sidan laddas...
Sidan laddas...
Sidan laddas...
Sidan laddas...
Sidan laddas...
Sidan laddas...
Sidan laddas...
Sidan laddas...
Sidan laddas...
Sidan laddas...
Sidan laddas...
Sidan laddas...
Sidan laddas...
Sidan laddas...
Sidan laddas...
Sidan laddas...
Sidan laddas...
Sidan laddas...
Sidan laddas...
Sidan laddas...
Sidan laddas...
Sidan laddas...
Sidan laddas...
Sidan laddas...
Sidan laddas...
Sidan laddas...
Sidan laddas...
Sidan laddas...
Sidan laddas...
Sidan laddas...
Sidan laddas...
Sidan laddas...
Sidan laddas...
Sidan laddas...
Sidan laddas...
Sidan laddas...
Sidan laddas...
Sidan laddas...
Sidan laddas...
Sidan laddas...
Sidan laddas...
Sidan laddas...
Sidan laddas...
Sidan laddas...
Sidan laddas...
Sidan laddas...
Sidan laddas...
Sidan laddas...
Sidan laddas...
Sidan laddas...
Sidan laddas...
Sidan laddas...
Sidan laddas...
Sidan laddas...
Sidan laddas...
Sidan laddas...
Sidan laddas...
Sidan laddas...
Sidan laddas...
Sidan laddas...
Sidan laddas...
Sidan laddas...
Sidan laddas...
Sidan laddas...
Sidan laddas...
Sidan laddas...
Sidan laddas...
Sidan laddas...
Sidan laddas...
Sidan laddas...
Sidan laddas...
Sidan laddas...
Sidan laddas...
Sidan laddas...
Sidan laddas...
Sidan laddas...
Sidan laddas...
Sidan laddas...
Sidan laddas...
Sidan laddas...
Sidan laddas...
Sidan laddas...
Sidan laddas...
Sidan laddas...
Sidan laddas...
Sidan laddas...
Sidan laddas...
Sidan laddas...
Sidan laddas...
Sidan laddas...
Sidan laddas...
Sidan laddas...
Sidan laddas...
Sidan laddas...
Sidan laddas...
Sidan laddas...
Sidan laddas...
Sidan laddas...
Sidan laddas...
Sidan laddas...
Sidan laddas...
Sidan laddas...
Sidan laddas...
Sidan laddas...
Sidan laddas...
Sidan laddas...
Sidan laddas...
Sidan laddas...
Sidan laddas...
Sidan laddas...
Sidan laddas...
Sidan laddas...
Sidan laddas...
Sidan laddas...
Sidan laddas...
Sidan laddas...
Sidan laddas...
Sidan laddas...
Sidan laddas...
Sidan laddas...
Sidan laddas...
Sidan laddas...
Sidan laddas...
Sidan laddas...
Sidan laddas...
Sidan laddas...
Sidan laddas...
Sidan laddas...
Sidan laddas...
Sidan laddas...
Sidan laddas...
Sidan laddas...
Sidan laddas...
Sidan laddas...
Sidan laddas...
Sidan laddas...
Sidan laddas...
Sidan laddas...
Sidan laddas...
Sidan laddas...
Sidan laddas...
Sidan laddas...
Sidan laddas...
Sidan laddas...
Sidan laddas...
Sidan laddas...
Sidan laddas...
Sidan laddas...
Sidan laddas...
Sidan laddas...
Sidan laddas...
Sidan laddas...
Sidan laddas...
Sidan laddas...
Sidan laddas...
Sidan laddas...
Sidan laddas...
Sidan laddas...
Sidan laddas...
Sidan laddas...
-
 1
1
-
 2
2
-
 3
3
-
 4
4
-
 5
5
-
 6
6
-
 7
7
-
 8
8
-
 9
9
-
 10
10
-
 11
11
-
 12
12
-
 13
13
-
 14
14
-
 15
15
-
 16
16
-
 17
17
-
 18
18
-
 19
19
-
 20
20
-
 21
21
-
 22
22
-
 23
23
-
 24
24
-
 25
25
-
 26
26
-
 27
27
-
 28
28
-
 29
29
-
 30
30
-
 31
31
-
 32
32
-
 33
33
-
 34
34
-
 35
35
-
 36
36
-
 37
37
-
 38
38
-
 39
39
-
 40
40
-
 41
41
-
 42
42
-
 43
43
-
 44
44
-
 45
45
-
 46
46
-
 47
47
-
 48
48
-
 49
49
-
 50
50
-
 51
51
-
 52
52
-
 53
53
-
 54
54
-
 55
55
-
 56
56
-
 57
57
-
 58
58
-
 59
59
-
 60
60
-
 61
61
-
 62
62
-
 63
63
-
 64
64
-
 65
65
-
 66
66
-
 67
67
-
 68
68
-
 69
69
-
 70
70
-
 71
71
-
 72
72
-
 73
73
-
 74
74
-
 75
75
-
 76
76
-
 77
77
-
 78
78
-
 79
79
-
 80
80
-
 81
81
-
 82
82
-
 83
83
-
 84
84
-
 85
85
-
 86
86
-
 87
87
-
 88
88
-
 89
89
-
 90
90
-
 91
91
-
 92
92
-
 93
93
-
 94
94
-
 95
95
-
 96
96
-
 97
97
-
 98
98
-
 99
99
-
 100
100
-
 101
101
-
 102
102
-
 103
103
-
 104
104
-
 105
105
-
 106
106
-
 107
107
-
 108
108
-
 109
109
-
 110
110
-
 111
111
-
 112
112
-
 113
113
-
 114
114
-
 115
115
-
 116
116
-
 117
117
-
 118
118
-
 119
119
-
 120
120
-
 121
121
-
 122
122
-
 123
123
-
 124
124
-
 125
125
-
 126
126
-
 127
127
-
 128
128
-
 129
129
-
 130
130
-
 131
131
-
 132
132
-
 133
133
-
 134
134
-
 135
135
-
 136
136
-
 137
137
-
 138
138
-
 139
139
-
 140
140
-
 141
141
-
 142
142
-
 143
143
-
 144
144
-
 145
145
-
 146
146
-
 147
147
-
 148
148
-
 149
149
-
 150
150
-
 151
151
-
 152
152
-
 153
153
-
 154
154
-
 155
155
-
 156
156
-
 157
157
-
 158
158
-
 159
159
-
 160
160
-
 161
161
-
 162
162
-
 163
163
-
 164
164
-
 165
165
-
 166
166
-
 167
167
-
 168
168
-
 169
169
-
 170
170
-
 171
171
-
 172
172
-
 173
173
-
 174
174
-
 175
175
-
 176
176
-
 177
177
-
 178
178
-
 179
179
-
 180
180
-
 181
181
-
 182
182
-
 183
183
-
 184
184
-
 185
185
-
 186
186
-
 187
187
-
 188
188
-
 189
189
-
 190
190
-
 191
191
-
 192
192
-
 193
193
-
 194
194
-
 195
195
-
 196
196
-
 197
197
-
 198
198
-
 199
199
-
 200
200
-
 201
201
-
 202
202
-
 203
203
-
 204
204
-
 205
205
-
 206
206
-
 207
207
-
 208
208
-
 209
209
-
 210
210
-
 211
211
-
 212
212


Pioneer X-SMC02 Användarmanual
- Kategori
- Mottagare för bilmedia
- Typ
- Användarmanual
- Denna manual är också lämplig för
på andra språk
- italiano: Pioneer X-SMC02 Manuale utente
- español: Pioneer X-SMC02 Manual de usuario
- Deutsch: Pioneer X-SMC02 Benutzerhandbuch
- français: Pioneer X-SMC02 Manuel utilisateur
- English: Pioneer X-SMC02 User manual
- Nederlands: Pioneer X-SMC02 Handleiding
Relaterade papper
Andra dokument
-
Exibel BDX600 Användarmanual
-
Yamaha DVD-S657 Bruksanvisning
-
-
-
-
Yamaha DVD-S550 Bruksanvisning
-
-
-
ONKYO CS-265DAB Användarmanual
-
Exibel BDX610 Användarmanual