
Musikanläggning · Musikkanlegg
Stereojärjestelmä · Stereoanlage
Ver. 20170706
English 2
Svenska 14
Norsk 26
Suomi 38
Deutsch 50
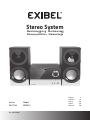
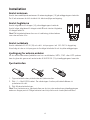
Stereo System
Art.no. Model
38-7334 BDX610

2
English
Stereo System
Art.no 38-7334 Model BDX610
Please read theentire instruction manual before using theproduct and then save
it for future reference. We reserve theright for any errors in text or images and any
necessary changes made to technical data. In theevent of technical problems or other
queries, please contact our Customer Services (see address details on theback).
Safety
• Theproduct should not be taken apart or modified. Certain unshielded components
inside thecasing carry dangerous voltages. Contact with these can lead to fire or
electric shock.
• Theproduct is designed for indoor use only.
• Never subject theproduct to high temperature, dust, heavy vibration, impacts,
humidity or moisture.
• Do not place theproduct where there is arisk of it falling into water or other liquid.
Do not place any objects which contain liquid onto theproduct such as vases,
drinks, etc.
• Disconnect theproduct from thepower supply by unplugging it from thewall socket.
• Make sure that thewall socket and plug are easily accessible.
• Protect your hearing. Listening on high volume for prolonged periods can lead to
permanent hearing loss.
• Do not cover theproduct. Adequate ventilation with adistance of at least 10 cm
between theventilation openings and adjacent surfaces is necessary to prevent
theappliance from overheating.
• Refer to themarkings in thebattery compartment to ensure correct polarity.
Never mix old and new batteries. Never mix rechargeable and non-rechargeable
batteries.
• Never subject thebatteries to extreme heat, direct sunlight, fire or similar.
• This product should not be exposed to strong electromagnetic force fields as this
may cause malfunctions.
• Repairs and service should only be performed by qualified tradesmen, and only
with original spare parts.

3
English
标签贴纸:黑底银字
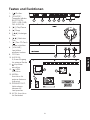
1 2 3 4 5 6 7
9 10 11 12
14
15
13
8
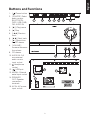
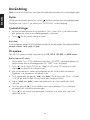
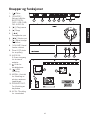
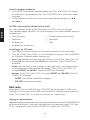
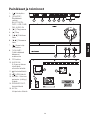
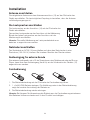
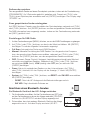
Buttons and functions
1. [ ] Power button
2. [ SOURCE ] Select
audio source:
BLUETOOTH,
DISC, USB, DAB,
FM, AUDIO IN
3. [ ►|| ] Play/pause
4. [ ■ ] Stop
5. [ |◄◄ ] Previous
track
6. [ ►►| ] Next track
7. [ ▲ ] Open/close
theCD drawer
8. [ VOLUME ]
Increase/decrease
thevolume
9. CD drawer
10. AUDIO IN: 3.5
mm external
audio source
input socket
11.
Headphone
socket
12.
USB port
13. AERIAL: External
aerial input socket
14. SPEAKER
OUT: Speaker
connection
terminals
15. AC IN: AC power
input socket

4
English
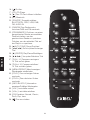
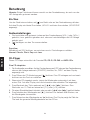
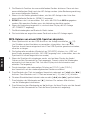
16
17
19
21
24
27
30
35
33
18
20
23
26
29
32
34
36
22
25
28
31
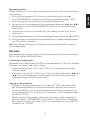
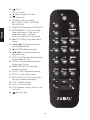
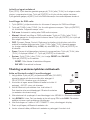
16. [ ] Power button
17. [ CD ] CD player
18. [ ▲ ] Open/close theCD drawer
19. [ BT ] Bluetooth
20. [ SOURCE ] Select audio source:
BLUETOOTH, DISC, USB, DAB,
FM, AUDIO IN
21. [ DAB/FM ] Switch radio between
DAB and FM
22. [ PRG/MEMORY ] Press to select
preset radio station. Hold in to save
achosen station. Press to save
thetrack on your playback list.
23. [ ■/AUTO TUNE ] Stop play/automatic
tuning
24. [ ◄◄/|◄◄ ] Rewind/previous track
25. [ ►||/ENTER ] Play/pause/enter
26. [ ►►/►►| ] Fast forward/next track
27. [ TUN-/-10 ] Lower theradio
frequency/go back 10 tracks
28. [ TUN-/+10 ] Raise theradio
frequency/go forward 10 tracks
29. [ MENU/REPEAT ] Display menu/
repeat playback
30. [ FOLD- ] Go to theprevious folder
31. [ FOLD+ ] Go to thenext folder
32. [ INFO/SHUFFLE ] Display
information/random playback
33. [ VOL- ] Decrease thevolume
34. [ VOL+ ] Increase thevolume
35. [ EQ ] Equalizer: normal, classic, rock,
pop, jazz
36. [
] Sound off

5
English
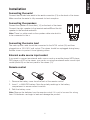
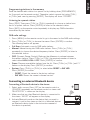
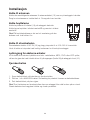
Installation
Connecting the aerial
Connect theincluded wire aerial to theaerial connection (13) on theback of thestereo.
Make sure that theaerial is fully unwound for best reception.
Connecting the speakers
Connect thespeakers to theoutlets [ 14 ] on theback of thestereo.
Connect theright speaker to theterminal marked R and theleft
speaker to theterminal marked L.
Note: There is awhite mark on thespeaker cable wire which is
to be connected to the +.
Connecting the mains lead
Themains power cable should be connected to theAC IN socket (15) and then
plugged into a100–240V wall socket. Thestereo should be unplugged during heavy
thunder storms to protect it from lightning strikes.
External audio source input socket
If you want to connect anexternal audio source such as amobile phone, MP3 player,
DVD player or VCR to thestereo, you can do so using theexternal audio source input
socket (Audio IN) on thefront panel of thestereo (10).
Remote control
1. Remove thebattery cover from theback of theremote control.
2. Insert 1 × AAA/LR03 battery. Note thepolarity markings in thebattery
compartment to ensure correct insertion.
3. Refit thebattery cover.
Note: Remove thebatteries from theremote control if it is not to be used for along
time. Old batteries can begin to leak and damage theproduct.

6
English
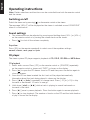
Operating instructions
Note: Certain selections and functions can be controlled from both theremote control
and thestereo.
Switching on/off
Switch thestereo on by pressing [ ] on theremote control or thestereo.
Themessage “HELLO” will be displayed as thestereo is switched on and “GOOD BYE”
when it is switched off.
Sound settings
• Thevolume level can be adjusted by pressing and holding down [ VOL- ] or [ VOL+ ]
on theremote control or by turning thevolume knob on thestereo.
• Press [
] to shut off thevolume completely.
Equalizer
Press [ EQ ] on theremote repeatedly to select one of theequalizer settings:
normal, classic, rock, pop and jazz.
CD player
Thestereo system CD player supports playback of CD, CD-R, CD-RW and MP3 discs.
CD playback
1. Select audio source: Press [ CD ] on theremote control or [ SOURCE ] repeatedly
on theremote control or stereo until “DISC” is shown on thedisplay.
2. Press [ ▲ ] to open theCD drawer. Insert aCD and then press thebutton again to
close thedrawer.
3. Once theCD has been inserted thefirst track will be played automatically.
Information about thetrack being played is shown on thedisplay.
4. Press [ |◄◄ ] or [ ►►| ] repeatedly to change track. Press [ -10 ] or [ +10 ] to skip
forwards or backwards 10 tracks in one go.
5. Hold down [ |◄◄ ] or [ ►►| ] while atrack is playing to search backwards or
forwards in thetrack.
6. Press [ ►|| ] once to pause playback. Press thebutton again to resume playback.
7. Press [ ■ ] to stop playback. Thenumber of tracks on theCD and thetotal duration
of play is shown on thedisplay.

7
English
Playback list
Up to 20 CD tracks can be saved on aplayback list and you can choose in which
order they are to be played.
1. Make sure that playback of theCD has been stopped by pressing [ ■ ].
2. Press [ PRG/MEMORY ] once to enter programming mode. “PRG” will appear on
thedisplay and thefirst slot of theplayback list will flash.
3. Select thetrack that you wish to save in theslot by pressing [ |◄◄ ] or [ ►►| ]
therequired number of times. Confirm by pressing [ PRG/MEMORY ]. Thenext slot
in theplayback list will start to flash.
4. Repeat step 3 above and save all thetracks in theorder you’d like them to be played.
5. Finalise theprogramming and start playback by pressing [ ►||/ENTER ].
6. To interrupt playback of theplayback list, press [ ■ ] repeatedly until “PRG”
disappears from thedisplay.
Note: Theplayback list is erased from thememory when you select another audio
source or switch thestereo system off.
FM radio
Thestereo system radio receiver supports both analogue (FM) and digital (DAB/DAB+)
radio transmissions.
Tuning into a radio station
Select audio source: Press [ DAB/FM ] or [ SOURCE ] repeatedly until “FM” is shown on
thedisplay. Thereafter the display will show thechosen station/frequency.
1. Manual tuning: Press [ TUN- ] or [ TUN+ ] to change to alower or higher frequency.
2. Automatic search: Hold down [ TUN- ] or [ TUN+ ] on theremote control or
[ |◄◄ ] or [ ►►| ] on thestereo to search automatically for thenext radio station.
Thesearch stops when astation has been found.
Programming stations in the memory
• Automatic station search and save: Press [ ■/AUTO TUNE ] on theremote control
or stereo to start thestereo searching for and saving stations automatically.
Thestations with thestrongest signals are programmed into the20 preset slots.
To interrupt thestation search, press [ ■/AUTO TUNE ] once again.
• Saving preset stations manually: Save thedesired radio station to apreset slot by
holding down [ PRG/MEMORY ] for 3 seconds on theremote control. Thereafter,
select apreset slot using [ TUN- ] or [ TUN+ ] and save by pressing [ ENTER ].
Thedisplay will show “STORED”.

8
English
Listening to a preset station
• Press [ PRG ]. Then press [ TUN- ] or [ TUN+ ] repeatedly to choose astation from
thelist of preset stations. Press [ ENTER ] to listen to theselected station.
• You can even move up or down in thestation list by pressing [ |◄◄ ] or [ ►►| ]
repeatedly.
Display RDS information (Radio Data System)
If theradio station sends out RDS information, theletters “RDS” will be displayed.
Press [ INFO ] on theremote control repeatedly to display any RDS information
transmitted by thestation.
Thefollowing information can be displayed:
• Station name
• Radio text
• Programme type
• Preset slot and frequency
• Signal type (mono/stereo)
• Clock
• Date
FM radio settings
1. Press [ MENU ] on theremote control to go to themenu for theFM radio settings.
2. Press [ TUN+ ] or [ TUN- ] to browse themenu. Press [ ENTER ] to confirm.
Thefollowing menus will appear:
• Scan: Choose thesensitivity for scanning for FM stations. Press [ TUN+ ] or [ TUN- ]
to choose DX (high sensitivity) or LOCAL (low sensitivity). Press [ ENTER ] to confirm.
• Audio: Select whether you wish to receive stereo audio or if you want to receive
transmissions in mono. In poor reception conditions mono can improve thesound
quality. Press [ TUN+ ] or [ TUN- ] to select either STEREO or MONO.
Press [ ENTER ] to confirm.
• System: Press [ TUN+ ] or [ TUN- ] to select either RESET or SW VER.
Press [ ENTER ] to confirm.
- RESET: Reset thestereo to thefactory settings.
- SW VER: Shows thecurrent software version.
DAB radio
Select audio source: Press [ DAB/FM ] or [ SOURCE ] repeatedly until “DAB” is shown
on thedisplay. If no DAB-stations are programmed as presets, anew scan will begin
automatically.
Press [ TUN- ] or [ TUN+ ] to choose astation from thelist of preset stations.

9
English
Programming stations in the memory
Save thedesired radio station to apreset slot by holding down [ PRG/MEMORY ]
for 3 seconds on theremote control. Thereafter, select apreset slot using [ TUN- ]
or [ TUN+ ] and save by pressing [ ENTER ]. Thedisplay will show “STORED”.
Listening to a preset station
Press [ PRG ]. Then press [ TUN- ] or [ TUN+ ] repeatedly to choose astation from
thelist of preset stations. Press [ ENTER ] to listen to theselected station.
Press [ INFO ] on theremote control repeatedly to display any DAB information
transmitted by thestation.
DAB radio settings
1. Press [ MENU ] on theremote control to go to themenu for theDAB radio settings.
2. Press [ TUN+ ] or [ TUN- ] to browse themenu. Press [ ENTER ] to confirm.
Thefollowing menus will appear:
• Full Scan: Automatic scan for DAB radio stations.
• Manual: Manual tuning into DAB radio stations. Press [ TUN+ ] or [ TUN- ]
repeatedly to choose thedesired frequency/station. Press [ ENTER ] to listen to
theselected station.
• DRC (Dynamic Range Control): Reduces thedifference in volume between
thevarious stations. Press [ TUN+ ] or [ TUN- ] therequired number of times to
select either HIGH, LOW or OFF. Press [ ENTER ] to confirm.
• Prune: Remove unavailable stations from thelist. Press [ TUN+ ] or [ TUN- ] until “Y”
flashes on thedisplay. Press [ ENTER ] to confirm.
• System: Press [ TUN+ ] or [ TUN- ] to select either RESET or SW VER.
Press [ ENTER ] to confirm.
- RESET: Reset thestereo to thefactory settings.
- SW VER: Shows thecurrent software version.
Connecting an external Bluetooth device
Connecting a Bluetooth device to the stereo
1. Select audio source: Press [ BT ] on theremote control or
[ SOURCE ] repeatedly on theremote control or stereo until
“BLUETOOTH” is shown on thedisplay.
2. Make sure that no other Bluetooth device is connected to
thestereo. “NO BT” will appear on thedisplay.
3. Activate Bluetooth mode on thedevice that you want to
connect. Look for thestereo on thelist of detected devices
on Bluetooth device (refer to theinstruction manual of
thedevice in question).

10
English
4. Once thedevices have found each other, thestereo will appear as “BDX610” on
theBluetooth device.
5. Select BDX610 on thelist. If you are required to enter aPIN code, enter 0000
(four zeros). Certain devices may also require you to approve theconnection.
6. Once theconnection has been successful “BT CONNECT” will appear on
thedisplay of thestereo.
7. Start playback on theBluetooth device.
8. Adjust thevolume both on thedevice and stereo to thedesired volume level.
Playing MP3 files from a USB memory
1. Plug aUSB flash drive into thestereo (12). Make sure to insert theUSB flash
drive theright way round to ensure that theconnectors are not damaged. Always
push theUSB flash drive straight in without twisting or bending it.
2. Select audio source: Press [ SOURCE ] repeatedly until “USB” is shown on
thedisplay (if “NO USB” is displayed, check that theUSB flash drive has been
inserted correctly).
3. When theUSB stick has been read, thenumber of files and tracks will be shown
on thedisplay. Thereafter, thefirst track will be played automatically. Information
about thetrack being played is shown on thedisplay.
4. Press [ FOLD- ] or [ FOLD+ ] therequired number of times to select afolder for playback.
5. Press [ |◄◄ ] or [ ►►| ] repeatedly to change track in thefolder. Press [ -10 ] or
[ +10 ] to skip forwards or backwards 10 tracks in one go.
6. Hold down [ |◄◄ ] or [ ►►| ] while atrack is playing to search backwards or
forwards in thetrack.
7. Press [ ►|| ] once to pause playback. Press thebutton again to resume playback.
8. Press [ ■ ] to stop playback. Thenumber of folders and total number of tracks on
theUSB flash drive will be shown on thedisplay.
Playback list
You can save up to 99 MP3 tracks on aplayback list and choose in which order they
are to be played.
1. Make sure that playback of theUSB flash drive has been stopped by pressing [ ■ ].
2. Press [ PRG/MEMORY ] once to enter programming mode. “PRG” will appear on
thedisplay and thefirst slot of theplayback list will flash.
3. Select thetrack that you wish to save in theslot by pressing [ |◄◄ ] or [ ►►| ]
therequired number of times. Use [ FOLD- ] or [ FOLD+ ] to select afolder. Confirm
by pressing [ PRG/MEMORY ]. Thenext slot in theplayback list will start to flash.
4. Repeat step 3 above and save all thetracks in theorder you’d like them to be played.

11
English
5. Finalise theprogramming and start playback by pressing [ ►||/ENTER ].
6. To interrupt playback of theplayback list, press [ ■ ] repeatedly until “PRG”
disappears from thedisplay.
Note: Theplayback list is erased from thememory when you select another audio
source or switch thestereo system off.
Audio source input (AUDIO IN)
1. Plug anexternal audio source to the3.5mm input jack (10) on thefront of thestereo.
2. Select audio source: Press [ SOURCE ] repeatedly until “AUDIO IN” appears on
thedisplay.
3. Start playback on theexternal audio source.
4. Adjust thestereo volume to thedesired level.
Playback options
Repeated playback (CD)
Press [ REPEAT ] once or repeatedly to repeat one track or all tracks on theCD.
• REPEAT ONE: Repeat asingle track. “REP” will appear on thedisplay.
• REPEAT ALL: Repeat all thetracks on thedisc. “REP. ALL” is shown on thedisplay.
• OFF: No repetition.
Repeated playback (USB)
Press [ REPEAT ] once or repeatedly to repeat one track, one folder or all tracks.
• REPEAT ONE: Repeat asingle track. “REP” will appear on thedisplay.
• REPEAT ALB: Repeat all thetrack in afolder/album. “REP. ALB” is shown on thedisplay.
• REPEAT ALL: Repeat all tracks. “REP. ALL” is shown on thedisplay.
• OFF: No repetition.
Random playback
• SHUFFLE: Thetracks are played in arandom order. “SHUF” will appear on thedisplay.
• OFF: Random playback deactivated.
Care and maintenance
• Clean theproduct by wiping it with asoft, damp cloth.
• Never use solvents or abrasive cleaning agents.

12
English
Troubleshooting guide
Thedevice will
not switch on.
• Check that thebatteries in theremote control are not flat.
Replace if necessary.
• Make sure that themains lead is undamaged and is securely
connected to both theelectrical socket and thestereo.
• Is thewall socket live?
• Unplug themains lead from thewall socket.
Wait afew seconds and then plug it in again.
It is not
possible to
play CD/
MP3 tracks.
• Check that thedisc is correctly inserted.
• Check that thedisc is neither scratched nor dirty.
• Certain CDs are not compatible with this stereo system.
Make sure that thedisc is of thetype CD, CD-R or CD-RW.
Poor or non-
existent radio
reception.
• Make sure that theaerial is fully extended and properly connected.
• Try moving theaerial.
• Move thestereo system to anew location.
No sound from
connected
external device.
• Make sure that thecorrect audio source has been chosen.
• Check thevolume level of both thestereo and
theconnected device.
If using Bluetooth
• Make sure that theBluetooth connection has been properly
established.
• Test theplayback from your external device before connecting it.
Things to consider
• Other wireless equipment using thesame frequency can reduce
thetransmission range.
• Therange can also be affected by thetype of obstacles located
between thetransmitter and thereceiver (e.g. aconcrete wall
will interfere with thesignal more than aplasterboard wall).
If using theAudio In socket
• Make sure that thelead is undamaged and properly connected
to thestereo (10) and to theexternal device.
• Make sure that thecorrect audio source has been chosen
(AUDIO IN).

13
English
Responsible disposal
This symbol indicates that this product should not be disposed of with
general household waste. This applies throughout theentire EU. In order
to prevent any harm to theenvironment or health hazards caused by
incorrect waste disposal, theproduct must be handed in for recycling
so that thematerial can be disposed of in aresponsible manner. When
recycling your product, take it to your local collection facility or contact
theplace of purchase. They will ensure that theproduct is disposed of in
anenvironmentally sound manner.
Specifications
Remote control battery 1×AAA/LR03 (sold separately)
Rated voltage 100–240 V AC, 50/60 Hz
Power 2×25W RMS
Frequency range FM 87.5–108 MHz
Power consumption Max 60 W
Stereo size 23.1×23.1×14.2 cm
Speaker size 14×22×30cm

14
Svenska
Musikanläggning
Art.nr 38-7334 Modell BDX610
Läs igenom hela bruksanvisningen före användning och spara den sedan för framtida bruk.
Vi reserverar oss för ev. text- och bildfel samt ändringar av tekniska data. Vid tekniska
problem eller andra frågor, kontakta vår kundtjänst (se adressuppgifter på baksidan).
Säkerhet
• Produkten får inte demonteras eller ändras. Farlig spänning finns oskyddad på
komponenter under produktens hölje. Kontakt med dessa kan leda till brand eller
ge elektriska stötar.
• Produkten är endast avsedd för inomhusbruk.
• Utsätt aldrig produkten för höga temperaturer, dammig miljö, starka vibrationer,
stötar, fukt eller väta.
• Placera inte produkten så att den kan falla ner ivatten eller annan vätska. Ställ inte
heller några föremål som innehåller vätska på produkten, t.ex. enblomvas eller dryck.
• Bryt strömmen till produkten genom att dra ut stickproppen ur vägguttaget.
• Produktens stickpropp måste vara lättåtkomlig.
• Skydda din hörsel. Lyssning med hög volym under lång tid kan leda till bestående
hörselskador.
• Täck inte över produkten. Tillräcklig ventilation, med ettminsta avstånd på
ca 10 cm mellan ventilationshålen och omgivande ytor, är nödvändig för att
förhindra att den blir överhettad.
• Se märkningen ibotten på batterihållaren så att polariteten blir rätt. Blanda inte nya
och gamla batterier. Blanda inte heller laddbara batterier med ej laddbara.
• Utsätt aldrig batterierna för extrem värme, direkt solljus, eld eller liknande.
• Produkten får inte utsättas för starka elektromagnetiska kraftfält, det kan orsaka
störningar ifunktionen.
• Låt behörig personal utföra service och reparationer och endast med originalreservdelar.

15
Svenska
标签贴纸:黑底银字
1 2 3 4 5 6 7
9 10 11 12
14
15
13
8
Knappar och funktioner
1. [ ] På/av
2. [ SOURCE ]
Val av ljudkälla:
BLUETOOTH,
DISC, USB, DAB,
FM, AUDIO IN
3. [ ►|| ] Play/pause
4. [ ■ ] Stopp
5. [ |◄◄ ]
Föregående spår
6. [ ►►| ] Nästa spår
7. [ ▲ ] Öppna/stäng
CD-luckan
8. [ VOLUME ] Öka/
minska volymen
9. Fack för CD-skiva
10. AUDIO IN:
3,5 mm
ljudingång för
externa enheter
11.
Uttag för
hörlurar
12.
USB-
anslutning
13. AERIAL:
Anslutning för
extern antenn
(ingår)
14. SPEAKER OUT:
Anslutningsplint
för högtalare
15. AC IN: Anslutning
för nätkabel

16
Svenska
16
17
19
21
24
27
30
35
33
18
20
23
26
29
32
34
36
22
25
28
31
16. [ ] På/av
17. [ CD ] CD-spelare
18. [ ▲ ] Öppna/stäng CD-luckan
19. [ BT ] Bluetooth
20. [ SOURCE ] Val av ljudkälla:
BLUETOOTH, DISC, USB, DAB, FM,
AUDIO IN
21. [ DAB/FM ] Växla radioläge mellan
DAB och FM
22. [ PRG/MEMORY ] Tryck för att välja
sparad radiostation. Håll in för att
spara vald radiostation. Tryck för att
spara spår till uppspelningslista.
23. [ ■/AUTO TUNE ] Stopp/automatisk
sökning
24. [ ◄◄/|◄◄ ] Snabbspola bakåt/välj
föregående spår
25. [ ►||/ENTER ] Play/pause/enter
26. [ ►►/►►| ] Snabbspola framåt/välj
nästa spår
27. [ TUN-/-10 ] Minska radiofrekvensen/
hoppa tillbaka 10 spår
28. [ TUN+/+10 ] Öka radiofrekvensen/
hoppa framåt 10 spår
29. [ MENU/REPEAT ] Visa menyn/
repetera uppspelning
30. [ FOLD- ] Gå till föregående mapp
31. [ FOLD+ ] Gå till nästa mapp
32. [ INFO/SHUFFLE ] Visa information/
slumpmässig uppspelning
33. [ VOL- ] Sänk volymen
34. [ VOL+ ] Höj volymen
35. [ EQ ] Equalizer: normal, classic, rock,
pop, jazz
36. [
] Stäng av ljudet

17
Svenska
Installation
Anslut antennen
Anslut den medföljande antennen till antenningången (13) på anläggningens baksida.
Se till att antennen är fullt utsträckt för bästa möjliga mottagning.
Anslut högtalarna
Anslut högtalarna till uttagen (14) på anläggningens baksida.
Anslut höger högtalare till uttaget märkt R och vänster högtalare
till uttaget märkt L.
Obs! På högtalarkablarna finns envit märkning på den ledare
som ska anslutas till +.
Anslut nätkabeln
Anslut nätkabeln till AC IN (15) och sätt istickproppen iett100−240 V vägguttag.
Kom ihåg att dra ur stickproppen vid kraftiga åskväder för att skydda anläggningen.
Ljudingång för externa enheter
Vill du ansluta enextern ljudkälla som t.ex. mobiltelefon, MP3-, DVD- eller VCR-spelare
kan du göra det genom att ansluta den till AUDIO IN (10) på anläggningens framsida.
Fjärrkontrollen
1. Öppna batteriluckan på baksidan av fjärrkontrollen.
2. Sätt i1 × AAA/LR03-batteri. Se märkningen ibotten på batterihållaren så
polariteten blir rätt.
3. Sätt tillbaka batteriluckan.
Obs! Ta ut batterierna ur fjärrkontrollen om du inte ska använda musikanläggningen
under enlängre period. Dåliga batterier kan börja läcka och skada fjärrkontrollen.

18
Svenska
Användning
Obs! Vissa val och funktioner kan styras från både fjärrkontrollen och musikanläggningen.
På/av
Slå på eller av enheten genom att trycka [ ] på fjärrkontrollen eller musikanläggningen.
Displayen visar ”HELLO” vid påslag och ”GOOD BYE” vid avstängning.
Ljudinställningar
• Justera volymen genom att trycka/hålla in [ VOL- ] eller [ VOL+ ] på fjärrkontrollen
eller genom att vrida på musikanläggningens volymvred.
• Tryck [
] för att snabbt stänga av ljudet.
Equalizer
Tryck upprepade gånger på [ EQ ] på fjärrkontrollen för att välja mellan förinställda ljudeffekter:
normal, classic, rock, pop och jazz.
CD-spelare
Den här CD-spelaren stödjer uppspelning av CD, CD-R, CD-RW och MP3-skivor.
Spela upp en CD-skiva
1. Välj ljudkälla: Tryck [ CD ] på fjärrkontrollen eller [ SOURCE ] upprepade gånger på
fjärrkontrollen eller musikanläggningen tills ”DISC” visas idisplayen.
2. Tryck [ ▲ ] för att öppna CD-luckan. Lägg ienCD-skiva iCD-facket och tryck
ytterligare engång för att stänga luckan.
3. När skivan matats in startar uppspelningen av det första spåret automatiskt.
Displayen visar information om aktuellt spår.
4. Tryck upprepade gånger på [ |◄◄ ] eller [ ►►| ] för att byta spår. Tryck [ -10 ] eller
[ +10 ] för att direkt hoppa 10 steg bakåt eller framåt på skivan.
5. Håll in [ |◄◄ ] eller [ ►►| ] under uppspelning för att söka framåt eller bakåt
iettspår.
6. Tryck engång på [ ►|| ] för att tillfälligt pausa uppspelningen. Tryck ytterligare
engång för att fortsätta uppspelningen.
7. Tryck [ ■ ] för att stoppa uppspelningen. Displayen visar antal spår samt total
speltid på skivan.

19
Svenska
Uppspelningslista
Du kan spara upp till 20 CD-spår ienuppspelningslista och välja ivilken ordning de
ska spelas upp.
1. Se till att uppspelningen av CD-skivan är stoppad genom att trycka [ ■ ].
2. Tryck [ PRG/MEMORY ] engång för att komma iprogrammeringsläge. ”PRG”
tänds idisplayen och första platsen iuppspelningslistan blinkar.
3. Välj det spår du vill spara genom att trycka upprepade gånger på [ |◄◄ ] eller [ ►►| ].
Bekräfta genom att trycka [ PRG/MEMORY ]. Nästa plats iuppspelningslistan
börjar blinka.
4. Upprepa steg 3 ovan och spara alla spår iden ordning som du vill att de ska
spelas upp.
5. Avsluta programmeringen och påbörja uppspelningen genom att trycka [ ►||/ENTER ].
6. För att avbryta uppspelning från uppspelningslistan tryck [ ■ ] upprepade gånger
tills ”PRG” släcks idisplayen.
Obs! Uppspelningslistan rensas ur minnet när du ändrar ljudkälla eller stänger av
musikanläggningen.
FM-radio
Musikanläggningens radiomottagare stödjer radiosändningar från både det analoga
(FM) och det digitala (DAB/DAB+) nätet.
Inställning av radiostation
Välj ljudkälla: Tryck [ DAB/FM ] eller [ SOURCE ] upprepade gånger tills ”FM” visas idisplayen.
Displayen visar därefter vald station/frekvens.
1. Manuell inställning: Tryck [ TUN- ] eller [ TUN+ ] för att stega uppåt eller nedåt
ifrekvensbandet.
2. Automatisk sökning: Håll in [ TUN- ] eller [ TUN+ ] på fjärrkontrollen eller [ |◄◄ ] eller
[ ►►| ] på musikanläggningen för att automatisk söka efter nästa radiostation.
Sökningen stoppas när nästa station hittas.
Lagring av radiostationer
• Automatisk lagring av radiostationer: Tryck [ ■/AUTO TUNE ] på fjärrkontrollen
eller musikanläggningen för att starta enautomatisk lagring av radiostationer.
Ensökning påbörjas och de starkaste radiostationerna lagras automatiskt ide
20 programplatserna. För att avbryta mitt isökningen - tryck ytterligare engång
på [ ■/AUTO TUNE ].
• Manuell lagring av radiostationer: Spara vald radiostation på enprogramplats
genom att hålla in [ PRG/MEMORY ] i3 sekunder på fjärrkontrollen. Välj därefter
enprogramplats med [ TUN- ] eller [ TUN+ ] och spara genom att trycka [ ENTER ].
Displayen visar ”STORED”.

20
Svenska
Lyssna på en sparad radiostation
• Tryck [ PRG ]. Tryck därefter upprepade gånger [ TUN- ] eller [ TUN+ ] för att välja
enradiostation iprogramplatslistan. Tryck [ ENTER ] för att lyssna på vald station.
• Du kan även stega upp och ner iprogramplatslistan genom att trycka upprepade
gånger på [ |◄◄ ] eller [ ►►| ].
Visa RDS-information (Radio Data System)
Om radiostationen sänder ut RDS-information tänds ”RDS” idisplayen.
Tryck upprepade gånger på [ INFO ] på fjärrkontrollen för att visa information som
radiostationen sänder ut. Displayen visar:
• Stationsnamn
• Radiotext
• Programtyp
• Programplats och frekvens
• Utsändningstyp (mono/stereo)
• Klocka
• Datum
Inställningar för FM-radio
1. Tryck [ MENU ] på fjärrkontrollen för att komma till menyn för FM-inställningar.
2. Tryck [ TUN+ ] eller [ TUN- ] för att scrolla igenom menyn. Tryck [ ENTER ] för att
bekräfta. Följande menyer visas:
• Scan: Välj känslighet vid sökning av FM-radiostationer. Tryck [ TUN+ ] eller [ TUN- ]
för att välja DX (hög känslighet) eller LOCAL (låg känslighet). Tryck [ ENTER ] för
att bekräfta.
• Audio: Välj om du vill ta emot stereoljud eller om du vill ta emot sändningen imono.
Vid dåliga mottagningsförhållanden kan monomottagning förbättra ljudkvaliteten.
Tryck [ TUN+ ] eller [ TUN- ] för att välja STEREO eller MONO. Tryck [ ENTER ] för
att bekräfta.
• System: Tryck [ TUN+ ] eller [ TUN- ] för att välja RESET eller SW VER.
Tryck [ ENTER ] för att bekräfta.
- RESET: Återställer musikanläggningen till fabriksinställningarna.
- SW VER: Visar aktuell mjukvara.
DAB-radio
Välj ljudkälla: Tryck [ DAB/FM ] eller [ SOURCE ] upprepade gånger tills ”DAB” visas
idisplayen. Finns inga DAB-stationer lagrade påbörjas ensökning automatiskt.
Tryck [ TUN+ ] eller [ TUN- ] för att välja enradiostation istationslistan.
Lagring av radiostationer
Spara vald radiostation på enprogramplats genom att hålla in [ PRG/MEMORY ]
i3 sekunder på fjärrkontrollen. Välj därefter enprogramplats med [ TUN- ] eller [ TUN+ ]
och spara genom att trycka [ ENTER ]. Displayen visar ”STORED”.
Sidan laddas...
Sidan laddas...
Sidan laddas...
Sidan laddas...
Sidan laddas...
Sidan laddas...
Sidan laddas...
Sidan laddas...
Sidan laddas...
Sidan laddas...
Sidan laddas...
Sidan laddas...
Sidan laddas...
Sidan laddas...
Sidan laddas...
Sidan laddas...
Sidan laddas...
Sidan laddas...
Sidan laddas...
Sidan laddas...
Sidan laddas...
Sidan laddas...
Sidan laddas...
Sidan laddas...
Sidan laddas...
Sidan laddas...
Sidan laddas...
Sidan laddas...
Sidan laddas...
Sidan laddas...
Sidan laddas...
Sidan laddas...
Sidan laddas...
Sidan laddas...
Sidan laddas...
Sidan laddas...
Sidan laddas...
Sidan laddas...
Sidan laddas...
Sidan laddas...
Sidan laddas...
Sidan laddas...
Sidan laddas...
Sidan laddas...
-
 1
1
-
 2
2
-
 3
3
-
 4
4
-
 5
5
-
 6
6
-
 7
7
-
 8
8
-
 9
9
-
 10
10
-
 11
11
-
 12
12
-
 13
13
-
 14
14
-
 15
15
-
 16
16
-
 17
17
-
 18
18
-
 19
19
-
 20
20
-
 21
21
-
 22
22
-
 23
23
-
 24
24
-
 25
25
-
 26
26
-
 27
27
-
 28
28
-
 29
29
-
 30
30
-
 31
31
-
 32
32
-
 33
33
-
 34
34
-
 35
35
-
 36
36
-
 37
37
-
 38
38
-
 39
39
-
 40
40
-
 41
41
-
 42
42
-
 43
43
-
 44
44
-
 45
45
-
 46
46
-
 47
47
-
 48
48
-
 49
49
-
 50
50
-
 51
51
-
 52
52
-
 53
53
-
 54
54
-
 55
55
-
 56
56
-
 57
57
-
 58
58
-
 59
59
-
 60
60
-
 61
61
-
 62
62
-
 63
63
-
 64
64


på andra språk
- Deutsch: Exibel BDX610 Benutzerhandbuch
- English: Exibel BDX610 User manual
- suomi: Exibel BDX610 Ohjekirja
Relaterade papper
Andra dokument
-
OK. ORD 110 Användarmanual
-
Pioneer X-SMC02 Användarmanual
-
Yamaha RX-A2000 Bruksanvisning
-
-
Sony XR-M500R Användarmanual
-
Clas Ohlson CD-726DAB Användarmanual
-
ONKYO CS-375D Användarmanual
-
-
Matsui MHFCD10E Användarmanual
-
Logik L10CDI13E Snabbstartsguide