POINT POMO5028CIB MINIOVN MED KOKEPLATER Bruksanvisning
- Kategori
- Mixer / matberedare tillbehör
- Typ
- Bruksanvisning

POMO5028CIB
User Manual
28L Mini Oven
With 2 Cooking plates

2
Thank you for purchasing your new POINT Mini Oven. These operating
instructions will help you use it properly and safely. We recommend
that you spend some time reading this instruction manual in order
that you fully understand all the operational features it offers. Read
all the safety instructions carefully before use and keep this
instruction manual for future reference.
Takk for at du kjøpte din nye Miniovn fra POINT. Denne
bruksanvisningen vil hjelpe deg med å bruke den på en trygg og riktig
måte. Vi anbefaler at du tar deg tid til å lese gjennom hele
bruksanvisningen for å bli fortrolig med alle funksjonene som tilbys.
Les alle sikkerhetsreglene nøye før bruk, og ta vare på
bruksanvisningen for fremtidig referanse.
Kiitos, kun ostit uuden POINT-miniuunin. Nämä käyttöohjeet
opastavat sinua käyttämään laitetta oikein ja turvallisesti.
Suosittelemme, että käytät hieman aikaa tämän käyttöoppaan
lukemiseen, jotta ymmärrät täysin, mitä toimintoja laitteessa
on. Lue kaikki turvallisuusohjeet huolellisesti ennen laitteen
käyttöä ja säilytä käyttöopas myöhempää tarvetta varten.
Tak for købet af din nye Miniovn fra POINT. Disse brugervejledninger
hjælper dig med at bruge dette apparat rigtigt og sikkert. Vi
anbefaler, at du læser denne brugervejledning, så du får en fuld
forståelse af hvordan alle funktionerne virker. Læs alle
sikkerhedsinstruktionerne omhyggeligt før brug, og behold denne
brugsvejledning til senere reference.
Tack för att du har köpt en Miniugn från POINT. Denna bruksanvisning
hjälper dig att använda den på ett säkert och korrekt sätt. Vi
rekommenderar att du tar dig tid att läsa igenom denna
bruksanvisning för att till fullo förstå alla driftfunktioner som den
erbjuder. Läs alla säkerhetsinstruktioner noggrant innan du
produkten och spara bruksanvisningen för framtida bruk.

3
lnstruction manual - English ................. page 4 - 14
Bruksanvisning - Norsk............................side 15 - 25
Käyttöopas - Suomi................................sivu 26 - 36
Brugervejledning - Dansk........................side 37 - 47
Bruksanvisning - Svenska.......................sidor 48-58

4
Warnings
This appliance is intended to be used in household and
similar applications such as:
staff kitchen areas in shops, offices and other working
environments;
farm houses;
by clients in hotels, motels and other residential environments;
bed and breakfast type environments.
If the supply cord is damaged, it must be replaced by the
manufacturer, its service agent or similarly qualified persons in
order to avoid a hazard.
This appliance can be used by children 8 years and older.
Persons with reduced physical, sensory or mental capabilities
or lack of experience and knowledge can use the appliance if
they are supervised or instructed on the safe use of it and the
risks involved. Children are not to play with the appliance.
Cleaning and user maintenance are not be carried out by
children unless they are older than 8 and are supervised.
Keep the appliance and its power cord out of reach of children
younger than 8 years.
The appliance is not intended to be operated by means of an
external timer or separate remote-control system.
The temperature of accessible surfaces may be high when the
appliance is operating.
The door or the outer surface may get hot when the appliance
is operating.
IMPORTANT SAFETY INSTRUCTIONS
PLEASE READ THE FOLLOWING SAFETY WARNINGS AND
THE INSTRUCTIONS CAREFULLY BEFORE USING THE
APPLIANCE AND KEEP THE MANUAL FOR FUTURE
REFERENCE.

5
The rear surface of appliance shall be placed against a wall.
Do not place the appliance in or near hot gas, electric burner,
or a heated oven or mini oven.
Do not touch hot surfaces.
Caution: Hot Surface.
The surfaces are liable to get hot during use.
Safety Information
.
To protect against fire, electric shock and personal injury, do not
immerse cord, plugs, or any parts of the oven in water or any
other liquid.
Do not let the cord hang over edge of a table or counter, or touch
any hot surfaces.
When using this device, plug it directly into the wall socket, not
via extension cables or other adapters as this may cause an
overload.
The use of accessories that are not recommended by the
manufacturer may cause a hazard or injury.
Unplug it from the mains socket when not in use or before
cleaning. Allow it to cool before pulling on or taking off the parts,
and before cleaning.
To disconnect, turn the timer control knob to “OFF-0”, then remove
the plug. Always hold the plug to remove, never pull the cord.
Use extreme caution when moving an appliance containing hot
oil or food.
Do not cover any part of the oven with metal or cloth, it may
cause overheating of the oven.
Do not place any item on the oven.
Use extreme caution when removing the tray or disposing hot
grease or other hot liquids.

6
Oversized foods or metal utensils cannot be put into the
appliance as they may create a fire or risk of electric shock.
A fire may occur if the oven is covered by or near any flammable
material, including curtains, draperies, etc. Do not store any
item on the oven during operation.
Extreme caution should be exercised when using cooking or
baking containers constructed of anything other than metal
or ovenproof glass.
Be sure that nothing touches the top or bottom elements of the
oven.
Do not place any of the following materials in the oven: plastic,
paper, or anything similar.
Always wear protective, insulated oven gloves when
or removing items from the hot oven.
This appliance has a tempered, safety glass door. The glass is
stronger than ordinary glass and will be more resistant to
breakage. Be aware that tempered glass can still break,
especially around the edges. Avoid scratching the door surface
or nicking the edges.
Children should be supervised to ensure that they do not play
with the appliance.
Do not use it outdoors.
Do not use this oven for any purpose other than the intended
ones.
Do not leave the appliance unattended when in operation.
Do not clean the inside of the oven with metal scouring pads as
it may touch electrical parts, and create a risk of electric shock.
putting in

7
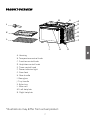
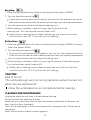
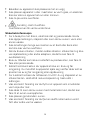
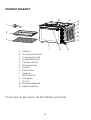
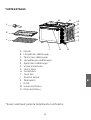
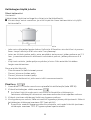
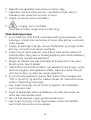
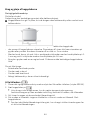
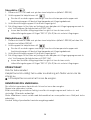
PRODUCT OVERVIEW
A. Housing
B. Temperature control knob
C. Function control knob
D. Hotplates control knob
E. Timer control knob
F. Power indicator light
G. Oven foot
H. Door handle
I. Door glass
J. Tray handle
K. Bake tray
L. Wire rack
M. Left hotplate
N. Right hotplate
*Illustrations may differ from actual product.
L
K
J
A
B
C
D
G
H
I
E
N
M
F

8
BEFORE FIRST USE
Before using your mini oven for the first time, be sure to:
Read all instructions in the manual.
Make sure the oven is unplugged and the timer control knob is in the “OFF-0” position.
Wash all accessories in warm soapy water.
Thoroughly dry all accessories and then assemble them in the oven.
Plug the oven in the mains socket and then you are ready to use it.
Once assembled for the first time, it is recommended that you run the oven at the
highest temperature (230°C) on the function for 15 minutes to burn off the
packing residue. This will remove all traces of odour that occurs on the first use.
Please Note: When using the oven for the first time, the oven may produce an odor
and smoke. The oven is burning off the excess oils in the heating elements and this is
normal.
Please familiarize yourself with the following oven functions and accessories before
first use:
Temperature Control: Choose the desired temperature (90°C-230°C), it controls the
oven temperature only.
Function Control: There are four function controls depending upon your
cooking requirements.
Upper heating( )/Lower heating( )/Upper& Lower heating( )/
Upper& Lower heating &Convection( )
Hotplates Control: There are three function controls for selecting the hotplates.
Small plate( )/Big plate( )/Both plates( )
Timer Control: Set cooking time up to 60 minutes. The oven will automatically turn
off once the timer runs out, and a bell will sound as a reminder. To manually turn off
the oven, turn this knob to the “OFF-0” position.
Power indicator light: It will illuminate when the oven is turned on.
Bake tray: Use for broiling or roasting meat, poultry, fish or various other foods. It can
also used as a drip tray to collect grease, oil, and liquid which come from the food
being rotisserie cooked.
Wire rack: For toasting, baking and general cooking in casserole dishes and standard
pans.
To make cleaning the oven easier, it’s best not to use the wire rack on its own, but
with an additional bake tray under it to catch crumbs or drips.

9
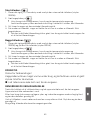
OPERATION
Place the oven on a clean, flat and heat resistant surface.
Ensure that there is enough ventilation around the oven.
Ensure that the oven is completely dry before use.
The oven should not be placed on untreated wooden surface.
Plug in the oven.
For best results, it is recommended that you preheat the oven for 15 minutes at
230°C.
How to Broil (Upper Heating )
1 . Place the bake tray at the uppermost position.
2Place the food to be cooked onto the bake tray and close the oven door.
3.Turn the function control knob to .
4.Turn the temperature control knob to the desired temperature.
5.Turn the timer control knob to the desired cooking time.
6.When broiling is complete, a bell will ring to signify the end of the broil cycle.
Turn the function control knob to OFF.
CAUTION: The surface of the oven will get hot during and after
use. Keep your hands safe by not touching the surface.
Always use extreme care when removing bake tray, wire rack or
any hot container from a hot oven. Always use the rack handle,
or an oven mitt when removing hot items from the oven.
Before the set cooking time has been reached, you may also turn the timer
control knob to the “OFF-0” position to finish cooking.
How to Bake (Lower Heating )
1. Place the wire rack on the lowest or middle rack support guide.
Positioning the Wire Racks :
Cookies – Use the bottom and middle support guides.
Layer Cakes – Use the bottom support guide only (bake one at a time).
Pies–Use bottom and middle support guides.
2.Place the food onto the wire rack and close the oven door.
Food should be placed as close as possible to the lower heating element without
touching it.
Brush the food with sauces or oil, as desired.
.

10
3. Turn the function control knob to .
4. Turn the temperature control knob to the desired temperature.
5. Turn the timer control knob to the desired cooking time.
6. When baking is complete, a bell will ring to signify the end of the bake cycle. Turn
the function control knob to OFF.
Before the set cooking time has been reached, you may also turn the timer control
knob to the “OFF-0” position to finish cooking.
How to Toast (Upper and lower heating )
1. Place the wire rack or bake tray into the desired position.
2. Place the food to be toasted onto the wire rack or bake tray and close the oven door.
3. Turn the function control knob to .
4. Turn the temperature control knob to the desired temperature.
5. Turn the timer control knob to the desired cooking time.
6. When toasting is complete, a bell will ring to signify the end of the toast cycle. Turn
the function control knob to OFF.
Before the set cooking time has been reached, you may also turn the timer
control knob to the “OFF-0” position to finish cooking.
Upper and lower heating + Convection
This cooking function combines hot air movement using a fan with the toast function.
The fan gently sends air to every area of the food, quickly browning, crisping and
sealing in moisture and flavour.
1. Place the bake tray into the middle position.
2. Place the food to be cooked onto the bake tray and close the oven door.
3. Turn the function control knob to .
4. Turn the temperature control knob to the desired temperature.
5. Turn the timer control knob to the desired cooking time.
6. When toasting is complete, a bell will ring to signify the end of the toast cycle. Turn
the function control knob to OFF.
Before the set cooking time has been reached, you may also turn the timer control
knob to the “OFF-0” position to finish cooking.
***FOR ALL COOKING METHODS, PLEASE REFER TO YOUR OWN
RECIPE BOOK.***

11
Using and caring for the hotplates
The right cookware
Risk of damage!
Improper use may damage the appliance or cooking utensils.
The solid plates may become damaged if they are operated without cookware or
with empty cookware.
The best cookware to use is the one for electric hobs
–that matches the size of the solid plates. The diameter d1 is always
given as the size of the pot or pan. Base diameter d2 is always around 2 cm smaller.
–with sufficient base thickness, e.g. enamelled steel pans with a thickness of 2-3 mm
and stainless steel pans with a thickness of 4-6 mm.
–Use only pots with clean and dry bases. This will prevent damage to the solid plates.
You should not use:
–Indented or battered pans
–Pans with a rough base
–Pans with a curved base
–Coated cookware that is scratched inside.
Small plate: ( )
1. Place the right cookware with food on the small solid plate (power 500W).
2.Turn the Hotplates control to .
If you want to use the oven simultaneously, you may turn the temperature
control knob and function control knob to desired position upon your
cooking requirements.
3.Turn the timer control knob to the desired cooking time.
4. When cooking is complete, a bell will ring to signify the end of the cooking cycle.
Turn the hotplates control knob to OFF.
Before the set cooking time has been reached, you may also turn the timer
control knob to the “OFF-0” position to finish cooking.

12
Big plate: ()
1. Place the right cookware with food on the big solid plate (power 1000W).
2. Turn the Hotplates control to .
If you want to use the oven simultaneously, you may turn the temperature control
knob and function control knob to desired position upon your cooking requirements.
3.Turn the timer control knob to the desired cooking time.
4.When cooking is complete, a bell will ring to signify the end of the
cooking cycle. Turn the hotplates control knob to OFF.
Before the set cooking time has been reached, you may also turn the timer
control knob to the “OFF-0” position to finish cooking.
Both plates: ( )
1. Place the right cookware with food on the big solid plate (power 1000W) and small
solid plate (power 500W).
2. Turn the Hotplates control to .
If you want to use the oven simultaneously, you may turn the temperature control
knob and function control knob to desired position upon your cooking requirements.
3.Turn the timer control knob to the desired cooking time.
4.When cooking is complete, a bell will ring to signify the end of the cooking cycle.
Turn the hotplates control knob to OFF.
Before the set cooking time has been reached, you may also turn the timer
control knob to the “OFF-0” position to finish cooking.
CLEANING AND MAINTENANCE
Unplug the appliance and allow it to cool before cleaning.
Do not immerse the appliance in water.
After each use, use a damp cloth to clean the interior and exterior of the oven and
door, then dry them thoroughly.
Wash all the accessories in warm soapy water with a sponge or cloth. Rinse and dry
thoroughly.
Never use abrasive or chemical cleaning agents.
CAUTION
Risk of burns!
The solid plates get very hot during operation and will remain hot
after they are switched off.
Allow the solid plates to cool completely before cleaning.

13
Surfaces in contact with food should be cleaned regularly to avoid cross contamination
from different types of food, the use of a damp cloth is advisable when dealing with
surfaces that come into contact with food. Correct food hygiene practices should
always be followed at all times to avoid possibility of food poisoning /cross
contamination.
Do not use a steam cleaner or pressure cleaner to clean the hotplates. Steam could get
through cracks into live electrical components of the hob and cause short-circuiting.
Dry all parts and surfaces thoroughly before use.
Make sure that all parts and surfaces are completely dry before plugging in the appliance.
SPECIFICATION
Model: POMO5028CIB
Rated voltage: 220-240V~, 50-60Hz
Rated power: 2940W
DISPOSAL
Do not dispose this product as unsorted municipal waste. Such
waste must be collected separately for special treatment.
This appliance is marked according to the European directive 2002/96/EC on Waste
from Electrical and Electronic Equipment (WEEE). By ensuring this product is
disposed of correctly, you will help prevent potential negative consequences for the
environment and human health, which could otherwise be caused by inappropriate
waste handling of this product.
The symbol on the product or on the documents accompanying the product indicates
that this appliance may not be treated as household waste. Instead it shall be
handed over to the applicable collection point for the recycling of electrical and
electronic equipment.
Disposal must be carried out in accordance with local environmental regulations for
waste disposal. For more detailed information about treatment, recovery and
recycling of this product, please contact your local city office or local waste
management office.

14
Power International AS,
PO Box 523, N-1471 Lørenskog, Norway
Power Norge:
https://www.power.no/kundeservice/
T: 21 00 40 00
Power Danmark:
https://www.power.dk/kundeservice/
T: 70 33 80 80
Punkt 1 Danmark:
https://www.punkt1.dk/kundeservice/
T: 70 70 17 07
Power Finland:
https://www.power.fi/tuki/asiakaspalvelu/
T: 0305 0305
Power Sverige:
https://www.power.se/kundservice/
T: 08 517 66 000

VIKTIGE SIKKERHETSANVISNINGER
LES DE FØLGENDE SIKKERHETSADVARSLENE OG
INSTRUKSJONENE NØYE FØR DU BRUKER APPARATET, OG TA
VARE PÅ BRUKSANVISNINGEN FOR FREMTIDIG OPPSLAG.
Advarsler
Dette apparatet er beregnet for bruk i husholdninger og lignende
bruksområder som:
- personalrom i butikker, på kontorer og andre arbeidsplasser;
- gårdsbruk;
- av gjester i hoteller, moteller og andre bosteder;
- enkle overnattingssteder.
Hvis strømledningen er skadet, må den skiftes av produsenten, en
autorisert serviceagent eller tilsvarende kvalifisert person for å
hindre fare.
Dette apparatet kan brukes av barn fra og med 8 år. Personer med
reduserte fysiske, sensoriske eller mentale evner, eller mangel på
erfaring og kunnskap, kan bruke apparatet så lenge noen holder
oppsyn eller gir instruksjoner om bruken av apparatet og farene
dette innebærer. Barn skal ikke leke med apparatet.
Barn skal ikke foreta rengjøring og vedlikehold med mindre de er
åtte år eller eldre og under tilsyn.
Hold apparatet og strømledningen utilgjengelige for barn under 8
år.
Apparatet er ikke beregnet på å brukes med en ekstern tidtaker
eller et separat fjernkontrollsystem.
Tilgjengelige overflater kan bli varme når apparatet er i bruk.
Temperaturen til døren eller utsiden kan bli veldig høy under bruk.
15

Baksiden av apparatet skal plasseres mot en vegg.
Ikke plasser apparatet i eller i nærheten av varm gass, en elektrisk
brenner eller en oppvarmet ovn eller miniovn.
Ikke ta på varme overflater.
Forsiktig: Varm Overflate.
Overflatene kan bli varme under bruk.
Sikkerhetsinformasjon
For å beskytte mot brann, elektrisk støt og personskade må du
ikke dyppe ledningen, støpslet eller noen del av ovnen i vann eller
annen væske.
Ikke la ledningen henge over kanten av et bord eller benk eller
komme nær varme overflater.
Når du bruker enheten, må den kobles direkte i stikkontakt og ikke
via skjøteledning eller andre adaptere, da dette kan føre til
overbelastning.
Bruk av tilbehør som ikke er anbefalt av produsenten, kan føre til
fare eller personskade.
Koble fra stikkontakten når apparatet ikke er i bruk og før
rengjøring. Du må alltid la apparatet kjøle seg ned før deler settes
på eller tas av og før rengjøring eller oppbevaring.
For å koble fra dreier du tidtakeren til «OFF-0» og støpselet ut av
stikkontakten. Hold alltid i selve støpselet og trekk aldri i
ledningen.
Vær ekstremt forsiktig når du flytter et apparat som inneholder
varm olje eller mat.
Ikke dekk til noen del av ovnen med metall eller klut, da det kan
føre til at ovnen overopphetes.
Ikke plasser gjenstander i ovnen.
Vær ekstremt forsiktig når du fjerner skuffer eller kaster varmt
fett eller andre varme væsker.
16

La ikke apparatet stå uten tilsyn når det er i bruk.
Ikke rengjør innsiden av ovnen med skuresvamp i metall, da det
kan berøre elektriske deler og skape fare for elektrisk støt.
Veldig store matvarer eller metallredskaper kan ikke settes inn i
apparatet, da de kan føre til brann eller utgjøre fare for elektrisk
støt.
Det kan oppstå brann hvis ovnen er dekket til eller står i nærheten
av brennbart materiale, inkludert gardiner, draperier osv. Ikke
oppbevar noe på ovnen under bruk.
Man må være ekstremt forsiktig når man lager mat med
beholdere laget av noe annet enn metall eller ildfast glass.
Sørg for at ingenting berører de øvre eller nedre delene av ovnen.
Ikke plasser noen av følgende materialer i ovnen: plast, papir eller
lignende.
Bruk alltid beskyttende, isolerte grytevotter når du legger inn eller
tar ut ting fra den varme ovnen.
Dette apparatet har en herdet sikkerhetsglassdør. Glasset er
sterkere enn vanlig glass og vil være mer motstandsdyktig mot
brudd. Vær oppmerksom på at herdet glass fortsatt kan knuse,
spesielt rundt kantene. Unngå å ripe opp døroverflaten eller lage
hakk i kantene.
Man må holde øye med barn for å sikre at de ikke leker med
apparatet.
Ikke bruk utendørs.
Ikke bruk ovnen til annet enn beregnet formål.
17

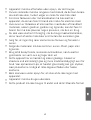
PRODUKTOVERSIKT
A. Kabinett
B. Temperaturkontroll
C. Funksjonskontroll
D. Kokeplatekontroll
E. Tidtakerkontroll
F. Strømindikator
G. Ovnsfot
H. Dørhåndtak
I. Dørglass
J. Bretthåndtak
K. Stekebrett
L. Grillrist
M. Venstre kokeplate
N. Høyre kokeplate
*Illustrasjoner kan avvike fra det faktiske produktet.
18
L
K
J
A
B
C
D
G
H
I
E
N
M
F

FØR FØRSTE GANGS BRUK
Før du bruker miniovnen for første gang, må du gjøre følgende:
Les alle instruksjonene i bruksanvisningen.
Sørg for at ovnen er koblet fra og at tidtakeren er satt til «OFF-0
».
Vask alt tilbehør i varmt såpe
vann.
Tørk av alt tilbehør, og sett det inn i ovnen igje
n.
Koble ovnen til stikkontakten, så er du klar til å bruk
e den.
Når ovnen settes sammen for første gang, anbefales det at den kjører på høye
ste
temperatur (230 °C) med funksjonen i 15 minutter for å brenne av rester av
emballasjen. Dette vil fjerne alle spor av lukt som oppstår ved første gangs bruk.
Merk: Når du bruker ovnen for første gang, kan den lage lukt og røyk. Ovnen brenner av
overflødig olje i varmeelementene, og dette er normalt.
Gjør deg kjent med følgende ovnsfunksjoner og tilbehør før første gangs bruk:
Temperaturkontroll: Velg ønsket temperatur (90–230 °C). Dette kontrollerer kun
ovnstemperaturen.
Funksjonskontroll: Det er fire funksjonskontroller avhengig av dine behov.
Overvarme ( ) / Undervarme ( )/ Over- og Undervarme ( )/
Over- og Undervarme og Varmluft ( )
Kokeplatekontroll: Det er tre funksjonskontroller for å velge kokeplater.
Liten plate ( ) / Stor plate ( ) / Begge platene ( )
Tidtakerkontroll: Tiden kan settes til opptil 60 minutter. Ovnen slår slå seg av
automatisk når tidtakeren er ferdig, og det høres en bjellelyd for å varsle om dette. For
å slå av ovnen manuelt dreier du den til «OFF-0».
Strømindikator: Denne lyser når ovnen er på.
Stekebrett: Brukes til grillsteking eller steking av kjøtt, fjærfe, fisk og diverse andre
matvarer. Den kan også brukes som et dryppbrett for å samle opp fett, olje og væske
som kommer fra mat som tilberedes med rotisseri.
Grillrist: For risting, baking og generell matlaging i gryteretter og standard panner.
For å gjøre det enklere å rengjøre ovnen er det best å ikke bruke bare grillristen,
men legge et ekstra stekebrett under for å fange smuler eller drypp.
19

DRIFT
Plasser ovnen på en ren, flat og varmebestandig overflate.
Sørg for at det er nok ventilasjon rundt ovnen.
Sørg for at ovnen er helt tørr før bruk.
Ovnen bør ikke plasseres på en overflate i ubehandlet tre.
Koble ovnen til stikkontakt.
For best resultat anbefales det at du forvarmer ovnen i 15 minutter til 230 °C.
FORSIKTIG: Overflaten på ovnen vil bli varm under og etter bruk.
Hold hendene trygge ved ikke å berøre overflaten.
Vær alltid ekstremt forsiktig når du fjerner stekebrett, rist eller
annen varm beholder fra en varm ovn. Bruk alltid risthåndtaket eller
en grytevott når du tar varme gjenstander ut av ovnen.
Hvordan grillsteke (Overvarme )
1. Plasser stekebrettet i den øverste posisjonen.
2. Legg maten som skal tilberedes på stekebrettet, og lukk ovnsdøren.
3. Drei funksjonskontrollen til .
4. Drei temperaturkontrollen til ønsket temperatur.
5. Drei tidtakeren til ønsket tid.
6. Når grillstekingen er fullført, høres en bjellelyd for å varsle om at grillstekesyklusen
er ferdig. Drei funksjonskontrollen til OFF.
Før den innstilte tiden er ute, kan du også vri tidtakeren til «OFF-0» for å fullføre.
Hvordan bake (Nedre varme )
1. Plasser grillristen på den nederste eller midtre riststøtteføreren.
Plassere grillristene:
Informasjonskapsler – Bruk støtteveiledningene nederst og i midten.
Lagdelt kake – Bruk kun den nederste støtten (bak én om gangen).
Paier – Bruk nedre og midtre støtteføtter
2. Legg maten på grillristen, og lukk ovnsdøren.
Mat bør plasseres så nært det nedre varmeelementet som mulig uten å berøre
det.
Pensle maten med sauser eller olje etter ønske.
20
Sidan laddas ...
Sidan laddas ...
Sidan laddas ...
Sidan laddas ...
Sidan laddas ...
Sidan laddas ...
Sidan laddas ...
Sidan laddas ...
Sidan laddas ...
Sidan laddas ...
Sidan laddas ...
Sidan laddas ...
Sidan laddas ...
Sidan laddas ...
Sidan laddas ...
Sidan laddas ...
Sidan laddas ...
Sidan laddas ...
Sidan laddas ...
Sidan laddas ...
Sidan laddas ...
Sidan laddas ...
Sidan laddas ...
Sidan laddas ...
Sidan laddas ...
Sidan laddas ...
Sidan laddas ...
Sidan laddas ...
Sidan laddas ...
Sidan laddas ...
Sidan laddas ...
Sidan laddas ...
Sidan laddas ...
Sidan laddas ...
Sidan laddas ...
Sidan laddas ...
Sidan laddas ...
Sidan laddas ...
Sidan laddas ...
-
 1
1
-
 2
2
-
 3
3
-
 4
4
-
 5
5
-
 6
6
-
 7
7
-
 8
8
-
 9
9
-
 10
10
-
 11
11
-
 12
12
-
 13
13
-
 14
14
-
 15
15
-
 16
16
-
 17
17
-
 18
18
-
 19
19
-
 20
20
-
 21
21
-
 22
22
-
 23
23
-
 24
24
-
 25
25
-
 26
26
-
 27
27
-
 28
28
-
 29
29
-
 30
30
-
 31
31
-
 32
32
-
 33
33
-
 34
34
-
 35
35
-
 36
36
-
 37
37
-
 38
38
-
 39
39
-
 40
40
-
 41
41
-
 42
42
-
 43
43
-
 44
44
-
 45
45
-
 46
46
-
 47
47
-
 48
48
-
 49
49
-
 50
50
-
 51
51
-
 52
52
-
 53
53
-
 54
54
-
 55
55
-
 56
56
-
 57
57
-
 58
58
-
 59
59


POINT POMO5028CIB MINIOVN MED KOKEPLATER Bruksanvisning
- Kategori
- Mixer / matberedare tillbehör
- Typ
- Bruksanvisning
på andra språk
Relaterade papper


Andra dokument
-
 SENZ SEMO1015B MINIOVN Användarmanual
-
Whirlpool ACM 224 N Användarguide
-
-
-
-
-
Electrolux EKC90450X Användarmanual
-
 Meganex MEG119U Användarmanual
-
Haws Toaster-Oven-MO-125236.1 Bruksanvisning

