Silvercrest SGS 80 A2 Operating Instructions Manual
- Typ
- Operating Instructions Manual

IAN 91000
FACIAL SAUNA SGS 80 A2
FACIAL SAUNA
Operating instructions
ANSIGTSSAUNA
Betjeningsvejledning
ÅNGBAD FÖR ANSIKTET
Bruksanvisning
KASVOSAUNA
Käyttöohje
GESICHTSSAUNA
Bedienungsanleitung

GB / IE Operating instructions Page 1
FI Käyttöohje Sivu 9
SE Bruksanvisning Sidan 17
DK Betjeningsvejledning Side 25
DE / AT / CH Bedienungsanleitung Seite 33
Before reading, unfold the page containing the illustrations and familiarise yourself with all functions of
the device.
Käännä ennen lukemista kuvallinen sivu esiin ja tutustu seuraavaksi laitteen kaikkiin toimintoihin.
Vik ut bildsidan och ha den till hands när du läser igenom anvisningarna och gör dig bekant med
apparatens / maskinens funktioner.
Før du læser, vend siden med billeder frem og bliv bekendt med alle apparatets funktioner.
Klappen Sie vor dem Lesen die Seite mit den Abbildungen aus und machen Sie sich anschließend mit allen
Funktionen des Gerätes vertraut.

B
A

- 1 -
Content Page
Introduction 2
Intended Use 2
Items supplied 2
Description of the appliance 2
Technical data 2
Safety instructions 3
Preparing the facial sauna for use 4
...with the face mask.........................................................................................................................4
...with the nose mask .......................................................................................................................4
Utilisation 4
Operation 5
Using aroma and herb containers 6
Cleaning and care 6
Storage 7
Disposal 7
Warranty & Service 7
Importer 8
IB_91000_SGS80A2_FI_SE_DK.qxp 28.06.2013 9:15 Uhr Seite 1

- 2 -
Facial Sauna
Introduction
Congratulations on the purchase of your new appli-
ance.
You have clearly decided in favour of a quality
product. These operating instructions are a part of
this product. They contain important information in
regard to safety, use and disposal. Before using the
product, familiarise yourself with all of these operating
and safety instructions. Use the product only as
described and only for the specified areas of applica-
tion. In addition, pass these documents on, together
with the product, to any future owner.
Intended Use
This facial sauna is intended for facial cosmetic care
using steam.
This appliance is intended for domestic use only, it
has not been designed for commercial applications!
Items supplied
Face mask
Nose mask
Steam controller
Heating unit
Measuring beaker
Operating instructions
Description of the appliance
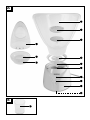
Figure A:
1 Face mask
2 Lid of aroma and herb container (fits the aroma
and herb container of the face mask and the
nose mask)
3 Aroma and herb container
4 Steam regulator
5 Handle of the steam re#gulator
6 Water bowl
7 Control lamp
8 Lo/Hi/Off button
9 Heating unit
0 Cable winder
q Bottom part of nose mask
w Aroma and herb container
e Top part of nose mask
Figure B:
r Measuring cup
Technical data
Rated voltage: 220 - 240 V
~
/ 50 Hz
Power consumption: 75 - 95 W
Protection class: II /
IB_91000_SGS80A2_FI_SE_DK.qxp 28.06.2013 9:15 Uhr Seite 2

- 3 -
Safety instructions
Risk of personal injury!
• Place the appliance only on firm and level surfaces. There is a risk of scalding
should hot liquids be spilled during use!
• This appliance may be used by children of the age of 8 years or more and by
persons with reduced physical, sensory or mental capabilities orlack of expe-
rience and/or knowledge if they are being supervised or have been instructed
with regard to the safe use of the appliance and have understood the potential
risks.
• Children must not play with the appliance.
• Cleaning and user maintenance should not be performed by children, unless
they are being supervised.
• Do not operate the appliance adjacent to water, for example, in the bathtub or
next to washbasins.
• Connect the appliance only to wall power sockets supplying the type of electrical
current detailed on the model plate.
• NEVER submerse the appliance in water or other liquids!
The appliance could become irreparably damaged!
• NEVER heat the appliance up without liquids!
• Do NOT fill the appliance with solvents or other inflammable fluids!
• Always disconnect the power cable by pulling on the plug itself.
Do NOT pull on the power cable itself!
• Arrange for defective power plugs and/or cables to be replaced at once by
qualified technicians or our Customer Service Department.
• Do NOT reach into the interior of the appliance when it is in use.
There is a risk of being burnt/scalded!
• Clean the appliance after every use so as to avoid the accumulation of fats
and other residues.
Risk of electric shock!
Do not use this appliance in the close vicinity of baths, washbowls or other
receptacles containing water.
IB_91000_SGS80A2_FI_SE_DK.qxp 28.06.2013 9:15 Uhr Seite 3

- 4 -
Preparing the facial sauna for use
• Unwind the cable from the cable winder 0 and
guide it through the recess on the underside of
the heating unit 9.
• Place the heating unit 9 on a level, non-slip and
water resistant surface.
• Using the measuring cup r fill the water bowl 6
with water. Orientate yourself with the scale on
the measuring cup r for how long you wish to use
the appliance (approx. 5, approx.10 or approx.
15 minutes). Use the scale that is appropriate to
the respective steam setting (Hi or Lo).
Warning!
NEVER fill the water bowl 6 with a water volume that
exceeds the “Hi 15 min.” marking ( in the measuring
cup r). Otherwise, the water could overflow and
then permeate into the interior of the appliance.
This could damage the appliance irreparably!
...with the face mask
If you wish to use the appliance with the face mask 1,
proceed as follows:
• Place the steam regulator 4 on the water bowl 6
so that the handle 5 points to the front.
• Place the face mask 1 on the heating unit 9:
The lugs on the heating unit 9 must grip in the
recesses on the underside of the face mask 1.
Then turn the face mask 1 clockwise so that it
sits firmly on the heating unit 9.
• Insert the plug into a power socket.
The Facial Sauna is now ready for use.
...with the nose mask
If you wish to use the appliance with the nose mask,
proceed as follows:
Note:
The steam regulator 4 is not needed when using
the nose mask.
• Place the lid of the aroma and herb container 2
onto the aroma and herb container w in the lower
part of the nose mask q in such a way that it is
secure.
• Fit the upper e and lower parts of the nose
mask q together so that they are securely
connected.
• Place the assembled nose mask onto the heating
unit 9:
The lugs on the heating unit 9 must engage in
the recesses on the underside of the nose mask.
Then rotate the nose mask clockwise so that it
is sitting securely on the heating unit 9.
• Insert the power plug into a power socket.
The Facial Sauna is now ready for use.
Utilisation
Attention!
This facial sauna may not be used if you suffer from
one of the following ailments:
• with acarodermatitis
• with erythrodermia
• with swellings in the facial area
• with heart illnesses
• with diabetes
• wounds in the facial area
• with eczema
• with psoriasis
IB_91000_SGS80A2_FI_SE_DK.qxp 28.06.2013 9:15 Uhr Seite 4

- 5 -
Should you be pregnant or have other health issues,
consult your doctor before using the appliance.
Utilisation of the facial sauna prepares your skin
admirably for further treatments, for example deep
cleansing, moisture provision, face masks etc. The
steam invigorates the skin, opens the pores and
impurities can be better removed.
Operation
Prepare the facial sauna as described under
“Preparing the facial sauna for use”.
• Press once on the Lo/Hi/Off button 8. The con-
trol lamp 7 glows green (low steam level "Lo").
The water in the water bowl 6 is heated just suf-
ficiently to produce a small amount of steam.
For more steam, press on the Lo/Hi/Off button 8
once more. The control lamp 7 glows red (high
steam level "Hi"). The water is heated more strongly
and so produces more steam.
Attention!
• If you feel uncomfortable or perceive the steam
as unpleasant, either hold your face a little furt-
her away from the face mask 1 / nose mask or
reduce the volume of steam. Should the feeling
of discomfort continue, stop using the appliance.
Attention! Hot steam!
• Since the human nasal mucous membrane is
extremely sensitive, never use the appliance with
steam level "Hi" when using the nose mask.
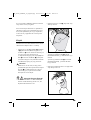
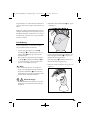
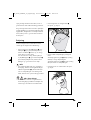
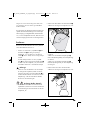
• Hold your face over the face mask 1. Close
your eyes and relax:
• You can also regulate the steam volume as follows:
Slide the handle of the steam regulator 5 to the
right (in the MAX direction) to increase the steam
volume.
Slide the handle of the steam regulator 5 to the
left (in the MIN direction) to decrease the steam
volume.
• Hold your nose over the nose mask. Close your
eyes and relax:
IB_91000_SGS80A2_FI_SE_DK.qxp 28.06.2013 9:15 Uhr Seite 5

- 6 -
• When the water in the water bowl 6 has eva-
porated, the appliance switches itself off auto-
matically. If you wish to switch the appliance off
prematurely, press the Lo/Hi/Off button 8 repea-
tedly until the control lamp 7 extinguishes.
Note:
After 30 minutes the appliance switches itself off
automatically, even if there is still water in the water
bowl 6.
Using aroma and herb
containers
You can enrich the steam with various herbs and
aromas. This can contribute to both relaxation and
the treatment of the skin.
Note:
Only those types of herbs and aromas can be em-
ployed that are intended and suitable for use in a
facial sauna.
Note:
The lid of the aroma and herb container 2 fits the
aroma and herb containers of the face mask 3 and
the nose mask w.
Before connecting the face mask 1/nose mask
with the heating unit 9:
• Press the two catches of the lid of the aroma and
herb container 2 together and lift it from the
respective aroma and herb container 3/w.
Face mask 1 only:
Press the two pins on the underside of the aroma
and herb container 3 through the opening in the
base of the face mask 1 so that the pins engage
and the aroma and herb container 3 is securely
attached.
• Put herbs or a cotton wool ball sprinkled with
aroma essence into the aroma and herb con-
tainer 3/w.
• Press the two catches of the lid of the aroma and
herb container 2 together and place it onto the
aroma and herb container 3/w.
Release the catches so that the lid 2 is securely
attached.
• Now assemble the face mask 1/nose mask
onto the heating unit 9 as described under
"Preparing the facial sauna for use".
The rising steam will now be directed through the
aroma and herb container 3/w and thus takes on
the fragrance.
Cleaning and care
Danger!
Before cleaning the appliance, remove the power
plug and allow it to cool down! Risk of injury!
The facial sauna should be thoroughly cleaned after
every usage. If you do not, microbes could quickly
develop in the warm moisture which, with further
utilisation of the appliance, could lead to negative
effects on ones health.
Warning!
Do not use abrasive, aggressive or chemical
cleaning agents! These damage the surfaces of the
appliance and cause irreparable damage.
• Dismantle the appliance.
Removing the face mask:
• Remove the face mask 1 from the heating unit 9:
Turn the face mask 1 anti-clockwise until it can
be lifted off.
IB_91000_SGS80A2_FI_SE_DK.qxp 28.06.2013 9:15 Uhr Seite 6

- 7 -
• Lift the steam regulator 4 from the heating unit 9.
• Remove the lid from the aroma and herb con-
tainer 2:
For this, press the two locking devices together
until the lid 2 allows itself to be removed.
• Pull out the aroma and herb container 3:
Press the pins that are protruding from the under-
side of the face mask 1 together and pull on the
aroma and herb container 3 at the same time.
Removing the nose mask:
• Remove the nose mask from the heating unit 9:
Turn the nose mask anti-clockwise until it can be
lifted off.
• Pull the lower q and upper parts e of the nose
mask apart.
• Remove the lid 2 (if fitted) from the aroma and
herb container w:
To do this, press the two catches together until
the lid 2 can be removed.
Clean the face mask 1, the two parts of the nose
mask q/e, the lid of the aroma and herb contai-
ner 2, the steam regulator 4, the aroma and herb
container 3 and the measuring cup r in a mild
soapy solution. Rinse everything off with fresh water
and then dry off.
Clean the heating unit 9 and the water bowl 6
with a lightly moistened cloth. For stubborn soiling
use a mild detergent on the cloth.
As soon as scale deposits form in the water bowl 6,
clean the water bowl 6 with a commercially avail-
able descaling agent that is suitable for aluminium.
Pay heed to the usage instructions for the descaling
agent.
Reassemble the facial sauna after cleaning.
Storage
Allow the appliance to cool down and clean it
(see section “Cleaning and care”).
Store the facial sauna at a clean, dry location.
Wind the power cable around the cable storage 0
on the underside of the appliance.
Disposal
Do not dispose of the appliance in your
normal domestic waste. This product is
subject to the European guideline
2002/96/EC.
Dispose of the appliance through an approved dis-
posal centre or at your community waste facility.
Observe the currently applicable regulations.
In case of doubt, please contact your waste disposal
centre.
Dispose of all packaging materials in an
environmentally friendly manner.
Warranty & Service
The warranty for this appliance is for 3 years from
the date of purchase. The appliance has been manu-
factured with care and meticulously examined before
delivery.
Please retain your receipt as proof of purchase. In the
event of a warranty claim, please make contact by
telephone with our Service Department. Only in
this way can a post-free despatch for your goods be
assured.
The warranty covers only claims for material and
manufacturing defects, but not for transport damage,
for wearing parts or for damage to fragile compo-
nents, e.g. buttons or batteries. This product is for
private use only and is not intended for commercial
use.
IB_91000_SGS80A2_FI_SE_DK.qxp 28.06.2013 9:15 Uhr Seite 7

- 8 -
The warranty is void in the case of abusive and im-
proper handling, use of force and internal tampering
not carried out by our authorized service branch.
Your statutory rights are not restricted in any way by
this warranty.
The warranty period will not be extended by repairs
made under warranty. This applies also to replaced
and repaired parts. Any damage and defects extant
on purchase must be reported immediately after un-
packing the appliance, at the latest, two days after
the purchase date. Repairs made after the expiration
of the warranty period are subject to payment.
Service Great Britain
Tel.: 0871 5000 720 (£ 0.10/Min.)
E-Mail: [email protected]
Hotline availability:
Monday to Friday 08:00 - 20:00 (CET)
Importer
KOMPERNASS HANDELS GMBH
BURGSTRASSE 21
44867 BOCHUM
GERMANY
www.kompernass.com
IAN 91000
IB_91000_SGS80A2_FI_SE_DK.qxp 28.06.2013 9:15 Uhr Seite 8

- 9 -
Sisällysluettelo Sivu
Johdanto 10
Määräystenmukainen käyttö 10
Toimituslaajuus 10
Laitteen kuvaus 10
Tekniset tiedot 10
Turvallisuusohjeita 11
Kasvosaunan valmisteleminen käyttöä varten 12
...kasvoille tarkoitetun osan kanssa...............................................................................................12
...nenälle tarkoitetun osan kanssa ...............................................................................................12
Käyttö 12
Käyttö 13
Aromi- ja yrttisäiliön käyttö 14
Puhdistus ja hoito 14
Säilytys 15
Hävittäminen 15
Takuu & huolto 16
Maahantuoja 16
IB_91000_SGS80A2_FI_SE_DK.qxp 28.06.2013 9:15 Uhr Seite 9

- 10 -
Kasvosauna
Johdanto
Sydämellinen onnittelumme uuden laitteesi johdosta.
Olet valinnut laadukkaan tuotteen. Käyttöohje on
osa tätä tuotetta. Se sisältää tärkeitä turvallisuutta,
käyttöä ja hävittämistä koskevia ohjeita. Tutustu kaik-
kiin käyttö- ja turvaohjeisiin ennen tuotteen käyttöä.
Käytä tuotetta vain kuvatulla tavalla ja vain mainittu-
ihin käyttötarkoituksiin. Anna myös kaikki asiakirjat
edelleen luovuttaessasi tuotteen eteenpäin.
Määräystenmukainen käyttö
Kasvosaunaa käytetään kasvojen kauneudenhoitoon
höyryn avulla.
Laite on tarkoitettu ainoastaan yksityiseen käyttöön,
ei kaupallisiin tarkoituksiin.
Toimituslaajuus
Kasvo-osa
Lisäosa nenälle
Höyrysäädin
Lämmitysyksikkö
Mitta-astia
Käyttöohje
Laitteen kuvaus
Kuva A:
1 Kasvo-osa
2 Aromi- ja yrttisäiliön kansi (sopii sekä kasvoille että
nenälle tarkoitetun osan aromi- ja yrttisäiliöön)
3 Aromi- ja yrttisäiliö
4 Höyrysäädin
5 Höyrysäätimen kahva
6 Vesikulho
7 Merkkivalo
8 Lo/Hi/Off-painike
9 Lämmitysyksikkö
0 Johdon kela
q Nenälle tarkoitetun osan alaosa
w Aromi- ja yrttisäiliö
e Nenälle tarkoitetun osan yläosa
Kuva B:
r Mittakulho
Tekniset tiedot
Nimellisjännite: 220 - 240 V
~
/ 50 Hz
Tehontarve: 75 - 95 W
Suojausluokka: II /
IB_91000_SGS80A2_FI_SE_DK.qxp 28.06.2013 9:15 Uhr Seite 10

- 11 -
Turvallisuusohjeita
Loukkaantumisvaara!
• Aseta laite aina kiinteälle ja tasaiselle alustalle. Käytön aikana on olemassa
palovammavaara, mikäli kuumat nesteet joutuvat iholle!
• Tätä laitetta voivat käyttää 8 vuotta täyttäneet lapset ja rajoittuneet fyysiset, aistilliset
tai henkiset kyvyt tai puutteellisen kokemuksen ja/tai tiedon omaavat henkilöt, kun
heitä valvotaan tai kun heitä on opastettu laitteen turvallisessa käytössä ja he ovat
ymmärtäneet käytöstä aiheutuvat vaarat.
• Lapset eivät saa leikkiä laitteella.
• Lapset eivät saa suorittaa puhdistusta ja käyttäjähuoltoa, paitsi jos he ovat 8
täyttäneet vuotta ja heitä valvotaan.
• Älä käytä laitetta veden läheisyydessä kuten kylpyammeessa tai pesualtaan
vieressä.
• Käytä laitetta vain sellaisessa sähköverkossa, joka täsmää tyyppikilven jännite-
tietojen kanssa.
• Älä koskaan upota laitetta veteen tai muihin nesteisiin!
Laite voi vaurioitua pysyvästi!
• Älä käynnistä laitetta, jos sen sisällä ei ole nesteitä!
• Älä laita laitteeseen liuottimia tai muita syttyviä nesteitä!
• Vedä aina pistokkeesta vetäessäsi virtajohtoa pistorasiasta.
Älä vedä itse kaapelista!
• Anna vaurioitunut verkkopistoke tai virtajohto heti valtuutetun ammattihenkilöstön
tai huoltopalvelun vaihdettavaksi vaarojen välttämiseksi.
• Älä koske käytön aikana laitteen sisälle. On olemassa palovamman vaara!
• Puhdista laite joka käytön jälkeen, muutoin siihen kerääntyy rasvaa ja muita
epäpuhtauksia.
Sähköiskun aiheuttama vaara!
Älä käytä tätä laitetta missään tapauksessa kylpyammeiden, pesualtaiden
tai muiden vettä sisältävien säiliöiden lähettyvillä.
IB_91000_SGS80A2_FI_SE_DK.qxp 28.06.2013 9:15 Uhr Seite 11

- 12 -
Kasvosaunan valmisteleminen
käyttöä varten
• Kiedo virtajohto johtokelalta 0 ja aseta se läm-
mitysyksikön 9 pohjassa olevan aukon läpi.
• Aseta lämmitysyksikkö 9 tasaiselle, liukumatto-
malle ja vedenkestävälle pinnalle.
• Mittaa mitta-astian r avulla vettä vesikulhoon 6.
Käytä mitta-astian r asteikkoa sen mukaan,
kuinka kauan haluat laitetta käyttää (n. 5, n.10
tai n.15 minuuttia). Käytä sitä asteikkoa, joka
sopii valittuun höyrytasoon (Hi tai Lo).
Varoitus!
Älä koskaan laita vesikulhoon 6 enempää vettä
kuin mitta-astian r) “Hi 15 min.”-merkinnän verran.
Muutoin ylimääräinen vesi saattaa valua laitteen
sisään. Laite voi vaurioitua korjauskelvottomaksi.
...kasvoille tarkoitetun osan kanssa
Jos haluat käyttää laitetta kasvoille tarkoitetun osan 1
kanssa, etene seuraavasti:
• Aseta höyrysäädin 4 vesikulholle 6 niin, että
kahva 5 osoittaa eteenpäin.
• Aseta kasvo-osa 1 lämmitysyksikölle 9:
Lämmitysyksikön 9 nokkien on osuttava kasvo-
osan 1 pohjassa oleviin aukkoihin.
Käännä sitten kasvo-osaa 1 myötäpäivään niin,
että se on tiukasti kiinni lämmitysyksiköllä 9.
• Työnnä verkkopistoke pistorasiaan.
Kasvosauna on nyt käyttövalmis.
...nenälle tarkoitetun osan kanssa
Jos haluat käyttää laitetta nenälle tarkoitetun osan
kanssa, etene seuraavasti:
Ohje:
Höyrysäädintä 4 ei tarvita, kun laitetta käytetään
nenälle tarkoitetun osan kanssa.
• Aseta aromi- ja yrttisäiliön kansi 2 aromi- ja
yrttisäiliön w päälle nenälle tarkoitetun osan
alaosaan q hyvin paikoilleen.
• Yhdistä nenälle tarkoitetun osan ylä- e ja
alakappale q tiukasti yhteen.
• Kiinnitä koottu nenälle tarkoitettu osa lämmitysyk-
sikköön 9:
Lämmitysyksikön 9 ulokkeiden on otettava kiinni
nenälle tarkoitetun osan alapuolella oleviin loviin.
Käännä sitten nenälle tarkoitettua osaa myötä-
päivään niin, että se on tiukasti kiinni lämmitysyksi-
kössä 9.
• Liitä pistoke verkkopistorasiaan.
Kasvosauna on nyt käyttövalmis.
Käyttö
Huomio!
Älä käytä kasvosaunaa seuraavien sairauksien tai
oireiden kanssa:
• ihon tulehdus
• ihon punertaminen
• turvotusta kasvojen alueella
• sydänsairaus
• sokeritauti
• haavoja kasvojen alueella
• ihottuma
• psoriasis
IB_91000_SGS80A2_FI_SE_DK.qxp 28.06.2013 9:15 Uhr Seite 12

- 13 -
Kysy ennen käyttöä lääkäriltä, mikäli olet raskaana
tai jos sinulla on terveysongelmia.
Kasvosaunan käyttö valmistaa ihoa optimaalisesti
jatkohoitoja varten, kuten syväpuhdistusta, kosteus-
hoitoa, kasvopakkauksia jne. Höyry elvyttää ihoa,
avaa huokoset ja epäpuhtaudet voidaan poistaa
helpommin.
Käyttö
Valmistele kasvosauna kuten kohdassa “Kasvosaunan
valmisteleminen käyttöä varten” on selitetty.
• Paina kerran Lo/Hi/Off-painiketta 8. Merkkiva-
lo 7 palaa vihreänä (alhainen höyrytaso "Lo").
Vesikulhossa 6 olevaa vettä kuumennetaan juuri
sen verran, että syntyy hieman höyryä.
Jos kaipaat lisää höyryä, paina Lo/Hi/Off-paini-
ketta 8 uudestaan. Merkkivalo 7 palaa punai-
sena (korkea höyrytaso "Hi"). Vettä kuumennetaan
voimakkaammin ja höyryä syntyy enemmän.
Huomio!
• Mikäli tunnet olosi huonoksi, tai höyry tuntuu
epämukavalta, pidä kasvoja hieman kauempana
kasvoille 1 / nenälle tarkoitetusta osasta tai
vähennä höyryä. Jos pahoinvointi ei hellitä,
keskeytä kasvosaunan käyttö.
Huomio! Kuumaa höyryä!
• Koska nenän limakalvo on erittäin herkkä, älä
koskaan säädä laitetta höyrytasolle “Hi”, kun
käytät nenälle tarkoitettua osaa.
• Pidä kasvojasi kasvo-osan 1 yläpuolella. Sulje
silmät ja rentoudu:
• Voit säädellä höyryn määrää seuraavasti:
Työnnä höyrysäätimen kahva 5 oikealle
(kohti MAX-merkintää), jos haluat lisätä höyryn
määrää.
Työnnä höyrysäätimen kahva 5 vasemmalle
(kohti MIN-merkintää), jos haluat vähentää
höyryn määrää.
• Pidä nenää nenälle tarkoitetun osan yläpuolella.
Sulje silmät ja rentoudu:
IB_91000_SGS80A2_FI_SE_DK.qxp 28.06.2013 9:15 Uhr Seite 13

- 14 -
• Kun vesikulhossa 6 oleva vesi on haihtunut, laite
sammuu automaattisesti. Jos haluat sammuttaa
laitteen jo sitä ennen, paina Lo/Hi/Off-painiketta
8 niin monta kertaa, että merkkivalo 7 sam-
muu.
Ohje:
Laite sammuu automaattisesti 30 minuutin kuluttua,
vaikka vesikulhossa 6 olisikin vielä vettä.
Aromi- ja yrttisäiliön käyttö
On mahdollista lisätä höyryyn erilaisia yrttejä ja
aromiaineita. Ne voivat auttaa ihon rentouttamises-
sa ja kauneuden hoidossa.
Ohje:
Käytä ainoastaan sellaisia yrttejä ja aromiaineita,
jotka on tarkoitettu käytettäviksi kasvosaunan kanssa.
Ohje:
Aromi- ja yrttisäiliön kansi 2 sopii niin kasvoille
tarkoitetun osan kuin nenällekin tarkoitetun 3 osan
aromi- ja yrttisäiliöön w.
Ennen kuin yhdistät kasvoille tarkoitetun osan 1/
nenälle tarkoitetun osan lämmitysyksikköön 9:
• Paina aromi- ja yrttisäiliön kannen 2 molemmat
salvat yhteen ja nosta se aromi- ja yrttisäiliöltä
3/w.
Jos käytät kasvoille tarkoitettua osaa 1:
työnnä aromi- ja yrttisäiliön 3 alapuolella olevat
tapit kasvoille tarkoitetun osan 1 pohjassa olevan
aukon lävitse niin, että tapit lukittuvat, ja aromi- ja
yrttisäiliö 3 on tukevasti kiinni.
• Aseta yrtit tai aromiöljyllä kostutetut puuvillaiset
pumpulitupot aromi- ja yrttisäiliöön 3/w.
• Paina aromi- ja yrttisäiliön kannen 2 molemmat
salvat yhteen ja aseta kansi aromi- ja yrttisäiliölle
3/w. Vapauta sitten salvat niin, että kansi 2
asettuu tiukasti paikoilleen.
• Asenna nyt kasvoille tarkoitettu osa 1/nenälle
tarkoitettu osa lämmitysyksikköön 9 kuten koh-
dassa “Kasvosaunan käytön valmistelut” on
kuvattu.
Nouseva höyry kulkeutuu aromi- ja yrttisäiliön 3/ w
kautta ja kuljettaa aromit mukanaan.
Puhdistus ja hoito
Vaara!
Vedä virtapistoke pistorasiasta ja anna laitteen jääh-
tyä ennen puhdistamista! Loukkaantumisvaara!
Puhdista kasvosauna aina joka käytön jälkeen.
Muutoin kosteaan ja lämpimään laitteeseen voi
muodostua mikrobikasvustoa, joka seuraavalla
käyttökerralla voi aiheuttaa terveyshaittoja.
Varo!
Älä käytä syövyttäviä, hankaavia tai kemiallisia puh-
distusaineita! Ne vaurioittavat laitteen pintoja ja voivat
rikkoa laitteen korjauskelvottomaksi.
• Irrota laitteen osat toisistaan.
Irrota kasvoille tarkoitettu osa:
• Poista kasvo-osa 1 lämmitysyksiköltä 9:
Käännä kasvo-osaa 1 vastapäivään, kunnes se
voidaan nostaa pois.
IB_91000_SGS80A2_FI_SE_DK.qxp 28.06.2013 9:15 Uhr Seite 14

- 15 -
• Nosta höyrysäädin 4 lämmitysyksiköltä 9.
• Poista kansi aromi- ja yrttisäiliöstä 2:
purista molemmat lukitukset yhteen, kunnes kansi
2 irtoaa säiliöstä.
• Nosta aromi- ja yrttisäiliö 3 ulos laitteesta:
Paina molemmat kasvoille tarkoitetun osan 1
alapuolella olevat tapit yhteen ja vedä samanai-
kaisesti aromi- ja yrttisäiliöstä 3.
Irrota nenälle tarkoitettu osa:
• Irrota nenälle tarkoitettu osa lämmitysyksiköstä 9:
Käännä nenälle tarkoitettua osaa vastapäivään,
kunnes se irtoaa.
• Irrota nenälle tarkoitetun osan ala- q ja yläkap-
paleet e toisistaan.
• Poista kansi 2 (mikäli paikoillaan) aromi- ja
yrttisäiliöstä w:
Paina molemmista salvoista, kunnes kansi 2
irtoaa.
Puhdista kasvoille tarkoitettu osa 1, nenälle tarkoi-
tetun osan molemmat kappaleet q/e, aromi- ja
yrttisäiliön kansi 2, höyrysäädin 4, aromi- ja yrtti-
säiliö 3 ja mittakulho r miedolla saippualiuoksella.
Huuhtele kaikki osat vedellä ja kuivaa lopuksi.
Puhdista lämmitysyksikkö 9 ja vesikulho 6 kostealla
liinalla. Jos lika on kovapintaista, lisää liinaan laimeaa
astianpesuainetta.
Heti kun vesikulhoon 6 muodostuu kalkkijäämiä,
puhdista vesikulho 6 tavallisella, alumiinille sopival-
la kalkinpoistoaineella. Noudata kalkinpoistoaineen
käyttöohjetta.
Kokoa kasvosauna puhdistuksen jälkeen.
Säilytys
Annan laitteen jäähtyä ja puhdista se (katso kohta
Puhdistus ja hoito).
Säilytä kasvosaunaa kuivassa paikassa.
Kelaa virtajohto 0 laitteen alapuolella olevaan
johtokelaan.
Hävittäminen
Älä missään tapauksessa heitä laitetta
tavallisen talousjätteen sekaan. Tämä
tuote on yhdenmukainen EU-direktiivin
2002/96/EC kanssa.
Anna laite hyväksytyn jätehuoltoyrityksen tai
kunnallisen jätelaitoksen hävitettäväksi.
Noudata voimassa olevia määräyksiä.
Epäselvissä tilanteissa ota yhteyttä paikalliseen
jätehuoltoviranomaiseen.
Hävitä kaikki pakkausmateriaalit
ympäristöystävällisesti.
IB_91000_SGS80A2_FI_SE_DK.qxp 28.06.2013 9:15 Uhr Seite 15

- 16 -
Takuu & huolto
Laitteen takuu on 3 vuotta ostopäivästä. Laite on
valmistettu huolellisesti ja tarkistettu tarkasti ennen
toimitusta. Säilytä ostokuitti todisteeksi takuun voi-
massaolosta.
Ota takuutapauksessa puhelimitse yhteyttä huoltopi-
steeseesi. Vain näin voidaan taata tuotteesi maksu-
ton lähettäminen huoltoon.
Takuu koskee ainoastaan materiaali- ja valmistusvir-
heitä, ei kuitenkaan kuljetusvaurioita, kuluvia osia tai
herkästi vaurioituvien osien, esim. kytkinten tai akku-
jen vaurioita. Tuote on tarkoitettu ainoastaan yksityi-
seen, ei kaupalliseen käyttöön.
Väärä tai asiaton käyttö, väkivallan käyttö ja muiden
kuin valtuutetun huoltopisteen suorittamat korjaukset
aiheuttavat takuun raukeamisen. Tämä takuu ei rajo-
ita kuluttajan lakisääteisiä oikeuksia.
Takuukorjaus ei pidennä takuuaikaa. Tämä koskee
myös vaihdettuja ja korjattuja osia. Mahdollisista jo
ostettaessa olemassa olevista vahingoista ja puuttei-
sta on ilmoitettava välittömästi pakkauksesta purka-
misen jälkeen, kuitenkin viimeistään kaksi päivää
ostopäiväyksen jälkeen. Takuuajan jälkeen suoritetut
korjaukset ovat maksullisia.
Huolto Suomi
Tel.: 010309 3582
E-Mail: [email protected]
Palvelupuhelin:
Maanantaista perjantaihin klo 8:00 – 20:00 (CET)
Maahantuoja
KOMPERNASS HANDELS GMBH
BURGSTRASSE 21
44867 BOCHUM
GERMANY
www.kompernass.com
IAN 91000
IB_91000_SGS80A2_FI_SE_DK.qxp 28.06.2013 9:15 Uhr Seite 16

- 17 -
Innehållsförteckning Sidan
Inledning 18
Föreskriven användning 18
Leveransens omfattning 18
Beskrivning 18
Tekniska data 18
Säkerhetsanvisningar 19
Göra ansiktssaunan klar att användas 20
...med ansiktsmask..........................................................................................................................20
...med näsmask ..............................................................................................................................20
Restriktioner för användning 20
Användning 21
Använda arom- och örtbehållaren 22
Rengöring och skötsel 22
Förvaring 23
Kassering 23
Garanti & Service 23
Importör 24
IB_91000_SGS80A2_FI_SE_DK.qxp 28.06.2013 9:15 Uhr Seite 17
Sidan laddas...
Sidan laddas...
Sidan laddas...
Sidan laddas...
Sidan laddas...
Sidan laddas...
Sidan laddas...
Sidan laddas...
Sidan laddas...
Sidan laddas...
Sidan laddas...
Sidan laddas...
Sidan laddas...
Sidan laddas...
Sidan laddas...
Sidan laddas...
Sidan laddas...
Sidan laddas...
Sidan laddas...
Sidan laddas...
Sidan laddas...
Sidan laddas...
Sidan laddas...
Sidan laddas...
-
 1
1
-
 2
2
-
 3
3
-
 4
4
-
 5
5
-
 6
6
-
 7
7
-
 8
8
-
 9
9
-
 10
10
-
 11
11
-
 12
12
-
 13
13
-
 14
14
-
 15
15
-
 16
16
-
 17
17
-
 18
18
-
 19
19
-
 20
20
-
 21
21
-
 22
22
-
 23
23
-
 24
24
-
 25
25
-
 26
26
-
 27
27
-
 28
28
-
 29
29
-
 30
30
-
 31
31
-
 32
32
-
 33
33
-
 34
34
-
 35
35
-
 36
36
-
 37
37
-
 38
38
-
 39
39
-
 40
40
-
 41
41
-
 42
42
-
 43
43
-
 44
44


Silvercrest SGS 80 A2 Operating Instructions Manual
- Typ
- Operating Instructions Manual
på andra språk
- Deutsch: Silvercrest SGS 80 A2
- English: Silvercrest SGS 80 A2
- dansk: Silvercrest SGS 80 A2
- suomi: Silvercrest SGS 80 A2
Relaterade papper
Andra dokument
-
Beurer FS 60 Användarmanual
-
-
Medisana 88245 Datablad
-
Medisana 88245 Bruksanvisning
-
-
HQ Aromathérapie Bruksanvisning
-
Philips HP5241/01 Användarmanual
-
Gima 20755 Bruksanvisning
-
BaByliss E829PE Användarmanual
-
ResMed Hospital Full Face Mask Användarmanual