Silvercrest SGB 1380 B2 Operating Instructions Manual
- Kategori
- Racletter
- Typ
- Operating Instructions Manual

KITCHEN TOOLS
Electric Oven with Grill SGB 1380 B2
Electric Oven with Grill
Operating instructions
Miniuuni ja grilli
Käyttöohje
Grill- och bakugn
Bruksanvisning
Grill- og bageovn
Betjeningsvejledning
Grill- und Backautomat
Bedienungsanleitung
KOMPERNASS GMBH
BURGSTRASSE 21 · D-44867 BOCHUM
www.kompernass.com
ID-Nr.: SGB 1380 B2-02/11-V2
IAN: 63914/63915
CV_63914_SGB1380B2_LB3.indd 1-3CV_63914_SGB1380B2_LB3.indd 1-3 05.04.2011 16:24:40 Uhr05.04.2011 16:24:40 Uhr

SGB 1380 B2
7
98
1
2
3
4
5
6
CV_63914_SGB1380B2_LB3.indd 4-6CV_63914_SGB1380B2_LB3.indd 4-6 05.04.2011 16:24:41 Uhr05.04.2011 16:24:41 Uhr

- 1 -
CONTENT PAGE
Safety information 2
Intended use 3
Items supplied 3
Setup 3
Description 4
Preparation for use 4
Switching off and transportation 5
Switching off .....................................................................................................................................5
Transporting ......................................................................................................................................5
Operation 5
Grilling and baking..........................................................................................................................5
Grilling and baking with circulating air .........................................................................................6
Tips for preparation and recipes 6
Muffins...............................................................................................................................................6
Hawaii toast......................................................................................................................................7
Baking deep-frozen pizza ...............................................................................................................7
Biscuits ...............................................................................................................................................7
Rolls....................................................................................................................................................7
Meringue...........................................................................................................................................8
Changing the bulb 8
Cleaning 8
Technical data 9
Troubleshooting 9
Disposal 10
Warranty & Service 11
Importer 11
Read the operating instructions carefully before using the device for the first time and preserve this booklet
for later reference. Pass this manual on to whoever might acquire the device at a future date.
IB_63914_SGB1380A1_LB3 06.04.2011 13:59 Uhr Seite 1

- 2 -
Electric Oven with Grill
Safety information
Important! Danger!
• Do not leave the appliance unattended when
it is in use.
• This appliance is not intended for use by indivi-
duals (including children) with restricted physical,
physiological or intellectual abilities or defi-
ciences in experience and/or knowledge un-
less they are supervised by a person responsi-
ble for their safety or receive from this person
instruction in how the appliance is to be used.
• Children should be supervised in order to make
sure that they do not play with the device.
• You may not open the housing of the appliance
or carry out any repairs. Should you do so, the
safety concept of the device may be compro-
mised and the warranty becomes void. Arrange
for defects on the appliance to be repaired
only by the dealer or authorised specialists.
• Arrange for defective power plugs and/or cables
to be replaced at once by qualified technicians
or our Customer Service Department.
• Ensure that fluids cannot permeate into the housing
of the appliance. Do not expose the appliance
to humidity and do not use it outdoors. Additio-
nally, DO NOT place fluid-filled receptacles
such as flower vases on the appliance. This
would increase the risk of fire and of receiving
an electric shock! Should liquids permeate into
the housing, unplug the appliance immediately
and arrange for it to be repaired by a qualified
technician.
• When the appliance is in use ensure that there
are no easily inflammable materials close to it
(e.g. dishcloths, oven cloths, etc.).
NEVER dry out textiles or other objects on or
above the appliance.
This would increase the risk of fire!
• NEVER touch the heating rods or the viewing
window when the appliance is in use, or before
it has cooled down completely. Do not reach in
to the cooking area when the appliance is in
use. Wait until the appliance has cooled down.
Otherwise, you could be burnt.
As the housing and the viewing window in the
glass door become very hot during use, you
must use an oven cloth or something similar to
open the oven flap. Otherwise, you could be
burnt.
• After use, allow the appliance to cool down
completely before transporting it.
• NEVER grasp the appliance, power cable or
power plug with wet hands. There is the risk
of receiving an electric shock.
• To disconnect, always pull out the plug itself
out of the power socket, do not pull the power
cable.
• Do not fold or crush the power cable.
• Lay the power cable in such a way that no one
can tread on or trip over it.
• Do not use extension cables.
• If you do not intend to use the appliance for an
extended period, you must disconnect it from
the power source. The appliance is completely
free of electrical power only when you unplug
it.
• Do not use an external timing switch or a separate
remote control system to operate the appliance.
IB_63914_SGB1380A1_LB3 06.04.2011 13:59 Uhr Seite 2

- 3 -
Clarification of the safety warnings
In the operating instructions there are the following
categories of safety warning:
Danger!
A warning with the word DANGER refers to possible
personal physical damage.
Important!
A warning with the word CAUTION refers to possible
property or environmental damage.
These warnings contain specific indications for
the economic use of the appliance.
Intended use
The Oven with Grill automat is intended for the heating,
cooking and grilling of food. It is intended exclusively
for these purposes and may only be used for them.
The user is also required to pay heed to all of the in-
formation in these operating instructions, especially
the safety instructions. All other uses are deemed to
be improper and may result in property damage
or even in personal injury. Kompernaß GmbH ac-
cepts no liability for damage caused by improper
use of the appliance.
Items supplied
The package contains
• Electric Oven with Grill
• a roasting grill
• a baking tray
• a handle for the roasting grills/baking tray
• operating instructions
Setup
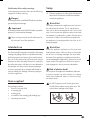
³ Place the appliance on a firm, level and heat-resis-
tant surface. Ensure there is sufficient ventilation
around the appliance.
Risk of fire!
The distance between the appliance rear side and
the wall should be at least 10 cm, with at least a
clear 10 cm above the appliance and 5 cm to each
side. For this reason the appliance may not be used,
for example, in cupboards or similar. Should it be so
used, there is likely to be insufficient ventilation for
the appliance, increasing both the risk of fire or of it
being damaged.
Risk of fire!
Ensure the appliance is placed on a firm, level and
heat-resistant surface. Failure to do so increases the
risk of fire or of it being damaged. The area under
the base of the appliance could become discolou-
red and damaged. Additionally, if placed on a soft
upper surface, the appliance could cause perma-
nent damage to it due to pressure indentations.
Risk of electric shock!
Do not place the appliance immediately adjacent
to sources of water, e.g. sinks or basins, or in damp
cellar areas. Otherwise, there is a risk of receiving
an electric shock.
Do NOT support yourself on the glass door.
Do NOT place objects on the glass door. This
would cause damage to the hinges.
IB_63914_SGB1380A1_LB3 06.04.2011 13:59 Uhr Seite 3

- 4 -
Description
The Oven with Grill automat is intended for the heating,
cooking and grilling of food. The air circulation system
provides for an equable and rapid distribution of
heat in the appliance.
Operating Elements
1
Control lamp (Power)
Glows during operation
2
Temperature regulator
Stepless adjustment of the temperature from
100° C to 230° C
3
Function switch for
OFF,
Upper heat,
Lower heat,
Upper and lower heat
4
Rocker switch for air circulation
5
Timer switch
Adjustment of the required baking/grilling time
from 0 – 60 min.
6
Glass door with handle
7
Roasting grill
8
Baking tray
9
Handle for roasting grill/baking tray
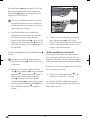
Preparation for use
³ Take the electrical Oven with Grill and all ac-
cessories from the packaging.
Risk of crush injuries!
When opening and closing the door, do not place
your fingers/hand between the door hinges. They
could be crushed.
³ Before using the appliance for the first time, it
and all of the accessories must be cleaned free
of possible packaging residues. Clean the ac-
cessories with a handwarm and mild detergent
solution and then dry them ab.
³ Wipe the appliance housing with a cloth lightly
moistened with water and then dry it carefully.
³ When the appliance is completely dry inside
and out, insert the plug into a suitable power
socket (220 - 240 V
~
/50 Hz).
³ Now switch the appliance on, without the ac-
cessories and without foodstuffs. Leave the ap-
pliance door completely open.
³ Select the setting 230° C with the temperature
regulator
2
. Place the function switch
3
to
upper and lower heat.
³ Place the time switch
5
at 15 minutes.
The appliance allows itself to be switched on
with the time switch
5
. As soon as the time
switch
5
is set the control lamp
1
glows.
As the heating elements are lightly greased, a
slight smell may occur when first putting them
into operation. This is harmless and stops after
a short time. Open a window and provide for
sufficient ventilation.
³ When the appliance has switched itself off auto-
matically, place the function switch
3
to OFF .
³ Remove the plug from the power socket and wait
until the appliance has cooled itself down.
³ Then clean the grill and baking area with a
cloth lightly moistened with water and then
dry it carefully.
IB_63914_SGB1380A1_LB3 06.04.2011 13:59 Uhr Seite 4

- 5 -
Switching off and transportation
Switching off
³ Place the function switch
3
and the time switch
5
at OFF. Unplug the power plug from the socket.
Transporting
³ If you wish to transport the appliance, first allow
it to cool down.
³ Remove the plug from the power socket.
³ Wrap the power cable around the retaining
hooks on the rear of the appliance.
Operation
Grilling and baking
³ Remove the roasting grill
7
and baking tray
8
from the appliance. If required, cover these
with baking paper resp. smear the baking tray
8
with butter or oil.
³ Allow the appliance to heat up for ca. 10 minutes
(dependant on the setting) to the required tem-
perature:
- Select the required temperature with the tem-
perature regulator
2
.
For grilling, you must always select the highest
temperature setting (230° C).
- Then, select with the function switch
3
either
upper heat (e.g. for toppings), lower heat
(e.g. for cakes) or upper and lower heat (e.g.
for Pizza). If you want to grill, always select
the setting upper heat with the function switch
3
.
- With the time switch
5
set the pre-heat time
(ca. 10 minutes).
- Close the glass door
6
.
³ When the warm-up period is finished, place
the foodstuffs on the roasting grill
7
resp. the
baking tray
8
and slide it in on one of the run-
ners. Ensure that there is sufficient space between
the foodstuffs and the inner walls/heating ele-
ments of the appliance.
If you wish to prepare food on the roasting grill
7
that drips excessively, then slide the baking
tray
8
into the bottom rail. By doing this, drip-
ping fat for example will be caught and the ap-
pliance is then easier to clean.
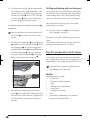
The most uniform baking results are obtained
when the baking tray
8
resp. the roasting grill
7
are placed on the central runner and the air
circulation is switched on.
³ Close the glass door
6
before starting the
grill or baking process.
If you are cooking especially fatty foodstuffs,
an increased smoke development can occur.
In this case, do not close the glass door
6
completely, instead, allow it to be slightly open:
If you carefully push the door to, it comes into
this position shortly before closing.
³ Adjust the time switch
5
to the required grilling
or baking time.
The maximum grilling or baking time is 60 minutes.
³ If the cooking time for the foodstuff amounts to
less than 25 minutes, first of all place the time
switch
5
at 60 minutes and then turn it back
to the required grilling or baking time.
The control lamp
1
indicates that your Oven with
Grill is switched on. The switch of the time switch
5
now rotates itself anti-clockwise towards OFF.
When your Oven with Grill has reached the set
temperature, the heating elements switch them-
selves off at intervals, to ensure that the tempe-
rature is maintained.
IB_63914_SGB1380A1_LB3 06.04.2011 13:59 Uhr Seite 5

- 6 -
³ The appliance switches itself off automatically
on completion of the programmed time. If you
wish to switch the appliance off prematurely,
turn the time switch
5
back to OFF. Place the
function switch
3
at the position OFF and re-
move the plug from the power socket.
You will hear a signal sound and the control lamp
1
extinguishes.
After the appliance has switched itself off, the
time switch
5
can continue to run for a short
period.
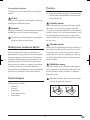
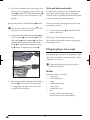
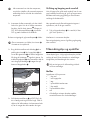
³ To remove the roasting grill
7
resp. baking tray
8
, ALWAYS use the provided handle
9
. To lift
the roasting grill
7
out, you must engage the
small hook of the handle
9
in the grill from above.
To lift the baking tray
8
out of the appliance,
the large hooks of the handle
9
must engage
with the front edge of the baking tray
8
.
³ After grilling or baking, place the function
switch
3
in the position OFF. Remove the plug
from the power socket. Allow the appliance to
cool down before cleaning it or switching it
back on.
Grilling and baking with circulating air
As a general rule, if you are baking or grilling with
air circulation vou can dispense with a pre-heating
of the cooking space. The cooking and browning
results are more even with the use of circulating air.
Take note of the instructions given in the recipes
when using air circulation.
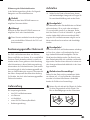
³ Press the rocker switch
4
for air circulation
until it engages in position "-".
The aerator in the grill and baking space starts to
rotate.
The methods of operation are then the same as for
grilling and baking without air circulation.
Tips for preparation and recipes
In this chapter we provide you with various examples
for the preparation of foods. These examples are re-
commendations. The preparation periods can vary.
Take note of the preparation details given on
the packaging of the foodstuff .
Muffins
Ingredients for four people:
• 1 Cup of flour
• 1 Teaspoon of baking powder
• 1 Egg
• 1 Tablespoon of melted butter
• 1 Cup of milk
• 3 Tablespoons of sugar
• Salt
• for variations, additionally nuts, chopped
bananas or chocolate flakes
IB_63914_SGB1380A1_LB3 06.04.2011 13:59 Uhr Seite 6

- 7 -
Preparation:
³ Mix together in a bowl, slowly and one after
the other, the flour, baking powder, egg, milk,
salt and sugar.
³ Melt the butter in a pan and mix it into the pastry.
³ Subject to taste, blend in the nuts, chocolate
flakes or chopped bananas.
³ Place the mixture into typical muffin moulds
and bake at 200° C with upper heat and air
circulation for about 15 minutes.
Hawaii toast
Ingredients for 4 toasts:
• 4 Slices of toast
• 1–2 Tablespoons of remoulade
• 120 g cooked ham
• 1/2 Tin of pineapples
• 4 Slices of cheese for melting
• Curry
Preparation:
³ Toast the toast slices.
³ Spread the remoulade thinly over the toasts
and lay the slices of cooked ham on them.
³ Lay one slice of pineapple on each of the
garnished toasts. Spice with curry.
³ Then place a slice of cheese over each of the
pineapple slices.
³ Lay the Hawaiian toasts on the grill
7
and
then bake them for about 8 minutes on the
middle level of the grill and baking machine, at
approx. 180°C with upper heat and air circu-
lation.
Baking deep-frozen pizza
Preparation:
³ Place the roasting grill
7
on the middle runner
in the cooking area.
³ Lay the deep-frozen pizza without packaging
onto the roasting grill
7
.
³ Bake the pizza with upper and lower heating
and switched on air circulation for ca.20 minutes.
³ Take heed of the details given on the packaging.
Biscuits
Ingredients:
• 125 g butter
• 125 g sugar
• 1 Packet of vanilla sugar
• 1 Pinch of salt
• 1 Egg
• 1 Egg white
• 250 g Plain flour
• 1 Teaspoon of baking powder
• Scraped peel of half a lemon
Preparation:
³ Beat the butter until foamy.
³ Add the sugar, vanilla sugar, lemon peel and
the eggs.
³ Mix together the flour, baking powder and
salt, then blend them into the mixture with a
mixing spoon.
³ Allow the pastry to stand for ca.10 minutes.
³ Bring the pastry into the desired shape, e.g.
with the assistance of a mincer, biscuit shaper
or a shaping bag with nozzle.
³ Place the biscuits onto the baking tray
8
, this
being first covered with baking paper.
³ Bake the biscuits in a pre-heated oven at 180° C
for ca. 10–15 minutes until golden brown.
The pastry volume is sufficient for several
baking trays
8
.
Rolls
Ingredients:
• 300 g Flour (or wholemeal flour)
• good 2 Teaspoons of baking powder
• 200 g Linseeds
• 1 Egg
• 500 g Curds
• 1 Teaspoon of salt
IB_63914_SGB1380A1_LB3 06.04.2011 13:59 Uhr Seite 7

- 8 -
• Subject to taste, caraway seeds, onions,
cubed bacon ...
Preparation:
³ Knead everything together well and then
shape it into small rolls.
³ Place the biscuits onto the baking tray
8
this
being first covered with baking paper.
³ Bake at approx. 180°C for approx. 30 minutes.
The pastry volume is sufficient for several
baking trays
8
.
Meringue
Ingredients:
• 1 Egg white
• Salt
• 45 g Sugar
Preparation:
³ Place the cooled egg white into a fat-free mixing
bowl. It may not contain any egg yolk, other-
wise the meringue will not be firm.
³ Beat the egg white at a slow speed, so that the
bubbles formed in the meringue are not too large.
³ Add a pich of salt to taste.
³ Gradually add in a half of the sugar when the
meringue starts to firm up.
³ Then beat it at the highest speed until stiff.
³ Add the remaining sugar. With this the meringue
attains the required solidity.
³ Fill the meringue mixture into a squeezing bag
with large star nozzles and, with a little space
between them, shape rosettes, tongues and
other designs on the backing tray, this being
first covered with baking paper.
³ Pre-heat the Oven with Grill to ca. 100° C
with air circulation.
³ Bake the meringues with air circulation at ca.
100° C for about 2 hours.
These recipes are provided without guarantee. All
ingredients and preparation information are guiding
values. Expand these recipe suggestions based on
your personal experiences. We hope you enjoy
the recipes and wish you "bon appetit".
Changing the bulb
Danger!
Always wait until until the appliance has cooled
down before changing the bulb. Otherwise, there is
a risk of being burnt!
Replace the bulb only with a bulb of the same
type (see chapter "Technical data ").
³ Open the glass door
6
.
³ Unscrew the glass cover of the light bulb
located at the right rear of the interior.
³ Unscrew the defective bulb and replace it with
the new bulb.
³ Screw the glass cover back on hand-tight.
Cleaning
Risk of electric shock!
Before you clean the Oven with Grill, you must
always remove the plug from the power socket.
There is a risk of receiving an electric shock!
Risk of electric shock!
When cleaning it, under no circumstances
may the appliance be submersed in water.
There is a risk of receiving an electric shock!
IB_63914_SGB1380A1_LB3 06.04.2011 13:59 Uhr Seite 8

- 9 -
Important!
Do not use household detergents or sharp/pointed
objects to remove soiling. . They could damge the
special coatings on the inner walls of the Oven with
Grill.
³ Should soiling occur, the Oven with Grill can
be cleaned with a soft cloth lightly moistened
with a mild soapy solution. For stubborn stai-
ning or baked-on soiling, place a cloth soaked
with a mild detergent on the contamination.
Wait until the contamination has softened and
then remove it!
³ Clean the baking tray
8
and the roasting grill
7
in a detergent solution. Allow stubborn soiling
to be softened. Rinse them off with clear water.
Risk of electric shock!
The Oven with Grill must be completely dry before
using it again after cleaning. Therefore, after cleaning
leave the appliance door open.
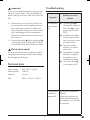
Technical data
Mains voltage: 220 - 240 V
~
/50 Hz
Nominal power: 1380 W
Capacity: 15 Litres
Bulb: 240 V, 15 W, E 14, 300°C
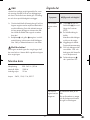
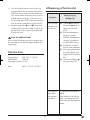
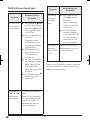
Troubleshooting
Symptom
Possible cause and
solution
The appliance
does not heat
up.
The time switch
5
is
showing OFF. Adjust the
time switch
5
to a time
greater than 0 minutes
(OFF) .
A domestic fuse is defect.
Check the domestic fuses
and, if necessary, renew
the defective one.
The power socket is
defective. Try another
wall socket.
The appliance is possibly
defective. Arrange for
the appliance to be
checked by specialists.
The function switch
3
is at the position OFF.
It is not possible
to switch the
appliance off.
An electronic component is
defective.
Remove the plug from the
wall socket and arrange for
the appliance to be checked
by specialists.
IB_63914_SGB1380A1_LB3 06.04.2011 13:59 Uhr Seite 9

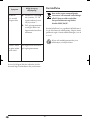
- 10 -
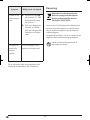
Should a defect not allow itself to be eliminated,
please contact your dealer or the manufacturer.
Symptom
Possible cause and
solution
The aerator for
the air circula-
tion does not
function.
The switch for air circula-
tion
4
is in the position
"O". Move the rocker
switch for air circulation
to the position "-".
The appliance is possibly
defective. Arrange for
the appliance to be
checked by specialists.
The door glass
is broken or
showing crak-
ks.
Arrange for the appliance
to be checked/repaired by
specialists.
Disposal
Do not dispose of the appliance in your
normal domestic waste. This product is
subject to the European guideline
2002/96/EC.
Dispose of the appliance through an approved dis-
posal centre or at your community waste facility.
Observe the currently applicable regulations.
In case of doubt, please contact your waste disposal
centre.
Dispose of all packaging materials in an
environmentally responsible manner.
IB_63914_SGB1380A1_LB3 06.04.2011 13:59 Uhr Seite 10

- 11 -
Warranty & Service
The warranty for this appliance is for 3 years from
the date of purchase. The appliance has been ma-
nufactured with care and meticulously examined be-
fore delivery. Please retain your receipt as proof of
purchase. In the event of a warranty claim, please
make contact by telephone with our Service Depart-
ment. Only in this way can a post-free despatch for
your goods be assured.
The warranty covers only claims for material and
maufacturing defects, but not for transport damage,
for wearing parts or for damage to fragile compo-
nents, e.g. buttons or batteries. This product is for
private use only and is not intended for commercial
use. The warranty is void in the case of abusive and
improper handling, use of force and internal tampe-
ring not carried out by our authorized service
branch. Your statutory rights are not restricted in
any way by this warranty.
The warranty period will not be extended by repairs
made under warranty. This applies also to replaced
and repaired parts. Any damage and defects extant
on purchase must be reported immediately after un-
packing the appliance, at the latest, two days after
the purchase date. Repairs made after the expira-
tion of the warranty period are subject to payment.
Service Great Britain
Tel.: 0871 5000 720
(£ 0.10/Min.)
E-Mail: komper[email protected]
Service Ireland
Tel.: 1890 930 034
(0,08 EUR/Min., (peak))
(0,06 EUR/Min., (off peak))
E-Mail: komper[email protected]
IAN 63914/63915
IAN 63914/63915
Importer
KOMPERNASS GMBH
BURGSTRASSE 21
44867 BOCHUM, GERMANY
www.kompernass.com
IB_63914_SGB1380A1_LB3 06.04.2011 13:59 Uhr Seite 11

- 12 -
IB_63914_SGB1380A1_LB3 06.04.2011 13:59 Uhr Seite 12

- 13 -
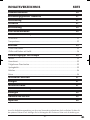
SISÄLLYSLUETTELO SIVU
Turvallisuusohjeita 14
Määräysten mukainen käyttö 15
Toimituslaajuus 15
Pystytys 15
Kuvaus 16
Ensimmäinen käyttöönotto 16
Pois päältä kytkeminen ja kuljettaminen 17
Sammuttaminen..............................................................................................................................17
Kuljettaminen ..................................................................................................................................17
Käyttö 17
Grillaaminen ja paistaminen.........................................................................................................17
Grillaaminen ja paistaminen kiertoilmatoimintoa käyttämällä ..................................................18
Valmistusvinkkejä ja ruokaohjeita 18
Muffinssit.........................................................................................................................................18
Hawaijin paahtoleipä....................................................................................................................19
Pakastepizzan kypsentäminen......................................................................................................19
Pursotinpikkuleivät..........................................................................................................................19
Sämpylät.........................................................................................................................................19
Marengit .........................................................................................................................................20
Lampun vaihto 20
Puhdistaminen 20
Tekniset tiedot 21
Toimintahäiriöiden korjaus 21
Hävittäminen 22
Takuu & huolto 23
Maahantuoja 23
Lue käyttöohje ennen ensimmäistä käyttökertaa huolellisesti läpi ja pidä sitä lähettyvillä myös myöhemmissä
käytöissä. Jos myyt laitteen, anna ohje myös seuraavalle omistajalle.
IB_63914_SGB1380A1_LB3 06.04.2011 13:59 Uhr Seite 13

- 14 -
Miniuuni ja grilli
Turvallisuusohjeita
Huomio! Vaara!
• Älä koskaan jätä laitetta käytön aikana ilman
valvontaa.
• Tätä laitetta ei ole tarkoitettu sellaisten henkilöiden
(mukaan lukien lapset) käyttöön, joiden rajoitetut,
fyysiset, aistilliset tai henkiset kyvyt tai kokemuksen
ja/tai tiedon puute estävät käytön, lukuun otta-
matta tilanteita, joissa heitä valvoo turvallisuu-
desta vastaava henkilö tai joissa he ovat saaneet
tältä ohjeita laitteen käytöstä.
• Lapsia on valvottava ja on varmistettava, että
he eivät leiki laitteella.
• Grilliuunin koteloa ei saa avata eikä korjata.
Jos laitteen kotelo avataan itse, turvallisuutta
ei voida taata eikä takuu ole voimassa. Anna
viallinen grilliuuni ainoastaan jälleenmyyjän
tai valtuutetun ammattilaisen korjattavaksi.
• Anna vaurioitunut verkkopistoke tai virtajohto
välittömästi valtuutetun ammattihenkilöstön tai
huoltopalvelun vaihdettavaksi vaarojen välttä-
miseksi.
• Huolehdi siitä, että grilliuunin koteloon ei pääse
nestettä. Laitetta ei saa altistaa kosteudelle eikä
sitä saa käyttää ulkona. Laitteen päälle ei myö-
skään saa asettaa mitään nestettä sisältäviä
esineitä, kuten esim. maljakoita. Se voi aiheut-
taa palovaaran tai sähköiskun vaaran! Mikäli
laitteen koteloon pääsee jostakin syystä nestettä,
laitteen verkkopistoke on irrotettava pistorasia-
sta ja laite on vietävä korjattavaksi.
• Grillin ympäristössä ei saa olla käytön aikana
mitään helposti palavia materiaaleja (esim. asti-
apyyhkeitä, patalappuja jne.)
Älä koskaan kuivata tekstiilejä tai esineitä lait-
teen päällä, sen yläpuolella tai sen sisällä.
Se voi aiheuttaa tulipalon vaaran!
• Älä koskaan koske kuumennuspuikkoihin tai
kurkistusikkunaan käytön aikana tai ennen kuin
grilliuuni on jäähtynyt. Älä työnnä käsiä tai mui-
ta ruumiinosia uuniin käytön aikana.
Odota, kunnes laite on jäähtynyt. Voit saada
muuten palovammoja.
Käytä uunin oven avaamiseen patalappua,
sillä uunin kotelo ja tarkastusikkuna kuumuvat
käytön aikana erittäin kuumaksi. Voit saada
muuten palovammoja.
• Anna grilliuunin jäähtyä käytön jälkeen ennen
sen kuljetusta.
• Älä ikinä koske laitteeseen, virtajohtoon tai
-pistokkeeseen märillä käsillä. Se voi muuten
aiheuttaa sähköiskun vaaran.
• Irrota laite verkkovirrasta ainoastaan pistokkeesta
vetämällä. Älä vedä johdosta.
• Älä taivuta tai purista sähköjohtoa.
• Sijoita verkkojohto siten, että sen päälle ei voi
astua tai ettei siihen voi kompastua.
• Jatkojohdon käyttö on kiellettyä.
• Irrota grilliuuni sähköverkosta, mikäli et käytä
sitä pitkään aikaan. Laite on täysin jännitteetön
ainoastaan silloin, kun verkkopistoke on irrotettu
sähköverkosta.
• Älä käytä laitetta ulkoisen ajastimen tai erillisen
kauko-ohjatun järjestelmän avulla.
IB_63914_SGB1380A1_LB3 06.04.2011 13:59 Uhr Seite 14

- 15 -
Turvaohjeiden selitykset
Turvaohjeet on jaoteltu käyttöohjeessa seuraaviin
luokkiin:
Vaara!
Ohjeet, joissa käytetään sanaa VAARA, varoittavat
mahdollisista henkilövahingoista.
Huomio!
Ohjeet, joissa käytetään sanaa HUOMIO, varoittavat
mahdollisista esine- tai ympäristövahingoista.
Kyseiset ohjeet sisältävät grilliuunin taloudellista
käyttöä koskevia erityisiä tietoja.
Määräysten mukainen käyttö
Grilliuunia käytetään ruokien kuumentamiseen,
kypsentämiseen ja grillaamiseen. Sitä saa käyttää
ainoastaan kyseiseen tarkoitukseen. Käytä laitetta
ainoastaan käyttöoppaassa kuvatulla tavalla. Ota
erityisesti huomioon turvallisuutta koskevat ohjeet.
Mikä tahansa muu käyttö on määräysten vastaista
ja saattaa johtaa esine- tai henkilövahinkoihin.
Kompernaß ei ota minkäänlaista vastuuta vahingoista,
joita aiheutuu määräysten vastaisesta käytöstä.
Toimituslaajuus
Toimituspakkaus sisältää
• grilliuunin
• uuniritilä
• paistopellin
• ritilän/pellin kahvan
• käyttöohjeen
Pystytys
³ Aseta laite tukevalle, tasaiselle ja kuumuutta kestä-
välle alustalle. Huolehdi laitteen ympäristön riittä-
västä tuuletuksesta.
Tulipalon vaara!
Laitteen taustapuolen ja seinän väliin täytyy jäädä
vähintään 10 cm leveä tila, ylöspäin vähintään
10 cm ja sivusuunnassa vähintään 5 cm kummallekin
puolelle. Laitetta ei siis saa sijoittaa kaappiin tai vas-
taavaan paikkaan. Muuten grillin tuuletuksesta ei
voida huolehtia, mikä voi aiheuttaa tulipalon tai laite
voi vaurioitua.
Tulipalon vaara!
Aseta grilliuuni ehdottomasti tukevalle, tasaiselle ja
kuumuutta kestävälle alustalle. Muutoin on olemas-
sa tulipalon vaara ja laite voi vaurioitua. Laitteen
pohjan alla oleva alue voi värjääntyä ja vahingoit-
tua. Lisäksi pehmeään alustaan voi jäädä pysyviä
painaumajälkiä.
Sähköiskun vaara
Älä sijoita laitetta veden välittömään läheisyyteen,
esim. pesualtaan tai pesuastioiden läheisyyteen tai
kosteisiin kellarihuoneisiin. Muutoin on olemassa
sähköiskun vaara.
Älä nojaa lasioveen. Älä aseta lasioven päälle
esineitä. Se vaurioittaa saranoita.
IB_63914_SGB1380A1_LB3 06.04.2011 13:59 Uhr Seite 15

- 16 -
Kuvaus
Grilliuunia käytetään ruokien kuumentamiseen,
kypsentämiseen ja grillaamiseen. Kiertoilmatoimin-
non avulla lämpö leviää tasaisesti uunin sisäpuolel-
la.
Osat
1
Merkkivalo (Power)
Palaa käytön aikana
2
Lämpötilansäädin
Lämpötilan portaaton säätö
100 °C ... 230 °C
3
Toimintokytkin
OFF (pois päältä),
ylälämpö,
alalämpö,
ylä- ja alalämpö
4
Kiertoilman vipukytkin
5
Ajastin
Halutun paisto-/grillausajan säätö 0–60 min.
6
Lasiovi ja kahva
7
Ritilä
8
Paistopelti
9
Ritilän/pellin kahva
Ensimmäinen käyttöönotto
³ Nosta sähköinen grilliuuni ja sen lisävarusteet
kuljetuspakkauksesta.
Puristumisvaara!
Älä koske oven sarana-alueeseen ovea avatessasi
tai sulkiessasi. Kätesi voi muuten jäädä puristuksiin.
³ Puhdista laite ja sen kaikki lisävarusteet mahdolli-
sista pakkausjäämistä ennen ensimmäistä käyt-
töönottoa. Puhdista lisävarusteet kädenlämpöisel-
lä, miedolla saippualiuoksella ja kuivaa ne
lopuksi.
³ Pyyhi laitteen kotelo veteen kostutetulla hieman
kostealla liinalla ja kuivaa se lopuksi huolellisesti.
³ Sitten kun laite on sisä- ja ulkopuolelta täysin
kuiva, aseta pistoke seinässä olevaan soveltu-
vaan pistorasiaan (220 - 240 V
~
/50 Hz).
³ Kytke laite seuraavaksi päälle ilman lisävarusteita
ja ilman grillattavaa tai paistettavaa ruoka-ai-
netta. Anna laitteen oven olla kokonaan auki.
³ Säädä lämpötilan säätimellä
2
lämpötilaksi
230 °C. Aseta toimintokytkin asentoon
3
ylä- ja
alalämmölle.
³ Aseta ajastimen ajaksi
5
15 minuuttia.
Laitteen voi kytkeä päälle ainoastaan ajastimel-
la
5
. Heti kun ajastin
5
on aktivoitu, merkkivalo
syttyy palamaan
1
.
Kuumentaminen voi aiheuttaa ensimmäisen käyt-
töönoton yhteydessä lievää hajunmuodostumista,
koska kuumennuselementtien pinnalla on hieman
rasvaa.Se on vaaratonta ja haju häviää lyhyen
ajan kuluttua. Avaa ikkuna ja huolehdi riittävästä
tuuletuksesta.
³ Kun laite kytkeytyy automaattisesti pois päältä,
aseta toimintopainike
3
asentoon OFF (pois
päältä).
³ Irrota verkkopistoke pistorasiasta ja odota, kunnes
laite on jäähtynyt.
³ Puhdista grilliuunin sisus lopuksi veteen kostute-
tulla hieman kostealla liinalla ja kuivaa se.
IB_63914_SGB1380A1_LB3 06.04.2011 13:59 Uhr Seite 16

- 17 -
Pois päältä kytkeminen ja
kuljettaminen
Sammuttaminen
³ Aseta toimintokytkin
3
ja ajastin
5
asentoon
OFF (pois päältä). Irrota verkkopistoke pistora-
siasta.
Kuljettaminen
³ Anna grilliuunin jäähtyä ennen kuljetusta.
³ Irrota verkkopistoke pistorasiasta.
³ Kääri verkkojohto laitteen taustapuolella
olevan kiinnityskoukun ympärille.
Käyttö
Grillaaminen ja paistaminen
³ Vedä ritilä
7
ja pelti
8
ulos laitteesta. Levitä
niille tarvittaessa leivinpaperia tai voitele pelti
8
voilla tai öljyllä.
³ Anna laitteen kuumua noin 10 minuuttia (valitusta
lämpötilasta riippuen) halutun lämpötilan saa-
vuttamiseksi:
- Valitse haluttu lämpötila lämpötilan säätimellä
2
.
Grillikäytössä on aina valittava korkein lämpö-
tila (230 °C).
- Valitse seuraavaksi toimintopainikkeella
3
joko ylälämpö (esim. kuorrutettaessa), alalämpö
(esim. kakuille) tai ylä- ja alalämpö (esim. piz-
zalle). Mikäli haluat grillata, käännä toiminto-
painike
3
aina ylälämmölle.
- Aseta esilämmitysaika ajastinta
5
käyttämällä
(n. 10 minuuttia).
- Sulje lasiovi
6
.
³ Kun aika on kulunut, aseta grillattava tai kyp-
sennettävä ruoka-aine ritilälle
7
tai pellille
8
ja työnnä se uuniin halutulle korkeudelle. Huo-
lehdi siitä, että grillattavan tai kypsennettävän
ruoka-aineen ja laitteen sisäseinien ja kuumen-
nuselementtien väliin jää riittävä väli.
Jos valmistat ritilällä
7
erittäin tippuvaa grillat-
tavaa tuotetta, työnnä paistopelti
8
alimpaan
kiskoon. Näin esim. putoava rasva kerätään ja
laite on myöhemmin helpompi puhdistaa.
Tasaisimman kypsennystuloksen saa aikaan
työntämällä pellin
8
tai ritilän
7
keskitasolle
ja käyttämällä kiertoilmatoimintoa.
³ Sulje lasiovi
6
ennen grillaamisen tai paista-
misen aloittamista.
Mikäli valmistat erityisen rasvapitoisia ruokia,
savua voi muodostua tavallista enemmän. Älä
sulje lasiovea
6
siinä tapauksessa aivan koko-
naan, vaan jätä se hieman raolleen: Kun laitat
oven varovasti kiinni, se kiinnittyy juuri ennen
sulkeutumista kyseiseen asentoon.
³ Aseta ajastimella
5
haluttu grillaus- tai paistoaika.
Pisin mahdollinen grillaus- tai paistoaika on 60 mi-
nuuttia.
³ Mikäli grillattavan tai paistettavan ruoka-aineen
kypsennysaika on alle 25 minuuttia, aseta a-
jastin
5
ensin 60 minuutiksi ja sen jälkeen takaisin
halutuksi grilllaus- tai paistoajaksi.
Merkkivalo
1
osoittaa grilliuunin olevan päällä.
Ajastimen
5
kytkin liikkuu nyt vastapäivään asentoa
OFF (nolla) kohti.
Kun grilliuunin haluttu lämpötila on saavutettu,
kuumennuselementit kytketään ajoittain pois
päältä valitun lämpötilan ylläpitämiseksi.
IB_63914_SGB1380A1_LB3 06.04.2011 13:59 Uhr Seite 17

- 18 -
³ Laite kytkeytyy automaattisesti pois päältä ase-
tetun ajan kuluttua. Mikäli haluat kytkeä laitteen
ennenaikaisesti pois päältä, käännä ajastin
5
takaisin asentoon OFF. Aseta toimintokytkin
3
asentoon OFF ja irrota verkkopistoke pistorasi-
asta.
Laitteesta kuuluu kilahtava ääni, ja merkkivalo
1
sammuu.
Ajastin
5
voi olla vielä jonkin aikaa toiminnassa
laitteen pois päältä kytkeytymisen jälkeen.
³ Käytä ritilän
7
tai pellin
8
ulosvetämiseen aina
mukana toimitettua kahvaa
9
. Jos haluat no-
staa ritilän
7
ulos, kahvan
9
pienet koukut on
kiinnitettävä ylhäältä päin ritilään. Jos haluat
nostaa pellin
8
ulos laitteesta, kahvan
9
suuret
koukut on kiinnitettävä pellin
8
etureunaan.
³ Aseta toimintokytkin
3
grillaamisen tai paista-
misen jälkeen asentoon OFF (pois päältä).
Irrota verkkopistoke pistorasiasta. Anna laitteen
jäähtyä ennen sen puhdistusta tai ennen kuin
sitä käytetään uudelleen.
Grillaaminen ja paistaminen kiertoil-
matoimintoa käyttämällä
Mikäli käytät grillaamiseen tai paistamiseen kiertoil-
matoimintoa, uunia ei yleensä tarvitse esilämmittää.
Kypsennys- ja ruskistustulos on tasaisempi kiertoil-
maa käytettäessä.
Ota huomioon ruokaohjeiden kiertoilmalla kypsent-
ämisestä annetut ohjeet.
³ Paina kiertoilman vipukytkintä
4
, kunnes se
kiinnittyy asentoon "-".
Uunin paistotilassa oleva tuuletin on päällä.
Grilliuunia käytetään muuten samoin kuin grillattaessa
tai paistettaessa ilman kiertoilmatoimintoa.
Valmistusvinkkejä ja ruokaohjeita
Tämä luku sisältää useita esimerkkejä ruokien kyps-
entämisestä. Esimerkit ovat suosituksia. Valmistusajat vo-
ivat poiketa esimerkkien ajoista.
Noudata ruoka-aineiden pakkausten valmis-
tusohjeita.
Muffinssit
Tarvikkeet neljälle hengelle:
• 1 kupillinen jauhoja
• 1 teelusikallinen leivinjauhetta
• 1 kananmuna
• 1 ruokalusikallinen voisulaa
• 1 kupillinen maitoa
• 3 rkl sokeria
• suolaa
• lisäksi pähkinöitä, hienonnettua banaania tai
suklaalastuja eri makuvaihtoehdoista riippuen
IB_63914_SGB1380A1_LB3 06.04.2011 13:59 Uhr Seite 18
Sidan laddas ...
Sidan laddas ...
Sidan laddas ...
Sidan laddas ...
Sidan laddas ...
Sidan laddas ...
Sidan laddas ...
Sidan laddas ...
Sidan laddas ...
Sidan laddas ...
Sidan laddas ...
Sidan laddas ...
Sidan laddas ...
Sidan laddas ...
Sidan laddas ...
Sidan laddas ...
Sidan laddas ...
Sidan laddas ...
Sidan laddas ...
Sidan laddas ...
Sidan laddas ...
Sidan laddas ...
Sidan laddas ...
Sidan laddas ...
Sidan laddas ...
Sidan laddas ...
Sidan laddas ...
Sidan laddas ...
Sidan laddas ...
Sidan laddas ...
Sidan laddas ...
Sidan laddas ...
Sidan laddas ...
Sidan laddas ...
Sidan laddas ...
Sidan laddas ...
Sidan laddas ...
Sidan laddas ...
Sidan laddas ...
Sidan laddas ...
Sidan laddas ...
Sidan laddas ...
-
 1
1
-
 2
2
-
 3
3
-
 4
4
-
 5
5
-
 6
6
-
 7
7
-
 8
8
-
 9
9
-
 10
10
-
 11
11
-
 12
12
-
 13
13
-
 14
14
-
 15
15
-
 16
16
-
 17
17
-
 18
18
-
 19
19
-
 20
20
-
 21
21
-
 22
22
-
 23
23
-
 24
24
-
 25
25
-
 26
26
-
 27
27
-
 28
28
-
 29
29
-
 30
30
-
 31
31
-
 32
32
-
 33
33
-
 34
34
-
 35
35
-
 36
36
-
 37
37
-
 38
38
-
 39
39
-
 40
40
-
 41
41
-
 42
42
-
 43
43
-
 44
44
-
 45
45
-
 46
46
-
 47
47
-
 48
48
-
 49
49
-
 50
50
-
 51
51
-
 52
52
-
 53
53
-
 54
54
-
 55
55
-
 56
56
-
 57
57
-
 58
58
-
 59
59
-
 60
60
-
 61
61
-
 62
62


Silvercrest SGB 1380 B2 Operating Instructions Manual
- Kategori
- Racletter
- Typ
- Operating Instructions Manual
på andra språk
- Deutsch: Silvercrest SGB 1380 B2
- English: Silvercrest SGB 1380 B2
- dansk: Silvercrest SGB 1380 B2
- suomi: Silvercrest SGB 1380 B2