Amprobe AMTMA40-A Användarmanual
- Kategori
- Mätning, testning
- Typ
- Användarmanual
Denna manual är också lämplig för

TMA40-A
Airflow Anemometer
Users Manual
• Mode d’emploi
• Bedienungshandbuch
• Manuale d’uso
• Manual de uso
• Användarhandbok

1
English
TMA40-A
Airflow Anemometer
Users Manual
TMA40-A_Rev002
© 2009 Amprobe Test Tools.
All rights reserved.

Limited Warranty and Limitation of Liability
Your Amprobe product will be free from defects in material and workmanship for 1 year from the
date of purchase. This warranty does not cover fuses, disposable batteries or damage from accident,
neglect, misuse, alteration, contamination, or abnormal conditions of operation or handling.
Resellers are not authorized to extend any other warranty on Amprobe’s behalf. To obtain service
during the warranty period, return the product with proof of purchase to an authorized Amprobe
Test Tools Service Center or to an Amprobe dealer or distributor. See Repair Section for details.
THIS WARRANTY IS YOUR ONLY REMEDY. ALL OTHER WARRANTIES - WHETHER EXPRESS, IMPLIED
OR STAUTORY - INCLUDING IMPLIED WARRANTIES OF FITNESS FOR A PARTICULAR PURPOSE OR
MERCHANTABILITY, ARE HEREBY DISCLAIMED. MANUFACTURER SHALL NOT BE LIABLE FOR ANY
SPECIAL, INDIRECT, INCIDENTAL OR CONSEQUENTIAL DAMAGES OR LOSSES, ARISING FROM ANY
CAUSE OR THEORY. Since some states or countries do not allow the exclusion or limitation of an
implied warranty or of incidental or consequential damages, this limitation of liability may not apply
to you.
Repair
All test tools returned for warranty or non-warranty repair or for calibration should be accompanied
by the following: your name, company’s name, address, telephone number, and proof of purchase.
Additionally, please include a brief description of the problem or the service requested and include
the test leads with the meter. Non-warranty repair or replacement charges should be remitted in the
form of a check, a money order, credit card with expiration date, or a purchase order made payable
to Amprobe® Test Tools.

3
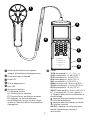
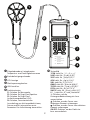
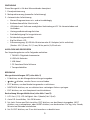
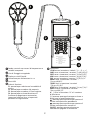
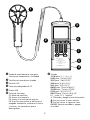
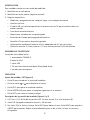
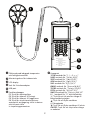
➊ Fan probe with built-in temperature and
humidity sensors
➋ Tripod mounting screw
➌ LCD display
➍ DC adaptor jack
➎ USB port
➏ Function Keys
F1: Press for measurement mode
F2: Press to access the memory
F3: Press to access the log files
F4: Press to enable/disable auto
power off, set data and time, and set
parameters to record.
➐ Keypad
1SYM stands for ”1,*,.,:,$,+,-,=”
2ABC stands for ”2,a,b,c,A,B,C”
3DEF stands for”3,d,e,f,D,E,F”
4GHI stands for”4,g,h,i,G,H,I”
5JKL stands for”5,j,k,l,J,K,L”
6MNO stands for”6,m,n,o,M,N,O”
7PQRS stands for”7,p,q,r,s,P,Q,R,S”
8TUV stands for”8,t,u,v,T,U,V”
9WXYZ stands for”9,w,x,y,z,W,X,Y,Z”
0 |__| stands for”0 and space”
: Press to turn on and off the backlight
: Press to shift the cursor to previous
: Press to shift the cursor to next
ON/OFF: Press to turn the unit on and
off
F1 F2 F3 F4
1 SYM. 2 ABC DEF 3
4 GHI 5 JKL MNO 6
7 PQRS 8 TUV WXYZ 9
ON/OFF
0
MEAS: Normal (Single)
measurement
MEM : Manual record(99 points)
measurement
LOG : Automatic record (Logger)
measurement
SET : Logger, Unit, real time,
other setting
1
3
26
7
5
4

4
TMA40-A
Airflow Anemometer
CONTENTS
Introduction .........................................................................................................................................5
Unpacking and inspection .................................................................................................................5
Operation ............................................................................................................................................5
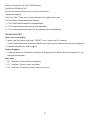
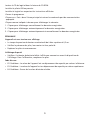
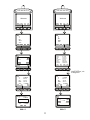
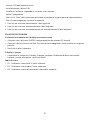
Meter setting: SET (See Fig.2) .......................................................................................................5
Meter Screen Description (See Figs 2&3) ......................................................................................5
Single Measurement: MEAS (See Fig. 3) .......................................................................................6
Multiple Measurement: MEM (See Fig. 4) ....................................................................................6
Automatic Logging: LOG (See Fig. 5) ...........................................................................................6
Comparison Table ................................................................................................................................7
Technical Specifications ....................................................................................................................8
Software Operation ............................................................................................................................8
Troubleshooting ..................................................................................................................................9

5
INTRODUCTION
This meter is designed with three measurement modes:
Single point measurement1.
Multiple points measurement (Manual record)2.
Automatic Logging 3.
Measuring/programming anywhere at any time•
User friendly interface•
USB cable and software enable to link with PC for downloading and uploading•
Backlight function•
Tripod mountable for long time use•
Power off time selectable•
Big Dot matrix LCD•
Powered by 4-pcs AAA batteries or 9V adaptor (not included) (Plug: outer:5.5mm; •
Inner:2.1mm; Center positive) 0.05mA minimum
UNPACKING AND INSPECTION
Your shipping carton should include:
1 x TMA40-A Airflow Anemometer
4 x AAA Battery
1 x USB Cable
1 x CD Download Suite
1 x Carrying case
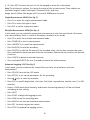
OPERATION
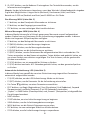
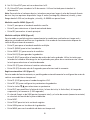
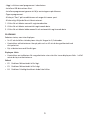
Meter setting: SET (See Fig.2)
Press F4 to enter the meter setting•
Press • or key to shift the cursor
Press EDIT to enter modification mode•
Press NEXT/BACK to enter the next or previous page.•
Press EXIT to return to main menu.•
Meter Screen Description (See Figs 2&3)
LCD Cont.(1-5): LCD brightness. From darkest 1 to brightest 5.1.
Auto Off: Selectable 1 to 20 minutes. 2.
Set clock: Choose date and time. Press EDIT to enter the month. Press NEXT to accept or 3.
ABORT to cancel. Repeat for day, year, hour, minute and second.
Set ID: Press EDIT to enable or disable ID.4.

6
ID: Press EDIT to enter the user id. Use the keypad to enter the information.5.
Note: To calculate air volume, first enter the value of the air source area. Three choices are
available: length X width (rectangle); Diameter(Circle); and Area.
Range from 0~300cm (Rectangle and Circle and 0~90000sq.cm for area.
Single Measurement: MEAS (See Fig. 3)
Press F1 to enter the single measurement mode.•
Press F2 to select the type of input•
Press ESC to return to previous menu•
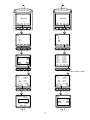
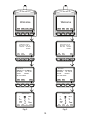
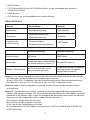
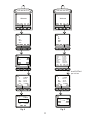
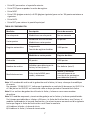
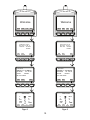
Multiple Measurement: MEM (See Fig. 4)
In this mode, you can manually record what you measure in real time and attach a file name
with the recording. There is a total of 99 memory locations in this mode.
Press F2 to enter the multiple measurement mode.•
Press F2(MEAS) to start a measurement.•
Press ABORT(F1) to cancel the measurement .•
Press SAVE(F4) to save the recording.•
Press F3(EDIT) to edit the file name of the recorded value. Use the keys to enter the name. •
Press and hold to move from one character to another. Release the key to select the desired
character.
Press CLR(F2) to delete a selected character.•
Press and hold CLR(F2) for over 2 seconds to delete the whole memory.•
Automatic Logging: LOG (See Fig. 5)
In this mode, you can automatically record what you have set up before a real time
measurement.
Press F3(LOG) to enter the LOG mode.•
Press SET(F3) to set up the parameters for the recording.•
Press • keys to select a parameter.
Press EDIT to modify begin date, start time, End date, suspend time, and the rate ( 1 to 200 •
seconds).
Expect is 2400 points(total memory) and remain (remaining memory) will be calculated •
according to your setting.
Press NEXT•
Press START to begin the logging session•
Press VIEW to see the recording data•
Press MEAS to see the real time data measurement.•
Press ESC to return to previous screen.•
Press STOP to suspend the logging session.•

7
Press NEXT•
Press P-PG(previous page) or N-PG (next page) to see the previous or the next 100 points.•
Press BACK•
Press EXIT to return to the main screen•
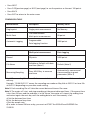
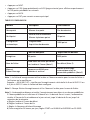
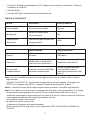
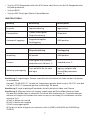
COMPARISON TABLE
Measurement Description Memory Point
Single point Single point measurement No Memory
Multi-Point File name editable
Multi-point measurement 99 points
Automatic Logging Programmable
Data logging function 2400 points
Multi-point measurement Data Logging
Record 99 points 2400 points
File Name Editable or Default with date
and time (Note 1) Default (Note 2)
Measuring/Sampling Press MEAS Key to measure
and store
Automatically measure and
store according to preset
parameters (Note 3)
Note 1: The recording file name will show current date and time as file name if the user doesn’t
edit any.
Example: ”05-06 09:21:51” means the recording was made on May 6th at 09:21:51 or June 5th
at 09:21:51 depending on your date mode setting.
Note 2: Each recording file will take the current date and time as file name.
Note 3: The meter will start and stop recording at the preset dates and times. If the preset time
is less than 24-hour and the end date is in the future, the meter will stop at the ending time
and restart again the next day until the ending date or until the memory is full.
a) Set the date and start time
b) Set the date and stop time
c) Set the sample rate
d) In order to record 24-hour a day, you must set START for 00:00:00 and SUSPEND for
23:59:59

8
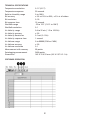
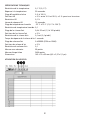
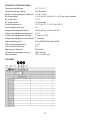
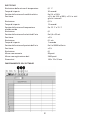
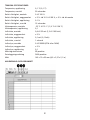
TECHNICAL SPECIFICATIONS
Temperature resolution 0.1°C (0.1°F)
Temperature response 30 seconds
Relative Humidity range 0 to 100%
RH accuracy ± 3% at 10% to 99%; ± 5% at all others
RH resolution 0.1%
RH response time 15 seconds
Wet Bulb range -22 to 70°C (-7.6°F to 158°F)
Wet Bulb resolution 0.1
Air Velocity range 0.4 to 32 m/s ( 1.3 to 105 ft/s)
Air Velocity accuracy ± 3%
Air Velocity Resolution 0.1 m/s (0.1 ft/s)
Air Velocity response time 1 second
Air Volume range 0 to 99999 (CFM or CMM)
Air Volume accuracy ± 3%
Air Volume resolution 0.1
Measurement with memory 99 points
Datalogging measurement 2400 points
Dimensions 165 X 70 X 53 mm ( 6.5 X 2.57 X 2.1 in)
SOFTWARE OPERATION

9
-Insert the software CD into CD-ROM driver
-Install the USB driver first
-Install the software follow the on-screen instructions
-Open the program
-Click the “Port” from main screen and input the right comm. port.
-Click as follow to download the memory
Click to download manually recorded data.1.
Click to download automatically recorded data2.
Click to download both manually & automatically recorded data3.
TROUBLESHOOTING
Power on but no display
Make sure the time of pressing ”ON/OFF” key is more than 0.2 seconds.•
Check the batteries are in place and make sure they are at good contact and correct polarity.•
Replace the batteries and try again .•
Display disappear
Check whether the low battery indicator is displayed on or before display disappears. If yes, •
replace the batteries .
Error code:
E2. Problem : Meter value is underflow .•
E3. Problem : Meter value is overflow.•
E4. Problem: Calculated source value occurs error.•

10
F1 F2 F3 F4
MEAS MEM LOG SET
Welcome
F1 F2 F3 F4
EXIT EDIT
LCD Cont.(1-5): 3
F1 F2 F3 F4
ESC LXW AREA
D
Select Item
Prn Cont. .(1-9): 5
Auto Off: 20 mins
Enable
NEXT
EXIT EDIT
Set Clock:
MM-DD-YY HH:MM:SS
NEXT
02-28-08 18: 29: 20
Set ID: Disable
ID: User Name
V
T
RH
WBT
VOL
MPS
C
%
C
CMM
F1 F2 F3 F4
MEAS MEM LOG SET
Welcome
F1 F2 F3 F4
EXIT EDIT
LCD Cont.(1-5): 3
F1 F2 F3 F4
ESC LXW AREA
D
Select Item
Prn Cont. .(1-9): 5
Auto Off: 20 mins
Enable
NEXT
EXIT EDIT
Set Clock:
MM-DD-YY HH:MM:SS
NEXT
02-28-08 18: 29: 20
Set ID: Disable
ID: User Name
V
T
RH
WBT
VOL
MPS
C
%
C
CMM
Fig. 2 Fig. 3

11
F1 F2 F3 F4
MEAS MEM LOG SET
Welcome
F1 F2 F3 F4
01:
F1 F2 F3 F4
ABORT SAVE
EXIT CLR BACK
06-30 23:56:49
EXIT MEAS EDIT NEXT
V:
T :
RH:
WBT :
VOL:
01:
T :
WBT :
29.7°C
RH:
73.7%
26.1°C 0.1CMM
VOL:
01:
V: 0.7MPS
T : 29.7°C
RH: 73.7%
WBT : 26.1°C
VOL: 0.1CMM
YES NO
06-30 23:56:49
01:
V: 0.7MPS
Clear?
WBT : 26.1°C
VOL: 0.1CMM
F1 F2 F3 F4
Fig. 4 Fig. 5
F1 F2 F3 F4
MEAS MEM LOG SET
Welcome
F1 F2 F3 F4
001:
F1 F2 F3 F4
ABORT SAVE
STOP MEAS ESC
02-13 04:56:49
EXIT START SET NEXT
V:
T :
RH:
WBT :
VOL:
T :
WBT :
29.7°C
RH:
73.7%
26.1°C0.1CMM
VOL:
01:
V: 0.7MPS
T : 29.7°C
RH: 73.7%
WBT : 26.1°C
VOL: 0.1CMM
EDIT VIEW
Begin: 02-13-08
F1 F2 F3 F4
Start: 04:25:36
End: 02-25-08
Suspend: 02:44:15
Rate: 60Sec(s)
Expect: 2400Points
Remain: 2300Points
EXIT NEXT
Press START to begin
V: 0.7MPS

12

1
Français
TMA40-A
Anémomètre
Mode d’emploi
TMA40-A_Rev002
© 2009 Amprobe Test Tools.
Tous droits réservés.

Limites de garantie et de responsabilité
Amprobe garantit l’absence de vices de matériaux et de fabrication de ce produit pendant une
période d’un an prenant effet à la date d’achat. Cette garantie ne s’applique pas aux fusibles, aux
piles jetables ni à tout produit mal utilisé, modifié, contaminé, négligé ou endommagé par accident
ou soumis à des conditions anormales d’utilisation et de manipulation. L’obligation de garantie
d’Amprobe est limitée, au choix d’Amprobe, au remboursement du prix d’achat ou à la réparation/
remplacement gratuit d’un produit défectueux. Les distributeurs agréés par Amprobe ne sont pas
autorisés à appliquer une garantie plus étendue au nom d’Amprobe. Pour bénéficier de la garantie,
renvoyez le produit accompagné d’un justificatif d’achat auprès d’un centre de services agréé par
Amprobe Test Tools ou d’un distributeur ou d’un revendeur Amprobe. Voir la section Réparation
pour tous les détails. LA PRESENTE GARANTIE EST LE SEUL ET EXCLUSIF RECOURS. TOUTES AUTRES
GARANTIES, EXPLICITES, IMPLICITES OU STATUTAIRES, NOTAMMENT LE CAS ECHEANT LES
GARANTIES DE QUALITE MARCHANDE OU D’ADAPTATION A UN OBJECTIF PARTICULIER, SONT
EXCLUES PAR LES PRESENTES. AMPROBE, LA SOCIÉTÉ MÈRE OU SES FILIALES NE PEUVENT EN AUCUN
CAS ÊTRE TENUES RESPONSABLES DES DOMMAGES PARTICULIERS, INDIRECTS, ACCIDENTELS OU
CONSÉCUTIFS, NI D’AUCUNS DÉGÂTS OU PERTES DE DONNÉES, SUR UNE BASE CONTRACTUELLE,
EXTRA-CONTRACTUELLE OU AUTRE. Etant donné que certaines juridictions n’admettent pas les
limitations d’une condition de garantie implicite, ou l’exclusion ou la limitation de dégâts accidentels
ou consécutifs, il se peut que les limitations et/ou les exclusions de cette garantie ne s’appliquent pas
à votre cas.
Réparation
Tous les outils de test renvoyés pour un étalonnage ou une réparation couverte ou non par la
garantie doivent être accompagnés des éléments suivants : nom, raison sociale, adresse, numéro
de téléphone et justificatif d’achat. Ajoutez également une brève description du problème ou du
service demandé et incluez les cordons de mesure avec l’appareil. Les frais de remplacement ou
de réparation hors garantie doivent être acquittés par chèque, mandat, carte de crédit avec date
d’expiration, ou par bon de commande payable à l’ordre de Amprobe® Test Tools.

3
➊ Sonde de ventilation avec capteurs
intégrés d’humidité et de températures
➋ Vis de montage sur trépied
➌ Ecran LCD
➍ Prise d’adaptateur c.c.
➎ Port USB
➏ Touches de fonction
F1 : Mode de mesure
F2 : Touche d’accès mémoire
F3 : Touche d’accès aux fichiers journaux
F4 : Appuyez sur cette touche pour
activer/désactiver la mise en veille, régler
la date et l’heure et définir les paramètres
à enregistrer.
➐ Clavier
1SYM correspond à « 1,*,.,:,$,+,-,= »
2ABC correspond à « 2,a,b,c,A,B,C »
3DEF correspond à « 3,d,e,f,D,E,F »
4GHI correspond à « 4,g,h,i,G,H,I »
5JKL correspond à « 5,j,k,l,J,K,L »
6MNO correspond à « 6,m,n,o,M,N,O »
7PQRS correspond à « 7,p,q,r,s,P,Q,R,S »
8TUV correspond à « 8,t,u,v,T,U,V »
9WXYZ correspond à « 9,w,x,y,z,W,X,Y,Z »
0 |__| correspond à « 0 » et « espace »
: Appuyer pour activer et désactiver le
rétroéclairage
: Appuyer pour positionner le curseur
sur la valeur précédente
: Appuyez pour positionner le curseur
sur la valeur suivante
ON/OFF : Appuyez sur ce bouton pour
mettre l’appareil hors tension et
sous tension.
F1 F2 F3 F4
1 SYM. 2 ABC DEF 3
4 GHI 5 JKL MNO 6
7 PQRS 8 TUV WXYZ 9
ON/OFF
0
MEAS: Normal (Single)
measurement
MEM : Manual record(99 points)
measurement
LOG : Automatic record (Logger)
measurement
SET : Logger, Unit, real time,
other setting
1
3
26
7
5
4

4
TMA40-A
Anémomètre
SOMMAIRE
Introduction .........................................................................................................................................5
Déballage et inspection .....................................................................................................................5
Fonctionnement ..................................................................................................................................5
Paramètres de l’anémomètre : SET (voir Fig. 2) ...........................................................................5
Description de l’écran de l’anémomètre (voir Fig. 2 et 3) ...........................................................5
Mesure simple : MEAS (voir Fig. 3) ...............................................................................................6
Mesure multiple : MEM (voir Fig. 4) .............................................................................................6
Consignation automatique : LOG (voir Fig. 5) .............................................................................6
Table de comparaison .........................................................................................................................7
Spécifications techniques ..................................................................................................................8
Utilisation du logiciel ..........................................................................................................................8
Dépannage ..........................................................................................................................................9

5
INTRODUCTION
Cet anémomètre est conçu avec trois modes de mesure :
Mesure monopoint1.
Mesure multipoint (enregistrement manuel)2.
Consignation automatique 3.
Mesurer/programmer partout à tout moment•
Une interface conviviale•
Le câble USB et le logiciel permettent de se connecter à un PC pour télécharger et •
transférer les données
Fonction de rétroéclairage•
Montage sur trépied pour utilisation à long terme•
Délai de mise en veille sélectionnable•
Matrice d’écran LCD à gros points•
Alimenté par 4 piles AAA ou un adaptateur 9 V (non inclus) (Connecteur : externe : •
5,5 mm ; interne : 2,1 mm ; centre positif) 0,05 mA maximum
DÉBALLAGE ET INSPECTION
Le carton d’emballage doit inclure les éléments suivants :
1 anémomètre TMA40-A
4 piles AAA
1 câble USB
1 CD Download Suite
1 étui de transport
FONCTIONNEMENT
Paramètres de l’anémomètre : SET (voir Fig. 2)
Appuyez sur F4 pour ouvrir la configuration de l’anémomètre.•
Appuyez sur • ou sur pour déplacer le curseur.
Appuyez sur EDIT pour passer en mode de modification.•
Appuyez sur NEXT/BACK pour passer à la page suivante ou précédente.•
Appuyez sur EXIT pour revenir au menu principal.•
Description de l’écran de l’anémomètre (voir Fig. 2 et 3)
LCD Cont. (1-5) : luminosité de l’écran LCD. Du plus sombre 1 au plus lumineux 5.1.
Auto Off : Arrêt automatique sélectionnable entre 1 et 20 minutes. 2.
Set Clock : Réglage de la date et de l’heure. Appuyez sur EDIT pour choisir le mois. Appuyez 3.
sur NEXT pour accepter ou sur ABORT pour annuler votre choix. Répétez l’opération pour
choisir le jour, l’année, l’heure, les minutes et les secondes.

6
Set ID: Appuyez sur EDIT pour activer ou désactiver l’identifiant.4.
ID : Appuyez sur EDIT pour entrer l’identifiant de l’utilisateur. Utilisez le clavier pour saisir 5.
les informations.
Remarque : Pour calculer le volume d’air, entrez d’abord la valeur pour la zone d’entrée d’air.
Trois modèles sont proposés. longueur x largeur (rectangle) ; diamètre (cercle) ; et zone.
Zone de 0~300 cm (rectangle et cercle) et de 0~90000 cm2 en surface.
Mesure simple : MEAS (voir Fig. 3)
Appuyez sur F1 pour passer en mode de mesure simple.•
Appuyez sur F2 pour sélectionner le type d’entrée.•
Appuyez sur ESC pour revenir au menu précédent.•
Mesure multiple : MEM (voir Fig. 4)
Ce mode permet d’enregistrer manuellement les mesures en temps réel et d’associer un nom de
fichier à l’enregistrement. Ce mode offre un total de 99 emplacements mémoire.
Appuyez sur F2 pour passer en mode de mesures multiples.•
Appuyez sur F2 (MEAS) pour lancer une mesure.•
Appuyez sur ABORT (F1) pour annuler la mesure.•
Appuyez sur SAVE (F4) pour enregistrer l’enregistrement.•
Appuyez sur F3 (EDIT) pour modifier le nom de fichier de la valeur enregistrée. Utilisez les •
touches pour saisir le nom. Maintenez la touche enfoncée pour passer d’un caractère à
l’autre. Relâchez la touche pour sélectionner le caractère souhaité.
Appuyez sur CLR (F2) pour supprimer le caractère sélectionné.•
Maintenez CLR (F2) enfoncé pendant plus de 2 secondes pour effacer la mémoire.•
Consignation automatique : LOG (voir Fig. 5)
Ce mode permet d’enregistrer les données automatiquement en fonction des paramètres
configurés avant une mesure en temps réel.
Appuyez sur F3 (LOG) pour passer en mode LOG.•
Appuyez sur SET (F3) pour configurer les paramètres pour l’enregistrement.•
Appuyez sur les touches • pour sélectionner un paramètre.
Appuyez sur EDIT pour modifier la date de début Begin, l’heure de début Start, la date de •
fin End, le temps de pause Suspend et le débit Rate (1 à 200 secondes).
Les valeurs Expect de 2400 points (mémoire totale) et Remain (mémoire restante) seront •
calculées à partir du paramétrage défini.
Appuyez sur NEXT.•
Appuyez sur START pour lancer la session d’enregistrement.•
Appuyez sur VIEW pour afficher les données d’enregistrement.•
Appuyez sur MEAS pour afficher la mesure des données en temps réel.•
Appuyez sur ESC pour revenir au menu précédent.•
Appuyez sur STOP pour suspendre la séance d’acquisition.•

7
Appuyez sur NEXT.•
Appuyez sur P-PG (page précédente) ou N-PG (page suivante) pour afficher respectivement •
les 100 points précédents ou suivants.
Appuyez sur BACK.•
Appuyez sur EXIT pour revenir au menu principal.•
TABLE DE COMPARAISON
Mesure Description Point mémoire
Monopoint Mesure à un point Pas de mémoire
Multipoint Nom de fichier modifiable
Mesure à plusieurs points 99 points
Consignation
automatique
Programmable
Acquisition des données 2400 points
Mesure multipoint Acquisition des données
Enregistrer 99 points 2400 points
Nom de fichier Modifiable ou défini par défaut
sur la date et l’heure (Note 1) Par défaut (Note 2)
Mesure/
Echantillonnage
Appuyez sur MEAS pour
mesurer et archiver
Mesure et archivage
automatique selon les
paramètres prédéfinis (Note 3)
Note 1 : Le fichier d’enregistrement utilise la date et l’heure courantes pour le nom de fichier si
l’utilisateur ne le modifie pas.
Exemple : « 05-06 09:21:51 » signifie que l’enregistrement a été réalisé le 6 mai à 09:21:51 ou
le 5 juin à 09:21:51 selon le format de date configuré.
Note 2 : Chaque fichier d’enregistrement utilise l’heure et la date pour le nom de fichier.
Note 3 : L’anémomètre démarre et arrête l’enregistrement aux dates et aux heures prédéfinies.
Si l’heure prédéfinie est inférieure à 24 heures et si la date de fin est à venir, l’anémomètre
s’arrête à l’heure de fin et redémarre le jour suivant jusqu’à la date de fin ou jusqu’à la
saturation de la mémoire.
a) Réglez la date et l’heure de début
b) Réglez la date et l’heure de fin
c) Réglez la fréquence d’échantillonnage
d) Pour enregistrer 24 heures par jour, réglez START sur 00:00:00 et SUSPEND sur 23:59:59
Sidan laddas...
Sidan laddas...
Sidan laddas...
Sidan laddas...
Sidan laddas...
Sidan laddas...
Sidan laddas...
Sidan laddas...
Sidan laddas...
Sidan laddas...
Sidan laddas...
Sidan laddas...
Sidan laddas...
Sidan laddas...
Sidan laddas...
Sidan laddas...
Sidan laddas...
Sidan laddas...
Sidan laddas...
Sidan laddas...
Sidan laddas...
Sidan laddas...
Sidan laddas...
Sidan laddas...
Sidan laddas...
Sidan laddas...
Sidan laddas...
Sidan laddas...
Sidan laddas...
Sidan laddas...
Sidan laddas...
Sidan laddas...
Sidan laddas...
Sidan laddas...
Sidan laddas...
Sidan laddas...
Sidan laddas...
Sidan laddas...
Sidan laddas...
Sidan laddas...
Sidan laddas...
Sidan laddas...
Sidan laddas...
Sidan laddas...
Sidan laddas...
Sidan laddas...
Sidan laddas...
Sidan laddas...
Sidan laddas...
Sidan laddas...
Sidan laddas...
Sidan laddas...
Sidan laddas...
Sidan laddas...
-
 1
1
-
 2
2
-
 3
3
-
 4
4
-
 5
5
-
 6
6
-
 7
7
-
 8
8
-
 9
9
-
 10
10
-
 11
11
-
 12
12
-
 13
13
-
 14
14
-
 15
15
-
 16
16
-
 17
17
-
 18
18
-
 19
19
-
 20
20
-
 21
21
-
 22
22
-
 23
23
-
 24
24
-
 25
25
-
 26
26
-
 27
27
-
 28
28
-
 29
29
-
 30
30
-
 31
31
-
 32
32
-
 33
33
-
 34
34
-
 35
35
-
 36
36
-
 37
37
-
 38
38
-
 39
39
-
 40
40
-
 41
41
-
 42
42
-
 43
43
-
 44
44
-
 45
45
-
 46
46
-
 47
47
-
 48
48
-
 49
49
-
 50
50
-
 51
51
-
 52
52
-
 53
53
-
 54
54
-
 55
55
-
 56
56
-
 57
57
-
 58
58
-
 59
59
-
 60
60
-
 61
61
-
 62
62
-
 63
63
-
 64
64
-
 65
65
-
 66
66
-
 67
67
-
 68
68
-
 69
69
-
 70
70
-
 71
71
-
 72
72
-
 73
73
-
 74
74


Amprobe AMTMA40-A Användarmanual
- Kategori
- Mätning, testning
- Typ
- Användarmanual
- Denna manual är också lämplig för
på andra språk
- italiano: Amprobe AMTMA40-A Manuale utente
- español: Amprobe AMTMA40-A Manual de usuario
- Deutsch: Amprobe AMTMA40-A Benutzerhandbuch
- français: Amprobe AMTMA40-A Manuel utilisateur
- English: Amprobe AMTMA40-A User manual
Relaterade papper
-
Amprobe TMA40-A Airflow Anemometer Användarmanual
-
-
Amprobe TMA40-A Användarmanual
-
-
-
-

