AEG EA 150 Användarmanual
- Kategori
- Kaffebryggare
- Typ
- Användarmanual
Denna manual är också lämplig för

EA 150
Espressoautomat
Automatic Espresso Machine
Cafetière automatique expresso
Máquina de espresso
Máquina de Café Expresso Automática
Automatisk espresso maskin
Espressoautomaatti
Àâòîìàòè÷åñêàÿ êîôåâàðêà ýñïðåññî
Automat na espreso
Ekspres ciœnieniowy
Automata presszókávéfõzõ-gép
Ìç÷áíÞ ôïõ åóðñÝóóï
Gebrauchsanweisung
Operating Instructions
Notice d’utilisation
Instrucciones de uso
Manual de Instruções
Bruksanvisning
Käyttöohje
Èíñòðóêöèÿ ïî ýêñïëóàòàöèè
Návod k použití
Instrukcja obs³ugi
Használati utasítás
Ïäçãßåò ×ñÞóçò
EA150.book Seite 1 Montag, 14. März 2005 10:37 10

2
3
4
2
3
4
2
1
EA150.book Seite 2 Montag, 14. März 2005 10:37 10

3
9
10
8
4
5
3
1614
15
13
12
11
6
7
5
EA150.book Seite 3 Montag, 14. März 2005 10:37 10

d
4
d
Sehr geehrte Kundin,
sehr geehrter Kunde,
lesen Sie bitte diese Gebrauchsanwei-
sung sorgfältig durch. Beachten Sie vor
allem die Sicherheitshinweise! Bewah-
ren Sie sie zum späteren Nachschlagen
auf.
Geben Sie die Gebrauchsanweisung
auch an eventuelle Nachbesitzer des
Gerätes weiter.
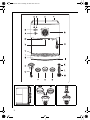
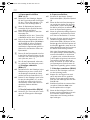
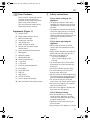
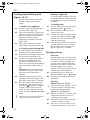
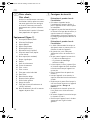
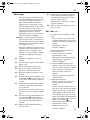
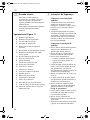
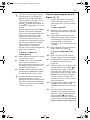
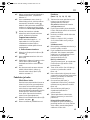
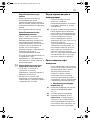
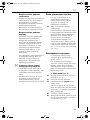
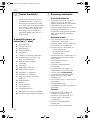
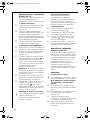
Ausstattung (Bild 1)
A Ein-/Aus-Schalter
B Wasser-/Dampf-Wahlschalter
C Betriebsanzeige
D Temperaturanzeige
E Tassenabstellfläche
F Wassertank (auf der Rückseite)
G Drehwähler für Kaffee, Dampf
und Heißwasser
H Aufschäumdüse (mit Aufsatz)
I Typschild
K Messlöffel
L Wartungshilfe
M Kaffeemehlpresser
N 1-Tassen-Sieb
O 2-Tassen-Sieb
P Sieb für Portionsbeutel
Q Siebträger
R Fingerschutz
S Tropfschale
T Tropfgitter
U Füllstandsanzeige
V Sieb im Brühkopf (innen)
W Brühkopf mit Siebträgeraufnahme
1 Sicherheitshinweise
Sicherheit beim Aufstellen
• Das Gerät muss standsicher stehen.
Achten Sie auf eine gerade und waage-
rechte Aufstellfläche.
• Das Gerät darf nur an ein Stromnetz
angeschlossen werden, dessen Span-
nung, Stromart und Frequenz mit den
Angaben auf dem Typschild (siehe
Unterseite des Gerätes) übereinstim-
men!
Sicherheit beim Betrieb
• Das Netzkabel nie mit heißen Geräte-
teilen in Berührung bringen!
• Den Netzstecker nie am Kabel aus der
Steckdose ziehen!
• Das Gerät nicht in Betrieb nehmen,
wenn:
– das Kabel beschädigt ist oder
– das Gehäuse sichtbare Beschädig-
gen aufweist.
• Aufschäumdüse, Sieb, Siebträger und
Siebhalterung werden funktionsbe-
dingt während des Betriebes heiß.
• Bitte Kinder fernhalten!
• Funktionsbedingt wird das Metallge-
häuse während des Betriebs warm.
• Den Siebträger nicht während des
Brühvorganges entnehmen, da das
Gerät unter Druck steht! Verbren-
nungsgefahr!
• Den Wassertank nur mit kaltem Wasser
füllen, niemals mit Milch oder anderen
Flüssigkeiten!
• Gerät nicht in Betrieb nehmen, wenn
der Wassertank nicht gefüllt ist!
• Gerät nicht ohne Tropfschale oder
Tropfgitter betreiben!
Sicherheit bei der Reinigung
• Vor Wartung oder Reinigung sicher-
stellen, dass das Gerät ausgeschaltet
und der Netzstecker gezogen ist!
• Entkalkungshinweise beachten!
• Das Gerät nicht in Wasser tauchen!
EA150.book Seite 4 Montag, 14. März 2005 10:37 10

d
5
Sicherheit bei Reparatur
Reparaturen an diesem Gerät dürfen
nur von Fachkräften durchgeführt
werden. Durch unsachgemäße Repara-
turen können erhebliche Gefahren ent-
stehen. Wenden Sie sich im
Reparaturfall an den Kundendienst
oder an Ihren autorisierten Fachhänd-
ler.
Wird das Gerät zweckentfremdet
benutzt oder falsch bedient, kann
keine Haftung für eventuelle Schäden
übernommen werden.
;
Dieses Gerät entspricht den folgen-
den EG-Richtlinien:
• 73/23/EWG vom 19.02.1973 „Nieder-
spannungsrichtlinie", einschließlich
Änderungsrichtlinie 93/68/EWG
• 89/336/EWG vom 03.05.1989 „EMV-
Richtlinie", einschließlich Änderungs-
richtlinie 92/31/EWG
Vor dem ersten Gebrauch
Lesen Sie bitte die Sicherheitshinweise,
um Gefahren für Sie selbst und
Beschädigungen am Gerät zu vermei-
den.
0 Stecken Sie den Netzstecker in die
Steckdose.
Vor der ersten Espressozubereitung
sollten Sie das Heizsystem einmal mit
einer Tankfüllung durchspülen. Verfah-
ren Sie dazu genau so, wie unter dem
Abschnitt „Espresso zubereiten“ bzw.
„Milch aufschäumen“ beschrieben,
ohne jedoch Espressomehl in das Sieb
zu geben. Stellen Sie ein möglichst
großes Gefäß in die Mitte des Tropfgit-
ters (Bild 1/T) und unter die Auf-
schäumdüse (Bild 1/H).
Espresso zubereiten
Nach dem Aufbrühen sollte der
Espresso von einer dichten, schaumi-
gen Schicht, der sogenannten Crema,
bedeckt sein.
Wichtig für einen aromatischen
Espresso mit Crema sind frisches, klares
Wasser, der richtige Mahlgrad und die
Wassertemperatur.
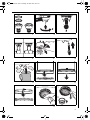
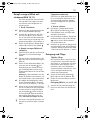
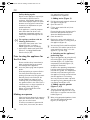
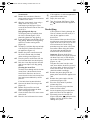
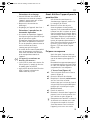
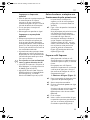
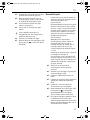
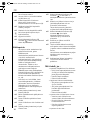
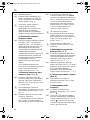
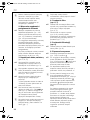
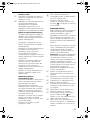
1. Wasser einfüllen (Bild 2)
0 Ziehen Sie den Wassertank nach oben
aus dem Gerät (Bild 2).
0 Öffnen Sie den Tankdeckel.
0 Befüllen Sie den Wassertank nur mit
kaltem, klarem Wasser.
Achten Sie darauf, dass der Wasserpe-
gel nicht unter der Marke MIN (Mini-
mum) und nicht über der Marke MAX
(Maximum) steht.
0 Schließen Sie den Deckel.
0 Setzen Sie den Wassertank wieder ein
und drücken Sie ihn nach unten, so
dass er fest im Gerät sitzt (Bild 2).
3
Sie können den Tankdeckel auch anhe-
ben und zur Seite klappen. So können
Sie den Wassertank auch direkt am
Gerät, z.B. mit einer Kanne, befüllen.
2. Gerät einschalten/Tassen vor-
wärmen
0 Schalten Sie das Gerät mit dem Ein-/
Aus-Schalter ein (Bild 1/A). Die
Betriebsanzeige (Bild 1/C, rot) und die
Temperaturanzeige (Bild 1/D, orange)
leuchten.
Sobald die Betriebstemperatur erreicht
ist, erlischt die Temperaturanzeige. Die
Temperaturanzeige kann während des
Betriebs wieder aufleuchten zum Zei-
chen, dass das Gerät nachheizt.
Sie können eine oder mehrere Tassen
mit der Öffnung nach unten auf die
Tassenabstellfläche stellen (Bild 1/E).
EA150.book Seite 5 Montag, 14. März 2005 10:37 10

d
6
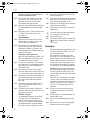
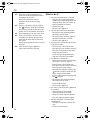
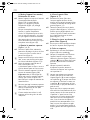
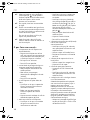
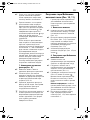
3. Espressomehl einfüllen
(Bild 3,4,5)
0 Nehmen Sie den Siebträger, klappen
Sie den Fingerschutz zurück und legen
Sie das 1-Tassen-Sieb oder das 2-Tas-
sen-Sieb in den Siebträger (Bild 3).
3
Wenn Sie Portionsbeutel benutzen,
verwenden Sie das Sieb für Portions-
beutel (Bild 1P und Bild 5).
0 Füllen Sie Espressomehl in das Sieb.
Verwenden Sie:
1 Meßlöffel voll für das 1-Tassen-Sieb,
2 Meßlöffel voll für das 2-Tassen Sieb.
0 Pressen Sie das Espressomehl mit dem
Kaffeemehlpresser (Bild 1/M) leicht in
das Sieb (Bild 4). Achten Sie darauf,
dass nach dem Pressen das Sieb bis
zum Rand mit Espressomehl gefüllt ist.
Säubern Sie den Rand des Siebes von
Espressomehl.
3
Pressen Sie das Espressomehl nicht fest
in das Sieb! In diesem Fall kann sich der
Durchfluss sehr stark verringern. (Siehe
auch „Was tun, wenn ...“)
3
Falls Sie das Espressomehl selbst mah-
len, wählen Sie den Mahlgrad „mittel“.
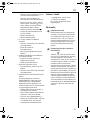
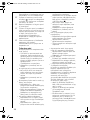
4. Siebträger eindrehen
(Bild 6,7)
0 Positionieren Sie den Siebträger in der
Siebhalterung so, dass sich der Griff
des Siebträgers unterhalb des linken
weißen Dreiecks befindet (Bild 6,“1“).
0 Drehen Sie den Siebträger nach rechts
bis zum Anschlag (Bild 6,“2“), so dass
der Griff nach vorne zeigt und sich
unterhalb der weißen Linie zwischen
den beiden Punkten befindet
(Bild 7,“3“).
5. Tasse(n) unterstellen (Bild 8)
0 Stellen Sie eine Tasse oder zwei Tassen
unter die Öffnungen des Siebträgers
(Bild 8).
6. Espresso aufbrühen
0 Schalten Sie den Wasser-/Dampf-
Wahlschalter (Bild 1/B) auf das Symbol
.
0 Wenn das Gerät die Betriebstempera-
tur erreicht hat, drehen Sie den Dreh-
wähler (Bild 1/G) auf das Symbol .
Das Wasser wird jetzt mit hohem Druck
durch das Espressomehl gepresst.
0 Wenn die gewünschte Menge Espresso
aufgebrüht ist, den Drehwäler zurück
nach links auf die Position "•" drehen.
3
Beachten Sie bitte, dass bei der Espres-
sozubereitung der Wasser-Dampf-
Wahlschalter (Bild 1/B) immer auf der
Position steht. Wird der Espresso auf
der Position gebrüht, kann durch die
höhere Brühtemperatur der Geschmack
des Kaffees beeinträchtigt werden.
Nach jeder Espressozubereitung oder
nach jedem Dampf-/Heißwasserbezug,
wenn der Drehwähler in die Position
„•“ gedreht wird, wird das Restwasser
in die Tropfschale geleitet. Jede weitere
Tasse wird mit frischem Wasser ge-
brüht. So erhalten Sie immer den vol-
len Espressogenuss. Deshalb muss die
Tropfschale regelmäßig geleert werden.
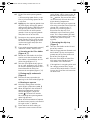
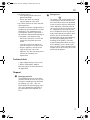
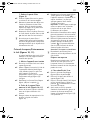
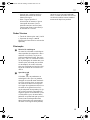
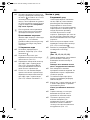
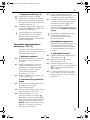
7. Siebträger entnehmen (Bild 9)
0 Drehen Sie den Siebträger nach links
aus der Halterung heraus.
0 Klappen Sie den Fingerschutz nach
vorne und halten Sie ihn gedrückt.
Klopfen Sie das gebrauchte Espresso-
mehl aus dem Siebträger bzw. aus dem
Sieb (Bild 9).
0 Siebhalter und Sieb mit warmem Was-
ser spülen. Siebhalter nicht in der
Geschirrspülmaschine reinigen!
3
Wenn das Gerät längere Zeit nicht
benutzt wird, den Siebträger nicht wie-
der eindrehen. Dadurch wird die
Lebensdauer der Dichtung am Brüh-
kopf verlängert.
EA150.book Seite 6 Montag, 14. März 2005 10:37 10

d
7
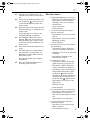
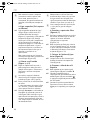
Dampf erzeugen/Milch auf-
schäumen (Bild 10,11)
Der heiße Dampf kann zum Aufschäu-
men von Milch für Cappuccino sowie
zum Erhitzen von Flüssigkeiten ver-
wendet werden.
1. Gerät einschalten
0 Stecken Sie den mitgelieferten Aufsatz
auf die Aufschäumdüse (Bild 10).
0 Schalten Sie das Gerät mit dem Ein-/
Aus-Schalter (Bild 1/A) ein. Warten
Sie, bis das Gerät seine Betriebstempe-
ratur erreicht hat und die orange Tem-
peraturanzeige (Bild 1/D) erloschen ist.
0 Stellen Sie den Wasser-/Dampf-Wahl-
schalter (Bild 1/B) auf das Symbol .
2. Dampf erzeugen/Milch auf-
schäumen
0 Füllen Sie Milch oder die zu erhitzende
Flüssigkeit in ein hitzebeständiges
Gefäß.
0 Tauchen Sie die Aufschäumdüse in die
Milch bzw. die zu erhitzende Flüssigkeit
(Bild 11).
0 Stellen Sie den Drehwähler (Bild 1/G)
nach links auf das Symbol . Das
Gerät beginnt jetzt, Dampf zu erzeu-
gen. Zu Anfang können noch einige
Tropfen heißes Wasser mit aus der Düse
austreten.
Wichtig: Die Aufschäumdüse darf den
Boden des Gefäßes nicht berühren, um
den Dampfaustritt nicht zu behindern.
0 Sie stoppen die Dampfzufuhr, indem
Sie den Drehwähler (Bild 1/G) wieder
nach rechts in die Position „•“ bringen.
0 Stellen Sie die aufgeschäumte Flüssig-
keit ab und drehen Sie den Dampfwäh-
ler noch einmal für einige Sekunden
auf das Symbol . Damit entfernen
Sie eventuelle Rückstände von Milch
oder anderen Flüssigkeiten aus der
Düse. Vorsicht! Der Dampf ist heiß.
3
Für feinen, cremigen Milchschaum ver-
wenden Sie am besten kühle, fettarme
Milch.
Cappuccino zubereiten
Füllen Sie eine große Kaffeetasse zu ½
bis ¾ mit Espresso. Geben Sie die auf-
geschäumte Milch darüber. Stäuben
Sie etwas Kakaopulver auf den Milch-
schaum.
3. Wasser erhitzen
0 Den Wasser-/Dampf-Wahlschalter
(Bild 1/B) auf die Position stellen.
0 Einen Behälter unter die Aufschäum-
düse (Bild 1/H) stellen.
0 Den Drehwähler für Kaffee, Dampf und
Heißwasser (Bild 1/G) auf die Position
stellen. Aus der Aufschäumdüse
tritt heißes Wasser aus.
0 Nachdem die gewünschte Menge Heiß-
wasser bezogen wurde, den Drehwähler
für Kaffee, Dampf und Heißwasser (Bild
1/G) wieder auf die Position „•“ stellen.
Reinigung und Pflege
Tägliche Pflege
Wir empfehlen Ihnen, täglich vor dem
ersten und nach dem letzten Espresso
das System ca. 10 Sekunden lang ohne
Espressomehl durchzuspülen, um zu
vermeiden, dass sich Kaffeepartikel
festsetzen können. Verfahren Sie dazu
wie bei der Espressozubereitung,
jedoch ohne Espressomehl.
0 Stellen Sie danach den Drehwähler
(Bild 1/G) kurz auf die Position .
0 Gießen Sie restliches Wasser aus dem
Wassertank.
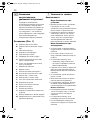
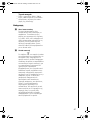
Reinigung (Bild 12,13,14,15,16)
1
Schalten Sie vor jeder Reinigung das
Gerät aus und ziehen Sie den Netzste-
cker!
EA150.book Seite 7 Montag, 14. März 2005 10:37 10

d
8
Reinigen Sie kein Teil des Gerätes in
der Geschirrspülmaschine!
0 Wischen Sie alle Flächen an der Ma-
schine mit einem feuchten Tuch ab.
Benutzen Sie keine scharfen oder
scheuernden Reinigungsmittel.
0 Spülen Sie den Wassertank mindestens
einmal pro Woche in normalem Spül-
wasser.
0 Reinigen Sie das 1-Tassen-Sieb und das
2-Tassen-Sieb von Zeit zu Zeit mit
einer Bürste.
Aufschäumdüse
0 Ziehen Sie den Aufsatz von der Auf-
schäumdüse und spülen Sie den Auf-
satz in normalem Spülwasser.
0 Wischen Sie die Aufschäumdüse mit
einem feuchten Tuch sauber. Mit der
Wartungshilfe (Bild 1/L) können Sie
den Düsenkopf zum Säubern oder Ent-
kalken abschrauben.
Tropfgitter und Tropfschale
Wenn die Füllstandsanzeige (Bild 1/U)
über das Tropfgitter hinausragt, muss
die Tropfschale geleert werden.
0 Greifen Sie in die Löcher des Tropfgit-
ters. Nehmen Sie das Tropfgitter heraus
und spülen Sie es unter fließendem
Wasser (Bild 12).
0 Zum Entleeren fassen Sie die Tropf-
schale an beiden Seiten und ziehen Sie
sie nach vorne aus dem Gerät (Bild 13).
0 Nehmen Sie den Kunststoffaufsatz mit
der Füllstandsanzeige ab und spülen
Sie beides unter fießendem Wasser
(Bild 14).
0 Setzen Sie den Kunststoffaufsatz mit
der Füllstandsanzeige wieder in die
Tropfschale ein.
0 Schieben Sie die saubere Tropfschale
zurück in das Gerät und setzen Sie das
Tropfgitter wieder ein.
Brühsieb reinigen
Am Brühkopf befindet sich das Brüh-
sieb, durch das das heiße Wasser
strömt. Untersuchen Sie von Zeit zu
Zeit, ob sich die Löcher des Brühsiebs
mit Kaffeepartikeln zugesetzt haben.
Falls sich die Löcher zugesetzt haben:
0 Schrauben Sie das Brühsieb mit einer
Münze ab (Bild 15).
0 Entnehmen Sie Brühsieb und Dichtung
(Bild 16/1) und entfernen Sie die Dich-
tung des Brühsiebs (Bild 16/2).
0 Reinigen Sie das Brühsieb mit warmem
Wasser und einer Bürste.
0 Spülen Sie die Dichtung mit warmem
Spülwasser.
3
Wenn das Gerät bei Minustemperatu-
ren transportiert werden soll:
0 Wassertank leeren.
0 Drehwähler (Bild 1/G) auf die Position
drehen und das Gerät „ausdamp-
fen“ lassen.
Entkalken
Wenn der Espresso ungewöhnlich lang-
sam durch den Filter läuft, ist es Zeit
für eine Entkalkung.
Wir empfehlen, die Maschine jedes
Vierteljahr mit Flüssigentkalker zu ent-
kalken. Wenn Sie in einer Gegend mit
hartem Wasser wohnen, muss die Ent-
kalkung evtl. öfter durchgeführt wer-
den. Beachten Sie dabei die Angaben
des Herstellers des Entkalkungsmittels.
Wichtig: Entfernen Sie vor dem Ent-
kalken das Brühsieb (Bild 1/V) und die
Dichtung des Brühsiebes, wie im Ab-
schnitt „Brühsieb reinigen“ beschrieben
(Bild 15, 16).
Füllen Sie erst das Wasser in den Was-
sertank, dann den Entkalker, niemals
umgekehrt. Es müssen mindestens 0,5 l
Wasser verwendet werden. Entspre-
chend ist das Entkalkungsmittel zu
dosieren.
0 Ziehen Sie den Netzstecker aus der
Steckdose und lassen Sie das Gerät
abkühlen.
0 Entfernen Sie die Aufschäumdüse mit
Aufsatz (Bild 1/H).
0 Setzen Sie den Siebträger ohne Sieb
ein.
0 Stellen Sie einen ausreichend großen
Behälter unter den Siebträger.
EA150.book Seite 8 Montag, 14. März 2005 10:37 10

d
9
0 Stecken Sie den Netzstecker in die
Steckdose und schalten Sie das Gerät
ein.
0 Stellen Sie den Drehwähler (Bild 1/G)
auf die Position und lassen Sie ca.
¼ der Entkalkungslösung durch das
System laufen.
0 Danach das Gerät ausschalten und die
Entkalkungslösung ca. 10 Minuten ein-
wirken lassen.
Diesen Vorgang mit weiteren ¼ der
Entkalkungslösung wiederholen.
0 Den Drehwähler (Bild 1/G) auf die
Position stellen. Die restliche Ent-
kalkungslösung über die Düse laufen
lassen und wiederum 10 Minuten ein-
wirken lassen.
0 Danach den Wassertank gründlich rei-
nigen.
0 Den Wassertank mit frischem Wasser
füllen und die eine Hälfte über den
Brühkopf, die andere Hälfte über die
Düse laufen lassen.
Bei starker Verkalkung den Vorgang
wiederholen.
0 Nach dem Entkalken Brühsieb und
Dichtung wieder einsetzen.
Was tun, wenn ...
• die Espressotemperatur zu niedrig ist:
– Führen Sie einen Brühvorgang ohne
Espressomehl, aber mit Sieb und
Siebträger durch, um das System
vorzuwärmen.
– Tassen vorwärmen.
–Gerät entkalken.
• sich die Durchlaufgeschwindigkeit
merklich verringert:
– Espressomehl nicht zu fest ins Sieb
pressen.
– Espressomehl nicht zu fein mahlen
(Mahlgrad „mittel“).
–Gerät entkalken.
• der Espresso seitlich aus dem Siebträ-
ger herausläuft:
– Sicherstellen, daß der Siebträger
richtig im Haltering eingesetzt ist.
– Siebträger etwas fester im Haltering
eindrehen.
– Den Rand des Siebträgers von
Espressomehl reinigen.
• kein Espresso austritt:
– Sicherstellen, daß der Wassertank
gefüllt und richtig eingesetzt ist.
– Sicherstellen, daß der Siebträger
richtig im Haltering eingesetzt ist.
– Sicherstellen, dass sich der Wasser-/
Dampf-Wahlschalter (Bild 1/B) in
der Position befindet und der
Drehwähler für Wasser, Dampf und
Heißwasser (Bild 1/G) nach rechts
auf die Position gedreht wurde.
– Espressomehl nicht zu fest in das
Sieb pressen.
– Brühsieb reinigen.
–Gerät entkalken.
• die Cremabildung sich verschlechtert:
– Sicherstellen, daß sich ausreichend
Espressomehl im Sieb befindet.
– Stets frisches Espressomehl verwen-
den.
– Espressomehl leicht andrücken.
• zu wenig Schaum beim Milchauf-
schäumen entsteht:
– Stets kühle, frische und fettarme
Milch verwenden.
– Aufschäumdüse reinigen.
EA150.book Seite 9 Montag, 14. März 2005 10:37 10

d
10
• der Durchlauf sich erhöht:
– Epressomehl ist zu grob gemahlen:
– Sicherstellen, dass sich ausreichend
Espressomehl im Sieb befindet.
• die Kaffemaschine sich während des
Betriebes ausschaltet:
Die Pumpe des Gerätes ist mit einer
Temperatursicherung ausgestattet, die
es vor Überhitzung schützt. Die Tempe-
ratursicherung unterbricht den Betrieb
der Maschine, wenn die Maschine zu
lange ohne Pause betrieben wurde
oder wenn die Pumpe ohne Wasser
gelaufen ist.
– Stellen Sie den Ein- /Aus-Schalter
auf „Aus“ und ziehen Sie den Netz-
stecker aus der Steckdose.
– Lassen Sie die Maschine mindestens
20 Minuten abkühlen. Füllen Sie
Wasser nach.
– Schließen Sie das Gerät wieder ans
Stromnetz an und schalten Sie es
ein. Falls das Gerät jetzt nicht wieder
funktioniert, wenden Sie sich an
unseren Kundendienst.
Technische Daten
• Anschlussspannung: 230 V, 50 Hz
• Leistungsaufnahme: 1000 W
(Siehe Typenschild sich auf der Geräte-
unterseite.)
Entsorgung
2 Verpackungsmaterial
Die Verpackungsmaterialien sind
umweltverträglich und wiederverwert-
bar. Die Kunststoffteile sind gekenn-
zeichnet, z. B. >PE<, >PS< etc.
Entsorgen Sie die Verpackungsmateria-
lien entsprechend ihrer Kennzeichnung
bei den kommunalen Entsorgungsstel-
len in den dafür vorgesehenen Sam-
melbehältern.
2 Altgerät
Das Symbol W auf dem Produkt
oder seiner Verpackung weist darauf
hin, dass dieses Produkt nicht als nor-
maler Haushaltsabfall zu behandeln ist,
sondern an einem Sammelpunkt für
das Recycling von elektrischen und
elektronischen Geräten abgegeben
werden muss. Durch Ihren Beitrag zum
korrekten Entsorgen dieses Produkts
schützen Sie die Umwelt und die Ge-
sundheit Ihrer Mitmenschen. Umwelt
und Gesundheit werden durch falsches
Entsorgen gefährdet. Weitere Informa-
tionen über das Recycling dieses Pro-
dukts erhalten Sie von Ihrem Rathaus,
Ihrer Müllabfuhr oder dem Geschäft, in
dem Sie das Produkt gekauft haben.
Im Service-Fall
Bei einer evtl. erforderlichen Reparatur,
einschließlich Ersatz der Netzzuleitung,
wenden Sie sich bitte zunächst telefo-
nisch an unsere Serviceline AEG-
Electrolux.
Für Deutschland: 01805- 30 60 80*:
*aus dem Festnetz der Deutschen Telekom Euro 0,12/Min.
Für Österreich:
Für Reparaturservice: 0810-955 400 *
Für Produktservice: 0810-955 200*
*aus dem Festnetz der TELEKOM AUSTRIA Euro 0,10/Min
EA150.book Seite 10 Montag, 14. März 2005 10:37 10

g
11
g
Dear Customer,
Please read this instruction manual
carefully. Please pay particular
attention to the safety instructions.
Retain it for future reference.
Give the instruction manual to any
future owner of the machine.
Equipment (Figure 1)
A On/off switch
B Water/steam selection switch
C Power indicator light
D Temperature indicator
E Cup storage area
F Water tank (at the rear)
G Selector dial for coffee, steam
and hot water
H Steam nozzle (with attachment)
I Rating plate
K Measuring spoon
L Maintenance tool
M Ground coffee presser
N 1-cup filter
O 2-cup filter
P Filter for prepacked portions
Q Filter holder
R Finger protector
S Drip tray
T Drip grating
U Fill level indicator
V Filter in brew head (inside)
W Brew head with filter holder retainer
1 Safety instructions
Safety when setting up the
appliance
• The appliance must be stable when
standing. Check that the site at which
the appliance is to be installed is even
and level.
• The appliance may only be connected
to a mains supply which has a voltage,
electricity type and frequency that
complies with the specifications on the
rating plate (see underside of the
appliance).
Safety when operating the
appliance
• Never bring the electrical cord in
contact with hot components of the
appliance.
• Never remove the power plug from the
power point by pulling on the cord.
• Do not use the appliance if:
– the cord is damaged or
– there is visible damage to the
housing.
• The steam nozzle, filter, filter holder
and retainer necessarily become hot
during use.
• Ensure that children are kept away.
• The metal housing will necessarily
become warm during use.
• Do not remove the filter holder during
the brewing process as the appliance is
pressurised. The risk of burns exists.
• Fill the water tank only with cold
water, never with milk or other liquids.
• Do not use the appliance if the water
tank has not been filled.
• Do not use the appliance without the
drip tray or the drip grating.
Safety during cleaning
• Prior to maintenance or cleaning
ensure that the appliance has been
switched off and that the power plug
has been disconnected.
• Follow the instructions referring to
decalcification.
• Do not immerse the appliance in water.
EA150.book Seite 11 Montag, 14. März 2005 10:37 10

g
12
Safety during repairs
Repairs to this appliance may only be
carried out by qualified service
engineers. Considerable danger may
result from improper repairs. If repairs
become necessary, please contact the
Customer Care Department or your
authorised dealer.
If the appliance is used for purposes
other than those for what it was
intended or is operated wrongly, no
liability for possible damages can be
accepted.
;
This appliance conforms with the
following EU Directives:
• 73/23/EEC dated 19.02.1973 “Low
Voltage Directive”, including
Modification Directive 93/68/EEC
• 89/336/EEC dated 03.05.1989 “EMC
Directive”, including Modification
Directive 92/31/EEC
Prior to using the appliance for
the first time
Please read the safety instructions in
order to prevent danger to yourself
and damage to the appliance.
0 Insert the power plug into the power
outlet.
Prior to preparing an espresso for the
first time you should rinse out the
heating system once by filling the tank.
Proceed exactly as described in the
section “Making an espresso” and
“Frothing milk”, but without placing
any ground coffee in the filter. Place a
container that is as large as possible in
the middle of the drip grating
(figure 1/T) and under the steam
nozzle (figure 1/H).
Making an espresso
After having been brewed, the espresso
should be covered with a dense frothy
layer, the so-called crema.
To achieve an aromatic espresso with
crema, fresh, clear water, the correct
size grounds and the water
temperature are important.
1. Adding water (Figure 2)
0 Pull the water tank upwards and out of
the appliance (figure 2).
0 Open the tank lid.
0 Fill the water tank with cold, clear
water only.
Ensure that the water line does not lie
below the MIN (minimum) line or
above the MAX (maximum) line.
0 Close the tank lid.
0 Replace the water tank and press it
downwards so that it is sitting firmly in
the appliance (figure 2).
3
You can also lift the tank lid and fold it
to the side. This enables you to fill the
water tank directly when it is in the
appliance, e.g. with a jug.
2. Switching on the appliance /
preheating cups
0 Switch the appliance on using the on/
off switch (figure 1/A). The power
indicator (figure 1/C, red) and the
temperature indicator (figure 1/D,
orange) will illuminate.
As soon as the operating temperature
has been attained, the temperature
indicator will go out. The temperature
indicator may illuminate again while
the appliance is being used to indicate
that the appliance is re-heating.
You can place one or more cups with
the opening facing downwards on the
cup storage area (figure 1/E).
3. Adding espresso grounds
(figures 3,4,5)
0 Take the filter holder, fold back the
finger protector and place the 1-cup
filter or the 2-cup filter into the filter
holder (figure 3).
3
When using prepacked portions, insert
the filter for prepacked portions
(figure 1/P and figure 5).
EA150.book Seite 12 Montag, 14. März 2005 10:37 10

g
13
0 Fill the filter with espresso grounds.
Use:
1 full measuring spoon for the 1-cup
filter, 2 full measuring spoons for the
2-cup filter.
0 Lightly press the espresso grounds into
the filter (figure 4) using the ground
coffee presser (figure 1/M). Ensure that
after pressing the coffee, the filter is
still filled to the rim with espresso
grounds. Clean any espresso grounds
away from the rim of the filter.
3
Do not press the espresso grounds too
firmly into the filter. In such an event
the flow of water through the coffee
can decrease significantly. (See also
“What to do if…”)
3
If you grind espresso grounds yourself,
choose the “middle” fineness level.
4. Screwing on the filter holder
(Figures 6, 7)
0 Position the filter holder in the filter
retainer such that the handle of the
filter holder is located below the left
white triangle (figure 6,“1“).
0 Twist the filter holder to the right as
far as it will go (figure 6,“2“), so that
the handle is pointing forwards and is
located beneath the white line
between the two points (figure 7,“3“).
5. Placing cup(s) underneath
(Figure 8)
0 Place one or two cups under the
openings in the filter holder (figure 8).
6. Brewing an espresso
0 Switch the water/steam selection
switch (figure 1/B) to the symbol .
0 When the appliance has attained its
operating temperature, turn the
selector dial (figure 1/G) to the
symbol . The water will now be
forced through the espresso grounds
under high pressure.
0 When the desired amount of espresso
has been brewed, turn the selector dial
left again to the “•” position.
3
Please note that when making an
espresso the water-steam selection
switch (figure 1/B) is always at the
position. If the espresso is brewed at
the position, the taste of the coffee
can be adversely affected due to the
higher brewing temperature.
Each time after making an espresso or
after using steam/hot water when the
selector dial is turned to the “•”
position, any remaining water is
directed to the drip tray. Each
additional cup is brewed using fresh
water. This is how to obtain the total
enjoyment out of espresso. This is why
the drip tray must be emptied
regularly.
7. Removing the drip tray
(Figure 9)
0 Twist the filter holder to the left and
out of the retainer.
0 Fold the finger protector forwards and
hold it down. Tap the used espresso
grounds out of the filter holder and
out of the filter (figure 9).
0 Rinse the filter holder and the filter
with warm water. Do not clean the
filter holder in the dishwasher!
3
If the appliance is not going to be used
for a longer period of time, do not
screw the filter holder back in. This will
increase the life of the seal located on
the brew head.
EA150.book Seite 13 Montag, 14. März 2005 10:37 10

g
14
Creating steam/frothing milk
(Figures 10, 11)
The hot steam can be used to froth
milk for a cappuccino or to heat
liquids.
1. Switch on the appliance.
0 Place the attachment provided onto
the steam nozzle (figure 10).
0 Switch on the appliance using the on/
off switch (figure 1/A). Wait until the
appliance has attained its operating
temperature and the orange
temperature indicator has gone out
(figure 1/D).
0 Switch the water/steam selection
switch (figure 1/B) to the symbol .
2. Creating steam/frothing milk
0 Pour some milk or other liquid to be
heated into a heat-proof container.
0 Immerse the steam nozzle into the milk
or liquid to be heated (figure 11).
0 Turn the selector dial (figure 1/G) to
the left onto the symbol. The
appliance will now begin to create
steam. At the beginning some drops of
water may drip out of the nozzle as
well.
Important: So as not to prevent the
steam from exiting, the steam nozzle
must not touch the base of the
container.
0 Stop steam from being emitted by
turning the selector dial (figure 1/G)
back to the right into the “•” position.
0 Place the steamed liquid to one side
and turn the steam selection switch
back to the symbol for a couple of
seconds. This will remove any milk
residue or residue from other liquids
out of the nozzle. Caution: The steam
is hot.
3
To achieve a fine, creamy milk froth it
is best to use cool low-fat milk.
Making a cappuccino
Fill a large coffee cup from ½ to ¾ full
of espresso. Pour the frothed milk over
the top. Sprinkle a little cocoa over the
milk froth.
3. Heating water
0 Turn the water/steam selection switch
(figure 1/B) to the position.
0 Place a container under the steam
nozzle (figure 1/H).
0 Turn the selector dial for coffee, steam
and hot water (figure 1/G) to the
position. Hot water will be emitted
from the steam nozzle.
0 After the desired amount of hot water
has been obtained, turn the selector
dial for coffee, steam and hot water
(figure 1/G) to the “•” position.
Cleaning and care
Daily care
We recommend that, each day prior to
the first and after the last espresso, you
rinse out the system for approx. 10
seconds without espresso grounds in
order to prevent particles coffee from
becoming lodged in the appliance.
Proceed as for making an espresso, but
without using espresso grounds.
0 Afterwards, turn the selector dial
(figure 1/G) briefly to the position.
0 Pour any remaining water out of the
water tank.
Cleaning
(figures12,13,14,15,16)
1
Prior to cleaning the appliance, switch
it off and disconnect the power plug.
Do not clean any part of the
appliance in the dishwasher.
0 Wipe all the appliance’s surfaces using
a damp cloth. Do not use harsh or
scratching cleaning agent.
0 Rinse out the water tank at least once
a week in normal rinse water.
0 Clean the 1-cup filter and the 2-cup
filter from time to time using a brush.
EA150.book Seite 14 Montag, 14. März 2005 10:37 10

g
15
Steam nozzle
0 Remove the attachment from the
steam nozzle and rinse the attachment
in normal rinse water.
0 Wipe the steam nozzle clean using a
damp cloth. You can use the
maintenance guide (figure 1/L) to
screw off the nozzle head to clean it or
decalcify it.
Drip grating and drip tray
The drip tray must be emptied when
the level indicator (figure 1/U) is
protruding above the drip grating.
0 Insert your fingers into the holes in the
drip grating. Remove the drip grating
and rinse it under running water
(figure 12).
0 To empty it, hold the drip tray on both
sides and pull it forwards and out of
the appliance (figure 13).
0 Remove the plastic attachment with
the level indicator and rinse both
under running water (figure 14).
0 Place the plastic attachment with the
level indicator back into the drip tray.
0 Push the clean drip tray back into the
appliance and place the drip grating
back in.
Cleaning the brew filter
The brew filter through which the hot
water flows is located on the brew
head. Check from time to time to
ensure that the holes in the brew filter
have not become blocked by coffee
particles.
If the holes have become blocked:
0 Unscrew the brew filter using a coin
(figure 15).
0 Remove the brew filter and seal
(figure 16/1) and remove the brew
filter’s seal (figure 16/2).
0 Clean the brew filter with warm water
and a brush.
0 Rinse the seal with warm rinse water.
3
If the appliance is to be transported at
temperatures below zero:
0 Empty the water tank.
0 Turn the selector dial (figure 1/G) to
the position and let the appliance
dry.
Decalcifying
If the espresso is flowing through the
filter at a slower rate than usual, it is
time for the appliance to be
decalcified.
We recommend that you decalcify the
machine once every three months with
liquid decalcifier. If you live in an area
with hard water the decalcifying
procedure may have to be carried out
more often. When doing this follow
the instructions provided by the
manufacturer of the decalcifier.
Important: Prior to decalcifying,
remove the brew filter (figure 1/V) and
the brew filter’s seal, as described in
the section “Cleaning the brew filter”
(figures 15, 16).
First pour the water into the water
tank, then add the decalcifier; never in
the reverse order. At least 0.5 litres of
water must be used. The decalcifier
should be added accordingly.
0 Remove the power plug from the
power point and allow the appliance to
cool.
0 Remove the steam nozzle with the
attachment (figure 1/H).
0 Place the filter holder in position
without the filter.
0 Place a sufficiently large container
under the filter holder.
0 Insert the power plug into the power
point and switch on the appliance.
0 Afterwards, turn the selector dial
(figure 1/G) to the position and let
approx. ¼ of the decalcifier flow
through the system.
EA150.book Seite 15 Montag, 14. März 2005 10:37 10

g
16
0 Then switch off the appliance and
allow the decalcifying solution to act
for approx. 10 minutes.
Repeat this procedure with an
additional ¼ of the decalcifying
solution.
0 Turn the selector dial (figure 1/G) to
the position. Allow the remaining
decalcifying solution to flow over the
nozzle and act for another 10 minutes.
0 Then thoroughly clean the water tank.
0 Fill the water tank with fresh water
and allow half to flow over the brew
head and the other half to flow over
the nozzle.
Repeat the procedure if there is a lot of
limescale.
0 After decalcifying the appliance,
replace the brew filter and seal.
What to do if…
• the espresso temperature is too low:
– Carry out the brewing procedure
without using espresso grounds, but
using the filter and filter holder, in
order to preheat the system.
– Preheat the cups.
– Decalcify the appliance.
• the flow speed decreases noticeably:
– Do not press the espresso grounds
too firmly into the filter.
– Do not grind the espresso grounds
too finely (“medium” fineness).
– Decalcify the appliance.
• the espresso is flowing out of the side
of the filter holder:
– Ensure that the filter holder has
been placed in the retainer correctly.
– Twist the filter holder a little more
firmly into the retainer.
– Clean any espresso grounds away
from the rim of the filter holder.
• no espresso is coming out:
– Ensure that the water tank has been
filled and is correctly in place.
– Ensure that the filter holder has
been placed in the retainer correctly.
– Ensure that the water/steam
selection switch (figure 1/B) is in the
position and the selector dial for
water, steam and hot water
(figure 1/G) has been turned right to
the position.
– Do not press the espresso grounds
too firmly into the filter.
– Clean the brew filter.
– Decalcify the appliance.
• the crema is no longer being produced
as it should:
– Ensure that there are enough
espresso grounds in the filter.
– Always use fresh espresso grounds.
– Press the espresso grounds lightly.
• too little milk froth is created when
steaming milk:
– Always use cool, fresh and low-fat
milk.
– Clean the steam nozzle.
EA150.book Seite 16 Montag, 14. März 2005 10:37 10

g
17
• the flow increases:
– the espresso grounds have been
ground too rough:
– Ensure that there are enough
espresso grounds in the filter.
• the coffee machine switches itself off
while operating:
The appliance pump is equipped with a
temperature fuse that protects it from
overheating. The temperature fuse
interrupts the machine’s operation, if
the machine is operated for too long or
if the pump is run without water.
– Set the on / off switch to “off” and
remove the plug from the mains
socket.
– Leave the machine to cool for at
least 20 minutes. Fill up with water.
– Plug the appliance into the mains
again and switch it on. If the
appliance still does not work, please
contact our Customer Care
Department.
Technical data
• Input supply voltage: 230 v, 50 Hz
• Power consumption: 1000 W
(See rating plate on the underside of
the appliance.)
Disposal
2
Packaging material
The packaging materials are environ-
mentally friendly and can be recycled.
The plastic components are identified
by markings, e.g. >PE<, >PS<, etc.
Please dispose of the packaging mate-
rials in the appropriate container at
the community waste disposal faci-
lities.
2
Old appliance
The symbol
W on the product or on
its packaging indicates that this pro-
duct may not be treated as household
waste. Instead it shall be handed over
to the applicable collection point for
the recycling of electrical and electro-
nic equipment. By ensuring this pro-
duct is disposed of correctly, you will
help prevent potential negative conse-
quences for the environment and
human health, which could otherwise
be caused by inappropriate waste
handling of this product. For more
detailed information about recycling
of this product, please contact your
local city office, your household waste
disposal service or the shop where you
purchased the product.
EA150.book Seite 17 Montag, 14. März 2005 10:37 10

f
18
f
Chère cliente,
Chèr client,
Veuillez lire attentivement cette notice
d’utilisation. Veuillez prêter une atten-
tion toute particulière aux consignes
de sécurité ! Conservez cette notice
pour pouvoir vous y référer ultérieure-
ment.
Transmettez aussi la notice à l’éventuel
futur propriétaire de l’appareil.
Equipement (figure 1)
A Interrupteur Marche/Arrêt
B Sélecteur Eau/Vapeur
C Voyant Marche
D Voyant Température
E Plateau porte-tasses
F Réservoir d’eau (à l’arrière)
G Sélecteur rotatif Café, Vapeur
et Eau chaude
H Buse vapeur (avec embout)
I Plaque signalétique
K Doseur
L Outil de maintenance
M Tasseur de mouture
N Filtre 1-tasse
O Filtre 2-tasses
P Filtre pour sachet individuel
Q Porte-filtre
R Protection des doigts
S Plateau récolte-gouttes
T Grille récolte-gouttes
U Gauge de niveau
V Filtre dans la buse d’écoulement de
café (à l’intérieur)
W Buse d’écoulement du café et anneau
support du porte-filtre
1 Consignes de sécurité
Précautions à prendre lors de
l’installation
• Précautions à prendre lors de
l’installation de l’appareil. Veillez à
placer l’appareil sur une surface plane
et horizontale.
• L’appareil ne peut être branché que sur
un réseau électrique dont la tension, le
type de courant et la fréquence
correspondent à ceux qui figurent sur
la plaque signalétique (voir dessous de
l’appareil).
Précautions à prendre lors de
l’installation
• Le câble d’alimentation électrique ne
doit jamais entrer en contact avec les
éléments chauds de l’appareil !
• Ne jamais tirer sur le câble pour
débrancher la fiche de contact de la
prise !
• Ne pas mettre l’appareil en marche si :
– le câble est endommagé ou
– s’il présente des dommages
extérieurs visibles.
• La buse vapeur, le filtre, le porte-filtre
et l’anneau support du filtre chauffent
nécessairement lorsque l’appareil est
en marche.
• Placez l’appareil hors de portée des
enfants !
• Lorsque l’appareil est en marche, la
coque en métal devient nécessairement
chaude.
• N’enlevez pas le porte-filtre lorsque le
café est en train de passer car l’appareil
est sous pression ! Danger de
brûlures !
• Ne remplissez le réservoir qu’avec de
l’eau, jamais avec du lait ou autres
liquides !
• Ne mettez l’appareil en marche lorsque
le réservoir est vide !
• N’utilisez pas l’appareil sans le récolte-
gouttes ou sans la grille récolte-
gouttes !
EA150.book Seite 18 Montag, 14. März 2005 10:37 10

f
19
Précautions de nettoyage
• Avant d’effectuer des travaux de
maintenance ou avant de nettoyer
l’appareil, assurez-vous qu’il est hors
tension et débranchez-le !
• Respectez les instructions de
détartrage !
• Ne plongez pas l’appareil dans l’eau !
Précautions à prendre lors de
travaux de réparation
• Les travaux de réparations d’appareil
électriques ne peuvent être réalisés que
par des spécialistes agréés.
D’importants dangers peuvent survenir
par le biais de réparations incorrectes.
En cas de réparation, adressez-vous au
service-clientèle ou à votre
commerçant spécialisé agréé.
• La société décline toute responsabilité
pour des dommages survenant à la
suite d’une utilisation non conforme
ou de manipulation erronée de
l’appareil.
;
Cet appareil est conforme aux
directives CE suivantes :
• 73/23/CEE du 19.02.1973 relative à la
“basse tension” y compris la directive
de modification 93/68/CEE
• 89/336/CEE du 03.05.1989 “Directive
CEM” y compris la directive de
modification 92/31/CEE
Avant d’utiliser l’appareil pour la
première fois
Afin d’éviter de vous blesser ou
d’endommager l’appareil, veuillez lire
les consignes de sécurité.
0 Branchez la fiche dans la prise.
Avant de préparer le tout premier
expresso, il est recommandé de d’abord
nettoyer une fois le système de chauf-
fage en remplissant le réservoir. Procé-
dez exactement comme indiqué dans le
paragraphe “Préparer un expresso” ou
“Faire mousser du lait”, sans toutefois
mettre de la poudre expresso dans le
filtre. Placez un récipient assez large au
milieu de la grille récolte-gouttes
(figure 1 /T) et sous la buse vapeur
(figure 1/H).
Préparer un expresso
Après être passé, l’expresso doit nor-
malement être recouvert d’une épaisse
couche de mousse qu’on appelle la
Crème.
Pour obtenir un expresso aromatique, il
est important d’utiliser de l’eau fraîche
et claire, une mouture expresso et une
température de l’eau adéquates.
1. Versez l’eau (figures 2)
0 Tirez le réservoir d’eau vers le haut et
sortez-le (figure 2).
0 Ouvrez le couvercle du réservoir.
0 Remplissez le réservoir exclusivement
avec de l’eau claire et froide.
Assurez-vous que le niveau de l’eau ne
soit pas inférieur au repère MIN (mini-
mum) et qu’il n’excède pas le repère
MAX (maximum).
0 Fermez le couvercle.
0 Remettez le réservoir dans l’appareil et
poussez-le vers le bas de manière à ce
qu’il soit bien en place (figure 2).
3
Vous pouvez aussi soulever le couvercle
du réservoir et le rabattre sur le côté.
Cela permet de remplir le réservoir
d’eau directement sans le retirer de
l’appareil, par ex. avec une carafe.
EA150.book Seite 19 Montag, 14. März 2005 10:37 10

f
20
2. Mettre l’appareil en marche/
Préchauffer les tasses
0 Mettez l’appareil en marche à l’aide de
l’interrupteur Marche/Arrêt
(figure 1/A). Le voyant Marche
(figure 1/C, rouge) et le voyant
Température (figure 1/D, orange)
s’allument.
Dès que la température requise est
atteinte, le voyant Température
s’éteint. Le Température peut se rallu-
mer au cours du processus : cela signi-
fie que l’appareil chauffe de nouveau.
Vous pouvez placer une ou plusieurs
tasses, ouverture vers le bas, sur le pla-
teau porte-tasses (figure 1/E).
3. Ajouter la mouture expresso
(figures 3, 4, 5)
0 Saisissez le porte-filtre, rabattez la
protection des doigts et placez le filtre
1-tasse ou le filtre 2-tasses dans le
porte-filtre (figure 3).
3
Lorsque vous utilisez un sachet indivi-
duel, servez-vous du filtre prévu pour
les sachets individuels (figures 1P, 5)
0 Versez la mouture expresso dans le
filtre. Utilisez pour cela :
1 plein doseur pour un filtre 1-tasse et
2 pleins doseurs pour un filtre 2-tasses.
0 Tassez la mouture expresso à l’aide du
tasseur de mouture (figure 1/M)
légèrement dans le filtre (figure 4).
Après avoir tassé la mouture expresso,
vérifiez que le filtre est plein à ras-
bord. Enlevez le surplus de mouture du
rebord du filtre.
3
Ne tassez pas trop la mouture expresso
dans le filtre ! Cela pourrait fortement
ralentir l’écoulement du café. (Voir
aussi “Que faire, si…”).
3
Si vous moulez vous-même le café
expresso, utilisez des grains de taille
“moyenne”.
4. Vissez le porte-filtre
(figures 6, 7)
0 Positionnez le porte-filtre dans
l’anneau support du filtre de telle
manière que la poignée du porte-filtre
se trouve au-dessous du triangle blanc
gauche (figure 6, “1”).
0 Tournez le porte-filtre vers la droite
jusqu’à la butée (figure 6, “2”) de telle
manière que la poignée pointe vers
l’avant et qu’elle se trouve au-dessous
de la ligne blanche entre les deux
points (figure 7, “3”).
5. Placez les tasses au-dessous du
porte-filtre (figure 8)
0 Placez une ou deux tasse(s) au-dessous
de l’orifice du porte-filtre (figure 8).
6. Faire un expresso
0 Positionnez le sélecteur Eau/Vapeur
(figure 1/B) sur le symbole .
0 Lorsque la température de l’eau dans
l’appareil atteint le niveau requis,
tournez le sélecteur (figure 1/G) sur le
symbole. L’eau est alors sous haute
pression et pénètre dans la mouture
expresso.
0 Lorsque la quantité souhaitée
d’expresso est passée, tournez le
sélecteur de nouveau vers la gauche
sur la position “•”.
3
Lorsque vous préparez un expresso,
assurez-vous que le sélecteur Eau/
Vapeur (figure 1/B) se trouve toujours
sur la position . Si, lorsque vous faites
un expresso, le sélecteur se trouve sur
la position , la température de l’eau
est très élevée, ce qui peut dénaturer le
goût du café.
Après avoir fait un expresso ou après
avoir utilisé de l’eau bouillante ou de la
vapeur, tournez le sélecteur rotatif sur
la position “•” pour évacuer l’eau
restante vers le récolte-gouttes. Pour
tout autre tasse de café supplémen-
taire, il est nécessaire de rajouter la
quantité d’eau correspondante. C’est
tout le secret d’un expresso au goût
parfait. C’est la raison pour laquelle le
récolte-gouttes doit être régulièrement
vidé.
EA150.book Seite 20 Montag, 14. März 2005 10:37 10
Sidan laddas...
Sidan laddas...
Sidan laddas...
Sidan laddas...
Sidan laddas...
Sidan laddas...
Sidan laddas...
Sidan laddas...
Sidan laddas...
Sidan laddas...
Sidan laddas...
Sidan laddas...
Sidan laddas...
Sidan laddas...
Sidan laddas...
Sidan laddas...
Sidan laddas...
Sidan laddas...
Sidan laddas...
Sidan laddas...
Sidan laddas...
Sidan laddas...
Sidan laddas...
Sidan laddas...
Sidan laddas...
Sidan laddas...
Sidan laddas...
Sidan laddas...
Sidan laddas...
Sidan laddas...
Sidan laddas...
Sidan laddas...
Sidan laddas...
Sidan laddas...
Sidan laddas...
Sidan laddas...
Sidan laddas...
Sidan laddas...
Sidan laddas...
Sidan laddas...
Sidan laddas...
Sidan laddas...
Sidan laddas...
Sidan laddas...
Sidan laddas...
Sidan laddas...
Sidan laddas...
Sidan laddas...
Sidan laddas...
Sidan laddas...
Sidan laddas...
Sidan laddas...
Sidan laddas...
Sidan laddas...
Sidan laddas...
Sidan laddas...
Sidan laddas...
Sidan laddas...
Sidan laddas...
Sidan laddas...
Sidan laddas...
Sidan laddas...
Sidan laddas...
Sidan laddas...
Sidan laddas...
Sidan laddas...
Sidan laddas...
Sidan laddas...
Sidan laddas...
Sidan laddas...
Sidan laddas...
Sidan laddas...
-
 1
1
-
 2
2
-
 3
3
-
 4
4
-
 5
5
-
 6
6
-
 7
7
-
 8
8
-
 9
9
-
 10
10
-
 11
11
-
 12
12
-
 13
13
-
 14
14
-
 15
15
-
 16
16
-
 17
17
-
 18
18
-
 19
19
-
 20
20
-
 21
21
-
 22
22
-
 23
23
-
 24
24
-
 25
25
-
 26
26
-
 27
27
-
 28
28
-
 29
29
-
 30
30
-
 31
31
-
 32
32
-
 33
33
-
 34
34
-
 35
35
-
 36
36
-
 37
37
-
 38
38
-
 39
39
-
 40
40
-
 41
41
-
 42
42
-
 43
43
-
 44
44
-
 45
45
-
 46
46
-
 47
47
-
 48
48
-
 49
49
-
 50
50
-
 51
51
-
 52
52
-
 53
53
-
 54
54
-
 55
55
-
 56
56
-
 57
57
-
 58
58
-
 59
59
-
 60
60
-
 61
61
-
 62
62
-
 63
63
-
 64
64
-
 65
65
-
 66
66
-
 67
67
-
 68
68
-
 69
69
-
 70
70
-
 71
71
-
 72
72
-
 73
73
-
 74
74
-
 75
75
-
 76
76
-
 77
77
-
 78
78
-
 79
79
-
 80
80
-
 81
81
-
 82
82
-
 83
83
-
 84
84
-
 85
85
-
 86
86
-
 87
87
-
 88
88
-
 89
89
-
 90
90
-
 91
91
-
 92
92


AEG EA 150 Användarmanual
- Kategori
- Kaffebryggare
- Typ
- Användarmanual
- Denna manual är också lämplig för
på andra språk
- čeština: AEG EA 150 Uživatelský manuál
- español: AEG EA 150 Manual de usuario
- Deutsch: AEG EA 150 Benutzerhandbuch
- polski: AEG EA 150 Instrukcja obsługi
- português: AEG EA 150 Manual do usuário
- français: AEG EA 150 Manuel utilisateur
- English: AEG EA 150 User manual
- suomi: AEG EA 150 Ohjekirja
Relaterade papper
Andra dokument
-
Aeg-Electrolux EA130 Användarmanual
-
Electrolux EEA130 Användarmanual
-
Braun BKMM30 Datablad
-
KitchenAid 5KES100 Artisan Bruksanvisning
-
Villaware NDVLEM1000 Användarmanual
-
Breville BARISTA MAX VCF126X01 Bruksanvisning
-
Krups CaféPresso Crematic Time 888 Instructions For Use Manual
-
Silvercrest SEM 1100 B3 Operating Instructions Manual
-