Gallagher W-0 Användarguide
- Kategori
- Personliga skalor
- Typ
- Användarguide

1
English
Contents
Box contents .......................................................1
Specifi ca ons ......................................................1
Charging the ba ery ...........................................2
Understanding the W-0 Weighing Unit ...............3
Installa on ..........................................................5
Weighing .............................................................7
Care and maintenance ......................................11
Approvals and standards ..................................12
BOX CONTENTS
The Gallagher W- box contains:
• W- weighing unit
• 110V - 230V Mains AC adapter
• Moun ng bracket and moun ng hardware
SPECIFICATIONS
Opera ng Temperature -20oC to + 70oC
Ba ery charge Temperature -0oC to +50oC
Environmental Protec on Ra ng IP66
Weight 1.1 kg
Es mated ba ery run me 27 hours
W
USER GUIDE
Thank you for purchasing the Gallagher W- Weigh Scale unit. The Gallagher
range of weighing systems is simple, tough, innova ve and reliable.
Follow these instruc ons for the setup and fi rst use of the W-.

2
Gallagher W- Weigh Scale User Guide
English
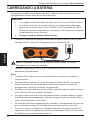
CHARGING THE BATTERY
To ensure op mum performance of the W-0, it is recommended that the internal
ba ery is charged for a minimum of 10 hours before fi rst me use.
Important:
• Charging of the W-0 should be in a cool (+10oC to +30oC) place.
• If the W-0 is to be stored for an extended period, this should be in a
cool dry place (–20oC to 25oC, humidity 45% to 85%) with a fully charged
ba ery. The W-0 should be charged un l full every 6 months.
• Always charge the baƩ ery indoors.
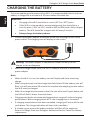
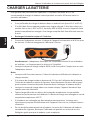
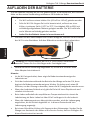
1. Connect the power adapter at the base of the unit and plug the W-0 into a
power outlet. The charging icon will display on the screen.
2. When the charge shows 100%, the W-0 is ready to use with or without the
power adapter.
Note:
• When the W-0 is in use, the ba ery icon will display and show remaining
charge.
• When using the scale and the charge level falls below 5% the ba ery icon will
fl ash. You will have about 60 minutes to complete the weighing session before
the W-0 must be charged.
• When the charge level becomes cri cal, the unit will sound 3 quick beeps and
the LED will fl ash 3 mes, then shut down.
• Charging outside the recommended temperature range will reduce charging
performance. When charging above 40oC, the charging me is increased.
• If charging temperatures have been exceeded, charging will stop un l the unit
cools down. The charge indica on will stop in this condi on.
• If a ba ery error occurs the ba ery indicator will fl ash all the segments.
Return the Weigh Scale to a Gallagher Authorised Service Centre for ba ery
replacement.
Warning: The power adaptor is intended for indoor use only. Do not
expose to rain or dampness.

3
Gallagher W- Weigh Scale User Guide
English
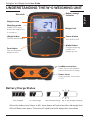
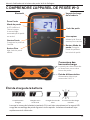
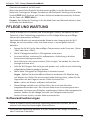
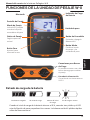
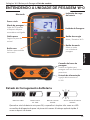
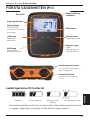
UNDERSTANDING THE W WEIGHING UNIT
Weigh buƩ on
Records animal weight
Zero buƩ on
Sets the displayed
weight to zero.
Mode BuƩ on
Changes weighing
modes and
weighing units.
Power buƩ on
Turn W-0 On/Off
Weigh screen
BaƩ ery charge
indicator
Bluetooth
Weighing mode
Shows AUTO when
Automa c weight lock
is turned on
Weight Unit
Battery Charge Status
Fully Charged 25 - 50% charge Less than 25% charge 5% or less charge remaining
Loadbar connectors
Either one or two loadbars
can be connected to weigh.
Power Input
External power connec on
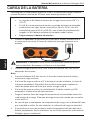
9 -15V
When the ba ery level drops to 0%, three beeps will sound and the red weight lock
LED will fl ash three mes. The scale will rapidly sound 4 beeps then shut down.

4
Gallagher W- Weigh Scale User Guide
English
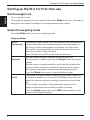
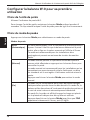
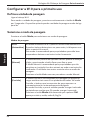
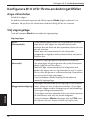
Setting up the W-0 for first time use
Set the weight unit
Turn on the W-0 scale.
To change the weight unit, press and hold down the Mode bu on for 3 seconds. A
beep will sound when the weight unit changes between kgs and lbs.
Select the weighing mode
Press the Mode bu on to select a weighing mode.
Weighing Modes
AUTO
(Automatic)
In Automatic mode the W-0 will automatically start weighing the
animal. When the scale has determined an accurate weight, it
will lock on to the measurement and display it on the screen.
This mode is recommended for yards that are well set up and
allow the animals to flow smoothly
The W-0 defaults to AUTO mode when switched on.
(Manual)
Manual mode allows the operator to decide when the
measurement is made by pressing the Weigh bu on to lock the
weight.
Manual mode is recommended for yards that do not allow the
animals to flow smoothly or where the animals are disruptive.
The operator has greater control over the weighing session.
Press the Mode button once to enable Manual mode.
(Fine)
Fine mode is recommended for weighing small static loads such
as fleeces or produce. In Fine mode, the Weigh Scale uses finer
weight increments and zero tracking is automatically switched
off.
In Fine mode, the weight is displayed when placed on the
platform and displays zero when the load is removed.
Press the Mode button twice until FINE briefly appears on the
screen, then 0.0kg/lb displays.

5
Gallagher W- Weigh Scale User Guide
English
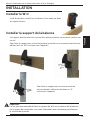
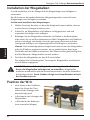
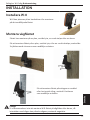
INSTALLATION
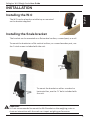
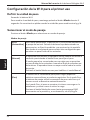
Installing the W-0
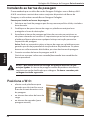
The W-0 can be placed on a table top or mounted
on the bracket supplied.
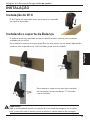
Installing the Scale bracket
The bracket can be mounted on a fl at ver cal surface, a round post, or a rail.
To mount the bracket on a fl at ver cal surface, or a round wooden post, use
the 3 x tek screws included with the unit.
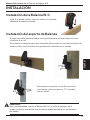
To mount the bracket on either a ver cal or
horizontal bar, use the ‘U’ bolts included with
the unit.
Important:
It is not recommended to mount the W-0 bracket on the weighing crate or
chute as interac on with the scale can impair weighing performance.

6
Gallagher W- Weigh Scale User Guide
English
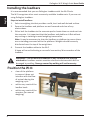
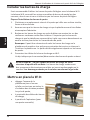
Installing the loadbars
It is recommended that you use Gallagher Loadbars with the W-0 Scale.
The W-0 recognises other most commonly available Loadbar sets. If you are not
using Gallagher Loadbars.
Steps to install loadbars
1. Select a weighing site that provides a solid, level and well drained surface.
2. Ensure the loadbars and pla orm are well secured and clear of any
obstruc ons.
3. Either bolt the loadbars to the concrete pad or locate them on studs set into
the concrete. It is important that the loadbars and pla orm sit fl at without
any rocking or twis ng to avoid weighing inaccuracies.
Note: It may be necessary to shim the loadbars or pla orm to ensure there
are no twis ng pressures within the pla orm. Weights should be evenly
distributed over the top of the weigh bars.
4. Connect the loadbar cables to the W-0.
A beep will sound indica ng a successful connec on/ disconnec on of the
loadbars.
WARNING – Do not weld the loadbars or any structure that they are
aƩ ached to. Loadbars contain sensi ve electronic devices which will be
damaged by welding. Damage caused by welding will void warranty.
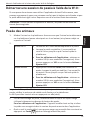
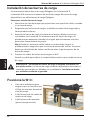
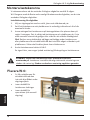
Position the W-0:
• clear of the pla orm
to ensure it does not
interfere with the fl ow
of animals during the
weighing cycle
• within easy reach of the
loadbar leads
• within easy reach of the
operator (for manual
weighing)

7
Gallagher W- Weigh Scale User Guide
English
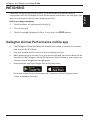
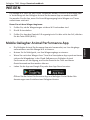
WEIGHING
There are 2 ways to use the W-0 scale. It can be used on its own or used in
conjunc on with the Gallagher Animal Performance mobile app. Use the app if you
want to record your session when weighing animals.
Before you begin weighing:
1. Check loadbars are connected to the W-0.
2. Turn on the W-0.
3. Check the weight displayed is Zero. If not, press the ZERO bu on.
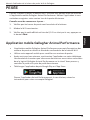
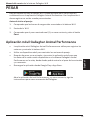
Gallagher Animal Performance mobile app
• The Gallagher Animal Performance mobile app is used to record live sessions
and control the W-0 Scale.
• Use your mobile device to control your weighing sessions.
• A er weighing your animals, sync your phone app and the session data will be
available in the Gallagher Animal Performance cloud so ware, where you can
monitor animal weights and weight gains.
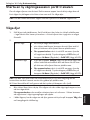
• Download the app from Google Play or the App Store.
Open the Animal Performance app and if required, follow the prompts to
create a Gallagher Account.

8
Gallagher W-Ϣ Weigh Scale User Guide
English
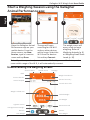
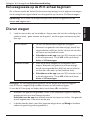
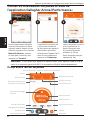
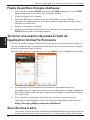
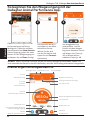
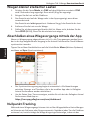
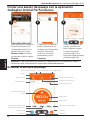
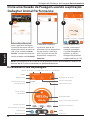
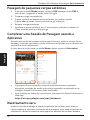
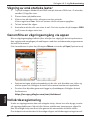
Start a Weighing Session using the Gallagher
Animal Performance app:
Open the Gallagher Animal
Performance app on your
mobile device. From the
Home screen, tap New
Session, type in a session
name and tap Done.
The app will begin
searching for the W-0
and any other devices
within range. Select the
W-0 from the devices
list and tap Connect.
The weigh screen will
open, ready to begin
weighing. Refer to
Weighing Animals (p. 9)
or Weighing Small StaƟ c
Loads (p. 10)
ϣ
pp
Ϥϥ
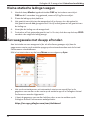
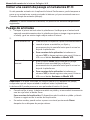
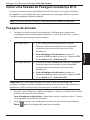
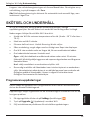
Understanding the weighing screen
Animal CountSession Name
Back
Settings
Weight Distribution
Session Summary
Animal VID/EID
Current Session
Locked Weight
Live Weight
Heaviest Animal
Lightest Animal
Average Session Weight
Actions
Devices
Lock Weight Zero Weight
Weight Locked Icon
Note: If you have previously connected the W-0 with your mobile device, and
come within range of the W-0, it will automaƟ cally connect.
Animal VID or EID

9
Gallagher W- Weigh Scale User Guide
English
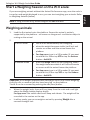
Weighing animals
1. Load the fi rst animal onto the pla orm. Ensure the animal is en rely
supported by the pla orm - no hooves on the ground - and that no object is
res ng on the animal.
2.
In AUTO mode • the W-0 will automa cally start weighing
• when the weight becomes stable it will lock and
remain on screen un l the animal leaves the
pla orm.
• For App users: type in a VID number (if you want
to record this. Either tap VID or tap the AcƟ ons
bu on > Add VID.
In Manual mode • press the Weigh bu on to start weighing. When
the weight becomes stable it will lock and remain
on screen un l the animal leaves the pla orm.
• For App users: type in a VID number (if you want
to record this). Either tap VID or tap the AcƟ ons
bu on > Add VID.
Important: If the weight displayed does not always return to 0.0 a er weighing,
check for dirt or manure that may have been le on the pla orm.
The W-0 can be re-zeroed by pressing the >0< (Zero) bu on.
• When the weight locks, there will be a beep from the scale and a red light
above the Weigh bu on displays briefly.
For App users: the mobile device will beep and vibrate. The weight will be
recorded in the session on the app.
• In either mode, you can re-weigh an animal by pressing Weigh a er a
successful weight lock.
Start a Weighing Session on the W-0 scale:
If you are weighing animals without the Animal Performance app, once the scale is
turned on and weight displayed is zero, you can start weighing your animals. Refer
to Weighing Animals (below).
Note: If using the scale only, animal weights are not recorded.

10
Gallagher W- Weigh Scale User Guide
English
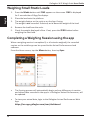
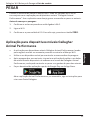
Weighing Small Static Loads
1. Press the Mode bu on un l FINE appears on the screen. FINE is displayed
for 2 seconds then 0.0kgs/lbs displays.
2. Place the load onto the pla orm.
3. The weight displays on the scale or on the App if using.
The weight is not recorded. If desired, write down the weight of the load.
4. Remove the load from the scale.
5. Check the weight displayed is Zero. If not, press the ZERO bu on before
weighing the next load.
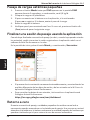
Completing a Weighing Session using the app
When a weighing session is completed (i.e. all animals weighed), the recorded
session on the mobile app can be synced to the Animal Performance cloud
so ware.
From the Home screen, tap the Menu bu on, then tap Sync.
• The Syncing process will automa cally begin and any diff erences in session
and animal data recorded in the app or in Gallagher Animal Performance, will
be updated.
• To view your animal data, login to the Gallagher Animal Performance Web
App:
hƩ ps://am.app.gallagher.com/amc/dashboard

11
Gallagher W- Weigh Scale User Guide
English
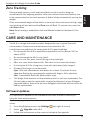
Zero Tracking
During a weigh session, small amounts of debris such as mud or dung can
accumulate on the weighing pla orm. A er each animal leaves the pla orm, the
scale compensates for the small amount of debris le by automa cally zeroing the
weight.
If the accumulated weight of the debris is more than the scales zero tracking range,
zero tracking will not work and the Zero icon will fl ash. To restore zero, press the
>0< Zero bu on.
Note: Zero tracking is enabled for Auto and Manual modes but disabled in Fine
mode.
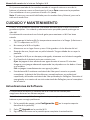
CARE AND MAINTENANCE
The W-0 is a tough and reliable product designed for use in typical livestock
environments. Proper care and maintenance can extend its life.
Listed below are guidelines for keeping the W-0 in good condi on.
• Do not expose the W-0 to excessive temperatures or fi re. (Below -20oC or
above +70oC).
• Do not submerge the W-0 in any liquid.
• Store in a cool, dry place. Avoid storing in direct sunlight.
• A er use, clean with a damp cloth. Take care not to scratch the display.
• If storing the W-0 for a long me, store with the ba ery fully charged.
• If ba ery fl uid comes in contact with:
Eyes - fl ush the aff ected area with water for at least 15 minutes. Ensure
adequate fl ushing by separa ng the eyelids with fi ngers. Call a physician.
Skin - immediately fl ush with water and/or soap.
• This Weigh Scale contains a Lithium ba ery which is not user replaceable. The
lithium ba ery must be replaced by a trained professional using a Gallagher
approved ba ery. Return the unit to a Gallagher Authorised Service Centre for
ba ery replacement.
Software Updates
It is important to update the W-0 so ware from me to me to ensure you
have the latest enhancements.
Updates are regularly released to enhance the features of the scale or to correct
issues.
1. From the Weighing screen, tap Seƫ ngs (top right of screen).
2. Select Upgrade under W-0.
3. Follow the instruc ons on the screen to complete the upgrade.

12
Gallagher W- Weigh Scale User Guide
English
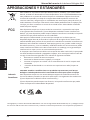
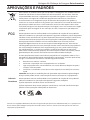
APPROVALS AND STANDARDS
This symbol on the product or its packaging indicates that this product must not be
disposed of with other waste. Instead, it is your responsibility to dispose of your waste
equipment by handing it over to a designated collec on point for the recycling of waste
electrical and electronic equipment. The separate collec on and recycling of your waste
equipment at the me of disposal will help conserve natural resources and ensure that
it is recycled in a manner that protects human health and the environment. For more
informa on about where you can drop off your waste equipment for recycling, please
contact your local city recycling offi ce or the dealer from whom you purchased the
product.
FCC This device complies with part 15 of the FCC Rules. Opera on is subject to the following
two condi ons: (1) this device may not cause harmful interference, and (2) this device
must accept any interference received, including interference that may cause undesired
opera on.
This equipment has been tested and found to comply with the limits for a Class B digital
device, pursuant to part 15 of the FCC Rules. These limits are designed to provide
reasonable protec on against harmful interference in a residen al installa on. This
equipment generates, uses and can radiate radio frequency energy and, if not installed
and used in accordance with the instruc ons, may cause harmful interference to radio
communica ons. However, there is no guarantee that interference will not occur in a
par cular installa on.
If this equipment does cause harmful interference to radio or television recep on,
which can be determined by turning the equipment off and on, the user is encouraged
to try to correct the interference by one or more of the following measures:
• Reorient or relocate the receiving antenna.
• Increase the separa on between the equipment and receiver.
• Connect the equipment into an outlet on a circuit diff erent from that to which the
receiver is connected.
• Consult the dealer or an experienced radio/TV technician for help.
CauƟ on: Changes or modifi ca ons not expressly approved by Gallagher Group Limited
could void the user’s authority to operate the equipment.
Industry
Canada
This device complies with Industry Canada licence-exempt RSS standard(s). Opera on is
subject to the following two condi ons:
(1) this device may not cause interference, and
(2) this device must accept any interference, including interference that may cause
undesired opera on of the device.
The Bluetooth® word mark and logos are registered trademarks owned by the Bluetooth SIG, Inc. and any use by
Gallagher Group Limited is under license. Other trademarks and trade names are those of their respec ve owners.

13
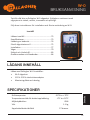
Nederlands
Inhoud
Inhoud van de doos ..........................................13
Specifi ca es ......................................................13
De ba erij opladen ...........................................14
Informa e over de W-0 weegeenheid ..............15
Monteren ..........................................................17
Wegen ...............................................................19
Zorg en onderhoud ...........................................23
Toela ngen en normen .....................................24
INHOUD VAN DE DOOS
De doos van de Gallagher W-0 bevat:
• W- weegeenheid
• AC-adapter voor 110-230 V
• Montagebeugel en montagehulpmiddelen
SPECIFICATIES
Bedrijfstemperatuur -20oC to + 70oC
Oplaadtemperatuurbereik ba erij -0oC to +50oC
Omgevingsbeschermingsklasse IP66
Gewicht 1.1 kg
Gescha e bedrijfs jd ba erij 27 hours
W
GEBRUIKERSHANDLEIDING
Bedankt voor uw aanschaf van de Gallagher W-0 weegschaaleenheid. De
serie weegsystemen van Gallagher is eenvoudig, duurzaam, innova ef en
betrouwbaar.
Volg deze instruc es voor het instellen en het eerste gebruik van de W-.

14
Gallagher W- weegschaal Gebruikershandleiding
Nederlands
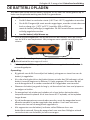
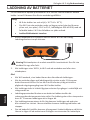
DE BATTERIJ OPLADEN
We raden aan om de interne ba erij minimaal 10 uur voor het eerste gebruik op te
laden om de op male werking van de W-0 te garanderen.
Belangrijk:
• De W-0 dient in een koele ruimte (+10 °C tot +30 °C) opgeladen te worden.
• Als de W-0 langere jd moet worden opgeslagen, moet de ruimte daarvoor
koel en droog zijn (–20oC to 25oC, humidity 45% to 85%) en
moet de ba erij volledig zijn opgeladen. De W-0 moet elke zes maanden
volledig opgeladen worden.
• Laad de baƩ erij alƟ jd binnen op.
1. Sluit de netvoedingadapter aan op de basis van de eenheid, steek de stekker
van de W-0 in een stopcontact. Het pictogram voor opladen verschijnt op het
scherm.
2. Als het opladen 100% aangee , is de W-0 klaar voor gebruik met of zonder de
netvoedingadapter.
Opmerking:
• Bij gebruik van de W-0 verschijnt het ba erij-pictogram en toont hoe ver de
ba erij is opgeladen.
• Als u de schaal gebruikt en het ba erijniveau minder dan 5% bedraagt, zal het
ba erij-icoontje beginnen te fl ikkeren. U hebt ongeveer 60 minuten de jd
om de weegsessie af te ronden voordat de W-0 opgeladen moet worden.
• Wanneer de ba erij zo goed als leeg is, zal de eenheid vier keer snel piepen en
vervolgens uitvallen.
• De weegschaal zal minder snel opladen als u hem buiten het aanbevolen
temperatuurbereik oplaadt. Als u hem boven 40 °C oplaadt, zal het opladen
langer duren.
• Als de laadtemperaturen overschreden worden, moet de weegschaal eerst
a oelen voordat hij verder opgeladen kan worden. U zult ook niet meer
kunnen zien hoe ver de weegschaal opgeladen is.
• Alle segmenten van de ba erij-indicator zullen fl ikkeren als er een
ba erijfout optreedt. Breng de weegschaal naar een door Gallagher erkend
servicecentrum om de ba erij te laten vervangen.
Opgelet: De voedingsadapter mag enkel binnen worden gebruikt.
Niet blootstellen aan regen of vocht.

15
Gallagher W- weegschaal Gebruikershandleiding
Nederlands
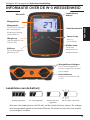
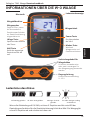
INFORMATIE OVER DE W WEEGEENHEID
Weegknop
Legt het gewicht van
het dier vast
Nulknop
Zet het weergegeven
gewicht op nul.
Modus-knop
Verandert
weegmodus en
weegeenheden.
Power-knop
W-0 in-/
uitschakelen
Weegscherm
Laadindicator
baƩ erij
Bluetooth
Weegmodus
Toont ‘AUTO’ wanneer
de automa sche
weegvergrendeling
ingeschakeld is
Gewichtseenheid
Laadstatus van de batterij
Volledig opgeladen 25 - 50% opgeladen Minder dan 25%
opgeladen
5% of minder resterend
WeegbalkaansluiƟ ngen
Eén of twee weegbalken
kunnen aangesloten worden
om te wegen.
Stroomtoevoer
Externe stroomaanslui ng
9 -15V
Wanneer het ba erijniveau tot 0% zakt, zal de schaal drie keer piepen. De rode ge-
wichtsvergrendelingsled zal drie keer fl ikkeren. De schaal zal snel vier keer piepen
en vervolgens uitvallen.

16
Gallagher W- weegschaal Gebruikershandleiding
Nederlands
De W-0 instellen voor het eerste gebruik
Stel de weegeenheid in
Zet de W-0-schaal aan.
Houd de knop Modus drie seconden ingedrukt om de weegeenheid te wijzigen.
De schaal zal piepen wanneer het gewicht van kilogram naar pond gewijzigd wordt.
Selecteer de weegmodus
Druk op de knop Modus om een weegmodus te selecteren.
Weegmodus
AUTO
(Automatic)
In de automatische modus zal de W-0 het dier automatisch
beginnen te wegen. Wanneer de weegschaal een nauwkeurig
gewicht heeft bepaald, wordt het gewicht vergrendeld en op het
scherm weergeven.
Deze modus is aanbevolen voor velden die goed zijn afgebakend
en waarin de dieren vlot kunnen bewegen.
(Manual)
Met de handma ge modus kan de gebruiker beslissen wanneer
er wordt gewogen. Het gewicht wordt vergrendeld wanneer er
op de knop Wegen wordt gedrukt.
De manuele modus is aangeraden voor velden waarin de dieren
niet vlot kunnen bewegen of wanneer de dieren weerspannig
zijn. De gebruiker hee meer controle over de weegsessie.
Druk één keer op de knop Modus om de handma ge modus in te
schakelen.
(FINE)
De fi jne modus wordt aanbevolen voor het wegen van kleine
sta sche ladingen zoals vliezen of producten. In de fi jne modus
gebruikt de weegschaal kleinere gewichtsverschillen en wordt
nultracering automa sch uitgeschakeld.
In de fi jne modus wordt het gewicht getoond wanneer de lading
op het pla orm wordt geplaatst en verschijnt nul wanneer deze
wordt verwijderd.
Druk twee keer op de knop Modus totdat FINE kort op het
scherm wordt getoond, daarna verschijnt 0,0 kg/lbs.

17
Gallagher W- weegschaal Gebruikershandleiding
Nederlands
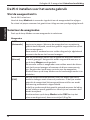
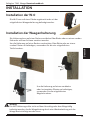
MONTEREN
De W-0 monteren
De W-0 kan op een tafel worden geplaatst of
op de meegeleverde beugel worden gemonteerd.
De beugel van de weegschaal
monteren
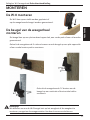
De beugel kan op een plat ver caal oppervlak, een ronde paal of een rail worden
gemonteerd.
Gebruik de meegeleverde 3 x teksschroeven om de beugel op een plat oppervlak
of een ronde houten paal te monteren.
Gebruik de meegeleverde ‘U’-bouten om de
beugel op een ver cale of horizontale balk te
monteren.
Belangrijk:
We bevelen aan om de W-0 beugel niet op het weegkrat of de weegkooi te
monteren, aangezien de weegpresta es hierdoor kunnen verslechteren.

18
Gallagher W- weegschaal Gebruikershandleiding
Nederlands
De weegbalken monteren
We raden u aan om de weegbalken van Gallagher met de W-0-weegschaal te
gebruiken.
De W-0 herkent de andere meest voorkomende weegbalken, als u geen
Gallagher-weegbalken gebruikt.
Stappen om weegbalken te installeren
1. Zoek een weegloca e uit met een stevige en gelijkma ge ondergrond en een
goede afvoer.
2. Zorg ervoor dat de weegbalken en het pla orm stevig verankerd en vrij van
obstakels zijn.
3. Zet de weegbalken met bouten op het betonblok vast of plaats ze op pennen
in het beton. Om onnauwkeurigheid in de me ngen te voorkomen, is het
belangrijk dat de weegbalken en het pla orm volstrekt horizontaal zijn
vastgezet en niet kunnen schudden of draaien.
Opmerking: Het kan nodig zijn de weegbalken of het pla orm op te vullen
om er zeker van te zijn dat er geen wringspanning kan ontstaan. Het gewicht
dient gelijkma g te worden verspreid over de bovenkant van de weegbalken.
4. Sluit de kabels van de weegbalken aan op de W-0.
Er wordt een piep afgegeven om aan te geven of het aansluiten/ontkoppelen
van de weegbalken gelukt is.
WAARSCHUWING - de weegbalken of een construcƟ e waarop deze
zijn bevesƟ gd nooit lassen. De weegbalken zijn voorzien van gevoelige
elektronische apparaatjes die bij lassen kunnen beschadigen.
Bij beschadiging als gevolg van lassen komt de garanƟ e te vervallen.
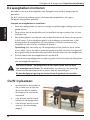
De W-0 plaatsen:
• op afstand van het pla orm
om er zeker van te zijn dat
de stroom dieren jdens
de weegcyclus niet wordt
verstoord
• ruim binnen bereik van de
kabels van de weegbalken
• ruim binnen bereik van de
operator (bij handma g
wegen)

19
Gallagher W- weegschaal Gebruikershandleiding
Nederlands
WEGEN
U kunt de W-0-weegschaal op twee manieren gebruiken. U kunt de weegschaal
afzonderlijk gebruiken of met de Gallagher Animal Performance-app. Gebruik de
app als u uw sessie wilt opnemen als u dieren weegt.
Voor het wegen:
1. Controleer of de gewichtsbalken aangesloten zijn op de W-0.
2. Schakel de W-0 in.
3. Controleer of het weergegeven gewicht 0.0 is. Druk op de knop ZERO als dat
niet het geval is.
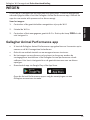
Gallagher Animal Performance-app
• U kunt de Gallagher Animal Performance-app gebruiken om live sessies op te
nemen en de W-0-weegschaal te bedienen.
• Gebruik uw mobiele toestel om uw weegsessies aan te sturen.
• Na het wegen van uw dieren synchroniseert u de app en worden de
sessiegegevens beschikbaar in de Gallagher Animal performance-cloud-
so ware. Hier kunt u het gewicht en de gewichtstoename van uw dieren
opvolgen.
• Download de app via Google Play of de App Store.
Open de Animal Performance-app en volg de aanwijzingen om een
Gallagher-account aan te make.

20
Gallagher W- weegschaal Gebruikershandleiding
Nederlands
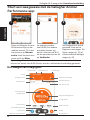
Start een weegsessie met de Gallagher Animal
Performance-app:
Open de Gallagher Animal
Performance-app op uw
mobiele toestel. Tik in het
startscherm op Nieuwe
sessie. Geef de sessie een
naam en k op Klaar.
De app gaat zoeken
naar de W-0 en andere
toestellen binnen zijn
bereik. Selecteer de W-0
uit de apparatenlijst en k
op Verbinden.
Het weegscherm wordt
geopend, klaar om te
beginnen met wegen. Zie
Dieren wegen (p. 21) of
Kleine staƟ sche ladingen
wegen (p. 22)
ϣϤ ϥ
Het weegscherm begrijpen
Aantal dierenSessienaam
Terug
Instellingen
Gewichtsverdeling
Sessieoverzicht
EID/VID dier
Huidige sessie
Vergrendeld gewicht
Live gewicht
Zwaarste dier
Lichtste dier
Gemiddeld gewicht
Acties
Apparaten
Gewicht vergrendelen Nul Gewicht
Icoon gewicht
vergrendeld
Opmerking: Als u de W-0 eerder al met uw mobiele toestel verbonden hebt en
binnen het bereik van de W-0 komt, wordt er automa sch verbinding gemaakt.
Dier EID of VID
Sidan laddas...
Sidan laddas...
Sidan laddas...
Sidan laddas...
Sidan laddas...
Sidan laddas...
Sidan laddas...
Sidan laddas...
Sidan laddas...
Sidan laddas...
Sidan laddas...
Sidan laddas...
Sidan laddas...
Sidan laddas...
Sidan laddas...
Sidan laddas...
Sidan laddas...
Sidan laddas...
Sidan laddas...
Sidan laddas...
Sidan laddas...
Sidan laddas...
Sidan laddas...
Sidan laddas...
Sidan laddas...
Sidan laddas...
Sidan laddas...
Sidan laddas...
Sidan laddas...
Sidan laddas...
Sidan laddas...
Sidan laddas...
Sidan laddas...
Sidan laddas...
Sidan laddas...
Sidan laddas...
Sidan laddas...
Sidan laddas...
Sidan laddas...
Sidan laddas...
Sidan laddas...
Sidan laddas...
Sidan laddas...
Sidan laddas...
Sidan laddas...
Sidan laddas...
Sidan laddas...
Sidan laddas...
Sidan laddas...
Sidan laddas...
Sidan laddas...
Sidan laddas...
Sidan laddas...
Sidan laddas...
Sidan laddas...
Sidan laddas...
Sidan laddas...
Sidan laddas...
Sidan laddas...
Sidan laddas...
Sidan laddas...
Sidan laddas...
Sidan laddas...
Sidan laddas...
Sidan laddas...
Sidan laddas...
Sidan laddas...
Sidan laddas...
-
 1
1
-
 2
2
-
 3
3
-
 4
4
-
 5
5
-
 6
6
-
 7
7
-
 8
8
-
 9
9
-
 10
10
-
 11
11
-
 12
12
-
 13
13
-
 14
14
-
 15
15
-
 16
16
-
 17
17
-
 18
18
-
 19
19
-
 20
20
-
 21
21
-
 22
22
-
 23
23
-
 24
24
-
 25
25
-
 26
26
-
 27
27
-
 28
28
-
 29
29
-
 30
30
-
 31
31
-
 32
32
-
 33
33
-
 34
34
-
 35
35
-
 36
36
-
 37
37
-
 38
38
-
 39
39
-
 40
40
-
 41
41
-
 42
42
-
 43
43
-
 44
44
-
 45
45
-
 46
46
-
 47
47
-
 48
48
-
 49
49
-
 50
50
-
 51
51
-
 52
52
-
 53
53
-
 54
54
-
 55
55
-
 56
56
-
 57
57
-
 58
58
-
 59
59
-
 60
60
-
 61
61
-
 62
62
-
 63
63
-
 64
64
-
 65
65
-
 66
66
-
 67
67
-
 68
68
-
 69
69
-
 70
70
-
 71
71
-
 72
72
-
 73
73
-
 74
74
-
 75
75
-
 76
76
-
 77
77
-
 78
78
-
 79
79
-
 80
80
-
 81
81
-
 82
82
-
 83
83
-
 84
84
-
 85
85
-
 86
86
-
 87
87
-
 88
88


Gallagher W-0 Användarguide
- Kategori
- Personliga skalor
- Typ
- Användarguide
på andra språk
- español: Gallagher W-0 Guía del usuario
- Deutsch: Gallagher W-0 Benutzerhandbuch
- português: Gallagher W-0 Guia de usuario
- français: Gallagher W-0 Mode d'emploi
- English: Gallagher W-0 User guide
- Nederlands: Gallagher W-0 Gebruikershandleiding
