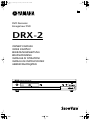
Yamaha DRX-2 Bruksanvisning
- Kategori
- CRT-TV-apparater
- Typ
- Bruksanvisning

®
DVD Recorder
Enregistreur DVD
DRX-2
OWNER’S MANUAL
MODE D’EMPLOI
BEDIENUNGSANLEITUNG
BRUKSANVISNING
MANUALE DI ISTRUZIONI
MANUAL DE INSTRUCCIONES
GEBRUIKSAANWIJZING
G

i
General information
General information
Laser safety
This unit employs a laser.To prevent possible eye injury, only a
qualified service person should remove the cover or attempt to
service this device.
NEVER MAKE OR CHANGE CONNECTIONS
WITH THE POWER ON.
The DVD recorder is in conformity with the
EMC directive and low-voltage directive.
ONLY QUALIFIED SERVICE PERSONNEL
SHOULD REMOVE THE COVER OR ATTEMPT
TO SERVICE THIS DEVICE.
CAUTION
Use of controls or adjustments or performance of procedures
other than those specified herein may result in hazardous radi-
ation exposure.
ATTENTION
L’emploi de commandes, de réglages ou un choix de procé-
dures différents des spécifications de cette brochure peut
entraîner une exposition à d’éventuelles radiations pouvant
être dangereses.
ACHTUNG
Die Verwendung von Bedienungselementen oder Einstellungen
oder die Durchführung von Bedienungsvorgängen, die nicht in
dieser Anleitung aufgeführt sind, kann zu einem Kontakt mit
gefährlichen Laserstrahlen führen.
OBSERVERA
Användning av kontroller och justeringar eller genomförande
av procedurer andra än de som specificeras i denna bok kan
resultera i att du utsätter dig för farlig strålning.
ATTENZIONE
Uso di controlli o regolazioni o procedure non specificamente
descritte può causare l’esposizione a radiazioni di livello peri-
coloso.
PRECAUCIÓN
El uso de los controles o los procedimientos de ajuste o uti-
lización diferentes de los especificados en este manual pueden
causar una exposición peligrosa a la radiación.
VOORZICHTIG
Gebruik van bedieningsorganen of instellingen, of uitvoeren
van handelingen anders dan staan beschreven in deze han-
dleiding kunnen leiden tot blootstelling aan gevaarlijke stralen.
LASER
Type InGaAlP semiconductor laser (DVD)
AlGaAs semiconductor laser (CD)
Wavelength 660 nm (DVD)
780 nm (CD)
Output Power 20 mW (DVD writing)
(out of objective)0.8 mW (DVD reading)
0.3 mW (CD reading)
Beam divergence82 degrees (DVD)
54 degrees (CD)
C
AUTION VISIBLE AND INVISIBLE LASER RADIATION.WHEN OPEN AVOID
EXPOSURE TO BEAM
AD
VARSEL SYNLIG OG USYNLIG LASERSTRÅLING VED ÅBNING UNDGÅ
UDSÆTTELSE FOR STRÅLING
AD
VARSEL SYNLIG OG USYNLIG LASERSTRÅLING NÅR DEKSEL ÅPNES
UNNGÅ EKSPONERING FOR STRÅLEN
V
ARNING SYNLIG OCH OSYNLIG LASERSTRÅLNING NÄR DENNA DEL
ÄR ÖPPNAD BETRAKTA EJ STRÅLEN
V
ARO!AVATTAESSA OLET ALTTIINA NÄKYV¨ALLE JA NÄKYMÄTTÖMÄLLE
LASER SÄTEILYLLE. ÄLÄ KATSO SÄTEESEEN
V
ORSICHT SICHTBARE UND UNSICHTBARE LASERSTRAHLUNG WENN
ABDECKUNG GEÖFFNET NICHT DEM STRAHL AUSSETSEN
D
ANGER VISIBLE AND INVISIBLE LASER RADIATION.WHEN OPEN AVOID
DIRECT EXPOSURE TO BEAM
A
TTENTION RAYONNEMENT LASER VISIBLE ET INVISIBLE EN CAS
D’OUVERTURE EXPOSITION DANGEREUSE AU FAISCEAU
S
HOW
V
IEW
is a registered trademark of Gemstar Develop-
ment Corporation.The S
HOW
V
IEW
system is manufactured
under licence from Gemstar Development Corporation.
Manufactured under license from Dolby Laboratories.“Dolby”,
“Pro Logic ”and the double-D symbol are trademarks of Dolby
Laboratories.Confidential Unpublished Works.
©1992-1997 Dolby Laboratories,Inc.All rights reserved.
“DTS” and “DTS Digital Out” are trademarks of Digital The-
ater Systems, Inc.
This product incorporates copyright protection technology
that is protected by method claims of certain U.S.patents and
other intellectual property rights owned by Macrovision Cor-
poration and other rights owners.
Use of this copyright protection technology must be autho-
rized by Macrovision Corporation, and is intended for home
and other limited viewing uses only unless otherwise autho-
rized by Macrovision Corporation.Reverse engineering or dis-
assembly is prohibited.
CAUTION
®
CAUTION:
Visible and invisible laserradiation
when open. Avoid exposure to beam.
CLASS 1
LASER PRODUCT
CAUTION:
Visible and invisible laserradiation
when open. Avoid exposure to beam.

General information
ii
English
Caution
Read this before operating your unit.
1
To assure the finest performance, please read this manual
carefully. Keep it in a safe place for future reference.
2
The recommended operating temperature range for the
Recorder is from 15˚C-35˚C (Celsius). Exceeding these
ranges may cause unstable recording results. Do not expose
this unit to sudden temperature changes from cold to hot,
nor locate this unit in an environment with high humidity
(i.e., a room with a humidifier) to prevent condensation
inside this unit, which may cause an electrical shock, fire,
damage to this unit, and/or personal injury.
3
Locate this unit away from other electrical appliances,
motors, or transformers to avoid humming sounds.
4
Install this unit in a well ventilated, cool, dry, clean place —
away from direct sunlight, heat sources, vibration, dust, mois-
ture, or cold. In a cabinet, allow about 2.5cm (1 inch) of free
space all around this unit for adequate ventilation.
5
Avoid installing this unit in a location where foreign objects
may fall onto this unit or where this unit may be exposed to
liquid dripping or splashing. On the top of this unit, do not
place:
– Other components, as they may cause damage and/or
discoloration on the surface of this unit.
– Burning objects (i.e., candles), as they may cause fire, damage
to this unit, and/or personal injury.
– Containers with liquid in them, as they may fall, spilling the
liquid and causing an electrical shock to the user and/or
damage to this unit.
6
Do not cover this unit with a newspaper, tablecloth, curtain,
etc. in order not to obstruct heat radiation. If the tempera-
ture inside this unit rises, it may cause fire, damage to this
unit, and/or personal injury.
7
Do not plug in this unit to a wall outlet until all connections
are complete.
8
Do not operate this unit upside-down. It may overheat, pos-
sibly causing damage.
9
Do not use excessive force on switches, knobs and/or cords.
10
When disconnecting the power cord from the wall outlet,
grasp the plug; do not pull the cord.
11
Do not clean this unit with chemical solvents; this might dam-
age the finish. Use a clean, dry cloth.
12
Use only the voltage specified on this unit. Using this unit
with a higher voltage than specified is dangerous and may
cause fire, damage to this unit, and/or personal injury.
YAMAHA will not be held responsible for any damage result-
ing from use of this unit with a voltage other than as speci-
fied.
13
To prevent damage by lightning, disconnect the power cord
from the wall outlet during an electrical storm.
14
Do not attempt to modify or fix this unit. Contact qualified
YAMAHA service personnel when any service is needed. The
cabinet should never be opened for any reason.
15
When not planning to use this unit for long periods of time
(i.e., vacation), disconnect the AC power plug from the wall
outlet.
16
Be sure to read the “Before you call an engineer” section on
common operating errors before concluding that this unit is
faulty.
17
Before moving this unit, press STANBY/ON to set the unit in
standby mode, then disconnect the AC power plug from the
wall outlet.
The unit is not disconnected from the AC power source as
long as it is connected to the wall outlet, even if this unit itself
is turned off.This state is called the standby mode.In this state,
this unit is designed to consume a very small quantity of power.

iii
General information
Features
Digital Home Cinema
Introducing YAMAHA DVD recorder in your home theater environment!
Dolby Digital and DTS are supported. You can enjoy super dynamic theatrical sound by
connecting to AV receiver/amplifier.
Dolby Digital
Dolby Laboratories standard for transmitting 5.1 channels. Five full-value channels are
transmitted in this acoustic playback system. A further channel is used for low frequen-
cies (effects). The loudspeakers are arranged front left, front middle, front right, rear
left and rear right. This system is currently the most common system and is used in
cinemas.
With this DVD recorder each sound track in 2-channel Dolby Digital is recorded onto
a DVD+RW.
DTS digital out
Transmission standard for 5.1 channels from Digital Theatre Systems Inc. This is the
second most wide-spread system after Dolby Digital.
Linear PCM
Audio
Recording
M1 & M2 recording modes offer high quality picture and sound enabled by linear PCM
recording.
Six Recording Modes
You have six recording modes to choose from: M1, M2, M2x, M3, M4, M6.
Select the one best suited for your need.
Six Hours of
Recording Time
You can record up to six hours in M6 recording mode.
Fit to Space Recording
Your DVD recorder calculates the best suitable bit rates from your programmed
recording time and an available disc space.
Simple programming system for DVD recorders. Simply enter the programming num-
ber associated with your television programme. You will find this number in your favor-
ite listings magazine.
Safe Record
Normally a recording is made at the current disc position. This is the same as for a
video cassette, in the middle of the tape for example. By holding down the
REC
S
button, the recording will be made at the end of all the other recordings to avoid over-
writing previous recordings.
New recordings on DVD+R discs are always added after all existing recordings.
Direct Record
At the touch of a button your DVD recorder, even though it is switched off, will check
which channel is currently playing on your television and record it.
Recordings made on your DVD recorder can be controlled from an external satellite
receiver.
Index Picture Screen
This screen tells you what’s on the disc. Each index screen represents a recording. On
the right hand side of the screen you can also see a disc indicator that shows the posi-
tion and length of the current recording on the disc in a graphic format. You can
choose and make your own index pictures from the title.
EDIT
DVD makes it so easy to delete titles, split titles, insert chapters automatically and
manually, and do many more things. It enables you to simply delete commercials and
unwanted scenes.
®
Automatic
Recording
SATELLITE

General information
iv
English
Many Playable Disc Types
The following types of disc are supported: DVD-Video, DVD-R, DVD-RW (when
recorded in video mode), CD, SVCD, VCD, CD-R, and CD-RW.
Your DVD recorder can play back pre-recorded DVDs and CDs. DVDs recorded using
this DVD recorder can be played back on current and future DVD players.
MP3-CD
PLAYBACK
MP3 files are highly compressed music files. The data is compressed to 1/10 of the vol-
ume of the original audio material using a special process. This means that 10 hours of
music can be stored on a single CD.
These music CDs can be played on this machine.
ID3 Tag
When playing MP3, your DVD recorder will display on TV the name of the albums,
tracks, and artists if ID3 Tag information is recorded on the disc.
This connector is also known as a “FireWire” or “IEEE 1394”. This connector is used
to transmit wide digital broadband signals that are used for digital video camcorders.
Using this connector, you can so easily capture and save video onto DVD from your
digital video camera.
RGB
Component
Video Input
Using your DVD recorder you can record from an RGB source such as a satellite
receiver using a SCART input (
EXT 2 AUX-I/O
socket). Video signals for the colours
R (Red), G (Green) and B (Blue) are transmitted via separate channels. This reduces
the interference that occurs with standard video cables.
Easy Link
Yamaha provides the best possible connection between your DVD recorder and other
home cinema equipment.
FOLLOW TV
This function automatically transfers all the television channel settings onto your DVD
recorder via the scart cable (
EXT 1 TO TV-I/O
socket).

1
Table of contents
Ta b le of contents
A quick preview ............................3
The remote control.................................................................................3
Additional TV functions..........................................................................4
Front of the device ..................................................................................5
Back of the unit.........................................................................................6
The symbols on your DVD recorder display ....................................7
Messages in the DVD recorder display...............................................7
1.
Introduction.............................9
Common questions .................................................................................9
Discs you can use.................................................................................. 10
Regional code......................................................................................... 11
Accessories............................................................................................. 11
Cleaning the discs.................................................................................. 11
2.
Connecting your DVD
recorder.......................................12
Preparing the remote control............................................................ 12
Connection notes.................................................................................. 12
Connecting your antenna.................................................................... 12
Connecting your DVD recorder to the TV.................................... 13
Connecting with a SCART cable and “Easy Link” ......................... 14
Connecting cable without “Easy Link” ............................................. 15
Connecting AV equipment to the EXT 2 AUX-I/O SCART
socket....................................................................................................... 17
Connecting your camcorder .............................................................. 18
3.
Connecting an AV receiver
..19
Basic playback connections................................................................. 19
Surround sound connections ............................................................. 20
Recording connections ........................................................................ 21
Power supply.......................................................................................... 22
Switching on ........................................................................................... 22
4.
Installing your DVD
recorder.......................................23
Initial installation.................................................................................... 23
Using a satellite receiver...................................................................... 25
Allocating a decoder............................................................................. 25
Manual TV channel search................................................................... 26
Sorting TV channels automatically (Follow TV)............................. 27
Automatic TV channel search ............................................................ 28
Adding and clearing TV channels manually...................................... 29
Setting the language/country............................................................... 30
Setting the time and date..................................................................... 31
5.
On-screen information......... 32
Symbols in the menu bar..................................................................... 32
Field for temporary messages ............................................................ 32
Status field............................................................................................... 33
Tuner information box ........................................................................ 34
Timer information box ........................................................................ 34
6.
Playback................................. 35
General notes on playback.................................................................. 35
Inserting a disc ....................................................................................... 35
Playing a DVD video disc..................................................................... 36
Playing a DVD+RW/ +R disc.............................................................. 36
Playing an audio CD.............................................................................. 37
Playing an MP3 CD................................................................................ 37
Playing a (Super) Video CD ................................................................ 38
7.
Additional playback
features ....................................... 39
Changing to another title/chapter..................................................... 39
Searching a disc...................................................................................... 39
Still picture.............................................................................................. 40
Slow motion ........................................................................................... 40
Search by time........................................................................................ 40
Repeat play.............................................................................................. 41
Shuffle....................................................................................................... 41
Scan feature ............................................................................................ 41
Camera angle.......................................................................................... 42
Zoom feature......................................................................................... 42
Select the audio language .................................................................... 43
Subtitles ................................................................................................... 43
8.
Manual recording.................. 44
General.................................................................................................... 44
Recording without automatic switch-off ......................................... 45
Interrupt recording (Pause) ................................................................ 46
Recording with automatic switch-off
(OTR one-touch-recording)............................................................... 46
Preventing accidental erasing of discs............................................... 47
Lining up recordings within a title (assemble cut)......................... 47
Selecting the recording type (Quality) ............................................. 48
Automatic recording from a satellite receiver
(Sat recording) ....................................................................................... 48
Direct Record........................................................................................ 49

Table of contents
2
English
9.
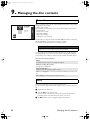
Managing the disc
contents.......................................51
General.....................................................................................................51
EDIT..........................................................................................................51
Editing recording titles (name)............................................................54
Playing the entire title...........................................................................54
Deleting recordings/titles.....................................................................54
Disc settings ............................................................................................55
10.
Programming a recording
(TIMER) .......................................57
General.....................................................................................................57
Programming recordings with the S
HOW
V
IEW
® System..............58
Programming recordings without the S
HOW
V
IEW
® System .......59
How to change or delete a programmed recording (TIMER).....60
Problem solving for programmed recordings .................................61
11.
User preferences................62
Picture settings .......................................................................................62
Sound settings.........................................................................................63
Language settings....................................................................................63
Additional settings .................................................................................64
Disc feature menu..................................................................................65
12.
Access control
(Child Lock).................................66
Child lock (DVD and VCD) ................................................................66
Parental level control (DVD video only)..........................................67
Changing the PIN code.........................................................................68
13.
Before you call an
engineer.......................................69
Appendix .....................................72
Using DRX-2 remote control for your TV set...............................72
Specifications...........................................................................................74

3
A quick preview
A quick preview
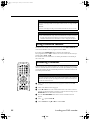
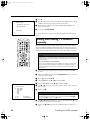
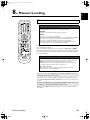
The remote control
BB
BB
/I
Switch on or off:
Press to switch set on or off, interrupt
menu function, interrupt a programmed recording (TIMER)
MONITOR
This button lets you switch between the TV receiver (internal
tuner) in the DVD recorder (TV picture on the TV set) and
playback on the DVD recorder
A/CH (Alternate
Channel)
Switches to the previous TV channel
CH +/–
Turns programs and inputs
0-9
Numerical key pad
VOL +/–
TV volume up/down
SELECT
Switches between different values in a menu
CLEAR
Deletes last entry/clear timer and programmed recordings
MUTE
TV Mute ON/OFF
TIMER
Press to make a TIMER programming with S
HOW
V
IEW
®
/with-
out S
HOW
V
IEW
®
or to alter or clear a programmed TIMER
wvt u
Down/up/left/right cursor movement
ENTER/OK
Acknowledges menu selection
TOP MENU
Displays DVD disc menu or Index Picture Screen
EDIT
Displays Edit menu for DVD+RW or DVD+R disc
SYSTEM MENU
Displays recorder system menu bar
TITLE/CHAP
Selects title
Selects chapter
SUBTITLE
Subtitle language selector
AUDIO
Audio language selector
ANGLE
Selects DVD camera angle
ZOOM
Enlarges video image
REPEAT
Repeats chapter, track, title, disc
A-B
Repeats a specific segment
SHUFFLE
Plays tracks in random order
SCAN
Playback of the first 10 seconds of each chapter within a title
(DVD) or the first 10 seconds of each track on a disc (VCD/
CD)
tt
tt
SKIP
Selects previous title/search backwards :
Briefly press the button during playback: Goes to previous
chapter/film or previous title
Hold down the button: Searches backwards
Hold down the button during still picture: Slow motion back-
wards

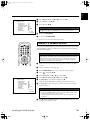
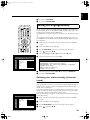
A quick preview
4
English
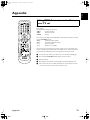
This remote control can also operate TV set made by different manufacturers.
For more information, see “Using DRX-2 remote control for your TV set”.
yy
yy
SKIP
Selects next title/search forwards :
Briefly press the button during playback: Goes to next chapter/
film or next title
Hold down the button: Searches forwards
Hold down the button during still picture: Slow motion for-
wards
PLAY
Starts playback
ee
ee
SEARCH/
SLOW
Searches backward
Slow motion
rr
rr
SEARCH/
SLOW
Searches forward
Slow motion
PAUSE
If this button is pressed during playback, the DVD recorder
switches to pause. You will see a still picture.
If this button is pressed during recording, the DVD recorder
will also switch to pause.
STOP
Stops playback/recording, except with programmed recordings
(TIMER)
Hold down button, opens and closes the disc tray
DIMMER
Changes brightness settings of the display
TV SHIFT
Press and hold while using other buttons to work the TV
SS
SS
REC
Direct recording of the currently selected programme
REC MODE
Switches recording modes
Additional TV functions
VOL+
Increase TV volume
VOL –
Reduce TV volume
For the following functions you need to hold down the button
at the side
TV/SHIFT
and then select the function you need
with the appropriate button.
/I
Turns the TV on / off
0..9 Number buttons:
0 - 9
CH+
Turns up the programme in numeric order
To select a higher programme number
CH-
Turns down the programme in numeric order
To select a lower programme number
MUTE
TV Mute on / off
BB
BB

5
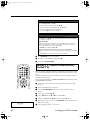
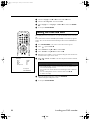
A quick preview
Auxiliary jacks on the front panel
Front of the device
STANDBY/ON
Switches the unit on or off, interrupt a function, interrupt a
programmed recording (TIMER)
FF
FF
(Open/Close)
Open/close disc tray
REC
Records the current TV channel
WW
WW
Plays a recorded disc
TT
TT
Selects previous title/search backwards
YY
YY
Selects next title/search forwards
AA
AA
Interrupt playback/recording
S-VIDEO
S Video socket:
Connection of SVHS/Hi8 camcorders or
SVHS/Hi8 video recorders (programme number “CAM1”)
Yellow socket
VIDEO
Video input socket:
Connection of camcorders or video
recorders (programme number “CAM1”)
White/red socket
left AUDIO right
Audio input socket left/right :
Connection of camcorders
or video recorders (programme number “CAM1”)
DV IN
i Link/DV socket (digital video input, IEEE 1394,
FireWire):
Connecting a digital camcorder or other suitable device (pro-
gramme number “CAM2”).
Tip
Switching between the
S-VIDEO
and
VIDEO
sockets takes place automatically. If
both sockets are in use, the signal at the
S-VIDEO
socket has priority.

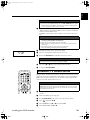
A quick preview
6
English
Output sockets (AUDIO/VIDEO OUT)
Output socket (DIGITAL AUDIO OUT)
Back of the unit
MAINS
Mains socket:
Connection to the mains supply (230V/50Hz)
ANTENNA
Aerial input :
Connection of the aerial
TV
Aerial output :
Connection of the TV set
EXT 2 AUX-I/O
Scart socket 2:
Connection of an additional device (satellite
receiver, set-top box, video recorder, camcorder, etc.)
EXT 1 TO TV-I/O
Scart socket 1:
Connection of a TV set. RGB output
S-VIDEO (Y/C)
S Video output:
Connection of an S-Video-compatible TV set
VIDEO (CVBS)
Video output (yellow socket):
Connecting a TV set with a
video input (CVBS, Composite Video)
AUDIO L, R
Analogue audio output (white/red socket):
Connection
of a TV set with audio input sockets or connection of an addi-
tional device
COAXIAL
OUTPUT
Connection of a digital audio device (amplifier/receiver) using a
coaxial digital cable
OPTICAL
OUTPUT
Connection of a digital audio device (amplifier/receiver) using a
fiber optic cable

7
A quick preview
These symbols can light up on your DVD recorder display:
The following messages may appear in your DVD recorder display:
The symbols on your DVD recorder
display
Multi-function display/text line
•) Clock
•) Disc/title playing time
•) OTR switch-off time
•) Title name
•) Display of the programme number of the TV channel/playing
time/channel name/function.
•) Display of information and alerts
IIIIIIIIIIIIIII
Disc bar:
Displays the current position on the disc (disc
pointer).
Record:
Single flashing segment at the current position.
Pause:
Flashing segment on both sides of the current position.
Stop:
Illuminated segment at the current position.
SAT
A satellite recording has been programmed.
TIMER
A recording (timer) has been programmed
A remote control signal has been received
VPS/PDC
Video programming system / programme delivery control: A
VPS or PDC code will be transmitted for the selected TV pro-
gram
LANG II
During playback a HiFi/2 channel tone was detected or a HiFi/2
channel tone was received. “I” or “II” lights up depending on
which sound channel has been selected
Messages in the DVD recorder dis-
play
IS TV ON?
The DVD recorder is in initial installation mode. Switch the TV
on, then read the paragraph on “Initial installation” in “Installing
your DVD recorder”.
NO SIGNAL
No input signal available (signal inadequate or unstable)
MENU
The menu on the screen is active
OPENING
Disc tray opening
TRAY OPEN
Disc tray open
CLOSING
Disc tray closing
READING
Disc being read
MENU UPDT
Once recording has been successfully completed the table of
contents is created
SAT TIMER VPS/PDC LANG I I

A quick preview
8
English
INIT MENU
The menu structure is created after the first recording has
been made on a new disc
COPY PROT
You have tried to copy a copy-protected DVD/video cassette
WAIT
Please wait until this message disappears. The DVD recorder is
busy performing a task
NO DISC
A disc has not been inserted for recording. If a disc has been
inserted, it cannot be read
INFO
Information about the inserted DVD is displayed on the screen
BUSY
The DVD recorder is processing to make the disc DVD com-
patible
ERASING
The entire information of the disc is erased
EMPTYDISC
The disc inserted is either new or has been completely erased
(not recorded)
PROTECTED
The disc is protected against recording
MAX TITLE
The maximum number of titles per disc has been reached. The
maximum number of titles per disc is 48
MAX CHAP
The maximum number of chapters per title/disc has been
reached. The maximum number of chapters per title is 124
DISC FULL
The disc is full. There is no space for new recordings
PAL DISC
A disc with PAL recordings has been inserted. The machine is
trying to record an NTSC signal. Insert a new disc or one that
contains NTSC recordings
NTSC DISC
A disc with NTSC recordings has been inserted. The machine
is trying to record a PAL signal. Insert a new disc or one that
contains PAL recordings
RECORDING
An illegal action (e.g.
F
Open/Close
button) was attempted
during recording
FREETITLE
Playback was started for an empty title or the following title is
empty
DISC LOCK
An attempt has been made to record during playback of a pro-
tected disc. This message appears if an attempt is made to
insert a chapter marker (
EDIT
button)
DISC ERR
An error occurred when writing the title. If this error keeps
occurring, please clean the disc or use a new one
For instructions on how to clean a disc, read the section on
“Cleaning the discs” in the next chapter
DISC WARN
An error occurred when writing the title. Recording was con-
tinued; the error was skipped
SETUP
After the automatic search the menu for setting the date/time
will appear on the screen
WAIT 01
During the automatic search the TV channels found are
counted
BLOCKED
The disc tray cannot be closed/opened
SAFE REC
The new recording will be added at the end of all the other
recordings (SAFE RECORD)
EASY LINK
Data is being transferred from the “EasyLink” TV
POST-FORMAT
A short recording has been made on a brand-new DVD+RW
disc

9
Introduction
1.
Introduction
What is a DVD?
DVD (Digital Versatile Disc) is a new storage medium that combines the convenience of
the compact disc with the latest digital video technology. DVD video uses modern
MPEG2 data compression technology that enables an entire feature film to be stored
on a single five inch disc.
How good is the resolution of DVD compared with VHS?
The razor-sharp digital images have a resolution of more than 500 lines of 720 pixels
per line. This is more than twice as high as VHS and is even better than the laser disc. Its
picture quality is easily comparable to the digital masters produced in recording studios.
What can DVD+RW do?
DVD+ReWritable uses phase change media, the same technology on which rewritable
CDs are based. A high-performance laser is used to change the reflective properties of
the recording layer; this process can be repeated more than a thousand times.
What can the DVD+R do?
DVD+R (write-once DVD). Unlike a DVD+RW disc, this disc can only be written once.
If it is not finalized after a recording, further recordings can be added to it. Old record-
ings can be deleted but can no longer be overwritten. The deleted titles are marked
“
Deleted title
”.
Before this disc can be played in a DVD player, it must be finalized in the DVD recorder.
Once this process is complete, no further recordings can be added.
What can my DVD recorder do?
Your DVD recorder is a machine for recording and playing back digital video discs with
"two-way" compatibility with the universal DVD video standard. This means:
•) existing DVD video discs can be played on the recorder.
•) Recordings made on your DVD recorder can be played on other DVD video players
and DVD ROM drives.
Common questions

Introduction
10
English
The following discs can be used in your DVD recorder for playback and recording:
Playback and recording
Playback only:
Discs you can use
DVD+RW (Digital Versatile Disc + rewritable)
DVD+R (Digital Versatile Disc + Recordable)
DVD Video (Digital Versatile Disc)
DVD-R (DVD-Recordable)
DVD-RW (DVD-Rewritable) These discs can only be played back if the recording was
made in video mode and the recording was finalized.
Audio CD (Compact Disc Digital Audio)
Super Audio CD (Only plays the CD layer of a hybrid SACD disc)
Video CD (Format 1.0, 1.1, 2.0)
Super Video CD
CD-R (CD-Recordable) Audio/MP3 content
CD-RW (CD-Rewritable) Audio/MP3 content
Recordable
ReWritable
SUPER VIDEO
DIGITAL VIDEO

11
Introduction
Since DVD films are not normally released in all parts of the world at the same time, all
DVD players have a specific regional code. Discs can be given a regional code. If the
regional codes differ between the player and the disc, playback is not possible.
DVDs must be marked “ALL” for all regions or “2” for region 2 to work in this machine.
If the DVD is marked with a different region, it cannot be played in this DVD recorder.
The number within the globe represents the region.
Regional code 2 represents:
Europe, Japan, South Africa, Middle East (incl. Egypt).
Remote control and batteries
Aerial cable
Mains cable
Scart cable (AV-Euro cable)
Some malfunctions (frozen or distorted picture and broken sound for example) are due
to dirt on the disc. To avoid such problems you should clean your discs regularly.
1
Dirty discs should be cleaned with a soft cloth. Always wipe from the middle to
the edge.
2
Do not use any solvents such as benzine, thinners, commercially available cleaning
agents or antistatic sprays designed for vinyl records.
Regional code
Accessories
Cleaning the discs
Question
Can I use a CD lens cleaner in the DVD recorder?
This optical unit (laser) of the DVD recorder operates at a higher power level than
the ones in normal DVDs and CD players so CD lens cleaner discs may actually
damage it.
CD lens cleaner discs should therefore not be used.
2
ALL

Connecting your DVD recorder
12
English
2.
Connecting your DVD recorder
You must install the supplied batteries into the remote control before you can use it.
1
Unpack the remote control and the two AA (LR-6) batteries.
2
Open the battery compartment, insert the batteries in accordance with the polar-
ity markings, and then close the battery compartment.
The remote control is now ready to use.
The remote control has a range of approximately 5 to 10 meters.
•) Before connecting your TV, VCR, AV amp, or any other equipment to your DVD
recorder, refer to the relevant manuals first.
•) Do not connect the power cord until all connections are complete.
•) For the best results when playing DVDs, connect the DVD recorder’s video output
directly to your TV. If you connect your TV via your VCR, the DVD copy protection
system may affect the picture quality.
•) To enjoy the surround sound capabilities offered by DVD (Dolby Digital, DTS,
MPEG-2), you need to connect one of the DVD recorder’s digital audio outputs to
an AV amp with an appropriate surround-sound decoder built-in. See “Surround
sound connections” on page 20.
•) For synchronized recordings to other components connected with digital audio
cables, the length of each track and track numbers of the recorded materials may
become different from the originals. Occasionally, it does not start recording.
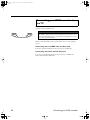
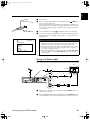
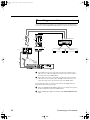
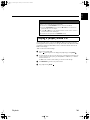
Connecting your antenna as shown will allow you to record a program on your DVD
recorder while watching another program on your TV.
1
Disconnect the antenna plug
(1)
from your TV and connect it to the DVD
recorder’s
ANTENNA
socket.
2
Using the supplied antenna cable
(2)
,
connect the DVD recorder’s
TV
socket to
your TV’s antenna input.
Preparing the remote control
Caution
Do not mix old and new batteries. Never mix different types of batteries
(standard, alkaline, etc.). Doing so may reduce the life of the batteries.
Connection notes
Caution
Do not connect the DVD recorder’s audio outputs to your audio system’s
turntable (phono) inputs. Doing so may damage your equipment.
Connecting your antenna
TV
2
1
Antenna In

13
Connecting your DVD recorder
The necessary cable connections must be made before you can record or playback TV
programmes using your DVD recorder.
When you install your DVD recorder for the first time, select one of the following
options:
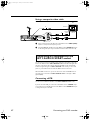
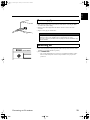
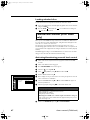
Connecting with a SCART cable and Easy Link
If your TV is equipped with “Easy Link” and you wish to use a SCART cable.
Connecting with cable without Easy Link
If your TV is not equipped with “Easy Link” and you wish to use a SCART cable,
S-Video (Y/C) cable, Video (CVBS) cable.
Connecting your DVD recorder to
the TV
Note
What is a SCART cable?
The SCART or Euro AV cable serves as the universal connector for picture, sound
and control signals. With this type of connection, there is practically no loss of qual-
ity in picture or sound transmission.

Connecting your DVD recorder
14
English
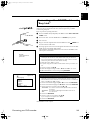
Your DVD recorder can exchange information with your TV using “Easy Link”. Your TV
channels can also be transferred in the same order from your TV to your DVD
recorder using “Easy Link”.
Please see your TV's operating instructions.
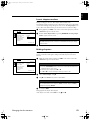
1
Connect a SCART cable (for Easylink) to the DVD recorder’s
EXT 1 TO TV-I/O
SCART
socket.
2
Connect the other end of the SCART cable to a
SCART
input on your TV.
3
Turn on the TV.
4
Plug one end of the supplied mains cable to the DVD recorder’s
MAINS
and
the other end into an AC outlet.
5
A message appears on the screen announcing that the transfer has started. “EASY
LINK” appears on the display during transfer.
The TV transfers all saved TV channels, in the same order, to the DVD recorder.
This may take several minutes.
Initial installation is now complete.
Connecting with a SCART cable and
“Easy Link”
Notes
✘
“
Time
”, “
Year
”, “
Month
”, “
Date
” appears on the TV screen
Normally the date and time are taken from the data sent by the TV channel
stored on programme P01. If the aerial signal is too weak or there is excessive
interference, you should set the date and time manually:
1
Check if the time in “
Time
” is correct.
2
If required, change the time with the number buttons
0..9
on your remote con-
trol.
3
Select the next line with
v
or
w
.
4
Check if the displayed settings for “
Year
”, “
Month
” and “
Date
” are correct.
5
When all information is correct, save by pressing
ENTER/OK
.
Notes
✘
I can see more installation menus on my TV set
Not all the necessary data has been transferred. Please enter the settings by
hand as follows. For more information on the various functions see “Initial instal-
lation” in “Installing your DVD recorder”.
1
Select the desired audio language using
w
or
v
and confirm with
ENTER/OK
.
2
Select the desired subtitle language with
w
or
v
and confirm with
ENTER/OK
.
3
Select the desired screen format position using
w
or
v
.
“
4:3 letterbox
”For a 4:3 TV set; cinema format (black bars above and below
the picture)
“
4:3 panscan
”For a 4:3 TV set; full height format with the sides cut off
“
16:9
”For a 16:9 TV set
4
Confirm with
ENTER/OK
.
5
Select the country of your residence with
w
or
v
.
If your country does not appear, select “
Other
”.
6
Confirm with
ENTER/OK
.
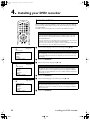
EasyLink
loading data from TV;
please wait
Virgin mode
Audio language
Press OK to continue
English
Español
Français
Português
Italiano

15
Connecting your DVD recorder
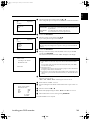
If your TV is not equipped with “Easy Link”, you need to connect the DVD recorder to
your TV using one of the following connection (the connection you choose will most
likely depend on the connections supported by your TV).
SCART (best picture quality)
SCART connections offer the best picture quality, so if your TV has a SCART
input, use it.
By using the DVD recorder’s user preferences, you can select whether the
EXT
1 TO TV-I/O
SCART socket outputs video signals in RGB or S-Video format.
RGB offers the best picture quality.
S-Video (very good picture quality)
S-Video connections offer better picture quality than composite video, so if your
TV has an S-Video input, use it.
Composite video (good picture quality)
If your TV has neither SCART nor S-Video inputs, use a composite video connec-
tion.
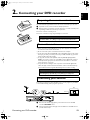
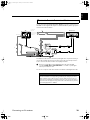
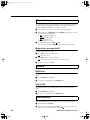
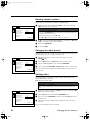
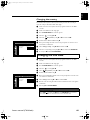
Using a SCART cable without “Easy Link”
Since SCART cables carry video and audio signals, only one cable is necessary.
1
Connect the supplied SCART cable
(3)
to the DVD recorder’s
EXT 1 TO TV-I/
O
socket.
2
Connect the other end of the SCART cable to a SCART input on your TV.
Connecting cable without “Easy
Link”
Notes
My TV has several SCART sockets. Which one should I use?
Select the SCART socket that is suitable for both video output and for video input.
My TV shows me a selection menu for the SCART socket
Select “VCR” as the source for this SCART socket.
TV
3
SCART
2
1
Sidan laddas ...
Sidan laddas ...
Sidan laddas ...
Sidan laddas ...
Sidan laddas ...
Sidan laddas ...
Sidan laddas ...
Sidan laddas ...
Sidan laddas ...
Sidan laddas ...
Sidan laddas ...
Sidan laddas ...
Sidan laddas ...
Sidan laddas ...
Sidan laddas ...
Sidan laddas ...
Sidan laddas ...
Sidan laddas ...
Sidan laddas ...
Sidan laddas ...
Sidan laddas ...
Sidan laddas ...
Sidan laddas ...
Sidan laddas ...
Sidan laddas ...
Sidan laddas ...
Sidan laddas ...
Sidan laddas ...
Sidan laddas ...
Sidan laddas ...
Sidan laddas ...
Sidan laddas ...
Sidan laddas ...
Sidan laddas ...
Sidan laddas ...
Sidan laddas ...
Sidan laddas ...
Sidan laddas ...
Sidan laddas ...
Sidan laddas ...
Sidan laddas ...
Sidan laddas ...
Sidan laddas ...
Sidan laddas ...
Sidan laddas ...
Sidan laddas ...
Sidan laddas ...
Sidan laddas ...
Sidan laddas ...
Sidan laddas ...
Sidan laddas ...
Sidan laddas ...
Sidan laddas ...
Sidan laddas ...
Sidan laddas ...
Sidan laddas ...
Sidan laddas ...
Sidan laddas ...
Sidan laddas ...
-
 1
1
-
 2
2
-
 3
3
-
 4
4
-
 5
5
-
 6
6
-
 7
7
-
 8
8
-
 9
9
-
 10
10
-
 11
11
-
 12
12
-
 13
13
-
 14
14
-
 15
15
-
 16
16
-
 17
17
-
 18
18
-
 19
19
-
 20
20
-
 21
21
-
 22
22
-
 23
23
-
 24
24
-
 25
25
-
 26
26
-
 27
27
-
 28
28
-
 29
29
-
 30
30
-
 31
31
-
 32
32
-
 33
33
-
 34
34
-
 35
35
-
 36
36
-
 37
37
-
 38
38
-
 39
39
-
 40
40
-
 41
41
-
 42
42
-
 43
43
-
 44
44
-
 45
45
-
 46
46
-
 47
47
-
 48
48
-
 49
49
-
 50
50
-
 51
51
-
 52
52
-
 53
53
-
 54
54
-
 55
55
-
 56
56
-
 57
57
-
 58
58
-
 59
59
-
 60
60
-
 61
61
-
 62
62
-
 63
63
-
 64
64
-
 65
65
-
 66
66
-
 67
67
-
 68
68
-
 69
69
-
 70
70
-
 71
71
-
 72
72
-
 73
73
-
 74
74
-
 75
75
-
 76
76
-
 77
77
-
 78
78
-
 79
79


Yamaha DRX-2 Bruksanvisning
- Kategori
- CRT-TV-apparater
- Typ
- Bruksanvisning
på andra språk
- italiano: Yamaha DRX-2 Manuale del proprietario
- Deutsch: Yamaha DRX-2 Bedienungsanleitung
- français: Yamaha DRX-2 Le manuel du propriétaire
- Türkçe: Yamaha DRX-2 El kitabı
- English: Yamaha DRX-2 Owner's manual
- dansk: Yamaha DRX-2 Brugervejledning
- Nederlands: Yamaha DRX-2 de handleiding
- română: Yamaha DRX-2 Manualul proprietarului
Relaterade papper
-
Yamaha DRX-730 Bruksanvisning
-
-
Yamaha HTR-6140 Bruksanvisning
-
Yamaha RX-V563 Bruksanvisning
-
-
-
-
-
-
Andra dokument
-
Philips 32PF4320 Användarmanual
-
NAD 517 Användarmanual
-
-
HP dvd600 DVD Writer series Användarguide
-
-
HP (Hewlett-Packard) DVD player Användarmanual
-
Clas Ohlson F71 Användarmanual
-
Sony KD-32NX200E Användarmanual
-
Sanyo RB-SL25 Användarmanual
-
Silvercrest KH 6522 Operating Instructions Manual