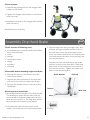
Human Care Slow Down Brake 10625 Bruksanvisning
- Kategori
- Barnvagnar
- Typ
- Bruksanvisning

Accessory manual
Fellow Classic, Fellow Supreme

2www.humancaregroup.com
Content
Accessory overview 3
Assembly Tray 4
Assembly Basket 5
Assembly Slow Down Brake 5
Assembly Newspaper Strap 5
Assembly cane holder 6
Assembly Bag 7
Assembly Back Support 7
Assembly Curb Climber 8
Assembly IV-stand 8
Assembly Oxygen Holder 10
Assembly One Hand Brake 11
Tillbehörsöversikt 12
Montering bricka 13
Montering korg 14
Montering släpbroms 14
Montering käpphållare 15
Montering väska 16
Montering ryggband 16
Montering steghjälp 17
Montering droppställning 17
Montering tidningsband 19
Montering Syrgashållare 20
Montering enhandsbroms 20
Montering låsspärr 21

www.humancaregroup.com 3
Accessory Manual (ENG)
Fellow Classic, Fellow Supreme
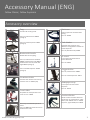
Accessory overview
Tray
Practical for resting items.
Part no, Fellow Classic: 08806
(image 1)
Part no. Fellow Supreme: 10667
(Image 2)
Basket with handle
Basket ideal for shopping.
Part no, Fellow Classic standard:
08805. Fellow Classic low: 88052.
Fellow Classic narrow, wide and
high: 88052. (Image 1)
Part no Fellow Supreme: 10666
(Image 2)
Slow down brake
Prevents the rollator from moving
too fast. Part no: 10625 (set)
Cane holder
Simplifies the transportation of a
cane. Part no: 10603
Soft carry case ideal for personal
items.
Part no: 08808. (Cannot be used on
Fellow Classic low)
Back rest
Gives support for the back when
sitting.
Part no: 10668
Curb climber
Simplifies the transport over
obstacles. Integrated in rollator for
Fellow Supreme.
Part no (Fellow Classic):10661
IV-stand
Can only be used with Fellow
Classic Standard.
Part no: 89654
Oxygen holder
Part no, Fellow Classic: 08811.
Part no. Fellow Supreme: 10671
Newspaper strap
Can only be used on Fellow
Supreme.
Part no. 10679.
One-hand brake
Allows control of brakes with one
hand. Part no, Fellow Classic, right:
10677, left: 10678. Part no. Fellow
Supreme, right: 10669, left: 10676.
1
2
1
2

4www.humancaregroup.com
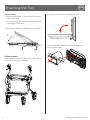
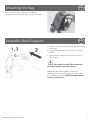
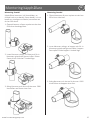
Attaching the Tray ENG
Fellow Classic
1. Attach the bracket of the tray over the back
edge of the seat.
2. Secure the tray by firmly pressing it over the
front edge of the seat.
Lift the tray in the front edge when removing it.
1.
2.
Fellow Supreme
Assemble the tray on to the seat of the rollator
as according to picture below.
1. Remove the tray by unfolding the seat.
Push underneath the tray’s feet to remove the
tray from the seat.

www.humancaregroup.com 5
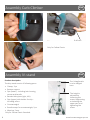
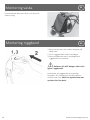
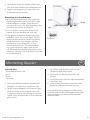
Attaching the Basket ENG
Fellow Classic
Hang the basket on the pipe to the locking device
and place it on the grating. Max load 10kg.
Fellow Supreme
Place the basket on the grid and push the
bracket over the frame.
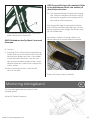
Slow down brake - right and left
The trailer brake is assembled by pushing it onto
the brake gear and fasten it through leading the
hook on the underside of the brake gear.
Adjust the roll resistance by screwing the
adjusting screw. Lock the adjusting screw with
the stop nut.
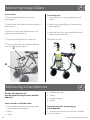
Attaching the Slow Down Brake ENG
Attaching the Newspaper Strap ENG
Pull the news paper strap over the seat to the
intended track. Only for Fellow Surpreme

6www.humancaregroup.com
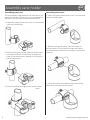
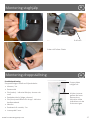
Assembly cane holder
Assembling upper part.
The cane holder is delivered in two main parts, an
upper and a lower. These are in turn composed of
two parts, verify that you have received them.
1. Open the clamp about that much it can be lead
over the handle pipe.
2. Before closing the clamp, take the attachment
and lead the pliers of the clamp through the
hole of the attachment. Attend on turning it in
preferred position.
3. Close the clamp and tighten the screw. Note!
Make sure that the attachment is secured.
Assembling lower part.
1. Open the clamp about that much it can be lead
over the handle pipe.
2. Before closing the clamp, take the cup and
lead the pliers of the clamp through the hole of
the attachment. Attend on turning it in preferred
position.
3. Close the clamp and tighten the screw. Note!
Make sure that the cup is secured.
ENG

www.humancaregroup.com 7
Attaching the Bag ENG
Form adjusted carrier bag that should be
adjusted around the pipe at the hold of the seat.
Assembly Back Support ENG
1. Loosen the screws and remove the knobs on
both sides.
2. Insert the back support into the end of the
handle.
3. Tighten the screws and the back support is
assembled.
The rollator can NOT be suspended,
carried or lifted in the back support.
Make sure the back support is securely
fastened. Pull the back support to make sure
it is fastened properly. NOTE! Pay aenon to
cracks or loose parts.

8www.humancaregroup.com
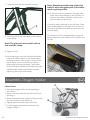
Assembly Curb Climber ENG
8-10 mm
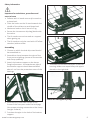
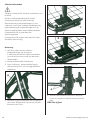
Assembly IV-stand ENG
Product descripon
The drip stand consist of following parts:
• Clamps, 3 pc
• Bottom support
• Pipe (lower) - including lock housing,
screws and handle
• Bended side pipes (right, left)
• Pipe (upper) with holder for drip -
including velcro.
• Counterweigth
• Bundle straps for counterweight, 2 pc.
• Allen key 5 mm.
Only for Fellow Classic Standard.
The heigth is
adjusted by
loosening this
screw, heightening
or lowering the
upper part, and
tightening the
screw.
The IV bag/bottle
is to be hanged
here.
Only for Fellow Classic

www.humancaregroup.com 9
8-10 mm
Important for technicians, prescribers and
users to know
• Rollator with IV stand must only be used on
a plane level.
• Point the hooks on the IV stand towards the
middle of the rollator to avoid skew load.
• Maximum load on the IV stand is 3 kg.
• Secure the intravenous drip bag/bottle with
the velcro.
• The IV stand must not be used as a support
when getting up.
• The IV stand can only be used with till Fellow
standard, wide and low.
Safety informaon
Assembling
1. Choose on which the side drip stand should
be assembled on.
2. Assemble a clamp between the pipe of the
front part and grating (screws to the outside
and clamp upwards).
3. Attach the bottom support to the clamp.
Rough adjustment - the attachment pipe of
the bottom support should be assembled
about 1 cm from the protection cover of the
bearings.
4. Assemble the other two clamps on the
frame of the front part under the lock pegs
(the screws pointing outwards and the clamp
straight forward).
5. Put down the pipe in the hole of the bottom
support.
6. Assemble the bended side pipes in the lock
housing. Make sure respectivley side pipe is
placed on the right side.
Note! Do not tighten firmly.

10 www.humancaregroup.com
Assembly Oxygen Holder ENG
Fellow Classic
1. Place the oxygen holder on the graiting of
the rollator.
2. Attach the two hooks on the rear end of the
graiting, A.
3. Attach the basket with a plastic clamp around
the front frame of the rollator, B.
4. Tighten with enclosed screw and knob.
5. Fix the oxygen tank with the velcro at the
oxygen holder, C.
B
C
A
7. Loosen the handle on the lock housing.
8. Put the ends of the side pipes in the clamps
from below.
Note! The pipe ends must match side to
side with the clamp.
8. Tighten firmly.
9. Adjusting to get a vertical dripstand:Achieve
to get the upper clamps to the same height,
pointing forward. Then loosen a little on the
lower clamp, turn it outwards or inwards
depending on preferred angle. There after
move the clamp sideways to achieve the right
sideway angle. When adjustment is ready
tightening all screws and clamps.
Note! Maximum heightening of the drip
stand is when the upper part of the white
mark is getting visible
10. If the drip stand is placed on the right side:
Place the counterweight at the left side, as
close to the side as possible, and secure it
with the two bundle straps.
If the drip stand is placed on the left side: Place
the counterweight at the right side, as close to
the side as possible, and secure it with the two
bundle straps.
The function of the counterweight is to give a
better balance to the rollator and to reduce the
tilt risk.

www.humancaregroup.com 11
Assembly One Hand Brake ENG
The kit consists of following parts:
• A complete pre-mounted handle with brake
lever and handlebar.
• wires
• casings
• distribution piece
• spring
• end seals
• wire lock
Disassemble before mounng single-hand brake
1. Remove the wires by the wheels on both
sides of the rollator.
2. Remove the wire and lever on the side that
will not to be used as a single-hand brake
3. Remove the handle tube on the side of the
handbrake.
Mounng of one-hand brake
1. Mount the one-hand brake on the desired side.
The distribution piece with the two holes up
at the handle is rotatable. Make sure that the
wires are not crossed, ie. The long wire should
be mounted to the center of the rollator.
2. Pull down the covers and the wires to the
wheels, the same way as the demounted sets.
3. Step through each wire through cover, wire
bracket, spring and brake bracket. Step on
the end sleeve with the knob down to the
floor, the sleeve should be in the bracket bell
hole and prevent the wire from jumping, see
also the illustration.
Step on the wire lock and adjust the brake
position so that it will work well. Check that
both ends of the housing are inserted into
the correct position. Tighten the cable lock
and cut the remaining wire.
Wire lock
End capbrake bracket
Feather
Wire
End cap
Fellow Supreme
1. Remove the grating and put the oxygen tank
holder on the frame.
2. Tighten the oxygen tank holder on the frame
with the strap.
3. Assembly the tank on the oxygen tank holder
with the velcro.
Note! Maximum load 5kg

12 www.humancaregroup.com
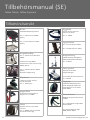
Tillbehörsmanual (SE)
Fellow Classic, Fellow Supreme
Tillbehörsöversikt
Bricka
Underlättar förflyttning av saker.
Art. nr: Fellow Classic: 08806
(Bild 1)
Art. nr Fellow Supreme: 10667
(Bild 2)
Korg med handtag
Art. nr: Fellow Classic Standard:
08805.
Fellow Classic låg: 88051
Fellow Classic smal, bred och hög:
88052. (Bild 1)
Art. nr: Fellow Supreme: 10666
(Bild 2)
Maxvikt samtliga: 10 kg
Släpbroms
Tillbehör som gör rollatorn
mindre lättrullad.
Art. nr: 10625 (par)
Käpphållare
Underlättar medtagandet av
käppen. Art. nr: 10603
Väska
Skyddar mot insyn och väder
och vind.
Art. nr: 08808. (Kan ej användas
för Fellow Classic Låg)
Ryggband
Ger ett stöd åt ryggen när
brukaren vill sitta.
Art. nr: 10668
Syrgashållare
Art. nr: Fellow Classic: 08811.
Art. nr Fellow Supreme: 10671
Droppställning
Praktiskt förvaring av droppåsen.
Endast till Fellow Classic Standard.
Art. nr: 89654
Tidningsband
Tillbehör för att fästa
morgontidningen.
Finns endast till Fellow Supreme.
Art. nr 10679.
Steghjälp
Underlättar förflyttningen över
hinder. Integrerad i rollatorn för
Fellow Supreme. Art. nr, Fellow
Classic:10661
Enhandsbroms
Möjliggör att styra bromsarna med
en hand.
Art. nr: Fellow Classic, höger: 10677,
vänster: 10678.
Art. nr Fellow Supreme, höger:
10669, vänster: 10676.
1
2
1
2

www.humancaregroup.com 13
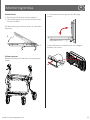
Montering bricka SE
Fellow Classic
1. Trä brickans fäste över sitsens bakkant.
2. Fäst brickan genom att trycka fast den över
sitsens framkant.
Vid demontering av brickan lyfter du i brickans
framkant.
1.
2.
Fellow Supreme
Montera brickan på rollatorns sits enligt figur
nedan.
1. Demontera brickan genom att fälla upp
sitsen.
Tryck på fötternas undersida för att avlägsna
brickan från sitsen.

14 www.humancaregroup.com
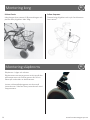
Fellow Classic
Häng korgen över ramen till låsanordningen och
placera den på gallret. Max 10kg.
Fellow Supreme
Placera korg på gallret och tryck fast klamman
över ramen.
Montering korg SE
Släpbroms - höger och vänster
Släpbromsen monteras genom att skjuta på den
på bromsarmen och fixeras genom att föra in
haken på undersidan av bromsarmen.
Justera rullmotståndet genom att skruva på
justerskruven. Därefter låses justerskruven med
stoppmuttern.
Montering släpbroms SE

www.humancaregroup.com 15
Montering käpphållare SE
Montering överdel
Käpphållare levereras i två huvuddelar, en
överdel och en underdel. Dessa består i sin tur
består av ytterligare två delar, kontrollera att
du har fått dessa.
1. Öppna klamman så pass mycket att den kan
föras över handtagsröret.
2. Innan klamman stängs, ta fästet och för in
klammans griptänder genom hålet i fästet.
Passa på att vrida den i önskad läge.
3. Stäng klamman och skruva åt skruven. OBS!
Kontrollera att fästet sitter fast.
Montering överdel
1. Öppna klamman så pass mycket att den kan
föras över sidoröret.
2. Innan klamman stängs, ta koppen och för in
klammans griptänder genom hålet i koppen.
Passa på att vrida koppen i önskad läge.
3. Stäng klamman och skruva åt skruven. OBS!
Kontrollera att koppen sitter fast.

16 www.humancaregroup.com
Formanpassad väska som fästs runt röret vid
sitsens urtag.
Montering väska SE
1. Skruva ut skruven och ta bort knoppen på
båda sidor.
2. För in ryggbandets ände i handtagen.
3. Skruva tillbaka skruven i handtaget och
ryggbandet är monterat.
Rollatorn får INTE hängas, bäras eller
lyftas i ryggbandet.
Kontrollera att ryggbandet är ordentligt
fastspänt. Dra i bandet och försäkra dig om
att den sitter fast. OBS! Var uppmärksam mot
sprickor eller lösa delar.
Montering ryggband SE

www.humancaregroup.com 17
Montering steghjälp SE
8-10 mm
Montering droppställning SE
Produktbeskrivning
Droppställningen består av följande delar:
• Klamma, 3 st
• Bottenstöd
• Rör (nedre) - inklusive låshylsa, skruvar och
vred
• Bockade sidorör (höger, vänster)
• Rör (övre) med hållare för dropp - inklusive
kardborreband.
• Motvikt
• Buntband till motvikt, 2 st.
• Insexnyckel 5 mm.
Höjden justeras
genom att lossa
denna skruv,
höja eller sänka
överdelen och dra
åt skruven igen.
Dropp-påsen
hänges här
Enbart till Fellow Classic

18 www.humancaregroup.com
Viktigt att tänka på för tekniker, ordinatörer och
brukare
Rollator med droppställning får endast
användas på plant och slätt underlag.
Rikta krokarna på droppställningen in mot
rollatorns mitt för att undvika snedbelastning.
Max belastning på droppställningen är 3 kg.
Säkra droppåse/flaska med kardborrebandet.
Droppstativet får ej användas som
uppresningsstöd.
Droppstativet får endast användas till Fellow
standard, bred och låg.
Säkerhetsinformaon
Montering
1. Välj först vilken sida av rollatorn
droppställningen ska monteras.
2. Montera en klamma mellan framdelens
rör och nät (skruvarna utåt och klamman
riktad uppåt).
2. Anslut bottenstödet till klamman.
3. Grov inställning - bottenstödets fäströr
skall monteras ca 1 cm från lagerhållarens
skyddshuv.
4. Montera övriga två klammor på framdelens
ram under låstapparna (skruvarna utåt och
klamman rakt fram).
5. Sätt nedre röret i bottenstödets hål.
6. Montera de bockade sidorören i låshylsan.
Se till att respektive sidorör kommer på rätt
sida.
OBS! Dra ej fast.

www.humancaregroup.com 19
Montering tidningsband SE
För över tidningsbandet över dynan till det
avsedda spåret
Enbart till Fellow Surpreme
7. Lossa vredet på låshylsan. Sätt i sidorörens
ändar i klammorna underifrån.
OBS! Rörändarna skall gå kant i kant med
klamman.
8. Dra fast.
9. Justering för att få en lodrät droppställning:
Sträva efter att de övre klammorna sitter på
samma höjd riktade rakt fram. Lossa sedan
lite på den nedre klamman, vrid den utåt
eller inåt beroende på önskad vinkel. Flytta
därefter klamman i sidled för att uppnå rätt
vinkel i sidled.
10. När injusteringen är klar - efterdra alla
skruvar och vred.
OBS! Droppställningen får maximalt höjas
så att överkanten på det vita märket på
röret börjar att synas.
11. Om droppställningen är placerad på höger
sida: Placera motvikten på vänster sida, så
nära kanten av gallret som möjligt och lås
den med de två buntbanden.
Om droppställningen är placerad på vänster
sida: Placera motvikten på höger sida, så nära
kanten av gallret som möjligt och lås den med
de två buntbanden.
Motviktens funktion är att ge rollatorn en
bättre balans och minska rollatorns tipprisk.
Enbart till Fellow Classic Standard.

20 www.humancaregroup.com
Fellow Classic
1. Placera syrgashållaren på rollatorns
bottengaller.
2. Haka fast de två krokarna på bottengallrets
bakre kant, A.
3. Sätt fast korgen med plastklammer runt
rollatorramens framkant, B.
4. Fäst med medföljande skruv och ratt.
5. Fixera syrgastuben med kardborrebandet
som sitter på syrgaskorgen, C.
B
C
A
Montering Syrgashållare SE
Fellow Supreme
1. Ta bort gallret och sätt syrgashållaren på
ramen.
2. Spänn fast syrgashållaren på ramen med
spännbandet.
3. Montera fast tuben på syrgashållaren med
hjälp av karborrebandet.
OBS! Max last 5kg
Montering enhandsbroms SE
Viktigt! Läs igenom hela
monteringsanvisningen innan arbetet
påbörjas.
Satsen består av följade delar:
• Ett komplett förmonterat handtag med
bromsspak och handtagsrör.
• Wirar
• höljen
• fördelningsstycke
• fjädrar
• ändavslutningar
• wirelås
Demontering före montering av
enhandsbroms
1. Demontera wirarna nere vid hjulen på båda
sidor av rollatorn.
Sidan laddas...
Sidan laddas...
-
 1
1
-
 2
2
-
 3
3
-
 4
4
-
 5
5
-
 6
6
-
 7
7
-
 8
8
-
 9
9
-
 10
10
-
 11
11
-
 12
12
-
 13
13
-
 14
14
-
 15
15
-
 16
16
-
 17
17
-
 18
18
-
 19
19
-
 20
20
-
 21
21
-
 22
22


Human Care Slow Down Brake 10625 Bruksanvisning
- Kategori
- Barnvagnar
- Typ
- Bruksanvisning
på andra språk
Relaterade papper
-
Human Care 89009 Rollator Fellow Classic Användarmanual
-
-
-
-
Human Care Back Strap 10621 Bruksanvisning
-
-
Human Care Carl-Oskar Trolley Walker Användarmanual
-
-
Human Care Rebel Bruksanvisning
-