Cello RODIUM 3 BLACK Användarmanual
- Kategori
- Grillar
- Typ
- Användarmanual
Denna manual är också lämplig för

Instruction manual GB
Käyttöohje FI
Bruksanvisning SE
Bruksanvisning NO
Kasutusjuhend EE
Instrukcijas LV
Instaliavimo instrukcijos LT
RODIUM 3 BLACK
2-24
25-46
47-67
68-88
89-109
110-129
130-149
(502100393/6438313544173)

2
1
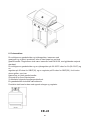
GB
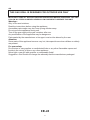
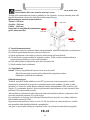
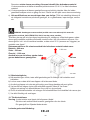
IMPORTANT: READ ALL INSTRUCTIONS AND OPERATIONS BEFORE OPERATING THIS UNIT.
FOLLOW ALL STEPS IN ORDER. NEVER ALLOW CHILDREN TO OPERATE THIS UNIT.
Warnings:
Only to be used outdoors.
Read the instructions before using the appliance.
Accessible parts maybe very hot, keep young children away.
Do not move the appliance during use.
Turn off the gas supply at the gas container after use.
Any modification of the appliance may be dangerous.
Parts sealed by the manufacturer or his agent must not be altered by the user.
Attention:
Some parts of this appliance become very hot, take special care when children or elderly
are present.
For your safety:
Do not store or use gasoline or mentholated fuels or any other flammable vapors and
liquids in the vicinity of this or any other appliance.
Never light a gas grill with gasoline or comparable fluids!
Suggestion: user should not change the assembly that the manufacturer packaged.
THIS GAS GRILL IS DESIGNED FOR OUTDOOR USE ONLY

2575CU0359CS02602

4
3
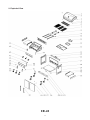
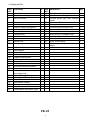
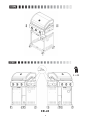
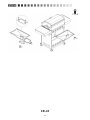
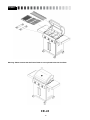
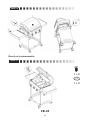
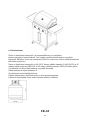
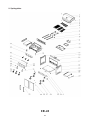
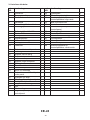
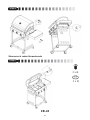
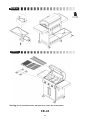
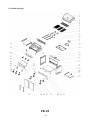
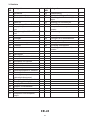
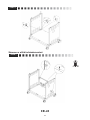
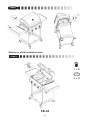
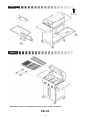
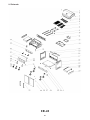
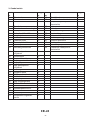
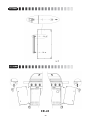
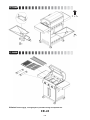
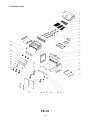
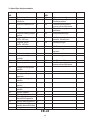
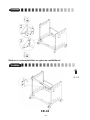
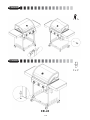
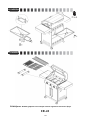
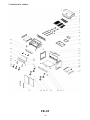
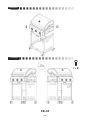
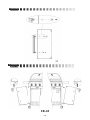
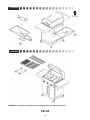
2. Exploded View

5
3
2. Exploded View

6
5
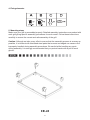
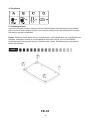
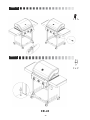
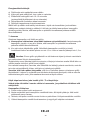
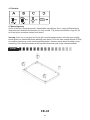
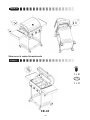
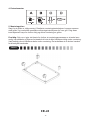
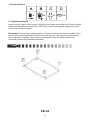
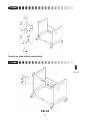
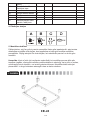
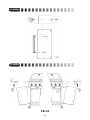
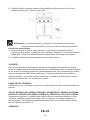
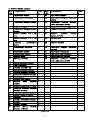
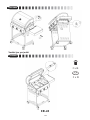
4. Fixing elements
5. Mounting steps
Make sure your grill is assembled properly. Detailed assembly instructions are packed with
each grill giving specific assembly procedures for each model. Follow these instructions
carefully to ensure the correct and safe assembly of the grill.
Caution: Although we take every effort to ensure that the assembly process is as easy as
possible, it is inherent with fabricated steel parts that corners and edged can cause cuts if
improperly handled during assembly procedures. Be careful while handling any parts
during assembly. It is strongly recommended that you protect hands with a pair of work
gloves.

7
5
4. Fixing elements
5. Mounting steps
Make sure your grill is assembled properly. Detailed assembly instructions are packed with
each grill giving specific assembly procedures for each model. Follow these instructions
carefully to ensure the correct and safe assembly of the grill.
Caution: Although we take every effort to ensure that the assembly process is as easy as
possible, it is inherent with fabricated steel parts that corners and edged can cause cuts if
improperly handled during assembly procedures. Be careful while handling any parts
during assembly. It is strongly recommended that you protect hands with a pair of work
gloves.
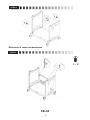
6
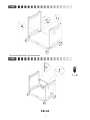
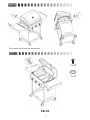
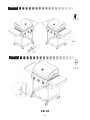
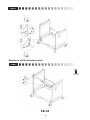
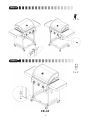
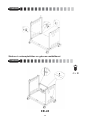
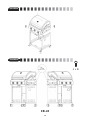
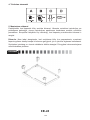
4 x B
The screws have been pre assembled

8
7
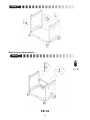
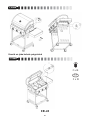
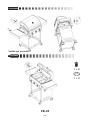
4 x A
The screws have been pre assembled

9
7
4 x A
The screws have been pre assembled
8
4 x B

10
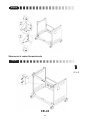
9
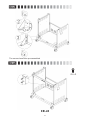
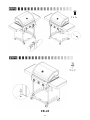
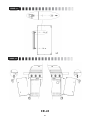
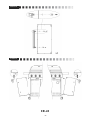
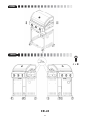
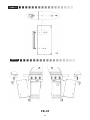
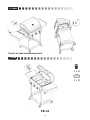
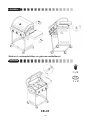
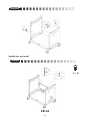
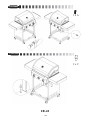
2 x B
2 x D
The screws have been pre assembled

11
9
2 x B
2 x D
The screws have been pre assembled
10
2 x B
2 x D
The screws have been pre assembled

12
11
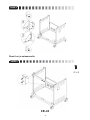
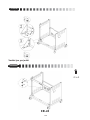
1 x A
2 x C

13
11
1 x A
2 x C
12
X2

14
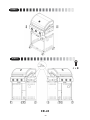
13
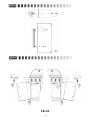
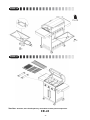
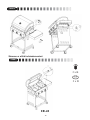
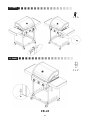
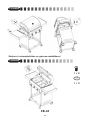
2 x A

15
13
2 x A
14
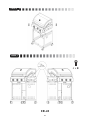
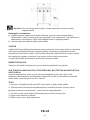
STEP17
Warning: Please ensure that the Flame Tamer is never placed below the Hot Plate.

16
15
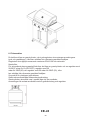
6. Preparation
See point 9 for further instructions.
Strongly recommended procedures/usage:
When using the gas cylinder, it must always be kept in upright position.
This appliance must only be used with an approved hose and regulator.
Energy saving tips:
a) Reduce the opening time of the lid.
b) Turn the grill off as soon as cooking is completed.
c) Preheat the gas grill for 10 to 15 minutes only.
(Except for the first use)
d) Do not preheat longer then recommended.
e) Do not use a higher setting than required.
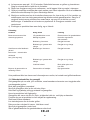
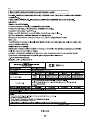
You will need to purchase a gas cylinder and the pressure regulator should correspond to
the pressure and gas category of the appliance, which can be obtained from your nearest
Gas Retailer. The regulator should be complying with EN16129 with current version and
national regulation.
You will need to purchase a gas cylinder and a 28-30/37 mbar regulator for I3+(28-30/37)
and 30mbar regulator for I3B/P(30), 50 mbar regulator for I3B/P(50) to operate this gas grill
which can be obtained from your nearest Gas Retailer.
If the hose and regulator are not included by the manufacturer, then only hoses and
regulators which meet national and regional codes are to be used. Connect the hose and
regulator to the gas cylinder at the right side of the gas grill .Keeping in mind that the gas
cylinder must be kept away from heat and in a safe position.

17
15
6. Preparation
See point 9 for further instructions.
Strongly recommended procedures/usage:
When using the gas cylinder, it must always be kept in upright position.
This appliance must only be used with an approved hose and regulator.
Energy saving tips:
a) Reduce the opening time of the lid.
b) Turn the grill off as soon as cooking is completed.
c) Preheat the gas grill for 10 to 15 minutes only.
(Except for the first use)
d) Do not preheat longer then recommended.
e) Do not use a higher setting than required.
You will need to purchase a gas cylinder and the pressure regulator should correspond to
the pressure and gas category of the appliance, which can be obtained from your nearest
Gas Retailer. The regulator should be complying with EN16129 with current version and
national regulation.
You will need to purchase a gas cylinder and a 28-30/37 mbar regulator for I3+(28-30/37)
and 30mbar regulator for I3B/P(30), 50 mbar regulator for I3B/P(50) to operate this gas grill
which can be obtained from your nearest Gas Retailer.
If the hose and regulator are not included by the manufacturer, then only hoses and
regulators which meet national and regional codes are to be used. Connect the hose and
regulator to the gas cylinder at the right side of the gas grill .Keeping in mind that the gas
cylinder must be kept away from heat and in a safe position.
16
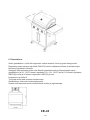
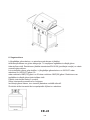
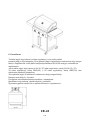
7. Installation
After purchasing your gas bottle you will then be ready to set it up with your gas grill.
a) When changing the gas bottle which shall be carried out away from any source of
ignition. Position the gas bottle at the side of your gas grill, not underneath, keeping in
mind that the bottle must be kept away from heat and in a safe position.
b)
Warning: Before attempting to light your gas grill you must refer to your lighting
instructions and warning / safety points.
Check the hose before each use, searching for cracking, cuts or any abrasions. If the hose
is found to be faulty in any way do not attempt to use your gas grill.
When changing your gas bottle ensures that there are no sources of ignition close by i.e.
fires, cigarettes, naked flames etc. Make sure that the appliance is switched off.
Ensure that the hose is not subjected to twisting which will affect the gas flow when
using your gas grill. Also the hose must not have undue tension and must not touch any
part of the gas grill which may be hot.
Please choose flexible hose whose heatproof higher than 80
Every 2 years changing the flexible hose when the national conditions require it.
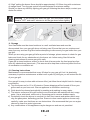
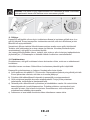
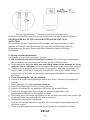
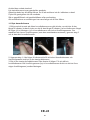
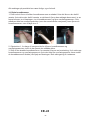
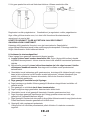
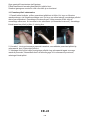
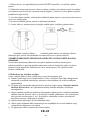
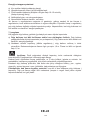
How to connect a gas bottle
a) Turn the orange cap so that the arrow is pointing to the gap in the shroud.
b) Remove the orange safety cap by pulling the lanyard out, then out. Do not use tools.
Leave the cap hanging.
c) Check that the black sealing washer is fitted inside the cylinder valve. Place the
regulator down over the valve with switch.
d) Turn the switch clockwise on gas bottle-then turn on the gas grill as instructed.
When ready to use your gas grill insert the regulator into the gas cylinder valve and
tighten firmly. The recommended hose length is about 1.0 m. The hose must not be longer
than 1.5 m.

18

19
18
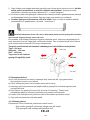
Install Regulator Hose Install Gas Tank & Regulator Hose
Do not use the grill until all connections have been checked and do not leak.
ALWAYS CHECK FOR LEAKS AFTER EVERY GAS TANK CHANGE
Check all gas supply fittings for leaks before each use. It is handy to keep a spray
bottle of soapy water near the shut-off valve of the gas supply line. Spray all the fittings.
Bubbles indicate leaks.
8. Warning and safety points
Please read the following points before using your gas grill:
a) Read the instructions before using the appliance. Please follow all assembly
instructions in this manual; if instructions are not followed it may cause problems in use.
b) This gas grill accessible parts maybe very hot when being used. Keep young
children away. Use protective when handling particularly hot components.
c) In the event of a gas leak shut off gas to the gas grill, extinguish any open flames, open
lid and if leak continues check for damages, poor connections etc. Contact your local
gas dealer immediately if the problem can’t be solved.
d) Do not move Gas grill during use.
e) Do not use or store any flammable liquids or vapors in the vicinity when operating the
gas grill.
f) This gas grill only to be used outdoors.
g) Do not use a naked flame to check for gas leaks.
h) Do not operate gas grill if there is a gas leak. Turn off the gas supply.
i) Do not attempt to disconnect any gas fitting part if your gas grill is being used, on the
gas grill or the gas regulator / bottle.
j) Care is advised when operating your gas grill, you should never leave unattended when
in use. Turn off the gas supply at the gas container after use.
k) The gas grill should be cleaned on a regular basis.
Take care not to enlarge burner ports or orifice/nozzle openings when cleaning the
burner or valves.
l) Do not attempt to use this appliance in a garage or any enclosed area. Also this
appliance must be keep away from flammable materials, etc. We recommend
keeping a distance of at least 0.5 to 1.0 meter clear of any flammable materials.
m) We would recommend that this gas grill be serviced by your local gas retail outlet at
least once a year by a competent engineer. Do not attempt to service this appliance
yourself.
n) Any modification of the appliance may be dangerous. Do not attempt any
unauthorized interference of the main controls on this gas grill, i.e. gas taps, injectors,
valves etc.
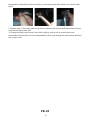
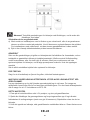
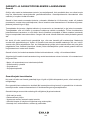
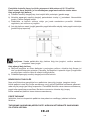
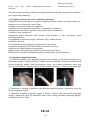
WARNING: The Handle Black Area (See Above Picture for Reference) Will Become Hot

20
19
When the Gas grill In Use, BE CAREFUL! Do Not Touch The Black Area.
“Since this barbecue has no restriction in the emission of unburned gas, this barbecue must
be installed and/or used outdoors or in an amply ventilated area. Were this BBQ in an
amply ventilated area the area must have at least 25% of the surfacesum of the wall
surfacearea open. ”
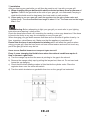
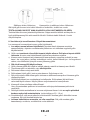
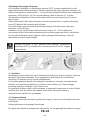
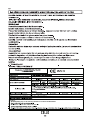
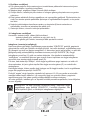
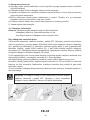
Strongly recommends minimum clearances from combustible materials must be:
Rear - 600mm
Sides - 500mm
Top - 1000 mm
Strong wind is not allowed to blow
through the back of the gas grill.
9. Safety precautions
a) Always test gas line for leaks at connector with soapy water after making connections.
b) The top lid must always be open when lighting the burner.
c) Use oven gloves and sturdy, long handled gas grill tools when cooking on the grill.
d) Be prepared if an accident or fire should occur. Know where the first aid kit and fire
extinguishers are and know how to use them.
e) Keep any electrical supply cord and the fuel supply hose away from any heated
surfaces.
f) Always cook with great care.
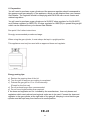
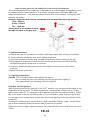
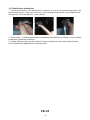
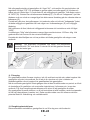
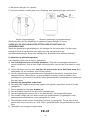
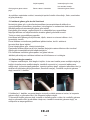
10. Lighting instructions
Caution: The lid must be open when lighting the burner!
Do not stand with your face directly over the gas grill when lighting it.
Your gas grill will have following method of ignition:
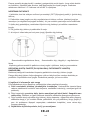
Pilot Gas Control Ignition:
With all gas controls on the Gas grill in the “OFF” position, turn the gas cylinder valve to the
on position at the regulator. To create a spark you must push the control knob in (A) and
hold in this position for 3-5 seconds to allow gas flow and then turn anticlockwise to” HIGH”
(B). It can spark to the burner lighting tube (C). You will hear a “snap” from the igniter and
you will also see a orange flame coming from the burner lighting tube at the left side of the
burner (D).
Continue to hold the burner control knob in for two seconds after the “snap”, this will allow
gas to flow completely down the burner tube (E) and insure ignition.
When the burner is alight, adjacent burners will cross light when their controls are turned to
“HIGH”
500mm
1000mm
600mm 600mm
500mm
Sidan laddas...
Sidan laddas...
Sidan laddas...
Sidan laddas...
Sidan laddas...
Sidan laddas...
Sidan laddas...
Sidan laddas...
Sidan laddas...
Sidan laddas...
Sidan laddas...
Sidan laddas...
Sidan laddas...
Sidan laddas...
Sidan laddas...
Sidan laddas...
Sidan laddas...
Sidan laddas...
Sidan laddas...
Sidan laddas...
Sidan laddas...
Sidan laddas...
Sidan laddas...
Sidan laddas...
Sidan laddas...
Sidan laddas...
Sidan laddas...
Sidan laddas...
Sidan laddas...
Sidan laddas...
Sidan laddas...
Sidan laddas...
Sidan laddas...
Sidan laddas...
Sidan laddas...
Sidan laddas...
Sidan laddas...
Sidan laddas...
Sidan laddas...
Sidan laddas...
Sidan laddas...
Sidan laddas...
Sidan laddas...
Sidan laddas...
Sidan laddas...
Sidan laddas...
Sidan laddas...
Sidan laddas...
Sidan laddas...
Sidan laddas...
Sidan laddas...
Sidan laddas...
Sidan laddas...
Sidan laddas...
Sidan laddas...
Sidan laddas...
Sidan laddas...
Sidan laddas...
Sidan laddas...
Sidan laddas...
Sidan laddas...
Sidan laddas...
Sidan laddas...
Sidan laddas...
Sidan laddas...
Sidan laddas...
Sidan laddas...
Sidan laddas...
Sidan laddas...
Sidan laddas...
Sidan laddas...
Sidan laddas...
Sidan laddas...
Sidan laddas...
Sidan laddas...
Sidan laddas...
Sidan laddas...
Sidan laddas...
Sidan laddas...
Sidan laddas...
Sidan laddas...
Sidan laddas...
Sidan laddas...
Sidan laddas...
Sidan laddas...
Sidan laddas...
Sidan laddas...
Sidan laddas...
Sidan laddas...
Sidan laddas...
Sidan laddas...
Sidan laddas...
Sidan laddas...
Sidan laddas...
Sidan laddas...
Sidan laddas...
Sidan laddas...
Sidan laddas...
Sidan laddas...
Sidan laddas...
Sidan laddas...
Sidan laddas...
Sidan laddas...
Sidan laddas...
Sidan laddas...
Sidan laddas...
Sidan laddas...
Sidan laddas...
Sidan laddas...
Sidan laddas...
Sidan laddas...
Sidan laddas...
Sidan laddas...
Sidan laddas...
Sidan laddas...
Sidan laddas...
Sidan laddas...
Sidan laddas...
Sidan laddas...
Sidan laddas...
Sidan laddas...
Sidan laddas...
Sidan laddas...
Sidan laddas...
Sidan laddas...
Sidan laddas...
Sidan laddas...
Sidan laddas...
Sidan laddas...
Sidan laddas...
-
 1
1
-
 2
2
-
 3
3
-
 4
4
-
 5
5
-
 6
6
-
 7
7
-
 8
8
-
 9
9
-
 10
10
-
 11
11
-
 12
12
-
 13
13
-
 14
14
-
 15
15
-
 16
16
-
 17
17
-
 18
18
-
 19
19
-
 20
20
-
 21
21
-
 22
22
-
 23
23
-
 24
24
-
 25
25
-
 26
26
-
 27
27
-
 28
28
-
 29
29
-
 30
30
-
 31
31
-
 32
32
-
 33
33
-
 34
34
-
 35
35
-
 36
36
-
 37
37
-
 38
38
-
 39
39
-
 40
40
-
 41
41
-
 42
42
-
 43
43
-
 44
44
-
 45
45
-
 46
46
-
 47
47
-
 48
48
-
 49
49
-
 50
50
-
 51
51
-
 52
52
-
 53
53
-
 54
54
-
 55
55
-
 56
56
-
 57
57
-
 58
58
-
 59
59
-
 60
60
-
 61
61
-
 62
62
-
 63
63
-
 64
64
-
 65
65
-
 66
66
-
 67
67
-
 68
68
-
 69
69
-
 70
70
-
 71
71
-
 72
72
-
 73
73
-
 74
74
-
 75
75
-
 76
76
-
 77
77
-
 78
78
-
 79
79
-
 80
80
-
 81
81
-
 82
82
-
 83
83
-
 84
84
-
 85
85
-
 86
86
-
 87
87
-
 88
88
-
 89
89
-
 90
90
-
 91
91
-
 92
92
-
 93
93
-
 94
94
-
 95
95
-
 96
96
-
 97
97
-
 98
98
-
 99
99
-
 100
100
-
 101
101
-
 102
102
-
 103
103
-
 104
104
-
 105
105
-
 106
106
-
 107
107
-
 108
108
-
 109
109
-
 110
110
-
 111
111
-
 112
112
-
 113
113
-
 114
114
-
 115
115
-
 116
116
-
 117
117
-
 118
118
-
 119
119
-
 120
120
-
 121
121
-
 122
122
-
 123
123
-
 124
124
-
 125
125
-
 126
126
-
 127
127
-
 128
128
-
 129
129
-
 130
130
-
 131
131
-
 132
132
-
 133
133
-
 134
134
-
 135
135
-
 136
136
-
 137
137
-
 138
138
-
 139
139
-
 140
140
-
 141
141
-
 142
142
-
 143
143
-
 144
144
-
 145
145
-
 146
146
-
 147
147
-
 148
148
-
 149
149
-
 150
150


Cello RODIUM 3 BLACK Användarmanual
- Kategori
- Grillar
- Typ
- Användarmanual
- Denna manual är också lämplig för
på andra språk
- eesti: Cello RODIUM 3 BLACK Kasutusjuhend
- English: Cello RODIUM 3 BLACK User manual
- suomi: Cello RODIUM 3 BLACK Ohjekirja
Relaterade papper
Andra dokument
-
Grandhall FREEDOM 455 Operating Instructions Manual
-
Grandhall ODEON Bruksanvisning
-
Grand Hall GTI-4 Bruksanvisningar
-
-
Patton Master Bruksanvisning
-
Rusta 623514740101 Användarmanual
-
Burns Barkles 010376 Användarmanual
-
 HP Vaerktoj 65460 Användarmanual
-
AEG AU96050-6I Installationsguide
-
FläktGroup HVSU Installationsguide
