
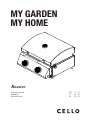
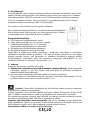
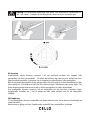
MY GARDEN
MY HOME
GB
FI
SE
Instruction manual
Käyttöohje
Bruksanvisning
1 - 14
15 - 28
29 - 43
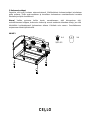
Roaster

1
GB
IMPORTANT: READ ALL INSTRUCTIONS AND OPERATIONS BEFORE OPERATING THIS UNIT.
FOLLOW ALL STEPS IN ORDER. NEVER ALLOW CHILDREN TO OPERATE THIS UNIT.
Warnings:
Only to be used outdoors.
Read the instructions before using the appliance.
Accessible parts maybe very hot, keep young children away.
Do not move the appliance during use.
Turn off the gas supply at the gas container after use.
Any modification of the appliance may be dangerous.
Parts sealed by the manufacturer or his agent must not be altered by the user.
Attention:
Some parts of this appliance become very hot, take special care when children or elderly are
present.
For your safety:
Do not store or use gasoline or mentholated fuels or any other flammable vapors and liquids
in the vicinity of this or any other appliance.
Never light a gas grill with gasoline or comparable fluids!
Suggestion: user should not change the assembly that the manufacturer packaged.
THIS GAS GRILL IS DESIGNED FOR OUTDOOR USE ONLY

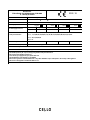
2
Product name
Model Number
Product Identification Number
Gas Category I
3B/P(30)
I
3B/P(37)
I
3B/P(50)
Butane(G30) Propane(G31) G30/G31 G30/G31 G30/G31
28-30 mbar 37 mbar 30 mbar 37 mbar 50 mbar
Main Burner Injector Size Ø 0.72mm 0.68mm Ø 0.65 mm
Total Nominal Heat Inputs (Hs)
Made in China
Gas and Supply Pressure
Country of Destination I
3B/P(30)
: ,CY,CZ,DK,EE,FI,FR,HU,LT,IT,NO,NL,SE,SI,SK,RO,HR,TR,BG,IS,LU,MT.
I
3B/P(50)
: AT,CH,CZ,DE,SK
Ø 0.72 mm
Main burner-4.4kW(320g/h)
Warning:
1) Accessible parts may be very hot, keep young children away from the device
2) Do not move the appliance during use
3) Turn off the gas supply at the gas cylinder after use
4) Any modification of the appliance is prohibited
5) Do not store gasoline or mentholated fuels or any other flammable vapors and liquids in the vicinity of this appliance
6) Never leave the appliance unattended while in use
I
3+(28-30/37)
: BE,CH,CY,CZ,ES,FR,GB,GR,IE,IT,LT,LU,LV,PT,SK,SI.
Kesko Ltd.
Tikkurilantie 10, 01380 Vantaa, FINLAND
P. +358-(0)10-53032
For outdoor use only
Read the instructions before using the appliance.
Outdoor gas Grill
CELLO ROASTER 2(501986729)
1008 CT 3240
I
3+(28-30/37)
I
3B/P(37)
: PL
0359-18
X

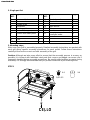
3
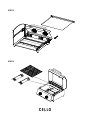
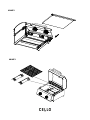
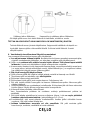
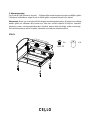
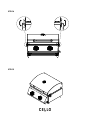
1. Exploded View

4
2. Single part list
seq.
NO.
appellation
qty
seq.
NO.
appellation
qty
1
Lid assembled
1
11
Control panel
1
2
Thermometer
1
12
Gas tube
1
3
Spindle of lid
2
13
Gas valve
2
4
Lid handle
1
14
Main burner
2
5
Cooking grid
1
15
Clamp
2
6
Firebox rear upper panel
1
16
Flame tamer
2
7
Firebox rear lower panel
1
17
Gas regulator and hose for
small gas bottle
1
8
Firebox
1
18
Gas connector
1
9
Feet
4
10
Grease collector
1
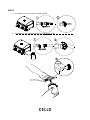
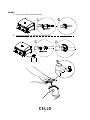
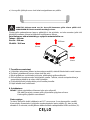
3. Mounting steps
Make sure your grill is assembled properly. Detailed assembly instructions are packed with
each grill giving specific assembly procedures for each model. Follow these instructions
carefully to ensure the correct and safe assembly of the grill.
Caution: Although we take every effort to ensure that the assembly process is as easy as
possible, it is inherent with fabricated steel parts that corners and edged can cause cuts if
improperly handled during assembly procedures. Be careful while handling any parts during
assembly. It is strongly recommended that you protect hands with a pair of work gloves.
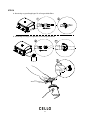
STEP1
X4
5/32-32
X4
Control Knob BaseControl Knob BaseControl Knob Base

5
STEP2
STEP3

6
STEP4
STEP5

7
STEP6
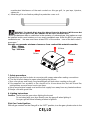
A:Assemble the gas connector for big gas bottle
B:Assemble the gas regulator and hose for small gas bottle

8
4. Preparation
You will need to purchase a LPG gas bottle and the pressure regulator should correspond to
the pressure and gas category of the appliance, which can be obtained from your nearest
Gas Retailer. The regulator should be complying with EN16129 with current version and
national regulation.
You will need to purchase a gas cylinder and a 28-30/37 mbar regulator for I3+(28-30/37)
and 30mbar regulator for I3B/P(30), 50 mbar regulator for I3B/P(50) to operate this gas grill.
which can be obtained from your nearest Gas Retailer.
See point 9 for further instructions.
Strongly Recommends Information:
When using the gas cylinder, it must always be kept in upright position.
This appliance must only be used with an approved hose and regulator.
Energy saving tips:
a) Reduce the opening time of the lid.
b) Turn the grill off as soon as cooking is completed.
c) Preheat the gas grill for 10 to 15 minutes only.
(Except for the first use)
d) Do not preheat longer then recommended.
e) Do not use a higher setting than required.
Connect the hose and regulator to the gas container at the right side of the gas grill .Keeping
in mind that the gas container must be kept away from heat and in a safe position .The hose
dimension is 8mm diameter. The gas hose must be approved in Finland with a diameter of
10 mm the LPG hose and its length must not exceed 1.2 m.
5. Installation
After purchasing your gas bottle you will then be ready to set it up with your gas grill.
a) When changing the gas bottle which shall be carried out away from any source of
ignition. Position the gas bottle at the side of your gas grill, not underneath, keeping in
mind that the bottle must be kept away from heat and in a safe position.
b) When ready to use your gas grill insert the regulator into the gas cylinder valve and
tighten firmly. The recommended hose length is about 1.0 m. The hose must not be
longer than 1.2 m.
Warning: Before attempting to light your gas grill you must refer to your lighting
instructions and warning / safety points.
Check the hose before each use, searching for cracking, cuts or any abrasions. If the hose is
found to be faulty in any way do not attempt to use your gas grill.
When changing your gas bottle ensures that there are no sources of ignition close by i.e.
fires, cigarettes, naked flames etc. Make sure that the appliance is switched off.

9
Ensure that the hose is not subjected to twisting which will affect the gas flow when
using your gas grill. Also the hose must not have undue tension and must not touch any part
of the gas grill which may be hot.
Please choose flexible hose whose heatproof higher than 80°C
Every 2 years changing the flexible hose when the national conditions require it.
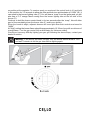
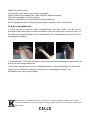
How to connect a gas bottle
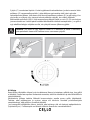
a) Turn the orange cap so that the arrow is pointing to the gap in the shroud.
b) Remove the orange safety cap by pulling the lanyard out, then out. Do not use tools.
Leave the cap hanging.
c) Check that the black sealing washer is fitted inside the cylinder valve. Place the regulator
down over the valve with switch.
d) Turn the switch clockwise on gas bottle-then turn on the gas grill as instructed.
Warning: Always test gas line for leaks at connector with soap water finishing all
connections.
How to disconnect a gas bottle
a) Except for twin-cylinder installations with a changeover valve, turn off the gas tap if fitted
to the appliance. Wait until the burner and pilot light have gone out. For installations with
a changeover valve, it is only necessary to switch off the empty cylinder.
b) Replace the orange safety cap onto the empty cylinder.
GENERAL
Although all gas connections on the grill are leak tested at the factory prior to shipment, a
complete gas tightness check must be performed at the installation site due to possible
mishandling in shipment, or excessive pressure unknowingly being applied to the unit.
Periodically check the whole system for leaks following the procedures listed below. If the
smell of gas is detected at anytime you should immediately check the entire system for
leaks.
BEFORE TESTING
Make sure that all packing material is removed from the grill including tie-down straps.
DO NOT SMOKE WHILE LEAK TESTING. NEVER PERFORM LEAK TEST WITH AN
OPEN FLAME.
Make a soap solution of one part liquid detergent and one part water. You will need a spray
bottle, brush, or rag to apply the solution to the fittings. For the initial leak test, make sure the
L.P. cylinder is 80% full.
TO TEST
1.Make sure the control valves are in the OFF position, and turn on the gas supply.
2.Check all connections from the gas regulator and supply valve up to and including the
connection to the manifold pipe assembly (the pipe that goes to the burners). Soap bubbles
will appear where a leak is present.
3.If a leak is present, immediately turn off the gas supply and tighten the leaky fittings.
4.Turn the gas back on and recheck.
5.Should the gas continue to leak from any of the fittings, turn off the gas supply.

10
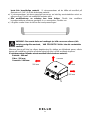
Install Regulator Hose Install Gas Tank & Regulator Hose
Do not use the grill until all connections have been checked and do not leak.
ALWAYS CHECK FOR LEAKS AFTER EVERY GAS TANK CHANGE
Check all gas supply fittings for leaks before each use. It is handy to keep a spray bottle
of soapy water near the shut-off valve of the gas supply line. Spray all the fittings.
Bubbles indicate leaks.
6. Warning and safety points
Please read the following points before using your gas grill:
a) Read the instructions before using the appliance. Please follow all assembly
instructions in this manual; if instructions are not followed it may cause problems in use.
b) This gas grill accessible parts maybe very hot when being used. Keep young
children away. Use protective when handling particularly hot components.
c) In the event of a gas leak shut off gas to the gas grill, extinguish any open flames, open
lid and if leak continues check for damages, poor connections etc. Contact your local gas
dealer immediately if the problem can’t be solved.
d) Do not move Gas grill during use.
e) Do not use or store any flammable liquids or vapors in the vicinity when operating the gas
grill.
f) This gas grill only to be used outdoors.
g) Do not use a naked flame to check for gas leaks.
h) Do not operate gas grill if there is a gas leak. Turn off the gas supply.
i) Do not attempt to disconnect any gas fitting part if your gas grill is being used, on the gas
grill or the gas regulator / bottle.
j) Care is advised when operating your gas grill, you should never leave unattended when
in use. Turn off the gas supply at the gas container after use.
k) The gas grill should be cleaned on a regular basis.
Take care not to enlarge burner ports or orifice/nozzle openings when cleaning the
burner or valves.
l) Do not attempt to use this appliance in a garage or any enclosed area. Also this
appliance must be keep away from flammable materials, etc. We recommend
keeping a distance of at least 0.5 to 1.0 meter clear of any flammable materials.
m) We would recommend that this gas grill be serviced by your local gas retail outlet at least
once a year by a competent engineer. Do not attempt to service this appliance yourself.
n) Any modification of the appliance may be dangerous. Do not attempt any

11
unauthorized interference of the main controls on this gas grill, i.e. gas taps, injectors,
valves etc.
o) Allow the grill to cool before putting the protective cover on it.
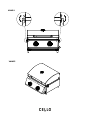
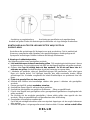
WARNING: The Handle Black Area (See Above Picture for Reference) Will Become Hot
When the Gas grill In Use, BE CAREFUL! Do Not Touch The Black Area.
“Since this barbecue has no restriction in the emission of unburned gas, this barbecue must
be installed and/or used outdoors or in an amply ventilated area. Were this BBQ in an amply
ventilated area, the area must have at least 25% of the surface(sum of the wall surface)
area open. ”
Strongly recommends minimum clearances from combustible materials must be:
Rear - 600mm
Sides - 500mm
Top - 1000 mm
7. Safety precautions
a) Always test gas line for leaks at connector with soapy water after making connections.
b) The top lid must always be open when lighting the burner.
c) Use oven gloves and sturdy, long handled gas grill tools when cooking on the grill.
d) Be prepared if an accident or fire should occur. Know where the first aid kit and fire
extinguishers are and know how to use them.
e) Keep any electrical supply cord and the fuel supply hose away from any heated surfaces.
f) Always cook with great care.
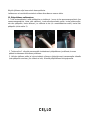
8. Lighting instructions
Caution: The lid must be open when lighting the burner!
Do not stand with your face directly over the gas grill when lighting it.
Your gas grill will have following method of ignition:
Pilot Gas Control Ignition:
With all gas controls on the Gas grill in the “OFF” position, turn the gas cylinder valve to the
500mm
500mm
1000mm
600mm

12
on position at the regulator. To create a spark you must push the control knob in (A) and hold
in this position for 3-5 seconds to allow gas flow and then turn anticlockwise to” HIGH” (B). It
can spark to the burner lighting tube (C). You will hear a “snap” from the igniter and you will
also see a 3”-5” orange flame coming from the burner lighting tube at the left side of the
burner (D).
Continue to hold the burner control knob in for two seconds after the “snap”, this will allow
gas to flow completely down the burner tube (E) and insure ignition.
When the burner is alight, adjacent burners will cross light when their controls are turned to
“HIGH”
At “High” setting the burner flame should be approximately 12-20mm long with a minimum of
orange flame. Turn the gas control fully anticlockwise for minimum setting.
Should you have any difficulty lighting your gas grill following the above steps, contact your
dealer for advice.
Warning : If the burner still does not light ,turn the burner control knob to” OFF”
and wait 5 minutes to let the gas clear before lighting again.

13
9. Storage
Your Gas Bottle must be stored outdoors in a well ventilated area and must be disconnected
from your gas grill when not being used. Ensure that you are outdoors and away from any
sources of ignition before attempting to disconnect your gas bottle from your gas grill.
When you are using your gas grill after a period of storage, please ensure to check for gas
leaks and check for any obstructions in the burner etc. before using. Also follow the cleaning
instructions to ensure gas grill is safe.
If gas grill is stored outdoors ensure to check that all areas under the front panel are free
from any obstructions (insects etc.) This area must be kept free as this may affect the flow of
combustion or ventilation air.
10. Cleaning instructions
Maintenance is recommended that every 90 days for your gas grill, but it is absolutely
necessary to perform maintenance at least once a year. By doing so you will extend the life of
your gas grill.
Your gas grill is easy to clean with minimum effort, just follow these helpful hints for
cleaning convenience.
a) Turn the burner on for 15 to 20 minutes. Grease drippings will be burned off from your
grill as well as your lava rock. Ensure appliance is cold before continuing.
b) Grids should be cleaned periodically by soaking and washing in soapy
water.
c) The interior surfaces of the grill housing cover should also be washed with hot, soapy
water. Use a wire brush, steel wool or a scouring pad to remove stubborn spots.
d) Periodically check the burner to see that it is free from insects and spiders which may
clog the gas system, deflecting gas flow. Ensure to clean venturi pipes on burner very
carefully, make sure that there are no obstructions. We recommend that you use a
pipe cleaner to clean the venturi pipe area.
e) Any modifications of this appliance may be dangerous and are not permitted.
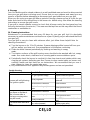
Trouble Shooting
Problem Possible Cause Solution
LP gas cylinder empty Replace with full cylinder
Faulty regulator
Have regulator checked or
replaced
Obstructions in burners Clean burners
Obstructions in gas jets or
hose
Clean jets and hose
Obstructions in burners Clean burners
Obstructions in gas jets or
hose.
Clean jets and hose
Windy conditions.
Use BBQ in a more sheltered
spot
Gas valve knob difficult to
turn.
Gas valve jammed Replace gas valve
Burners will not light using
The ignition system
Low flame or flashback
(fire in burner tube-a
hissing or roaring noise
may be heard)
If your problem is not resolved from the information above, please call the Gas grill helpline.

14
11. Gas grill Safety Hints
Stand your gas grill on a safe level surface, away from inflammable items such as wooden
fences or overhanging tree branches.
Never use your gas grill indoors!
Once lit do not move your gas grill or leave it unattended.
Keep children and pets at a safe distance from the gas grill.
Keep a fire extinguisher handy.
The gas grill will become hot when in use, so handle lids etc. with the help of gloves.
Ensure that the appliance has completely cooled down before storing.
Use outdoors only!
Read the instructions before using the gas grill.
Assessable parts may be very hot, Keep young children away!
Do not move the gas grill during using.
Turn off the gas supply at the gas container after use.
Any modification of the appliance may be dangerous and be not permitted.
12.Change main burner
1. First, find out which main burner has been broken, if it’s not the far left one (if it’s the far
left one, just remove the broken one), remove from the far right burner, take out the circlip,
take out the main burner, remove the transmission frame; If the machine do not have
transmission frame(like American version ), just remove the main burner, no need to take
step 2.
2. Repeat step 1, from right side to left side to remove main burner and transmission frame,
until remove the broken one.
3. Change the bad main burner, from left to right by turn to set up main burner and
transmission frame (if do not have transmission frame, just change the main burner directly),
use circlip to set.

15
FI
TÄRKEÄÄ: LUE KAIKKI OHJEET JA KUVAUKSET ENNEN KUIN KÄYTÄT LAITETTA. TEE
VAIHEET OIKEASSA JÄRJESTYKSESSÄ. ÄLÄ KOSKAAN ANNA LASTEN KÄYTTÄÄ LAITETTA.
Varoituksia:
Vain ulkokäyttöön.
Lue ohjeet ennen laitteen käyttöä.
Osat saattavat olla hyvin kuumia, joten pidä pienet lapset
etäällä laitteesta.
Älä siirrä laitetta käytön aikana.
Käytön jälkeen sulje kaasuntulo kaasupullosta.
Laitteen kaikenlainen muuntelu voi olla vaarallista.
Valmistajan tai sen edustajan sinetöimiä osia ei saa muuttaa.
Huomio:
Käytön aikana osa laitteen osista kuumenee. Noudata erityistä huolellisuutta, kun läsnä on
lapsia tai iäkkäitä henkilöitä.
Oman turvallisuutesi vuoksi:
Älä säilytä tai käytä bensiiniä tai muita syttyviä nesteitä tai höyryjä tämän tai muiden
laitteiden läheisyydessä.
Älä koskaan sytytä kaasugrilliä bensiinillä tai vastaavilla nesteillä!
Älä jätä päällä olevaa grilliä vartioimatta. Huom! Käyttäjä ei saa tehdä muutoksia valmistajan
toimittamaan kokoonpanoon.
TÄMÄ KAASUGRILLI ON TARKOITETTU VAIN ULKOKÄYTTÖÖN

16
Tuotenimi
Malli
Tuotteen tunnistenumero
Kaasuluokka I
3B/P(30)
I
3B/P(37)
I
3B/P(50)
Butaani (G30)
Propaani (G31)
Butaani, Propaani
tai
niiden sekoitus
Butaani,
Propaani tai
niiden sekoitus
Butaani, Propaani
tai
niiden sekoitus
28-30 mbar 37 mbar 30 mbar 37 mbar 50 mbar
Pääpolttimen suuttimen
halkaisija
Ø 0.72mm 0.68mm Ø 0.65 mm
Teho
Kesko Ltd.
Tikkurilantie 10, 01380 Vantaa, FINLAND
P. +358-(0)10-53032
Kaasugrilli ulkokäyttöön
CELLO ROASTER 2(501986729)
1008 CT 3240
I
3+(28-30/37)
Kaasutyyppi
Suuttimen koko
Maakohtainen kaasuluokka
I
3+(28-30/37)
: BE,CH,CY,CZ,ES,FR,GB,GR,IE,IT,LT,LU,LV,PT,SK,SI.
I
3B/P(30)
: ,CY,CZ,DK,EE,FI,FR,HU,LT,IT,NO,NL,SE,SI,SK,RO,HR,TR,BG,IS,LU,MT.
I
3B/P(50)
: AT,CH,CZ,DE,SK
I
3B/P(37)
: PL
Ø 0.72 mm
Polttimet -4.4kW(320g/h)
Ainoastaan ulkokäyttöön
Lue ohjeet ennen laitteen käyttämistä.
Varoitus:
Grillin osat voivat olla erittäin kuumia. Pienten lasten pääsy laitteelle estettävä.
Älä siirrä grilliä käytön aikana.
Käytön jälkeen sammuta kaasupullon venttiili.
Älä tee muutoksia grilliin.
Käytön aikana grillin lähettyvillä ei saa olla palavia nesteitä tai materiaaleja.
Älä koskaan jätä grilliä valvomatta käytön aikana.
Valmistettu Kiinassa
0 359-18
X

17
1. Räjäytyskuva
2. Osaluettelo
Järj.
nro
nimi Lkm Järj.
nro
nimi Lkm
1
Kansi asennettuna
1 11
Säädinpaneeli
1
2
Lämpömittari
1
12 Kaasuputki 1
3
Kannen kara
2
13 Kaasuventtiili 2
4
Kannen kahva
1
14 Pääpoltin 2
5
Keittoritilä
1
15 Kiinnike 2
6
Tulikotelon takapaneeli
1
16 Liekinvaimennin 2
7
Tulikotelon alatakapaneeli
1
17
Kaasunsäädin ja letku
pienelle kaasupullolle
1
8
Tulikotelo
1
18 Kaasuliitin 1
9
Jalat
4
10
Rasvakaukalo
1

18
3. Kokoamisvaiheet
Varmista, että grilli kootaan asianmukaisesti. Mallikohtaiset kokoamisohjeet toimitetaan
grillin mukana. Grillin asianmukaisen ja turvallisen kokoamisen varmistamiseksi noudata
toimitettuja ohjeita huolellisesti.
Huom! Vaikka pyrimme kaikin tavoin varmistamaan, että kokoaminen olisi
mahdollisimman helppoa, teräsosien kulmat ja reunat saattavat aiheuttaa viiltoja, jos niitä
käsitellään huolimattomasti kokoamisen aikana. Käsittele osia varoen. Suosittelemme
suojaamaan kädet työkäsineillä.
VAIHE1
X4
5/32-32
X4

19
VAIHE2
VAIHE3
Sidan laddas...
Sidan laddas...
Sidan laddas...
Sidan laddas...
Sidan laddas...
Sidan laddas...
Sidan laddas...
Sidan laddas...
Sidan laddas...
Sidan laddas...
Sidan laddas...
Sidan laddas...
Sidan laddas...
Sidan laddas...
Sidan laddas...
Sidan laddas...
Sidan laddas...
Sidan laddas...
Sidan laddas...
Sidan laddas...
Sidan laddas...
Sidan laddas...
Sidan laddas...
Sidan laddas...
-
 1
1
-
 2
2
-
 3
3
-
 4
4
-
 5
5
-
 6
6
-
 7
7
-
 8
8
-
 9
9
-
 10
10
-
 11
11
-
 12
12
-
 13
13
-
 14
14
-
 15
15
-
 16
16
-
 17
17
-
 18
18
-
 19
19
-
 20
20
-
 21
21
-
 22
22
-
 23
23
-
 24
24
-
 25
25
-
 26
26
-
 27
27
-
 28
28
-
 29
29
-
 30
30
-
 31
31
-
 32
32
-
 33
33
-
 34
34
-
 35
35
-
 36
36
-
 37
37
-
 38
38
-
 39
39
-
 40
40
-
 41
41
-
 42
42
-
 43
43
-
 44
44


Cello 1008 CT 3240 Användarmanual
- Typ
- Användarmanual
- Denna manual är också lämplig för
på andra språk
- eesti: Cello 1008 CT 3240 Kasutusjuhend
- English: Cello 1008 CT 3240 User manual
Relaterade papper
Andra dokument
-
 BIGHORN 3000 GASSGRILL Bruksanvisning
-
Dometic FO500 Bruksanvisning
-
-
OUTDOOR CHEF LEON 570 G Bruksanvisning
-
OUTDOORCHEF City 420 G Användarguide
-
-
-
-
-
Rusta 623514720101-0102 Användarmanual
