
hp LaserJet 3030
hp LaserJet 3015
hp LaserJet 3380
fax
faksi
fax


hp LaserJet 3015 all-in-one
hp LaserJet 3030 all-in-one
hp LaserJet 3380 all-in-one
Fax Guide
English

Copyright Information
© 2003 Copyright Hewlett-Packard
Development Company, L.P.
Reproduction, adaptation or translation
without prior written permission is
prohibited, except as allowed under the
copyright laws.
The information contained in this document
is subject to change without notice.
The only warranties for HP products and
services are set forth in the express
warranty statements accompanying such
products and services. Nothing herein
should be construed as constituting an
additional warranty. HP shall not be liable
for technical or editorial errors or omissions
contained herein.
Part number Q2660-90929
Edition 1, 10/2003
FCC Requirements (United States)
This equipment has been tested and found
to comply with the limits for a Class B
digital device, pursuant to Part 15 of the
FCC rules. These limits are designed to
provide reasonable protection against
harmful interference in a residential
installation. This equipment generates,
uses, and can radiate radio frequency
energy. If not installed and used in
accordance with the instructions, it may
cause harmful interference to radio
communications. However, there is no
guarantee that interference will not occur in
a particular installation. If this equipment
does cause harmful interference to radio or
television reception, which can be
determined by turning the equipment off
and on, the user is encouraged to try to
correct the interference by one or more of
the following measures:
Reorient or relocate the receiving antenna.
Increase separation between equipment
and receiver.
Connect equipment to an outlet on a circuit
different from that to which the receiver is
located.
Consult your dealer or an experienced
radio/TV technician.
Any changes or modifications to the printer
that are not expressly approved by HP
could void the user’s authority to operate
this equipment.
Use of a shielded interface cable is
required to comply with the Class B limits
of Part 15 of FCC rules.
This equipment complies with FCC rules,
Part 68. On the back of this equipment is a
label that contains, among other
information, the FCC registration number
and ringer equivalence number (REN) for
this equipment. If requested, this
information must be provided to the
telephone company. The REN is used to
determine the quantity of devices which
may be connected to the telephone line.
Excessive RENs on the telephone line may
result in the devices not ringing in
response to an incoming call. In most, but
not all, areas, the sum of the RENs should
not exceed five (5.0). To be certain of the
number of devices that may be connected
to the line, as determined by the total
RENs, contact the telephone company to
determine the maximum REN for the
calling area.
This equipment uses the following USOC
jacks: RJ11C.
An FCC-compliant telephone cord and
modular plug is provided with this
equipment. This equipment is designed to
be connected to the telephone network or
premises wiring using a compatible
modular jack which is Part 68 compliant.
This equipment cannot be used on
telephone company-provided coin service.
Connection to Party Line Service is subject
to state tariffs. If this equipment causes
harm to the telephone network, the
telephone company will notify you in
advance that temporary discontinuance of
service may be required. If advance notice
is not practical, the telephone company will
notify the customer as soon as possible.
Also, you will be advised of your right to file
a complaint with the FCC if you believe it is
necessary. The telephone company may
make changes in its facilities, equipment,
operations, or procedures that could affect
the operation of the equipment. If this
happens, the telephone company will
provide advance notice in order for you to
make the necessary modifications in order
to maintain uninterrupted service. If trouble
is experienced with this equipment, please
see the numbers in the front of this manual
for repair and (or) warranty information. If
the trouble is causing harm to the
telephone network, the telephone company
may request you remove the equipment
from the network until the problem is
resolved. The following repairs can be
done by the customer: Replace any
original equipment that came with the
device. This includes the print cartridge,
the supports for trays and bins, the power
cord, and the telephone cord. It is
recommended that the customer install an
AC surge arrestor in the AC outlet to which
this device is connected. This is to avoid
damage to the equipment caused by local
lightning strikes and other electrical surges.
Hewlett-Packard Development Company, L.P.
20555 S.H. 249
Houston, TX 77070

Trademark Credits
Microsoft, Windows, Windows NT, and MS-
DOS are U.S. registered trademarks of
Microsoft Corporation.
All other devices mentioned herein may be
trademarks of their respective companies.
Safety Information
WARNING!
Potential Shock Hazard
Always follow basic safety precautions
when using this device to reduce risk of
injury from fire or electric shock.
Read and understand all instructions in the
electronic User Guide.
Observe all warnings and instructions
marked on the device.
Use only a grounded electrical outlet when
connecting the HPLaserJet 3015 all-in-
one, HP LaserJet 3030 all-in-one, or HP
LaserJet 3380 all-in-one device to a power
source. If you do not know whether the
outlet is grounded, check with a qualified
electrician.
Do not touch the contacts on the end of
any of the sockets on the HP LaserJet
3015 all-in-one, HPLaserJet 3030 all-in-
one, or HP LaserJet 3380 all-in-one.
Replace damaged cords immediately.
Unplug this device from wall outlets before
cleaning.
Do not install or use this device near water
or when you are wet.
Install the device securely on a stable
surface.
Install the device in a protected location
where no one can step on or trip over the
power cord and the power cord will not be
damaged.
If the device does not operate normally,
see the electronic User Guide.
Refer all servicing questions to qualified
personnel.
Hewlett-Packard Development Company, L.P.
20555 S.H. 249
Houston, TX 77070

Hewlett-Packard Development Company, L.P.
20555 S.H. 249
Houston, TX 77070

Table of contents
1FaxSetup
Connecting the device to a telephone line ........................................................................... 10
Connecting the HP LaserJet 3015 all-in-one and the HP LaserJet 3030 all-in-
one ................................................................................................................................. 10
Connecting the HP LaserJet 3380 all-in-one ................................................................. 11
Connecting additional devices .............................................................................................. 15
Using a dedicated fax line .............................................................................................. 15
Using a shared telephone line ........................................................................................ 15
To connect additional devices to the HP LaserJet 3015 all-in-one and the HP
LaserJet 3030 all-in-one ................................................................................................. 16
To connect additional devices to the HP LaserJet 3380 all-in-one ................................ 18
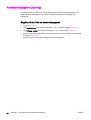
Specifying the fax settings .................................................................................................... 21
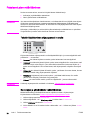
To enter text from the control panel ............................................................................... 21
To set the time and date ................................................................................................ 21
To set the fax header ..................................................................................................... 22
2 Faxing (basic)
Loading originals to fax ......................................................................................................... 24
To load fax documents into the automatic document feeder (ADF) .............................. 24
To load fax documents on the flatbed scanner .............................................................. 25
Sending faxes ....................................................................................................................... 26
To adjust the resolution for the current fax job ............................................................... 26
To send a fax to one recipient ........................................................................................ 26
To send a fax to multiple recipients ................................................................................ 26
To send a fax by using a group-dial entry ...................................................................... 27
To send a fax to a group manually (ad hoc faxing) ........................................................ 27
Using manual dial ................................................................................................................. 29
To use manual dial with the automatic document feeder (ADF) .................................... 29
To use manual dial with the flatbed scanner .................................................................. 29
Redialing manually ............................................................................................................... 30
To redial manually .......................................................................................................... 30
Canceling a fax job ...............................................................................................................31
To cancel the current fax job .......................................................................................... 31
To cancel a fax job by using the Fax Job Status ........................................................... 31
Sending faxes by using the software .................................................................................... 32
To send a fax from the software (Windows 98, ME, 2000, or XP) ................................. 32
To send a fax from the software (Mac OS 10.2.x) ......................................................... 32
To send a fax from a third-party application, such as Microsoft Word (all
operating systems) ......................................................................................................... 33
Changing the default contrast setting ................................................................................... 34
To change the default contrast ...................................................................................... 34
Changing the default resolution setting ................................................................................ 35
To change the default resolution setting ........................................................................ 35
Changing the default glass-size setting ................................................................................ 36
To change the default glass-size setting ........................................................................ 36
ENWW Table of contents 5
English

Selecting tone-dialing or pulse-dialing mode ........................................................................ 37
To select tone-dialing or pulse-dialing ............................................................................ 37
Changing the redial settings ................................................................................................. 38
To change the redial-on-busy option ............................................................................. 38
To change the redial-on-no-answer option .................................................................... 38
To change the redial-on-communication-error option .................................................... 38
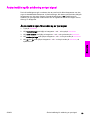
Receiving faxes .................................................................................................................... 39
To receive faxes when you hear fax tones .................................................................... 39
Receiving faxes to your computer ........................................................................................ 40
To turn off the receive-to-PC setting from the control panel .......................................... 40
Setting the answer mode ...................................................................................................... 41
To set the answer mode ................................................................................................. 41
Changing ring patterns for call answering ............................................................................ 42
To change ring patterns for call answering .................................................................... 42
Changing the rings-to-answer setting ................................................................................... 43
Using the rings-to-answer setting ................................................................................... 43
To set the number of rings-to-answer ............................................................................ 43
Changing autoreduction settings for incoming faxes ............................................................ 44
To change autoreduction for incoming faxes ................................................................. 44
Blocking or unblocking fax numbers ..................................................................................... 45
To block or unblock a fax number .................................................................................. 45
Changing the sound-volume settings ................................................................................... 46
To change the fax-sounds (line-monitor) volume (HP LaserJet 3015) .......................... 46
To change the fax-sounds (line-monitor) volume (HP LaserJet 3030 all-in-one or
the HP LaserJet 3380 all-in-one) ................................................................................... 46
To change the ring volume ............................................................................................. 46
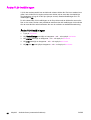
3 Faxing (advanced)
About speed-dial entries, one-touch keys, and group-dial entries ....................................... 48
To program speed-dial entries and one-touch keys ....................................................... 48
To delete speed-dial entries and one-touch keys .......................................................... 49
To program speed-dial entries or one-touch keys quickly ............................................. 49
To manage group-dial entries ........................................................................................ 50
Using dialing characters ....................................................................................................... 52
To insert a pause ............................................................................................................ 52
Inserting a dial prefix ............................................................................................................. 53
To set the dial prefix ....................................................................................................... 53
Sending a delayed fax .......................................................................................................... 54
To send a delayed fax .................................................................................................... 54
Sending a fax by dialing from a telephone ........................................................................... 55
To send a fax by dialing from a telephone ..................................................................... 55
Changing the detect-dial-tone setting ................................................................................... 56
To change the detect-dial-tone setting ........................................................................... 56
Using billing codes ................................................................................................................ 57
To change the billing-code setting ................................................................................. 57
To use billing codes ........................................................................................................ 57
Reprinting a fax ..................................................................................................................... 58
To reprint a fax ............................................................................................................... 58
Deleting faxes from memory ................................................................................................. 59
To delete faxes from memory ........................................................................................ 59
Using fax forwarding .............................................................................................................60
To use fax forwarding ..................................................................................................... 60
Making an extension telephone available to receive faxes .................................................. 61
To make an extension telephone available to receive faxes ......................................... 61
Using fax polling ................................................................................................................... 62
6 ENWW

To poll (request a fax from) another fax machine .......................................................... 62
Changing the silence-detect mode ....................................................................................... 63
To change the silence-detect mode ............................................................................... 63
Creating stamp-received faxes ............................................................................................. 64
To make stamp-received faxes available ....................................................................... 64
Setting the fax-error-correction mode ................................................................................... 65
To change the error-correction setting ........................................................................... 65
Changing the V.34 setting .................................................................................................... 66
To change the V.34 setting ............................................................................................ 66
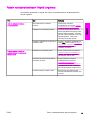
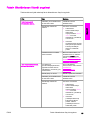
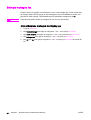
4 Fax Logs and Reports
Printing the fax activity log .................................................................................................... 68
To print the fax activity log ............................................................................................. 68
To set the fax activity log to print automatically ............................................................. 68
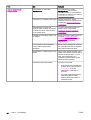
Printing a fax call report ........................................................................................................ 69
To print a fax call report ................................................................................................. 69
Setting print times for the fax call report ............................................................................... 70
To set the print times for the fax call report .................................................................... 70
Including the first page of each fax on the fax call report ..................................................... 71
To include the first page of each fax on the fax call report ............................................ 71
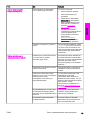
Printing a phone book report ................................................................................................ 72
To print a phone book report .......................................................................................... 72
Printing the billing-code report .............................................................................................. 73
To print the billing-code report ....................................................................................... 73
Printing the block-fax list .......................................................................................................74
To print the block-fax list ................................................................................................ 74
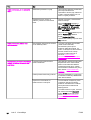
Printing all fax reports ........................................................................................................... 75
To print all fax reports ..................................................................................................... 75
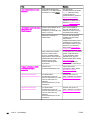
5 Troubleshooting
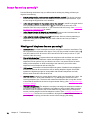
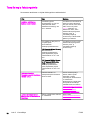
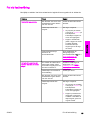
Is your fax set up correctly? .................................................................................................. 78
What type of telephone line are you using? ................................................................... 78
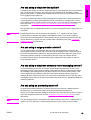
Are you using a telephone-line splitter? ......................................................................... 79
Are you using a surge-protection device? ...................................................................... 79
Are you using a telephone company voice-messaging service? ................................... 79
Are you using an answering machine? .......................................................................... 79
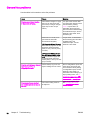
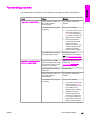
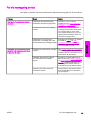
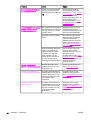
General fax problems ........................................................................................................... 80
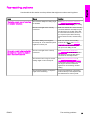
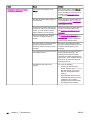
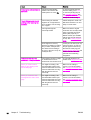
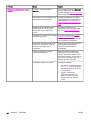
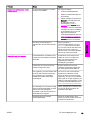
Fax-receiving problems ........................................................................................................ 81
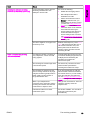
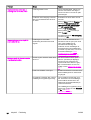
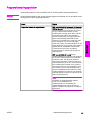
Fax-sending problems .......................................................................................................... 85
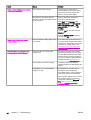
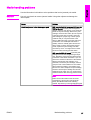
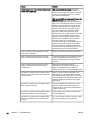
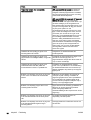
Media-handling problems ..................................................................................................... 87
Viewing the electronic User Guide ....................................................................................... 89
To view the electronic User Guide in the device software ............................................. 89
To view the electronic User Guide on the device CD-ROM (Windows) ......................... 89
To view the electronic User Guide on the device CD-ROM (Mac) ................................. 89
Glossary
Index
ENWW Table of contents 7
English

8 ENWW

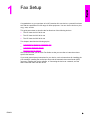
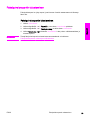
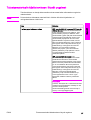
Fax Setup
Congratulations on your purchase of an HP LaserJet all-in-one device, a powerful business
tool with the capabilities of a full range of office equipment. You can use the device to print,
copy, scan, and fax.
This guide was written to describe the fax functions of the following devices:
● The HP LaserJet 3015 all-in-one
● The HP LaserJet 3030 all-in-one
● The HP LaserJet 3380 all-in-one
This chapter describes the following topics:
●
Connecting the device to a telephone line
●
Connecting additional devices
●
Specifying the fax settings
We recommend that you save this Fax Guide so that you can refer to instructions about
specific fax features.
If you need general setup instructions for your device, such as instructions for installing the
print cartridge, installing the media input trays and the automatic document feeder (ADF)
input tray, installing the device software, or connecting the device to a network, see the
Start Guide that came with the device.
ENWW 9
English

Connecting the device to a telephone line
To use the fax functions of the device, first connect the device to the telephone line. The
way you connect the device to the telephone line depends on how many telephone lines
you have coming into the telephone jack and, if you have multiple lines, which line you want
to use for faxing.
Note
In order for the device to send or receive a fax without interruption, it must be the first device
that is connected to the telephone jack.
Connecting the HP LaserJet 3015 all-in-one and the HP
LaserJet 3030 all-in-one
Complete the following instructions to connect the device to a telephone line.
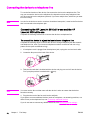
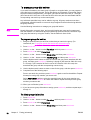
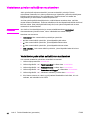
To connect the device to a jack that controls one telephone line
Complete the following steps to connect the device to a single telephone jack that controls
one telephone line, even if you have two telephone numbers on that line and use a ring-
pattern service (such as distinctive ring).
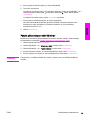
1. If a telephone cord is plugged into the telephone jack, unplug the cord and set it aside.
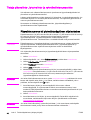
2. Locate the fax ports on the back of the device.
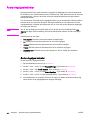
3. Take the fax cord that is included with the device and plug one end of it into the device
"line" port (the port that is marked with a
icon).
Note
You must use the fax cord that came with the device in order to ensure that the device
functions correctly.
4. Plug the other end of the fax cord into the wall-jack.
If you want to connect additional devices (such as a telephone, an answering machine, or a
caller-ID box) to the telephone line, see
Connecting additional devices.
If you do not want to connect any additional devices, see
Specifying the fax settings.
10 Chapter 1 Fax Setup ENWW

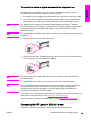
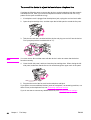
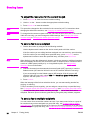
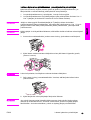
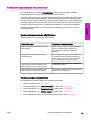
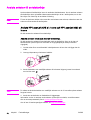
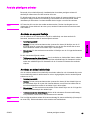
To connect the device to a jack that controls two telephone lines
Use these steps to connect the device to a single or split telephone jack if you have a
dedicated line for fax calls and a separate line for voice calls.
1. If a telephone cord is plugged into the telephone jack, unplug the cord and set it aside.
2. If you do not have a telephone jack that has a built-in splitter, plug an external Line1/
Line2 splitter (not included with the HP LaserJet all-in-one) into the telephone jack.
Note
Two different kinds of splitters are available: Parallel splitters (also called “T” splitters)
provide two telephone-line outlets for a jack that controls a single telephone number; Line1/
Line2 splitters provide two telephone-line outlets for a jack that controls two unique
telephone numbers.
Note
Not all splitters are compatible with the device, and not all regions/countries support the use
of splitters.
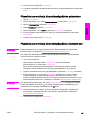
3. Locate the fax ports on the back of the device.
4. Take the fax cord that is included with the device and plug one end of it into the device
"line" port (the port that is marked with a
icon).
Note
You must use the fax cord that came with the device in order to ensure that the device
functions correctly.
5. Plug the other end of the fax cord into the jack, on the fax side of the splitter.
Note
If you do not know which side of the splitter is for the fax number, connect a telephone to
one splitter jack and dial the fax number. If you get a busy signal, the telephone is
connected to the fax side of the splitter. If you get a ringing signal, the telephone is
connected to the telephone side of the splitter.
If you want to connect additional devices (such as a telephone, an answering machine, or a
caller-ID box) to the telephone line, see
Connecting additional devices.
If you do not want to connect any additional devices, see
Specifying the fax settings.
Connecting the HP LaserJet 3380 all-in-one
Complete the following instructions to connect the device to a telephone line.
ENWW Connecting the device to a telephone line 11
English

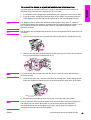
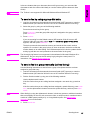
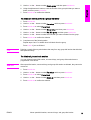
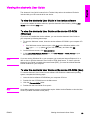
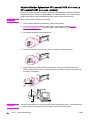
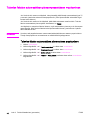
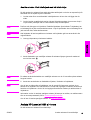
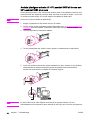
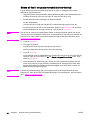
To connect the device to a jack that controls one telephone line
Complete the following steps to connect the device to a single telephone jack that controls
one telephone line, even if you have two telephone numbers on that line and use a ring-
pattern service (such as distinctive ring).
1. If a telephone cord is plugged into the telephone jack, unplug the cord and set it aside.
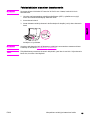
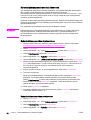
2. Open the print-cartridge door, and then open the left side panel to reveal the fax ports.
3. Take the fax cord that is included with the device and plug one end of it into the device
"line" port (the port that is marked with an "L").
Note
You must use the fax cord that came with the device in order to ensure that the device
functions correctly.
4. Close the left side panel, and then close the print-cartridge door. When closing the left
side panel, make sure that the fax cord is routed through the upper notch in the panel.
5. Plug the other end of the fax cord into the telephone wall-jack.
If you want to connect additional devices (such as a telephone, an answering machine, or a
caller-ID box) to the telephone line, see
Connecting additional devices.
If you do not want to connect any additional devices, see
Specifying the fax settings.
12 Chapter 1 Fax Setup ENWW

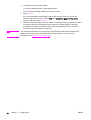
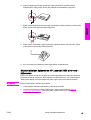
To connect the device to a jack that controls two telephone lines
Use these steps to connect the device to a single or split telephone jack if you have a
dedicated line for fax calls and a separate line for voice calls.
1. If a telephone cord is plugged into the telephone jack, unplug the cord and set it aside.
2. If you do not have a telephone jack that has a built-in splitter, plug an external Line1/
Line2 splitter (not included with the HP LaserJet all-in-one) into the telephone jack.
Note
Two different kinds of splitters are available: Parallel splitters (also called “T” splitters)
provide two telephone-line outlets for a jack that controls a single telephone number; Line1/
Line2 splitters provide two telephone-line outlets for a jack that controls two unique
telephone numbers.
Note
Not all splitters are compatible with the device, and not all regions/countries support the use
of splitters.
3. Open the print-cartridge door, and then open the left side panel to reveal the fax ports.
4. Take the fax cord that is included with the device and plug one end of it into the device
"line" port (the port that is marked with an "L").
Note
You must use the fax cord that came with the device in order to ensure that the device
functions correctly.
5. Close the left side panel, and then close the print-cartridge door. When closing the left
side panel, make sure that the fax cord is routed through the upper notch in the panel.
6. Plug the other end of the fax cord into the jack, on the fax side of the splitter.
Note
If you do not know which side of the splitter is for the fax number, connect a telephone to
one splitter jack and dial the fax number. If you get a busy signal, the telephone is
connected to the fax side of the splitter. If you get a ringing signal, the telephone is
connected to the telephone side of the splitter.
ENWW Connecting the device to a telephone line 13
English


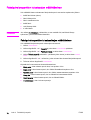
Connecting additional devices
Depending on the setup of your telephone lines, you can connect additional devices to the
telephone line along with the HP LaserJet all-in-one.
As a general rule, no more than three devices should be connected to a single telephone
line. If too many devices are connected to a single telephone line, one or more of the
devices might not detect an incoming call. If this occurs, disconnect one or more of the
devices.
Note
The HP LaserJet all-in-one device cannot replace a computer modem. It cannot act as a
data modem for sending and receiving e-mail, connecting to the Internet, or communicating
with other computers.
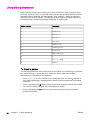
Using a dedicated fax line
If you connect the HP LaserJet all-in-one device to a telephone line that is used only for fax
calls, you might want to connect the following devices:
● Caller-ID box
● Modem: You can connect a computer modem (external or internal) to the fax line if you
want to use the fax line for e-mail or for access to the Internet, but you cannot send or
receive faxes while using the line for these purposes.
● Extra telephone: You can connect an extra telephone to the fax line if you want to
make outgoing calls on the fax line.
You should
not
connect the following devices:
● Answering machine or computer voicemail: If you use computer voicemail, you must
connect a modem (external or internal) to your dedicated voice line. Then, use the
dedicated voice line to connect to the Internet and receive voicemail.
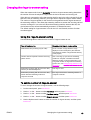
Using a shared telephone line
If you connected the device to a telephone line that is shared between fax calls and voice
calls, or if you have one telephone line that has two telephone numbers and a ring-pattern
service, you might want to connect the following devices:
● Caller-ID box
● Modem: You can connect a computer modem (external or internal) to the shared line if
you want to use the shared line for e-mail or for access to the Internet, but you cannot
send or receive faxes while using the line for these purposes.
● Extra telephone: You can connect a telephone to the shared line if you want to make or
answer voice calls on the shared line.
● Answering machine or computer voicemail: You should connect these devices to the
same telephone jack as the device to make sure that the different devices do not
interfere with one another.
Note
It is possible to connect devices to another telephone jack for the same telephone line (in
another room, for example). However, the devices could interfere with faxing and with each
other.
ENWW Connecting additional devices 15
English

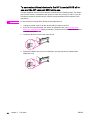
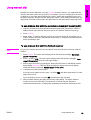
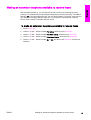
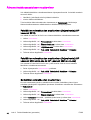
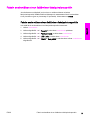
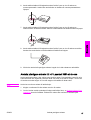
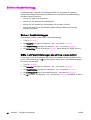
To connect additional devices to the HP LaserJet 3015 all-in-
one and the HP LaserJet 3030 all-in-one
Connect additional devices in the order that is described in the following steps. The output
port for each device is connected to the input port of the next, forming a "chain". If you do
not want to connect a specified device, skip the step that explains it and continue to the
next device.
Note
Do not connect more than three devices to the telephone line.
1. Unplug the power cords for all the devices that you want to connect.
2. If you have not yet connected your device to a telephone line, see
Connecting the
device to a telephone line before proceeding. The device should already be connected
to a telephone jack.
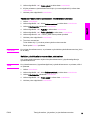
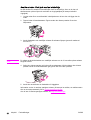
3. Locate the fax ports on the back of the device.
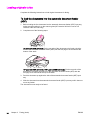
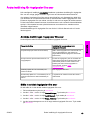
4. Remove the plastic insert from the "telephone" port (the port that is marked with a
telephone icon).
16 Chapter 1 Fax Setup ENWW

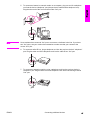
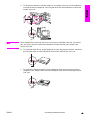
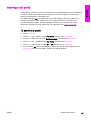
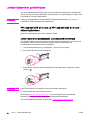
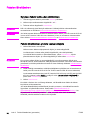
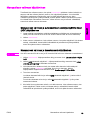
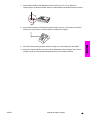
5. To connect an internal or external modem on a computer, plug one end of a telephone
cord into the device “telephone” port (the port that is marked with a telephone icon).
Plug the other end of the cord into the modem “line” port.
Note
Some modems have a second “line” port to connect to a dedicated voice line. If you have
two “line” ports, see your modem documentation to make sure that you connect to the
correct “line” port.
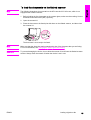
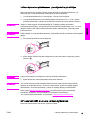
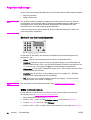
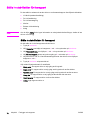
6. To connect a caller-ID box, plug a telephone cord into the previous device’s “telephone”
port. Plug the other end of the telephone cord into the caller-D box “line” port.
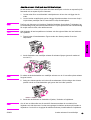
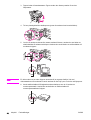
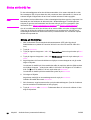
7. To connect an answering machine, plug a telephone cord into the previous device’s
“telephone” port. Plug the other end of the telephone cord into the answering machine
“line” port.
ENWW Connecting additional devices 17
English

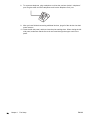
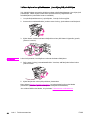
8. To connect a telephone, plug a telephone cord into the previous device’s “telephone”
port. Plug the other end of the telephone cord into the telephone “line” port.
9. After you have finished connecting additional devices, plug all of the devices into their
power sources.
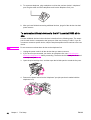
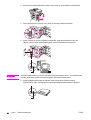
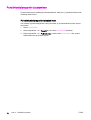
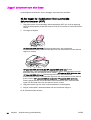
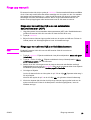
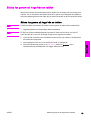
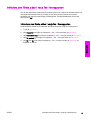
To connect additional devices to the HP LaserJet 3380 all-in-
one
Connect additional devices in the order that is described in the following steps. The output
port for each device is connected to the input port of the next, forming a "chain". If you do
not want to connect a specific device, skip the step that explains it and continue to the next
device.
Note
Do not connect more than three devices to the telephone line.
1. Unplug the power cords for all the devices that you want to connect.
2. If you have not yet connected your device to a telephone line, see
Connecting the
device to a telephone line before proceeding. The device should already be connected
to a telephone jack.
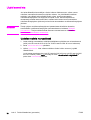
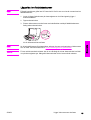
3. Open the print-cartridge door, and then open the left side panel to reveal the fax ports.
4. Remove the plastic insert from the "telephone" port (the port that is marked with the
telephone icon).
18 Chapter 1 Fax Setup ENWW
Sidan laddas...
Sidan laddas...
Sidan laddas...
Sidan laddas...
Sidan laddas...
Sidan laddas...
Sidan laddas...
Sidan laddas...
Sidan laddas...
Sidan laddas...
Sidan laddas...
Sidan laddas...
Sidan laddas...
Sidan laddas...
Sidan laddas...
Sidan laddas...
Sidan laddas...
Sidan laddas...
Sidan laddas...
Sidan laddas...
Sidan laddas...
Sidan laddas...
Sidan laddas...
Sidan laddas...
Sidan laddas...
Sidan laddas...
Sidan laddas...
Sidan laddas...
Sidan laddas...
Sidan laddas...
Sidan laddas...
Sidan laddas...
Sidan laddas...
Sidan laddas...
Sidan laddas...
Sidan laddas...
Sidan laddas...
Sidan laddas...
Sidan laddas...
Sidan laddas...
Sidan laddas...
Sidan laddas...
Sidan laddas...
Sidan laddas...
Sidan laddas...
Sidan laddas...
Sidan laddas...
Sidan laddas...
Sidan laddas...
Sidan laddas...
Sidan laddas...
Sidan laddas...
Sidan laddas...
Sidan laddas...
Sidan laddas...
Sidan laddas...
Sidan laddas...
Sidan laddas...
Sidan laddas...
Sidan laddas...
Sidan laddas...
Sidan laddas...
Sidan laddas...
Sidan laddas...
Sidan laddas...
Sidan laddas...
Sidan laddas...
Sidan laddas...
Sidan laddas...
Sidan laddas...
Sidan laddas...
Sidan laddas...
Sidan laddas...
Sidan laddas...
Sidan laddas...
Sidan laddas...
Sidan laddas...
Sidan laddas...
Sidan laddas...
Sidan laddas...
Sidan laddas...
Sidan laddas...
Sidan laddas...
Sidan laddas...
Sidan laddas...
Sidan laddas...
Sidan laddas...
Sidan laddas...
Sidan laddas...
Sidan laddas...
Sidan laddas...
Sidan laddas...
Sidan laddas...
Sidan laddas...
Sidan laddas...
Sidan laddas...
Sidan laddas...
Sidan laddas...
Sidan laddas...
Sidan laddas...
Sidan laddas...
Sidan laddas...
Sidan laddas...
Sidan laddas...
Sidan laddas...
Sidan laddas...
Sidan laddas...
Sidan laddas...
Sidan laddas...
Sidan laddas...
Sidan laddas...
Sidan laddas...
Sidan laddas...
Sidan laddas...
Sidan laddas...
Sidan laddas...
Sidan laddas...
Sidan laddas...
Sidan laddas...
Sidan laddas...
Sidan laddas...
Sidan laddas...
Sidan laddas...
Sidan laddas...
Sidan laddas...
Sidan laddas...
Sidan laddas...
Sidan laddas...
Sidan laddas...
Sidan laddas...
Sidan laddas...
Sidan laddas...
Sidan laddas...
Sidan laddas...
Sidan laddas...
Sidan laddas...
Sidan laddas...
Sidan laddas...
Sidan laddas...
Sidan laddas...
Sidan laddas...
Sidan laddas...
Sidan laddas...
Sidan laddas...
Sidan laddas...
Sidan laddas...
Sidan laddas...
Sidan laddas...
Sidan laddas...
Sidan laddas...
Sidan laddas...
Sidan laddas...
Sidan laddas...
Sidan laddas...
Sidan laddas...
Sidan laddas...
Sidan laddas...
Sidan laddas...
Sidan laddas...
Sidan laddas...
Sidan laddas...
Sidan laddas...
Sidan laddas...
Sidan laddas...
Sidan laddas...
Sidan laddas...
Sidan laddas...
Sidan laddas...
Sidan laddas...
Sidan laddas...
Sidan laddas...
Sidan laddas...
Sidan laddas...
Sidan laddas...
Sidan laddas...
Sidan laddas...
Sidan laddas...
Sidan laddas...
Sidan laddas...
Sidan laddas...
Sidan laddas...
Sidan laddas...
Sidan laddas...
Sidan laddas...
Sidan laddas...
Sidan laddas...
Sidan laddas...
Sidan laddas...
Sidan laddas...
Sidan laddas...
Sidan laddas...
Sidan laddas...
Sidan laddas...
Sidan laddas...
Sidan laddas...
Sidan laddas...
Sidan laddas...
Sidan laddas...
Sidan laddas...
Sidan laddas...
Sidan laddas...
Sidan laddas...
Sidan laddas...
Sidan laddas...
Sidan laddas...
Sidan laddas...
Sidan laddas...
Sidan laddas...
Sidan laddas...
Sidan laddas...
Sidan laddas...
Sidan laddas...
Sidan laddas...
Sidan laddas...
Sidan laddas...
Sidan laddas...
Sidan laddas...
Sidan laddas...
Sidan laddas...
Sidan laddas...
Sidan laddas...
Sidan laddas...
Sidan laddas...
Sidan laddas...
Sidan laddas...
Sidan laddas...
Sidan laddas...
Sidan laddas...
Sidan laddas...
Sidan laddas...
Sidan laddas...
Sidan laddas...
Sidan laddas...
Sidan laddas...
Sidan laddas...
Sidan laddas...
Sidan laddas...
Sidan laddas...
Sidan laddas...
Sidan laddas...
Sidan laddas...
Sidan laddas...
Sidan laddas...
Sidan laddas...
Sidan laddas...
Sidan laddas...
Sidan laddas...
Sidan laddas...
Sidan laddas...
Sidan laddas...
Sidan laddas...
Sidan laddas...
Sidan laddas...
Sidan laddas...
Sidan laddas...
Sidan laddas...
Sidan laddas...
Sidan laddas...
Sidan laddas...
Sidan laddas...
Sidan laddas...
Sidan laddas...
Sidan laddas...
Sidan laddas...
Sidan laddas...
Sidan laddas...
Sidan laddas...
Sidan laddas...
Sidan laddas...
Sidan laddas...
Sidan laddas...
Sidan laddas...
Sidan laddas...
Sidan laddas...
Sidan laddas...
Sidan laddas...
Sidan laddas...
Sidan laddas...
-
 1
1
-
 2
2
-
 3
3
-
 4
4
-
 5
5
-
 6
6
-
 7
7
-
 8
8
-
 9
9
-
 10
10
-
 11
11
-
 12
12
-
 13
13
-
 14
14
-
 15
15
-
 16
16
-
 17
17
-
 18
18
-
 19
19
-
 20
20
-
 21
21
-
 22
22
-
 23
23
-
 24
24
-
 25
25
-
 26
26
-
 27
27
-
 28
28
-
 29
29
-
 30
30
-
 31
31
-
 32
32
-
 33
33
-
 34
34
-
 35
35
-
 36
36
-
 37
37
-
 38
38
-
 39
39
-
 40
40
-
 41
41
-
 42
42
-
 43
43
-
 44
44
-
 45
45
-
 46
46
-
 47
47
-
 48
48
-
 49
49
-
 50
50
-
 51
51
-
 52
52
-
 53
53
-
 54
54
-
 55
55
-
 56
56
-
 57
57
-
 58
58
-
 59
59
-
 60
60
-
 61
61
-
 62
62
-
 63
63
-
 64
64
-
 65
65
-
 66
66
-
 67
67
-
 68
68
-
 69
69
-
 70
70
-
 71
71
-
 72
72
-
 73
73
-
 74
74
-
 75
75
-
 76
76
-
 77
77
-
 78
78
-
 79
79
-
 80
80
-
 81
81
-
 82
82
-
 83
83
-
 84
84
-
 85
85
-
 86
86
-
 87
87
-
 88
88
-
 89
89
-
 90
90
-
 91
91
-
 92
92
-
 93
93
-
 94
94
-
 95
95
-
 96
96
-
 97
97
-
 98
98
-
 99
99
-
 100
100
-
 101
101
-
 102
102
-
 103
103
-
 104
104
-
 105
105
-
 106
106
-
 107
107
-
 108
108
-
 109
109
-
 110
110
-
 111
111
-
 112
112
-
 113
113
-
 114
114
-
 115
115
-
 116
116
-
 117
117
-
 118
118
-
 119
119
-
 120
120
-
 121
121
-
 122
122
-
 123
123
-
 124
124
-
 125
125
-
 126
126
-
 127
127
-
 128
128
-
 129
129
-
 130
130
-
 131
131
-
 132
132
-
 133
133
-
 134
134
-
 135
135
-
 136
136
-
 137
137
-
 138
138
-
 139
139
-
 140
140
-
 141
141
-
 142
142
-
 143
143
-
 144
144
-
 145
145
-
 146
146
-
 147
147
-
 148
148
-
 149
149
-
 150
150
-
 151
151
-
 152
152
-
 153
153
-
 154
154
-
 155
155
-
 156
156
-
 157
157
-
 158
158
-
 159
159
-
 160
160
-
 161
161
-
 162
162
-
 163
163
-
 164
164
-
 165
165
-
 166
166
-
 167
167
-
 168
168
-
 169
169
-
 170
170
-
 171
171
-
 172
172
-
 173
173
-
 174
174
-
 175
175
-
 176
176
-
 177
177
-
 178
178
-
 179
179
-
 180
180
-
 181
181
-
 182
182
-
 183
183
-
 184
184
-
 185
185
-
 186
186
-
 187
187
-
 188
188
-
 189
189
-
 190
190
-
 191
191
-
 192
192
-
 193
193
-
 194
194
-
 195
195
-
 196
196
-
 197
197
-
 198
198
-
 199
199
-
 200
200
-
 201
201
-
 202
202
-
 203
203
-
 204
204
-
 205
205
-
 206
206
-
 207
207
-
 208
208
-
 209
209
-
 210
210
-
 211
211
-
 212
212
-
 213
213
-
 214
214
-
 215
215
-
 216
216
-
 217
217
-
 218
218
-
 219
219
-
 220
220
-
 221
221
-
 222
222
-
 223
223
-
 224
224
-
 225
225
-
 226
226
-
 227
227
-
 228
228
-
 229
229
-
 230
230
-
 231
231
-
 232
232
-
 233
233
-
 234
234
-
 235
235
-
 236
236
-
 237
237
-
 238
238
-
 239
239
-
 240
240
-
 241
241
-
 242
242
-
 243
243
-
 244
244
-
 245
245
-
 246
246
-
 247
247
-
 248
248
-
 249
249
-
 250
250
-
 251
251
-
 252
252
-
 253
253
-
 254
254
-
 255
255
-
 256
256
-
 257
257
-
 258
258
-
 259
259
-
 260
260
-
 261
261
-
 262
262
-
 263
263
-
 264
264
-
 265
265
-
 266
266
-
 267
267
-
 268
268
-
 269
269
-
 270
270
-
 271
271
-
 272
272
-
 273
273
-
 274
274
-
 275
275
-
 276
276
-
 277
277
-
 278
278
-
 279
279
-
 280
280
-
 281
281
-
 282
282
-
 283
283
-
 284
284
-
 285
285
-
 286
286
-
 287
287
-
 288
288
-
 289
289
-
 290
290
-
 291
291
-
 292
292
-
 293
293
-
 294
294
-
 295
295
-
 296
296
-
 297
297
-
 298
298


HP LASERJET 3015 ALL-IN-ONE PRINTER Användarguide
- Typ
- Användarguide
- Denna manual är också lämplig för
på andra språk
Relaterade papper
-
HP LaserJet 3300 Multifunction Printer series Användarmanual
-
HP OfficeJet 7610 Wide Format e-All-in-One series Användarguide
-
-
HP Officejet Pro 8610 Bruksanvisning
-
HP OfficeJet 7510 Wide Format All-in-One Printer series Bruksanvisning
-
HP LaserJet 9050 Printer series Snabbstartsguide
-
-
-
-
