
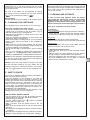
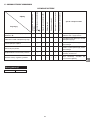
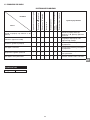
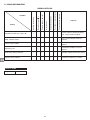
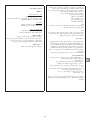
4010041626 (ECN20047643-03)
ES
IT
FR
SE
NO
NL
PT
GR
FI
DK
AE
PL
SK
SI
HU
HR
CZ
RU
BG
TR
RO
DE
GB
camp’bistro
MODE D’EMPLOI ............................ 5
INSTRUCTIONS FOR USE ............. 8
BEDIENUNGSANLEITUNG ............11
GEBRUIKSAANWIJZING .............. 14
ISTRUZIONI PER L’USO ............... 17
INSTRUCCIONES DE EMPLEO ... 20
MODO DE EMPREGO ................... 23
BRUKSANVISNING ....................... 26
BRUKSANVISNING ....................... 29
BETJENINGSVEJLEDNING.......... 32
KÄYTTÖOHJE ............................... 35
........................ 38
INSTRUKCJA OBSLUGI ............... 41
NÁVOD NA OBSLUHU ................. 44
NAVODILO ZA UPORABO ............ 47
HASZNÁLATI UTASÍTÁS .............. 50
UPUTE ZA KORIŠTENJE ............. 53
........................ 56
.. 59
.............................. 62
FOLOSIRE SI ÎNTRETINERE ........ 65
....... 68
KULLANIM KILAVUZU .................. 72

2

3

4

5
flamme, source de chaleur ou étincelle (cigarette,
appareil électrique, etc.), loin d’autres personnes et de
matériaux inflammables.
LES CARTOUCHES CAMPINGAZ
®
CP250/ CP250
SP ÉTANT À VALVE, ELLES PEUVENT ÊTRE
DÉMONTÉES DE CET APPAREIL MÊME SI ELLES
NE SONT PAS VIDES, ET REMONTÉES SUR
D’AUTRES APPAREILS CAMPINGAZ
®
CONÇUS
POUR FONCTIONNER EXCLUSIVEMENT AVEC
CES CARTOUCHES.
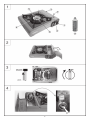
- Ouvrir le couvercle du compartiment cartouche (3)
(fig. 2).
- Vérifier que le bouton d’allumage (1) est sur la position
‘’l’’ en le tournant dans le sens de rotation des
aiguilles d’une montre et que le levier (2) est sur la
position “UNLOCK” (fig. 3).
Remarque : la cartouche de gaz ne pourra être
verrouillée que si le bouton d’allumage est en position
‘’l’’ et le support casseroles mis en place.
- S’assurer de la présence et du bon état du joint
d’étanchéité se trouvant à l’intérieur du logement
interne du détendeur (fig. 4). Ne pas utiliser l’appareil
si le joint manque ou est détérioré, le rapporter à
votre revendeur.
- Installer la cartouche dans le logement, la fente
“F” placée vers le haut, et bien engager le guide
cartouche “G” dans le fente (fig. 5).
- Verrouiller la cartouche en plaçant le levier (2) sur
la position “LOCK” (fig. 6). Fermer le couvercle du
compartiment cartouche (3).
L’ appareil est prêt à fonctionner.
ATTENTION : S’assurer que la cartouche (8) est en
position avec la fente “F” vers le haut et qu’elle est bien
engagée dans le guide cartouche “G”.
Une cartouche mal positionnée provoquera la rupture
du régulateur et/ou une fuite de gaz audible et avec une
odeur caractéristique.
En cas de fuite (odeur de gaz avant l’ouverture du
robinet), mettre immédiatement l’appareil à l’extérieur,
dans un endroit très ventilé, sans source d’inflammation,
où la fuite pourra être recherchée et arrêtée. Si vous
voulez vérifier l’étanchéité de votre appareil, faites-le
à l’extérieur. Ne pas rechercher les fuites avec une
flamme, utiliser un liquide de détection de fuite gazeuse.
C - UTILISATION DU RECHAUD
Quelques conseils supplémentaires :
Ne pas utiliser votre appareil à moins de 20 cm
d’une paroi ou d’un objet combustible, et à moins
de 1 mètre d’un plafond.
ATTENTION : des parties accessibles peuvent être
très chaudes. Eloigner les jeunes enfants.
Ne jamais toucher le support casseroles (4) ou le
brûleur (5) pendant ou juste après l’utilisation de
l’appareil.
Ne pas obstruer l’ouverture de ventilation (7) située
sur le couvercle du compartiment cartouche (3).
Ne jamais utiliser de casseroles couvrant
entièrement le brûleur (5).
Poser l’appareil sur une surface horizontale stable
et pendant l’utilisation, ne pas le déplacer.
Attendre le refroidissement complet de l’appareil
avant toute manipulation pour le rangement.
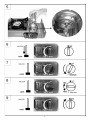
Allumage du brûleur
L’appareil est équipé d’un allumeur piézo électrique relié
à une électrode d’allumage (6).
- Tourner le volant (1) dans le sens inverse de rotation
FR
Débit : 160 g/h (2,2 kW)
Catégorie : pression directe butane
Nous vous remercions d’avoir choisi cet appareil
Campingaz
®
CAMP’BISTRO
A - IMPORTANT : VOUS UTILISEZ DU GAZ, SOYEZ
PRUDENT !
Ce mode d’emploi a pour objet de vous permettre
d’utiliser correctement et en toute sécurité votre
appareil Campingaz
®
CAMP’BISTRO.
Respectez les instructions de ce mode d’emploi
ainsi que les consignes de sécurité figurant sur les
cartouches Campingaz
®
CP250/ CP250 SP. Le non
respect de ces instructions peut être dangereux
pour l’utilisateur et son entourage.
Lisez-le attentivement pour vous familiariser avec
l’appareil avant de l’assembler à son récipient de gaz.
Conservez ce mode d’emploi en permanence en
lieu sûr afin de pouvoir vous y reporter en cas de
besoin.
Cet appareil doit être utilisé exclusivement avec
les cartouches Campingaz
®
CP250/ CP250 SP. Il
peut être dangereux d’utiliser d’autres récipients
de gaz.
La Société Application Des Gaz décline toute
responsabilité en cas d’utilisation d’une cartouche
de toute autre marque.
Cet appareil ne doit être utilisé qu’à l’extérieur des
locaux et éloigné de matériaux inflammables.
Ne pas utiliser un appareil qui fuit, qui fonctionne mal
ou qui est détérioré. Le rapporter à votre vendeur qui
vous indiquera le service après-vente le plus proche.
Ne jamais modifier cet appareil, ni l’utiliser pour
des applications auxquelles il n’est pas destiné.
Ne jamais modifier cet appareil, ni l’utiliser pour
des applications auxquelles il n’est pas destiné.
Ne pas utiliser cet appareil dans une caravane, un
véhicule, une tente, un abri, une cabane ou autre
petit espace clos.
Ne pas utiliser l’appareil pendant votre sommeil ou
sans surveillance.
Cet appareil à gaz fonctionnant sur le principe de
la combustion consomme de l’oxygène et rejette
des substances et gaz qui peuvent être dangereux,
tel que le monoxyde de carbone (CO).
Le monoxyde de carbone, inodore et incolore,
peut provoquer des malaises et des symptômes
qui rappellent la grippe, voire éventuellement la
mort si l’appareil est utilisé à l’intérieur d’un petit
espace clos sans ventilation adéquate.
Si la cartouche de gaz est éjectée automatiquement
du détendeur, NE PAS CONNECTER LA
CARTOUCHE A NOUVEAU, laisser refroidir
complètement l’appareil avant toute utilisation.
Ne pas utiliser de casserole de diamètre inférieur
à 12cm ou supérieur à 26cm. Ne pas utiliser de
récipients avec un fond concave ou convexe. Ne
pas utiliser de gril, plancha ou pierre sur le produit
excepté les accessoires Campingaz
®
développés
spécifiquement pour ce produit.
B - MISE EN SERVICE
- Retirer l’appareil de sa boîte protectrice.
MISE EN PLACE D’UNE CARTOUCHE CAMPINGAZ
®
CP250/ CP250 SP
(Si une cartouche vide est en place, lire le paragraphe
D : “Changement de la cartouche”)
Pour la mise en place ou le changement d’une
cartouche, opérer toujours dans un endroit aéré, de
préférence à l’extérieur et jamais en présence d’une
Figures : voir pages 2 à 4

6
des aiguilles d’une montre jusqu’au déclic ( )
annonçant la production de l’étincelle (fig. 7).
Si l’allumage ne se produit pas, ramener le volant en
position ‘’l’’ (fig. 9) et recommencer l’opération.
- Si 3 essais s’avèrent infructueux, placer le volant
de réglage sur la position ‘’l’’ (fig. 9) et vérifier si
la cartouche contient du gaz (bruit de liquide en la
secouant) avant de recommencer les opérations
précédentes. (Si une cartouche vide est en place, lire
le paragraphe “D - Changement de la cartouche”).
Cuisson
Poser la casserole sur les bras, centrée sur le brûleur, et
régler le débit du gaz de manière à ce que les flammes
ne dépassent pas la casserole.
Pour ajuster la taille de la flamme, tourner le bouton
d’allumage (1) doucement entre la position MIN ( )
et la position MAX ( )(fig. 8).
Extinction
Quand la cuisson est terminée : fermer le gaz en
tournant le volant (1) à fond dans le sens de rotation des
aiguilles d’une montre (position ‘’l’’) (fig. 9).
D - CHANGEMENT DE LA CARTOUCHE
La cartouche peut être retirée de l’appareil même si elle
n’est pas complètement vide.
- Attendre que l’appareil ait refroidi.
- Vérifiez que l’arrivée du gaz est bien fermée en
tournant le volant (1) dans le sens de rotation des
aiguilles d’une montre jusqu’à la position ‘’l’’ (fig. 9)
et que le brûleur (5) est éteint.
- Déverrouiller la cartouche en plaçant le levier (2) en
position “UNLOCK” (fig. 10).
- Ouvrir le compartiment cartouche (3) et retirer celle-ci
en la levant par l’arrière.
- Ne jamais jeter une cartouche qui n’est pas vide (vérifier
avant l’absence de bruit de liquide en la secouant).
- Vérifier qu’aucune coulure d’aliment n’a obstrué le
logement interne du détendeur de l’appareil (fig. 4)
avant d’assembler une nouvelle cartouche.
- Vérifier la présence et le bon état du joint (fig. 4).
- Mettre en place une nouvelle cartouche en suivant les
instructions du paragraphe “B - MISE EN SERVICE -
MISE EN PLACE D’UNE CARTOUCHE CAMPINGAZ
®
CP250/ CP250 SP”.
Attention :
En cas de changement de cartouche au cours de
l’utilisation, ne pas toucher les surfaces chaudes de
l’appareil (brûleur, support de casserole, plaque...).
Attention :
Il peut rester un reliquat de gaz après l’arrêt de
l’appareil. Pour votre sécurité, avec le levier de la
cartouche (2) sur la position “UNLOCK” (fig. 10), placer
le volant de réglage (1) sur la position ( ), afin de brûler
le gaz restant.
E - DISPOSITIF DE SECURITE
Ne jamais utiliser un appareil qui fuit, qui est endommagé
ou qui ne fonctionne pas correctement.
Si la pression dans la cartouche est trop élevée
(surchauffe due à une surface trop importante sur la
grille de cuisson par exemple), un dispositif intégré
débranche la cartouche et le levier (2) se met en
position ‘’UNLOCK’’. Dans ce cas, il faut retirer la
cartouche et la laisser refroidir (passer sous l’eau par
exemple) avant de la réutiliser ou utiliser une nouvelle
cartouche en opérant selon “D - CHANGEMENT DE LA
CARTOUCHE”.
L’appareil ne fonctionnera de nouveau que lorsque la
pression du gaz redevient normale.
RÉINITIALISATION DU DISPOSITIF DE SÉCURITÉ
- Tourner le volant de réglage (1) à fond dans le sens
de rotation des aiguilles d’une montre (position ‘’l’’)
et placer le levier de la cartouche (2) sur la position
“UNLOCK”.
- Retirer la cartouche.
- Placer le volant de réglage sur la position ( ) pour
brûler l’excès de gaz.
- Après 5 minutes, remettre le volant de réglage sur la
position ‘’l’’.
- Vérifier que le volant de réglage est sur ‘’l’’ et effectuer
l’initialisation du dispositif de sécurité, comme suit:
1) Placer le levier de verrouillage de la cartouche (2)
vers le bas, sur la position “LOCK”, puis
2) Le placer vers le haut, sur la position “UNLOCK” .
- Installer une nouvelle cartouche ou une cartouche qui
a refroidi.
- Répéter la procédure d’allumage.
Si la température dans la cartouche est élevée, le gaz
ne sortira pas, même si la cartouche est installée dans
l’appareil. Ceci grâce au déclenchement du dispositif de
sécurité. L’appareil n’est pas défectueux.
F - ENTRETIEN ET STOCKAGE
Après refroidissement complet de votre appareil :
1 - Nettoyage
Corps de l’appareil
- Nettoyer l’appareil après avoir enlever la cartouche.
- Nettoyer le support casseroles (4), l’extérieur et le
couvercle de la cartouche (3) avec de l’eau chaude,
puis sécher avec un chiffon.
Brûleur (5)
Si le brûleur est sale, le passage des flammes est
obstrué.
- Nettoyer les trous du brûleur à l’aide d’une brosse
métallique.
Electrode d’allumage PIEZO (6)
Si l’électrode est mouillée, l’appareil ne s’allumera pas.
- Essuyer puis sécher avec un chiffon.
2 - Stockage et transport
- Vérifier que le levier (2) est placé en position
“UNLOCK” (fig. 10).
- Toujours enlever la cartouche de gaz du produit
pendant le stockage ou le transport de l’appareil.
- Stocker l’appareil et sa cartouche dans un endroit
frais, sec et aéré, hors de portée des enfants, jamais
dans un sous-sol ou une cave.
FR

7
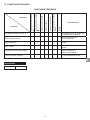
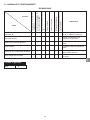
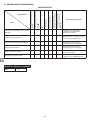
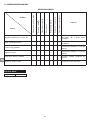
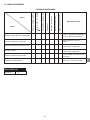
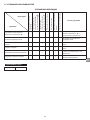
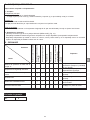
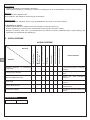
ANOMALIES
Impossible d’installer la
cartouche.
Pas d’alimentation en gaz
dans la position (
).
Odeur de gaz dans la
position ‘’l’’.
Flamme faible.
Flamme irrégulière.
Pas d’allumage - Allumage
défectueuse.
Le brûleur s’éteint pendant
le fonctionnement.
Dépannage
Le bouton d’allumage n’est pas sur la
position ‘’l’’
P
Mettre le bouton d’allumage sur
‘’l’’ et retirer la cartouche.
Sécurité activée
P P P
Voir explication sur le dispositif de
sécurité.
Bouton d’allumage défectueux
P P P P
Contacter le S.A.V.
Buse bouchée
P P P
Contacter le S.A.V.
Cartouche non installée correctement
P P P P
Engager le guide cartouche dans
la fente de la cartouche.
Trous bouchés dans le brûleur.
P P P
Utiliser une brosse métallique
pour nettoyer.
Symptômes
Causes
FR
G - ANOMALIES DE FONCTIONNEMENT
Période de garantie
Ans 2

8
GB
Figures: see pages 2 to 4
Consumption: 160 g/h (2.2 kW)
Category: butane direct pressure
Thank you for choosing this Campingaz
®
CAMP’BISTRO
A - IMPORTANT: YOU ARE USING GAS, BE VERY
CAREFUL!
The purpose of these instructions is to enable you to
use your Campingaz
®
CAMP’BISTRO correctly and in
complete safety.
Please read them carefully to familiarise yourself
with the equipment prior to assembling the gas
container. Keep these instructions in a safe place
so that you can refer to them if needed.
Please observe these instructions and the safety
measures printed on the Campingaz
®
CP250/
CP250 SP cartridges. Failure to observe these
instructions may result in the user and people in
the immediate vicinity being put at risk.
This equipment must be used exclusively with
Campingaz
®
CP250/ CP250 SP cartridges. Using
other gas containers may be dangerous.
The Société Application Des Gaz accepts no
responsibility when cartridges of any other make
are used.
This equipment should only be used outside
premises and kept away from inflammable
materials.
Do not use equipment which leaks, functions
incorrectly or is damaged. Return it to your retailer
who will inform you of your nearest after-sales
service.
Never modify this equipment or use it for purposes
for which it is not intended.
Do not use this product in caravans, cars, tents,
huts, sheds or any small enclosed areas.
The product should not be used while sleeping or
left unattended.
This product consumes fuel through combustion
or consumption of oxygen and gives off certain
substances and gas, which could be dangerous
such as carbon monoxide.
Carbon monoxide is an odorless, clear gas that
can cause flu-like symptoms, sickness, illness,
and possibly death if produced inside aforesaid
enclosed areas through use of the product without
proper ventilation.
If the cartridge is automatically ejected from the
regulator, DO NOT CONNECT THE CARTRIDGE
AGAIN, let the appliance cool down completely
before any use.
Do not use a container smaller than 12cm or
larger than 26 cm in diameter. Do not use vessels
with concave or convex bottoms. Do not use
griddles, plancha or stone on the product except
specific Campingaz
®
accessories developed for
this product.
B - PREPARATION FOR OPERATION
- Remove the device from its packaging.
Installing a CAMPINGAZ
®
cartridge CP250/ CP250 SP
(When the existing cartridge is empty, read paragraph
D: “Changing the cartridge”)
To install or remove a cartridge, always work in a well-
ventilated area, preferably outside and never in the
presence of a flame, heat source or spark (lit cigarette,
electrical equipment, etc.) at a good distance from
other people and flammable material.
AS CAMPINGAZ
®
CP250/ CP250 SP CARTRIDGES
HAVE VALVES, EVEN IF THEY ARE NOT EMPTY,
THEY MAY BE REMOVED FROM THIS EQUIPMENT
TO MAKE IT EASIER TO TRANSPORT, AND THEY
MAY BE FITTED TO OTHER EQUIPMENT FROM THE
CAMPINGAZ
®
CP250/ CP250 SP RANGE WHICH
ARE DESIGNED TO OPERATE EXCLUSIVELY WITH
THESE CARTRIDGES.
- Open the cartridge cover (3) (fig. 2).
- Check that the ignition button (1) is set to position “l”
by turning it clockwise and that the lever (2) is set to
UNLOCK (Fig. 3).
Comment: the gas cartridge can only be locked if the
ignition button is in position “l” and the pan support is in
place.
- Check that the seal between the appliance and the
gas container is in place and in good condition before
connecting the gas container (see Figure 4). Do not
use this appliance if it has damaged or worn seal.
- Install the cartridge in its housing, slot “F” facing
upwards, and engage the cartridge guide “G” firmly
into the slot (Fig. 5).
- Lock the cartridge by moving the lever (2) to the LOCK
position (Fig. 6). Close the cartridge compartment
cover (3).
The equipment is ready for use.
CAUTION: Make sure the cartridge slot “F” is pointing
upward and inserted in the cartridge guide “G”.
Incorrect positioning of the gas cartridge (8) will cause
the regulator to break and/or gas leakage, producing a
hissing sound and gas smell.
In case of leakage (gas smell before opening the valve),
put immediately the equipment outside, in a well-ventilated
area, without inflammation source, where it will be possible
to locate and stop the lead. If you wish to check the
tightness of the equipment, do it outside. Do not try to
locate a leak with a flame, use gas leak detection liquid.
C - USE
Additional instructions:
Do not use your stove at a distance closer than 20
cm to a wall or flammable object, nor closer than 1
meter to a ceiling.
WARNING: Accessible parts may be very hot. Keep
young children away.
Never touch the pan support (4) or the burner (5)
during or just after using the equipment.
Do not obstruct the ventilation hole (7) in the
cartridge compartment cover (3).
Never use pans which cover the burner entirely (5).
Position the equipment on a stable, horizontal
surface and do not move when in use.
Wait until the appliance has completely cooled
down before handling and putting it away.
Lighting the burner
The equipment is fitted with a piezo-electric lighter
connected to an ignition electrode (6).
- Turn the control knob (1) anti-clockwise until you hear
a click ( ) indicating a spark (Fig. 7). If the equipment
does not light, turn the control knob to position “l” (Fig.
9) and start the operation again.
- If the equipment still does not light after three attempts,
turn the control knob to position “l” and check that the
cartridge contains gas (sound of liquid sloshing when
shaken) before starting the previous steps again. (If
the cartridge is empty, refer to paragraph D - Changing
the cartridge).

9
Cooking
Position the pan on the arms centred over the burner
and adjust the gas flow so that the flames do not burn
higher than the pan.
The size of the flame can be regulated by turning
the ignition knob (2) between the full flow position
( ) and medium flow position ( ).
Extinguishing
Turn the ignition knob (1) clockwise to “l” position (fig. 9).
D - CHANGING THE CARTRIDGE
The cartridge may be removed even if it is not empty.
Once your equipment has fully cooled:
- Check that the gas inlet is fully closed by turning the
control knob (1) clockwise to the “l” position (Fig. 9)
and that the burner (5) is extinguished.
- Disconnect the cartridge by putting the lever (2) in the
“UNLOCK” position.
- Open the cartridge compartment (3) and remove the
cartridge by lifting it from behind.
- Never throw away a cartridge which is not completely
empty, (check there is no liquid in the cartridge by
shaking it).
- Make sure that no food has dropped into and thus
obstructs the equipment regulator internal housing (fig.
4) before installing a new cartridge.
- Check that the seal is present and in good condition
(fig. 4)
- Put in a new cartridge by following the instructions in
paragraph “B - PREPARATION FOR OPERATION -
Installing a CAMPINGAZ
®
cartridge CP250/ CP250 SP”.
Caution: If the cartridge is replaced while the appliance
is in use, do not touch the hot surfaces of the appliance
(burner, saucepan holder, plate...).
Caution: Some fuel may remain in the gas cock after
the unit has been turned off. For your safety, with the
cartridge lever (2) in “UNLOCK” position, turn ignition
knob (1) to ( ) position to burn off any remaining fuel.
E - SAFETY DEVICE
Do not use an appliance which is leaking, damaged, or
which does not operate properly.
If the gas pressure in the cartridge is too high (for
instance overheating due to too large a surface on the
cooking grill) a built-in device disconnects the cartridge
and the lever (2) returns to “UNLOCK”. In this case, you
need to remove the cartridge and let it cool down (run
it under water, for example) before reusing it or use a
new cartridge following the instructions in Section “D -
CHANGING THE CARTRIDGE”.
The unit will not operate until the gas pressure of the
cartridge returns back to the normal stove.
HOW TO RESET SAFETY DEVICE
- Turn the ignition knob (1) to the “l” position and raise
cartridge lever (2) up to the “UNLOCK” position.
- Remove the gas cartridge.
- Turn the ignition knob to the (
) position to release
excess gas in the gas cock.
- After 5 minutes, turn the ignition knob to the “l”
position.
- Make sure the ignition knob is “l” and reset safety
device by:
a) Pushing the cartridge lever down to “LOCK” position,
and then
b) Pushing the cartridge lever up to “UNLOCK” position.
- Replace a new cartridge or a cooled down cartridge.
- Repeat the ignition procedure.
If the temperature in the cartridge is high initially, fuel will
not emerge even though the cartridge is installed in the
stove. This is due to the operation of the safety device.
It is not out of order.
F - CLEANING AND STORAGE
In case of burn back (ignition under the burner
cap) switch the product off, allow it to cool down
(approximately five minutes), then reignite the
appliance. If the problem of burn back persists, then
please contact your local Campingaz
®
representative.
Once your equipment has fully cooled:
1 - Cleaning
Main equipment
- Clean the equipment having removed the cartridge.
- Clean the pan support (4) and the cartridge exterior
and cover (3) with warm water, then dry with a cloth.
Burner (5)
A dirty burner will clog the holes of the flame.
Clean the flame holes of burner head with a metal brush
Ignition Plug
lf it is wet, ignition will not be made. Make sure any
water is removed, and dry with a cloth.
2 - Storage and transportation
- Check that the lever (2) is in the UNLOCK position
(Fig. 10).
- Always remove the gas cartridge from the product
during storage or transportation of the appliance
- Store the equipment and the cartridge in a cool, dry
and well-ventilated area, out of reach of children.
Never store in a basement or cellar.
GB

10
GB
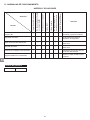
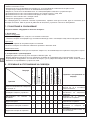
TROUBLE SHOOTING
Cartridge would not install
No gas supply in (
) position
Smell gas in “l” position
Low flame
Uneven flame
No ignition/Faulty ignition
Extinction in operation
Trouble shooting
Ignition knob is not turn to “l” position P
Turn ignition knob completely to
“l” and reset cartridge.
Safety device activated
P P P
Refer to explanation for safety
device.
Ignition knob malfunction
P P P P
Contact local agent to repair.
Clogged nozzle
P P P
Contact local agent to repair.
Cartridge incorrectly installed
P P P P
Fit cartridge guide into cartridge
slot.
Clogged burner holes
P P P
Use a metal brush to clean it.
Troubles
Causes
G - TROUBLESHOOTING
Warranty Period
Years 2

11
Durchsatz: 160 g/h (2,2 kW)
Kategorie: Direktdruck Butan
Vielen Dank, dass Sie sich für den Campingaz
®
CAMP’BISTRO entschieden haben.
A - WICHTIG: BEIM UMGANG MIT GAS IST
BESONDERE VORSICHT GEBOTEN!
Diese Bedienungsanleitung soll Sie bei der richtigen und
sicheren Benutzung Ihres Campingaz
®
CAMP’BISTRO
unterstützen.
Lesen Sie sie aufmerksam durch und machen
Sie sich mit dem Gerät vertraut, bevor Sie die
Gaskartusche anschließen.
Beachten Sie bitte alle Anweisungen in der
Bedienungsanleitung sowie die Sicherheitshinweise
auf den Campingaz
®
Kartuschen CP250/ CP250 SP.
Das Nichteinhalten der Anweisungen kann für den
Anwender und seine Umgebung gefährlich sein.
Bewahren Sie diese Bedienungsanleitung an
einem sicheren Ort auf, damit Sie im Bedarfsfall
immer auf sie zurückgreifen können.
Dieses Gerät darf nur mit Kartuschen des Typs
Campingaz
®
CP250/ CP250 SP, die mit Butan gefüllt
sind, betrieben werden. Die Verwendung anderer
Gasbehälter kann gefährlich sein.
Die Firma Application Des Gaz/Camping Gaz
lehnt jegliche Haftung bei der Verwendung von
Kartuschen einer anderen Marke ab.
Das Gerät darf nur im Freien und fern von
brennbaren Stoffen verwendet werden.
Betreiben Sie kein Gerät, das undicht ist, schlecht
funktioniert oder beschädigt ist. Bringen Sie es zu
Ihrem Händler zurück. Er kann Ihnen die nächste
Kundendienstvertretung nennen.
Nehmen Sie an dem Gerät keine Veränderungen
vor und setzen Sie es nicht für Anwendungen ein,
für die es nicht vorgesehen ist.
Das Gerät nicht in Wohnwagen, Fahrzeugen,
Zelten, Schutzdächern, Hütten und kleinen
geschlossenen Bereichen verwenden. Nicht
beim Schlafen benützen, nicht unbewacht
lassen. Alle Produkte, die mit Gasverbrennung
betrieben werden, verbrauchen Sauerstoff und
geben Verbrennungsrückstände ab. Ein Teil dieser
Verbrennungsrückstände kann Kohlenmonoxyd
(CO) enthalten. Kohlenmonoxyd ist geruch- und
farblos, es kann Übelkeit und grippeähnliche
Symptome verursachen, eventuell sogar zum Tod
führen, wenn das Gerät im geschlossenen Raum
ohne geeignete Belüftung verwendet wird.
Wenn die Kartusche automatisch aus dem
Regulator ausgeworfen wird, DIE KARTUSCHE
NICHT ERNEUT ANSCHLIESSEN. Lassen Sie das
Gerät komplett abkühlen, bevor Sie es verwenden.
Verwenden Sie keinen Behälter mit einem
Durchmesser von kleiner als 12 cm oder größer als
26 cm. Verwenden Sie keine Gefäße mit nach innen
oder außen gewölbten Böden. Verwenden Sie kein
Blech, keinen Plancha oder Stein für das Produkt,
außer spezielles für dieses Produkt entwickeltes
Campingaz
®
Zubehör.
B - INBETRIEBNAHME
- Das Gerät aus der Verpackung nehmen.
Einsetzen der Gaskartusche Campingaz
®
CP250/
CP250 SP
(Befindet sich eine leere Kartusche in dem Gerät, lesen
Sie bitte den Abschnitt D: “Ausbau der Kartusche”.)
Achten Sie darauf, dass die (De-)Montage einer
Kartusche immer an einem gut durchlüfteten Ort, am
besten im Freien, niemals in der Nähe von offenen
Flammen, Wärmequellen oder Funken (Zigarette,
elektrisches Gerät usw.) und immer entfernt von
anderen Personen und brennbaren Materialien erfolgt.
DIE CAMPINGAZ
®
-KARTUSCHEN CP250/
CP250 SP SIND MIT EINEM VENTIL
AUSGESTATTET. SIE KÖNNEN DAHER,
SELBST WENN SIE NOCH NICHT VOLL-
STÄNDIG ENTLEERT SIND, HERAUSGENOMMEN
UND IN ANDERE CAMPINGAZ
®
-GERÄTE FÜR
KARTUSCHEN CP250/ CP250 SP EINGESETZT
WERDEN.
- Den Deckel des Kartuschenfachs (3) öffnen (Abb. 2).
- Überprüfen, dass sich der Regelknopf (1) durch
Drehen im Uhrzeigersinn auf der Position “l” (OFF)
befindet und dass die Kartuschenverriegelung (2) auf
“UNLOCK” steht (Abb. 3).
Anmerkung: Die Gaskartusche kann nur dann
verriegelt werden, wenn der Zündknopf auf “l” (OFF)
steht und der Topfuntersatz eingesetzt ist.
- Sicherstellen, dass die Dichtung im Inneren des
Geräteventils vorhanden und in gutem Zustand ist
(Abb. 4). Das Gerät nicht verwenden, wenn die
Dichtung fehlt oder beschädigt ist; es zum Händler
zurückbringen.
- Die Kartusche mit dem Spalt “F” nach oben zeigend
einlegen und die Kartuschenführung “G” richtig
einsetzen (Abb. 5).
- Durch Herunterdrücken der Kartuschenverriegelung
(2) auf “LOCK” die Kartusche verriegeln (Abb. 6). Den
Deckel des Kartuschenfachs (3) schließen.
Das Gerät ist betriebsbereit.
ACHTUNG: Vergewissern Sie sich, dass die
Gaskartusche mit der Einkerbung nach oben richtig in
der Führung sitzt.
Wenn die Gaskartusche nicht richtig sitzt, kommt es
zu einer Unterbrechung der Gaszufuhr und/oder einem
hörbaren Austreten von Gas zusammen mit einem
charakteristischen Geruch.
Bei einem Leck (Gasgeruch vor dem Öffnen des Ventils)
das Gerät sofort an einen gut belüfteten Ort ohne
Entzündungsquelle ins Freie bringen, an dem das Leck
gesucht und abgedichtet werden kann. Die Dichtigkeit des
Gerätes immer im Freien überprüfen. Undichte Stellen
nicht mit Hilfe einer Flamme suchen (eine Flüssigkeit für
die Gasleckerkennung verwenden).
C - VERWENDUNG
Einige zusätzliche Empfehlungen:
Das Gerät in mindestens 20 cm Abstand zur Wand
oder zu einem brennbaren Gegenstand und in
mindestens 1 m Abstand zur Decke verwenden.
ACHTUNG: Die zugänglichen Teile am Kocher können
sehr heiß werden. Halten Sie Kinder davon fern.
Den Topfuntersatz (4) und den Brenner (5) während
oder kurz nach dem Gebrauch des Gerätes niemals
berühren.
Die Lüftungsschlitze (7) auf dem Deckel des
Kartuschenfachs (3) nicht verstopfen.
Niemals Töpfe verwenden, die den Brenner (5) ganz
zudecken.
Stellen Sie den Kocher auf eine stabile und ebene
Fläche, verschieben Sie ihn nicht während des
Betriebs.
Das Gerät erst nach vollständigem Abkühlen reinigen
und aufräumen.
DE
Abbildungen: siehe Seite 2 - 4

12
Zünden des Brenners
Das Gerät ist mit einem piezoelektrischen Zünder
ausgestattet, der mit einer Zündelektrode (6) in Verbindung
steht.
- Den Reglerknopf (1) gegen den Uhrzeigersinn drehen,
bis ein Klicken (
) zu hören ist, das die Erzeugung
des Funkens ankündigt (Fig. 7). Wenn keine Zündung
erfolgt, den Reglerknopf auf “l” (OFF) zurückdrehen
(Abb. 9) und den Vorgang wiederholen.
- Nach drei erfolglosen Versuchen den Reglerknopf auf
“l” stellen (Abb. 9) und überprüfen, ob die Kartusche
Gas enthält (Flüssigkeitsgeräusch beim Schütteln),
bevor ein erneuter Versuch unternommen wird. (Wenn
die eingesetzte Kartusche leer ist, den Abschnitt “D -
Auswechseln der Kartusche” durchlesen).
Kochen
Den Topf zentriert auf die Topfträger setzen und die
Gasleistung so einstellen, dass die Flammen nicht über
den Topf hinauszüngeln.
Zum Regulieren der Flamme den Regelknopf (1) vorsichtig
zwischen den Stellungen voll Leistung ( ) und
mittlere Leistung ( ) drehen (Abb. 8).
Ausschalten
Den Regelknopf (1) im Uhrzeigersinn in die Stellung “l”
(OFF) drehen (Abb. 9).
D - AUSWECHSELN DER KARTUSCHE
Die Kartusche kann ausgebaut werden, auch wenn sie
noch nicht leer ist.
Nach dem vollständigen Abkühlen des Gerätes:
- Durch Drehen des Reglerknopfes (1) im Uhrzeigersinn
bis zur Position “l” (OFF) sicherstellen, dass die
Gaszufuhr geschlossen und der Brenner (5) erloschen
ist (Abb. 9).
- Durch Stellen der Kartuschenverriegelung (2) auf
“UNLOCK” die Kartusche vom Gerät abtrennen (Abb. 10).
- Öffnen Sie das Kartuschenfach (3). Heben Sie die
Kartusche am Ende an und nehmen Sie sie heraus.
- Eine nicht vollständig entleerte Kartusche niemals
wegwerfen! Schütteln Sie die Kartusche, um zu prüfen,
ob im Inneren Flüssigkeit hörbar ist.
- Vor dem Einsetzen einer neuen Kartusche überprüfen,
dass das Innere des Geräteventils nicht durch einen
Nahrungsmittelrest verstopft ist (Abb. 4).
- Sicherstellen, dass die Dichtung im Inneren des
Geräteventils vorhanden und in gutem Zustand ist
(Abb. 4)
- Setzen Sie die neue Kartusche ein unter Befolgung der
Anweisungen in Paragraph “B - INBETRIEBNAHME -
EINSETZEN DER GASKARTUSCHE CAMPINGAZ
®
CP250/ CP250 SP”.
Achtung: Bei einem Kartuschenwechsel während des
Gebrauchs die heißen Stellen des Gerätes (Brenner,
Topfträger, Topfuntersatz ...) nicht berühren!
Achtung: Nach dem Abschalten des Geräts kann ein
Rest Gas im Gerät verbleiben. Zu Ihrer Sicherheit,
wenn sich der Hebel der Kartuschenverriegelung (2) in
Stellung “UNLOCK’’ (Abb. 10) befindet, den Regelknopf
(1) in die Stellung ( ) drehen, um das Restgas zu
verbrennen.
E - ÜBERHITZUNGSSCHUTZ
Niemals ein Gerät benutzen, wenn es eine Leckage
aufweist, beschädigt ist oder nicht richtig arbeitet.
Wenn der Druck in der Kartusche zu hoch ist (z.
B. aufgrund eines zu großen Kochgefäßes auf den
Topfträgern), verschließt eine integrierte Sicherung die
Kartusche, und die Kartuschenverriegelung (2) stellt
sich automatisch auf die Position “UNLOCK”.Wenn
dieser Fall eintritt, muss die Kartusche aus dem Gerät
genommen und z. B. unter einem kalten Wasserstrahl
abgekühlt werden, bevor sie wieder benutzt werden
kann. (siehe Abschnitt “D - AUSWECHSELN DER
KARTUSCHE”).
RÜCKSTELLUNG DES ÜBERHITZUNGSSCHUTZES
- Den Regelknopf (1) in Stellung “l” (OFF) bringen und
die Kartuschenverriegelung (3) in Stellung “UNLOCK”
anheben.
- Die Gaskartusche entnehmen.
- Den Regelknopf in Stellung ( ) drehen, um das
überschüssige Gas zu entleeren.
- Nach 5 Minuten den Regelknopf in Stellung “l” (OFF)
drehen.
- Überprüfen, ob der Regelknopf auf “l” (OFF) steht und
wie folgt eine Rückstellung des Überhitzungsschutzes
vornehmen:
a) Die Kartuschenverriegelung (2) nach unten in
Stellung “LOCK” schieben, dann:
b) Die Kartuschenverriegelung nach oben in Stellung
“UNLOCK” schieben.
- Eine neue Gaskartusche oder eine inzwischen
abgekühlte Gaskartusche einsetzen.
- Den Vorgang zum Einschalten wiederholen (siehe
“Gebrauchsanweisung”).
Wenn die Anfangstemperatur in der Gaskartusche
hoch ist, wird das Gas nicht austreten, auch nicht
wenn die Gaskartusche in dem Kocher installiert ist.
Dies ist auf das Einschalten des Überhitzungsschutzes
zurückzuführen. Das Gerät ist nicht defekt.
F - REINIGEN UND LAGERN
Nach dem vollständigen Abkühlen des Gerätes:
1 - Reinigung
Gerätekörper
- Nach dem Entfernen der Kartusche das Gerät
reinigen.
- Den Topfuntersatz (4), die Außenfläche und den
Kartuschendeckel (3) mit warmem Wasser reinigen,
dann mit einem Lappen trocknen.
Brenner (5)
Wenn der Brenner schmutzig ist, können die Flammen
nicht mehr frei austreten.
Die Brenneröffnungen mit einer Metallbürste reinigen.
Zündelektrode (6)
Wenn die Elektrode feucht ist, kann man das Gerät
nicht einschalten.
Abwischen und mit einem Lappen abtrocknen.
2 - Lagerung und Transport
- Überprüfen, dass der Hebel (2) auf “UNLOCK” steht
(Abb. 10).
- Entfernen Sie die Gaskartusche während der Lagerung
oder des Transports stets aus dem Produkt.
- Bewahren Sie den Kocher und die Kartusche an
einem kühlen, trockenen und belüfteten Ort für Kinder
unzugänglich auf, jedoch niemals in einem Keller oder
Untergeschoß.
DE

13
FUNKTIONSSTÖRUNGEN
DE
Gaskartusche nicht installier-
bar
Keine Gaszufuhr in Stellung
(
)
Gasgeruch in Stellung “l”
Flamme schwach
Flamme unregelmäßig
Kein Einschalten - Zündung
defekt
Der Brenner erlischt im
Betrieb
Fehlerbehebung
Der Regelknopf steht nicht auf “l”
P
Den Regelknopf auf “l” stellen und
die Gaskartusche entnehmen
Überhitzungsschutz aktiv
P P P
Siehe die Erklärung zum
Überhitzungsschutz
Regelknopf defekt
P P P P
Sich an den örtlichen Kundendienst
wenden
Düse verstopft
P P P
Sich an den örtlichen Kundendienst
wenden
Gaskartusche nicht richtig installiert
P P P P
Die Einkerbung der Gaskartusche
richtig in die Führung im
Kartuschenfach einführen.
Löcher im Brenner verstopft
P P P
Mit einer Metallbürste reinigen
Anzeichen
Ursachen
G - FUNKTIONSSTÖRUNGEN
Garantiezeit
Jahre 2

14
Capaciteit: 160 g/u (2,2 kW)
Klasse: rechtstreekse butaan druk
Wij danken u dat u voor de Campingaz
®
CAMP’BISTRO
gekozen heeft.
A - BELANGRIJK: U GEBRUIKT GAS, WEES
VOORZICHTIG!
Deze gebruiksaanwijzing heeft als doel u in staat
te stellen uw Campingaz
®
CAMP’BISTRO op een
correcte en veilige wijze te gebruiken.
Lees deze gebruiksaanwijzing aandachtig
door om het apparaat beter te leren kennen
voordat u de cartouche aansluit. Bewaar deze
gebruiksaanwijzing altijd op een vaste plaats zodat
u deze kunt raadplegen indien nodig.
Lees de aanwijzingen van deze gebruiksaanwijzing,
evenals de veiligheidsvoorschriften die op de
Campingaz
®
CP250/ CP250 SP cartouche staan.
Het niet naleven van deze aanwijzingen kan gevaar
opleveren voor de gebruiker en zijn omgeving.
Dit apparaat dient uitsluitend gebruikt te worden
met de Campingaz
®
CP250/ CP250 SP cartouches.
Het kan gevaarlijk zijn andere soorten dan de
Campingaz
®
CP250/ CP250 SP cartouche te
gebruiken.
Application Des Gaz wijst elke verantwoordelijkheid
af in geval van gebruik van een cartouche van een
ander merk.
Dit apparaat mag alleen buiten worden gebruikt uit
de buurt van ontvlambaar materiaal.
Gebruik geen apparaat dat lekt, slecht werkt of
beschadigd is. Breng het naar uw dealer die u
de verdere informatie over reparaties etc. kan
verstrekken.
Breng nooit wijzigingen op dit apparaat aan en
gebruik het alleen voor de toepassingen waarvoor
het bestemd is.
Dit apparaat mag niet in een caravan, voertuig,
tent, afdak, hut of andere kleine gesloten ruimte
gebruikt worden. Het mag niet gebruikt worden
wanneer u slaapt en mag nooit onbewaakt
achtergelaten worden. Ieder gasapparaat werkt
volgens het volgende principe: de brandstof
gebruikt zuurstof en stoot verbrandingsproducten
uit. Een gedeelte van deze verbrandingsproducten
kan koolmonoxide (CO) bevatten. Koolmonoxide
dat reuk- en kleurloos is, kan leiden tot flauwvallen
of symptomen die aan griep doen denken. In
extreme gevallen kan het zelfs de dood tot gevolg
hebben, wanneer het apparaat binnenshuis zonder
goede ventilatie gebruikt wordt.
Als de patroon automatisch uit de drukregelaar
wordt uitgeworpen, SLUIT DE PATROON DAN
NIET OPNIEUW AAN en laat het apparaat helemaal
afkoelen voordat u het opnieuw gaat gebruiken.
Gebruik geen houder met een diameter kleiner
dan 12 cm of groter dan 26 cm. Gebruik geen tank
met een holle of bolle onderkant. Gebruik op dit
product geen grillplaat, plancha of steen die niet
speciaal door Campingaz
®
voor dit product is
ontwikkeld.
B - INGEBRUIKNAME
- Neem het apparaat uit de verpakking.
Het aansluiten van een CAMPINGAZ
®
-cartouche
CP250/ CP250 SP
(Indien een lege cartouche geplaatst wordt, lees dan
paragraaf “D - HET UITNEMEN VAN EEN CARTOUCHE”)
Werk steeds in een geventileerde ruimte bij voorkeur
buiten en nooit in de aanwezigheid van een vlam,
warmtebron of vonk (sigaret, elektrisch apparaat, enz.)
en ver verwijderd van andere personen of ontvlambare
materialen om een cartouche te monteren of uit te nemen.
AANGEZIEN DE CAMPINGAZ
®
CARTOUCHES
CP250/ CP250 SP EEN KLEP HEBBEN, KUNNEN
ZE UIT HET APPARAAT GENOMEN WORDEN
OM HET VERVOER TE VERGEMAKKELIJKEN
ZELFS AL ZIJN ZE NIET LEEG EN KUNNEN ZE
OP ANDERE APPARATEN VAN HET CAMPINGAZ
®
ASSORTIMENT CP250/ CP250 SP, ONTWORPEN
OM EXCLUSIEF MET DEZE CARTOUCHES TE
WERKEN, GEMONTEERD WORDEN.
- Het patroondeksel (3) openmaken(figuur 2).
- Controleer of de ontstekingsknop (1) op de stand “l”
staat door er in wijzerzin aan te draaien tot hendel (2)
in de stand “UNLOCK” staat (fig. 3).
Opmerking: de gaspatroon kan alleen worden
vergrendeld wanneer de ontstekingsknop in de stand
“l” staat en de ketelhouder is geplaatst.
- Verzeker u ervan dat de pakking die zich aan de
binnenkant van de reduceerklep bevindt aanwezig
en in goede staat is (fig. 4). Gebruik het apparaat
niet als de pakking ontbreekt of wanneer deze
beschadigd is. Breng het apparaat in dat geval
terug naar uw wederverkoper.
- Plaats de patroon in de patroonhouder met de groef “F”
naar boven gericht. Zorg ervoor dat de patroongeleider
“G” in de groef is geschoven (fig. 5).
- Vergrendel de patroon door de hendel (2) op de stand
“LOCK” te plaatsen (fig. 6). Sluit het deksel van de
patroonhouder (3).
Het apparaat is klaar voor gebruik.
LET OP: u moet controleren of de patroon naar boven is
gericht en goed in de patroongeleider “G” steekt.
Een onjuist geplaatste patroon kan een breuk van
de regulateur en/of een hoorbaar gaslek met een
kenmerkende geur tot gevolg hebben.
Bij lekkage (gaslucht voordat de kraan geopend wordt)
moet het apparaat onmiddellijk naar buiten worden
gebracht, naar een zeer goed geventileerde plaats waar
geen vlam, vonk of verwarmingsbron aanwezig is, zodat
daar de oorzaak van het gaslek kan worden opgespoord
en verholpen. Controleer de gasdichtheid van uw apparaat
altijd buiten. Spoor geen lekken op met behulp van een
vlam. Gebruik een speciale vloeistof voor het opsporen
van gaslekken.
C - GEBRUIK
Enkele tips:
Gebruik uw lamp niet op minder dan 20 cm afstand
van een muur of van een brandbaar voorwerp, of
op minder dan 1 m afstand van een plafond
LET OP: De bereikbare delen kunnen zeer warm
worden. Denk om de kinderen.
De ketelhouder (4) of de brander (5) nooit tijdens of
net na gebruik van het apparaat aanraken.
De ventilatieopeningen (7) op het deksel van de
patroonhouder (3) niet dichtstoppen.
Nooit ketels gebruiken die de brander volledig
bedekken (5).
Plaats het apparaat op een stabiel en horizontaal
oppervlak en verplaats het niet gedurende het
gebruik.
Laat het apparaat helemaal afkoelen alvorens het
op te bergen.
NL
Illustraties: zie pagina 2 tot 4

15
De brander aansteken
Het apparaat is voorzien van een piezzo-elektrische
ontsteking gekoppelde aan een ontstekingselektrode (6).
- Draai tegen wijzerzin aan het vliegwiel (1) tot u een klik
hoort ( ) die aangeeft dat een vonk wordt geproduceerd
(fig. 7). Wanneer de brander niet aangaat, draait u het
wieltje terug naar de stand “l” (fig. 9) en herbegint u.
- Indien er na drie vruchteloze pogingen nog steeds
geen ontsteking is, zet het regelwieltje dan in de stand
“l” (fig. 9) en controleer of de patroon nog gas bevat
(u moet vloeistof horen verplaatsen wanneer u met de
patroon schudt) voor u de vorige handelingen herhaalt.
(Indien de patroon leeg is, lees dan eerst paragraaf “D
- Patroon vervangen”).
Koken
Plaats de ketel op de armen, centraal op de brander
en regel de gastoevoer zo dat de vlammen niet verder
reiken dan de ketel.
Om de hoogte van de vlam te regelen, draait u de
ontstekingsknop (1) zachtjes op een stand tussen de
volledig open stand ( ) en de half open stand
( ).
Uitschakelen
De ontstekingsknop (1) met de klok mee op “l” zetten.
D - HET UITNEMEN VAN EEN CARTOUCHE
De cartouche kan eruit genomen worden zelfs indien
deze niet leeg is.
Laat het toestel eerst volledig afkoelen:
- Controleer of de gaskraan dicht is door de knop (1)
met de wijzers van de klok mee te draaien tot stand
“l”, en controleer of de brander (5) uit is (fig. 9).
- Verwijder de vulling door de hendel (2) op “UNLOCK”-
stand te zetten (fig. 10).
- Open de vullinghouder (3) en neem de vulling eruit
door deze aan de achterkant op te heffen.
- Gooi een gasvulling die niet helemaal leeg is, in geen
geval weg (controleer of u bij het schudden van de
vulling geen geluid van vloeistof meer hoort).
- Verzeker u ervan dat geen enkel druipspoor van
voeding de interne behuizing van de reduceerklep van
het apparaat heeft afgesloten, voordat u een nieuwe
cartouche assembleert. (fig. 4).
- Controleer of de afdichtingsring zich in een goede
staat bevindt (fig. 4).
- Breng een nieuwe gasvulling aan volgens de instructies
in paragraaf “B - INGEBRUIKNAME
- Het aansluiten van een CAMPINGAZ
®
-cartouche
CP250/ CP250 SP”.
Waarschuwing: als u de vulling tijdens het gebruik
verwisselt, raak dan nooit de hete oppervlakken van het
apparaat aan (brander, grill, bakplaat....).
Waarschuwing: Er kan nog wat gas overblijven nadat
het toestel werd uitgezet. Zet om veiligheidsredenen de
ontstekingsknop (2) op “UNLOCK”
terwijl het patroonhendeltje (1) op ( ) staat om het
resterend gas op te branden.
E - VEILIGHEIDSVOORZIENING
Nooit een lekkend, beschadigd of niet naar behoren
werkend toestel gebruiken.
Wanneer de druk in de vulling te hoog is (oververhitting door
een te groot oppervlakte op het kookrooster bijvoorbeeld),
schakelt een ingebouwde beveiliging de vulling uit en komt
de hendel (2) in stand “UNLOCK” te staan.
Verwijder in dat geval de vulling en laat deze afkoelen
(onder de kraan bijvoorbeeld) alvorens deze weer te
gebruiken of breng een nieuwe vulling aan waarbij u te
werk gaat als beschreven onder D - HET UITNEMEN
VAN EEN CARTOUCHE.
Het apparaat kan pas opnieuw worden gebruikt wanneer
de gasdruk weer normaal is geworden.
DE VEILIGHEIDSVOORZIENING OPNIEUW
INSCHAKELEN
- De ontstekingsknop (1) op “l” zetten en het hendeltje
van de gaspatroon (2) omhoog zetten op “UNLOCK”.
- De butagaspatroon verwijderen.
- De ontstekingsknop op (
).zetten om de overmaat
aan gas af te voeren.
- Na 5 minuten de ontstekingsknop opnieuw op “l”
zetten.
- Controleren of de ontstekingsknop op “l” staat en de
veiligheidsvoorziening als volgt opnieuw inschakelen:
a) Het hendeltje van de patroon (2) omlaag drukken op
“LOCK” en:
b) Het hendeltje van de patroon omhoog drukken op
“UNLOCK”.
- Een nieuwe of afgekoelde patroon insteken.
- De ontstekingsprocedure herhalen.
Als de temperatuur in de patroon in het begin hoog
is, komt er geen gas uit, zelfs wanneer de patroon
in een fornuis wordt geplaatst. Dit komt doordat de
veiligheidsvoorziening in werking treedt. Het toestel is
niet defect.
F - HET REINIGEN EN HET OPBERGEN
In geval van terugbranding (ontsteking onder de
branderdop), schakel het product uit, laat deze
(circa vijf minuten) afkoelen en schakel het
apparaat opnieuw in. Als de terugbranding zich
opnieuw voordoet, neem contact op met uw lokale
Campingaz
®
-handelaar.
Laat het toestel eerst volledig afkoelen:
1 - Reinigen
Apparaatframe
- Reinig het apparaat nadat u de patroon hebt
verwijderd.
- Maak de ketelhouder (4), de buitenkant en het deksel
van de patroon (3) schoon met warm water. Droog
vervolgens af met een doek.
Brander (5)
Wanneer de brander vuil is, wordt de doorgang voor de
vlammen verstopt.
De brandergaten met een staalborstel schoonmaken.
Niet in water onderdompelen.
Electrische piëzo (6)
Wanneer de electrische piëzo nat is, kan het toestel
niet worden aangezet. Deze dient afgedroogd te
worden met een doek.
2 - Opslag en vervoer
- Controleer of de hendel (2) op de stand “UNLOCK”
staat (fig. 10).
- Verwijder voorafgaand aan opslag of vervoer van dit
product altijd eerst de gaspatroon.
- Berg het apparaat evenals de cartouche op in een
koele, droge en geventileerde plaats, buiten het bereik
van kinderen en nooit in een ondergronds terrein of in
een kelder.
NL

16
NL
STORINGEN OPHEFFEN
De patroon kan niet worden
ingebracht
Geen gastoevoer in de stand (
).
Gasgeur in de stand “l”.
Klein vlammetje.
Onregelmatige vlam.
Geen ontsteking - Defecte
ontsteking.
Brander gaat uit tijdens het
gebruik.
Opheffing van de storing
De ontstekingsknop staat niet op “l” P
De ontstekingsknop op “l” zetten
en de patroon verwijderen
Veiligheidsvoorziening ingeschakeld
P P P
Zie uitleg over
veiligheidsvoorziening.
Ontstekingsknop defect
P P P P
Met de plaatselijke
serviceafdeling contact opnemen
Verstopt mondstuk
P P P
Met de plaatselijke
serviceafdeling contact opnemen
Patroon niet op de juiste manier
ingebracht
P P P P
Steek de patroongeleider in de
gleuf van de patroon
Verstopte brandergaatjes
P P P
Gebruik een staalborstel om
schoon te maken
Symptomen
Oorzaken
G - Storingen
Garantieperiode
Jaar 2

17
Portata : 160 g/ora (2,2 kW)
Categoria : pressione diretta butano.
Vi siamo grati di aver scelto questo apparecchio
Campingaz
®
CAMP’BISTRO.
A - IMPORTANTE : UTILIZZATE IL GAS,
SIATE PRUDENTI !
Lo scopo di queste istruzioni è di consentirvi di utilizzare
correttamente e in tutta sicurezza l’apparecchio
Campingaz
®
CAMP’BISTRO.
Leggetele attentamente, per familiarizzarvi con
l’apparecchio prima di assemblarlo col recipiente
di gasRispettate le istruzioni di questo prospetto e
le norme di sicurezza che figurano sulle bombole
Campingaz
®
CP250/ CP250 SP. Il mancato rispetto
di queste istruzioni può essere pericoloso per
l’utente e le altre persone che si trovano nelle
vicinanze.
Conservare il presente prospetto in luogo sicuro
per poterlo consultare in caso di necessità.
Questo apparecchio deve essere utilizzato
esclusivamente con le bombole Campingaz
®
CP250/
CP250 SP. Può essere pericoloso utilizzarlo con altri
recipienti di gas.
La Sociatà Application Des Gaz declina qualsiasi
responsabilità in caso di utilizzazione di una
bombola di un altro marchio.
Il presente apparecchio va esclusivamente utilizzato
all’esterno, lontano da materiale infiammabile.
Non utilizzare un apparecchio che perde, che
funziona male o che è danneggiato. Restituirlo al
rivenditore che vi indicherà il servizio assistenza
più vicino.
Non modificare mai questo apparecchio e non
utilizzarlo per applicazioni alle quali non è destinato.
Questo apparecchio non va usato nelle roulottes,
all’interno di veicoli, tende, ripari, baracche e spazi
chiusi di piccole dimensioni …
Non va usato mentre dormite e non va lasciato
incustodito. Tutti gli apparecchi a gas che
funzionano secondo il principio della combustione
consumano ossigeno ed espellono le sostanze
generate dalla combustione. Una parte di tali
sostanze puo’ contenere monossido di carbonio
(CO).
Il monossido di carbonio, inodore e incolore, puo’
provocare malessere, con sintomi analoghi a quelli
dell’influenza, e persino la morte se l’apparecchio
viene usato in ambienti interni non ventilati.
Se la cartuccia viene espulsa automaticamente dal
regolatore, NON COLLEGARE NUOVAMENTE LA
CARTUCCIA, lasciare raffreddare completamente
l’apparecchio prima di riutilizzarlo.
Non utilizzare un contenitore con diametro minore
di 12 cm o maggiore di 26 cm. Non utilizzare
recipienti con fondo concavo o convesso. Non
utilizzare piastre, griglie o pietre sul prodotto,
a meno che non si tratti di accessori specifici
Campingaz
®
sviluppati per questo prodotto.
B - MESSA IN SERVIZIO
- Estrarre l’apparecchio dall’imballaggio.
Installazione di una cartuccia Campingaz
®
CP250/
CP250 SP
(Se è già installata una bombola vuota, leggere il
paragrafo “D - ESTRAZIONE DELLA BOMBOLA”).
Per la sistemazione o l’estrazione di una bombola, operare
sempre in luogo aereato, preferibilmente all’esterno, e
mai alla presenza di una fiamma, di una fonte di calore
o di scintille (sigarette, apparecchi elettrici, ecc.), lontano
dalle altre persone e dai materiali infiammabili.
POICHE’ LE BOMBOLE CAMPINGAZ
®
CP250/
CP250 SP SONO A VALVOLA, POSSONO ESSERE
ESTRATTE DALL’APPARECCHIO PER FACILITARNE
IL TRASPORTO, ANCHE SE NON SONO VUOTE,
E REINSTALLATE SU ALTRI APPARECCHI
CAMPINGAZ
®
DELLA GAMMA CP250/ CP250 SP
IDEATI PER FUNZIONARE ESCLUSIVAMENTE CON
QUESTE BOMBOLE.
- Aprire il coperchio dello scomparto porta cartuccia (3)
(fig. 2).
- Verificare che il pulsante d’accensione (1) sia
posizionato su “l” facendolo girare in senso orario e
che la leva (2) sia posizionata su”UNLOCK” (fig. 3).
Nota : la cartuccia di gas si puo’ aprire solo se il
pulsante d’accensione è in posizione “l” e se il
supporto per casseruole è installato.
- Verificare la presenza ed il corretto stato della
guarnizione posta all’interno del vano del regolatore
di pressione (fig. 4). Non utilizzare l’apparecchio se
la guarnizione è assente o deteriorata ; in tal caso
portare l’apparecchio al rivenditore.
- Installare la cartuccia nell’apposito alloggiamento, con
la fessura “F” verso l’alto, e inserire correttamente il
guida-cartuccia “G” dentro la fessura (fig. 5).
- Bloccare la cartuccia spostando la leva (2) in posizione
“LOCK” (fig. 6). Chiudere il coperchio dello scomparto
della cartuccia (3).
L’apparecchio è pronto per l’uso.
ATTENZIONE : Verificare che la cartuccia sia posizionata
verso l’alto e che sia ben inserita nel guida cartuccia “G”.
Una cartuccia mal posizionata può provocare la rottura
del regolatore e/o una fuga di gas udibile e con un odore
caratteristico.
In caso di fuga di gas (odore di gas prima dell’apertura del
rubinetto), portare immediatamente fuori l’apparecchio,
in luogo molto ventilato, lontano da qualunque fonte di
combustione, per cercare l’origine della fuga e risolvere
il problema. Se desiderate verificare la tenuta stagna del
vostro apparecchio, fatelo all’aria aperta. Non utilizzate
una fiamma per cercare la fuga, ma un apposito liquido
per la rilevazione delle fughe di gas.
C - UTILIZZAZIONE
Qualche consiglio in più :
Non utilizzare l’apparecchio a meno di 20 cm da
una parete o da un oggetto combustibile, oppure a
meno di 1 m dal soffitto.
ATTENZIONE: Alcune parti esposte possono
riscaldarsi. Tenere lontano dalla portata dei
bambini.
Non toccare il supporto per casseruole (4) o
il bruciatore (5) durante o subito dopo l’uso
dell’apparecchio.
Non ostruire l’apertura di ventilazione (7) posta sopra
il coperchio dello scomparto della cartuccia (3).
Non utilizzare casseruole che coprano interamente
il bruciatore (5).
Poggiare l’apparecchio su una superficie orizzontale
stabile e non spostarlo durante l’utilizzazione
Aspettare che l’apparecchio sia completamente
raffreddato prima di spostarlo o riporlo.
IT
Illustrazioni : vedi pagine 2 a 4

18
Accensione del bruciatore
L’apparecchio è munito di accendigas piezoelettrico
collegato ad un elettrodo d’accensione (6).
- Girare la manopola (1) in senso antiorario fino allo
scatto ( ) che indica la produzione della scintilla
(fig. 7). In caso di mancata accensione, rimettere
la manopola in posizione “l” (fig. 9) e ricominciare
l’operazione.
- Dopo 3 tentativi infruttuosi, spostare la manopola di
regolazione su “l” (fig. 9) e verificare la presenza di
gas nella cartuccia (scuotendola per sentire il rumore
del liquido) prima di ricominciare da capo. (Se la
cartuccia è vuota, vedi paragrafo “D - Sostituzione
della cartuccia”).
Cottura
Posare la casseruola sul braccio, centrandola sul
bruciatore, e regolare l’erogazione del gas per evitare
che le fiamme sporgano dalla casseruola.
Per regolare le dimensioni della fiamma, spostare il
bottone d’accensione (1) con dolcezza tra la posizione
( ) e la posizione ( ).
Spegnimento
Girare il bottone d’accensione (1) in senso orario in
posizione “l” (fig. 9).
D - ESTRAZIONE DELLA BOMBOLA
La bombola può essere estratta anche se non è vuota.
Dopo aver lasciato raffreddare completamente
l’apparecchio:
- Verificare la corretta chiusura dell’uscita del gas
girando il volano (1) in senso orario fino alla posizione
“l” (fig. 9). Verificare che il bruciatore (5) sia spento.
- Scollegare la cartuccia posizionando la leva (2) su
“UNLOCK” (fig. 10).
- Aprire il vano cartuccia (3) e togliere questa ultima
sollevandola dal didietro.
- Non gettare mai una bombola che non è vuota (controllare
che non vi sia liquido all’interno, scuotendola).
- Prima di montare una nuova cartuccia, verificare
che il vano interno del regolatore di pressione
dell’apparecchio non sia stato ostruito da tracce di
alimenti (fig. 4).
- Verificare la presenza ed il corretto stato della
guarnizione posta all’interno del vano del regolatore di
pressione (fig. 4).
- Installare una nuova bombola seguendo le istruzioni
del paragrafo “B - MESSA IN SERVIZIO - Installazione
di una cartuccia Campingaz
®
CP250/ CP250 SP”.
Attenzione : Se dovete sostituire la cartuccia durante il
funzionamento dell’apparecchio, badate a non toccare
le superfici calde dell’apparecchio (bruciatore, supporto
della casseruola, piastra...).
Attenzione : Dopo aver spento l’apparecchio può
rimanere del gas. Per garantire la vostra sicurezza, con
la leva della cartuccia (2) sulla posizione “UNLOCK”,
girare il bottone d’accensione (1) verso la posizione ( ),
per bruciare il gas rimanente.
E - DISPOSITIVO DI SICUREZZA
Non utilizzare mai un apparecchio che presenta fughe,
che è danneggiato o che non funziona correttamente.
Se la pressione nella cartuccia è troppo elevata (per
esempio, in caso di surriscaldamento dovuto ad una
superficie troppo ampia sulla griglia di cottura), un
dispositivo integrato disinnesta la cartuccia e la leva
(2) si mette in posizione “UNLOCK”. In questo caso,
occorre togliere la cartuccia e lasciarla raffreddare (per
esempio, passandola sotto l’acqua), prima di riutilizzarla
o utilizzare una nuova cartuccia operando come al
punto “D - ESTRAZIONE DELLA BOMBOLA”.
L’apparecchio funzionerà di nuovo solo quando la
pressione del gas sarà ridiventata normale.
AZZERAMENTO DEL DISPOSITIVO DI SICUREZZA
- Girare il bottone d’accensione (1) sulla posizione “l” e
sollevare la leva della cartuccia (2) verso la posizione
“UNLOCK”.
- Estrarre la cartuccia di butano.
- Girare il bottone d’accensione sulla posizione ( ). per
svuotare l’eccesso di gas.
- Dopo 5 minuti, rimettere il bottone d’accensione sulla
lposizione “l”.
- Verificare che il bottone d’accensione sia su “l” ed
effettuare l’azzeramento del dispositivo di sicurezza,
come segue:
a) Spingere la leva della cartuccia verso il basso sulla
posizione “LOCK”, poi :
b) Spingere la leva della cartuccia verso l’alto, sulla
posizione “UNLOCK”.
- Installare una nuova cartuccia o una cartuccia fredda.
- Ripetere la procedura d’accensione.
Se inizialmente la temperatura nella cartuccia è alta,
il gas non uscirà, anche se la cartuccia è installata in
una cucina. Ciò è dovuto all’avvio del dispositivo di
sicurezza. L’apparecchio non è difettoso.
F - PULIZIA / COMME RIPORRE
Dopo aver lasciato raffreddare completamente
l’apparecchio:
1 - Pulizia
Corpo dell’apparecchio
- Pulire l’apparecchio dopo aver tolto la cartuccia.
- Pulire il supporto per casseruole (4), l’esterno e
il coperchio della cartuccia (3) con acqua tiepida,
quindi asciugare con uno straccio.
Bruciatore (5)
Se il bruciatore è sporco, il passaggio della fiamma è
ostruito.
- Pulire i fori del bruciatore con una spazzola metallica.
Candela d’accensione (6)
Se la candela è bagnata, l’apparecchio non si accende.
Asciugarla con uno straccio.
2 - Conservazione e trasporto
- Verificare il posizionamento della leva (2) su
“UNLOCK” (fig. 10).
- Rimuovere sempre la cartuccia gas dal prodotto durante
la conservazione o il trasporto dell’apparecchio.
- Immagazzinare l’apparecchio e la bombola in luogo
fresco, asciutto e aereato, fuori dalla portata dei
bambini, mai in un sottosuolo o in una cantina.
IT

19
RIPARAZIONE
IT
Installazione della cartuccia
impossibile.
Assenza d’alimentazione di
gas nella posizione(
).
Odore di gas sulla posizione
“l”.
Fiamma debole
Fiamma irregolare
Mancata accensione -
Accensione difettosa
Bruciatore spento durante il
funzionamento.
Riparazione
Il bottone d’accensione non è sulla
posizione “l”
P
Mettere il bottone d’accensione
su ‘’l’’ e togliere la cartuccia.
Sicurezza attivata.
P P P
Vedere la spiegazione sul
dispositivo di sicurezza.
Bottone d’accensione difettoso.
P P P P
Contattare il Servizio Assistenza
locale
Ugello tappato.
P P P
Contattare il Servizio Assistenza
locale
Cartuccia non correttamente installata.
P P P P
Inserire il guida cartuccia nella
fessura della cartuccia
Orifizi tappati nel bruciatore.
P P P
Utilizzare una spazzola metallica
per pulire.
Sintomi
Cause
G - ANOMALIE DI FUNZIONAMENTO
Periodo di garanzia
Anni 2

20
Consumo: 160 g/h (2,2 kW)
Categoría: presión directa butano
Le agradecemos haber elegido este aparato Campingaz
®
CAMP’BISTRO.
A - IMPORTANTE: ESTA UTILIZANDO GAS
¡SEA PRUDENTE!
Estas instrucciones de empleo tienen por objeto
permitirle utilizar su aparato correctamente y con total
seguridad su aparato Campingaz
®
CAMP’BISTRO.
Léalas atentamente para familiarizarse con el
aparato antes de conectarlo al recipiente de gas.
Respete las instrucciones de esta nota y los
consejos de seguridad que aparecen en los
cartuchosCampingaz
®
CP250/ CP250 SP. Si no los
respeta, esto puede representar un peligro para el
usuario y para su entorno.
Conserve estas instrucciones de empleo siempre
en un lugar seguro con el fin de poderlas consultar
cuando sea necesario.
Este aparato debe utilizarse exclusivamente con
cartuchos Campingaz
®
CP250/ CP250 SP. Puede
resultar peligroso utilizar otro tipo de recipientes
de gas.
La Société Application Des Gaz declina toda
responsabilidad en caso de utilizarse un cartucho
de otra marca.
Este aparato sólo se debe utilizar en el exterior de
los locales y alejado de materiales inflamables.
No utilizar un aparato que presente pérdidas, que
funcione mal o que esté deteriorado. Informar al
vendedor, quien le indicará el servicio postventa más
cercano.
Jamás modificar este aparato ni utilizarlo para
otras aplicaciones que las específicas para las
cuales ha sido diseñado.
Este aparato no debe ser utilizado dentro de una
caravana, un vehículo, tienda, caseta, cabaña o
cualquier otro espacio pequeño y cerrado…
No debe ser utilizado mientras duerma ni debe ser
dejado sin vigilancia. Todos los aparatos de gas
que funcionan sobre el principio de la combustión,
consumen oxígeno y descargan productos de
combustión. Una parte de estos productos de
combustión puede contener monóxido de carbono
(CO). El monóxido de carbono, inodoro e incoloro,
puede provocar malestar y síntomas similares a
la gripe; pueden provocar incluso la muerte si el
aparato se utiliza en interior sin una ventilación
adecuada.
Si el cartucho salta automáticamente del regulador,
NO VUELVA A CONECTARLO DE NUEVO, deje que
la unidad se enfríe por completo antes de volver a
usarla.
Use exclusivamente recipientes de entre 12 cm
y 26 cm de diámetro. No use vasos con fondos
cóncavos ni convexos. No use parrillas, planchas
ni piedras con la unidad, use solo los accesorios
de Campingaz
®
diseñados específicamente para
este producto.
B - PUESTA EN SERVICIO
- Retire el aparato de su caja protectora.
Instalacion de un cartucho Campingaz
®
CP250/
CP250 SP
(Si se encuentra instalado un cartucho vacío, leer el
párrafo D: “Cambio del cartucho”).
Para instalar o para desmontar un cartucho, proceder
siempre en un sitio aireado, de preferencia al aire
libre, y nunca en presencia de llama, fuente de calor o
chispa (cigarrillo, aparato eléctrico, etc.), lejos de otras
personas y de materiales inflamables.
DADO QUE LOS CARTUCHOS CAMPINGAZ
®
CP250/ CP250 SP TIENEN VALVULA, PUEDEN
DESMONTARSE DEL APARATO CON EL FIN DE
FACILITAR SU TRANSPORTE AUN CUANDO NO
ESTEN VACIOS; PODRAN VOLVER A MONTARSE
EN OTROS APARATOS CAMPINGAZ
®
DE LA GAMA
CP250/ CP250 SP DISE—ADOS PARA FUNCIONAR
EXCLUSIVAMENTE CON ESTOS CARTUCHOS.
- Abra la tapa del cartucho (3) (fig. 2).
- Comprobar que el botón de encendido (1) esté en
la posición “l” girándolo en el sentido de las agujas
del reloj y que la palanca (2) esté en la posición
“UNLOCK” (fig. 3).
Comentario : el cartucho de gas sólo se podrá
bloquear si el botón de encendido está en posición “l”
y el soporte para cacerolas está colocado en su sitio.
- Comprobar que hay una junta de estanqueidad dentro
del alojamiento interno del regulador (fig. 4) y que está
en buen estado. No utilizar el aparato si la junta
no está en su lugar o si está deteriorada. En este
caso, llevar a un centro técnico.
- Instalar el cartucho en el alojamiento, la ranura “F”
situada hacia arriba, e introducir el guía del cartucho
“G” en la ranura (fig. 5).
- Bloquear el cartucho colocando la palanca (2)
en la posición “LOCK” (fig. 6). Cerrar la tapa del
compartimento del cartucho (3).
El aparato está listo para el uso.
ATENCIÓN : Asegurarse de que el cartucho está
colocado hacia arriba y que está bien encajado en la
guía del cartucho “G”.
Un cartucho mal colocado puede provocar la rotura del
regulador y/o una fuga audible de gas, lo que producirá
un olor característico.
En caso de pérdidas (olor a gas antes de abrir el grifo),
ponga inmediatamente el aparato en el exterior, en un
lugar muy bien ventilado, sin fuentes de inflamación,
donde podrá buscarse y repararse la pérdida. Si desea
comprobar la estanqueidad de su aparato, hágalo en el
exterior. No busque pérdidas con una llama; utilice un
líquido de detección de pérdida gaseosa.
C - UTILIZACION
Algunos consejos suplementarios :
No utilizar su lámpara a menos de 20 cm de una
pared o de un objeto combustible, ni a menos de
1 m de un techo
ATENCIÓN: Algunas partes accesibles pueden
estar muy calientes. Mantener fuera del alcance de
los niños.
No tocar jamás el soporte para cacerolas (4) o el
quemador (5) durante o justo después del uso del
aparato.
No obstruir la apertura de ventilación (7) situada
sobre la tapa del compartimento del cartucho (3).
No utilizar jamás cacerolas que cubran totalmente
el quemador (5).
Colocar el aparato sobre una superficie horizontal
estable y no desplazarlo durante la utilización.
Espere que el aparato se haya enfriado por completo
antes de manipularlo para colocarlo en su sitio.
ES
Figuras: ver páginas 2 a 4
Sidan laddas ...
Sidan laddas ...
Sidan laddas ...
Sidan laddas ...
Sidan laddas ...
Sidan laddas ...
Sidan laddas ...
Sidan laddas ...
Sidan laddas ...
Sidan laddas ...
Sidan laddas ...
Sidan laddas ...
Sidan laddas ...
Sidan laddas ...
Sidan laddas ...
Sidan laddas ...
Sidan laddas ...
Sidan laddas ...
Sidan laddas ...
Sidan laddas ...
Sidan laddas ...
Sidan laddas ...
Sidan laddas ...
Sidan laddas ...
Sidan laddas ...
Sidan laddas ...
Sidan laddas ...
Sidan laddas ...
Sidan laddas ...
Sidan laddas ...
Sidan laddas ...
Sidan laddas ...
Sidan laddas ...
Sidan laddas ...
Sidan laddas ...
Sidan laddas ...
Sidan laddas ...
Sidan laddas ...
Sidan laddas ...
Sidan laddas ...
Sidan laddas ...
Sidan laddas ...
Sidan laddas ...
Sidan laddas ...
Sidan laddas ...
Sidan laddas ...
Sidan laddas ...
Sidan laddas ...
Sidan laddas ...
Sidan laddas ...
Sidan laddas ...
Sidan laddas ...
Sidan laddas ...
Sidan laddas ...
Sidan laddas ...
Sidan laddas ...
-
 1
1
-
 2
2
-
 3
3
-
 4
4
-
 5
5
-
 6
6
-
 7
7
-
 8
8
-
 9
9
-
 10
10
-
 11
11
-
 12
12
-
 13
13
-
 14
14
-
 15
15
-
 16
16
-
 17
17
-
 18
18
-
 19
19
-
 20
20
-
 21
21
-
 22
22
-
 23
23
-
 24
24
-
 25
25
-
 26
26
-
 27
27
-
 28
28
-
 29
29
-
 30
30
-
 31
31
-
 32
32
-
 33
33
-
 34
34
-
 35
35
-
 36
36
-
 37
37
-
 38
38
-
 39
39
-
 40
40
-
 41
41
-
 42
42
-
 43
43
-
 44
44
-
 45
45
-
 46
46
-
 47
47
-
 48
48
-
 49
49
-
 50
50
-
 51
51
-
 52
52
-
 53
53
-
 54
54
-
 55
55
-
 56
56
-
 57
57
-
 58
58
-
 59
59
-
 60
60
-
 61
61
-
 62
62
-
 63
63
-
 64
64
-
 65
65
-
 66
66
-
 67
67
-
 68
68
-
 69
69
-
 70
70
-
 71
71
-
 72
72
-
 73
73
-
 74
74
-
 75
75
-
 76
76


Campingaz Camp Bistro Bruksanvisning
- Typ
- Bruksanvisning
- Denna manual är också lämplig för
på andra språk
- italiano: Campingaz Camp Bistro Manuale del proprietario
- čeština: Campingaz Camp Bistro Návod k obsluze
- slovenčina: Campingaz Camp Bistro Návod na obsluhu
- español: Campingaz Camp Bistro El manual del propietario
- Deutsch: Campingaz Camp Bistro Bedienungsanleitung
- polski: Campingaz Camp Bistro Instrukcja obsługi
- português: Campingaz Camp Bistro Manual do proprietário
- français: Campingaz Camp Bistro Le manuel du propriétaire
- Türkçe: Campingaz Camp Bistro El kitabı
- English: Campingaz Camp Bistro Owner's manual
- dansk: Campingaz Camp Bistro Brugervejledning
- русский: Campingaz Camp Bistro Инструкция по применению
- suomi: Campingaz Camp Bistro Omistajan opas
- Nederlands: Campingaz Camp Bistro de handleiding
- română: Campingaz Camp Bistro Manualul proprietarului
Relaterade papper
-
Campingaz CAMP’BISTRO STOPGAZ Bruksanvisning
-
-
-
-
-
-
-