Campingaz Shashlik Rotario Instructions For Use Manual
- Typ
- Instructions For Use Manual

- 1 -
FR
MODE D’EMPLOI
(9)
GB
INSTRUCTIONS FOR USE
(13)
DE
BEDIENUNGSANLEITUNG
(17)
IT
ISTRUZIONI PER L'USO
(21)
NL
GEBRUIKSAANWIJZING
(25)
SE
BRUKSANVISNING
(29)
NO
BRUKSANVISNING
(33)
DK
BETJENINGSVEJLEDNING
(37)
FI
KÄYTTÖOHJE
(41)
GR
Ο∆ΗΓΙΕΣ ΧΡΗΣΕΩΣ
(45)
RU
ИНСТРУКЦИЯ ПО ЭКСПЛУАТАЦИИ
(49)
TR
KULLANIM KILAVUZU
(53)
40100
13569
–
10/2011
Shashlik Rotario

- 2 -

- 3 -

- 4 -

- 5 -

- 6 -

- 7 -

- 8 -

- 9 -
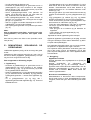
Débit 182 g/h (2,5 kW) - Injecteur : 48
Catégorie : Pression directe butane
Nous vous remercions d'avoir choisi ce réchaud
Campingaz
®
Shashlik Rotario.
Figures : voir pages 2 à 8.
A - IMPORTANT : VOUS UTILISEZ DU GAZ,
SOYEZ PRUDENT !
Ce mode d'emploi a pour objet de vous permettre
d'utiliser correctement et en toute sécurité votre
appareil Campingaz
®
.
Respectez les instructions de ce mode d'emploi
ainsi que les consignes de sécurité figurant sur les
cartouches Campingaz
®
CV 470 PLUS. Le non
respect de ces instructions peut être dangereux
pour l'utilisateur et son entourage.
Lisez-le attentivement pour vous familiariser avec
l'appareil avant de l'assembler à son récipient de gaz.
Conservez ce mode d'emploi en permanence en lieu
sûr afin de pouvoir vous y reporter en cas de besoin.
Cet appareil doit être utilisé exclusivement avec les
cartouches Campingaz
®
CV 470 PLUS. Il peut être
dangereux d'utiliser d'autres récipients de gaz.
La Société Application Des Gaz décline toute
responsabilité en cas d'utilisation d'une cartouche
de toute autre marque.
Cet appareil ne doit être utilisé qu’à l’extérieur des
locaux et éloigné de matériaux inflammables.
N'utilisez pas un appareil qui fuit, ayant des joints
endommagés ou usés, qui fonctionne mal ou qui est
endommagé. Rapportez-le à votre revendeur qui
vous indiquera le service après-vente le plus
proche.
Attention : des parties accessibles peuvent être très
chaudes. Eloigner les jeunes enfants de l’appareil.
Ne modifiez jamais votre appareil, ne l'utilisez pas
pour des applications auxquelles il n'est pas destiné.
Ne pas utiliser cet appareil dans une caravane, un
véhicule, une tente, un abri, une cabane ou autre
petit espace clos. Ne pas utiliser l'appareil pendant
votre sommeil ou sans surveillance.
Cet appareil à gaz fonctionnant sur le principe de la
combustion consomme de l'oxygène et rejette des
substances et gaz qui peuvent être dangereux, tel
que le monoxyde de carbone (CO).
Le monoxyde de carbone, inodore et incolore, peut
provoquer des malaises et des symptômes qui
rappellent la grippe, voire éventuellement la mort si
l'appareil est utilisé à l'intérieur d'un petit espace
clos sans ventilation adéquate
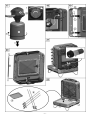
B – PREPARATION DE L’APPAREIL
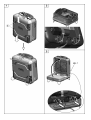
- Débloquez et dépliez les 2 pieds (1) (fig. 1) ainsi que
le crochet (16) situé sur le dessus.
- Poser l’appareil à plat et lever totalement les 2
crochets (2) situés à l’arrière de l’appareil, en position
verticale (fig. 2).
- Ouvrir délicatement l’appareil jusqu’à entendre un clic
(fig. 3), puis rabattre les 2 crochets (2) de verrouillage
vers le bas.
- Sortir le bac à graisse (3) ainsi que les 5 brochettes
(4) de l’appareil (fig. 4).
- Enlever le ressort (5) qui maintient le cadre porte
brochettes (6) en dégageant les crochets situés à
chaque extrémité du ressort (fig. 5). Ranger le ressort
dans un endroit où vous pourrez le retrouver
facilement.
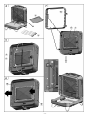
- Sortir le cadre de support brochettes (6) de la cage du
brûleur (7) en le tirant vers l’extérieur (fig. 6).
- Placer le cadre de support brochettes (6) dans la cage
du brûleur (7) en faisant coïncider ses crochets « C »
et les butées inférieures « B » avec les ergots situés
de chaque coté de la cage du brûleur (fig. 7). Vérifier
que le cadre est fermement accroché dans la cage du
brûleur.
- Enlever le moteur tourne-broche (8) placé derrière
l’appareil en dégraphant l’attache adhésive (fig. 8).
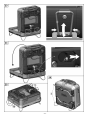
- Mise en place d’une pile dans le moteur tourne-
broche : Le moteur fonctionne avec une pile de type
D (LR20) 1,5V. Déverrouiller le boitier du moteur dans
le sens indiqué sur la figure 9 après avoir enlevé
délicatement le menchon de protection plastique.
- Placer la pile dans le boitier dans le sens indiqué sur
la figure 9, puis remettre en place le boitier de pile en
faisant coincider les fentes du boitier avec les ergots
du moteur, et selon l’axe « A » - voir la figure 9.
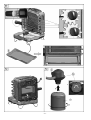
- Remettre en place le manchon de protection plastique
sur le moteur afin d’assurer l’étanchéité du moteur à
l’eau en cas de pluie ou autre.
- Vérifier le fonctionnement du moteur en actionnant le
bouton rouge du moteur (2 sens de rotation).
- Mettre en place le moteur tourne-broche (8) comme
indiqué sur la figure 9. Veiller à bien faire coïncider le
trou du moteur avec le trou du cadre porte brochettes
(4).
- Insertion des brochettes (4) sur le cadre porte
brochettes (6) (fig. 10) : Les brochettes doivent être
insérées en commençant par le bas (moteur tourne
broche). Tenir une brochette en plaçant le majeur et
l’index dans la zone « a », puis exercer une pression
sur la poignée « b » avec votre pouce (fig. 10). Tout
en maintenant cette pression, enfiler la brochette dans
le trou placé sur le coté du moteur, puis la ramener
dans l’encoche située de l’autre coté du cadre.
Relacher la pression sur la poignée « b ». La roue
dentée doit se trouver à l’extérieur du cadre.
Insertion de la brochette du bas : Pour insérer la
brochette dans le trou du moteur (8) (fig. 10), lever le
moteur légèrement vers le haut puis insérer la
brochette dans le trou.
- Lorsque toutes les brochettes sont placées, mettre en
marche le moteur (8) afin de vous assurez que la
rotation des brochettes s’effectue normalement (fig.
11). Les 5 brochettes doivent tourner simultanément.
- Mettre en place le bac à graisse (3) (fig. 11).
- Dégager le détendeur (9) de son logement en le tirant
fermement (fig. 12) et mettre en place une cartouche
de gaz Campingaz
®
CV 470 Plus (voir paragraphe
MISE EN PLACE D'UNE CARTOUCHE
CAMPINGAZ
®
CV 470 PLUS ci-dessous).
- Lorsque la cartouche de gaz est connectée au
détendeur, accrocher l’ensemble détendeur-cartouche
sur l’appareil en suivant la figure 14.
FR

- 10 -
MISE EN PLACE D'UNE CARTOUCHE CAMPINGAZ
®
CV 470 PLUS
(Si une cartouche vide est déjà en place, lire le
paragraphe D : "Changement de la cartouche").
Pour la mise en place ou le démontage d'une cartouche,
opérer toujours dans un endroit très aéré, de préférence
à l'extérieur et jamais en présence d'une flamme, source
de chaleur ou étincelle (cigarette, appareil électrique,
cuisinière, etc.), loin d'autres personnes et de matériaux
inflammables.
LES CARTOUCHES CAMPINGAZ
®
CV470 PLUS ETANT
A VALVE, ELLES PEUVENT ETRE DEMONTEES DE
CET APPAREIL AFIN DE FACILITER SON TRANSPORT
MEME SI ELLES NE SONT PAS VIDES ET REMONTEES
SUR D'AUTRES APPAREILS CAMPINGAZ
®
DE LA
GAMME 470 PLUS CONÇUS POUR FONCTIONNER
EXCLUSIVEMENT SUR CES CARTOUCHES.
a) Vérifier que l'arrivée du gaz est bien fermée en
tournant jusqu'à la butée le volant de réglage (10)
dans le sens de rotation des aiguilles d'une montre
(sens « - » de la flèche) (fig. 13).
b) Maintenir le détendeur (9) et visser doucement la
cartouche (11) sur le détendeur en la tournant dans
le sens indiqué sur la figure 13 jusqu'à entendre un
"clic" (environ un sixième de tour). Ne plus visser la
cartouche au-delà : vous risquez de détériorer sa
valve.
En cas de fuite (odeur de gaz avant l'ouverture du
robinet), mettez immédiatement l'appareil à l'extérieur,
dans un endroit très ventilé, sans source d'inflammation,
où la fuite pourra être recherchée et arrêtée. Si vous
voulez vérifier l'étanchéité de votre appareil, faites-le à
l'extérieur. Ne pas rechercher les fuites avec une
flamme, utiliser du liquide détecteur de fuite gazeuse.
C - UTILISATION
Quelques conseils supplémentaires :
Ne pas utiliser votre appareil à moins de 20 cm
d'une paroi ou d'un objet combustible.
Poser l’appareil sur une surface horizontale.
Pendant l’utilisation, ne pas le déplacer, afin d'éviter
l'apparition de grandes flammes jaunes dues à la
combustion du butane liquide au lieu de butane
vaporisé. Si cela se produit, éteindre votre appareil
en fermant le robinet situé sur le détendeur.
ATTENTION : des parties accessibles peuvent être
très chaudes. Eloigner les jeunes enfants.
Utiliser des gants appropriés pour manipuler le
cadre porte brochettes et le bac à graisse.
Ne jamais toucher le brûleur (12 – fig. 7) pendant ou
juste après l'utilisation de l'appareil.
En cas de fuite (odeur de gaz), fermer le robinet
situé sur le détendeur.
Attendre le refroidissement complet de l'appareil
avant toute manipulation pour le rangement.
Eviter les efforts de torsion sur le tuyau souple.
Allumage du brûleur (fig. 15)
- Tourner le volant de réglage (10) situé sur le
détendeur, à fond dans le sens « + ».
- Attendre environ 5 secondes afin que le gaz
envahisse la cage du brûleur.
- Appuyer plusieurs fois sur le bouton rouge d’allumage
piézo (
) (14) situé derrière l’appareil et en plaçant
vos doigts dans l’encoche placée en dessous de ce
bouton.
- Vérifier la présence de la flamme sur le brûleur. Si
l'allumage ne se produit pas, tourner le volant de
réglage (10) en position OFF (sens « - » de la flèche)
et recommencer l'opération.
- Si 3 essais s'avèrent infructueux, placer le volant de
réglage (10) sur la position OFF (sens « - » de la
flèche) et vérifier si la cartouche (11) contient du gaz
(bruit de liquide en la secouant) avant de
recommencer les opérations précédentes. (Si une
cartouche vide est en place, lire le paragraphe "D -
Changement de la cartouche").
Cuisson
Voici quelques conseils simples pour obtenir le meilleur
résultat avec le dispositif innovant de votre appareil :
Toutes sortes de viande peuvent étre grillées ou cuites
en brochette (bœuf, mouton, agneau, poulet, porc, …)
ainsi que certains légumes (poivrons, tomates,
champignons…).
- Couper des morceaux de viande si possible en cubes
de 1,5 à 2 cm de coté.
- Embrocher par brochette les cubes de viande
séparés, si possible, de tomates cerise, de
champignons ou de poivrons. Veiller à ne pas placer
d’aliments aux extrémités de la brochette (environ 4
cm).
- Poivrer, saler et épicer à votre goût chaque brochette
constituée.
- Respecter les positions de longueur de viande sur
chaque brochette.
La brochette sera ainsi soumise de manière optimale
au spectre des infra-rouges du brûleur. Les infra-
rouges de votre appareil pénètrent dans la viande en
profondeur pour une cuisson saine, sans graisse
brulée et avec l’assurance d’une viande moelleuse.
Ces types d’infra-rouges sont particulièrement adaptés
à la cuisson de la viande.
- Lorsque vos brochettes sont prêtes, allumer le brûleur
- voir le paragraphe C «Allumage du brûleur (fig. 15)».
- Lorsque le brûleur est allumé, attendre environ 5
minutes pour obtenir le rougeoiement maximum (infra-
rouge maximun).
- Passé ce délai, insérer les brochettes sur le cadre
porte brochettes – voir paragraphe C «Comment
insérer les brochettes (4) sur le cadre porte
brochettes (6) (fig. 10) » .
- Débuter la cuisson en actionnant le bouton du moteur
(2 sens de rotation – fig. 11). Quel que soit le sens de
rotation du moteur, la cuisson s’effectuera dans les
meilleures conditions.
FR

- 11 -
Les 3 brochettes centrales auront une cuisson plus
rapide, alors que les 2 brochettes extrêmes (la plus
haute et la plus basse) auront une cuisson plus lente.
Les convives aimant les brochettes biens cuites se
porteront vers les brochettes du centre,
Les convives aimant les brochettes plutôt saignantes se
porteront vers les brochettes des extrémes.
Si vous souhaitez une compléte homogenéité de
cuisson il vous faut, durant la cuisson, déplacer les
brochettes centrales au profit des extrémes (les
brochettes extrêmes passent au centre et les brochettes
centrales passent aux extrémes). Veiller à toujours
maintenir la rotation de toutes les brochettes par le
moteur.
Temps de cuisson moyen : 10 à 15 minutes suivant la
viande et le gout recherché.
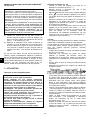
Ajustement de la flamme du brûleur
Pour ajuster la taille de la flamme, tourner le volant de
réglage (10) doucement entre la position « + » et la
position « - ».
Extinction
Quand la cuisson est terminée : tourner à fond le volant
de réglage (10) jusqu'à la butée dans le sens de rotation
des aiguilles d'une montre (sens « - » de la flèche) (fig.
13).
D – CHANGEMENT DE LA CARTOUCHE
RAPPEL
Pour la mise en place ou le démontage d'une
cartouche, opérez toujours dans un endroit très aéré
et jamais en présence d'une flamme, source de
chaleur ou étincelle (cigarette, appareil électrique,
cuisinière, etc.), loin d'autres personnes et de
matériaux inflammables, de préférence à l'extérieur.
La cartouche peut être démontée même si elle n'est
pas vide
Changer la cartouche à l'extérieur et loin d'autres
personnes.
- Attendre que l'appareil ait refroidi.
- Vérifiez que l'arrivée du gaz est bien fermée en
tournant le volant de réglage (10) jusqu'à la butée
dans le sens de rotation des aiguilles d'une montre
(sens « - » de la flèche) (fig. 17), et que le brûleur (12)
est éteint avant de débrancher le récipient de gaz.
- Décrocher l’ensemble détendeur-cartouche de son
support en le levant vers le haut (fig. 16). Ne pas le
tirer vers vous : vous risqueriez de détériorer le
support.
- Maintenir le détendeur (9), puis desserrer la cartouche
(11) en la tournant dans le sens indiqué sur la figure
17 et la retirer.
- Mettre en place une nouvelle cartouche en suivant les
instructions du paragraphe “MISE EN PLACE D'UNE
CARTOUCHE CAMPINGAZ
®
CV470 PLUS”.
- Remettre en place l’ensemble détendeur-cartouche
sur son support (fig. 14).
Attention :
En cas de changement de cartouche au cours de
l'utilisation, ne pas toucher les surfaces chaudes de
l'appareil (brûleur, cadre porte brochettes...).
Ne jamais jeter une cartouche qui n'est pas vide (vérifier
avant l'absence de bruit de liquide en la secouant).
E – DEMONTAGE, ENTRETIEN ET
STOCKAGE
Entretenez votre appareil régulièrement ; vous en serez
satisfait pendant de nombreuses années.
Ne pas nettoyer votre appareil durant son
fonctionnement. Attendre qu’il ait refroidi pour éviter des
brûlures dues aux parties chaudes (bac à graisse, cadre
support brochettes).
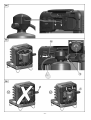
Après refroidissement complet de votre appareil :
1 - Rangement
- Vérifiez que l'arrivée du gaz est bien fermée en
tournant le volant de réglage (10) jusqu'à la butée
dans le sens de rotation des aiguilles d'une montre
(sens « - » de la flèche) (fig. 17), et que le brûleur (12)
est éteint.
- Déconnecter la cartouche de gaz (11) du détendeur
(9) (voir paragraphe CHANGEMENT DE LA
CARTOUCHE), puis ranger le détendeur dans son
logement placé derrière l’appareil (fig. 18).
- Enlever le moteur tourne broche (8) et le placer dans
son logement de rangement placé derrière l’appareil
(fig. 21). Le verrouiller en attachant la bande adhésive
par-dessus.
- Retirer le cadre porte brochettes (6) de la cage du
brûleur (7) en le relevant légèrement pour le dégager
des ergots, puis le ranger dans la cage brûleur en
plaçant ses crochets « C » et butées « B » dans les
fentes verticales au fond de la cage (fig. 19).
- Remettre en place le ressort (5) en fixant les crochets
en haut et en bas de la cage du brûleur et par-dessus
le cadre support brochettes (fig. 20).
- Ranger les brochettes (4) dans la partie inférieure (fig.
22), puis placer le bac à graisse (3) par-dessus en le
retournant.
- Déconnecter les 2 crochets (2) situés en bas et à
l’arrière de l’appareil. Les pincer pour les deverrouiller
(fig. 23).
- Pousser vers la droite le bouton rouge de verrouillage
(16) placé à l’arrière de l’appareil, puis refermer
l’appareil délicatement (fig. 24).
- Verrouiller l’appareil :
o Remettre en place les 2 crochets (2) situés derrière
l’appareil,
o Relever le crochet (15) situé sur le dessus de
l’appareil (fig. 25),
o Replier les pieds dans leur logement.
Votre appareil est prêt pour le stockage ou le transport.
Stocker l'appareil et sa cartouche dans un endroit frais,
sec et aéré, hors de portée des enfants, jamais dans un
sous-sol ou une cave.
FR

- 12 -
En cas d'inutilisation prolongée, déconnecter la
cartouche de l'appareil en procédant comme indiqué au
paragraphe D.
En cas de bouchage de l'injecteur, (la cartouche contient
encore du gaz mais l'appareil ne s'allume pas), ne pas
essayer de le déboucher, reporter l’appareil à votre
revendeur.
2 – Nettoyage
Corps de l'appareil
Nettoyer l'appareil après avoir enlevé la cartouche de
gaz (voir paragraphe D).
Nettoyer le bac à graisse (3), les brochettes (4), le
support brochettes (6) et les parties internes de
l’appareil avec un produit détergeant non agressif de
type liquide vaisselle et de l'eau chaude, puis sécher
avec un chiffon. Note : Ces éléments peuvent être mis
dans un lave vaisselle.
Céramiques du brûleur (12)
Les céramiques sont les composants actifs du brûleur.
Elles rougeoient en cours d'utilisation. Ne pas
nettoyer, mouiller ou frotter les céramiques. Cela
pourrait les endommager.
CONDITIONS D’APPLICATION DE LA GARANTIE
- Le produit bénéficie d'une garantie totale pièces et main d'œuvre de 2 (deux) ans à compter de sa date d'achat.
- La garantie s'applique lorsque le produit livré n'est pas conforme à la commande ou lorsqu'il est défaillant, dès lors que
la réclamation est accompagnée d'une pièce justificative de la date d'achat (ex : facture, ticket de caisse) et d'une
description du problème rencontré.
- Tout produit fonctionnant au gaz devra être séparé de la cartouche ou du cylindre auquel il est connecté avant d'être
retourné à un centre de service après-vente agréé.
- Le produit sera soit réparé, remplacé ou remboursé - en tout ou partie.
- La garantie est nulle et ne s'applique pas lorsque le dommage est survenu du fait (i) d'un emploi ou stockage incorrect
du produit, (ii) d'un défaut d'entretien du produit ou d'un entretien non-conforme aux instructions d'utilisation, (iii) de la
réparation, modification, entretien du produit par un tiers non agréé, (iv) de l'utilisation de pièces de rechange qui ne
seraient pas d'origine.
- NOTA : l'usage professionnel de ce produit est exclu de la garantie.
- Toute prise en charge pendant la période de garantie est sans incidence sur la date d'expiration de la garantie.
- Cette garantie n’affecte en rien les droits légaux du consommateur qui bénéficie en tout état de cause des conditions
des articles 1604 et suivants et 1386.1 et suivants du Code Civil relatifs à la garantie légale.
- Consulter notre service consommateurs pour toute réclamation.
Si vous n'arrivez pas à résoudre le problème, veuillez contacter votre revendeur qui vous indiquera le Service après
Vente le plus proche de votre domicile, ou à défaut téléphonez au Service Informations Consommateurs CAMPINGAZ :
APPLICATION DES GAZ SA
219, Route de Brignais
BP 55 - 69563 Saint Genis Laval – France
Tél. : +33 (0)4 78 86 88 94
Fax : +33 (0)4 78 86 88 38
CAMPINGAZ SUISSE SA
Route du Tir-Fédéral 10
1762 Givisiez - Suisse
Tél. : +41 26 460 40 40 Fax : +41 26 460 40 50
E-Mail: info@campingaz.ch
COLEMAN BENELUX B.V.
Minervum 7168
4817 ZN BREDA - PAYS-BAS
Tél. : +31 76 572 85 00 Fax : +31 76 571 10 14
www.campingaz.com
FR

- 13 -
Consumption: 182 g/h (2.5 kW) - injector n° 48
Category: butane direct pressure
Thank you for choosing this Campingaz
®
Shashlik
Rotario camping stove.
Figures: see pages 2 to 8.
A - IMPORTANT: YOU ARE USING GAS, BE
VERY CAREFUL!
The purpose of these instructions is to enable you
to use your Campingaz
®
appliance correctly and in
complete safety.
Please read them carefully to familiarise yourself
with the equipment prior to assembling the gas
container. Keep these instructions in a safe place so
that you can refer to them if needed.
Please observe these instructions and the safety
measures printed on the Campingaz
®
CV 470 PLUS
cartridges. Failure to observe these instructions
may result in the user and people in the immediate
vicinity being put at risk.
This equipment must be used exclusively with
Campingaz
®
CV 470 PLUS cartridges. Using other
gas containers may be dangerous.
The Société Application Des Gaz accepts no
responsibility where cartridges of any other make
are used.
This equipment should only be used outside
premises and kept away from inflammable materials.
Do not use equipment which leaks, functions
incorrectly or is damaged. Return it to your retailer
who will inform you of your nearest after-sales
service.
WARNING: accessible parts may be very hot. Keep
young children away from the device.
Never modify this equipment or use it for purposes
for which it is not intended.
Do not use this product in caravans, cars, tents,
huts, sheds or any small enclosed areas.
The product should not be used while sleeping or
left unattended.
This product consumes fuel through combustion or
consumption of oxygen and gives off certain
substances and gas, which could be dangerous
such as carbon monoxide.
Carbon monoxide is an odorless, clear gas that can
cause flu-like symptoms, sickness, illness, and
possibly death if produced inside aforesaid
enclosed areas through use of the product without
proper ventilation.
B – PREPARING THE DEVICE
- Open and unfold the two feet (1) (fig. 1) and the hook
(16) located on top of the device.
- Lie the device in a horizontal position and fully raise
the two hooks (2) located at the rear of the device to a
vertical position (fig. 2).
- Carefully open the device until you hear a click (fig. 3),
then push the two locking hooks (2) down.
- Take the drippings tray (3) and the five spits (4) out of
the device (fig. 4).
- Remove the spring (5) that keeps the spit holder in
place (6) by unfastening the hooks located on each
end of the spring (fig. 5). Put the spring in a place
where it will be easy to find.
- Remove the spit holder frame (6) from the burner cage
(7) by pulling it out (fig. 6).
- Place the spit holder frame (6) inside the burner cage
(7) by aligning the “C” hooks and the lower “B” stops
with the tabs located on each side of the burner cage
(fig. 7). Ensure that the frame is snugly attached to the
burner cage.
- Remove the spit motor (8) positioned behind the
device by detaching the adhesive band (fig. 8).
- Inserting a battery in the spit motor: The motor
operates on a Type D (LR20) 1.5 V battery. Unscrew
the battery housing in the direction indicated in figure 9
after carefully removing the protective plastic sleeve.
- Place the battery inside the housing in the direction
indicated in figure 9, then reposition the housing by
aligning the slots in the housing with the tabs on the
motor following the “A” axis – see figure 9.
- Put the protective plastic sleeve back in place on the
motor to ensure that the motor is watertight in case of
rain or the presence of moisture.
- Check that the motor is working by activating the red
motor button (two rotational directions).
- Put the spit motor (8) in place as indicated in figure 9.
Be sure that the motor hole coincides with the
corresponding hole in the spit holder frame.
- Inserting spits (4) on the spit holder frame (6) (fig.
10): The spits must be inserted starting at the bottom
(spit motor). Hold a spit by placing your middle and
index fingers in the “a” area, then push on the “b”
handle with your thumb (fig. 10). Keep pushing as you
thread the spit in the hole located on the motor side,
then place it in the slot located on the other side. Stop
pushing on the “b” handle. The toothed wheel should
be on the outside of the frame.
Inserting the lower spit: To insert the spit in the motor
hole (8) (fig. 10), raise the motor slightly and insert the
spit in the hole.
- When all the spits are in place, turn on the motor (8) to
check that the spits turn properly (fig. 11). The five
spits should turn together.
- Insert the drippings tray (3) (fig. 11).
- Remove the regulator (9) from its housing by pulling
firmly (fig. 12) and insert a Campingaz
®
CV 470 Plus
gas cylinder (see the paragraph below on INSERTING
A CAMPINGAZ
®
CV 470 PLUS CYLINDER).
- When the gas cylinder has been connected to the
regulator, hang the regulator-cylinder unit on the
device as shown in figure 14.
INSTALLING THE CAMPINGAZ
®
CV 470 PLUS
CARTRIDGE
Where the existing cartridge is empty, read paragraph D:
"Changing the cartridge").
When installing or changing a cartridge, always operate
in a very well-ventilated location, preferably outside,
never near a flame, heat source or spark (cigarette,
electric apparatus, etc.) and far away from other people
and inflammable materials.
GB

- 14 -
AS CAMPINGAZ
®
CV 470 PLUS CARTRIDGES ARE
VALVE-OPERATED, THEY CAN BE DETACHED
FROM THE EQUIPMENT, EASILY TRANSPORTED
(EVEN WHEN NOT EMPTY) AND FITTED TO OTHER
CAMPINGAZ
®
EQUIPMENT IN THE 470 PLUS RANGE
DESIGNED TO OPERATE EXCLUSIVELY WITH
THESE CARTRIDGES.
a) Check that the gas feed is properly closed by turning
the adjustment wheel (10) in a clockwise direction
(toward the “ - ” end of the arrow) all the way until it
stops (fig. 13).
b) Holding the regulator (9), carefully screw the cylinder
(11) onto the regulator by turning in the direction
indicated in figure 13 until you hear a “click” (about
one-sixth of a turn). Do not screw the cylinder any
tighter; you may damage the cylinder valve.
In the event of leakage (smell of gas prior to turning the
tap on), take the equipment outside immediately, in a
well-ventilated area with no combustion source, where
the leak can be located and halted. If you wish to check
that your equipment is correctly sealed, do so outside.
Never attempt to locate leaks using a flame. Use gas
leak solution.
C - USE
Additional instructions:
Do not use your device at a distance of less than 20
cms from a wall or a combustible object.
Position the equipment on a stable, horizontal
surface and do not move when in use so as to avoid
the appearance of large flames resulting from the
combustion of liquid butane rather than vaporised
butane. Should this occur, position the equipment
and turn the tap off - found on the regulator.
In case of leakage (gas smell), close the valve
(located on the regulator).
Wait until the device has completely cooled before
preparing it for storage.
Careful: some parts may be very hot. Keep young
children away from the device.
Use heat-proof gloves for manipulating the spit
holder frame and the drippings tray.
Never touch the burner (12 – fig. 7) during or
immediately after using the device.
Avoid twisting the flexible hose.
Lighting the stove (fig. 15)
- Turn the adjustment wheel (10) located on the
regulator all the way toward the “ + ” mark.
- Wait about five seconds for the gas to fill the burner
cage.
- Push repeatedly on the red piezo lighter button ( )
(14) located behind the device by putting your fingers
in the notch found under this button.
- Check to see whether the burner has lighted. If lighting
does not occur, turn the adjustment wheel (10) to the
OFF position (toward the “ – ” end of the arrow) and
restart the lighting procedure.
- If the equipment still does not light after three
attempts, turn the control knob (10) to position '' - '' and
check that the cartridge contains gas (sound of liquid
sloshing when shaken) before starting the previous
steps again. (If the cartridge is empty, refer to
paragraph D - Changing the cartridge).
Cooking
Here are a few simple tips for obtaining the best results
using the innovative features of your stove:
All types of meat can be grilled or roasted in kebabs
(beef, mutton, lamb, chicken, pork, etc.), as well as
certain vegetables (peppers, tomatoes, mushrooms,
etc.).
- If possible, cut the meat into cubes measuring 1.5 to 2
cm square.
- Thread the meat cubes onto a spit, separating them
with cherry tomatoes, mushrooms or slices of pepper.
Be careful not to place meat cubes or vegetables at
the ends of the spit (approximately the last 4 cm on
each end).
- When the brochettes are ready, salt and pepper them
and add your favorite spices.
- Be sure the pieces of meat cover the same length on
each spit.
In this way, heat from the infrared spectrum of the
burner will penetrate the brochettes in an optimal way.
Infrared rays from your device penetrate the meat for a
healthy result, with no burned fat and a tender
consistency. This type of infrared heat is particularly
appropriate for cooking meat.
- When your brochettes are ready, turn on the stove –
see paragraph C “Lighting the stove (fig. 15)”.
- When the stove has been lighted, wait about five
minutes to obtain maximum glow (maximum infrared).
- Next, insert the spits on the spit holder frame – see
paragraph C “Inserting spits (4) on the spit holder
frame (6) (fig. 10)”.
- Start cooking by turning on the motor button (two
rotational directions – fig. 11). Whichever direction the
motor turns, food will always be cooked in the best
way.
The three central spits provide faster cooking, while the
two outside spits (the highest and lowest ones) cook
more slowly.
Guests who prefer thoroughly cooked kebabs will
choose the spits from the center.
Guests who like rarer meat will choose the outer spits.
For uniform cooking of all kebabs, change the position of
the central spits during cooking with those on the outer
ends (outside spits go to the inside and inside spits go to
the outside). Check to see that all spits are being turned
by the motor.
Average cooking time is 10 to 15 minutes, depending on
the type of meat and the desired results.
Burner flame adjustment
To adjust flame size, turn the adjustment wheel (10)
carefully between the “ + ” and “ – ” positions.
GB

- 15 -
Turning off the device
When cooking is finished, turn the adjustment wheel (10)
all the way in a clockwise direction (toward the “ – ” end
of the arrow) (fig. 13).
D – CHANGING THE CARTRIDGE
REMINDER
Always insert or remove cartridges in a very well
ventilated area, where there are no flames, heat
sources or sparks (cigarettes, electrical appliances,
cookers, etc.), and well away from other people and
inflammable material. Whenever possible change
the cartridge outside.
The cartridge may be removed even if it is not
empty. Replace the cartridge outside and away from
other people.
- Wait until the device has cooled.
- Check that the gas feed is properly closed by turning
the adjustment wheel (10) all the way in a clockwise
direction (toward the “ – ” end of the arrow) (fig. 17);
check that the stove (12) has been turned off before
removing the gas container.
- Unhook the regulator-cylinder unit from its point of
attachment by lifting it up (fig. 16). Do not pull it toward
you; you may damage the unit holder.
- Holding the regulator (9), unscrew the cylinder (11) by
turning it in the direction indicated in figure 17 and
remove it.
- Insert a new cylinder according to the instructions
given in the “INSERTING A CAMPINGAZ
®
CV470
PLUS CYLINDER” paragraph.
- Put the regulator-cylinder unit back in place (fig. 14).
Caution:
When changing a cylinder during use, do not touch
the hot surfaces on the device (stove, spit holder
frame, etc.).
Never throw away a cartridge which is not completely
empty, (check there is no liquid in the cartridge by
shaking it).
E – DISASSEMBLY, UPKEEP AND
STORAGE
If you take regular care of your device, it will give you
satisfaction for many years.
Do not clean your device while it is in use. Wait until it
has cooled to avoid being burned by hot parts (drippings
tray, spit holder frame).
Once your equipment has fully cooled:
1 - Storage
- Check that the gas feed is properly closed by turning
the adjustment wheel (10) all the way in a clockwise
direction (toward the “ – ” end of the arrow) (fig. 17);
check that the stove (12) is turned off.
- Disconnect the gas cylinder (11) from the regulator (9)
(see the paragraph on CHANGING THE CYLINDER),
then place the regulator in its storage housing behind
the device (fig. 18).
- Remove the spit motor (8) and place it in its storage
housing behind the device (fig. 21). Fasten it in place
by putting the adhesive band around it.
- Remove the spit holder frame (6) from the burner cage
(7) by pulling it up slightly to free the tabs, then store it
inside the burner cage by positioning the “C” hooks
and “B” stops in the vertical slots at the bottom of the
cage (fig. 19).
- Put the spring (5) back in place by attaching the hooks
at the top and bottom of the burner cage and on top of
the spit holder frame (fig. 20).
- Store the spits (4) in the lower part (fig. 22), then place
the drippings tray (3) upside down on top of them.
- Disconnect the two hooks (2) located at the bottom of
and behind the device. Squeeze them to unlock them
(fig. 23).
- Push the red locking button (15) located behind the
device to the right, then carefully close the device (fig.
24).
- Lock the device:
o Reposition the two hooks (2) at the rear of the
device,
o Raise the hook (16) located on top of the device (fig.
25),
o Fold the feet inside their housing.
Your device is now ready for storing or transporting.
Store the equipment and the cartridge in a cool, dry and
well-ventilated area, out of reach of children. Never store
in a basement or cellar.
If you will not be using the device for a long period of
time, disconnect the cylinder from the device by
proceeding as indicated in paragraph D.
In the case of the injector becoming clogged (the
cylinder still contains gas but the equipment will not
light), do not try to unclog it yourself. Return the
equipment to your retailer.
2 – Cleaning
Body of the device
Clean the device after having removed the gas
cylinder (see paragraph D).
Clean the drippings tray (3), the spits (4), the spit
holder (6) and the internal parts of the device with a
gentle, non-abrasive cleanser, such as dishwashing
detergent, and hot water. Dry with a cloth. Note:
These elements may be washed in a dishwasher.
Ceramic burner parts (12)
The ceramic parts are the active burner components;
they glow when in use. Do not clean or rub them or get
them wet, since this could cause damage.
GB

- 16 -
TERMS OF APPLICATION OF THE GUARANTEE
- The product is covered by a total parts and labor warranty for a period of 2 (two) years from its purchase date.
- The warranty applies to products that do not conform to the order or that are defective.
- Within the guarantee period, the product shall be either repaired, replaced or reimbursed - in full or in part. Liability to
Buyer under a claim shall in no event exceed the price of the product.
- The warranty is null and void and does not apply should the damage arise from (i) abuse of the products (ii) failure to
operate and maintain the products in accordance with the instructions of use (iii) repair, service, alteration or
modification of the product by unauthorized third parties (iv) original parts are not used.
- The warranty is excluded in case of professional use.
- Proof of the purchase date (ie. invoice, till receipt) and claim report are required to obtain a free warranty service.
- Do not return the appliance with the gas container (cylinder or cartridge) fitted; ensure it is dismantled before sending
back.
- Service under the guarantee does not affect the expiry date of the warranty.
- All other claims including for damages resulting from this warranty are excluded unless ADG’s liability is legally
mandatory.
- This guarantee in no way affects a Buyer’s statutory rights.
- In the event of difficulty, please contact the Local Customer Service in your country. List of contacts is available in this
leaflet.
CONSUMER SERVICE
In case of continued difficulty, please contact your local retailer who will give you details of the nearest After
Sales Service point, or call the CAMPINGAZ® Customer Service at:
COLEMAN UK LTD
Gordano Gate - Wyndham Way
Portishead - BRISTOL BS20 7GG
ENGLAND
Tel: +44 (0)1275 845 024
Fax: +44 (0)1275 849 255
Warning: Due to our policy of continual product development, the company reserves the right to alter or modify this
Product without prior notice.
www.campingaz.com
GB

- 17 -
Durchsatz: 182 g/h (2,5 kW) - Düse N° 48
Kategorie: Direktdruck Butan
Wir danken Ihnen, dass Sie sich für diesen Campingaz
®
Shashlik Rotario entschieden haben.
Abbildungen: siehe Seiten 2 - 8
A - WICHTIG: BEIM UMGANG MIT GAS IST
BESONDERE VORSICHT GEBOTEN!
Diese Bedienungsanleitung soll Sie bei der richtigen
und sicheren Benutzung Ihres Campingaz
®
-Geräts
unterstützen.
Lesen Sie sie aufmerksam durch und machen Sie
sich mit dem Gerät vertraut, bevor Sie die
Gaskartusche anschließen.
Beachten Sie alle Anweisungen in der
Bedienungsanleitung sowie die Sicherheitshinweise
auf den Campingaz
®
-Kartuschen CV 470 PLUS. Das
Nichteinhalten der Anweisungen kann für den
Anwender und seine Umgebung gefährlich sein.
Bewahren Sie diese Bedienungsanleitung an einem
sicheren Ort auf, damit Sie im Bedarfsfall immer auf
sie zurückgreifen können.
Dieses Gerät darf nur mit Kartuschen des Typs
Campingaz
®
CV 470 PLUS betrieben werden. Die
Verwendung anderer Gasbehälter kann gefährlich
sein.
Die Firma Application Des Gaz/Camping Gaz lehnt
jegliche Haftung bei der Verwendung von
Kartuschen einer anderen Marke ab.
Das Gerät darf nur im Freien und weit entfernt von
brennbaren Materialien betrieben werden.
Betreiben Sie kein Gerät, das undicht ist, schlecht
funktioniert oder beschädigt ist. Bringen Sie es zu
Ihrem Händler zurück. Er kann Ihnen die nächste
Kundendienstvertretung nennen.
ACHTUNG: Die zugänglichen Teile am Kocher
können sehr heiß werden. Halten Sie Kinder davon
fern.
Nehmen Sie an dem Gerät keine Veränderungen vor
und setzen Sie es nicht für Anwendungen ein, für
die es nicht vorgesehen ist.
Das Gerät nicht in Wohnwagen, Fahrzeugen, Zelten,
Schutzdächern, Hütten und kleinen geschlossenen
Bereichen verwenden. Nicht beim Schlafen
benützen, nicht unbewacht lassen. Alle Produkte,
die mit Gasverbrennung betrieben werden,
verbrauchen Sauerstoff und geben
Verbrennungsrückstände ab. Ein Teil dieser
Verbrennungsrückstände kann Kohlenmonoxyd
(CO) enthalten. Kohlenmonoxyd ist geruch- und
farblos, es kann Übelkeit und grippeähnliche
Symptome verursachen, eventuell sogar zum Tod
führen, wenn das Gerät im geschlossenen Raum
ohne geeignete Belüftung verwendet wird.
B - GERÄT VORBEREITEN
- Die 2 Füße (1) lösen und aufklappen (Abb. 1), ebenso
den oberen Haken (16).
- Gerät flach aufstellen und die beiden Haken (2) an der
Rückseite des Gerätes senkrecht stellen (Abb. 2).
- Gerät bis zum Klick (Abb. 3) vorsichtig öffnen, dann
beide Verriegelungshaken (2) nach unten klappen und
in den vorgesehenen Schlitz einführen.
- Fettwanne (3) und die 5 Spieße (4) aus dem Gerät
entnehmen (Abb. 4).
- Feder (5), die den Rahmen des Spießhalters (6) hält,
abnehmen; dazu die Haken an jedem Ende der Feder
lösen (Abb. 5). Feder an einem Ort aufbewahren, wo
sie wieder leicht zu finden ist.
- Rahmen des Spießhalters (6) aus dem Brennerkasten
(7) herausziehen (Abb. 6).
- Rahmen des Spießhalters (6) so in den Brennerkasten
(7) setzen, dass die Haken "C" und die unteren
Aussparungen "B" mit den Nasen auf jeder Seite des
Brennerkastens übereinstimmen (Abb. 7). Überprüfen,
dass der Rahmen fest im Brennerkasten sitzt.
- Spieß-Drehmotor (8) hinten am Gerät abnehmen;
dazu den Klettverschluss lösen (Abb. 8).
- Einsetzen der Batterie in den Spieß-Drehmotor:
Der Motor arbeitet mit einer Batterie Typ D (LR20) 1,5
V (nicht im Lieferumfang enthalten). Batteriefach wie
in Abb. 9 gezeigt vom Motor lösen, nachdem der
Kunststoffschutz vorsichtig entfernt wurde.
- Batterie wie in Abb. 9 gezeigt einlegen, dann
Batteriefach wieder anbringen; dabei müssen die
Schlitze des Batteriefachs mit den Nasen am Motor
übereinstimmen, Achse "A" - siehe Abb. 9.
- Kunststoffschutz wieder am Motor anbringen, damit
der Motor bei Regen usw. wasserdicht ist.
- Funktion des Motors prüfen; dazu den roten Knopf am
Motor (2 Drehrichtungen) betätigen.
- Spieß-Drehmotor (8) wie auf Abb. 9 gezeigt am Gerät
einhängen. Darauf achten, dass die Öffnung für den
Spieß im Motor mit der Öffnung des
Spießhalterrahmens (4) übereinstimmt.
- Einsetzen der Spieße (4) in den Rahmen (6) (Abb.
10): Die Spieße müssen von unten her (Drehmotor)
eingesetzt werden. Spieß mit Mittel- und Zeigefinger
bei "a" halten und mit dem Daumen auf Griff "b"
drücken (Abb. 10). Mit diesem Druck den Spieß in das
Loch auf der Motorseite einführen und in die Nut auf
der anderen Seite des Rahmens einsetzen. Druck am
Griff "b" lösen. Das Zahnrad muss außerhalb des
Rahmens sein.
Spieß von unten einführen: Um den Spieß in das Loch
am Motor (Abb. 10) einzuführen, Motor leicht anheben
und Spieß einsetzen.
- Wenn alle Spieße eingesetzt sind, Motor (8)
einschalten, um zu sehen, dass die Spieße sich richtig
drehen (Abb. 11). Die 5 Spieße müssen sich
gleichzeitig drehen.
- Fettwanne (3) einsetzen (Abb. 11).
- Druckminderer (9) leicht nach oben schieben und aus
der Halterung ziehen (Abb. 12) und eine Gaskartusche
Campingaz
®
CV 470 Plus anbringen (siehe Abschnitt
weiter unten EINSETZEN EINER KARTUSCHE
CAMPINGAZ
®
CV 470 PLUS).
- Wenn die Gaskartusche an den Druckminderer
angeschlossen ist, in das Gerät wie in Abb. 14 gezeigt
einsetzen.
DE

- 18 -
EINSETZEN EINER CAMPINGAZ
®
-KARTUSCHEN CV
470 PLUS
(Befindet sich eine leere Kartusche im Gerät, lesen Sie
bitte den Abschnitt D : " Auswechseln der Kartusche ").
Beim Einsetzen oder Abnehmen einer Kartusche ist
darauf zu achten, dass der Raum sehr gut belüftet ist.
Vorzugsweise im Freien durchführen, jedoch nie in der
Nähe von offenem Feuer, einer Heizquelle oder
Funkenflug (Zigaretten, Elektrogerät usw.) sowie
Personen und brennbaren Stoffen.
DA DIE CAMPINGAZ
®
KARTUSCHEN CV 470 PLUS
ÜBER EIN VENTIL VERFÜGEN, KÖNNEN SIE FÜR
EINFACHEN TRANSPORT VOM GERÄT
ABGENOMMEN WERDEN, AUCH WENN SIE NOCH
NICHT LEER SIND. SIE LASSEN SICH DANN IN
ANDEREN CAMPINGAZ
®
-GERÄTEN DER LINIE 470
PLUS, DIE AUSSCHLIESSLICH FÜR DEN BETRIEB
MIT DIESEN KARTUSCHEN ENTWICKELT WURDEN,
WEITERVERWENDEN.
a) Überprüfen, dass die Gaszufuhr gut geschlossen ist;
dazu den Einstellknopf (10) im Uhrzeigersinn bis
zum Anschlag (Pfeilrichtung " - ") (Abb. 13) drehen.
b) Druckminderer (9) festhalten und die Kartusche (11)
vorsichtig durch Drehen bis zum "Klicken" wie auf
Abb. 13 angegeben einschrauben (etwa 1/6
Umdrehung). Kartusche nicht weiter einschrauben,
da sonst das Ventil beschädigt wird.
Bei einem Leck (Gasgeruch vor dem Öffnen des Ventils)
das Gerät sofort an einen gut belüfteten Ort ohne
Entzündungsquelle ins Freie bringen, an dem das Leck
gesucht und abgedichtet werden kann. Die Dichtigkeit
des Gerätes immer im Freien überprüfen. Undichte
Stellen nicht mit Hilfe einer Flamme suchen (eine
Flüssigkeit für die Gasleckerkennung verwenden).
C - BETRIEB
Einige zusätzliche Hinweise:
Ihr Gerät nicht weniger als 20 cm von einer Wand
oder einen brennbaren Gegenstand entfernt
verwenden.
Stellen Sie das Gerät auf eine stabile und ebene
Fläche, verschieben Sie es nicht während des
Betriebs, um das Auftreten von Stichflammen zu
vermeiden, die entstehen können, wenn flüssiges
Butan anstelle von gasförmigem Butan verbrennt.
Sollte dies einmal vorkommen, stellen Sie das Gerät
ab und schließen Sie die Gaszufuhr auf dem
Druckregler.
Bei einer Leckage (Gasgeruch) den Hahn (am
Druckregler) zudrehen.
Vor dem Wegräumen abwarten, bis das Gerät ganz
abgekühlt ist.
Achtung: einige Geräteteile können sehr heiß sein.
Kleinkinder vom Gerät fern halten.
Für den Spießhalterrahmen und die Fettpfanne
geeignete Handschuhe verwenden.
Keinesfalls den Brenner (12 - Abb. 7) während oder
kurz nach Benutzung des Geräts berühren.
Den Schlauch nicht verdrehen.
Anzünden des Brenners (Abb. 15)
- Einstellknopf (10) am Druckminderer vollständig in
Richtung "+" drehen.
- 5 Sekunden warten, bis das Gas den Brennerkasten
füllt.
- Mehrmals auf den roten Piezo-Zündknopf ( ) (14) an
der Geräterückseite drücken; dazu mit den Fingern in
die Nut unter diesem Knopf greifen.
- Am Brenner muss die Flamme zu sehen sein. Wenn
keine Zündung erfolgt, Einstellrad (10) auf OFF
drehen (Pfeilrichtung "-") und den Vorgang von vorne
beginnen.
- Nach drei erfolglosen Versuchen den Regelknopf (1)
auf '' - '' stellen und überprüfen, ob die Kartusche Gas
enthält (Flüssigkeitsgeräusch beim Schütteln), bevor
ein erneuter Versuch unternommen wird. (Wenn die
eingesetzte Kartusche leer ist, den Abschnitt "D -
Auswechseln der Kartusche" durchlesen).
Gerät betreiben
Einige einfache Tipps für beste Ergebnisse mit diesem
neuartigen Gerät:
Sie können alle Fleischarten am Spieß grillen oder
braten (Rind, Hammel, Lamm, Huhn, Schwein usw.),
ebenso einige Gemüse (Paprika, Tomaten,
Champignons usw.).
- Fleischstücke ... möglichst in 1,5 bis 2 cm große
Würfel schneiden.
- Fleischstücke abwechselnd möglichst mit
Cocktailtomaten, Champignons oder Paprika auf dem
Spieß befestigen. Spießenden (ca. 4 cm) freihalten.
- Jeden fertig bestückten Spieß pfeffern, salzen und
nach Ihrem Geschmack würzen.
- Fleischstücke sollten auf jedem Spieß etwa die gleiche
Größe haben.
So wird der Spieß von den Infrarotstrahlen des
Brenners optimal erfasst. Die Infrarotstrahlen Ihres
Geräts dringen tief ins Fleisch ein; so erhalten Sie auf
gesunde Art und Weise ohne verbranntes Fett ein
zartes Fleisch. Diese Art Infrarotstrahlen sind
besonders zum Garen von Fleisch geeignet.
- Wenn Ihre Spieße fertig sind, Brenner anzünden -
siehe Abschnitt C " Anzünden des Brenners (Abb.
15)".
- Wenn der Brenner angezündet ist, ca. 5 Minuten
warten bis zum stärksten Rotglühen (Infrarot
Maximum).
- Dann Spieße in den Rahmen einsetzen - siehe
Abschnitt C "Einsetzen der Spieße (4) in den Rahmen
(6) (Abb. 10)".
- Motorknopf (2 Drehrichtungen - Abb. 11) betätigen,
um den Bratvorgang zu starten. Unabhängig von der
Drehrichtung des Motors erfolgt das Braten
bestmöglich.
Die 3 mittleren Spieße garen schneller, die beiden
äußeren (der obere und der untere) garen langsamer.
Gäste, die durchgegartes Fleisch wünschen, wählen die
Spieße in der Mitte, Gäste, die eher blutiges Fleisch
wünschen, wählen die äußeren Spieße.
DE

- 19 -
Wenn Sie vollständig gleich gegarte Spieße möchten,
müssen Sie während des Bratens die mittleren Spieße
an die Stelle der äußeren setzen (die äußeren kommen
in die Mitte, und umgekehrt). Achten Sie darauf, dass
alle Spieße vom Motor gedreht werden.
Durchschnittliche Garzeit: 10 - 15 Minuten je nach
Fleischart und Geschmack.
Einstellen der Brennerflamme
Um die Größe der Flamme einzustellen, Einstellknopf
(10) langsam zwischen "+" und "-" drehen.
Ausschalten
Wenn das Braten beendet ist: Einstellknopf (10) bis zum
Anschlag im Uhrzeigersinn (Pfeilrichtung "-") (Abb. 13)
drehen.
D – AUSWECHSELN DER KARTUSCHE
HINWEIS:
Die Kartusche immer an einem gut belüfteten Ort
oder im Freien, fern jeglicher Flammen, Funken oder
Hitzequelle (Zigaretten, Elektrogerät, Herd... usw.)
sowie fern von Personen oder brennbaren Stoffen
einsetzen oder auswechseln. Kartusche im Freien
und nicht in der Nähe anderer Personen
auswechseln. Die Kartusche kann ausgebaut
werden, auch wenn sie noch nicht leer ist.
- Abwarten, bis das Gerät abgekühlt ist.
- Überprüfen, dass die Gaszufuhr gut geschlossen ist;
dazu den Einstellknopf (10) bis zum Anschlag im
Uhrzeigersinn drehen (Pfeilrichtung "-") (Abb. 17);
prüfen, dass der Brenner (12) erloschen ist, bevor die
Kartusche abgenommen wird.
- Druckminderer und Kartusche aus der Halterung nach
oben ziehen (Abb. 16). Nicht zu sich ziehen: damit
könnten Sie die Halterung beschädigen.
- Druckminderer (9) festhalten, dann die Kartusche (11)
durch Drehen lösen und abnehmen wie in Abb. 17
angegeben.
- Neue Kartusche einsetzen, siehe Anleitungen von
Absatz “EINSETZEN EINER KARTUSCHE
CAMPINGAZ
®
CV470 PLUS”.
Druckminderer mit Kartusche in die Halterung
einsetzen (Abb. 14).
Achtung:
Die heißen Teile des Geräts (Brenner, Spießrahmen
usw.) beim Wechseln der Kartusche während der
Benutzung nicht berühren.
Niemals eine nicht vollständig entleerte Kartusche
wegwerfen (überprüfen Sie durch Schütteln der
Kartusche, ob sie noch Flüssigkeit enthält).
E – DEMONTAGE, WARTUNG UND
AUFBEWAHRUNG
Warten Sie Ihr Gerät regelmäßig, damit Sie viele Jahre
lang an ihm Freude haben.
Gerät während des Betriebs nicht reinigen. Abwarten,
bis es abgekühlt ist, um Verbrennungen an den heißen
Teilen (Fettwanne, Spießhalterung) zu vermeiden).
Nach dem vollständigen Abkühlen des Gerätes:
1 - Aufbewahren
- Überprüfen, dass die Gaszufuhr gut geschlossen ist;
dazu den Einstellknopf (10) bis zum Anschlag im
Uhrzeigersinn drehen (Pfeilrichtung "-") (Abb. 17), und
prüfen, dass der Brenner (12) erloschen ist.
- Gaskartusche (11) vom Druckminderer (9) abnehmen
(siehe Abschnitt AUSWECHSELN DER
KARTUSCHE), dann den Druckminderer in seine
Halterung hinten am Gerät (Abb. 18) einsetzen.
- Spieß-Drehmotor (8) abnehmen und in seine
Halterung hinten am Gerät einsetzen (Abb. 21) und
mit dem Klettband befestigen.
- Spießrahmen (6) aus dem Brennerkasten (7) leicht
nach oben heben und entnehmen, dann im
Brennerkasten aufbewahren; dazu die Haken "C" und
die Anschläge "B" in die senkrechten Schlitze hinten
im Kasten einsetzen (Abb. 19).
- Feder (5) einsetzen; dabei die Haken oben und unten
am Brennerkasten und über dem Spießrahmen
befestigen (Abb. 20).
- Spieße (4) in den unteren Teil (Abb. 22) einräumen,
die Fettpfanne (3) umgedreht darüber.
- Die 2 Haken (2) unten an der Geräterückseite öffnen.
Zum Entriegeln zusammendrücken (Abb. 23).
- Roten Verriegelungsknopf (16) hinten am Gerät nach
rechts schieben, dann Gerät vorsichtig schließen
(Abb. 24).
- Gerät verriegeln:
o 2 Haken (2) hinten am Gerät anbringen.
o Haken (16) oben auf dem Gerät einhaken (Abb. 25).
o Füße einklappen.
Jetzt ist Ihr Gerät fertig zum Aufbewahren oder
Transportieren.
Bewahren Sie den Kocher und den Gasbehälter für
Kinder unzugänglich an einem kühlen, trockenen und
belüfteten Ort auf, jedoch niemals in einem Keller oder
Untergeschoss.
Bei längerer Nichtbenutzung Kartusche vom Gerät
entfernen, wie in Abschnitt D angegeben.
Sollte die Düse verstopft sein (der Gasbehälter enthält
noch Gas, aber der Brenner zündet nicht), versuchen
Sie nicht, sie zu reinigen. Bringen Sie das Gerät zu
Ihrem Händler.
2 – Reinigen
Gehäuse des Geräts
Nach dem Abnehmen der Gaskartusche (siehe
Abschnitt D) Gerät reinigen.
Fettpfanne (3), Spieße (4), Spießhalterung (6) und
Innenteile des Geräts mit einem milden
Reinigungsmittel oder flüssigem Spülmittel und
warmem Wasser reinigen, dann mit einem Lappen
trocknen. Anmerkung: Diese Teile dürfen in die
Spülmaschine.
Keramikteile des Brenners (12)
Die aktiven Bestandteile des Brenners sind aus
Keramik. Während der Benützung werden sie
rotglühend. Keramikteile nicht reinigen, anfeuchten
oder reiben. Sie könnten dadurch beschädigt werden.
DE

- 20 -
GARANTIEBEDINGUNGEN
- Für das Produkt gilt eine vollständige Garantie von 2 (zwei) Jahren ab Kaufdatum für Teile und Produktion.
- Die Garantie kommt zur Anwendung, wenn das gelieferte Gerät nicht der Bestellung entspricht oder fehlerhaft ist; dazu
muss der Reklamation ein Nachweis des Kaufdatums ((z. B.: Rechnung, Kassenbeleg) und eine Beschreibung des
festgestellten Problems beigelegt werden.
- Jedes mit Gas betriebene Gerät muss von der montierten Kartusche oder der Gasflasche getrennt werden, bevor es an
ein zugelassenes Kundendienstzentrum zurückgeschickt wird.
- Das Gerät wird entweder repariert, ersetzt oder erstattet - ganz oder teilweise.
- Die Garantie ist unwirksam und kommt nicht zur Anwendung, wenn der Schaden verursacht wurde (i) durch falsche
Bedienung oder Lagerung des Geräts, (ii) durch einen Wartungsfehler oder nicht gemäß den Bedienungsanweisungen
durchgeführte Wartung des Geräts, (iii) durch Reparatur, Änderung, Wartung des Geräts durch einen nicht
zugelassenen Dritten, (iv) durch Verwendung von nicht Original-Ersatzteilen.
- Anmerkung: die gewerbliche Verwendung des Geräts ist von der Garantie ausgeschlossen.
- Jede Übernahme während der Garantiezeit ist ohne Auswirkung auf das Ablaufdatum der Garantie.
- Diese Garantie beeinträchtigt keinesfalls die gesetzlichen Ansprüche des Verbrauchers.
- Für jede Reklamation wenden Sie sich bitte an unseren Verbraucher-Service.
VERBRAUCHERSERVICE DEUTSCHLAND/ÖSTERREICH
CAMPING GAZ (DEUTSCHLAND) GmbH
EZetilstraße 5
D-35410 Hungen-Inheiden
Tel. D: 06402 89-0 - Fax D: 06402 89-246
Tel. A: 01 6165118 - Fax A: 01 6165119
E-Mail: info@campingaz.de
SCHWEIZCAMPINGAZ SUISSE SA
Route du Tir-Fédéral 10
1762 Givisiez - Schweiz
Tel: 41 26 460 40 40 - Fax: 41 26 460 40 50
E-Mail: info@campingaz.ch
www.campingaz.com
DE
Sidan laddas...
Sidan laddas...
Sidan laddas...
Sidan laddas...
Sidan laddas...
Sidan laddas...
Sidan laddas...
Sidan laddas...
Sidan laddas...
Sidan laddas...
Sidan laddas...
Sidan laddas...
Sidan laddas...
Sidan laddas...
Sidan laddas...
Sidan laddas...
Sidan laddas...
Sidan laddas...
Sidan laddas...
Sidan laddas...
Sidan laddas...
Sidan laddas...
Sidan laddas...
Sidan laddas...
Sidan laddas...
Sidan laddas...
Sidan laddas...
Sidan laddas...
Sidan laddas...
Sidan laddas...
Sidan laddas...
Sidan laddas...
Sidan laddas...
Sidan laddas...
Sidan laddas...
Sidan laddas...
-
 1
1
-
 2
2
-
 3
3
-
 4
4
-
 5
5
-
 6
6
-
 7
7
-
 8
8
-
 9
9
-
 10
10
-
 11
11
-
 12
12
-
 13
13
-
 14
14
-
 15
15
-
 16
16
-
 17
17
-
 18
18
-
 19
19
-
 20
20
-
 21
21
-
 22
22
-
 23
23
-
 24
24
-
 25
25
-
 26
26
-
 27
27
-
 28
28
-
 29
29
-
 30
30
-
 31
31
-
 32
32
-
 33
33
-
 34
34
-
 35
35
-
 36
36
-
 37
37
-
 38
38
-
 39
39
-
 40
40
-
 41
41
-
 42
42
-
 43
43
-
 44
44
-
 45
45
-
 46
46
-
 47
47
-
 48
48
-
 49
49
-
 50
50
-
 51
51
-
 52
52
-
 53
53
-
 54
54
-
 55
55
-
 56
56


Campingaz Shashlik Rotario Instructions For Use Manual
- Typ
- Instructions For Use Manual
på andra språk
- italiano: Campingaz Shashlik Rotario
- Deutsch: Campingaz Shashlik Rotario
- français: Campingaz Shashlik Rotario
- Türkçe: Campingaz Shashlik Rotario
- English: Campingaz Shashlik Rotario
- dansk: Campingaz Shashlik Rotario
- русский: Campingaz Shashlik Rotario
- suomi: Campingaz Shashlik Rotario
- Nederlands: Campingaz Shashlik Rotario
Relaterade papper
-
Campingaz 6051 Användarmanual
-
Campingaz BIVOUAC Bruksanvisning
-
-
-
-
-
-
-
-