Auriol Z29962D Bruksanvisning
- Kategori
- Väderstationer
- Typ
- Bruksanvisning
Denna manual är också lämplig för

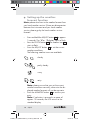
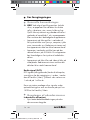
3
TENDENCY
%
COMFORT
IN OUT
OUT
O
C
O
C
DAY D M
s
MAX
MIN
MAX
MIN
YEAR
PM
A
1
2
3
4
5
6
7
8
9
10
11
12
13
14
15
16
17
18
19
Z29962A
64089_aur_Wetterstation_Content_LB3.indd 3 03.03.11 10:54

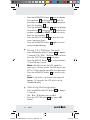
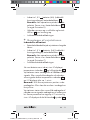
4
TENDENCY
%
COMFORT
IN OUT
OUT
O
C
O
C
DAY D M
s
MAX
MIN
MAX
MIN
YEAR
PM
B
1
2
3
4
5
6
7
8
9
10
11
12
13
14
15
16
17
18
19
Z29962D
64089_aur_Wetterstation_Content_LB3.indd 4 03.03.11 10:54

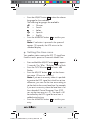
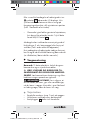
5
C
20
21
22
2324
64089_aur_Wetterstation_Content_LB3.indd 5 03.03.11 10:54

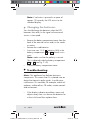
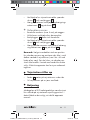
6
D
25
26
27
2829
64089_aur_Wetterstation_Content_LB3.indd 6 03.03.11 10:54

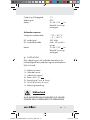
7 GB/IE
Introduction
Proper Use .......................................................Page 8
Description of parts .........................................Page 8
Technical Data .................................................Page 9
Scope of Supply ..............................................Page 10
Safety
General Safety Information ............................Page 11
Safety Instructions for Batteries .......................Page 12
Before Initial Use
General information ........................................Page 13
Setting up the external sensor .........................Page 14
Setting up the weather station ........................Page 14
Mounting the product on a wall
Weather station ...............................................Page 16
External sensor .................................................Page 16
Setting up the weather station ................Page 17
Operation
Setting the time / date manually .......................Page 17
Displaying DST summertime ............................Page 18
Setting the alarm ..............................................Page 18
Switching the alarm on / off ............................Page 18
Using the snooze function ...............................Page 19
Temperature display ........................................Page 19
Humidity display ..............................................Page 19
Setting up the weather forecast function ........Page 20
Weather trend .................................................Page 21
Setting the memory function for
minimum / maximum levels ..............................Page 21
Displaying the maximum / minimum levels ....... Page 21
Using 12- / 24-hour format .............................Page 22
Selecting the language ...................................Page 22
Setting the time zone .......................................Page 23
Changing the batteries ....................................Page 24
Troubleshooting ............................................. Page 24
Cleaning and Maintenance .......................Page 25
Disposal .............................................................Page 25
Service................................................................Page 26
Declaration of Conformity .........................Page 26
64089_aur_Wetterstation_Content_LB3.indd 7 03.03.11 10:54

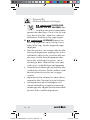
8 GB/IE
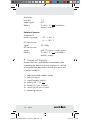
Radio-controlled weather station
Introduction
Familiarise yourself with the product be-
fore using it for the first time. In addition
please refer carefully to the operating
instructions below and the safety advice. Use the
product only as described and for the indicated
purpose. Keep these instructions in a safe place. If
you pass the product on to anyone else, please
ensure that you also pass on all the documentation.
Proper Use
The weather station displays the indoor and outdoor
temperature in Celsius (°C) or Fahrenheit (°F), the
indoor relative humidity in % RH and their maximum
and minimum levels. The weather station also displays
a weather forecast, the time in 12/24-hour format
and the date. It is also equipped with an alarm and
calendar function. Any other use or modification of
the instrument constitutes improper use and may
result in injury and / or damage to the instrument.
The manufacturer is not liable for damage caused
by improper use. The device is not intended for
commercial use.
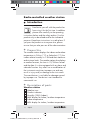
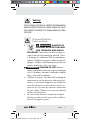
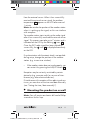
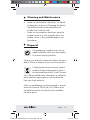
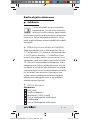
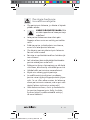
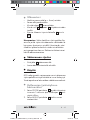
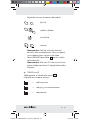
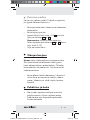
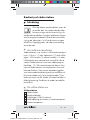
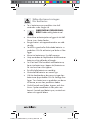
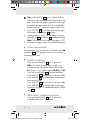
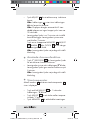
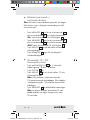
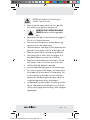
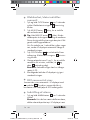
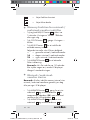
Description of parts
Weather station
1
Weather icon
2
Comfort indicator
3
Humidity (%RH) (indoor)
4
MAX display for indoor / outdoor temperature
5
Indoor temperature
6
MIN display for indoor / outdoor temperature
64089_aur_Wetterstation_Content_LB3.indd 8 03.03.11 10:54

9 GB/IE
7
Outdoor temperature
8
Date (Day / Month)
9
Time
10
Z
Z
/ REGISTER button
11
MEMORY button
12
ADJUST button (for settings)
13
ALARM button
14
CLOCK button
15
-Icon
16
s
-Icon (DST / summertime)
17
YEAR / DAY display
18
MAX / MIN display for humidity
19
Weather trend
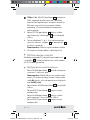
20
Hanger
21
Battery compartment
22
Stand
23
Dowel (ø 7 mm)
24
Screw (ø 4.5 mm)
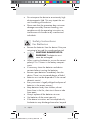
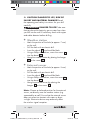
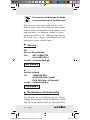
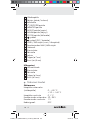
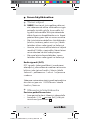
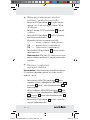
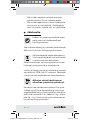
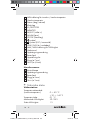
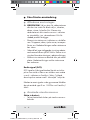
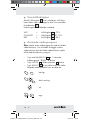
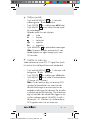
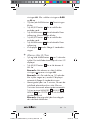
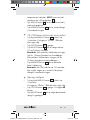
External sensor
25
Indicator LED
26
Hanger
27
Battery compartment
28
Dowel (ø 5 mm)
29
Screw (ø 3 mm)
Technical Data
Weather station:
Indoor temperature
measuring range: 0 – + 50 °C
+ 32 – + 140 °F
Temperature
resolution: 0.1 °C
Measuring range
humidity: 30 – 95 %
64089_aur_Wetterstation_Content_LB3.indd 9 03.03.11 10:54

10 GB/IE
Resolution
humidity: 1 %
Radio signal: DCF
Battery: 2 x AA 1.5 V
(included in
delivery scope)
External sensor:
Temperature
measuring range: – 20 – + 60 °C
– 4 – + 140 °F
HF transmission
signal: 433 MHz
HF transmission
range: max. 30 metres in open space
Battery: 2 x AA 1.5 V
(included in
delivery scope)
Scope of Supply
Please check the supplied items immediately after
unpacking the device to ensure that there is nothing
missing and that the product and all of its parts are
in perfect condition.
1 x radio-controlled weather station
1 x external sensor
1 x stand (weather station)
4 x battery AA 1.5 V
2 x dowels (ø 7 mm, ø 5 mm)
2 x screws (ø 4.5 mm, ø 3 mm)
1 x operating manual
64089_aur_Wetterstation_Content_LB3.indd 10 03.03.11 10:54

11 GB/IE
Safety
YOU SHOULD STORE ALL SAFETY INFORMATION
AND INSTRUCTIONS IN A SAFE PLACE IN CASE
YOU NEED TO REFER TO THEM AGAIN IN THE
FUTURE!
General Safety
Information
WARNING!
DANGER TO
LIFE AND ACCIDENT HAZARD
FOR TODDLERS AND SMALL
CHILDREN! Never allow children to play un-
supervised with the packaging material. There
is a danger of suffocation from the packaging
material. Children frequently underestimate the
dangers. Children should be kept away from the
product at all times. This is not a toy.
WARNING!
DANGER TO LIFE! Batteries
can be swallowed, which may represent a danger
to life. If a battery has been swallowed, medical
help is required immediately.
Children or persons who lack the knowledge or
experience to use the device or whose physical,
sensory or intellectual capacities are limited must
never be allowed to use the device without su-
pervision or instruction by a person responsible
for their safety. Children must never be allowed
to play with the device.
Do not use the device in hospitals or medical
facilities, as otherwise this may result in malfunc-
tions of life-support systems.
64089_aur_Wetterstation_Content_LB3.indd 11 03.03.11 10:54

12 GB/IE
Do not expose the device to an extremely high
electromagnetic field. This may impair the cor-
rect functioning of the device.
Please note that the guarantee does not cover
damage caused by incorrect handling, non-
compliance with the operating instructions or
interference with the device by unauthorised
individuals.
Safety Instructions
for Batteries
Remove the batteries from the device if they are
not going to be used for a prolonged period.
CAUTION! DANGER OF EX-
PLOSION! The batteries must
never be recharged!
When inserting the batteries, ensure the correct
polarity! This is shown in the battery compart-
ments.
If necessary, clean the batteries and device
contacts before inserting the batteries.
Remove spent batteries immediately from the
device. There is an increased danger of leaks!
Batteries must not be disposed of in the normal
domestic waste!
Every consumer is legally obliged to dispose of
batteries in the proper manner!
Keep batteries away from children; do not
throw them in the fire, short-circuit them or take
them apart.
Always replace all the batteries at once.
Use batteries of the same type only.
If the above instructions are not complied with,
the batteries may discharge themselves beyond
64089_aur_Wetterstation_Content_LB3.indd 12 03.03.11 10:54

13 GB/IE
their end voltage. There is a danger of leaking.
If the batteries have leaked inside your device,
you should remove them immediately in order
to prevent damage to the device!
Avoid contact with the skin, eyes and mucous
membranes. Any parts of the body coming into
contact with battery acid should be rinsed off
with copious amounts of water and / or a doctor
contacted if necessary!
Before Initial Use
General information
CAUTION! When choosing where to position
the weather station, make sure that it is not
exposed to direct sunlight, vibrations, dust, heat,
cold or moisture. Do not place the weather
station or external sensor near to heat sources,
e.g. radiators, as this may result in damage to
the instruments.
Do not place the devices near sources of inter-
ference such as television sets, computers, thick
walls, thermopane windows etc. Otherwise the
transmission of radio waves between the devices
may be impaired.
Please ensure that neighbouring devices are not
operated at the same frequency of 433 MHz.
Such devices may cause interference to the
radio connection.
Do not place the devices next to or on metal
plates. Otherwise the quality of radio wave
transmission may be reduced.
Radio signal (DCF):
The DCF signal (time signal transmitter) is made up
64089_aur_Wetterstation_Content_LB3.indd 13 03.03.11 10:54

14 GB/IE
of time pulses transmitted from one of the highest
precision clocks in the world close to Frankfurt / Main
in Germany - it varies by 1 second in 1 million years.
In ideal conditions, your weather station can pick
up this signal over a distance of up to approx.
1,500 km around Frankfurt / Main.
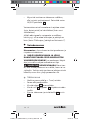
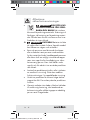
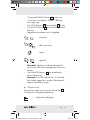
Setting up the external sensor
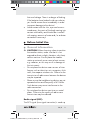
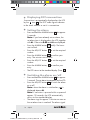
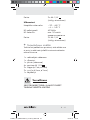
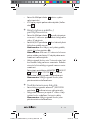
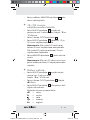
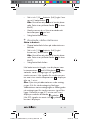
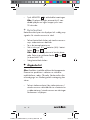
Inserting the batteries:
Remove the battery compartment cover from
the back of the external sensor.
Insert two 1.5 V
batteries (AA) (included) in
the battery compartment
27
.
Note: make sure that the polarity is correct.
This is indicated inside the battery compartment
27
(see Fig. D).
– The external sensor is now ready for operation
and the indicator LED
25
will flash.
Close the battery compartment cover.
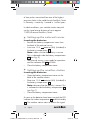
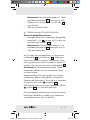
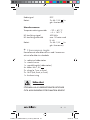
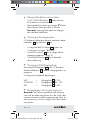
Setting up the weather station
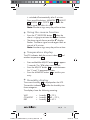
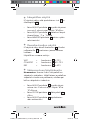
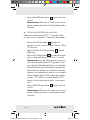
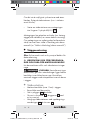
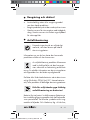
Inserting the batteries:
Open the battery compartment cover on the
back of the weather station.
Place two 1.5 V
batteries (AA) (included) in
the battery compartment
21
.
Note: take care that the polarity is correct. This
is indicated inside the battery compartment
21
(see Fig. C).
Close the battery compartment cover.
As soon as the batteries have been inserted, the LCD
indicates the indoor temperature
5
and the humidity
3
. The weather station starts to receive the signal
64089_aur_Wetterstation_Content_LB3.indd 14 03.03.11 10:54

15 GB/IE
from the external sensor. When it has successfully
received the external sensor signal, the outdoor
temperature
7
appears on the LCD after around
1 minute.
Note: do not alter the position of the weather station
when it is picking up the signal, as this can interfere
with reception.
The weather station starts to pick up the radio signal
after it has successfully received the external sensor
signal. This process can take up to 7 minutes and is
indicated on the LCD by the flashing
icon
15
.
Once the DCF radio signal has been picked up
successfully, the
icon
15
is displayed constantly
on the LCD.
If synchronisation with the atomic clock is not possible
during setup, change the position of the weather
station (e.g. to next to a window).
If the weather station does not work properly, you
can restart it by pressing the ADJUST button
12
.
Reception may be seriously restricted by certain
obstacles (e.g. concrete walls) or sources of inter-
ference (e.g. other electrical devices).
If interference with reception of the radio signal con-
tinues, you can also set the time and date manually
(see “Setting the time / date manually”).
Mounting the product on a wall
Note: You will require an electric drill and a Phillips
screwdriver for this step.
64089_aur_Wetterstation_Content_LB3.indd 15 03.03.11 10:54

16 GB/IE
CAUTION! DANGER TO LIFE, RISK OF
INJURY AND MATERIAL DAMAGE! Read
the operating and safety instructions for your drill
carefully.
WARNING!
DANGER TO LIFE! Take care
that you do not hit electricity, gas or water lines when
you drill into the wall. If necessary, check with a pipe
and cable detector before drilling.
Weather station
Mark the position of the hole (ø approx. 7 mm)
on the wall.
Drill the hole with an electric drill.
Insert the dowel
23
into the drilled hole.
Using a Phillips screwdriver, screw the screw
24
into the dowel
23
.
Hang the weather station by placing the hanger
20
on the screw
24
.
External sensor
Mark the position of the hole (ø approx. 5 mm)
on the wall.
Drill the hole with an electric drill.
Insert the dowel
28
into the drilled hole.
Using a Phillips screwdriver, screw the screw
29
into the dowel
28
.
Hang the external sensor by placing the
hanger
26
on the screw
29
.
Note: Choose a sheltered position for the external
sensor, not directly near the weather station (e.g.
separated by a wall). Ensure that the external sensor
does not come into contact with water or direct
sunlight. Electronic devices may adversely affect
the wireless signal reception.
64089_aur_Wetterstation_Content_LB3.indd 16 03.03.11 10:54

17 GB/IE
Setting up the weather station
Place the stand
22
on the underside of the
weather station.
Place the weather station on a level surface.
Operation
Reception of the DCF radio signal may be disrupted
or interrupted at the location of the weather station.
In this case you are able to set the instrument
manually.
Setting the time / date manually
1. Press and hold the CLOCK button
14
for approx.
3 seconds. The hours on the time display
9
begin to flash.
2. Press the ADJUST button
12
to set the required
number.
Tip: keep the ADJUST button
12
pressed for
faster time setting. You can also use this option
for the subsequent settings.
If no button is pressed in the space of approx.
1 minute, the LCD automatically returns to the
standard display.
3. Press the CLOCK button
14
to confirm your
entry. The minutes on the time display
9
start
to flash.
4. Repeat steps 2 and 3 to set the minutes, seconds,
year
17
and date
8
(month and day).
Note: the seconds display can only be reset
to 00.
5. The LCD returns to the standard display after
you have made the settings.
64089_aur_Wetterstation_Content_LB3.indd 17 03.03.11 10:54

18 GB/IE
Displaying DST summertime
Summertime is automatically displayed on the LCD
by the
s
icon
16
. The DCF radio signal indicates
to the clock whether or not it is summertime.
Setting the alarm
Press and hold the ALARM button
13
for approx.
3 seconds.
Note: if you have already set an alarm, the
set alarm time is displayed on the LCD together
with AL. Otherwise 0:00 and AL are displayed.
Press the ALARM button
13
briefly. The hours
start to flash.
Press the ADJUST button
12
to set the required
number.
Press the ALARM button
13
to confirm your
entry. The minutes start to flash.
Press the ADJUST button
12
to set the required
number.
Press the ALARM button,
13
to confirm your
entry.
The LCD returns to the standard display (Time
9
).
Switching the alarm on / off
Press and hold the ALARM button
13
for approx.
3 seconds. The set alarm time appears on the LCD.
Press the ADJUST button
12
to switch the alarm
on or off.
Note: when the alarm is switched on,
is
displayed above AL.
Note: if no button is pressed within a space of
approx. 30 seconds, the LCD automatically
returns to the standard display.
The alarm rings for approx. 2 minutes as soon as
the set alarm time is reached. The alarm signal
64089_aur_Wetterstation_Content_LB3.indd 18 03.03.11 10:54

19 GB/IE
is switched off automatically after 2 minutes.
Press one of the buttons, MEMORY
11
, ADJUST
12
, ALARM
13
or CLOCK
14
, to switch the
alarm signal off within this time.
Note: the alarm rings every day at the set time.
Using the snooze function
Press the Z
Z
/ REGISTER button
10
when the
alarm is ringing to activate the snooze function.
The alarm signal silences and the Z
Z
display
flashes. The alarm signal sounds again after an
interval of 5 minutes.
Note: the alarm rings every day at the set time.
Temperature display
The LCD indicates both the current indoor
5
and
outdoor temperature
7
.
Press and hold the ADJUST button
12
for approx.
3 seconds. The °C display starts to flash.
Press the ADJUST button
12
to switch between
the °C and °F temperature scales.
Press the MEMORY button
11
to confirm your
entry.
Humidity display
The current humidity
3
is displayed on the LCD.
The comfort indicator
2
divides the humidity into
three categories.
The displays have the following meaning:
WET = humidity
3
> 70 %
COMFORT = humidity
3
40 – 70 %,
DRY = humidity
3
< 40 %
64089_aur_Wetterstation_Content_LB3.indd 19 03.03.11 10:54

20 GB/IE
Setting up the weather
forecast function
Note: please also listen to the weather forecast from
your local weather service. If there are discrepancies
between the instrument and your local weather
service, please go by the local weather service
forecast.
Press and hold the ADJUST button
12
for approx.
3 seconds. The °C or °F display starts to flash.
Press the CLOCK button
14
. The weather icon
1
starts to flash.
Press the ADJUST button
12
to set the current
weather conditions.
The following weather icons are available:
cloudy
partly cloudy
sunny
rainy
Note: please ensure that you set the current
weather conditions correctly; otherwise the dis-
played weather forecast will not be accurate.
Press the MEMORY button
11
to confirm your
entry.
Note: if no button is pressed in a space of
approx. 30 seconds, the LCD returns to the
standard display.
64089_aur_Wetterstation_Content_LB3.indd 20 03.03.11 10:54

21 GB/IE
Weather trend
The weather station has a weather trend display
19
.
The displays have the following meaning:
= the weather is deteriorating
= no change in the weather
= the weather is improving
Setting the memory function
for minimum / maximum levels
Press and hold the ADJUST button
12
for approx.
3 seconds. Either the °C or °F display starts to
flash.
Press the CLOCK button
14
twice. - - starts to
flash.
Press the ADJUST button
12
to set the required
memory interval.
The following intervals are available:
- - = general minimum / maximum levels
1d = daily minimum / maximum levels
7d = weekly minimum / maximum levels
Press the MEMORY button
11
to confirm your
entry.
Note: if no button is pressed in a space of
approx. 30 seconds, the LCD returns to the
standard display.
Displaying the maximum /
minimum levels
Note: depending on the memory interval setting,
the LCD displays either the general, daily or weekly
minimum / maximum levels.
64089_aur_Wetterstation_Content_LB3.indd 21 03.03.11 10:54

22 GB/IE
Press the MEMORY button
11
once to display
the maximum
4
and minimum
6
levels for
the indoor temperature (IN) and the maximum
levels for humidity
3
.
Press the MEMORY button
11
again to display
the maximum
4
and minimum
6
levels for the
outdoor temperature (OUT) and the minimum
levels for the humidity
3
.
Press the ADJUST button
12
to reset the mini-
mum / maximum levels.
Press the MEMORY button
11
again to return
to the standard display.
Using 12- / 24-hour format
Press and hold the ADJUST button
12
for approx.
3 seconds. The °C or °F display starts to flash.
Press the CLOCK button
14
three times.
Press the ADJUST button
12
to switch between
12 and 24-hour format.
Note: the AM icon on the LCD stands for
mornings in 12-hour format. The PM icon on the
LCD in 12-hour format stands for the afternoon.
Press the MEMORY button
11
to confirm your
entry.
Note: if no button is pressed in the space of
approx. 30 seconds, the LCD returns to the
standard display.
Selecting the language
Press and hold the ADJUST button
12
for approx.
3 seconds.
The °C or °F display starts to flash.
Press the CLOCK button
14
four times. dE
flashes.
64089_aur_Wetterstation_Content_LB3.indd 22 03.03.11 10:54
Sidan laddas...
Sidan laddas...
Sidan laddas...
Sidan laddas...
Sidan laddas...
Sidan laddas...
Sidan laddas...
Sidan laddas...
Sidan laddas...
Sidan laddas...
Sidan laddas...
Sidan laddas...
Sidan laddas...
Sidan laddas...
Sidan laddas...
Sidan laddas...
Sidan laddas...
Sidan laddas...
Sidan laddas...
Sidan laddas...
Sidan laddas...
Sidan laddas...
Sidan laddas...
Sidan laddas...
Sidan laddas...
Sidan laddas...
Sidan laddas...
Sidan laddas...
Sidan laddas...
Sidan laddas...
Sidan laddas...
Sidan laddas...
Sidan laddas...
Sidan laddas...
Sidan laddas...
Sidan laddas...
Sidan laddas...
Sidan laddas...
Sidan laddas...
Sidan laddas...
Sidan laddas...
Sidan laddas...
Sidan laddas...
Sidan laddas...
Sidan laddas...
Sidan laddas...
Sidan laddas...
Sidan laddas...
Sidan laddas...
Sidan laddas...
Sidan laddas...
Sidan laddas...
Sidan laddas...
Sidan laddas...
Sidan laddas...
Sidan laddas...
Sidan laddas...
Sidan laddas...
Sidan laddas...
Sidan laddas...
Sidan laddas...
Sidan laddas...
Sidan laddas...
Sidan laddas...
Sidan laddas...
-
 1
1
-
 2
2
-
 3
3
-
 4
4
-
 5
5
-
 6
6
-
 7
7
-
 8
8
-
 9
9
-
 10
10
-
 11
11
-
 12
12
-
 13
13
-
 14
14
-
 15
15
-
 16
16
-
 17
17
-
 18
18
-
 19
19
-
 20
20
-
 21
21
-
 22
22
-
 23
23
-
 24
24
-
 25
25
-
 26
26
-
 27
27
-
 28
28
-
 29
29
-
 30
30
-
 31
31
-
 32
32
-
 33
33
-
 34
34
-
 35
35
-
 36
36
-
 37
37
-
 38
38
-
 39
39
-
 40
40
-
 41
41
-
 42
42
-
 43
43
-
 44
44
-
 45
45
-
 46
46
-
 47
47
-
 48
48
-
 49
49
-
 50
50
-
 51
51
-
 52
52
-
 53
53
-
 54
54
-
 55
55
-
 56
56
-
 57
57
-
 58
58
-
 59
59
-
 60
60
-
 61
61
-
 62
62
-
 63
63
-
 64
64
-
 65
65
-
 66
66
-
 67
67
-
 68
68
-
 69
69
-
 70
70
-
 71
71
-
 72
72
-
 73
73
-
 74
74
-
 75
75
-
 76
76
-
 77
77
-
 78
78
-
 79
79
-
 80
80
-
 81
81
-
 82
82
-
 83
83
-
 84
84
-
 85
85


Auriol Z29962D Bruksanvisning
- Kategori
- Väderstationer
- Typ
- Bruksanvisning
- Denna manual är också lämplig för
på andra språk
- English: Auriol Z29962D Owner's manual
- dansk: Auriol Z29962D Brugervejledning
- suomi: Auriol Z29962D Omistajan opas
Relaterade papper
-
Auriol Z30398 Bruksanvisning
-
-
Auriol Z29962C - IAN 70340 Bruksanvisning
-
Milomex Z30237C Bruksanvisning
-
-
-
-
-
-