Bifinett KH 1135 Operating Instructions Manual
- Kategori
- Racletter
- Typ
- Operating Instructions Manual

PRESERVING BOILER
Operating instructions
SÄILÖNTÄKEITIN
Käyttöohje
HENKOGNINGSAUTOMAT
Betjeningsvejledning
HERMETISERINGSMASKIN
Bruksanvisning
ΑΑYYTTOOMMAATTOOΣΣ BBPPAAΣΣTTHHPPAAΣΣ
Οδηγίες χρήσης
3
PRESERVING BOILER
EINKOCHAUTOMAT
Bedienungsanleitung
INKOKNINGSAPP ARAT
Bruksanvisning
KOMPERNASS GMBH · BURGSTRASSE 21 · D-44867 BOCHUM
www.kompernass.com
ID-Nr.: KH1135-01/08-V2
KH 1135
CV_KH1135_E2246_LB3.qxd 26.02.2008 12:12 Uhr Seite 1

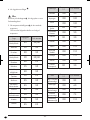
KH 1135
q
e
w
y
u
r
w
i
t
CV_KH1135_E2246_LB3.qxd 26.02.2008 12:12 Uhr Seite 4

- 1 -
CONTENT PAGE
Correct Usage 2
Safety information 2
Items supplied 2
Technical data 2
Appliance description 3
Commissioning 3
Preserving 3
Heating and keeping liquids warm 5
Cleaning and care 5
Storage 6
Recipe 6
Disposal 7
Warranty and Service 8
Importer 8
Read the operating instructions carefully before using the appliance for the first time and preserve this
booklet for later reference. Pass the manual on to whomsoever might acquire the scale at a later date.
IB_KH1135_E2246_LB3 26.02.2008 12:02 Uhr Seite 1

- 2 -
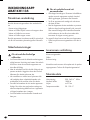
PRESERVING BOILER
KH1135
Correct Usage
The Fruit Preserver is suitable for:
- Preserving
- Heating and keeping drinks warm, and for their
pouring
- Heating and keeping boiled sausages warm, or
the like
- Heating and keeping soups warm
The appliance is intended for domestic use only, it
is not suitable for commercial or industrial
applications.
Safety information
To avoid potentially fatal electric
shocks:
• Ensure that the base with the electrical connec-
tions does not come into contact with water!
Ensure that the base is completely dry before
use, especially if it has accidentally become wet.
• Ensure that the power cable never becomes wet
or moist during operation. Lay the cable so that
it cannot be trapped or otherwise damaged.
• Arrange for defective power plugs and/or cables
to be replaced at once by qualified technicians
or our Customer Service Department.
• Always remove the power plug from the wall
socket after use. Switching the appliance off is
not sufficient, because the appliance is under
power for as long as the plug is connected to
the power socket.
• Ensure that the power cable does not come into
contact with parts of the appliance that are hot.
To avoid the risks of fire or injury:
• Hot steam clouds may be released. Additionally,
the appliance becomes very hot during use.
Wear oven mitts.
• Make certain that the appliance stands firmly
and vertically before switching it on.
• This appliance is not intended for use by indivi-
duals (including children) with restricted physical,
physiological or intellectual abilities or deficiences
in experience and/or knowledge unless they are
supervised by a person responsible for their safety
or receive from this person instruction in how the
appliance is to be used.
• Children should be supervised to ensure that
they do not play with the appliance.
• Do not move the Fruit Preserver after it has
heated up!
Items supplied
Fruit Preserver
Preserving grill
Operating instructions
After unpacking, check to ensure that all items are
present. Remove all packaging material.
Technical data
Mains voltage: 220 - 240 V
~
50Hz
Power consumption: 1800 W
Capacity: ca. 27 Liter
Temperature range : 30 - 100 ˚C
IB_KH1135_E2246_LB3 26.02.2008 12:02 Uhr Seite 2

- 3 -
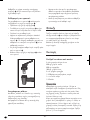
Appliance description
1
Lid
2
Heat insulated handles
3
Pouring lever
4
Pouring tap
5
Cable retainer
6
Temperature regulator
7
Control lamp
8
Preserving grill
Commissioning
Installation of the appliance
• Completely unwind the power cable from the
cable retainer
5
.
• Place the appliance on a level and slip-free surface.
Ensure that a wall power socket is easily acces-
sible.
Preparing the appliance for use
• Clean the appliance as described in the chapter
"Cleaning and Care"..
• Insert the power plug into a power socket.
• Fill the appliance with ca. 5 liters of water and
bring it to the boil (see chapter “Switching the
appliance on and off”).
Attention
:
When it is hot, take hold of the appliance ONLY
by means of the heat insulated handles
2
. Risk of
Burns!
Note:
On the first use the generation of a slight smell can
occur, due to residues from the production. It is com-
pletely harmless and disperses after a short time.
Provide for sufficient ventilation, for example, open
a window.
Switching the appliance on and off
Adjust the temperature regulator
6
to the desired
heating level.
The control lamp
7
glows. When the set temperature
has been reached, the temperature control lamp
7
goes out. The control lamp glows during operation
when the temperature falls below the set level and
the fruit preserver needs to heat itself back up.
When you wish to switch the appliance off, turn
the temperature controller
6
to the position OFF.
When the appliance is not in use, always remove
the plug from the wall power socket.
Preserving
To be understood under the term preserving is the
conservation of foodstuffs by, amongst others, the
effects of heat. Dependent upon the type and mass
of the items to be preserved, a differentiation is
made between the processes of sterilisation and
pasteurisation.
In sterilisation, the items to be preserved are heated
to a temperature of at least 100°C. With pasteuri-
sation the heating temperature lies by 80°C. For
domestic use pasteurisation is sufficient.
To achieve this, you need appropriate preserving
jars, with screw-tops or lids with rubber rings, and
a fruit preserver.
1. Place the preserving grill
8
in the fruit preserver.
2. Stand the well sealed preserving jars on the
preserving grill
8
.
Note:
A maximum of 14 x 1 liter preserving jars, in two layers,
one above the other, can be pasteurised/sterilised.
3. Fill the fruit preserver with sufficent water to ensure
that the upper jars are submersed in water to at
least 3/4 of their height. Ensure that the preser-
ving jars in the lower layer are firmly sealed, so
that water cannot infiltrate them.
IB_KH1135_E2246_LB3 26.02.2008 12:02 Uhr Seite 3

- 4 -
4. Close the fruit preserver with the lid
1
.
Attention
:
When it is hot, take hold of the appliance ONLY
by means of the heat insulated handles
2
. Risk of
Burns!
5. Adjust the temperature controller
6
to the desired
heating level.
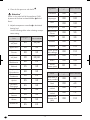
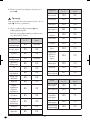
Use the following tables when selecting a tempe-
rature setting:
Fruit
Temperature in
˚C
Time in minutes
Apple
soft/hard
85 30/40
Apple sauce
90 30
Cherries
80 30
Pear
soft/hard
90 30/80
Strawberries
Blackberries
80 25
Rhubarb
95 30
Raspberries,
Gooseberries
80 30
Redcurrants
Cranberries
90 25
Apricot
85 30
Mirabelle
Greengage
85 30
Peach
85 30
Plum
Damson
90 30
Quince
95 30
Blueberries
85 25
Meat
Temperature in
˚C
Time in minutes
Roast meat, in
pieces, cooked
100 85
Broth
100 60
Game, Poultry
cooked
100 75
Goulash
cooked
100 75
Minced meat,
Sausage meat
(raw)
100 110
Vegetables
Temperature in
˚C
Time in minutes
Cauliflower
100 90
Asparagus
100 120
Peas
100 120
Pickled gherkin
85 30
Baby-carrots
Carrots
100 90
Pumpkin
90 30
Kohlrabi
100 95
Celeriac
100 110
Brussels sprouts
Red cabbage
100 110
Mushrooms
100 110
Beans
100 120
Tomato
Tomato puree
90 30
IB_KH1135_E2246_LB3 26.02.2008 12:02 Uhr Seite 4

- 5 -
Note:
The preserving phase begins when the control
lamp
7
extinguishes, indicating that the appliance
has heated itself up to the programmed temperature.
With a completely full appliance this can take up
to 90 minutes!
6. When the preserving phase is finished, switch
the temperature controller
6
to OFF. Remove
the power plug from the wall socket.
7. Position a heat resistent container under the pouring
tap
4
and press the pouring lever
3
down.
The water drains itself.
8. When the water has drained away allow the
preserving jars to cool down.
Heating and keeping liquids
warm
Attention
:
Fill the appliance with liquids to a maximum level
of 4 cm below the upper edge! If the level is any
higher, the liquids could overflow!
1. Pour the liquid (for example, mulled wine or
cocoa) into the fruit preserver.
2. Place the lid
1
onto the fruit preserver.
Attention
:
When it is hot, take hold of the appliance ONLY
by means of the heat insulated handles
2
. Risk of
Burns!
3. Adjust the temperature controller
6
to the des-
ired heating level. The control lamp
7
glows.
4. Regularly stir the liquid so that the heat is evenly
distributed.
5. When the desired temperature has been rea-
ched, the temperature control lamp
7
goes out.
The control lamp glows during operation when
the temperature falls below the set level and the
fruit preserver needs to heat itself back up.
6. You can pour liquids that have no solid consti-
tuents through the pouring tap
4
.
For this, hold a suitable receptacle under the
pouring tap
4
and press the pouring lever
3
down.
When there is sufficient liquid in the receptacle,
release the pouring lever
3
.
Note:
Should you wish to pour off a large volume of liquid,
pull the pouring lever
3
upwards until it stays in
position. Then you do not have to hold the pouring
lever
3
.
Attention
:
Do not pour off liquids with solid constituents, for
example, soups. The solids will block the pouring
tap
4
!
Note:
You can also keep stews warm in the fruit preserver.
They need to be stirred regularly to prevent them
sticking to the bottom of the appliance.
Cleaning and care
Attention
:
Always remove the power plug before cleaning the
appliance! Danger of electrical shock!
NEVER submerse the appliance in water or
other liquids!
Clean the appliance with a lightly moist cloth. For
stubborn soiling use a mild detergent on the cloth.
Attention
:
Do not use abrasive or aggressive cleaning materials.
These could attack the upper surfaces and irreparably
damage the appliance.
IB_KH1135_E2246_LB3 26.02.2008 12:02 Uhr Seite 5

- 6 -
Clean the preserving grill
8
in a mild soapy
solution and rinse it with clear water.
Cleaning the pouring tap
To clean the pouring tap
4
thoroughly, you can
unscrew the pouring lever
3
.
• Dismantle the pouring lever
3
.
• Place the pouring lever
3
in a mild soapy solution
and swirl it back and forth.
• Rinse it off with clear water.
• To clean the pouring tap
4
, allow a mild soapy
solution to flow through it. Should there be stubborn
soiling on the inside of the pouring tap
4
use a
pipe cleaner or similar to remove it.
• Afterwards, rinse the pouring tap
4
through
with clear water.
• Re-assemble the pouring lever
3
back on to the
pouring tap.
Scale removal
Deposits of scale on the bottom of the appliance
lead to increased energy consumption and reduce
the service life of the appliance.
Descale the appliance as soon as scale deposits
become apparent.
• Use a standard commercial descaling product.
Proceed as described in the instructions for usage
of the descaler.
• After descaling, rinse the appliance with lots of
clean and clear water.
Storage
Wind the cable around the cable retainer
5
and
insert the plug into the plug holder in the middle of
the appliance base.
Store the fruit preserver at a cool and dry location.
Recipe
Coarse Liver Sausage
2 kg Pork belly with rind
500 g Pork liver
500 g Onions
100 g Pork drippings
2 Tsp crushed Pimento
1 Tbsp Thyme and Marjoram, dried
1 Tsp white Pepper
1 Tbsp Salt
Preparation
Cook the pork belly for 1.5 hours in salted water
then leave it to cool in there. When cool, grind it
through a medium sized grinding disc.Grind the li-
ver through a fine disc.
Cube the onions and braise them in the dripping un-
til glassy. Then add the meat, liver, spices and a
1/4 Liter of the pork belly broth and stir it vigorous-
ly. Immediately fill the mixture into prepared glas-
ses. Fill the glasses up to 1/3 only!
Cook the glasses for ca. 2 hours at ca. 98°C.
This recipe can be varied in many different ways:
for example, by the addition of various herbs, garlic
or cubes of ham.
IB_KH1135_E2246_LB3 26.02.2008 12:02 Uhr Seite 6

- 7 -
Sweet-sour Pumpkin
2 kg Pumpkin
1/2 l Vinegar
1 l Water
1/4 l Wine vinegar
1 kg Sugar
Juice and rind of a lemon
a root of Ginger
(Fresh ginger cut into slices)
a stick of Cinnamon
some Cloves
Preparation
Half the pumpkin and remove the core. Peel the
pumpking and cut it into small cubes. Weigh the
pumpkin cubes and wash them. Douse them in a
bowl with diluted vinegar (for each 2 Kilogrammes
of pumpkin pulp a 1/2 Liter of vinegar and 1 Liter
of Water). Allow the pumpkin cubes to marinate in it
for 12 hours. When ready, shake off the water and
allow the pumpkin cubes to drain well.
Prepare the decoction as follows:
1/4 liter wine vinegar, 1 kilogramm sugar, the juice
and rind of 1 lemon, 1 piece (root) of fresh ginger
cut into slices - as a substitute, 1/2 teaspoon of gin-
ger powder, 1 stick of cinnamon, some cloves (ca. a
tablespoon full, Esslöffel voll, alternatively, ground).
Prepare the decoction and then cook the pumpkin
cubes in it until glassy.
Fill the pumpkin cubes into a preserving glasses. Al-
low the decoction to be cooked up once more and
then thicken it. Pour it over the pumpkin cubes and
then close the preserving glasses The preserving
glasses may only be fulled up to 1/3!
Cook the pumpkin at 90°C for ca. 30 minutes in
the fruit preserver.
Strawberry Jam
Remove the stalks and wash the strawberries. Sprin-
kle them with preserving sugar at a ratio of 1:1 (for
1000 g strawberries 1000 g sugar). Leave them to
marinade overnight and stir them from time to time.
Fill the strawberries into preserving glasses (fill them
up 2/3 only) and seal the preserving glasses well.
Cook the strawberries at 80°C for ca. 25 minutes
in the fruit preserver.
Disposal
Do not dispose of the appliance in your
normal domestic waste. This appliance
is subject to the European Guidelines
2002/96/EG.
Dispose of the appliance through an approved
disposal centre or at your community waste facility.
Observe the currently applicable regulations.
In case of doubt, please contact your waste disposal
centre.
Dispose of all packaging materials in an
environmentally friendly manner.
IB_KH1135_E2246_LB3 26.02.2008 12:02 Uhr Seite 7

- 8 -
Warranty and Service
The warranty for this appliance is for 3 years from
the date of purchase. The appliance has been ma-
nufactured with care and meticulously examined before
delivery. Please retain your receipt as proof of purchase.
In the case of a warranty claim, please make contact
by telephone with our service department. Only in
this way can a post-free despatch for your goods
be assured.
The warranty covers only claims for material and
maufacturing defects, not for wearing parts or for
damage to fragile components, e.g. buttons or
batteries. The appliance is intended for domestic
use only, NOT for commercial purposes.
If this product has been subjected to improper or
inappropriate handling, abuse, or modifications not
carried out by one of our authorised sales and service
outlets, the warranty will be considered void. Your
statutory rights are not restricted in any way by this
warranty.
DES Ltd
Units 14-15
Bilston Industrial Estate
Oxford Street
Bilston
WV14 7EG
Tel.: 0870/787-6177
Fax: 0870/787-6168
e-mail: suppor[email protected]
Irish Connection
Harbour view
Howth
Co. Dublin
Tel: 00353 (0) 87 99 62 077
Fax: 00353 18398056
e-mail: suppor[email protected]
Importer
KOMPERNASS GMBH
BURGSTRASSE 21
44867 BOCHUM, GERMANY
www.kompernass.com
IB_KH1135_E2246_LB3 26.02.2008 12:02 Uhr Seite 8

- 9 -
SISÄLLYSLUETTELO SIVU
Määräystenmukainen käyttö 10
Turvaohjeet 10
Toimituslaajuus 10
Tekniset tiedot 10
Laitteen kuvaus 11
Käyttöönotto 11
Umpiointi 11
Nesteiden lämmittäminen / lämpimänä pitäminen 13
Puhdistus ja hoito 13
Säilytys 14
Reseptejä 14
Hävittäminen 15
Takuu ja huolto 16
Maahantuoja 16
Säilytä käsikirja myöhempää käyttöä varten. Jos myyt laitteen, anna käsikirja uudelle omistajalle!
IB_KH1135_E2246_LB3 26.02.2008 12:02 Uhr Seite 9

- 10 -
SÄILÖNTÄKEITIN
KH1135
Määräystenmukainen käyttö
Umpiointilaite soveltuu:
- umpiointiin
- juomien lämmitykseen ja lämpimänä pitämiseen
sekä niiden tarjoiluun
- makkaroiden ym. lämmitykseen ja lämpimänä pitä-
miseen
- keittojen lämmitykseen ja lämpimänä pitämiseen
Laite on tarkoitettu ainoastaan yksityiseen käyttöön,
eikä se sovellu kaupallisiin tai teollisiin tarkoituksiin.
Turvaohjeet
Hengenvaarallisen sähköiskun
välttämiseksi:
• Varmista, ettei elektronisia liitäntöjä sisältävä jalusta
joudu milloinkaan kosketuksiin veden kanssa!
Anna jalustan kuivua ensin täysin, jos se on kas-
tunut vahingossa.
• Pidä huolta siitä, ettei virtajohto kastu konetta
käytettäessä. Vedä virtajohto siten, ettei se tartu,
puristu tai vaurioidu muulla tavalla.
• Anna vaurioitunut verkkopistoke tai virtajohto
heti valtuutetun ammattihenkilöstön tai huoltopal-
velun vaihdettavaksi vaarojen välttämiseksi.
• Vedä käytön jälkeen verkkopistoke aina pistora-
siasta. Pelkästään virran katkaiseminen ei riitä,
koska laitteessa on virta niin kauan, kunnes pistoke
irrotetaan pistorasiasta.
• Varmista, ettei virtajohto joudu kosketuksiin kuumien
laitteen osien kanssa.
Palo- ja loukkaantumisvaarojen
välttämiseksi:
• Laitteesta voi purkautua kuumaa vesihöyryä. Säiliö
on lisäksi käytössä erittäin kuuma. Käytä pata-
lappua tai -kinnasta.
• Ennen kuin käynnistät laitteen, huolehdi siitä,
että se on tukevasti pystyssä.
• Tätä laitetta ei ole tarkoitettu sellaisten henkilöiden
(mukaan lukien lapset) käyttöön, joiden rajoitetut,
fyysiset, aistilliset tai henkiset kyvyt tai kokemuksen
ja/tai tiedon puute estävät käytön, lukuun otta-
matta tilanteita, joissa heitä valvoo turvallisuudesta
vastaava henkilö tai joissa he ovat saaneet tältä
ohjeita laitteen käytöstä.
• Lapsia on valvottava ja on varmistettava, etteivät
he leiki laitteella.
• Älä siirrä umpiointilaitetta enää sen lämmittyä!
Toimituslaajuus
Umpiointilaite
Umpiointiritilä
Käyttöohje
Varmistu pakkauksesta purkamisen jälkeen, että
toimitus on täydellinen. Poista kaikki pakkaustarvik-
keet.
Tekniset tiedot
Verkkojännite: 220 - 240 V
~
50 Hz
Nimellisteho: 1800 W
Tilavuus: n. 27 litraa
Lämpötila-alue: 30 – 100 ˚C
IB_KH1135_E2246_LB3 26.02.2008 12:02 Uhr Seite 10

- 11 -
Laitteen kuvaus
1
Kansi
2
Lämpöeristetyt kahvat
3
Hanavipu
4
Hana
5
Johtokela
6
Lämpötilansäädin
7
Merkkivalot
8
Umpiointiritilä
Käyttöönotto
Laitteen asentaminen
• Kiedo virtajohto kokonaan johtokelalta
5
.
• Aseta laite tasaiselle ja liukumattomalle pinnalle.
Varmista, että verkkopistorasia on helposti
ulottuvilla.
Laitteen saattaminen käyttökuntoon
• Puhdista laite luvussa "Puhdistus ja hoito"
kuvatulla tavalla.
• Työnnä verkkopistoke pistorasiaan.
• Täytä laitteeseen n. 5 litraa vettä ja kiehauta
vesi (katso luku "laitteen käynnistäminen ja
sammuttaminen").
Huomio:
Koske ainoastaan laitteen kahvoihin
2
laitteen
ollessa kuuma. Palovamman vaara!
Huomaa:
Ensimmäisellä käyttökerralla saattaa valmistustekni-
sistä jäämistä johtuen esiintyä lievää hajua. Se on
täysin vaaratonta ja häviää jonkin ajan kuluttua.
Huolehdi riittävästä ilmanvaihdosta, avaa esimerkiksi
ikkuna.
Laitteen päällekytkentä ja sammutus
Aseta lämpötilansäädin
6
haluttuun lämpötilaan.
Merkkivalo
7
syttyy. Kun asetettu lämpötila on
saavutettu, merkkivalo
7
sammuu. Se syttyy välillä
uudelleen, kun asetettu lämpötila alittuu ja umpiointi-
laite kuumentuu uudelleen.
Jos haluat sammuttaa laitteen, käännä lämpötilan-
säädin
6
asentoon OFF.
Jos et käytä laitetta enää, irrota verkkopistoke aina
verkkopistorasiasta.
Umpiointi
Umpioinnilla tarkoitetaan elintarvikkeiden säilöntää
lämmön vaikutuksella. Aina umpioitavan tuotteen
laadun ja määrän mukaan erotetaan toimenpiteet
sterilointi ja pastörointi.
Steriloinnissa umpioitava tuote kuumennetaan vähin-
tään 100 °C:seen. Pastöroinnissa on kuumennus-
lämpötila 80 °C. Kotitalouskäytössä pastörointi on
riittävää.
Tähän tarvitaan vastaavia kierrekannellisia tai kumi-
rengaskannellisia umpiointitölkkejä.
1. Aseta umpiointiritilä
8
umpiointilaitteeseen.
2. Aseta huolella suljetut umpiointitölkit umpiointiriti-
lälle
8
.
Huomaa:
Korkeintaan 14 kappaletta yhden litran umpiointitölkkejä
voidaan pastöroida/steriloida kahdessa kerroksessa pääl-
lekkäin.
3. Täytä umpiointilaitteeseen niin paljon vettä, että
vähintään 3/4 ylemmistä umpiointitölkeistä on
vedessä. Varmista, että alemman kerroksen um-
piointitölkit on suljettu hyvin, jotta niihin ei pääse
vettä.
IB_KH1135_E2246_LB3 26.02.2008 12:02 Uhr Seite 11

- 12 -
4. Sulje umpiointilaite kannella
1
.
Huomio:
Koske ainoastaan laitteen kahvoihin
2
laitteen
ollessa kuuma. Palovamman vaara!
5. Aseta lämpötilansäädin
6
haluttuun lämpötilaan.
Valitse lämpötila seuraavien taulukoiden mukai-
sesti:
Hedelmät Lämpötila [˚C]
Aika
minuutteina
Omena
pehmeä/kova
85 30/40
Omenasose
90 30
Kirsikka
80 30
Päärynä
pehmeä/kova
90 30/80
Mansikka
Karhunvatukka
80 25
Raparperi
95 30
Vadelma,
karviainen
80 30
Viinimarja
Puolukka
90 25
Aprikoosi
85 30
Kriikuna
85 30
Persikka
85 30
Luumu
90 30
Kvitteni
95 30
Mustikka
85 25
Liha Lämpötila [˚C]
Aika
minuutteina
Paisti palana
läpikypsä
100 85
Lihaliemi
100 60
Riista, siipikarja
läpikypsytetty
100 75
Gulassiliha
läpikypsytetty
100 75
Jauheliha,
makkaramassa
(raaka)
100 110
Vihannekset Lämpötila [˚C]
Aika
minuutteina
Kukkakaali
100 90
Parsa
100 120
Herneet
100 120
Maustekurkut
85 30
Porkkanat
100 90
Kurpitsa
90 30
Kyssäkaali
100 95
Selleri
100 110
Ruusukaali
Punakaali
100 110
Sienet
100 110
Pavut
100 120
Tomaatti
Tomaattisose
90 30
IB_KH1135_E2246_LB3 26.02.2008 12:02 Uhr Seite 12

- 13 -
Huomaa:
Umpiointiaika alkaa vasta, kun merkkivalo
7
sammuu
ja osoittaa, että laite on kuumentunut asetettuun
lämpötilaan. Tämä voi kestää jopa 90 minuuttia
laitteen ollessa täynnä!
6. Aseta lämpötilansäädin
6
umpiointiajan lopuksi
asentoon OFF. Vedä verkkopistoke pistorasiasta.
7. Aseta lämpöä kestävä astia hanan
4
alle ja paina
hanavipua
3
alaspäin. Vesi virtaa ulos.
8. Anna umpiointitölkkien jäähtyä, kun kuuma vesi
on valunut ulos.
Nesteiden lämmittäminen /
lämpimänä pitäminen
Huomio:
Täytä nesteitä kattilaan korkeintaan 4 cm päähän
laitteen reunasta! Muutoin neste voi valua yli!
1. Täytä neste (esimerkiksi glögi tai kaakao)
umpiointilaitteeseen.
2. Aseta kansi
1
umpiointilaitteelle.
Huomio:
Koske ainoastaan laitteen kahvoihin
2
laitteen
ollessa kuuma. Palovamman vaara!
3. Aseta lämpötilansäädin
6
haluttuun lämpötilaan.
Merkkivalo
7
palaa.
4. Sekoita nesteitä säännöllisesti, jotta lämpö jakautuu
tasaisesti.
5. Kun haluttu lämpötila on saavutettu, lämpötilan
merkkivalo
7
sammuu. Se syttyy välillä uudelleen,
kun asetettu lämpötila alittuu ja umpiointilaite
kuumentuu.
6. Voit valuttaa nesteen hanan
4
kautta, jos nes-
teessä ei ole kiinteitä ainesosia.
Pidä tätä varten mukia tai vastaavaa hanan
4
alla ja paina hanavipua
3
alaspäin.
Kun mukissa on haluttu määrä nestettä, päästä
hanavipu
3
irti.
Huomaa:
Jos haluat valuttaa suurempia määriä nestettä, vedä
hanavipua
3
ylöspäin, kunnes se lukittuu. Tällöin
hanavivusta
3
ei tarvitse pitää kiinni.
Huomio:
Älä valuta mitään kiinteitä ainesosia sisältäviä nes-
teitä, kuten esim. keittoja ja vastaavia. Kiinteät
ainesosat tukkivat hanan
4
!
Huomaa:
Voit myös lämmittää patoja umpiointilaitteessa.
Sekoita patoja säännöllisesti, muuten ne palavat
kiinni laitteen pohjaan.
Puhdistus ja hoito
Huomio:
Vedä pistoke irti pistorasiasta ennen jokaista puhdis-
tuskertaa! Sähköiskun vaara!
Älä koskaan upota laitetta veteen tai muihin
nesteisiin!
Puhdista laite kevyesti kostutetulla liinalla. Jos lika on
kovapintaista, lisää liinaan laimeaa astianpesuainetta.
Huomio:
Älä käytä hankaavia tai syövyttäviä puhdistusaineita.
Nämä voivat vahingoittaa pintaa ja vaurioittaa laiteen
korjauskelvottomaan kuntoon.
IB_KH1135_E2246_LB3 26.02.2008 12:02 Uhr Seite 13

- 14 -
Puhdista umpiointiritilä
8
miedossa saippuavedessä
ja huuhtele se puhtaalla vedellä.
Hanan puhdistaminen
Voit kiertää hanavivun
3
irti voidaksesi puhdistaa
hanan
4
perusteellisesti.
• Kierrä hanavipu
3
irti.
• Aseta hanavipu
3
mietoon saippuaveteen ja
liikuttele sitä edestakaisin.
• Huuhtele se puhtaalla vedellä.
• Laske hanan
4
läpi mietoa saippualiuosta hanan
puhdistamiseksi. Kovapintaiset liat voit puhdistaa
hanan
4
sisäosista piipunpuhdistajalla.
• Laske sen jälkeen hanan
4
läpi puhdasta vettä.
• Kierrä hanavipu
3
jälleen hanaan.
Kalkinpoisto
Kalkin kertyminen laitteen pohjaan aiheuttaa
energiahukkaa ja vaikuttaa laitteen käyttöikään.
Poista kalkki laitteesta heti, kun huomaat kalkkikertymiä.
• Käytä tähän tavanomaista kalkinpoistoainetta.
Toimi kalkinpoistoaineen ohjeiden mukaisesti.
• Puhdista laite kalkinpoiston jälkeen runsaalla
puhtaalla vedellä.
Säilytys
Kiedo virtajohto johtokelan
5
ympärille ja työnnä
verkkopistoke laitteen pohjassa keskellä olevaan
verkkopistokepidikkeeseen.
Säilytä umpiointilaitetta viileässä ja kuivassa paikassa.
Reseptejä
Karkea maksamakkara
2 kg porsaankylkeä nahkoineen
500 g porsaanmaksaa
500 g sipulia
100 g sianihraa
2 tl murskattua maustepippuria
1 rkl timjamia ja meiramia, kuivattuna
1 tl valkopippuria
1 rkl suolaa
Valmistus
Keitä porsaankylkeä 1,5 tuntia suolavedessä ja
anna sen jäähtyä siinä. Jauha se lopuksi lihamyllyllä
keskikokoisella levyllä. Jauha maksa hienojakoisella
reikälevyllä.
Kuutioi sipulit ja kuullota ne ihrassa. Lisää sitten liha,
maksa, mausteet ja 1/4 litraa porsaankyljen keitto-
vettä ja sekoita ne voimallisesti. Täytä massa heti
esivalmisteltuihin lasitölkkeihin. Täytä tölkistä vain
1/3!
Keitä tölkkejä n. 2 tuntia n. 98 °C:ssa.
Tätä reseptiä voit muunnella eri tavoin: Lisää esimer-
kiksi erilaisia yrttejä, valkosipulia tai kinkkukuutioita.
IB_KH1135_E2246_LB3 26.02.2008 12:02 Uhr Seite 14

- 15 -
Hapanimelä kurpitsa
2 kg kurpitsaa
1/2 l etikkaa
1 l vettä
1/4 l viinietikkaa
1 kg sokeria
Yhden sitruunan mehu ja kuoret
yksi inkiväärinjuuri
(viipaleiksi leikattua tuoretta inkivääriä)
kanelitanko
muutamia neilikoita
Valmistus
Puolita kurpitsa ja poista siemenet. Kuori kurpitsa ja
leikkaa se pieniksi kuutioiksi. Punnitse kurpitsakuutiot
ja pese ne. Kaada niiden päälle kulhossa laimen-
nettua etikkaa (2 kiloa kurpitsanlihaa kohti 1/2 li-
traa etikkaa ja 1 litra vettä). Anna kurpitsakuutioi-
den seistä liemessä 12 tuntia. Kaada seuraavana
päivänä vesi pois ja valuta kurpitsakuutiot kunnolla.
Valmista liemi:
1/4 litraa viinietikkaa, 1 kilo sokeria, 1 sitruunan
mehu ja kuoret, 1 kpl (juuri) viipaleiksi leikattua tuo-
retta inkivääriä - vaihtoehtoisesti 1/2 teelusikallista
inkiväärijauhetta - 1 kanelitanko, muutama neilikka
(n. ruokalusikallinen, vaihtoehtoisesti jauhettuna).
Kiehauta liemi ja keitä kurpitsat liemessä kuultaviksi.
Täytä kurpitsakuutiot umpiointitölkkeihin. Anna lie-
men kiehahtaa vielä kerran ja sitten saostua. Kaada
se kurpitsakuutioiden päälle ja sulje umpiointitölkit.
Umpiointitölkkeihin saa täyttää vain 1/3!
Keitä kurpitsaa 90 °C:ssa n. 30 minuuttia umpiointi-
laitteessa.
Mansikkahillo
Poista kannat ja pese mansikat. Ripottele mansikoille
hillosokeria 2:1 (1000 g mansikoita 500 g hilloso-
keria). Anna vetäytyä yön yli ja sekoita.
Täytä mansikat umpiointitölkkeihin (täytä vain 2/3)
ja sulje umpiointitölkit kunnolla.
Keitä mansikoita 80 °C:ssa n. 25 minuuttia umpioin-
tilaitteessa.
Hävittäminen
Älä hävitä laitetta tavallisen talousjät-
teen mukana. Tämä tuote on eurooppa-
laisen direktiivin 2002/96/EY alainen.
Anna laite hyväksytyn jätehuoltoyrityksen tai kunnallisen
jätelaitoksen hävitettäväksi.
Noudata voimassa olevia määräyksiä.
Ota epävarmoissa tilanteissa yhteyttä jätelaitokseen.
Hävitä kaikki pakkausmateriaalit ympäristöys-
tävällisellä tavalla.
IB_KH1135_E2246_LB3 26.02.2008 12:02 Uhr Seite 15

- 16 -
Takuu ja huolto
Laitteen takuu on 3 vuotta ostopäivästä. Laite on
valmistettu huolella ja tarkastettu perusteellisesti ennen
toimitusta. Säilytä ostokuitti tositteeksi ostosta. Ota
takuutapauksessa puhelimitse yhteyttä lähimpään
huoltopisteeseen. Vain näin voidaan taata tuotteesi
maksuton lähettäminen huoltoon.
Takuu koskee ainoastaan materiaali- ja valmistusvir-
heitä, ei kuitenkaan kuluvia osia tai herkästi vaurioi-
tuvien osien, esim. kytkinten tai akkujen vaurioita.
Tuote on tarkoitettu ainoastaan yksityiseen käyttöön.
Tuotetta ei siten saa käyttää ammatillisiin tarkoituksiin.
Väärä tai asiaton käyttö, väkivallan käyttö ja muiden
kuin valtuutetun huoltopisteen suorittamat korjaukset
aiheuttavat takuun raukeamisen. Tämä takuu ei rajoita
kuluttajan lakisääteisiä oikeuksia.
Kompernass Service Suomi
Petäjäksentie 19
FIN - 26100 Rauma
Tel.: 02 822 28 87
Fax: 010 293 02 63
e-mail: suppor[email protected]
Maahantuoja
KOMPERNASS GMBH
BURGSTRASSE 21
44867 BOCHUM, SAKSA
www.kompernass.com
IB_KH1135_E2246_LB3 26.02.2008 12:02 Uhr Seite 16

- 17 -
INNEHÅLLSFÖRTECKNING SIDAN
Föreskriven användning 18
Säkerhetsanvisningar 18
Leveransens omfattning 18
Tekniska data 18
Beskrivning 19
Förberedelser 19
Konservering 19
Värma upp och hålla vätskor varma 21
Rengöring och skötsel 21
Förvaring 22
Recept 22
Kassering 23
Garanti och service 24
Importör 24
Spara den här anvisningen för senare frågor – och överlämna den tillsammans med apparaten om du
överlåter den till någon annan person!
IB_KH1135_E2246_LB3 26.02.2008 12:02 Uhr Seite 17

- 18 -
INKOKNINGSAPP
ARAT KH1135
Föreskriven användning
Den här konserveringsmaskinen ska användas för
att:
- Konservering inläggningar
- Värma och hålla drycker varma och tappa ut dem
- Värma och hålla korvar varma.
- Värma och hålla soppor varma.
Den här apparaten är endast avsedd för privat bruk
och får inte användas yrkesmässigt eller industriellt.
Säkerhetsanvisningar
För att undvika livsfarliga
elchocker:
• Se till att sockeln med de elektriska anslutningarna
aldrig kommer i beröring med vatten! Låt sockeln
bli helt torr innan du använder apparaten om
den råkat bli fuktig.
• Akta så att kabeln inte blir våt eller fuktig när ap-
paraten används. Lägg den så att den inte kan
klämmas eller skadas på annat sätt.
• Låt omedelbart en auktoriserad yrkesman eller
vår kundtjänst byta ut skadade kontakter och
strömkablar för att undvika risken för skador.
• Dra alltid ut kontakten när du använt apparaten
färdigt. Det räcker inte med att bara stänga av,
eftersom nätspänning alltid finns kvar i apparaten
så länge kontakten sitter i uttaget.
• Se till att kabeln inte kan komma i kontakt med
heta ytor.
För att undvika brand och
personskador:
• Heta ångor kan tränga ut. Dessutom är behållaren
mycket varm när apparaten används. Använd
därför grytlappar, grillvantar eller liknande.
• Se till att apparaten står stadigt och rakt innan
du sätter på den.
• Den här apparaten ska inte användas av personer
(inklusive barn) med begränsad fysisk, sensorisk
eller mental förmåga eller bristande erfarenhet
och kunskap om de inte först övervakats eller
instruerats av någon ansvarig person.
Se noga till så att barnen inte leker med apparaten.
• Flytta inte på konserveringsmaskinen när den är
varm!
Leveransens omfattning
Konserveringsmaskin
Galler
Bruksanvisning
Kontrollera att leveransen är komplett när du packat
upp apparaten. Ta bort allt förpackningsmaterial.
Tekniska data
Nätspänning: 220 - 240 V
~
50Hz
Nominell effekt: 1800 W
Volym: ca 27 liter
Temperaturområde: 30 - 100 ˚C
IB_KH1135_E2246_LB3 26.02.2008 12:02 Uhr Seite 18
Sidan laddas...
Sidan laddas...
Sidan laddas...
Sidan laddas...
Sidan laddas...
Sidan laddas...
Sidan laddas...
Sidan laddas...
Sidan laddas...
Sidan laddas...
Sidan laddas...
Sidan laddas...
Sidan laddas...
Sidan laddas...
Sidan laddas...
Sidan laddas...
Sidan laddas...
Sidan laddas...
Sidan laddas...
Sidan laddas...
Sidan laddas...
Sidan laddas...
Sidan laddas...
Sidan laddas...
Sidan laddas...
Sidan laddas...
Sidan laddas...
Sidan laddas...
Sidan laddas...
Sidan laddas...
Sidan laddas...
Sidan laddas...
Sidan laddas...
Sidan laddas...
Sidan laddas...
Sidan laddas...
Sidan laddas...
Sidan laddas...
Sidan laddas...
-
 1
1
-
 2
2
-
 3
3
-
 4
4
-
 5
5
-
 6
6
-
 7
7
-
 8
8
-
 9
9
-
 10
10
-
 11
11
-
 12
12
-
 13
13
-
 14
14
-
 15
15
-
 16
16
-
 17
17
-
 18
18
-
 19
19
-
 20
20
-
 21
21
-
 22
22
-
 23
23
-
 24
24
-
 25
25
-
 26
26
-
 27
27
-
 28
28
-
 29
29
-
 30
30
-
 31
31
-
 32
32
-
 33
33
-
 34
34
-
 35
35
-
 36
36
-
 37
37
-
 38
38
-
 39
39
-
 40
40
-
 41
41
-
 42
42
-
 43
43
-
 44
44
-
 45
45
-
 46
46
-
 47
47
-
 48
48
-
 49
49
-
 50
50
-
 51
51
-
 52
52
-
 53
53
-
 54
54
-
 55
55
-
 56
56
-
 57
57
-
 58
58
-
 59
59


Bifinett KH 1135 Operating Instructions Manual
- Kategori
- Racletter
- Typ
- Operating Instructions Manual
på andra språk
- Deutsch: Bifinett KH 1135
- English: Bifinett KH 1135
- dansk: Bifinett KH 1135
- suomi: Bifinett KH 1135
Relaterade papper
Andra dokument
-
Silvercrest 75748 Operating Instructions Manual
-
Silvercrest SSMS 600 B3 Bruksanvisning
-
Silvercrest ET SSMS 600 C3 Operating Instructions Manual
-
-
-
Kompernass Scale KH809 Användarmanual
-
Electrolux EN3481MOX Användarmanual
-
-
HUSQVARNA-ELECTROLUX QN4041X Användarmanual
-
Cuisinart SG21BE KRYDDERKVERN, BLÅ Bruksanvisning