XGIMI MOGO 2 PRO FULL HD BÆRBAR PROJEKTOR Bruksanvisning
- Kategori
- Dataprojektorer
- Typ
- Bruksanvisning

User Guide
Benutzerhandbuch
Guíadelusuario
Guide de l'utilisateur
Guida per l'utente
ユーザーガイド
사용 설명서
Podręcznik użytkownika
Guia do Utilizador
Руководство пользователя
使用指南
دلیل المستخدم
Brugervejledning
Käyöopas
Brukerveiledning
Gebruikershandleiding
Användarhandbok

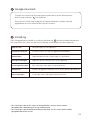
CONTENTS
01
09
1 7
25
33
44
49
57
65
73
81
90
98
106
114
122
130
English
Deutsch
Español
Français
Italiano
日本語
한국어
Polski
Português
Русский язык
繁体中文
اللغة العربية
Dansk
Suomi
Norsk
Nederlands
Svenska

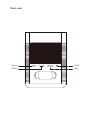
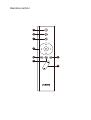
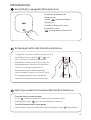
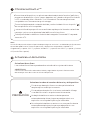
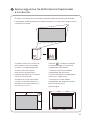
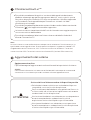
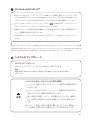
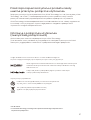
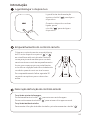
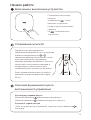
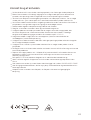
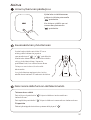
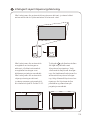
Front view
AB
C
Overview

ToF
Autofocus Note: To prevent auto keystone correction
failure, avoid blocking the sensor.
EN
DE
ES
FR
I T
JP
KR
PL
PT
RU
TW
AE
DK
F I
NO
NL
SE
ﻲﺋﺎﻘﻠﺗﻟا زﯾﻛرﺗﻟا
ToF ءزﺟﻟا
Autofokus
ToF Teil Hinweis: Um ein Versagen der automatischen
Trapezkorrektur zu vermeiden, sollten Sie den
Sensor nicht blockieren.
Enfoque
automático
Pieza ToF
Nota: Para evitar errores en la corrección
trapezoidal automática, no bloquee el
sensor.
Mise au point
automatique
Capteur ToF
Remarque: Pour éviter tout échec de la
correction de la distorsion trapézoïdale, ne
pas obstruer le capteur.
Messa a fuoco
automatica
Parte ToF
Nota: Non bloccare il sensore per evitare
errori di correzione trapezoidale.
オートフォーカス
ToF部
注:自動台形補正の失敗を防ぐために、センサ
ーを遮らないようにしてください。
자동 초점
ToF 부품
참고:자동 키스톤 보정 실패를 방지하려면
센서를 차단하지 마십시오.
Automatyczna
regulacja ostrości
Część ToF
Uwaga: Aby uniknąć błędów korekcji
zniekształceń trapezowych, nie należy
zasłaniać czujnika.
Focagem
automática
Componente ToF
Nota: Para evitar a falha da correção
trapezoidal automática, evite bloquear o
sensor.
Автофокус
Компонент ToF Примечание.Не закрывайте датчик, чтобы
избежать сбоя автоматической коррекции
трапецеидальных искажений.
自動對焦
ToF 零件
附注:
為防止自動梯形校正失敗,
請勿遮擋感應器。
:ﺔظﺣﻼﻣ
.رﻌﺷﺗﺳﻣﻟا بﺟﺣ بﻧﺟﺗ ،ﻲﺋﺎﻘﻠﺗﻟا فارﺣﻧﻻا ﺢﯾﺣﺻﺗ لﺷﻓ ﻊﻧﻣﻟ
Lens
ﺔﺳدﻌﻟا
Objektiv
Lente
Objectif
Lente
レンズ
렌즈
Obiektyw
Objetiva
Объектив
鏡頭
Auto Keystone
Correction
ﻲﺋﺎﻘﻠﺗﻟا فارﺣﻧﻻا
ﺢﯾﺣﺻﺗﻟا
Automatische
Trapez-korrektur
Corrección
trapezoidal
automática
Correction automatique de
la distorsion trapézoïdale
Correzione
automatica
eeo trapezoidale
自動台形
補正
자동 키스톤
보정
Automatyczna korekcja
zniekształceń
trapezowych
Correção
trapezoidal
automática
Автоматическая коррекция
трапецеидальных
искажений
自動梯形
校正
ABC
Linse
ToF Autofokus Automatisk
trapezkorrektion Bemærk: For at undgå fejl i den
automatiske keystone-korrektion skal du
undgå at blokere sensoren.
Linssi
ToF-
automaaitarkennus Automaainen kuvan
korjaus Huom! älä peitä anturia, joa kuvan
automaainen korjaus onnistuu.
Linse
ToF-autofokus Automatisk
keystone-korrigering Merknad: Unngå å blokkere sensoren for å
forhindre feil med automatisk
keystone-korrigering.
Lens
Automatisch
scherpstellen ToF Automatische
keystone-correctie Let op: Voorkom dat de automatische
keystone-correctie mislukt door ervoor te
zorgen dat de sensor niet is geblokkeerd.
Objektiv
ToF-autofokus Auto Keystone-
korrigering Obs: Undvik a blockera sensorn för a
förhindra a den automatiska
keystone-korrigeringen misslyckas.

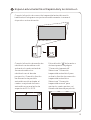
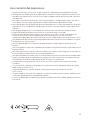
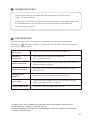
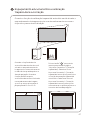
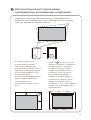
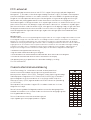
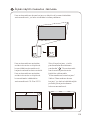
Rear view
Type-C
USB 2.0
AUDIO
HDMI

1. The Type-C port only supports power supply.
2. Using a non-XGIMI standard adapter may have a certain impact on the brightness and
volume. For the best experience, it is recommended to use the XGIMI standard adapter.
Note
1. Der Typ-C-Port unterstützt nur die Stromversorgung.
2. Die Verwendung eines nicht standardmäßigen XGIMI-Netzteils kann sich möglicherweise
auf die Helligkeit und die Lautstärke auswirken. Das beste Bild- und Klangerlebnis erzielen Sie mit dem
Standard-XGIMI-Netzteil.
Hinweis
Nota 1. El puerto tipo C solo admite alimentación eléctrica.
2. El uso de un adaptador estándar que no sea de XGIMI podría afectar al brillo y al volumen.
Para disfrutar de la mejor experiencia, se recomienda usar un adaptador estándar XGIMI.
Remarque 1. Le port Type-C ne peut être utilisé que pour l'alimentation électrique.
2. Utiliser un adaptateur standard non-XGIMI peut avoir un certain impact sur la luminosité et le volume.
Pour une expérience optimale, il est recommandé d'utiliser l'adaptateur standard XGIMI.
1. La porta Type-C supporta solo l'alimentazione.
2. L'uso di un adaatore standard non XGIMI può avere un certo impao sulla luminosità e
sul volume. Per un'esperienza oimale, si consiglia di utilizzare l'adaatore standard XGIMI.
Nota
1. Type-Cポートでは電源のみがサポートされています。
2. XGIMI標準アダプター以外のアダプターを使用すると、明るさと音量に何らかの影響を及ぼす
場合があります。最適な体験を得られるように、XGIMI標準アダプターの使用をおすすめします。
注
1. Type-C 포트는 전원 공급만 지원합니다.
2. 비 XGIMI 표준 어댑터를 사용하면 밝기와 볼륨에 일정한 영향을 미칠 수 있습니다.
최상의 경험을 얻으려면 XGIMI 표준 어댑터를 사용하는 것이 좋습니다.
참고
1. port Type-C obsługuje tylko zasilanie.
2. Używanie zasilacza innego niż standardowy zasilacz XGIMI może wpłynąć negatywnie na jasność i
głośność. Z myślą o najlepszych efektach zaleca się stosowanie standardowego zasilacza XGIMI.
Uwaga
1. A porta Type-C suporta apenas a fonte de alimentação.
2. Utilizar um adaptador não XGIMI pode ter um determinado impacto no brilho e volume.
Para usufruir da melhor experiência, recomenda-se que utilize o adaptador padrão XGIMI.
Nota
1. Разъем Type-C поддерживает только питание.
2. Использование адаптера, отличного от стандарта XGIMI, может повлиять на яркость и громкость.
Для лучшего результата рекомендуется использовать адаптер со стандартом XGIMI.
Примечание
1. Type-C接口僅支持供電。
2. 使用非極米標準充電器可能會對亮度和音量產生一定的影響。
為了獲得最佳體驗,請使用極米標準充電器。
附注
.طﻘﻓ ﺔﻗﺎطﻟا ردﺻﻣ Type-C ذﻔﻧﻣ مﻋدﯾ .1
ﻰﻠﻋ لوﺻﺣﻠﻟ .توﺻﻟا ىوﺗﺳﻣو عوطﺳﻟا ﻰﻠﻋ نﯾﻌﻣ رﯾﺛﺄﺗ ﻲﺳﺎﯾﻘﻟا XGIMI فﻼﺧ ل ّ
وﺣﻣ مادﺧﺗﺳﻻ نوﻛﯾ دﻗ.2
.XGIMI ﻲﺳﺎﯾﻘﻟا ل ّ
وﺣﻣﻟا مادﺧﺗﺳﺎﺑ ﻰﺻوُﯾ ،ﺔﺑرﺟﺗ لﺿﻓأ
ﺔظﺣﻼﻣ
EN
DE
ES
FR
I T
JP
KR
PL
PT
RU
TW
AE
DK
F I
NO
NL
SE
1. Type-C-porten understøer kun strømforsyning.
2. Brug af en adapter, der ikke er en XGIMI-standardadapter, kan have en vis indvirkning på lysstyrken
og lydstyrken.For at få den bedste oplevelse anbefales det at bruge XGIMI-standardadapteren.
Bemærk:
1. Type-C-pori tukee vain virransyööä.
2. Muun kuin XGIMI-vakiosoviimen käyö voi vaikuaa jonkin verran kirkkauteen ja äänenvoimakkuuteen.
Parhaan käyökokemuksen saamiseksi on suositeltavaa käyää XGIMI-vakiosovitinta.
Huom!
1. Type-C-porten støter kun strømforsyning.
2. Bruk av en ikke-XGIMI-standardadapter kan ha innvirkning på lysstyrken og volumet.
For den beste opplevelsen, anbefales det å bruke XGIMI-standardadapteren.
Merknad:
1. De Type-C-poort ondersteunt alleen voeding.
2. Het gebruik van een niet-XGIMI-standaardadapter kan een zekere invloed hebben op de helderheid en
het volume.Voor de beste ervaring wordt het gebruik van de XGIMI-standaardadapter aanbevolen.
Let op:
1. Type-C-porten stöder endast strömförsörjning.
2. Om du använder en icke-XGIMI-standardadapter kan ljusstyrkan och volymen påverkas. För bästa möjliga
upplevelse rekommenderas du a använda XGIMI-standardadaptern.
Obs:

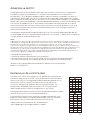
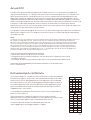
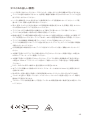
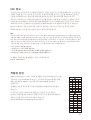
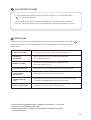
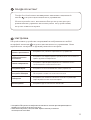
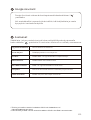
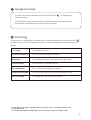
Remote control
A
B
C
D
G
H
E
F

A
Power
Einschalten
Encendido
/apagado
Marche
/Arrêt
Zasilanie
Alimentação
Питание
電源
전원
Alimentazione
ﺔﻗﺎطﻟا
B
Focus
Bildschärfe
Enfoque
Mise au
point
Ostrość
Focagem
Фокусировка
對焦鍵
초점
Messa
a fuoco
زﯾﻛرﺗﻟا
C
Google
Assistant
Google
Assistant
Asistente
de Google
Assistant
Google
Asystent
Google
Assistente
Google
Google
Ассистент
Google
助理
Google
어시스턴트
Google
Assistant
دﻋﺎﺳﻣ
Google
D
Navigation
Navigation
Navegación
Navigation
Nawigacja
Navegação
Навигация
導航
탐색
Navigazione
لﻘﻧﺗﻟا
E
Return
Zurück
Retorno
Retour
Powrót
Retroceder
Возврат
返回
리턴
Indietro
عوﺟرﻟا
F
Seings /
Menu
Einstellungen/
Menü
ajustes/
Menú
Paramètres/
Menu
Ustawienia/
Menu
Definições/
Menu
Настройки/
Меню
設定/
功能表
설정/
메뉴
Impostazioni/
Menu
تادادﻋﻹا
ﺔﻣﺋﺎﻘﻟا/
G
Home
Start
Inicio
Accuei
Początek
Início
Главный
экран
Home 鍵
홈
Home
ﺔﺣﻔﺻﻟا
ﺔﯾﺳﯾﺋرﻟا
H
Volume
Volume
Volume
Volume
Głośność
Volume
Громкость
Volume
볼륨
Volume
توﺻﻟا ىوﺗﺳﻣ
EN
DE
ES
FR
I T
JP
KR
PL
PT
RU
TW
AE
DK
F I
NO
NL
SE
Fokus Navigering Tilbage Indstillinger/
Menu
Hjem Lydstyrke
Strøm Google
Assistant
Tarkennus Selaus Paluu Asetukset/
valikko
Etusivu Äänenvoi-
makkuus
Virta Google
Assistant
Fokus Navigering Tilbake Innstilinger/
Meny
Hjem Volum
Strøm Google
Assistant
Scherpstellen Navigatie Terug Instellingen/
Menu
Home Volume
Aan/uit-knop Google
Assistant
Fokus Navigering Tillbaka Inställningar/
Meny
Hem VolymStröm Google
Assistent

Please read the Product Instructions carefully
before using the product.
Thank you for buying and using the products of XGIMI Technology Co., Ltd. (hereinafter referred
to as "XGIMI Technology" or "XGIMI"). You should read the Product Instructions carefully before
using this product for both your safety and interests.
XGIMI Technology will assume no responsibility for any personal injury, damage to property or
other loss caused because due to failure to operate this product according to the Product
Instructions or precautions.
* Model: XK04T
* XGIMI Technology reserves the right to interpret and amend the Instructions.
About the Product Instructions
(hereinafter referred to as "the Instructions")
Copyright of the Instructions belongs to XGIMI Technology;
Trademarks and names mentioned in the Instructions belong to their respective right owners;
In the case of inconformity between the content of the Instructions and the actual product, the
actual product shall prevail.
Google, Android TV, and Chromecast built-in are trademarks of Google LLC.
Google Assistant is not available in certain languages and countries.
HDMI High-Definition Multimedia interface, and the HDMI Logo are
trademarks or registered trademarks of HDMI Licensing Administrator, Inc.
Dolby, Dolby Audio, and double-D symbol are trademarks of
Dolby Laboratories.
The product is designed and manufactured with high quality materials and
components that are recyclable.
Disposal instructions for used products:
This symbol on the product indicates that it is protected under the
Directive 2012/19/EU.
01

02
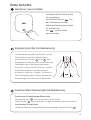
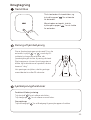
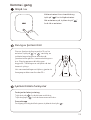
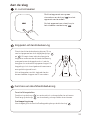
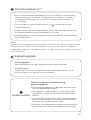
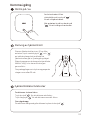
Remote control pairing
Place the remote control within 10cm of the
device, press" "and " "simultaneously,
an indicator light will begin flashing as the
remote control enters pairing mode. Release
the buons as soon as flashing begins, and
the connection is successful when a "Ding"
is heard.
If pairing fails, repeat the above steps after
30s.
Power on / o
Remote control functions
Focus adjustment function
Short press the" " to trigger autofocus.
Long press the" " to trigger manual focus.
Shortcut buon
To access the shortcut buon function, briefly press the" " .
Geing Started
Connect the device to a power
source and press" " to turn on
the device.
When the device is on, press" "
to turn the device o.

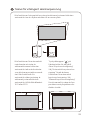
When the automatic keystone function is enabled, the frame will be
adjusted automatically if you move the device to another location.
Intelligent Screen Adaption technology
When the automatic obstacle
avoidance function is enabled,
the frame will automatically
avoid any obstacles that block
projection area. When the
automatic screen alignment
function is enabled, the frame
will automatically adjust to an
aspect ratio of 16:9 or 16:10.
Press the " "on the remote
control to enter the "Keystone
Correction” page. Select
"Auto Keystone Correction” to
enable the automatic
keystone correction function.
Select "Manual Keystone
Correction” to manually adjust
the four points and size of the
projection area.
03

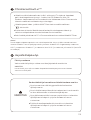
Adjust the device’s voice output channel
Automatically shut down the device after a pre-set time
Remove apps from the device
Adjust image parameters under the video or signal source
Image mode
3D seings for video and signal sources3D Video Setup
Clear Apps
Sound Seings
Adjust the keystone for the projected imageKeystone Correction
Sleep Timer
Seings for other related functionsAll seings
Google Assistant
Google Assistant can be activated by pressing the" "buon on the
remote control.
Using your voice, you can quickly access entertainment, control smart
devices, and get answers on screen.
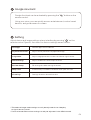
Adjust device and image seings at any interface by pressing " " on the
remote control. Specific functions for various seings are as follows:
Seing
04
* 3D mode and Image mode seings can only be adjusted via the video play
or signal source channel.
* Frame ratio and HDMI version seings can only be adjusted via the HDMI channel.

Note:
Screencasting is optimized for selected services only. Streaming quality for other content might
vary. Supported operating systems and devices: AndroidTM2.3 Gingerbread and higher, i0S® 7 and
higher, Windows® 7 and higher, Mac OS.10.7 and higher and Chrome OS (version 38 or higher).
Cast your favorite entertainment apps—movies & TV shows, music, games, sports
and more—from your Android, iOS device, Mac, Windows computer, or Chromebook
to the device. Find Chromecast-enabled apps at g.co/castapps.
Quickly cast video and audio contents to the TV through " "of mobile application
supported.
Screencasting will not be interrupted due to calling or message sending, and the
mobile phone baery consumption is minimal.
The whole frame of Android phones or Chrome browser on PC can be cast to the TV.
Chromecast built-inTM
CAUTION
There is a risk of explosion if the baery is replaced with the
wrong type of baery;
Disposal of a baery into fire, mechanically crushing or cuing
the baery, may result in an explosion;
Do not leave baery in an environment with extremely high
temperature that may result in an explosion or the leakage of
flammable liquid or gas;
Do not put baery in an environment with extremely low
pressure that may result in an explosion or the leakage of
flammable liquid or gas.
Warning for remote controller and portal device
05
System upgrade
Online upgrade
The online upgrade can be made through system seing
WARNING:
Please refer to the information on the exterior boom of the enclosure for electrical
and safety information before installing or operating the apparatus.

Correct use of the device:
Do not face lens into eyes as injury to the eyes can be caused by the strong projector light.
Do not block the air inlet/outlet of the device in order to avoid damage to internal electronic
devices arising from normal heat dissipation failure of the device.
Do not wipe the lens directly with cleaning tools including paper and cloth etc. in order to
avoid damage to lens; please clean up the dust on the lens surface through clean air blowing.
Do not wash the device with chemicals, detergents or any liquid in order to avoid corrosion of
circuit board by rainwater, moisture and mineral-containing liquids.
Keep the device and its components and accessories out of reach of children.
Ensure that the device is used in a dry and ventilated environment.
Do not store the device in overheated or overcooled places, because extreme temperatures
will shorten the life of electronic devices. Permissible environ ment for storage and use of the
device in an environment of 0°C-40°C.
Do not put the device into any heating equipment (such as dryer and microwave oven etc.)
for drying.
Do not extrude the device firmly or place barriers on it or its back to avoid damage to the
device.
Do not throw, strike or sharply vibrate the device to avoid damage to the internal circuit
board.
Do not try to disassemble and assemble the device yourself. Please contact after-sales
service of XGIMI for any problem.
Do not repair any product on your own. In the case of normal operation failure of the device or
any component, you shall consult after-sales service of XGIMI promptly or return it to the
factory for repair.
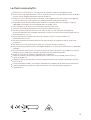
Operations in the 5.15-5.35 GHz band are restricted to indoor usage only.
In the installation and operation of the device, the for distance between radiator and body
should be at least 20cm.
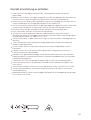
As with any bright source, do not stare into the direct beam, RG2 IEC 62471-5:2015
Use careful with the earphone maybe excessive sound pressure from earphones and
headphones can cause hearing loss.
Adapter plug is used as the disconnect device, so the disconnect device shall remain readily
operable.
06

07
Be careful that the product may emit harmful light radiation
FCC ID: 2AFENXK03T
FCC warning
The device meets provisions of part 15 of FCC rule. Operation meets the following 2 conditions:
(1) the device will not cause harmful interference, and (2) the device must accept any
interference received, including interference that may result in accidental operations. Users that
intentional or unintentional modification and replacement of radiators without explicit approval
from the responsible compliance party may prevent the user from operating the device. If the
manual is provided in a form other than paper, such as, provided in computer disk through the
Internet, then the information required in the section can be included in the manual in the
alternative form under the premise that users can have access to the form information.
For B-class digital or peripheral device, instructions provided by users shall include the following
or similar statements and put them in a prominent place of manual text:
Notes:
the device has been tested to meet restrictions of part 15 of FCC rule on B-class digital device. These
restrictions are aimed at proving the eective prevention of harmful interference in a residential
installation. If installation and use are not made according to the instructions, the device will generate and
radiate radio frequency energy, and may cause harmful interference to radio communication. However,
there is no guarantee that interference will not occur in a particular installation. If the device does cause
harmful interference to radio or television reception (determined by stopping and starting the device), it is
suggested that users should aempt to correct the interference by one or more of the following measures:
Reposition direction of receiving antenna.
Increase the distance between the device and the receiver.
Connect the device to a circuit socket dierent from the circuit connected to the receiver.
Consult distributors or experienced radio/television technicians to seek help.
*
*
*
*
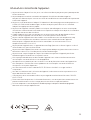
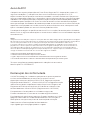
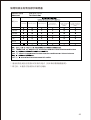
Declaration of Conformity
XGIMI Technology Co., Ltd hereby declares that this product is in
compliance with the essential requirements and other relevant provisions
of Directive 2014/53/EU Radio Equipment Regulations 2017Directive
2011/65/EU and UK.The Restriction of the Use of Certain Hazardous
Substances in Electrical Electronic Equipment Regulations 2012, and
compliance with REACH Directive (Regulation No 1907/2006).
This product is allowed to be used in some of EU member states as
illustrated in the right chart.
This Frequency applies to the following Member States or the geographical
area within a Member State where restrictions on puing into service or
requirements for authorisation of use exist.
You can find the Declaration of Conformity on
hps://global.xgimi.com/pages/product-support
BE
BG
CZ
DK
DE
EE
IE
EL
ES
FR
HR
IT
CY
LV
LT
LU
HU
MT
NL
AT
PL
PT
RO
SI
SK
FI
SE
UK
BE
BG
CZ
DK
DE
EE
IE
EL
ES
FR
HR
IT
CY
LV
LT
LU
HU
MT
NL
AT
PL
PT
RO
SI
SK
FI
SE
UK

* More information, please find the electronic manual: xgimi.com/us/support/index
Wireless Specification
Radiation Exposure Statement
The device is compiled by using FCC and ISED Innovation, Science and Economic Evelopment
radiation exposure limits specified for uncontrolled environments.
The transmier shall not be placed or operated in conjunction with any other antenna or
transmier.
For the LED projector, the device meets FCC and ISED Innovation, Science and Economic
Evelopment radiation exposure limits specified uncontrolled environments.
* Only use aachments/accessories specified or providedby the manufacturer
(such as the exclusive supply adapter etc).
* Beware that this product may emit harmful light radiation.
08
This device may not cause interference, and
This device must accept any interference, including interference that may cause undesired
operation of the device.
(2)
( )
1
ISED Warning
This device complies with Innovation, Science and Economic Evelopment Licence-exempt RSS
standard(s). Operation is subject to the following two conditions:
IC: 27045-XK03T
Bluetooth version: 5.2
Bluetooth transmier frequency range: 2400 MHz - 2483.5 MHz
Bluetooth transmier power: ≤17 dBm (EIRP)
Wi-Fi network: IEEE 802.11 a/b/g/n/ac (2.4GHz/5GHz)
2.4G Wi-Fi transmier frequency range:
2412 - 2472 MHz (2.4 GHz ISM Band, USA 11 Channels, Europe and others 13 Channels)
2.4G Wi-Fi transmier power: ≤17 dBm (EIRP)
5G Wi-Fi transmier frequency range:
5.15 - 5.35GHz, 5.470 - 5.725GHz, 5.725 - 5.850GHz
5G Wi-Fi transmier power:
5.15 - 5.25GHz < 22dBm (EIRP), 5.25 - 5.35GHz & 5.470 - 5.725GHz < 19dBm (EIRP),
5.725 - 5.825GHz < 13dBm (EIRP)
Note: This power is for EU only

09
Bie lesen Sie vor Verwendung des Produkts
die Produktanweisungen aufmerksam durch.
Vielen Dank, dass Sie sich für den Kauf und die Nutzung der Produkte von XGIMI Technology Co.,
Ltd. (im Folgenden als „XGIMI Technology“ oder „XGIMI“ bezeichnet) entschieden haben. Aus
Sicherheitsgründen und aus eigenem Interesse sollten Sie die Produktanweisungen
aufmerksam lesen, bevor Sie dieses Produkt verwenden.
XGIMI Technology haftet nicht für Personen- oder Sachschäden oder andere Verluste, die durch
die Nichtbeachtung der Produktanweisungen oder Vorsichtsmaßnahmen verursacht werden.
* Modell: XK04T
* XGIMI Technology behält sich das Recht zur Auslegung und Änderung der Anweisungen vor.
Über die Produktanweisungen
(im Folgenden als „die Anweisungen“ bezeichnet)
Die Urheberrechte der Anweisungen liegen bei XGIMI Technology.
Die in den Anweisungen erwähnten Marken und Namen gehören ihren jeweiligen Rechtsinhabern.
Bei Nichtübereinstimmung des Inhalts der Anweisungen mit dem eigentlichen Produkt hat das
eigentliche Produkt Vorrang.
Google, Android TV und Chromecast built-in sind Marken von Google LLC.
Google Assistant ist in bestimmten Sprachen und Ländern nicht verfügbar.
High-Definition Multimedia Interface und das HDMI-Logo sind Marken oder
registrierte Marken von HDMI Licensing Administrator, Inc.
Dolby, Dolby Audio und das Doppel-D-Symbol sind Marken der
Dolby Laboratories.
Das Produkt wurde mit qualitativ hochwertigen Materialien und Komponenten
konstruiert und gefertigt, die recycelbar sind.
Entsorgungsanweisungen für Altprodukte:
Dieses Symbol auf dem Produkt zeigt an, dass es
gemäß der Richtlinie 2012/19/EU geschützt ist.

10
Gerät ein-/ausschalten
Funktion zur Einstellung der Bildschärfe
Drücken Sie kurz „ “, um den Autofokus auszulösen.
Halten Sie die „ “ lange gedrückt, um den manuellen Fokus auszulösen.
Funktion der Schnelltaste
Um auf die Verknüpfungstastenfunktion zuzugreifen, drücken Sie kurz„ “ .
Erste Schrie
Schließen Sie das Gerät an die
Stromquelle an
und drücken Sie auf „ “, um
das Gerät einzuschalten.
Wenn das Gerät eingeschaltet
ist, drücken Sie
auf „ “, um das Gerät
auszuschalten.
Kopplung mit der Fernbedienung
Die Fernbedienung darf maximal 10 cm vom
Gerät entfernt sein. Drücken Sie dann
gleichzeitig die Tasten „ “ und „ “. Eine
Anzeigeleuchte beginnt zu blinken,wenn die
Fernbedienung in den Kopplungsmodus
wechselt. Lassen Sie die Tasten los, sobald
das Blinken beginnt. Die Verbindung ist
erfolgreich, wenn ein „Klingeln“ zu hören ist.
Falls die Kopplung fehlschlägt, wiederholen
Sie die obigen Schrie nach 30 Sekunden.
Funktionsbeschreibung der Fernbedienung

Wenn die automatische Trapezkorrektur aktiviert ist, wird das Bild
automatisch angepasst, wenn Sie das Gerät an einen anderen Ort
bewegen.
Zusätzlicher Abstand zwischen Keystone und Korrektur
11
Wenn die Funktion zur
automatischen Hindernisver-
meidung aktiviert ist, weicht das
Bild automatisch allen
Hindernissen aus, die den
Projektionsbereich blockieren.
Wenn die automatische
Bildschirmausrichtung aktiviert
ist, wird das Bild automatisch auf
ein Seitenverhältnis von 16:9
oder 16:10 eingestellt.
Drücken Sie die Taste „ “ auf der
Fernbedienung, um die Seite
„Trapezkorrektur“ aufzurufen.
Wählen Sie „Automatische
Trapezkorrektur“, um die
automatische Trapezkorrektur-
funktion zu aktivieren. Wählen Sie
„Manuelle Trapezkorrektur“, um die
vier Punkte und die Größe des
Projektionsbereichs manuell
einzustellen.

Google Assistant
Der Google Assistant kann durch Drücken der Taste „ “ auf der
Fernbedienung aktiviert werden.
Mit Ihrer Stimme können Sie schnell auf Unterhaltungsangebote
zugreifen, intelligente Geräte steuern und Antworten auf dem
Bildschirm erhalten.
Einstellung
Stellen Sie Ihr Gerät und Ihr Bild an jeder Schnistelle über „ “ auf der
Fernbedienung ein. Die spezifischen Funktionen der verschiedenen
Einstellungen sind wie folgt:
12
Einstellungen zum Entfernen von Apps auf dem Gerät
Apps löschen
Einstellungen zur Anpassung der Trapezkorrektur für
das projizierte Bild
Trapezkorrektur
Einstellungen zum Sprachausgabekanal des Geräts
Einstellungen, um den Projektor nach einer bestimmten
konfigurierten Zeitspanne automatisch auszuschalten.
Einstellungen für Bildparameter unter Video oder Signalquelle
Bildmodus
3D-Einstellungen für Video oder Signalquelle3D-Videoeinrichtung
Klangeinstellungen
Sleep-Timer
Einstellungen für andere zugehörige Elemente
Alle Einstellungen
* 3D-Einstellung und Bildmodus können nur unter Videowiedergabe oder
Signalquellenkanal eingestellt werden.
* Die Optionen Bildverhältnis und HDMI-Version können nur unter
HDMI-Kanal eingestellt werden.
Sidan laddas...
Sidan laddas...
Sidan laddas...
Sidan laddas...
Sidan laddas...
Sidan laddas...
Sidan laddas...
Sidan laddas...
Sidan laddas...
Sidan laddas...
Sidan laddas...
Sidan laddas...
Sidan laddas...
Sidan laddas...
Sidan laddas...
Sidan laddas...
Sidan laddas...
Sidan laddas...
Sidan laddas...
Sidan laddas...
Sidan laddas...
Sidan laddas...
Sidan laddas...
Sidan laddas...
Sidan laddas...
Sidan laddas...
Sidan laddas...
Sidan laddas...
Sidan laddas...
Sidan laddas...
Sidan laddas...
Sidan laddas...
Sidan laddas...
Sidan laddas...
Sidan laddas...
Sidan laddas...
Sidan laddas...
Sidan laddas...
Sidan laddas...
Sidan laddas...
Sidan laddas...
Sidan laddas...
Sidan laddas...
Sidan laddas...
Sidan laddas...
Sidan laddas...
Sidan laddas...
Sidan laddas...
Sidan laddas...
Sidan laddas...
Sidan laddas...
Sidan laddas...
Sidan laddas...
Sidan laddas...
Sidan laddas...
Sidan laddas...
Sidan laddas...
Sidan laddas...
Sidan laddas...
Sidan laddas...
Sidan laddas...
Sidan laddas...
Sidan laddas...
Sidan laddas...
Sidan laddas...
Sidan laddas...
Sidan laddas...
Sidan laddas...
Sidan laddas...
Sidan laddas...
Sidan laddas...
Sidan laddas...
Sidan laddas...
Sidan laddas...
Sidan laddas...
Sidan laddas...
Sidan laddas...
Sidan laddas...
Sidan laddas...
Sidan laddas...
Sidan laddas...
Sidan laddas...
Sidan laddas...
Sidan laddas...
Sidan laddas...
Sidan laddas...
Sidan laddas...
Sidan laddas...
Sidan laddas...
Sidan laddas...
Sidan laddas...
Sidan laddas...
Sidan laddas...
Sidan laddas...
Sidan laddas...
Sidan laddas...
Sidan laddas...
Sidan laddas...
Sidan laddas...
Sidan laddas...
Sidan laddas...
Sidan laddas...
Sidan laddas...
Sidan laddas...
Sidan laddas...
Sidan laddas...
Sidan laddas...
Sidan laddas...
Sidan laddas...
Sidan laddas...
Sidan laddas...
Sidan laddas...
Sidan laddas...
Sidan laddas...
Sidan laddas...
Sidan laddas...
Sidan laddas...
Sidan laddas...
Sidan laddas...
Sidan laddas...
Sidan laddas...
Sidan laddas...
Sidan laddas...
Sidan laddas...
Sidan laddas...
Sidan laddas...
-
 1
1
-
 2
2
-
 3
3
-
 4
4
-
 5
5
-
 6
6
-
 7
7
-
 8
8
-
 9
9
-
 10
10
-
 11
11
-
 12
12
-
 13
13
-
 14
14
-
 15
15
-
 16
16
-
 17
17
-
 18
18
-
 19
19
-
 20
20
-
 21
21
-
 22
22
-
 23
23
-
 24
24
-
 25
25
-
 26
26
-
 27
27
-
 28
28
-
 29
29
-
 30
30
-
 31
31
-
 32
32
-
 33
33
-
 34
34
-
 35
35
-
 36
36
-
 37
37
-
 38
38
-
 39
39
-
 40
40
-
 41
41
-
 42
42
-
 43
43
-
 44
44
-
 45
45
-
 46
46
-
 47
47
-
 48
48
-
 49
49
-
 50
50
-
 51
51
-
 52
52
-
 53
53
-
 54
54
-
 55
55
-
 56
56
-
 57
57
-
 58
58
-
 59
59
-
 60
60
-
 61
61
-
 62
62
-
 63
63
-
 64
64
-
 65
65
-
 66
66
-
 67
67
-
 68
68
-
 69
69
-
 70
70
-
 71
71
-
 72
72
-
 73
73
-
 74
74
-
 75
75
-
 76
76
-
 77
77
-
 78
78
-
 79
79
-
 80
80
-
 81
81
-
 82
82
-
 83
83
-
 84
84
-
 85
85
-
 86
86
-
 87
87
-
 88
88
-
 89
89
-
 90
90
-
 91
91
-
 92
92
-
 93
93
-
 94
94
-
 95
95
-
 96
96
-
 97
97
-
 98
98
-
 99
99
-
 100
100
-
 101
101
-
 102
102
-
 103
103
-
 104
104
-
 105
105
-
 106
106
-
 107
107
-
 108
108
-
 109
109
-
 110
110
-
 111
111
-
 112
112
-
 113
113
-
 114
114
-
 115
115
-
 116
116
-
 117
117
-
 118
118
-
 119
119
-
 120
120
-
 121
121
-
 122
122
-
 123
123
-
 124
124
-
 125
125
-
 126
126
-
 127
127
-
 128
128
-
 129
129
-
 130
130
-
 131
131
-
 132
132
-
 133
133
-
 134
134
-
 135
135
-
 136
136
-
 137
137
-
 138
138
-
 139
139
-
 140
140
-
 141
141
-
 142
142
-
 143
143
-
 144
144
-
 145
145
-
 146
146


XGIMI MOGO 2 PRO FULL HD BÆRBAR PROJEKTOR Bruksanvisning
- Kategori
- Dataprojektorer
- Typ
- Bruksanvisning
på andra språk
- italiano: XGIMI MOGO 2 PRO FULL HD BÆRBAR PROJEKTOR Manuale del proprietario
- português: XGIMI MOGO 2 PRO FULL HD BÆRBAR PROJEKTOR Manual do proprietário
- français: XGIMI MOGO 2 PRO FULL HD BÆRBAR PROJEKTOR Le manuel du propriétaire
- 日本語: XGIMI MOGO 2 PRO FULL HD BÆRBAR PROJEKTOR 取扱説明書
- dansk: XGIMI MOGO 2 PRO FULL HD BÆRBAR PROJEKTOR Brugervejledning
Andra dokument
-
JBL Live 300TWS Snabbstartsguide
-
Nikon VT46 Användarmanual
-
LG LMG810EAW.ABTMMB Användarmanual
-
LG LMG810EAW Bruksanvisning
-
Tivoli AUDIO MODEL ONE DIGITAL+ RADIO GEN2, HVIT Användarmanual
-
Technics SL-G700M2 Network/Super Audio CD Player Användarmanual
-
Mode d'Emploi Alpha 6500 18-135mm (ILCE-6500M/B) Användarmanual
-
Yamaha DPX-1 Bruksanvisning
-
Inseego Wavemaker™ PRO FX2000e Snabbstartsguide