MyBinding Kutrimmer 1038 Paper Cutter Användarmanual
- Kategori
- Leksaker
- Typ
- Användarmanual


D Betriebsanleitung
GB Operating Instructions
F Mode d´emploi
NL Gebruiksaanwijzing
I Manuale d´istruzione
E Instrucciones de uso
S Bruksanvising
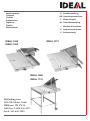
IDEAL 1038
IDEAL 1058
IDEAL 1071
IDEAL 1080
IDEAL 1110
Hebelschneider
Trimmers
Cisailles
Snijmachines
Taglierine
Cizallas
Skärmaskiner
MyBinding.com
5500 NE Moore Court
Hillsboro, OR 97124
Toll Free: 1-800-944-4573
Local: 503-640-5920

IDEAL 1038 • IDEAL 1058 • IDEAL 1071 • IDEAL 1080 • IDEAL 1110
- 2-
D Bitte lesen Sie vor Inbetriebnahme der Maschine unbedingt diese Betriebsanleitung
und beachten Sie die Sicherheitshinweise. Die Betriebsanleitung muss jederzeit
verfügbar sein.
GB Please read these operating instructions before putting the machine into operation
and observe the safety precautions. The operating instructions must always be
available.
F Nous vous prions de lire attentivement le mode d’emploi avant d’utiliser la machine,
et attirons votre attention sur les consignes de sécurité. Les instructions d'utilisation
et les consignes de sécurité doivent toujours être disponibles. Les instructions
d'utilisation et les consi.
NL Leest u voor de ingebruik name van het apparaat a.u.b. deze gebruiksaanwijzing
goed door en neemt u de veiligheidsinstructies n acht. De gebruiksaanwijzing en
de veiligheids-voorschriften moeten altijd binnen handbereik zijn.
I Per favore legga questo manuale di istruzione prima di mettere in funzione il
distruggidocumenti e osservi le regole di sicurezza. Le istruzioni d’uso devono
essere sempre disponibili.
E Le recomendamos lea las instrucciones antes de poner en funcionamiento esta
máquina y cumpla las normas de seguridad. Las instrucciones de servicio y
seguridad deben estar siempre disponibles.
S Läs igenom denna bruksanvisning innan ni startar maskinen. Var noga med
säkerhetsföreskrifterna. Instruktionsmanualen måste alltid finnas tillgänglig.
FIN Lue nämä käyttö-ohjeet läpi ennenkuin käynnistät laitteen !
Noudata turvaohjeita. Käyttöohjeiden on oltava aina saatavilla.
N Lees gjennom denne bruksannvisningen før De tar i bruk maskinen
Vær oppmerksom på sikkerhetsforskriftene. Opperatørmanualen
må alltid være tilgjengelig.
PL Proszę uważnie przeczytać instrukcję obsługi przed uruchomieniem urządzenia i
stosować się do przepisów bezpieczeństwa. Instrukcje obsługi muszą być
zawsze dostępne.
RUS Ïîæàëóéñòà, ïðî÷èòàéòå èíñòðóêöèþ ïî ýêñïëóàòàöèè ïåðåä óñòàíîâêîé
àïïàðàòà, ñîáëþäàéòå òåõíèêó áåçîïàñíîñòè. Èíñòðóêöèÿ ïî
ýêñïëóàòàöèè äîëæíà íàõîäèòüñÿ â äîñòóïíîì äëÿ ïîëüçîâàòåëÿ ìåñòå.
H A gép üzembe helyezése előtt figyelmesen olvassa el a kezelési utasítást és tartsa
be a biztonsági előírásokat. A kezelési utasításnak mindig elérhetőnek kell lennie.
TR Lütfen makineyi çalýþtýrmadan önce bu kullanma talimatlarýný dikkatli bir þekilde
okuyunuz ve belirtilen güvenlik önlemlerine uyunuz. Kullanma Talimatlarý
her zaman kullanýma hazýr olmalýdýr.
DK Før installation af maskinen bedes De venligst læse brugervejledningen
brugervejledningen og være opmærksom på sikkerhedsanvisningerne.
Brugervejledningen skal altid være tilgængelig.
CZ Prosím přečtěte si instrukce k obsluze a dodržujte bezpečnostní
upozornění. Návod k obsluze musí být vždy dostupný.
P Por favor leiam o manual de instruções antes de colocar a máquina em operação
e vejam as precauções de segurança. As instruções de operação deverão estar
sempre disponíveis.
GR ÐÁÑÁÊÁËÙ ÄÉÁÂÁÓÔÅ ÔÉÓ ÏÄÇÃÉÅÓ ×ÑÇÓÅÙÓ ÊÁÉ ÔÉÓ ÐÑÏÖÕËÁÎÅÉÓ
ÁÓÖÁËÅÉÁÓ ÐÑÉÍ ÂÁËÅÔÅ ÔÏ ÌÇ×ÁÍÇÌÁ ÓÅ ËÅÉÔÏÕÑÃÉÁ.
ÏÉ ÏÄÇÃÉÅÓ ×ÑÇÓÇÓ ÐÑÅÐÅÉ ÍÁ ÅÉÍÁÉ ÐÁÍÔÁ ÄÉÁÈÅÓÉÌÅÓ.
SLO Prosimo preberite navodila za uporabo ter upoštevajte varnostna opozorila
preden zaženete naparavo. Navodila naj bodo vedno pri roki.
SK Starostlivo si preštudujte tento návod na obsluhu pred uvedením stroja do
prevádzky a najmä bezpecnostné predpisy. Držte tento návod na obsluhu na
dostupnom mieste.
EST Palun lugege enne masina käivitamist käesolevat kasutusjuhendit ning järgige
ohutusnõudeid. Kasutusjuhend peab alati käepärast olema.
CHI
UAE
•
Sicherheitshinweise
•
Safety precautions
•
•
Consignes de sécurité
•
Veiligheidsvoorschriften
•
•
Misure di Sicurezza
•
Normas de Seguridad
•
•
Säkerhetsföreskrifter
•
Turvallisuusohjeita
•
Sikkerhetsforskriftene
•
•
Środki bezpieczeństwa
•
Ìåðû ïðåäîñòîðîæíîñòè
•

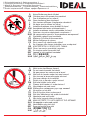
D Keine Bedienung durch Kinder!
GB Children must not operate the machine!
F Pas d‘utilisation par un enfant!
NL Geen bediening door kinderen!
I Non lasciare utilizzare il tagliacarte a bambini!
E No dejar que la utilicen los niños!
S Installera maskinen utom räckhåll för barn!
FIN Asentakaa laite lasten ulottumattomiin !
N Installer maskinen utenfor rekkevidde for barn!
PL Dzieciom nie wolno obsługiwać urządzenia !
RUS
Íå äîïóñêàéòå äåòåé ê ïîëüçîâàíèþ àïïàðàòîì!
H Gyerekek a gépet nem kezelhetik
TR Makinayý Çocuklar Kullanmamalýdýr.
DK Må kun betjenes af voksne
CZ Stroj nesmí být obsluhován dětmi!
P As crianças não devem trabalhar com a máquina!
GR ÁÐÁÃÏÑÅÕÅÔÁÉ Ç ×ÑÇÓÇ ÁÐÏ ÐÁÉÄÉÁ.
SLO Otroci ne smejo uporabljati naprave
SK So strojom nesmú pracovať deti!
EST Lapsed ei tohi masinat kasutada!
CHI
UAE
D Nicht unter das Messer fassen!
GB Do not reach beneath the blade!
F Ne pas passer les mains sous la lame!
NL Niet met de handen onder het mes komen!
I Non toccare la lama nella parte inferiore!
E ¡No tocar debajo de la cuchilla!
S Sträck inte in handen under kniven!
FIN Älä laita kättäsi terän alle !
N Plasser aldri hender ol. under kniven !
PL Nie wkladac rak pod noze!
RUS
Èçáåãàéòå ïîïàäàíèÿ ðóê ïîä ëåçâèå!
H Ne nyúljon a kés alá!
TR Elinizi býçaðýn altýna sokmayýnýz!
DK Stik ikke hænderne ind under knivbladet!
CZ Nesahejte pod ostří nože!
P Não tocar na parte inferior da faca!
GR ÌÇÍ ÁÃÃÉÆÅÔÅ ÔÏ ÊÁÔÙ ÌÅÑÏÓ ÔÇÓ ËÅÐÉÄÁÓ!
SLO Ne segajte z roko pod rezilo!
SK Nevkladajte ruky pod nôž!
EST Ärge pange kätt tera alla!
CHI
UAE
- 3-
•
Sicherheitshinweise
•
Safety precautions
•
•
Consignes de sécurité
•
Veiligheidsvoorschriften
•
•
Misure di Sicurezza
•
Normas de Seguridad
•
•
Säkerhetsföreskrifter
•
Turvallisuusohjeita
•
Sikkerhetsforskriftene
•
•
Środki bezpieczeństwa
•
Ìåðû ïðåäîñòîðîæíîñòè
•

- 4 -
IDEAL 1038 • IDEAL 1058 • IDEAL 1071 • IDEAL 1080 • IDEAL 1110
IDEAL 1038
IDEAL 1058
IDEAL 1071
•
Sicherheitshinweise
•
Safety precautions
•
•
Consignes de sécurité
•
Veiligheidsvoorschriften
•
•
Misure di Sicurezza
•
Normas de Seguridad
•
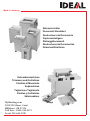
D Bei allen Maschinentypen darf der
Messerschutz
A
nicht abgenommen
werden und muß jederzeit funktionsfähig
sein.
GB For safe operation of all trimmers it is
important, that the knife guard
A
is not
removed and is always in good working
condition.
F Le dispositif de protection de la lame
A
ne doit pas être démonté, et doit toujours
être prêt à fonctionner.
NL Voor de veiligheid mag de
mesbeschermer
A
nooit worden
verwijderd.
I La protezione lama
A
non deve assolu-
tamente essere rimossa.
E Para un uso seguro de la cizalla, es
importante que el protector cuchilla
A
no
esté levantado.
S För säker användning av alla
skärmaskiner är det viktigt att knivskyddet
A
är korrekt monterat.
MyBinding.com
5500 NE Moore Court
Hillsboro, OR 97124
Toll Free: 1-800-944-4573
Local: 503-640-5920

- 5 -
IDEAL 1080
IDEAL 1110
D Bei allen Maschinentypen darf der
Messerschutz
A
nicht abgenommen
werden und muß jederzeit funktionsfähig
sein. Die Modelle IDEAL 1080, und
IDEAL 1110 sind mit einer
Messerverschlußvorrichtung ausgestatet.
Bei Bedarf kann der Messerhebel
D
mit
dem mitgelieferten Schloß gesichert
werden, um Mißbrauch zu verhindern.
GB For safe operation of all trimmers it is
important, that the knife guard
A
is not
removed and is always in good working
condition. The models IDEAL 1080 and
IDEAL 1110 can be locked with a knife
lever
D
to prevent unauthorised use (lock
is supplied).
F Le dispositif de protection de la lame
A
ne doit pas être démonté, et doit toujours
être prêt à fonctionner. Les modèles
IDEAL 1080 et 1110 sont équipés d’un
dispositif de verrouillage de lame
(cadenas fourni).
NL Voor de veiligheid mag de
mesbeschermer
A
nooit worden
verwijderd. De modellen 1080 en 1110
zijn voorzien van een oog en hangslot om
ongeoorloofd gebruik te voorkomen.
I La protezione lama
A
non deve assolu-
tamente essere rimossa. I modelli IDEAL
1080 e 1110 sono disponibili con un
lucchetto fornito di serie per il bloccaggio
della lama
D
che consente di prevenire
un uso improprio della taglierina.
E Para un uso seguro de la cizalla, es
importante que el protector cuchilla
A
no
esté levantado. Los modelos IDEAL 1080
y 1110 pueden ser bloqueados para
prevenir un uso desautorizado (se
suministra un candado).
S För säker användning av alla
skärmaskiner är det viktigt att skärskyddet
A
är korrekt monterat och inte avlägsnas.
Modellerna IDEAL 1080 och IDEAL 1110
är försedda med knivlås
D
.
•
Sicherheitshinweise
•
Safety precautions
•
•
Consignes de sécurité
•
Veiligheidsvoorschriften
•
•
Misure di Sicurezza
•
Normas de Seguridad
•
•
Säkerhetsföreskrifter
•

- 6 -
IDEAL 1038 • IDEAL 1058 • IDEAL 1071 • IDEAL 1080 • IDEAL 1110
Made in Germany
1038
Geprfte
Sicherheit
A4
10"x 8"
A5
8"x 5"
A6
IDEAL 1038
IDEAL 1058
IDEAL 1071
Made in Germany
1071
A4
10"x 8"
A5
8"x 5"
13x 8"
A6
B
A
A
•
Aufstellen
•
Installation
•
Montage
•
Installatie
•
•
Installazione
•
Instalación
•
Installation
•
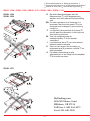
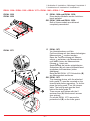
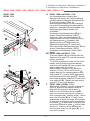
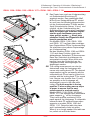
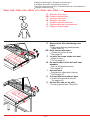
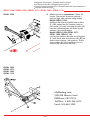
D IDEAL 1071
Vor Inbetriebnahme muß die
Preßvorrichtung mit dem daran befestigten
Messerschutz
A
montiert werden.
Dazu die Preßvorrichtung mit Messer-
schutz
A
aufsetzen, der Messerschutz
muß dabei hinter der Messerschutz-
führung
C
fixiert sein.
Anschließend die beiden mitgelieferten
Schrauben (A) mit einem Inbusschlüssel
eindrehen und festziehen (siehe
Abbildung).
Beim Modell IDEAL 1071 Schutzfolie (B)
am Messerschutz entfernen.
GB IDEAL 1071
The clamping device, with the attached
knife guard
A
,
must be mounted on the
trimmer table before operating. To do this
place the knife guard
A
on the trimmer
table. The knife guard must be fixed
behind the knife guide
C
.
Then secure and tighten with the 2
enclosed hex (A) head wrench screws
(see picture).
For model IDEAL 1071 remove the
protective foil (B) on the knife guard.
D IDEAL 1038 und IDEAL 1058:
Diese beiden Modelle werden funktions-
bereit geliefert.
GB IDEAL 1038 and IDEAL 1058:
Both of these models are delivered
completely assembled.

- 7 -
Made in Germany
1038
Geprfte
Sicherheit
A4
10"x 8"
A5
8"x 5"
A6
IDEAL 1038
IDEAL 1058
IDEAL 1071
Made in Germany
1071
A4
10"x 8"
A5
8"x 5"
13x 8"
A6
B
A
A
•
Aufstellen
•
Installation
•
Montage
•
Installatie
•
•
Installazione
•
Instalación
•
Installation
•
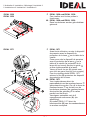
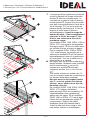
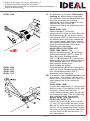
F IDEAL 1071
Avant toute utilisation, monter le dispositif
de pression avec le dispositif de
protection de la lame
A
sur la table de la
cisaille.
Poser pour cela le dispositif de pression
avec la protection de la lame
A
sur la
table de la cisaille (la protection de la
lame doit se trouver derrière le guide
C
et être réglée parallèle à la lame).
Visser et serrer les vis (A) jointes avec
une clé à six pans (fournie) (voir croquis)
Pour les cisailles modèl IDEAL 1071
enlever le film (B) protecteur du dispositif
de protection de la lame.
NL IDEAL 1071
Voor ingebruikname dient de
papieraandruk met de mesbeschermer
A
gemonteerd te worden. Om dit te doen de
mesbeschermer
A
op de tafel van de
bordschaar plaatsen (de mesbeschermer
dient achter de geleiding
C
te vallen
parallel met het mes).
Vervolgens vastzetten met de 2
meegeleverde schroeven (A) (zie
afbeelding).
Bij modell IDEAL 1071 dient de
beschermfolie (B) van de mesbeschermer
te worden verwijderd.
F IDEAL 1038 und IDEAL 1058:
Ces cisailles sont livrées prêtes à
fonctionner.
NL IDEAL 1038 and IDEAL 1058:
Deze bordscharen worden gebruiksklaar
geleverd.

- 8 -
IDEAL 1038 • IDEAL 1058 • IDEAL 1071 • IDEAL 1080 • IDEAL 1110
Made in Germany
1038
Geprfte
Sicherheit
A4
10"x 8"
A5
8"x 5"
A6
IDEAL 1038
IDEAL 1058
IDEAL 1071
Made in Germany
1071
A4
10"x 8"
A5
8"x 5"
13x 8"
A6
B
A
A
•
Aufstellen
•
Installation
•
Montage
•
Installatie
•
•
Installazione
•
Instalación
•
Installation
•
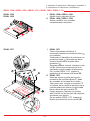
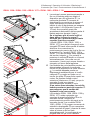
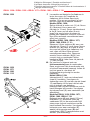
I IDEAL 1071
Prima di procedere all’utilizzo è
necessario montare la protezione lama
A
con pressino.
Posizionare il dispositivo di pressione con
protezione lama
A
(la protezione deve
trovarsi fissata dietro la guida della
protezione
C
.
Successivamente inserire e fissare le due
viti (A) fornite di serie servendosi di un
cacciavite a stella (vedere illustrazione).
Per i modell IDEAL 1071 togliete la
protezione di sicurezza sulla lama (B).
E IDEAL 1071
Antes de utilizar el pisón junto con la
protección de cuchilla adjunta
A
,
debe
ser montado en la mesa de la cizalla.
Para hacer esto, coloque el protector
A
en la base de la cizalla (el protector de la
cuchilla tendria de estar en la guia debe
fijarse detrás del guia cuchilla
C
.
Luego asegurar y apretar con la llave
allen interior los dos tornillos (A) adjuntos
de cabeza (ver dibujo).
En los modelo IDEAL 1071 extraiga la
lámina de protección de la cuchilla (B).
I IDEAL 1038 e IDEAL 1058:
Modelli forniti già pronti all’uso.
E IDEAL 1038 y IDEAL 1058:
Ambos modelos son enviados
completamente montados.

- 9 -
IDEAL 1071
Made in Germany
1071
A4
10"x 8"
A5
8"x 5"
13x 8"
A6
B
A
A
Made in Germany
1038
Geprfte
Sicherheit
A4
10"x 8"
A5
8"x 5"
A6
IDEAL 1038
IDEAL 1058
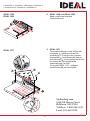
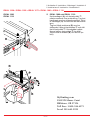
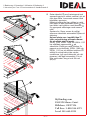
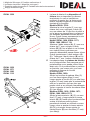
S IDEAL 1038 och IDEAL 1058:
Båda modellerna levereras
färdigmonterade.
S IDEAL 1071
Fixeringsanordningen med tillhörande
knivskydd
A
, måste monteras före
användning. För att göra det, placera
knivskyddet
A
på arbetsbordet bakom
justerskruven
C
skruva sedan fast de två
skruvarna (A) med medföljande
sexkantsnyckel (se bild).
För modell IDEAL 1071, avlägsna
skyddsfolien (B) på knivskyddet.
•
Aufstellen
•
Installation
•
Montage
•
Installatie
•
•
Installazione
•
Instalación
•
Installation
•
MyBinding.com
5500 NE Moore Court
Hillsboro, OR 97124
Toll Free: 1-800-944-4573
Local: 503-640-5920

- 10 -
IDEAL 1038 • IDEAL 1058 • IDEAL 1071 • IDEAL 1080 • IDEAL 1110
A
B
A
6
A
5
A4
A3
8
"x
5"
1
0
x
8"
1
3"x8"
B
B
IDEAL 1080
IDEAL 1110
•
Aufstellen
•
Installation
•
Montage
•
Installatie
•
•
Installazione
•
Instalación
•
Installation
•
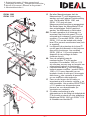
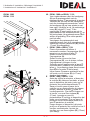
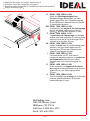
D IDEAL 1080 und IDEAL 1110:
Vor Inbetriebnahme müssen der
Handgriff (A)
sowie die Preßvorrichtung
mit dem daran befestigten Messerschutz
A
montiert werden. Dazu die
Befestigungsschraube für den Handgriff
mit einem Kreuzschlitzschraubendreher
entfernen. Handgriff (A) aufschieben und
Befestigungsschraube wieder fest
eindrehen.
Die beiden Sechskantmuttern (B) mit
einem Schraubenschlüssel (SW17)
entfernen, dann den Messerhebel
D
etwas anheben und die Preßvorrichtung
mit Messerschutz
A
aufsetzen (der
Messerschutz muß dabei hinter der
Messerschutzführung
C
fixiert sein).
Dann die beiden Sechskantmuttern (B) mit
einem Schraubenschlüssel (SW17)
eindrehen und festziehen (siehe Abbil-
dung).
GB IDEAL 1080 and IDEAL 1110:
The knife handle (A) and clamp with the
attached knife guard
A
must be mounted
before operating.
To do this remove the screw for the knife
handle with a philips-head screwdriver,
slide the knife handle (A) into position and
secure again with the screw.
Remove both hexagon nuts (B) with a
wrench (17 mm), lift the knife carrier
D
slightly and put the clamping device with
knife guard
A
in place. Knife guard must
be fixed behind the knife guide
C
. Secure
the clamping device and knife
A
with the 2
nuts supplied (B). Tighten the nuts with a
wrench (17 mm) (see picture).
F IDEAL 1080 et IDEAL 1110:
Avant toute utilisation, monter la poignée
(A) et le dispositif de pression avec le
dispositif de protection de la lame
A
.
Retirer la vis de fixation de la poignée
avec un tournevis cruciforme, monter et
fixer la poignée (A). Veuillez retirer I’écrou
avec une clé plate (B) (ø 17 mm). Lever
légèrement le levier de coupe
D
et monter
le dispositif de pression avec la protection
de la lame
A
(la protection de la lame doit
se trouver derrière le guide
C
et être fixée
à celui-ci). Visser et serrer ensuite les
écrous joints avec une clé plate (B) (ø 17
mm) (voir croquis).

- 11 -
IDEAL 1080
IDEAL 1110
A
B
A
6
A
5
A
4
A
3
8
"x
5"
1
0
x
8"
1
3"x8"
B
B
NL IDEAL 1080 en IDEAL 1110:
Voor ingebruikname dient de handgreep
(A) en de papieraandruk met de
mesbeschermer
A
gemonteerd te worden.
Verwijder de schroef van de handgreep
met een kruiskopschroevendraier, schuif
de handgreep (A) op haar plaats en zet
haar vast. Verwijder a.u.b. de zeshoekige
moer (B) (sleutel 17 mm). Til de
meshouder
D
een beetje op en zet de
papieraandruk met mesbeschermer
A
op
de juiste plaats (de mesbeschermer dient
achter de geleiding
C
te vallen parallel
met het mes).
Vervolgens de papieraandruk met
mesbeschermer met de 2 meegeleverde
zeskantige moeren vastzetten (B) (sleutel
17 mm) (zie afbeelding).
I IDEAL 1080 e IDEAL 1110:
Prima di procedere all’utilizzo è
necessario montare I’impugnatura (A) e il
pressino con protezione lama
A
.
Svitare la vite a croce che fissa
I’impugnatura (A).
Svitare la vite a croce che fissa
I’impugnatura (B), con la chiave, infilare
I’impugnatura e stringere la vite.
Sollevare quindi leggermente la lama
D
e posizionare il pressino con protezione
lama
A
(la protezione lama deve trovarsi
fissa dietro la guida
C
della lama).
Infine fissare il pressino avvitando le due
viti fornite con la chiave (B) (ø17 mm)
(vedere ilustrazione).
E IDEAL 1080 y IDEAL 1110:
Antes de utilizar la máquina, el brazo de
la cuchilla (A) debe ser montado, al igual
que el dispositivo del pisón junto con el
protector de cuchilla suministrado
A
.
Sacar el tornillo para el brazo de la
cuchilla con un destornillador de cabeza
philips y deslizar el brazo
D
hasta su
correcta posición. Fijar bien el brazo con
el tornillo. con una Ilave inglesa (B)
(17mm). Levantar un poco el
portacuchillas
D
colocar el dispositivo del
pisón con el protector
A
en su lugar (el
protector de la cuchilla debe estar en la
guia
C
paralela a la cuchilla).
Luego asugure el dispositivo del pisón
junto con el protector de cuchilla con los 2
tornillos suministrados. Apriete los
tornillos con una Ilave inglesa (B) (17mm)
(ver dibujo).
•
Aufstellen
•
Installation
•
Montage
•
Installatie
•
•
Installazione
•
Instalación
•
Installation
•

- 12 -
IDEAL 1038 • IDEAL 1058 • IDEAL 1071 • IDEAL 1080 • IDEAL 1110
IDEAL 1080
IDEAL 1110
A
B
A
6
A
5
A4
A3
8
"x
5"
1
0
x
8"
1
3"x8"
B
B
S IDEAL 1080 och IDEAL 1110:
Knivhandtaget (A) och knivskyddet
A
måste monteras före användning. Tag bort
handtaget med en stjärnskruvmejsel. Skjut
in handtaget (A) och skruva fast skruvarna
igen.
Tag bort båda muttrarna (B) med en
skiftnyckel, lätta på knivbalken
D
och sätt
fast knivskyddet
A
. Knivskyddet måste
fixeras bakom knivguiden
C
(se bild).
Skruva fast muttrarna (B) och dra åt. (se
bild)
•
Aufstellen
•
Installation
•
Montage
•
Installatie
•
•
Installazione
•
Instalación
•
Installation
•
MyBinding.com
5500 NE Moore Court
Hillsboro, OR 97124
Toll Free: 1-800-944-4573
Local: 503-640-5920

- 13 -
10"x 8"
A5
8"x 5"
A6
Made in Germany
1071
A4
10"x 8"
A5
8"x 5"
13x 8"
A6
IDEAL 1038
IDEAL 1058
IDEAL 1071
•
Bedienung
•
Operation
•
Utilisation
•
Bediening
•
•
Istruzioni per l´uso
•
Funcionamiento
•
Handhavande
•
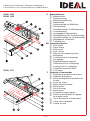
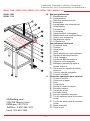
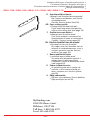
D Bedienelemente
A
- Messerschutz
B
- Papierpressung
C
- Messerschutzführung
D
- Messerhebel
E
- Seitenanschlag mit Maßskala
F
- Rückanschlag
G
- Feststellschraube für Rückanschlag
H
- Vorderanschlag
I
- Ausklappbare Papierstützen
J
- Skalendrehknopf für Vorderanschlag
K
- Feststellschraube für Vorderanschlag
L
- Abklappbarer Seitentisch
M
- Fußpressung
GB Operating elements
A
- Knife guard
B
- Paper clamp
C
- Knife guide
D
- Knife carrier
E
- Side lay with measuring scale
F
- Backgauge
G
- Locking screw for backgauge
H
- Frontgauge
I
- Extendable paper supports
J
- Calibrated knob for frontgauge
K
- Locking knob for frontgauge
L
- Collapsible extension table
M
- Foot clamp
F Eléments et commandes
A
- Dispositif de protection de la lame
B
- Dispositif de pression
C
- Guide du dispositif de protection de
la lame
D
- Levier de coupe
E
- Butée latérale graduée
F
- Butée arrière
G
- Vis de blocage
H
- Butée avant
I
- Languettes support papier
J
- Bouton moleté gradué de réglage
de la butée avant
K
- Vis de blocage de la butée avant
L
- Table avant rabattable
M
- Presse au pied

- 14 -
IDEAL 1038 • IDEAL 1058 • IDEAL 1071 • IDEAL 1080 • IDEAL 1110
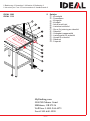
IDEAL 1080
IDEAL 1110
A
6
A
5
A4
A3
8
"x
5"
1
0
x8"
1
3"x8"
•
Bedienung
•
Operation
•
Utilisation
•
Bediening
•
•
Istruzioni per l´uso
•
Funcionamiento
•
Handhavande
•
NL Bedieningselementen
A
- Mesbeschermer
B
- Papieraandruk
C
- Geleiding mesbeschermer
D
- Meshouder
E
- Aanleglineaal met maatindeling
F
- Achteraanleg
G
- Fixeerschroef
H
- Vooraanleg
I
- Papiersteuntjes (uitklapbaar)
J
- Meettrommel met schaalverdeling
K
- Fixatie voor vooraanleg
L
- Wegklapbare zijtafel
M
- Fußpressung
I Denominazione delle parti
A
- Protezione lama
B
- Pressino
C
- Guida lama
D
- Lama
E
- Guida laterale con scala graduata
F
- Squadra di battuta posteriore
G
- Vite di fissaggio
H
- Squadra di battuta anteriore
I
- Supporto carta ripiegabile
J
- Manopola graduata squadra di
battuta anteriore
K
- Vite di arresto squadra di battuta
anteriore
L
- Tavolino laterale ripiegabile
M
- Pressino a pedale
E Elementos operativos de la máquina:
A
- Protector cuchilla
B
- Pisón para el papel
C
- Guía
D
- Portacuchilla
E
- Escala de medición lateral
F
- Escuadra trasera
G
- Tornillo de ajuste
H
- Escuadra frontal
I
- Soporte extensible del papel
J
- Tornillo calibrado para la escuadra
frontal
K
- Tornillo de ajuste para la escuadra
frontal
L
- Mesa extensible
M
- Pisón de pié
MyBinding.com
5500 NE Moore Court
Hillsboro, OR 97124
Toll Free: 1-800-944-4573
Local: 503-640-5920

- 15 -
IDEAL 1080
IDEAL 1110
A
6
A
5
A4
A3
8
"x
5"
1
0
x8"
1
3"x8"
•
Bedienung
•
Operation
•
Utilisation
•
Bediening
•
•
Istruzioni per l´uso
•
Funcionamiento
•
Handhavande
•
S Detaljer
A
- Knivskydd
B
- Pressskena
C
- Knivguide
D
- Knivbalk
E
- Anhåll med linjal
F
- Justerbart sidostöd
G
- Skruv för justering av sidostöd
H
- Sidostöd
I
- Utdragbart pappersstöd
J
- Justeringsratt för sidostöd
K
- Låsratt för sidostöd
L
- Sidobord
M
- Fotpedal
MyBinding.com
5500 NE Moore Court
Hillsboro, OR 97124
Toll Free: 1-800-944-4573
Local: 503-640-5920

- 16 -
IDEAL 1038 • IDEAL 1058 • IDEAL 1071 • IDEAL 1080 • IDEAL 1110
A
6
A
5
A4
A3
8
"x
5"
10
x8"
1
3"x8"
G
e
p
r
f
te
Sicherheit
1080
Made in Germany
1071
A4
10"x 8"
A5
8"x 5"
13x 8"
A6
IDEAL 1080
IDEAL 1110
IDEAL 1038
IDEAL 1058
IDEAL 1071
•
Bedienung
•
Operation
•
Utilisation
•
Bediening
•
•
Istruzioni per l´uso
•
Funcionamiento
•
Handhavande
•
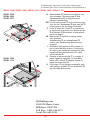
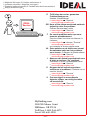
D Messerhebel
D
anheben und Papier von
links einlegen. Rückanschlag
F
und
Seitenanschlag
E
ermöglichen eine
präzise Papieranlage.
GB Lift the knife carrier
D
and insert the paper
from the left. Backgauge
F
and side lay
E
allow paper to be precisely positioned.
F Lever le levier de coupe
D
et positionner
le papier par la gauche. Les butées arrière
F
et latérale
E
permettent un placement
précis du papier.
NL Meshouder
D
optillen en papier vanaf
links plaatsen.
Achteraanleg
F
en aanleglineaal
E
maken een nauwkeurige positionering
mogelijk.
I Sollevare límpugniatura
D
e metere la
pila di carta dal lato sinistro. Posizionare
la carta come desiderato servendosi della
squadra di battuta posteriore
F
e della
guida laterale
E
.
E Levante el porta-cuchilla
D
y coloque el
papel desde la izquierda. La escuadra
trasera
F
y lateral
E
permite colocar el
papel de forma precisa.
S Lyft kniven
D
och placera materialet som
skall skäras. Anhållet
E
och sidostödet
F
ger ett exakt skärresultat.
MyBinding.com
5500 NE Moore Court
Hillsboro, OR 97124
Toll Free: 1-800-944-4573
Local: 503-640-5920

- 17 -
IDEAL 1080
IDEAL 1110
A
6
A
5
A4
A3
8
"x
5"
10
x
8"
1
3"x8"
G
e
p
r
f
te
Sicherheit
1080
1.
2.
1.
2.
IDEAL 1038
IDEAL 1058
IDEAL 1071
•
Bedienung
•
Operation
•
Utilisation
•
Bediening
•
•
Istruzioni per l´uso
•
Funcionamiento
•
Handhavande
•
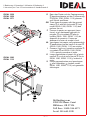
D Dann das Papier mit der Papierpressung
B
beziehungsweise mit der Fußpressung
M
(IDEAL 1080, IDEAL 1110) pressen
und Schnitt ausführen.
GB Then clamp the paper with the manual
clamp
B
or with the foot pedal
M
(only
model IDEAL 1080, IDEAL 1110) and
perform the cut.
F Pressez le papier en appuyant (sans
forcer) et en maintenant appuyée la
poignée
B
ou la pédale
M
(pour le
modèle IDEAL 1080, IDEAL 1110) du
dispositif de pression. Couper en
abaissant le levier de coupe à fond.
NL Vervolgens het papier met papieraandruk
B
aandrukken met de hand of de voet
M
(IDEAL 1080, IDEAL 1110) en snijden.
I
Fermare i fogli con il pressino manuale
B
o a pedale
M
nel IDEAL 1080, IDEAL
1110 e quindi procedere al taglio.
E Luego pisar/sujetar el papel con el pisón
manual
B
o con el pisón de pié
M
(en la
IDEAL 1080, IDEAL 1110) y realizar el
corte.
S Fixera pappersbunten med presskenan
B
eller fotpedalen
M
(endast modell
IDEAL 1080, IDEAL 1110) och genomför
skärningen.
MyBinding.com
5500 NE Moore Court
Hillsboro, OR 97124
Toll Free: 1-800-944-4573
Local: 503-640-5920

- 18 -
IDEAL 1038 • IDEAL 1058 • IDEAL 1071 • IDEAL 1080 • IDEAL 1110
A4
10"x 8"
A5
8"x 5"
13x 8"
A6
0x
8"
A5
8"x 5"
A6
A
6
A
5
A4
8
"x
5"
1
0
x8"
1
3"x8"
D Das Papier kann auch am Vorderanschlag
mit Schmalschnitt-Einrichtung
H
angelegt werden. Das gewünschte Maß
läßt sich am Skalendrehknopf
J
einstel-
len und kann bei Wiederholungsschnitten
mit der Arretierschraube
K
fixiert werden.
Auch Schmalschnitte (kleiner 10 mm) sind
möglich, da der Vorderanschlag bei
Schnittausführung automatisch wegklappt.
Beim Schneiden von schmalen Papier-
streifen muß das Messer ganz nach
oben geführt werden
D
, damit beim
nächsten Schnitt das eingestellte Maß
korrekt geschnitten wird.
Die Modelle IDEAL 1038, IDEAL 1058,
und IDEAL 1071 verfügen über ausklapp-
bare Papierstützen
I
am Vorderanschlag.
Sie erleichtern eine präzise Papieranlage
am Vorderanschlag.
Bei den Modellen IDEAL 1080 und IDEAL
1110 wird diese Funktion durch den
abklappbaren Seitentisch
L
übernommen.
Dazu den Seitentisch hochklappen der
automatisch einrastet. Wenn nicht mehr
benötigt, kann der Seitentisch an der
Längsseite etwas herausgezogen und
abgeklappt werden.
GB The cutting measurement can also be
determined using the frontgauge with
narrow strip cutting device
H.
The desired
measurement can be set exactly with the
calibrated knob
J
and can be locked into
position with the locking knob
K
for repeat
cuts. Narrow cuts (smaller than 10 mm)
are possible as the frontgauge will
automatically move to the side while
cutting. The knife must be in the top
position
D
when cutting narrow strips
of paper to ensure that the next
measurement is reached exactly.
Models IDEAL 1038, IDEAL 1058 and
IDEAL 1071 are equipped with extendable
paper supports
I
on the frontgauge.
They insure precise positioning of the
paper against the frontgauge. A collapsible
extension table
L
replaces these paper
supports on
models IDEAL 1080 and
IDEAL 1110. Raise the table into place
and it automatically clicks into place.
When it is no longer needed, the table can
be pulled out and folded down.
•
Bedienung
•
Operation
•
Utilisation
•
Bediening
•
•
Istruzioni per l´uso
•
Funcionamiento
•
Handhavande
•

- 19 -
A4
10"x 8"
A5
8"x 5"
13x 8"
A6
0x
8"
A5
8"x 5"
A6
A
6
A
5
A4
8
"x
5"
1
0
x8"
1
3"x8"
F Le papier peut être également positionné
contre le dispositif de coupe de bandes
étroites
H
situé sur la butée avant. La
cote désirée se règle à I’aide du bouton
moleté gradué
J
, et peut être verrouillée
pour des coupes répétitives à I’aide de la
vis de blocage
K
. Lors de la coupe de
bandes étroites (inférieures à 10 mm de
largeur) la butée avant s’effacera
automatiquement. Avant la coupe de
bandes étroites, il faut complètement
remonter le levier de coupe
D
afin
d’avoir une cote exacte lors de la
prochaine coupe.
Les modèles IDEAL 1038, IDEAL 1058 et
IDEAL 1071 sont équipés de languettes
de support papier
I
sous la butée avant,
qui facilitent la mise en place du papier.
Pour le modèles IDEAL 1080 et IDEAL
1110, cette fonction est remplie par la
table avant rabattable
L
qui s’enclenche
automatiquement lorsqu’on la positionne
à I’horizontale. Tirer sur la table pour la
déverrouiller et la rabattre.
NL Het papier kan ook aan de vooraanleg
H
gelegd worden. Gewenste maat instellen
met de meettrommel
J
en kan bij
snedes met dezelfde afmetingen
vastgezet worden d.m.v. een schroef
(
K
).
Ook smalle stroken van minder dan 10
mm zijn mogelijk omdat de vooraanleg bij
het snijden automatisch wegklapt.
Het mes moet in de hoogste positie
zijn
D
, voor het snijden van dunne
stroken, om er zeker van te zijn dat
de maten juist zijn.
De modellen IDEAL 1038, IDEAL 1058 en
IDEAL 1071 hebben uitklapbare
papiersteuntjes
I
bij de vooraanleg. Zij
vergemakkelijken een nauwkeurige
aanleg van het papier. Bij de modellen
IDEAL 1080 en IDEAL 1110 wordt deze
funktie door de wegklapbare zijtafel
L
overgenomen. Gewoon de zijtafel
opklappen (deze blijft vanzelf staan).
Indien de tafel niet meer nodig is: iets
naar buiten trekken en neerklappen.
•
Bedienung
•
Operation
•
Utilisation
•
Bediening
•
•
Istruzioni per l´uso
•
Funcionamiento
•
Handhavande
•
Sidan laddas...
Sidan laddas...
Sidan laddas...
Sidan laddas...
Sidan laddas...
Sidan laddas...
Sidan laddas...
Sidan laddas...
Sidan laddas...
Sidan laddas...
Sidan laddas...
Sidan laddas...
Sidan laddas...
Sidan laddas...
Sidan laddas...
Sidan laddas...
Sidan laddas...
-
 1
1
-
 2
2
-
 3
3
-
 4
4
-
 5
5
-
 6
6
-
 7
7
-
 8
8
-
 9
9
-
 10
10
-
 11
11
-
 12
12
-
 13
13
-
 14
14
-
 15
15
-
 16
16
-
 17
17
-
 18
18
-
 19
19
-
 20
20
-
 21
21
-
 22
22
-
 23
23
-
 24
24
-
 25
25
-
 26
26
-
 27
27
-
 28
28
-
 29
29
-
 30
30
-
 31
31
-
 32
32
-
 33
33
-
 34
34
-
 35
35
-
 36
36
-
 37
37


MyBinding Kutrimmer 1038 Paper Cutter Användarmanual
- Kategori
- Leksaker
- Typ
- Användarmanual
på andra språk
- italiano: MyBinding Kutrimmer 1038 Paper Cutter Manuale utente
- español: MyBinding Kutrimmer 1038 Paper Cutter Manual de usuario
- Deutsch: MyBinding Kutrimmer 1038 Paper Cutter Benutzerhandbuch
- français: MyBinding Kutrimmer 1038 Paper Cutter Manuel utilisateur
- English: MyBinding Kutrimmer 1038 Paper Cutter User manual
- Nederlands: MyBinding Kutrimmer 1038 Paper Cutter Handleiding