
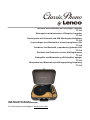
Turntable with Bluetooth and USB player/ recorder
TT-116
Platenspeler met bluetooth en USB-speler/-recorder
TT-116
Plattenspieler mit Bluetooth und USB-Wiedergabe/Aufnahme
TT-116
Tourne-disque avec Bluetooth et lecteur/enregistreur USB
TT-116
Tocadiscos con Bluetooth y reproductor/grabador USB
TT-116
Giradischi con Bluetooth e lettore USB/registratore
TT-116
Pladespiller med Bluetooth og USB-afspiller/-optager
TT-116
Skivspelare med Bluetooth och USB-uppspelning/inspelning
TT-116
INSTRUCTION MANUAL
For information and support, www.lenco.com

2
Index :
English .................................................................................................................................................... 3
Nederlands .......................................................................................................................................... 14
Deutsch ................................................................................................................................................ 25
Français ................................................................................................................................................ 37
Español ................................................................................................................................................ 48
Italiano ................................................................................................................................................. 59
Dansk/Norsk ........................................................................................................................................ 70
Svenska ................................................................................................................................................ 81
Version : 1.0

3
English
CAUTION:
Usage of controls or adjustments or performance of procedures other than those specified herein may result
in hazardous radiation exposure.
PRECAUTIONS BEFORE USE
KEEP THESE INSTRUCTIONS IN MIND:
1. Do not cover or block any ventilation openings. When placing the device on a shelf, leave 5 cm (2”) free
space around the whole device.
2. Install in accordance with the supplied user manual.
3. Keep the device away from heat sources such as radiators, heaters, stoves, candles and other heat-
generating products or naked flame. The device can only be used in moderate climates. Extremely cold or
warm environments should be avoided. Working temperature between 0° and 35°C.
4. Avoid using the device near strong magnetic fields.
5. Electrostatic discharge can disturb normal usage of this device. If so, simply reset and restart the device
following the instruction manual. During file transmission, please handle with care and operate in a
static-free environment.
6. Warning! Never insert an object into the product through the vents or openings. High voltage flows
through the product and inserting an object can cause electric shock and/or short circuit internal parts.
For the same reason, do not spill water or liquid on the product.
7. Do not use in wet or moist areas such as bathrooms, steamy kitchens or near swimming pools.
8. The device shall not be exposed to dripping or splashing and make sure that no objects filled with liquids,
such as vases, are placed on or near the apparatus.
9. Do not use this device when condensation may occur. When the unit is used in a warm wet room with
damp, water droplets or condensation may occur inside the unit and the unit may not function properly;
let the unit stand in power OFF for 1 or 2 hours before turning on the power: the unit should be dry
before getting any power.
10. Although this device is manufactured with the utmost care and checked several times before leaving the
factory, it is still possible that problems may occur, as with all electrical appliances. If you notice smoke,
an excessive build-up of heat or any other unexpected phenomena, you should disconnect the plug from
the main power socket immediately.
11. This device must operate on a power source as specified on the specification label. If you are not sure of
the type of power supply used in your home, consult your dealer or local power company.
12. Keep away from animals. Some animals enjoy biting on power cords.
13. To clean the device, use a soft dry cloth. Do not use solvents or petrol based fluids. To remove severe
stains, you may use a damp cloth with dilute detergent.
14. The supplier is not responsible for damage or lost data caused by malfunction, misuse, modification of
the device or battery replacement.
15. Do not interrupt the connection when the device is formatting or transferring files. Otherwise, data may
be corrupted or lost.
16. If the unit has USB playback function, the USB memory stick should be plugged into the unit directly.
Don’t use an USB extension cable because it can cause interference resulting in failing of data.
17. The rating label has been marked on the bottom or back panel of the device.
18. This device is not intended for use by people (including children) with physical, sensory or mental
disabilities, or a lack of experience and knowledge, unless they’re under supervision or have received
instructions about the correct use of the device by the person who is responsible for their safety.
19. This product is intended for non professional use only and not for commercial or industrial use.
20. Make sure the unit is adjusted to a stable position. Damage caused by using this product in an unstable
position vibrations or shocks or by failure to follow any other warning or precaution contained within
this user manual will not be covered by warranty.
21. Never remove the casing of this device.
22. Never place this device on other electrical equipment.
23. Do not allow children access to plastic bags.
24. Only use attachments/accessories specified by the manufacturer.

4
25. Refer all servicing to qualified service personnel. Servicing is required when the device has been
damaged in any way, such as the power supply cord or the plug, when liquid has been spilled or objects
have fallen into the device, when the device has been exposed to rain or moisture, does not operate
normally, or has been dropped.
26. Long exposure to loud sounds from personal music players may lead to temporary or permanent hearing
loss.
27. If the product is delivered with power cable or AC power adaptor:
⚫ If any trouble occur, disconnect the AC power cord and refer servicing to qualified personnel.
⚫ Don’t step on or pinch the power adaptor. Be very careful, particularly near the plugs and the
cable’s exit point. Do not place heavy items on the power adaptor, which may damage it. Keep the
entire device out of children’s reach! When playing with the power cable, they can seriously injure
themselves.
⚫ Unplug this device during lightning storms or when unused for a long period.
⚫ The socket outlet must be installed near the equipment and must be easily accessible.
⚫ Do not overload ac outlets or extension cords. Overloading can cause fire or electric shock.
⚫ Devices with class 1 construction should be connected to a main socket outlet with a protective
earthed connection.
⚫ Devices with class 2 construction do not require a earthed connection.
⚫ Always hold the plug when pulling it out of the main supply socket. Do not pull the power cord. This
can cause a short circuit.
⚫ Do not use a damaged power cord or plug or a loose outlet. Doing so may result in fire or electric
shock.
28. If the product contains or is delivered with a remote control containing coin/cell batteries:
Warning:
⚫ “Do not ingest battery, Chemical Burn Hazard” or equivalent working.
⚫ [The remote control supplied with] This product contains a coin/button cell battery. If the battery is
swallowed, it can cause severe internal burns in just 2 hours and can lead to death.
⚫ Keep new and used batteries away from children.
⚫ If the battery compartment does not close securely, stop using the product and keep it away from
children.
⚫ If you think batteries might have been swallowed or placed inside any part of the body, seek
immediate medical attention.
29. Caution about the use of Batteries:
⚫ Danger of explosion if battery is incorrectly replaced. Replace only with the same or equivalent
type.
⚫ Battery cannot be subjected to high or low extreme temperatures, low air pressure at high altitude
during use, storage or transportation.
⚫ Replacement of a battery with an incorrect type that can result in an explosion or the leakage of
flammable liquid or gas.
⚫ Disposal of a battery into fire or a hot oven, or mechanically crushing or cutting of a battery, that
can result in an explosion.
⚫ Leaving a battery in an extremely high temperature surrounding environment that can result in an
explosion or that leakage of flammable liquid or gas.
⚫ A battery subjected to extremely low air pressure that may result in an explosion or the leakage of
flammable liquid or gas.
⚫ Attention should be drawn to the environmental aspects of battery disposal.
INSTALLATION
• Unpack all parts and remove protective material.
• Do not connect the unit to the mains before checking the mains voltage and before all other connections
have been made.

5
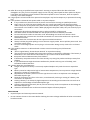
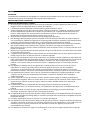
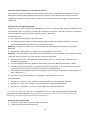
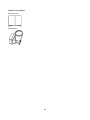
Accessories included:
User manual
Power adaptor

6
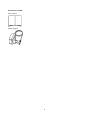
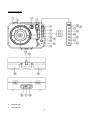
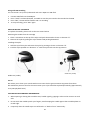
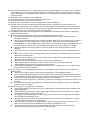
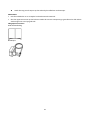
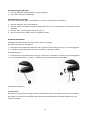
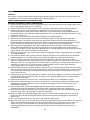
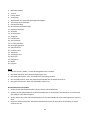
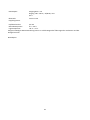
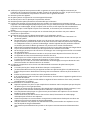
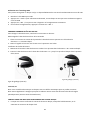
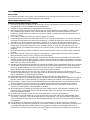
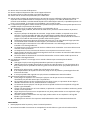
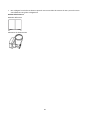
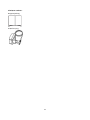
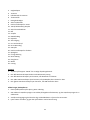
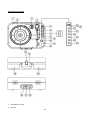
Location of Controls
1. Turntable deck
2. Turntable shaft

7
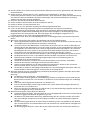
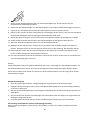
3. Center hole adaptor
4. Tone arm
5. Cueing lever
6. Tone arm clip
7. Turntable speed selector
8. Auto stop control switch
9. LED status indicator
10. Power switch/Volume control
11. Headphone jack
12. Stylus
13. Lock catch
14. Carrying handle
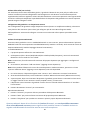
15. Speaker
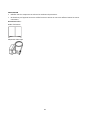
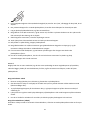
16. Aux in jack
17. Line out channel R/L
18. DC in jack
19. USB slot
20. Function LED
21. Recording
22. Previous track
23. Next track
24. Play/pause
25. Mode
26. Pair
Mode
1. Short press “Mode” to select the playing mode.
2. Blue LED will be flashed when Bluetooth is pairing.
3. Blue LED will be illuminated when Bluetooth is connected
4. Red LED will be illuminated when it is turntable mode/Aux in mode.
5. Green LED will be illuminated when it is USB mode.
Using the turntable
1. Place the turntable case on a flat level surface.
2. Insert the adaptor cord into the Dc jack at the rear of the case and plug the adaptor into the mains supply
socket.
3. On first use, ensure that the cable tie is removed from the player arm.
4. Remove the stylus cover and keep in a safe place for future use

8
5. Move the speed selector to the speed (33,45 or 78rpm) corresponding to the record to the played
6. Turn the Volume knob to turn the turntable on and the mode indicator will illuminate red
7. Place a record onto the turntable spindle and unclip the tone arm
8. Use the cuing lever to lift the tone arm and move the arm so that the stylus is positioned just inside the
edge of the record or aligned with the start of the track to be played.
9. Slowly lower the arm and after a short interval the record will start to play
10. Adjust the volume to the desired level by rotating the volume control knob
11. When the end of the record has been reached the turntable will stop
12. Use the lever again to lift the tone arm (the deck will start to rotate again), move it back to the clip and
lower into the cradle. The deck will stop
13. Secure the tine arm using the clip and refit the stylus cover after use and always before moving the
turntable
14. To turn off the turntable at any time, lift the tone arm on the record and turn the volume knob fully
anticlockwise.
Note
Some records have larger center hole and it may be necessary to fit the center hole adaptor to the turntable
shaft before placing the record on the turntable. Always refit the stylus cover and secure the turntable arm
using the clip before moving the turntable.
Using with auxiliary device
1. Auxiliary analogue audio equipment can be connected and amplified via the turntable.
2. Connect the auxiliary equipment using a 3.5mm jack cable (cable not included) into the Aux in jack.
3. Press the play button on the auxiliary equipment and use the track controls as usual on the auxiliary
device.
4. The volume can be adjusted using the volume knob on the turntable or the controls on the connected
auxiliary device.
5. To turn off the unit at the anytime turn the volume knob fully anticlockwise.
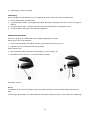
Using headphones (not included)
A stereo headphone jack has been provided so that the turntable can be used without disturbing others.
Plug in the headphones at the point marked headphone near the volume knob and adjust the listening volume
to your chosen level. Excessive sound pressure from earphones and headphones can cause hearing loss. The
turntable speakers will not operate when earphones are fitted.

9
Connecting the turntable to external speaker
In connecting the turntable to external speakers (via a suitable amplifier), use a twin phono to twin phono
lead (not included) to connect the RCA output jacks to the Audio in of the amplifier. Ensure red plugs are
inserted into the red sockets and white into white.
Using with Bluetooth device
Check that your turntable is in Bluetooth mode. If you are not already in Bluetooth mode, short press the
Mode button until you are in Bluetooth mode (Blue LED will be illuminated). It will begin to search for
Bluetooth devices (Blue LED flashed during pairing).
In Bluetooth Mode:
1. Your device will search for Bluetooth.
2. On the device (e.g. iPhone/iPad/Android/other phone/Tablet/Computer), turn on Bluetooth connectivity
and ensure that it is ‘discoverable’.
Note: If necessary, refer to the instructions for your device to add or set up Bluetooth.
3. Select to ‘Add new device’, if necessary.
Note: Some products will automatically search for a new device and so the ‘Add new device’ option is not
available.
4. When found, your device will be displayed as 'Lenco TT-116'. Select and begin pairing.
5. When pairing is complete 'Bluetooth Connected' will be displayed.
6. Now that you have paired your device with the turntable, it will connect to it when it is within range,
which is about 10 meter or less (33 feet or less), line of sight.
7. Your device will remain paired with the turntable unless you decide to disconnect or 'unpair' it.
8. You can short press “Pair" to reconnect.
Playing Bluetooth
1. Press “Previous” for previous track of your Bluetooth device.
2. Press “Next” for next track of your Bluetooth device.
3. Press “Play/pause” for play or pause of your Bluetooth device.
“This product has a bluetooth reception function, you can not transmit any bluetooth sound with it:
this means that you can receive wirelessly a bluetooth sound signal from an external source like a
smartphone.”
Using with USB playback
1. Connect USB flash or MP3 player into the USB port.
2. It will play automatically

10
Using with USB encoding
You can record a vinyl record, Bluetooth and Aux in Mp3 to a USB flash.
1. Connect USB flash into the USB port.
2. Press “mode” to select Bluetooth, turntable or Aux that you intend to be recorded to the USB.
3. Press “REC”, the LED will be flashed. And it is recording.
4. To stop recording, press “REC” again.
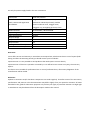
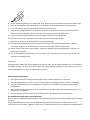
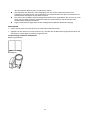
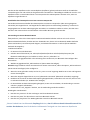
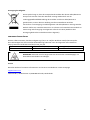
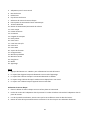
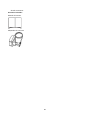
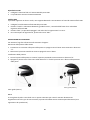
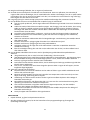
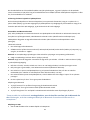
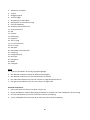
HOW TO REPLACE THE NEEDLE
To replace the needle, please refer to the instructions below.
Removing the needle from the cartridge
1. Place a screwdriver at the tip of the stylus and push downward as shown in direction “A”.
2. Remove the stylus by pulling the stylus forward and pushing downward.
Installing the Stylus
1. Hold the tip of the stylus and insert the stylus by pressing as shown in direction “B”.
2. Push the stylus upward as in direction “C” until the stylus locks into the tip position.
Guide Pins (inside)
Guide Pins (inside)
NOTES
We advise you to clean your records with an anti-static cloth to gain maximum enjoyment from them.
We would also point out that for the same reason your stylus should be replaced periodically (approximately
every 250 playback hours)
TIPS FOR BETTER TURNTABLE PERFORMANCE
1. When opening or closing the turntable cover, handle it gently, gripping it either at the centre or at each
side.
2. Do not touch the needle tip with your fingers; avoid bumping the needle against the turntable platter or
record edge.
3. Frequently clean the needle tip-use a soft brush in a “back-to-front” motion only.

11
4. If you must use a needle cleaning fluid, use very sparingly.
5. Gently wipe the turntable player housing with a soft cloth. Use only a small amount of mild detergent to
clean the turntable player.
6. Never apply harsh chemicals or solvents to any part of the turntable system.
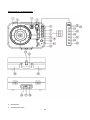
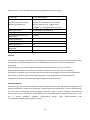
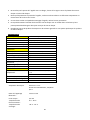
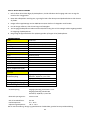
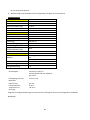
SPECIFICATIONS
Type
Belt drive
drive motor
DC motor
speed
33 1/3 rpm, 45 rpm, 78 rpm
wow and flutter
<0.35%
turntable platter
200mm
cartridge
Type
ceramic cartridge
Stylus
0.7 mil
optimum tracking force
6 gram
output
300-500mv
frequency response
,+/-20dB
crosstalk
10db
signal to noise ration (S/N)
18db
General
Adaptor
Input AC 100-240V, 50/60Hz, 0.3A max.
Output DC5V 1A
product
DC5V 1A
audio output (line out)
300-500mv
power consumption
5W
Power adaptor.
Output DC 5V 1A
Input AC 100-240V, 50/60Hz, 0.3A max.
Bluetooth Pairing name:
Lenco TT-116
Headphone socket:
3.5mm
Operating Temperature:
0°C‐40°C
Storage Temperature:
-20°C‐70°C
Due to continuing improvement, the features and the design are subject to change without notice
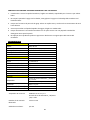
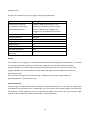
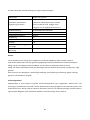
Power supply adaptor

12
Use only the power supply listed in the user instructions
Information
Value and precision
Manufacturers name or trade
mark, commercial registration
and address
DongGuan Obelieve Electronic Co., Ltd
Huazhaoxin Industrial park B-4/F, Golden
phoenix industrial zone, Fenggan town,
Dongguan city, Guangdong province, China
Model Identifier
0BL-0501000E / 0BL-0501000B
Input voltage
100-240V
Input AC frequency
50/60Hz
Output voltage
5V
Output current
1A
Output Power
5W
Average active efficiency
73.62
No load Power consumption
≤ 0.10
Guarantee
Lenco offers service and warranty in accordance to European law, which means that in case of repairs (both
during and after the warranty period) you should contact your local dealer.
Important note: It is not possible to send products that need repairs to Lenco directly.
Important note: If this unit is opened or accessed by a non-official service center in any way, the warranty
expires.
This device is not suitable for professional use. In case of professional use, all warranty obligations of the
manufacturer will be voided.
Disclaimer
Updates to Firmware and/or hardware components are made regularly. Therefore some of the instruction,
specifications and pictures in this documentation may differ slightly from your particular situation. All items
described in this guide for illustration purposes only and may not apply to particular situation. No legal right
or entitlements may be obtained from the description made in this manual.

13
Disposal of the Old Device
This symbol indicates that the relevant electrical product or battery should not be
disposed of as general household waste in Europe. To ensure the correct waste
treatment of the product and battery, please dispose them in accordance to any
applicable local laws of requirement for disposal of electrical equipment or batteries.
In so doing, you will help to conserve natural resources and improve standards of
environmental protection in treatment and disposal of electrical waste (Waste
Electrical and Electronic Equipment Directive).
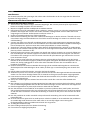
DECLARATION OF CONFORMITY
Hereby, Commaxx declares that the radio equipment type [Lenco TT-116] is in compliance with directive
2014/53/EU.
The full text of the EU declaration of conformity is available at the following internet address:
https://commaxx-certificates.com/doc/tt-116_doc.pdf
Type RF
Frequency range (MHz)
Power (dBm)
Bluetooth
2402-2480
<6
WARNING: To prevent possible hearing damage, do not listen at high volume levels for
long periods.
Service
For more information and helpdesk support, please visit support.lenco.com
Commaxx B.V. Wiebachstraat 37, 6466 NG Kerkrade, The Netherlands.

14
Nederlands
VOORZICHTIG:
Het gebruik van bedieningen of afstellingen of het uitvoeren van procedures anders dan hierin
gespecificeerd, kan leiden tot blootstelling aan gevaarlijke straling.
VOORZORGSMAATREGELEN VÓÓR GEBRUIK
NEEM DEZE INSTRUCTIES IN ACHT:
1. Bedek of blokkeer geen van de ventilatieopeningen. Als u het apparaat op een schap plaatst, dient u
voor 5 cm (2") vrije ruimte rondom het gehele apparaat te zorgen.
2. Installeer in overeenstemming met de meegeleverde gebruikshandleiding.
3. Houd het apparaat uit de buurt van warmtebronnen zoals radiatoren, kachels, fornuizen, kaarsen en
andere warmtegenererende producten of open vuur. Het apparaat kan alleen worden gebruikt in
gematigde klimaten. Extreem koude of warme omgevingen dienen te worden vermeden.
Bedrijfstemperatuur tussen 0° en 35°C.
4. Gebruik het apparaat niet in de buurt van krachtige magnetische velden.
5. Elektrostatische ontlading kan de normale werking van dit apparaat verstoren. In dit geval kunt u het
apparaat gewoon resetten en herstarten volgens de gebruiksaanwijzingen. Wees voorzichtig tijdens de
bestandsoverdracht en voer dit uit in een omgeving zonder statische interferentie.
6. Waarschuwing! Steek geen voorwerpen in het product via de ventilatie- of andere openingen. Er is hoge
spanning aanwezig in het product en als u er een voorwerp insteekt, kan dat tot elektrische schokken
en/of kortsluiting van de interne onderdelen leiden. Laat om dezelfde reden geen water of vloeistof op
het product terechtkomen.
7. Gebruik het apparaat niet in natte of vochtige ruimtes zoals badkamers, keukens met veel stoom of in de
buurt van zwembaden.
8. Stel het apparaat niet bloot aan druppels of spetters en zorg ervoor dat er geen met vloeistof gevulde
voorwerpen, zoals vazen, op of in de buurt van het apparaat worden geplaatst.
9. Gebruik dit apparaat niet als er condensatie kan optreden. Wanneer het apparaat in een warme en
vochtige kamer wordt gebruikt, dan kunnen er waterdruppeltjes of condensatie binnenin het apparaat
worden gevormd waardoor het apparaat mogelijk niet meer goed werkt; houd en apparaat 1 of 2 uur op
UIT staan voordat u de voeding weer inschakelt: het apparaat dient droog te zijn voordat deze stroom
ontvangt.
10. Al is dit apparaat met de grootste zorg vervaardigd en meerdere keren gecontroleerd voordat deze de
fabriek verlaat, is het toch mogelijk dat er problemen optreden, zoals bij alle elektrische apparaten. Als u
rook, overmatige warmteontwikkeling of andere onverwachte verschijnselen constateert, dient u
onmiddellijk de stekker uit het stopcontact te trekken.
11. Dit apparaat moet van stroom worden voorzien door een bron zoals aangegeven op het specificatielabel.
Als u niet zeker weet welk type stroomvoorziening in uw huis wordt gebruikt, neem dan contact op met
uw dealer of het plaatselijke energiebedrijf.
12. Houd uit de buurt van dieren. Sommige dieren bijten graag op voedingskabels.
13. Gebruik een zachte, droge doek om het apparaat schoon te maken. Gebruik geen oplosmiddelen of
vloeistoffen op benzinebasis. U kunt een vochtige doek met verdund schoonmaakmiddel gebruiken om
hardnekkige vlekken te verwijderen.
14. De leverancier is niet verantwoordelijk voor schade of verlies van gegevens veroorzaakt door storing,
misbruik, modificatie van het apparaat of vervanging van de batterij.
15. Onderbreek de verbinding niet terwijl het apparaat bestanden formatteert of overdraagt. Gegevens
kunnen anders corrupt of verloren raken.
16. Als het apparaat een USB-afspeelfunctie heeft, moet de USB-geheugenstick rechtstreeks in het apparaat
worden gestoken. Gebruik geen USB-verlengsnoer, omdat deze interferentie kan veroorzaken waardoor
uw gegevens verloren kunnen gaan.
17. Het classificatielabel is te vinden op de onder- of achterkant van het apparaat.
18. Dit product is niet bestemd voor gebruik door personen (waaronder kinderen) met verminderde fysieke,
zintuiglijke of mentale capaciteiten, of met een tekort aan kennis en ervaring, tenzij een persoon
verantwoordelijk voor hun veiligheid toezicht houdt of instructies heeft gegeven voor het correcte
gebruik van het apparaat.
19. Dit product is uitsluitend bedoeld voor niet-professioneel gebruik en niet voor commercieel of
industrieel gebruik.

15
20. Zorg ervoor dit apparaat op een stabiele plek te plaatsen. Beschadigingen veroorzaakt door het gebruik
van dit apparaat in een onstabiele positie, trillingen of schokken of door het niet opvolgen van andere
waarschuwingen of voorzorgsmaatregelen beschreven in deze gebruikshandleiding, worden niet gedekt
door de garantie.
21. Verwijder nooit de behuizing van dit apparaat.
22. Plaats dit apparaat nooit op andere elektrische apparatuur.
23. Houd plastic zakken uit de buurt van kinderen.
24. Gebruik alleen hulpstukken/accessoires gespecificeerd door de fabrikant.
25. Laat alle onderhoud over aan bevoegd onderhoudspersoneel. Onderhoud is vereist wanneer het
apparaat op enigerlei wijze is beschadigd, zoals een beschadigde voedingskabel of stekker, wanneer er
vloeistof is gemorst of voorwerpen in het apparaat zijn gevallen, wanneer het apparaat is blootgesteld
aan regen of vocht, niet normaal functioneert of is gevallen.
26. Langdurige blootstelling aan harde geluiden van persoonlijke muziekspelers kan leiden tot tijdelijk of
permanent gehoorverlies.
27. Als het product wordt geleverd met een voedingskabel of AC-stroomadapter:
⚫ Als er problemen optreden, koppel de AC-voedingskabel dan los en laat reparaties over aan
bevoegd personeel.
⚫ Niet op de stroomadapter gaan staan of deze indrukken. Wees zeer voorzichtig, vooral in de buurt
van de stekkers en waar de kabel uit het apparaat komt. Plaats geen zware voorwerpen op de
stroomadapter, om beschadiging ervan te voorkomen. Houd het gehele apparaat buiten bereik van
kinderen! Wanneer kinderen met de voedingskabel spelen, kunnen zij ernstig letsel oplopen.
⚫ Koppel dit apparaat los tijdens onweer of wanneer deze voor een lange periode niet wordt
gebruikt.
⚫ Het stopcontact moet in de buurt van de apparatuur zijn geïnstalleerd en eenvoudig te bereiken
zijn.
⚫ Zorg ervoor stopcontacten of verlengsnoeren niet te overbelasten. Overbelasting kan tot brand of
elektrische schokken leiden.
⚫ Apparaten met een klasse 1 constructie moeten worden aangesloten op een stopcontact met een
beschermende aardverbinding.
⚫ Apparaten met een klasse 2 constructie vereisen geen aardverbinding.
⚫ Houd altijd de stekker vast wanneer u deze uit het stopcontact trekt. Trek niet aan de
voedingskabel. Dit kan anders een kortsluiting veroorzaken.
⚫ Gebruik geen beschadigde voedingskabel of stekker of een los stopcontact. Dit kan anders leiden
tot brand of elektrische schokken.
28. Als het product een afstandsbediening met knoop-/celbatterijen bevat of daarmee wordt geleverd:
Waarschuwing:
⚫ "Batterij niet inslikken, gevaar op chemische brandwonden" of soortgelijke werking.
⚫ [De afstandsbediening meegeleverd met] Dit product bevat een knoop-/celbatterij. Als de batterij
wordt ingeslikt, kan deze in slechts 2 uur ernstige en zelfs fatale interne brandwonden veroorzaken.
⚫ Houd zowel nieuwe als gebruikte batterijen uit de buurt van kinderen.
⚫ Als het batterijvak niet goed sluit, gebruik het product dan niet langer en houd het uit de buurt van
kinderen.
⚫ Als u denkt dat batterijen zijn ingeslikt of in een lichaamsdeel zijn geplaatst, dient u onmiddellijk
medische hulp in te roepen.
29. Waarschuwing m.b.t. het gebruik van batterijen:
⚫ Risico op ontploffing als de batterij incorrect is geïnstalleerd. Vervang alleen door hetzelfde of een
gelijkwaardig type.
⚫ Stel de batterij niet bloot aan extreem hoge of lage temperaturen of een lage luchtdruk op grote
hoogte tijdens gebruik, opslag of transport.
⚫ Vervanging van een batterij door een incorrect type kan leiden tot een ontploffing of de lekkage
van ontvlambare vloeistoffen of gas.
⚫ Verwijdering van een batterij in vuur of een hete oven of het mechanisch verpletteren of snijden
van een batterij kan leiden tot een ontploffing.
⚫ Laat een batterij nooit achter in omgevingen met extreem hoge temperaturen, anders kan dit
leiden tot een ontploffing of de lekkage van ontvlambare vloeistoffen of gas.
⚫ Stel een batterij nooit bloot aan een extreem lage luchtdruk, anders kan dit leiden tot een
ontploffing of de lekkage van ontvlambare vloeistoffen of gas.

16
⚫ Houd rekening met de impact op het milieu bij het afdanken van batterijen.
INSTALLATIE
• Pak alle onderdelen uit en verwijder het beschermende materiaal.
• Sluit het apparaat niet aan op het lichtnet voordat de correcte netspanning is geverifieerd en alle andere
aansluitingen tot stand zijn gebracht.
Inbegrepen accessoires:
Gebruikshandleiding
Netadapter

17
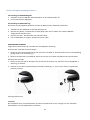
Locatie van bedieningen
1. Platenspelerdek
2. Platenspeleras

18
3. Middengatadapter
4. Toonarm
5. Plaatsingshendel
6. Toonarmklem
7. Snelheisregelaar platenspeler
8. Schakelaar voor bediening automatische stop
9. Led-statusindicator
10. Aan/uit-schakelaar/volumeregeling
11. Hoofdtelefoonaansluiting
12. Naald
13. Vergrendeling
14. DRAAGHENDEL
15. Luidspreker
16. Aux in-aansluiting
17. Line out R/L-kanaal
18. DC in-aansluiting
19. USB-poort
20. Functie-led
21. Opnemen
22. Vorige track
23. Next track
24. Play/pause
25. Mode
26. Koppelen
Modus
1. Druk kort op "Mode" om de afspeelmodus te selecteren.
2. De blauwe led knippert wanneer bluetooth wordt gekoppeld.
3. De blauwe led brandt wanneer bluetooth is gekoppeld.
4. De rode led brandt in de platenspeler/Aux in-modus.
5. De groene led brandt in de USB-modus.
De platenspeler gebruiken
1. Plaats de platenspeler op een vlak, waterpas oppervlak.
2. Steek het snoer van de adapter in de DC-aansluiting aan de achterkant van de behuizing en steek de
adapter in het stopcontact.
3. Controleer bij het eerste gebruik of de kabelbinder van de platenspelerarm is verwijderd.
4. Verwijder de naaldkap en bewaar het op een veilige plaats voor toekomstig gebruik

19
5. Zet de snelheidsregelaar op de snelheid (33, 45 of 78 toeren) die overeenkomt met de af te spelen plaat.
6. Draai de volumeknop om de platenspeler in te schakelen en de modusindicator zal rood branden.
7. Plaats een plaat op de as van de draaitafel en maak de toonarm los.
8. Gebruik de plaatsingshendel om de toonarm op te tillen en verplaats de toonarm zodat de naald net
binnen de rand van de plaat staat of in één lijn met het begin van de af te spelen track.
9. Laat de toonarm langzaam zakken. Na een korte pauze wordt de plaat afgespeeld.
10. Stel het volume in op het gewenste niveau door aan de volumeknop te draaien.
11. Wanneer het einde van de plaat is bereikt, stopt de platenspeler.
12. Gebruik de plaatsingshendel opnieuw om de toonarm op te tillen (het dek begint weer te draaien),
breng hem terug naar de toonarmklem en laat hem in de houder zakken. Het dek stopt.
13. Zet de toonarm vast met de toonarmklem . plaats de naaldkap altijd terug na gebruik en voordat u de
platenspeler verplaatst.
14. Om de platenspeler op enig moment uit te schakelen, tilt u de toonarm van de plaat op en draait u de
volumeknop volledig linksom.
Opmerking
Sommige platen hebben een groter middengat en het kan nodig zijn de middengatadapter op de draaitafelas
te plaatsen voordat u de plaat op de platenspeler legt. Plaats altijd de naaldkap terug en zet de toonarm vast
met de toonarmklem voordat u de platenspeler verplaatst.
Met hulpapparaat gebruiken
1. Via de platenspeler kan analoge hulpaudioapparatuur worden aangesloten en versterkt.
2. Sluit de hulpapparatuur aan met een 3,5 mm kabel (kabel niet meegeleverd) op de Aux in-aansluiting.
3. Druk op de afspeelknop van het hulpapparaat en gebruik de trackbediening zoals gebruikelijk op het
hulpapparaat.
4. Het volume kan worden ingesteld met de volumeknop op de platenspeler of met de bedieningen op het
aangesloten hulpapparaat.
5. Om het apparaat op elk moment uit te schakelen draait u de volumeknop helemaal linksom.
Een hoofdtelefoon gebruiken (niet meegeleverd)
Er is een stereo hoofdtelefoonaansluiting voorzien zodat de platenspeler kan worden gebruikt zonder anderen
te storen.
Sluit de hoofdtelefoon aan op het met hoofdtelefoon gemarkeerde punt bij de volumeknop en stel het
luistervolume in op het door u gekozen niveau. Een te hoge geluidsniveau van oortelefoons en hoofdtelefoons

20
kan gehoorbeschadiging veroorzaken. De luidsprekers van de platenspeler werken niet als er een
hoofdtelefoon is aangesloten.
De platenspeler aansluiten op een externe luidspreker
Als u de platenspeler aansluit op externe luidsprekers (via een geschikte versterker), gebruik dan een kabel
met dubbele tulpstekkers aan beide uiteinden (niet meegeleverd) om de RCA-uitgangsaansluitingen te
verbinden met de audio in-aansluitingen van de versterker. Zorg ervoor dat de rode stekkers in de rode
aansluitingen worden gestoken en de witte in de witte.
Met bluetooth-apparaat gebruiken
Controleer of uw platenspeler in de bluetooth-modus staat. Als de platenspeler zich nog niet in de
bluetooth-modus bevindt, drukt u kort op de modusknop totdat de platenspeler zich in de bluetooth-modus
bevindt (de blauwe led brandt). Hij begint te zoeken naar bluetooth-apparaten (blauwe led knippert tijdens
het koppelen).
In bluetooth-modus:
1. Uw aparaart zoekt naar bluetooth.
2. Schakel op het apparaat (bijvoorbeeld iPhone/iPad/Android/andere telefoon/tablet/computer) de
bluetooth-connectiviteit in en zorg ervoor dat het apparaat "detecteerbaar" is.
Opmerking: raadpleeg indien nodig de instructies voor uw apparaat om bluetooth in te schakelen of in te
stellen.
3. Selecteer indien nodig "Add new device" (Nieuw apparaat toevoegen).
Opmerking: sommige producten zoeken automatisch naar een nieuw apparaat en dus is de optie "Add new
device" (Nieuw apparaat toevoegen) niet beschikbaar.
4. Indien gevonden, wordt uw apparaat weergegeven als "Lenco TT-116". Selecteer het en begin met
koppelen.
5. Wanneer het koppelen is voltooid, verschijnt "Bluetooth Connected" (Bluetooth verbonden).
6. Nu u uw apparaat met de platenspeler heeft gekoppeld, maakt het verbinding wanneer het binnen
bereik is, wat ongeveer 10 meter gezichtslijn of minder is.
7. Uw apparaat blijft gekoppeld met de platenspeler, tenzij u besluit de verbinding te verbreken of te
ontkoppelen.
8. U kunt kort op "Koppelen" drukken om opnieuw verbinding te maken.
Bluetooth afspelen
1. Druk op "Previous" voor het vorige nummer op uw bluetooth-apparaat.
2. Druk op "Next" voor het vorige nummer op uw bluetooth-apparaat.
3. Druk op "Play/pause" om af te spelen van of te pauzeren op uw bluetooth-apparaat.
“Dit product heeft een bluetooth-ontvangstfunctie, u kunt geen bluetooth-geluid ermee verzenden:
dit betekent dat u draadloos een bluetooth-geluidssignaal kunt ontvangen van een externe bron,
zoals een smartphone.”
Sidan laddas...
Sidan laddas...
Sidan laddas...
Sidan laddas...
Sidan laddas...
Sidan laddas...
Sidan laddas...
Sidan laddas...
Sidan laddas...
Sidan laddas...
Sidan laddas...
Sidan laddas...
Sidan laddas...
Sidan laddas...
Sidan laddas...
Sidan laddas...
Sidan laddas...
Sidan laddas...
Sidan laddas...
Sidan laddas...
Sidan laddas...
Sidan laddas...
Sidan laddas...
Sidan laddas...
Sidan laddas...
Sidan laddas...
Sidan laddas...
Sidan laddas...
Sidan laddas...
Sidan laddas...
Sidan laddas...
Sidan laddas...
Sidan laddas...
Sidan laddas...
Sidan laddas...
Sidan laddas...
Sidan laddas...
Sidan laddas...
Sidan laddas...
Sidan laddas...
Sidan laddas...
Sidan laddas...
Sidan laddas...
Sidan laddas...
Sidan laddas...
Sidan laddas...
Sidan laddas...
Sidan laddas...
Sidan laddas...
Sidan laddas...
Sidan laddas...
Sidan laddas...
Sidan laddas...
Sidan laddas...
Sidan laddas...
Sidan laddas...
Sidan laddas...
Sidan laddas...
Sidan laddas...
Sidan laddas...
Sidan laddas...
Sidan laddas...
Sidan laddas...
Sidan laddas...
Sidan laddas...
Sidan laddas...
Sidan laddas...
Sidan laddas...
Sidan laddas...
Sidan laddas...
Sidan laddas...
-
 1
1
-
 2
2
-
 3
3
-
 4
4
-
 5
5
-
 6
6
-
 7
7
-
 8
8
-
 9
9
-
 10
10
-
 11
11
-
 12
12
-
 13
13
-
 14
14
-
 15
15
-
 16
16
-
 17
17
-
 18
18
-
 19
19
-
 20
20
-
 21
21
-
 22
22
-
 23
23
-
 24
24
-
 25
25
-
 26
26
-
 27
27
-
 28
28
-
 29
29
-
 30
30
-
 31
31
-
 32
32
-
 33
33
-
 34
34
-
 35
35
-
 36
36
-
 37
37
-
 38
38
-
 39
39
-
 40
40
-
 41
41
-
 42
42
-
 43
43
-
 44
44
-
 45
45
-
 46
46
-
 47
47
-
 48
48
-
 49
49
-
 50
50
-
 51
51
-
 52
52
-
 53
53
-
 54
54
-
 55
55
-
 56
56
-
 57
57
-
 58
58
-
 59
59
-
 60
60
-
 61
61
-
 62
62
-
 63
63
-
 64
64
-
 65
65
-
 66
66
-
 67
67
-
 68
68
-
 69
69
-
 70
70
-
 71
71
-
 72
72
-
 73
73
-
 74
74
-
 75
75
-
 76
76
-
 77
77
-
 78
78
-
 79
79
-
 80
80
-
 81
81
-
 82
82
-
 83
83
-
 84
84
-
 85
85
-
 86
86
-
 87
87
-
 88
88
-
 89
89
-
 90
90
-
 91
91


på andra språk
- italiano: Lenco TT-116 Manuale utente
- español: Lenco TT-116 Manual de usuario
- Deutsch: Lenco TT-116 Benutzerhandbuch
- français: Lenco TT-116 Manuel utilisateur
- dansk: Lenco TT-116 Brugermanual
- Nederlands: Lenco TT-116 Handleiding
Relaterade papper
Andra dokument
-
TEAC MC-D800 Bruksanvisning
-
TEAC TN-400BT Bruksanvisning
-
Teufel Teufel Stereo M Vinyl Bruksanvisning
-
-
JAM HX-TT400 Bruksanvisningar
-
TEAC TN-570 Bruksanvisning
-
Denver VPL-210 WOOD Användarmanual
-
Yamaha TT-N503 Bruksanvisning
-
Ledwood ROUND300 Användarguide
-
Fresh n Rebel CODE CORE Användarguide