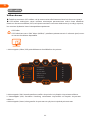
Cepter ULTRA 24,5" FULL HD-GAMINGSKJERM Bruksanvisning
- Typ
- Bruksanvisning

https://www.ceptertech.com/
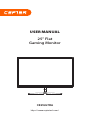
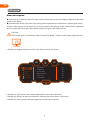
25” Flat
Gaming Monitor
USER MANUAL
CE25ULTRA


Thank you for choosing this Monitor.
Please read this instruction manual thoroughly before using and ensure
you are familiar with the setup and operation of your new gaming gadget.
Retain this instruction manual for future reference.
GB
Takk for at du valgte denne Monitoren.
Les denne bruksanvisningen nøye før bruk, og sørg for at du er kjent med
oppsett og bruk av ditt nye spilltilbehør.
Ta vare på denne bruksanvisningen for fremtidig referanse.
NO
Tak, for at dit valg af dette Skærm.
Læs venligst denne brugsanvisning grundigt inden brug, og sørg for,
at du er bekendt med opsætningen og driften af din nye spille-enhed.
Behold denne brugsanvisning til senere brug.
DK
Kiitos, kun valitsit tämän monitori.
Lue nämä käyttöohjeet perusteellisesti ennen käyttöä ja varmista,
että olet tutustunut uuden pelilaitteesi asettamiseen ja käyttöön.
Säilytä tämä käyttöopas tulevaa tarvetta varten.
FI
Tack för att du valt denna skärm.
Läs noggrant bruksanvisningen innan du använder spelenheten,
för att se till att du har kunskap om dess inställningar och funktioner.
Spara bruksanvisningen för framtida referens.
SE
1

Bruksanvisning – Svenska ..................................................................................... sida 35 - 42
Bruksanvisning – Norsk .......................................................................................... side 11 - 18
Käyttöopas - Suomi ................................................................................................. sivu 27 - 34
Brugervejledning – Dansk .................................................................................... side 19 - 26
Instruction Manual – English ................................................................................ page 3 - 10
2
EN
NO
DK
FI
SE

3
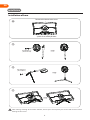
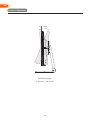
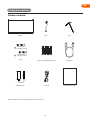
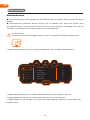
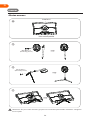
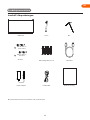
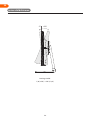
Product introduction
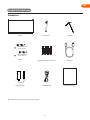
Packing list
Monitor Stand Base
Power Cable
Power adapter
Mount Screws x 4
● Redundant screws can be used as spare screws.
DP Cable
User Manual
Screws
M4 10mm x 2
(Fixed Stand)
1
M4 12mm x 2
(Fixed Base)
2
EN

4
M4 10mm x 2
(Fixed Stand)
M4 12mm x 1
(Fixed Base)
1
2
3
4
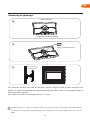
Note: During standing of the whole monitor, do not press the liquid crystal screen with hand to avoid
damage to the screen.
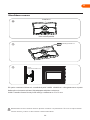
Installation of base
Installation
Remove the decorative cover
quick-disassembly button
EN

5
Installation of mount
1
2
3
Notes: To prevent the monitor on the mount from failing, please install it firmly and protect it fully. Do not
place or hang any object on the mount, and the using height of the mount should be less than 2 meters.
Remove the cover
quick-disassembly button
During padlocking of the monitor, do not pinch the screen with the hands to avoid damaging the
screen. Install the mount to the mount stud by referring to the user manual of the mount (purchased
separately).
Tips: The mounting hole distance of the mount for the product is 75x75mm.
Mount Screws x 4
Mount (not included)
EN

6
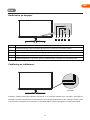
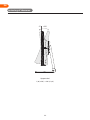
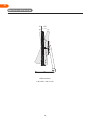
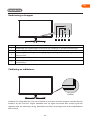
Adjusting the monitor
Tilting angle
-5.0°(±2.0°)- +20°(±2.0°)
-5° +20°
EN

7
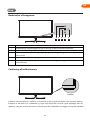
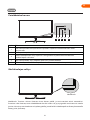
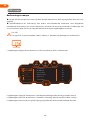
Usage
Description of buttons
Explanation of indicators
Indicator: Steady blue light indicates the power is on and the monitor runs normally. Red light to
indicate no video source and no horizontal or vertical signal detected or low voltage. Please make
sure that your computer is turned on and all video cables are fully plugged in and/or connected.
Indicator
Up rocker button: The rocker is used to quick enter the contextual mode.
Left rocker button: Quickly enter the Input Signal or go back to the previous menu/exit.
Down rocker button: Quickly enter the Game Crosshair menu.
Rocker switch button: press to turn on/off the monitor.
Right rocker button: Press to enter sub-menus/ quickly enter the main menu.
Button Function
1
2
3
4
5
32 4 5
1
EN

8
Menu description
The color and shape of the OSD menu of the actual monitor may be slightly different from them
shown in the figure.
Specifications of the OSD menu may change with improvements of functions without prior notice.
The on-screen display (OSD) menu can be used to adjust the settings of the monitor and is displayed
on the screen after turning on the monitor and pressing the Left rocker button.
1. Rocker key (Right) to enter the OSD main menu or enter sub-menus.
OSD menu
2. Rocker key (Up) to enter the Contextual Model or move up in the menu.
3. Rocker key (Down) to enter the GamePlus Switching or move down in the menu.
4. Rocker key (Left) to enter the Input Signal or exit the current screen.
240hz 1920
x
1080
OFF
Other Settings
Game Settings
OSD Settings
Color Settings
PIP/PBP
Picture Settings
Standard Mode On
Off
Off
Off
Off
50
RTS/RPG Mode
FPS Arena Mode
MOBA Arena Mode
Adaptive-Sync
Shadow Balance
EN
OSD lock
OSD unlock: Press and hold the ''Menu'' button for about 5 seconds until it pops up below icon.

9
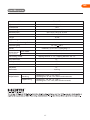
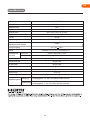
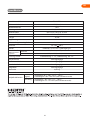
Specification
Product model CE25ULTRA
Screen Size
Viewing Angle
25” (62cm)
178°(H) / 178°(V)
Pixel pitch
0.3114 (H) × 0.3114 (V) mm
Contrast ratio 3000:1TYP
16.7MColors
Aspect Ratio 16:9
Resolution 1920 x1080
Product
Dimensions
Lifting base
Without base
Action
Storage
556.4 x 328.4 x 67.2 mm
556.4 x 409.6 x 184.8 mm
With base
N/A
N/A
N/A
N/A
Tilting angle
Height range
Rotation angle
Forward tilting : 5° ± 2°; Backward tilting: 20° ± 2°
Vertical angle
speaker
Environmental
conditions
Temperature: 0°C~ 40°C (32°F ~ 104°F)
Humidity: 10%~90% RH (non-condensing)
Temperature: -20°~ 60° (-4°F ~ 140°F)
Humidity: 5%~95% RH (non-condensing)
HDMI2.0 x 2, DP1.4 x 2, Audio Output x 1
Power Input
Ports
Maximum refresh rate 240Hz
4.05 kg
5.49 kg
Net Weight
Gross Weight
DC 12V 4.0 A
EN

10
-Dispose of all packaging, paper, cartons and plastic bags in accordance with your local
recycling regulations.
-At the end of the product's lifespan, please dispose of it separately from your household
waste at an authorized household WEEE waste recycling centre.
-For more information, please contact the local authority or the retailer where you purchased
the product.
Power International AS,
PO Box 523, 1471 Lørenskog, Norway
Power Norge:
https://www.power.no/kundeservice/
T: 21 00 40 00
Expert Danmark:
https://www.expert.dk/kundeservice/
T: 70 70 17 07
Power Danmark:
https://www.power.dk/kundeservice/
T: 70 33 80 80
Punkt 1 Danmark:
https://www.punkt1.dk/kundeservice/
T: 70 70 17 07
Expert Finland:
https://www.expert.fi/tuki/asiakaspalvelu/
T: 020 7100 670
Power Finland:
https://www.power.fi/tuki/asiakaspalvelu/
T: 0305 0305
Power Sverige:
https://www.power.se/kundservice/
T: 08 517 66 000
EN

11
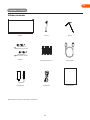
Produktintroduksjon
Pakkeliste
Skjerm Gulvstativ Sokkel
Veggmonterings Skruer x 4
● Skruer til overs kan brukes som reserveskruer.
DP-kabel
Skruer
M4 10mm x 2
(fast stativ)
1
M4 12mm x 2
(Fast sokkel)
2
NO
Strømledning
Strømadapter Bruksanvisning

12
M4 10mm x 2
(fast stativ)
M4 12mm x 2
(Fast sokkel)
1
2
3
4
Merk: Når hele skjermen står, må du ikke trykke den med hånden for å unngå å skade skjermen.
Montere sokkelen
Installasjon
erne lokk
knapp for rask demontering
NO

13
Montere feste
1
2
3
Merknader: For å forhindre at skjermen på festet svikter må den installeres godt og beskyttes fullstendig. Ikke
plasser eller heng noen gjenstander på festet. Festet bør ikke brukes høyere enn 2 meter.
erne lokk
knapp for rask demontering
Når du låser skjermen med hengelås, må du ikke klemme den med hendene for å unngå å skade den.
Sett festet på festetappen i henhold til bruksanvisningen til festet (kjøpes separat).
Tips: Avstanden til monteringshullet til produktets feste er 75x75 mm.
Veggmonterings Skruer x 4
Feste (følger ikke med)
NO

14
Justere skjermen
Skråstilling vinkel
-5,0°(±2.0°)- +20°(±2,0°)
-5° +20°
NO

15
Bruk
Beskrivelse av knapper
Forklaring av indikatorer
Indicator: Steady blue light indicates the power is on and the monitor runs normally. Red light to
indicate no video source and no horizontal or vertical signal detected or low voltage. Please make
sure that your computer is turned on and all video cables are fully plugged in and/or connected.
Indikator
Vippeknapp opp: Vippe knappen brukes til å gå raskt inn i kontekst modus.
Vippeknapp venstre: Gå raskt til inngangssignalet eller gå tilbake til forrige meny/avslutt.
Vippeknapp ned: Gå raskt inn i Spilltrådkors-menyen.
Vippeknapp: trykk for å slå på/av skjermen.
Vippeknapp høyre: Trykk for å gå inn i undermenyer / raskt gå inn i hovedmenyen.
Knapp Funksjon
1
2
3
4
5
32 4 5
1
NO

16
Meny Beskrivelse
Fargen og formen på skjermmenyen til den faktiske skjermen kan være litt forskjellig fra det som
vises på figuren.
Spesifikasjoner for skjermmenyen kan endres med forbedringer av funksjoner uten forvarsel. På
skjermmenyen kan man justere innstillingene på skjermen. Den vises på skjermen når man har slått på
skjermen og trykket vippeknappen til venstre.
1. Vippeknapp (høyre) for å gå inn i hovedskjerm menyen eller gå inn i undermenyer.
Skjermmeny
2. Vippeknapp (opp) for å gå inn i kontekst modus eller gå opp i menyen.
3. Vippeknapp (ned) for å gå inn i GamePlus-bytte eller flytte ned i menyen.
4. Vippeknapp (venstre) for å velge inngangssignalet eller gå ut av gjeldende skjerm.
240hz 1920
x
1080
OFF
Other Settings
Game Settings
OSD Settings
Color Settings
PIP/PBP
Picture Settings
Standard Mode On
Off
Off
Off
Off
50
RTS/RPG Mode
FPS Arena Mode
MOBA Arena Mode
Adaptive-Sync
Shadow Balance
Skjermmenylås
Lås opp skjermmeny: Hold inne «Meny»-knappen i cirka 5 sekunder til ikonet under dukker opp.
NO

17
Spesifikasjoner
Produktmodell CE25ULTRA
Skjermstørrelse
Betraktningsvinkel
25” (62cm)
178°(H) / 178°(V)
Pikselavstand
0,3114 (H) × 0,3114 (V) mm
Kontrastforhold 3000:1TYP
16,7MFarger
Sideforhold 16:9
Oppløsning 1920 x1080
Uten sokkel
Handling
Oppbevaring
556,4 x 328,4 x 67,2 mm
556,4 x 409,6 x 184,8 mm
Med sokkel
I/T
I/T
I/T
I/T
Skråstilling vinkel
Høydeområde
Rotasjonsvinkel
Vipping forover: 5° ± 2°; Vipping bakover: 20° ± 2°
Vertikal vinkel
høyttaler
Miljøforhold
Temperatur: 0–40 °C (32–104 °F)
Luftfuktighet: 10–90 % RF (ikke-kondenserende)
Temperatur: -20°–60° (-4–140 °F)
Luftfuktighet: 5–95 % RF (ikke-kondenserende)
HDMI2.0 x 2, DP1.4 x 2, lydutgang x 1
Strøminngang
Porter
Maksimal oppdateringsfrekvens 240Hz
4,05 kg
5,49 kg
Nettovekt
Bruttovekt
DC 12V 4,0 A
Produktdi-
mensjoner
løftesokkel
NO

18
- Kast all emballasje, papir, kartonger og plastposer i samsvar med lokale regler for
resirkulering.
- Når produktet ikke skal brukes lenger, må det avhendes adskilt fra husholdningsavfall hos en
miljøstasjon for gjenvinning av elektrisk og elektronisk avfall.
- Du får nærmere informasjon ved å kontakte lokale myndigheter eller forhandleren du kjøpte
produktet hos.
Power International AS,
Postboks 523, 1471 Lørenskog, Norge
Power Norge:
https://www.power.no/kundeservice/
T: 21 00 40 00
Expert Danmark:
https://www.expert.dk/kundeservice/
T: 70 70 17 07
Power Danmark:
https://www.power.dk/kundeservice/
T: 70 33 80 80
Punkt 1 Danmark:
https://www.punkt1.dk/kundeservice/
T: 70 70 17 07
Expert Finland:
https://www.expert.fi/tuki/asiakaspalvelu/
T: 020 7100 670
Power Finland:
https://www.power.fi/tuki/asiakaspalvelu/
T: 0305 0305
Power Sverige:
https://www.power.se/kundservice/
T: 08 517 66 000
NO
Sidan laddas...
Sidan laddas...
Sidan laddas...
Sidan laddas...
Sidan laddas...
Sidan laddas...
Sidan laddas...
Sidan laddas...
Sidan laddas...
Sidan laddas...
Sidan laddas...
Sidan laddas...
Sidan laddas...
Sidan laddas...
Sidan laddas...
Sidan laddas...
Sidan laddas...
Sidan laddas...
Sidan laddas...
Sidan laddas...
Sidan laddas...
Sidan laddas...
Sidan laddas...
Sidan laddas...
Sidan laddas...
-
 1
1
-
 2
2
-
 3
3
-
 4
4
-
 5
5
-
 6
6
-
 7
7
-
 8
8
-
 9
9
-
 10
10
-
 11
11
-
 12
12
-
 13
13
-
 14
14
-
 15
15
-
 16
16
-
 17
17
-
 18
18
-
 19
19
-
 20
20
-
 21
21
-
 22
22
-
 23
23
-
 24
24
-
 25
25
-
 26
26
-
 27
27
-
 28
28
-
 29
29
-
 30
30
-
 31
31
-
 32
32
-
 33
33
-
 34
34
-
 35
35
-
 36
36
-
 37
37
-
 38
38
-
 39
39
-
 40
40
-
 41
41
-
 42
42
-
 43
43
-
 44
44
-
 45
45


Cepter ULTRA 24,5" FULL HD-GAMINGSKJERM Bruksanvisning
- Typ
- Bruksanvisning
på andra språk
Relaterade papper
-
 Cepter ATILIUS 27" QHD-GAMINGSKJERM Bruksanvisning
-
 Cepter PULSE 34" UWQHD-GAMINGSKJERM Bruksanvisning
-
 Cepter ATILIUS 49" DQHD-GAMINGSKJERM Användarmanual
-
 Cepter ALPHA 23,8" FULL HD-GAMINGSKJERM Användarmanual
-
 Cepter PULSE 23,8" FULL HD-SKJERM Bruksanvisning
-
 Cepter PULSE 27" FULL HD-SKJERM Bruksanvisning
-
 Cepter PULSE 21,5" FULL HD-SKJERM Användarmanual
-
 Cepter ATILIUS 32" QHD-GAMINGSKJERM Bruksanvisning
-
 Cepter PULSE 27" FULL HD-SKJERM Användarmanual


