Electrolux EHF8748FOK Användarmanual
- Kategori
- Kokplattor
- Typ
- Användarmanual

EHF8748FOK
.................................................. ...............................................
EN HOB USER MANUAL 2
FR TABLE DE CUISSON NOTICE D'UTILISATION 17
DE KOCHFELD BENUTZERINFORMATION 33
SV INBYGGNADSHÄLL BRUKSANVISNING 49

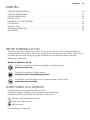
CONTENTS
SAFETY INFORMATION . . . . . . . . . . . . . . . . . . . . . . . . . . . . . . . . . . . . . . . . . . . . . . . . . . . . . . . . . 3
PRODUCT DESCRIPTION . . . . . . . . . . . . . . . . . . . . . . . . . . . . . . . . . . . . . . . . . . . . . . . . . . . . . . . 5
DAILY USE . . . . . . . . . . . . . . . . . . . . . . . . . . . . . . . . . . . . . . . . . . . . . . . . . . . . . . . . . . . . . . . . . . . 7
HELPFUL HINTS AND TIPS . . . . . . . . . . . . . . . . . . . . . . . . . . . . . . . . . . . . . . . . . . . . . . . . . . . . . 10
CARE AND CLEANING . . . . . . . . . . . . . . . . . . . . . . . . . . . . . . . . . . . . . . . . . . . . . . . . . . . . . . . . 12
TROUBLESHOOTING . . . . . . . . . . . . . . . . . . . . . . . . . . . . . . . . . . . . . . . . . . . . . . . . . . . . . . . . . 13
INSTALLATION . . . . . . . . . . . . . . . . . . . . . . . . . . . . . . . . . . . . . . . . . . . . . . . . . . . . . . . . . . . . . . 15
TECHNICAL INFORMATION . . . . . . . . . . . . . . . . . . . . . . . . . . . . . . . . . . . . . . . . . . . . . . . . . . . . 16
ENVIRONMENT CONCERNS . . . . . . . . . . . . . . . . . . . . . . . . . . . . . . . . . . . . . . . . . . . . . . . . . . . . 16
WE’RE THINKING OF YOU
Thank you for purchasing an Electrolux appliance. You’ve chosen a product that brings with it
decades of professional experience and innovation. Ingenious and stylish, it has been designed with
you in mind. So whenever you use it, you can be safe in the knowledge that you’ll get great results
every time.
Welcome to Electrolux.
Visit our website for:
Get usage advice, brochures, trouble shooter, service information:
www.electrolux.com
Register your product for better service:
www.electrolux.com/productregistration
Buy Accessories, Consumables and Original spare parts for your appliance:
www.electrolux.com/shop
CUSTOMER CARE AND SERVICE
We recommend the use of original spare parts.
When contacting Service, ensure that you have the following data available.
The information can be found on the rating plate. Model, PNC, Serial Number.
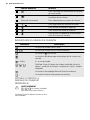
Warning / Caution-Safety information
General information and tips
Environmental information
Subject to change without notice.
2
www.electrolux.com

SAFETY INFORMATION
Before the installation and use of the appli-
ance, carefully read the supplied instruc-
tions. The manufacturer is not responsible
if an incorrect installation and use causes
injuries and damages. Always keep the in-
structions with the appliance for future ref-
erence.
CHILDREN AND VULNERABLE
PEOPLE SAFETY
WARNING!
Risk of suffocation, injury or perma-
nent disability.
• Do not let persons, children included,
with reduced physical sensory, reduced
mental functions or lack of experience
and knowledge use the appliance. They
must have supervision or instruction for
the operation of the appliance by a per-
son who is responsible for their safety.
• Do not let children play with the appli-
ance.
• Keep all packaging away from children.
• Keep children and pets away from the
appliance when it operates or when it
cools down. Accessible parts are hot.
• If the appliance has a child safety device,
we recommend that you activate it.
INSTALLATION
WARNING!
Only a qualified person must install
this appliance.
• Remove all the packaging.
• Do not install or use a damaged appli-
ance.
• Obey the installation instruction supplied
with the appliance.
• Keep the minimum distance from the
other appliances and units.
• Always be careful when you move the
appliance because it is heavy. Always
wear safety gloves.
• Seal the cut surfaces with a sealant to
prevent moisture to cause swelling.
• Protect the bottom of the appliance from
steam and moisture.
• Do not install the appliance adjacent to a
door or under a window. This prevents
hot cookware to fall from the appliance
when the door or the window is opened.
• If the appliance is installed above draw-
ers make sure that the space, between
the bottom of the appliance and the up-
per drawer, is sufficient for air circulation.
• The bottom of the appliance can get hot.
We recommend to install a non-combus-
tile separation panel under the appliance
to prevent access to the bottom.
Electrical connection
WARNING!
Risk of fire and electrical shock.
• All electrical connections must be made
by a qualified electrician.
• Before every wiring make sure the main
terminal of the appliance is not live.
• Make sure the appliance is installed cor-
rectly. Loose and incorrect plug and
socket can make the terminal become
too hot.
• Make sure that a shock protection is in-
stalled.
• Do not let the electricity bonds touch the
appliance or hot cookware, when you
connect the appliance to the near sock-
ets.
• Do not let the electricity bonds tangle.
• Use a strain relief clamp on cable.
• Use the correct mains cable.
• Make sure not to cause damage to the
mains plug and to the mains cable. Con-
tact the Service or an electrician to
change a damaged mains cable.
• The electrical installation must have an
isolation device which lets you discon-
nect the appliance from the mains at all
poles. The isolation device must have a
contact opening width of minimum 3
mm.
• Use only correct isolation devices: line
protecting cut-outs, fuses (screw type
fuses removed from the holder), earth
leakage trips and contractors.
ENGLISH 3

USE
WARNING!
Risk of injury, burns or electric
shock.
• Use this appliance in a household envi-
ronment.
• Do not change the specification of this
appliance.
• Do not use an external timer or a sepa-
rate remote-control system to operate
the appliance.
• Do not let the appliance stay unattended
during operation.
• Do not operate the appliance with wet
hands or when it has contact with water.
• Do not put cutlery or saucepan lids on
the cooking zones. They become hot.
• Set the cooking zone to “off” after use.
• Do not use the appliance as a work sur-
face or as a storage surface.
• If the surface of the appliance is cracked,
disconnect immediately the appliance
from the power supply. This to prevent
an electrical shock.
WARNING!
Risk of fire or explosion.
• Fats and oil when heated can release
flammable vapours. Keep flames or
heated objects away from fats and oils
when you cook with them.
• The vapours that very hot oil releases
can cause spontaneous combustion.
• Used oil, that can contain food rem-
nants, can cause fire at a lower tempera-
ture than oil used for the first time.
• Do not put flammable products or items
that are wet with flammable products in,
near or on the appliance.
• Do not try to extinguish a fire with water.
Disconnect the appliance and cover the
flame with a lid or a fire blanket.
WARNING!
Risk of damage to the appliance.
• Do not keep hot cookware on the con-
trol panel.
• Do not let cookware to boil dry.
• Be careful not to let objects or cookware
fall on the appliance. The surface can be
damaged.
• Do not activate the cooking zones with
empty cookware or without cookware.
• Do not put aluminium foil on the appli-
ance.
• Cookware made of cast iron, aluminium
or with a damaged bottom can cause
scratches on the glass ceramic. Always
lift these objects up when you have to
move them on the cooking surface.
CARE AND CLEANING
WARNING!
Risk of damage to the appliance.
• Clean regularly the appliance to prevent
the deterioration of the surface material.
• Do not use water spray and steam to
clean the appliance.
• Clean the appliance with a moist soft
cloth. Only use neutral detergents. Do
not use abrasive products, abrasive
cleaning pads, solvents or metal objects.
DISPOSAL
WARNING!
Risk of injury or suffocation.
• Disconnect the appliance from the mains
supply.
• Cut off the mains cable and discard it.
4
www.electrolux.com

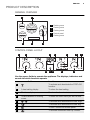
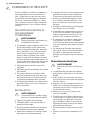
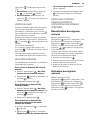
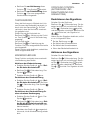
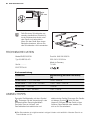
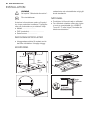
PRODUCT DESCRIPTION
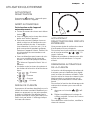
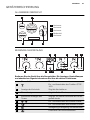
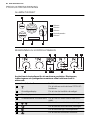
GENERAL OVERVIEW
1 2
35
145
mm
120/180
mm
145/210/270
mm
170
mm
265
mm
4
1
Cooking zone
2
Cooking zone
3
Cooking zone
4
Control panel
5
Cooking zone
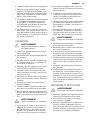
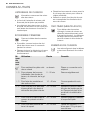
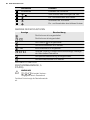
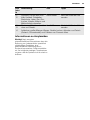
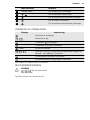
CONTROL PANEL LAYOUT
71 2
3
4 5 6
1012 9
81113
Use the sensor fields to operate the appliance. The displays, indicators and
sounds tell which functions operate.
sensor field function
1
To activate and deactivate the STOP+GO
function.
2
A heat setting display To show the heat setting.
3
The timer display To show the time in minutes.
4
Timer indicators of cooking
zones
To show for which zone you set the time.
5
/
To activate and deactivate the outer rings.
6
To activate and deactivate the outer ring.
7
To lock / unlock the control panel.
8
To activate Automatic Heat Up function.
ENGLISH 5

sensor field function
9
A control bar To set a heat setting.
10
/
To increase or decrease the time.
11
To activate and deactivate the appliance.
12
To set a cooking zone.
13
To activate and deactivate the outer ring.
HEAT SETTING DISPLAYS
Display Description
The cooking zone is deactivated.
-
The cooking zone operates.
The function operates.
The Automatic Heat Up function operates.
+ digit
There is a malfunction.
/ /
OptiHeat Control (3 step Residual heat indicator) : continue
cook / stay warm / residual heat.
Lock / The Child Safety function operates.
The Automatic Switch Off function operates.
OPTIHEAT CONTROL (3 STEP
RESIDUAL HEAT INDICATOR)
WARNING!
/ / The risk of burns from
residual heat!
OptiHeat Control shows the level of the re-
sidual heat.
6
www.electrolux.com

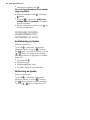
DAILY USE
ACTIVATION AND
DEACTIVATION
Touch for 1 second to activate or deac-
tivate the appliance.
AUTOMATIC SWITCH OFF
The function deactivates the appliance
automatically if:
•
All cooking zones are deactivated (
).
• You do not set the heat setting after you
activate the appliance.
• You spill something or put something on
the control panel for more than 10 sec-
onds, (a pan, a cloth, etc.). An acoustic
signal sound some time and the appli-
ance deactivates. Remove the object or
clean the control panel.
• You do not deactivate a cooking zone or
change the heat setting. After some time
comes on and the appliance deacti-
vates. See below.
• The relation between heat setting and
times of the Automatic Switch Off func-
tion:
•
, - — 6 hours
•
- — 5 hours
•
- — 4 hours
•
- — 1.5 hours
THE HEAT SETTING
Touch the control bar at the heat setting.
Change to the left or the right, if it is neces-
sary. Do not release before you have a cor-
rect heat setting. The display shows the
heat setting.
ACTIVATION AND
DEACTIVATION OF THE OUTER
RINGS
You can adjust the surface you cook to the
dimension of the cookware.
To activate the outer rings touch the sensor
field
/ / . The indicator comes
on.
Do the procedure again to deactivate the
outer rings. The indicator goes out.
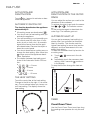
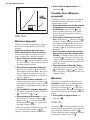
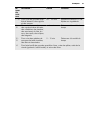
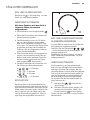
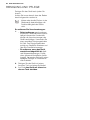
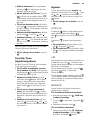
AUTOMATIC HEAT UP
You can get a necessary heat setting in a
shorter time if you activate the Automatic
Heat Up function. This function sets the
highest heat setting for some time (see the
diagram), and then decreases to the nec-
essary heat setting.
To start the Automatic Heat Up function for
a cooking zone:
1.
Touch ( comes on in the dis-
play).
2.
Immediately touch the necessary heat
setting. After 5 seconds
comes on
in the display.
To stop the function change the heat set-
ting.
1
2
3
4
5
6
7
8
9
10
11
12
0
1 2 3 4 5 6 7 8 9 101112 1314
TIMER
Count Down Timer
Use the Count Down Timer to set how long
the cooking zone operates for only this one
time.
ENGLISH 7

Set the Count Down Timer after the se-
lection of the cooking zone.
You can set the heat setting before or after
you set the timer.
•
To set the cooking zone: touch
again and again until the indicator of a
necessary cooking zone comes on.
• To activate the Count Down Timer:
touch
of the timer to set the time (
00
-
99
minutes). When the indicator
of the cooking zone start to flash slow,
the time counts down.
• To see the remaining time: set the
cooking zone with
. The indicator of
the cooking zone starts to flash quickly.
The display shows the remaining time.
•
To change the Count Down Timer:
set the cooking zone with
. Touch
or .
• To deactivate the timer: set the cook-
ing zone with
. Touch . The re-
maining time counts back to
00
. The
indicator of the cooking zone goes out.
When the countdown comes to an end,
the sound operates and
00
flashes. The
cooking zone deactivates.
•
To stop the sound: touch
CountUp Timer ( The count up
timer)
Use the CountUp Timer to monitor how
long the cooking zone operates.
•
To set the cooking zone (if more
than 1 cooking zone operate ) : touch
again and again until the indicator of
a necessary cooking zone comes on.
• To activate the CountUp Timer: touch
of the timer comes on. When the
indicator of the cooking zone starts to
flash slow, the time counts up. The dis-
play switches between
and counted
time (minutes).
•
To see how long the cooking zone
operates: set the cooking zone with
. The indicator of the cooking zone starts
to flash quickly. The display shows the
time that the cooking zone operates.
• To deactivate the CountUp Timer: set
the cooking zone with
and touch
or to deactivate the timer. The indica-
tor of the cooking zone goes out.
Minute Minder
You can use the timer as a Minute Minder
while the cooking zones do not operate.
Touch
. Touch or of the timer to
set the time. When the time comes to an
end, the sound operates and
00
flashes.
•
To stop the sound: touch
STOP+GO
The function sets all cooking zones that
operate to the lowest heat setting (
).
When
operates, you cannot change the
heat setting.
The
function does not stop the timer
function.
•
To activate this function touch
. The
symbol
comes on.
•
To deactivate this function touch .
The heat setting that you set before
comes on.
LOCK
When the cooking zones operate, you can
lock the control panel, but not
. It pre-
vents an accidental change of the heat set-
ting.
First set the heat setting.
To start this function touch
. The sym-
bol
comes on for 4 seconds.
The Timer stays on.
To stop this function touch
. The heat
setting that you set before comes on.
When you stop the appliance, you also
stop this function.
THE CHILD SAFETY DEVICE
This function prevents an accidental opera-
tion of the appliance.
To activate the child safety device
•
Activate the appliance with
. Do not
set the heat settings.
•
Touch
for 4 seconds. The symbol
comes on.
•
Deactivate the appliance with
.
8
www.electrolux.com

To deactivate the child safety device
•
Activate the appliance with . Do not
set the heat settings. Touch
for 4
seconds. The symbol
comes on.
•
Deactivate the appliance with
.
To override the child safety device for
only one cooking time
•
Activate the appliance with
. The
symbol
comes on.
•
Touch for 4 seconds. Set the heat
setting in 10 seconds. You can oper-
ate the appliance.
• When you deactivate the appliance with
, the child safety device operates
again.
OFFSOUND CONTROL
(DEACTIVATION AND
ACTIVATION OF THE SOUNDS)
Deactivation of the sounds
Deactivate the appliance.
Touch
for 3 seconds. The displays
come on and go out. Touch
for 3 sec-
onds.
comes on, the sound is on.
Touch
, comes on, the sound is off.
When this function operates, you can hear
the sounds only when:
•
you touch
• the Minute Minder comes down
• the Count Down Timer comes down
• you put something on the control panel.
Activation of the sounds
Deactivate the appliance.
Touch
for 3 seconds. The displays
come on and go out. Touch
for 3 sec-
onds.
comes on, because the sound is
off. Touch
, comes on. The sound is
on.
ENGLISH 9

HELPFUL HINTS AND TIPS
COOKWARE
Information about the cookware
• The bottom of the cookware must be as
thick and flat as possible.
• Cookware made of enamelled steel and
with aluminium or copper bottoms can
cause the colour change on the glass-
ceramic surface.
ENERGY SAVING
How to save energy
• If it is possible, always put the lids on the
cookware.
• Put cookware on a cooking zone before
you start it.
• Stop the cooking zones before the end
of the cooking time to use residual heat.
• The bottom of pans and cooking zones
must have the same dimension.
ÖKO TIMER (ECO TIMER)
To save energy, the heater of the
cooking zone deactivates before
the count down timer sounds. The
difference in the operation time de-
pends on the heat setting level and
the length of the cooking operation.
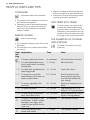
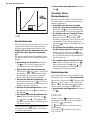
THE EXAMPLES OF COOKING
APPLICATIONS
The data in the table is for guid-
ance only.
Heat
set-
ting
Application: Time Hints
1
To keep cooked food warm as necessary Put a lid on the cookware
1 - 3 To make Hollandaise sauce
and to melt butter, chocolate
and gelatine
5 - 25 min Mix at intervals
1 - 3 To make fluffy omelettes and
baked eggs solid
10 - 40 min Cook with a lid on
3 - 5 To simmer rice and milk-
based dishes and to heat up
ready-cooked meals
25 - 50 min Add a minimum of two
times as much liquid as
rice. Mix milk dishes half-
way through
5 - 7 To steam vegetables, fish
and meat
20 - 45 min Add some tablespoons of
liquid
7 - 9 To steam potatoes 20 - 60 min Use maximum of. ¼ l of
water for 750 g of potatoes
7 - 9 To cook larger quantities of
food, stews and soups
60 - 150 min Add a maximum of 3 l of a
liquid to the ingredients
9 -
12
To lightly fry escalopes, veal
cordon bleu, cutlets, rissoles,
sausages, liver, eggs, pan-
cakes and doughnuts and to
cook roux
as necessary Turn halfway through
12 -
13
To fry hash browns, loin
steaks and steaks
5 - 15 min Turn halfway through
10
www.electrolux.com

Heat
set-
ting
Application: Time Hints
14 To boil large quantity of water, cook pasta, sear meat (goulash, pot, roast)
and to deep-fry chips
Information on acrylamides
Important! According to the newest
scientific knowledge, if you brown food
(specially the one which contains starch),
acrylamides can pose a health risk. Thus,
we recommend that you cook at the lowest
temperatures and do not brown food too
much.
ENGLISH 11

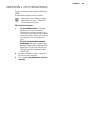
CARE AND CLEANING
Clean the appliance after each use.
Always use cookware with clean bottom.
Scratches or dark stains on the
glass-ceramic cause no effect on
how the appliance operates.
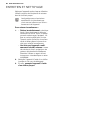
To remove the dirt:
1.
– Remove immediately: melted
plastic, plastic foil, and food with
sugar. If not, the dirt can cause
damage to the appliance. Use a
special scraper for the glass . Put
the scraper on the glass surface at
an acute angle and move the blade
on the surface .
–
Remove after the appliance is
sufficiently cool: limescale rings ,
water rings, fat stains, shiny metallic
discolorations. Use a special clean-
ing agent for glass ceramic or stain-
less steel.
2.
Clean the appliance with a moist cloth
and some detergent.
3.
At the end rub the appliance dry
with a clean cloth.
12
www.electrolux.com

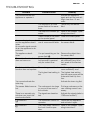
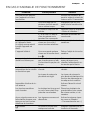
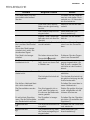
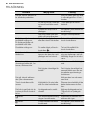
TROUBLESHOOTING
Problem Possible cause Remedy
You cannot activate the
appliance or operate it.
Activate the appliance
again and set the heat set-
ting in less than 10 sec-
onds.
You touched 2 or more
sensor fields at the same
time.
Touch only one sensor
field.
The Stop+Go function op-
erates.
Refer to the chapter “Oper-
ating instructions”.
There is water or fat stains
on the control panel.
Clean the control panel.
An acoustic signal sounds
and the appliance deacti-
vates.
An acoustic signal sounds
when the appliance is de-
activated.
You put something on
one or more sensor fields.
Remove the object from
the sensor fields.
The appliance deacti-
vates.
You put something on the
sensor field
.
Remove the object from
the sensor field.
The residual heat indicator
does not come on.
The cooking zone is not
hot because it operated
only for a short time.
If the cooking zone operat-
ed sufficiently long to be
hot, speak to the service
centre.
The Automatic Heat Up
function does not operate.
The cooking zone is hot. Let the cooking zone be-
come sufficiently cool.
The highest heat setting is
set.
The highest heat setting
has the same power as the
Automatic Heat Up func-
tion.
You cannot activate the
outer ring.
Activate the inner ring first.
The sensor fields become
hot.
The cookware is too large
or you put it too near to
the controls.
Put large cookware on the
rear cooking zones if nec-
essary.
There is no acoustic sig-
nal when you touch the
panel sensor fields.
The signals are deactiva-
ted.
Activate the signals (refer to
“OffSound control”).
comes on.
The Automatic Switch Off
operates.
Deactivate the appliance
and activate it again.
comes on.
The Child Safety Device or
the Lock function oper-
ates.
Refer to the chapter “Oper-
ating instructions”.
ENGLISH 13

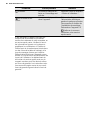
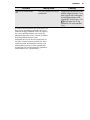
Problem Possible cause Remedy
and a number come
on.
There is an error in the
appliance.
Disconnect the appliance
from the electrical supply
for some time. Disconnect
the fuse from the electrical
system of the house. Con-
nect it again. If
comes
on again, speak to the
service centre.
If you tried the above solutions and cannot
repair the problem, speak to your dealer or
the customer service. Give the data from
the rating plate, three digit letter code for
the glass ceramic (it is in the corner of the
glass surface) and an error message that
comes on.
Make sure, you operated the appliance
correctly. If not the servicing by a customer
service technician or dealer will not be free
of charge, also during the warranty period.
The instructions about the customer serv-
ice and conditions of guarantee are in the
guarantee booklet.
14
www.electrolux.com

INSTALLATION
WARNING!
Refer to "Safety information" chap-
ter.
Before the installation
Before the installation of the appliance, re-
cord the information below from the rating
plate. The rating plate is on the bottom of
the appliance casing.
• Model ...........................
• PNC .............................
• Serial number ....................
BUILT-IN APPLIANCES
• Only use the built-in appliances after you
assemble the appliance into correct
built-in units and work surfaces that align
to the standards.
CONNECTION CABLE
• The appliance is supplied with the con-
nection cable.
• Replace the damaged mains cable with
a special cable (type H05BB-F Tmax
90°C; or higher). Speak to your local
Service Centre.
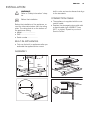
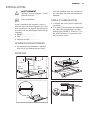
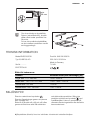
ASSEMBLY
min.
50mm
min.
50mm
min.
500mm
=
=
R 5mm
600mm
490
+1
mm
750
+1
mm
min.
25 mm
min.
20 mm
ENGLISH 15

min.
28 mm
If you use a protection box (an ad-
ditional accessory
1)
), the protective
floor directly below the appliance is
not necessary.
You can not use the protection box
if you install the appliance above an
oven.
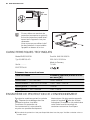
TECHNICAL INFORMATION
Modell EHF8748FOK Prod.Nr. 949 596 058 00
Typ 58 HBD 68 AO 220-240 V 50-60 Hz
Made in Germany
Ser.Nr. .......... 7.8 kW
ELECTROLUX
Cooking zones power
Cooking zone Nominal Power (Max heat setting)
[W]
Right rear —170 / 265 mm 1400 / 2200 W
Middle rear — 145 / 210 / 270 mm 1050 / 1950 / 2700 W
Left rear — 145 mm 1200 W
Left front — 120 / 180 mm 700 / 1700 W
ENVIRONMENT CONCERNS
Recycle the materials with the symbol
.
Put the packaging in applicable containers
to recycle it.
Help protect the environment and human
health and to recycle waste of electrical
and electronic appliances. Do not dispose
appliances marked with the symbol
with
the household waste. Return the product
to your local recycling facility or contact
your municipal office.
1)
The protection box accessory may not be available in some countries. Please contact your
local supplier.
16
www.electrolux.com

SOMMAIRE
CONSIGNES DE SÉCURITÉ . . . . . . . . . . . . . . . . . . . . . . . . . . . . . . . . . . . . . . . . . . . . . . . . . . . . . 18
DESCRIPTION DE L'APPAREIL . . . . . . . . . . . . . . . . . . . . . . . . . . . . . . . . . . . . . . . . . . . . . . . . . . 21
UTILISATION QUOTIDIENNE . . . . . . . . . . . . . . . . . . . . . . . . . . . . . . . . . . . . . . . . . . . . . . . . . . . . 23
CONSEILS UTILES . . . . . . . . . . . . . . . . . . . . . . . . . . . . . . . . . . . . . . . . . . . . . . . . . . . . . . . . . . . . 26
ENTRETIEN ET NETTOYAGE . . . . . . . . . . . . . . . . . . . . . . . . . . . . . . . . . . . . . . . . . . . . . . . . . . . . 28
EN CAS D'ANOMALIE DE FONCTIONNEMENT . . . . . . . . . . . . . . . . . . . . . . . . . . . . . . . . . . . . . . 29
INSTALLATION . . . . . . . . . . . . . . . . . . . . . . . . . . . . . . . . . . . . . . . . . . . . . . . . . . . . . . . . . . . . . . 31
CARACTERISTIQUES TECHNIQUES . . . . . . . . . . . . . . . . . . . . . . . . . . . . . . . . . . . . . . . . . . . . . . 32
EN MATIÈRE DE PROTECTION DE L'ENVIRONNEMENT . . . . . . . . . . . . . . . . . . . . . . . . . . . . . . 32
NOUS PENSONS À VOUS
Merci d'avoir choisi ce produit Electrolux. Avec ce produit, vous bénéficiez de dizaines d'années
d'expérience professionnelle et d'innovation. Ingénieux et élégant, il a été conçu sur mesure pour
vous. Grâce à cet appareil, vous savez que chaque utilisation vous apportera satisfaction.
Bienvenue chez Electrolux.
Visitez notre site Internet pour :
Obtenir des conseils d'utilisation, des brochures, de l'aide, des informations :
www.electrolux.com
Enregistrer votre produit pour obtenir un meilleur service :
www.electrolux.com/productregistration
Acheter des accessoires, consommables et pièces de rechange d'origine pour votre
appareil :
www.electrolux.com/shop
SERVICE APRÈS-VENTE
N'utilisez que des pièces de rechange d'origine.
Avant de contacter le service, assurez-vous de disposer des informations suivantes :
Vous trouverez ces informations sur la plaque signalétique. Modèle, PNC, numéro de série.
Avertissement/Attention : consignes de sécurité.
Informations générales et conseils
Informations écologiques
Sous réserve de modifications.
FRANÇAIS 17

CONSIGNES DE SÉCURITÉ
Avant d'installer et d'utiliser cet appareil, li-
sez soigneusement les instructions four-
nies. Le fabricant ne peut être tenu pour
responsable des dommages et blessures
liés à une mauvaise installation ou utilisa-
tion. Conservez toujours cette notice avec
votre appareil pour vous y référer ultérieu-
rement.
SÉCURITÉ DES ENFANTS ET
DES PERSONNES
VULNÉRABLES
AVERTISSEMENT
Risque d'asphyxie, de blessure ou
d'invalidité permanente.
• Cet appareil n'est pas destiné à être utili-
sé par des enfants ou des personnes
dont les capacités physiques, sensoriel-
les ou mentales, ou le manque d'expé-
rience et de connaissance les empê-
chent d'utiliser l'appareil sans risque
lorsqu'ils sont sans surveillance à moins
qu'une personne responsable de leur sé-
curité ne les supervise ou leur donne des
instructions sur la manière de l'utiliser.
• Ne laissez pas les enfants jouer avec
l'appareil.
• Ne laissez pas les emballages à la portée
des enfants.
• Tenez les enfants et les animaux éloi-
gnés de l’appareil lorsqu'il est en cours
de fonctionnement ou lorsqu'il refroidit.
Les parties accessibles sont chaudes.
• Si l'appareil est équipé d'un dispositif de
sécurité enfants, nous vous recomman-
dons de l'activer.
INSTALLATION
AVERTISSEMENT
L'appareil doit être installé unique-
ment par un professionnel qualifié.
• Retirez l'intégralité de l'emballage.
• N'installez pas et ne branchez pas un
appareil endommagé.
• Suivez scrupuleusement les instructions
d'installation fournies avec l'appareil.
• Respectez l'espacement minimal requis
par rapport aux autres appareils.
• L'appareil est lourd, prenez toujours des
précautions lorsque vous le déplacez.
Portez toujours des gants de sécurité.
• Isolez les surfaces découpées à l'aide
d'un matériau d'étanchéité pour éviter
que la moisissure ne provoque de gon-
flements.
• Protégez la partie inférieure de l'appareil
de la vapeur et de l'humidité.
• N'installez pas l'appareil près d'une por-
te ou sous une fenêtre. Les récipients
chauds risqueraient de tomber de l'ap-
pareil lors de l'ouverture de celles-ci.
• Si l'appareil est installé au-dessus de ti-
roirs, assurez-vous qu'il y a suffisam-
ment d'espace entre le fond de l'appareil
et le tiroir supérieur pour que l'air puisse
circuler.
• Le dessous de l'appareil peut devenir
très chaud. Nous vous recommandons
d'installer un panneau de séparation
ignifuge sous l'appareil pour en bloquer
l'accès.
Branchement électrique
AVERTISSEMENT
Risque d'incendie ou d'électrocu-
tion.
• L'ensemble des branchements électri-
ques doit être effectué par un technicien
qualifié.
• Avant chaque raccordement, assurez-
vous que la borne principale de l'appareil
est hors tension.
• Assurez-vous que l'appareil est bien in-
stallé. Des connexions desserrées ou in-
correctes peuvent être à l'origine d'une
surchauffe des bornes.
• Assurez-vous qu'une protection anti-
chocs est installée.
• Contrôlez que les câbles d'alimentation
n'entrent pas en contact avec les surfa-
ces brûlantes de l'appareil ou les réci-
pients brûlants lorsque vous branchez
l'appareil électrique à des prises électri-
ques situées à proximité.
• Ne laissez pas les connexions s'emmê-
ler.
• Utilisez une pince pour détendre le câ-
ble.
18
www.electrolux.com

• Utilisez le câble d'alimentation approprié.
• Veillez à ne pas endommager la fiche
secteur ni le câble d'alimentation. Con-
tactez le service après-vente ou un élec-
tricien pour remplacer le câble d'alimen-
tation s'il est endommagé.
• L'installation électrique doit être équipée
d'un dispositif d'isolement à coupure
omnipolaire. Le dispositif d'isolement
doit présenter une distance d'ouverture
des contacts d'au moins 3 mm.
• N'utilisez que des systèmes d'isolation
appropriés : des coupe-circuits, des fusi-
bles (les fusibles à visser doivent être re-
tirés du support), un disjoncteur différen-
tiel et des contacteurs.
UTILISATION
AVERTISSEMENT
Risque de blessures, de brûlures
ou d'électrocution.
• Utilisez cet appareil dans un environne-
ment domestique.
• Ne modifiez pas les caractéristiques de
cet appareil.
• Ne faites pas fonctionner l'appareil avec
un minuteur externe ou un système de
commande à distance.
• Ne laissez jamais l'appareil sans surveil-
lance pendant son fonctionnement.
• N'utilisez jamais cet appareil avec les
mains mouillées ou lorsqu'il est en con-
tact avec de l'eau.
• Ne posez pas de couverts ou de couver-
cles sur les zones de cuisson. Elles sont
chaudes.
• Éteignez les zones de cuisson après
chaque utilisation.
• N'utilisez jamais l'appareil comme plan
de travail ou comme plan de stockage.
• Si la surface de l'appareil présente des
fêlures, débranchez immédiatement l'ap-
pareil pour éviter tout risque d'électrocu-
tion.
AVERTISSEMENT
Risque d'explosion ou d'incendie.
• Les graisses et l'huile chaude peuvent
dégager des vapeurs inflammables. Te-
nez les flammes ou les objets chauds
éloignés des graisses et de l'huile lors-
que vous vous en servez pour cuisiner.
• Les vapeurs dégagées par l'huile très
chaude peuvent provoquer une combus-
tion spontanée.
• L'huile qui a servi contient des restes
d'aliments qui peuvent provoquer un in-
cendie à température plus faible que
l'huile n'ayant jamais servi.
• Ne placez pas de produits inflammables
ou d'éléments imbibés de produits in-
flammables à l'intérieur, à proximité ou
sur l'appareil.
• Ne tentez pas d'éteindre un incendie
avec de l'eau. Débranchez l'appareil et
couvrez les flammes à l'aide d'un cou-
vercle ou d'une couverture à incendie.
AVERTISSEMENT
Risque de dommage de l'appareil.
• Ne laissez pas de récipients chauds sur
le bandeau de commande.
• Ne laissez pas le contenu des récipients
de cuisson s'évaporer.
• Prenez soin de ne pas laisser tomber
d'objets ou de récipients sur l'appareil.
Sa surface risque d'être endommagée.
• Ne faites jamais fonctionner les zones de
cuisson avec des récipients de cuisson
vides ou sans aucun récipient de cuis-
son.
• Ne placez jamais de papier aluminium
sur l'appareil.
• N'utilisez pas de récipients en fonte ou
en aluminium, ni de récipients dont le
fond est endommagé et rugueux. Ils ris-
queraient de rayer la surface vitrocérami-
que. Soulevez toujours ces objets lors-
que vous devez les déplacer sur la surfa-
ce de cuisson.
ENTRETIEN ET NETTOYAGE
AVERTISSEMENT
Risque de dommage de l'appareil.
• Nettoyez régulièrement l'appareil afin de
maintenir le revêtement en bon état.
• Ne pulvérisez pas d'eau ni de vapeur
pour nettoyer l'appareil.
• Nettoyez l'appareil avec un chiffon doux
humide. Utilisez uniquement des pro-
duits de lavage neutres. N'utilisez pas de
produits abrasifs, de tampons à récurer,
de solvants ou d'objets métalliques.
FRANÇAIS 19

MISE AU REBUT
AVERTISSEMENT
Risque de blessure ou d'asphyxie.
• Débranchez l'appareil de l'alimentation
électrique.
• Coupez le câble d'alimentation au ras de
l'appareil et mettez-le au rebut.
20
www.electrolux.com
Sidan laddas...
Sidan laddas...
Sidan laddas...
Sidan laddas...
Sidan laddas...
Sidan laddas...
Sidan laddas...
Sidan laddas...
Sidan laddas...
Sidan laddas...
Sidan laddas...
Sidan laddas...
Sidan laddas...
Sidan laddas...
Sidan laddas...
Sidan laddas...
Sidan laddas...
Sidan laddas...
Sidan laddas...
Sidan laddas...
Sidan laddas...
Sidan laddas...
Sidan laddas...
Sidan laddas...
Sidan laddas...
Sidan laddas...
Sidan laddas...
Sidan laddas...
Sidan laddas...
Sidan laddas...
Sidan laddas...
Sidan laddas...
Sidan laddas...
Sidan laddas...
Sidan laddas...
Sidan laddas...
Sidan laddas...
Sidan laddas...
Sidan laddas...
Sidan laddas...
Sidan laddas...
Sidan laddas...
Sidan laddas...
Sidan laddas...
-
 1
1
-
 2
2
-
 3
3
-
 4
4
-
 5
5
-
 6
6
-
 7
7
-
 8
8
-
 9
9
-
 10
10
-
 11
11
-
 12
12
-
 13
13
-
 14
14
-
 15
15
-
 16
16
-
 17
17
-
 18
18
-
 19
19
-
 20
20
-
 21
21
-
 22
22
-
 23
23
-
 24
24
-
 25
25
-
 26
26
-
 27
27
-
 28
28
-
 29
29
-
 30
30
-
 31
31
-
 32
32
-
 33
33
-
 34
34
-
 35
35
-
 36
36
-
 37
37
-
 38
38
-
 39
39
-
 40
40
-
 41
41
-
 42
42
-
 43
43
-
 44
44
-
 45
45
-
 46
46
-
 47
47
-
 48
48
-
 49
49
-
 50
50
-
 51
51
-
 52
52
-
 53
53
-
 54
54
-
 55
55
-
 56
56
-
 57
57
-
 58
58
-
 59
59
-
 60
60
-
 61
61
-
 62
62
-
 63
63
-
 64
64


Electrolux EHF8748FOK Användarmanual
- Kategori
- Kokplattor
- Typ
- Användarmanual
på andra språk
- Deutsch: Electrolux EHF8748FOK Benutzerhandbuch
- français: Electrolux EHF8748FOK Manuel utilisateur
- English: Electrolux EHF8748FOK User manual
Relaterade papper
-
Electrolux EHF3120FOK Användarmanual
-
-
Electrolux EHF3320FOK Användarmanual
-
-
Electrolux EHF6343FOK Användarmanual
-
-
Electrolux HOI335F Användarmanual
-
Electrolux HOI630NF Användarmanual
-
-