
IT
GB
FR
DE
ES
PT
EL
PL
CZ
NL
FI
NO
SV
DA
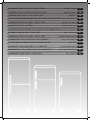
COMBINATI TOTAL NO FROST E FROST FREE ...........................................da pag.4 a pag.5
COMBINED TOTAL NO FROST AND FROST FREE ..................................... page 6 to page 7
COMBINÉS NO FROST ET NO FROST TOTAL
.............................................................pages 8 à 9
KÜHL-GEFRIERKOMBINATIONEN TOTAL NO FROST UND FROSTFREE .. Seite 10 bis Seite 11
COMBINADO TOTAL NO FROST Y FROST FREE .....................................de pág.12 a pág.13
COMBINADO TOTAL NO FROST .................................................................da pág. 14 à pág.15
ΨΥΓΕΙΟΚΑΤΑΨΥΚΤΗΣ ΜΕ ΣΥΣΤΗΜΑ "TOTAL NO FROST" ΚΑΙ ΜΕ ΑΥΤΟΜΑΤΗ ΑΠΟΨΥΞ .. αό σελ. 16 έως σελ. 17
LODÓWKI KOMBI NO FROST I FROST FREE ..............................................................od str. 18 do str.19
KOMBINACE TOTAL NO FROST A FROST FREE
................................. od strany 20 do strany 21
COMBINATIE TOTAAL GEEN VORST EN VORSTVRIJ .............................pag. 22 t/m pag. 23
HUURTUMATON JÄÄKAAPPIPAKASTINYHDISTELMÄ........................................ sivut 24-25
KOMBINERT TOTAL INGEN FROST OG FROSTFRI ..............................fra side 26 til side 27
KOMBINERAD TOTAL INGEN FROST OCH FROSTFRITT ............... från sida 28 till sida 29
KOMBINERET UDEN FROST OG FROSTFRI
........................................................... fra s. 30 til s.31

TOTAL NO FROST
I prodotti total No frost sono costituiti da un sistema
di aereazione composto da 2 bocchette regolabili
manualmente.
Si consiglia di tenere le bocchette parzialmente
e completamente aperte.
The Frost Free Plus system uses the two manually
adjustable vents to circulate cold air evenly around the
fridge.
It is recommended that the vents are kept partially or
completely open.
FROST FREE PLUS
Die völlig frostfreien Produkte sind mit einer
Lüftungsanlage ausgestattet, die sich aus zwei von
Hand einstellbaren Düsen zusammensetzt.
Es wird empfohlen, die Öffnungen jeweils teilweise und
vollständig geöffnet zu halten.
TOTAL NO FROST
NO FROST TOTAL
Los productos Total No frost estan compuestos por
un sistema de ventilación formado por dos difusores
ajustables manualmente.
Es recomendable mantener las aberturas parcial
o totalmente abiertas.
Produkty z systemem całkowicie automatycznego
rozmrażania zawierają system wentylacyjny, w którego
skład wchodzą dwie ręcznie regulowane dysze.
Zaleca się, aby otwory pozostawały częściowo lub
całkowicie otwarte.
CAŁKOWICIE AUTOMATYCZNE ROZMRAŻANIE
Os equipamentos No Frost são compostos por um
sistema de ventilação que inclui 2 bocais manualmente
ajustáveis.
É recomendável manter as aberturas parcial ou
totalmente abertas.
NO FROST TOTAL
TOTAL NO FROST
Les produits total No Frost sont constitués d‘un système
de ventilation qui comprend 2 sorties d’air froid, réglables
manuellement.
Il est recommandé de maintenir les ouvertures
partiellement et complètement ouvertes.
Τα προϊόντα με πλήρως αυτόματη απόψυξη αποτελούνται
από ένα σύστημα αερισμού το οποίο περιλαμβάνει
2 ακροφύσια που ρυθμίζονται χειροκίνητα.
Συνιστάται να διατηρείτε τα ανοίγματα εν μέρει και πλήρως
ανοικτά.
ΠΛΗΡΩΣ ΑΥΤΟΜΑΤΗ ΑΠΟΨΥΞΗ
Výrobky s označením Total No frost jsou vybaveny
systémem větrání, který je tvořen 2 ručně nastavitelnými
větracími otvory.
Doporučujeme nechat tyto otvory částečně a úplně
otevřené.
TOTAL FROST FREE

TOTAAL ‚FROST FREE‘
De ‚totaal frost free‘ producten hebben een
ventilatiesysteem dat twee handmatig verstelbare
openingen bevat.
Het is aan te bevelen om de openingen gedeeltelijk of
compleet open te houden.
Helt frostfria produkter består av ett ventilationssystem
som består av 2 manuellt justerbara munstycken.
Vi rekommenderar att öppningarna hålls delvis och
helt öppna.
HELT FROSTFRI
Totalt frostfrie produkter består af et ventilationssystem,
som indeholder 2 manuelt justerbare dyser.
Det anbefales at holde åbningerne delvist og fuldstændigt
åbne.
TOTAL FROSTFRI
TOTAL FROST FREE
Total frost free -tuotteissa on ilmanvaihtojärjestelmä,
joka muodostuu kahdesta manuaalisesti säädettävästä
suuttimesta.
Suosittelemme pitämään aukot osittain ja täysin auki.
Total frost free-produktene har et ventilasjonssystem som
består av to manuelt justerbare munnstykker.
Det anbefales å holde åpningene delvis og komplett
åpne.
TOTAL FROST FREE

4 IT
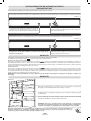
1
2
3
4
5
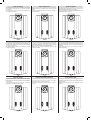
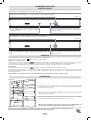
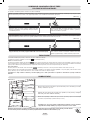
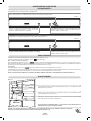
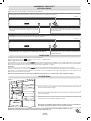
COMBINATI FROST FREE
QUADRO COMANDI
Per raggiungere il quadro comandi è suffi ciente aprire la porta superiore del frigorifero
MODELLO CON OPZIONE SUPER La manopola consente di attivare tutto l’apparecchio e di impostare la temperatura del vano congelatore e
Frigorifero. Le posizioni consigliate sono 2-3. Se si ruota sulla posizione “0“ si disattiva completamente l’apparecchio.
La spia arancio si accende quando la Manopola termostato è
ruotata in corrispondenza della posizione SUPER. In questo
caso il compressore funziona continuamente.
CONGELAZIONE
(Figura 1)
La buona conservazione degli alimenti congelati è garantita in tutti gli scomparti del congelatore.
In alcuni prodotti è presente una sezione
nella parte superiore, (vedi guida rapida).
MODELLO CON OPZIONE SUPER
Disporre i cibi da congelare nel cassetto
, ruotare in senso orario il termostato fi no a raggiungere la posizione di SUPER, contemporaneamente
si accenderà la relativa spia arancio (vedi fi gura 1). Trascorse altre 24 ore la congelazione è terminata. Riportare quindi il termostato nella posizione
2-3. La funzione SUPER viene disattivata automaticamente dalla scheda elettronica dopo 26 ore. La quantità massima di alimenti che è possibile
congelare è indicata nella targhetta matricola, (vedi fi gura 3).
MODELLO BASE
Disporre i cibi da congelare nel cassetto
, la congelazione è garantita in qualsiasi posizione della manopola (vedi fi gura 2).
All’inizio della congelazione, per non fare raffreddare eccessivamente il vano frigo, potrebbe essere necessario arretrare di circa 1/2 numero la
manopola del termostato, in funzione del carico e della temperatura ambiente. Alla fi ne della congelazione, riportare la manopola del termostato
sul valore abituale.
N.B. Per una miglior circolazione dell’aria, lasciare dello spazio tra gli alimenti ed evitare di ostruire le bochette dell’ari raffreddamento.
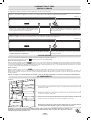
LO SBRINAMENTO
(Figura 3)
La presenza di un lieve strato di brina o di gocce d’acqua durante il funzionamento è da
considerarsi normale
E’ importante mantenere sempre pulito il condotto di scarico ed evitare di porre i cibi
a contatto con la parete della cella
Il vano freezer non necessita di sbrinamento poiché questo prodotto è dotato di un
sistema automatico che impedisce la formazione di ghiaccio (frost free)
Importante: In presenza di temperatura ambiente molto calda, l’apparecchio potrebbe funzionare in continuo, con
conseguente formazione anomala di brina sulla parete di fondo della cella frigo. In questi casi è necessario ruotare la
manopola frigo su numeri più bassi (1-2).
MODELLO BASE La manopola consente di attivare tutto l’apparecchio e di impostare la temperatura del vano congelatore e Frigorifero. Le
posizioni consigliate sono 2-3. Se si ruota sulla posizione “0“ si disattiva completamente l’apparecchio.
Importante: Alcuni apparecchi inizieranno a funzionare dopo un tempo di
almeno 6 minuti dal momento in cui si è inserita la spina nella presa della
corrente e impostata la temperatura.
NB. In questa posizione è possibile trovare la targa matricola, contenente i dati da
comunicare all’Assistenza Tecnica qualora si verifi casse un guasto.
La spia verde “ON“ indica che l’apparecchio è in funzione. La
spia si accende qualunque sia la posizione del termostato
ad eccezione dello 0.
(Figura 2)
La spia verde “ON“ indica che l’apparecchio è in funzione. La
spia si accende qualunque sia la posizione del termostato
ad eccezione dello 0.

5 IT
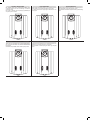
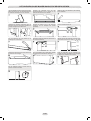
Per invertire il senso di apertura delle porte seguire le indicazioni in relazione al tipo di testata e di cerniera di cui il vostro prodotto è costituito.
INVERSIONE DEL SENSO DI APERTURA DELLE PORTE

6 EN
1
2
3
4
5
COMBINED FROST FREE
CONTROL PANEL
Open the top door of the fridge in order to access the control panel.
MODEL WITH SUPER OPTION Turn on the knob to switch on the appliance and set the temperature of the freezer compartment and fridge. We
recommend you set the temperature to 2 or 3. Turn the knob to “0” to turn off the appliance.
The orange light comes on when the thermostat knob is
turned to SUPER. In this case the compressor continues
to function as normal.
FREEZING
(Figure 1)
The preservation of frozen foods is guaranteed in all of the freezer’s compartments.
In some products there is a section
in the top part, (see quick guide).
MODEL WITH SUPER OPTION
Place the foods to be frozen in the drawer
, turn the thermostat clockwise to SUPER position, and the orange light will come on (see fi gure
1). After 24 hours, freezing is completed. Therefore, reset the thermostat to position 2-3. The SUPER function is automatically disabled
from the circuit board after 26 hours. The rating plate states the maximum quantity of foods that can be frozen, (see fi gure 3).
BASE MODEL
Place the foods to be frozen in the drawer
, freezing is guaranteed in any position of the knob (see fi gure 2).
At the start of the freezing process, so as not to make the fridge compartment excessively cold, it may be necessary to turn the thermostat knob
back by approximately 1/2 numbers, according to the load and room temperature. Once the freezing process is completed, return the thermostat
knob to the usual value.
N.B. For better air circulation, leave some room in between the foods and avoid blocking the cooling air outlets.
DEFROSTING
(Figure 3)
A small amount of frost or drops of water on the back of the fridge compartment when
the fridge is working is normal
Make sure the water outlet is always clean. Make sure foods do not touch the back or
sides of the fridge compartment
The freezer compartment does not require defrosting because this product is equipped
with an automatic system that prevents the formation of ice (frost free)
Important: If the room temperature is very warm, the appliance may work continuously and a layer of frost will deposit on
the back of the fridge compartment. In this case, turn the knob to lower settings (1-2).
BASE MODEL Turn on the knob to switch on the appliance and set the temperature of the freezer compartment and fridge. We recommend you
set the temperature to 2 or 3. Turn the knob to “0” to turn off the appliance.
Important: Some appliances will start working at least 6 minutes after the
plug has been inserted in the power outlet and the temperature has been
set.
NB. This is the rating plate. If you need to contact our Service Department in the
event of faults, remember to give them the information on the plate.
The green “ON“ light shows that the unit is working. This
light is on irrespective of the knob setting, except for when
the knob is set to 0.
(Figure 2)
The green “ON“ light shows that the unit is working. This
light is on irrespective of the knob setting, except for when
the knob is set to 0.

7 EN
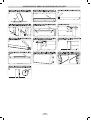
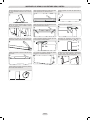
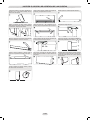
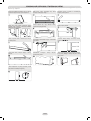
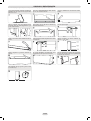
Place the appliance on the floor or at a 45° angle,
since it is necessary to work on the bottom of the
appliance.
Take off the bottom right-hand hinge by removing
the screws, pin and washers, then remove the
lower door.
Mark and break the left-hand slot on the panel, in
the insert area.
Take the top left-hand hinge from the accessories
kit and fasten it.
Fit the panel, and secure with the screws and
caps.
To reverse the handles: remove the outer caps
from the right-hand side of the doors.
Remount the hinges and doors working from
bottom to top,
Unscrew the handles from the left-hand side and
move them to the right-hand side, then position
the outer caps on the left-hand side of the doors.
Remove the lower plinth by pulling out the 3
protective plugs and by loosening the screws.
Remove the caps (A) and (B), loosen the screws
and partially remove the panel.
Unscrew the right hinge.
Drill the plinth on the marked left hand-side area.
Put the appliance in an upright position and wait
two hours before turning it on.
2 Hours
In order to reverse the opening of the doors, follow the indications in relation to the insert and hinge type your product is made up of.
REVERSING THE OPENING OF THE DOORS

8 FR
1
2
3
4
5
COMBINE NO FROST
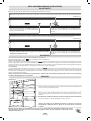
PANNEAU DE COMMANDE
Ouvrez la porte supérieure du réfrigérateur afi n d'accéder au panneau de commande.
MODELE DISPOSANT DE L'OPTION SUPER Tournez le bouton afi n de mettre l'appareil en marche et de régler la température du compartiment
congélateur et du réfrigérateur. Nous vous conseillons de régler la température sur 2 ou 3. Placez le bouton sur “0” pour éteindre l'appareil.
Le voyant orange s'allume quand le bouton du thermostat
est sur la position SUPER. Dans ce cas, le compresseur
fonctionne en continue.
CONGELATION
(Image 1)
La conservation d'aliments surgelés est garantie dans tous les compartiments du congélateur.
Certains modèles disposent d'un espace
dans la partie supérieure, (voir le guide de référence rapide).
MODELE DISPOSANT DE L'OPTION SUPER
Placez les aliments à congeler dans le tiroir
, tournez le thermostat dans le sens des aiguilles d'une montre jusqu'à la position SUPER. Le
voyant orange s'allume. (Voir image 1). La congélation est terminée après 24 heures. Replacez le thermostat en position 2 ou 3. La fonction SUPER
est automatiquement désactivée par la carte électronique au bout de 26h. La plaque signalétique indique la quantité d’aliments maximale pouvant
être congelée. (Voir image 3).
MODELE DE BASE
Placez les aliments à congeler dans le tiroir
, la congélation est assurée, quelle que soit la position du thermostat (voir image 2).
Au démarrage du processus de congélation, pour que la partie réfrigérateur ne devienne pas trop froide, il peut être nécessaire de baisser le
thermostat d'une demie graduation en fonction de la quantité d'aliments présente et de la température de la pièce. Replacez le thermostat dans sa
position habituelle une fois le processus de congélation terminé.
N.B. Pour garantir une meilleure circulation de l'air, espacez les aliments et évitez d’obstruer les sorties d'air de refroidissement.
DEGIVRAGE
(Image 3)
Il est normal qu'une fi ne péllicule de givre ou de gouttes d'eau se forme au fond du
réfrigérateur quand ce dernier est en marche.
Assurez-vous de toujours maintenir propre la zone d'évacuation d'eau. Assurez-vous
que les aliments ne soient pas en contact avec le fond ou les parois du réfrigérateur.
Le compartiment congélateur n'a pas besoin d'être dégivré car il est équipé d'un système
automatique empêchant la formation de glace (No Frost).
Important : Si la température de la pièce est trop élevée, il se peut que l'appareil fonctionne en continue et qu'une couche
de givre se forme dans le fond du compartiment réfrigérateur. Dans ce cas, positionnez le bouton sur les réglages les
plus bas. (1-2).
MODELE DE BASE. Tournez le bouton afi n de mettre l'appareil en marche et de régler la température du compartiment congélateur et du
réfrigérateur . Nous vous conseillons de régler la température sur 2 ou 3. Placez le bouton sur “0” pour éteindre l'appareil.
Important : Certains appareils commencent à fonctionner 6 minutes au
moins après que la prise ait été insérée dans la prise de courant et que la
température ait été réglée.
NB. Ceci est la plaque de signalisation. Si vous devez contacter notre service
après vente en cas de dysfonctionnement, pensez à leur fournir les informations
fi gurant sur la plaque.
Le voyant vert "ON" indique que l'appareil est en marche. Ce
voyant reste allumé peu importe la position du bouton, sauf
si ce dernier est en position 0.
(Image 2)
Le voyant vert "ON" indique que l'appareil est en marche. Ce
voyant reste allumé peu importe la position du bouton, sauf
si ce dernier est en position 0.

9 FR
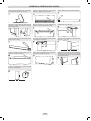
Allongez l'appareil au sol ou à un angle de 45°
car il est nécessaire d'intervenir sur le bas de
l'appareil.
Enlevez la charnière inférieure droite en retirant
les vis, le goujon et les rondelles. Enlevez
ensuite la porte du bas.
Découpez une fente sur le côté gauche du
panneau au niveau de la zone marquée a cet effet.
Fixez la charnière supérieure gauche que vous
trouverez dans le kit d'accessoires.
Installez le panneau et fixez-le à l'aide des vis et
des caches.
Pour inverser les poignées: Retirez les caches
extérieurs sur le côté droit des portes.
Remontez les charnières et les portes en
commençant par celles du bas
Devissez les poignées à gauche et déplacez les
du côté droit, puis positionnez les caches
extérieurs dans les trous du côté gauche.
Retirez la plinthe inférieure en tirant sur les trois
caches protecteurs et en devissant les vis.
Retirez les caches (A) et (B), desserrez les vis et
enlevez partiellement le bandeau.
Devissez la charnière de droite.
Percez la plinthe au niveau du repère situé à
gauche.
Placez l'appareil en position verticale et patientez
deux heures avant de l'allumer.
2 heures
Afi n de pouvoir inverser le sens d'ouverture des portes, reportez-vous aux instructions relatives au type de charnières et de goujons dont votre appareil est équipé.
INVERSER LE SENS D'OUVERTURE DES PORTES

10 DE
1
2
3
4
5
KÜHL-GEFRIERKOMBINATION FROSTFREE
SCHALTBRETT
Öffnen Sie die obere Tür des Kühlschranks, um Zugang zum Schaltbrett zu erhalten.
MODELL MIT OPTION SUPER: Drehen Sie den Drehknopf, um das Gerät einzuschalten, und stellen Sie die Temperatur des Gefrierfachs und des
Kühlschranks ein. Wir empfehlen, die Temperatur auf die Stufe 2 oder 3 zu stellen. Drehen Sie den Drehknopf auf “0”, um das Gerät auszuschalten.
Wenn der Thermostatknopf auf SUPER eingestellt ist,
erscheint die Anzeige orange. In diesem Fall arbeitet der
Kompressor im Dauerbetrieb.
EINFRIEREN
(Abbildung 1)
Die Konservierung des Gefrierguts ist in allen Gefrierfächern gewährleistet.
Bei einigen Geräten gibt es einen
Bereich im Oberteil (siehe Kurzanleitung).
MODELL MIT OPTION SUPER
Legen Sie die einzufrierenden Nahrungsmittel in das Fach und drehen Sie das Thermostat im Uhrzeigersinn auf die Einstellung SUPER,
bis das orangefarbene Licht erscheint (siehe Abbildung 1). Nach 24 Stunden ist das Einfrieren abgeschlossen. Stellen Sie deshalb das Thermostat
zurück auf die Position 2-3. Die SUPER Funktion wird automatisch nach 26 Stunden von der Steuerplatine deaktiviert. Das Matrikelschild gibt die
maximale Menge von Nahrungsmitteln an, die eingefroren werden können (siehe Abbildung 3).
GRUNDMODELL
Legen Sie Nahrungsmittel, die eingefroren werden sollen, in das Fach , das Einfrieren wird bei jeder Drehknopf-Position gewährleistet (siehe
Abbildung 2). Am Anfang des Einfriervorgangs kann es erforderlich sein, den Thermostatknopf je nach Befüllung und Raumtemperatur um ungefähr
eine halbe Stufe zurückzudrehen, damit der Kühlraum nicht zu kalt ist. Wenn das Einfrieren abgeschlossen ist, drehen Sie den Thermostatknopf
auf den ursprünglichen Wert zurück.
Hinweis: Um eine bessere Luftzirkulation zu gewährleisten, sollten Sie zwischen den Nahrungsmitteln etwas Platz lassen und außerdem
vermeiden, den Kühlluftauslass zu blockieren.
ABTAUEN
(Abbildung 3)
Beim normalen Betrieb des Kühlschranks entsteht auf der Rückseite des Kühlraums ein
wenig Frost oder ein paar Wassertropfen.
Stellen Sie sicher, dass der Wasserablauf immer sauber ist. Vergewissern Sie sich,
dass die Nahrungsmittel nicht die Rückseite oder die Seitenwände des Kühlschranks
berühren.
Das Gefrierfach erfordert kein Abtauen, da dieses Produkt mit einem automatischen
System ausgestattet ist, das die Eisbildung verhindert (frostfrei)
Wichtiger Hinweis: Wenn die Raumtemperatur sehr warm ist, wird das Gerät unter Umständen ständig laufen und auf
der Rückseite des Kühlraums wird sich eine Frostschicht ablagern. Stellen Sie den Drehknopf in diesem Fall auf eine
niedrigere Einstellung (1-2).
GRUNDMODELL: Drehen Sie den Drehknopf, um das Gerät einzuschalten und die Temperatur des Gefrierfachs und des Kühlschranks einzustellen.
Wir empfehlen, die Temperatur auf die Stufe 2 oder 3 zu stellen. Drehen Sie den Drehknopf auf “0”, um das Gerät auszuschalten.
Wichtiger Hinweis: Einige Geräte laufen erst dann an, wenn sie für
mindestens 6 Minuten an der Steckdose angeschlossen waren und nachdem
die Temperatur eingestellt wurde.
Hinweis: Hier fi nden Sie das Matrikelschild. Wenn Sie bei einer Störung den
Kundendienst kontaktieren müssen, geben Sie die Informationen auf diesem
Schild an.
Das grüne “ON“ Licht zeigt an, dass das Gerät in Betrieb
ist. Dieses Licht ist unabhängig von der Einstellung des
Drehknopfes, außer für den Fall, dass der Drehknopf auf
"0" steht.
(Abbildung 2)
Das grüne “ON“ Licht zeigt an, dass das Gerät in Betrieb
ist. Dieses Licht ist unabhängig von der Einstellung des
Drehknopfes, außer für den Fall, dass der Drehknopf auf
"0" steht.

11 DE
Legen Sie den Kühlschrank auf den Fußboden
oder kippen Sie ihn um 45°, um leichter an der
Unterseite arbeiten zu können.
Entfernen Sie das untere rechte Scharnier, indem
Sie die Schrauben, den Stift und die Unterlegscheiben
abschrauben. Nehmen Sie dann die untere Tür ab.
Ritzen Sie die linke Öse der Stirnwand ein und
stechen Sie diese an der markierten Stelle im
Bereich des Einsatzes durch.
Nehmen Sie aus dem Zubehör das obere linke
Scharnier und befestigen Sie es.
Bringen Sie die Stirnwand wieder an, indem Sie
die Schrauben und Schutzkappen befestigen.
Um die Griffe nach der anderen Richtung
auszurichten: Nehmen Sie die Zierkappen an der
rechten Seite der Türen ab.
Bringen Sie die Scharniere und Türen wieder an,
beginnen Sie dabei von unten:
Schrauben Sie die Griffe von der linken Seite ab
und bringen Sie sie an der rechten Seite an,
befestigen Sie dann erneut die Zierkappen an
der linken Seite der Türen.
Entfernen Sie den unteren Sockel, indem Sie die
3 Schutzstopfen herausziehen und die
Schrauben lösen.
Entfernen Sie die Schutzkappen (A) und (B),
lösen Sie die Schrauben und ziehen Sie die
Stirnwand teilweise heraus.
Schrauben Sie das rechte Scharnier ab.
Bohren Sie an der Markierung der linken Seite
ein Loch in den Sockel.
Stellen Sie das Gerät wieder senkrecht auf und
warten Sie mindestens 2 Stunden, bevor Sie es
wieder in Betrieb nehmen.
2 Stunden
Um die Türanschläge zu wechseln, befolgen Sie die Anweisungen, die sich auf die Stirnwand und die Bauart der Scharniere beziehen, die Ihr Gerät verwendet.
WECHSEL DES TÜRANSCHLAGS

12 ES
1
2
3
4
5
COMBINADO TOTAL NO FROST PANEL DE MANDOS
PANEL DE MANDOS
Abra la puerta superior del frigorífi co para acceder a la caja de mandos.
MODELO CON LA SÚPER OPCIÓN de Giro de la rueda para encender el aparato y fi jar la temperatura deseada del compartimento del congelador.
Le recomendamos que fi je la temperatura al nivel 2 o 3. Gire la rueda hasta “0” para apagar el aparato.
La luz naranja aparece cuando el interruptor del termostato
se encuentra fi jado en SUPER (al máximo). En este caso,
el compresor sigue funcionando a la normalidad.
CONGELADOR
(Figura 1)
La conservación de todas las comidas congeladas queda garantizda en cualquiera de los compartimentos del congelador.
Algunos productos incluyen una sección
en la parte superior,(véase la guía rápida).
MODELO CON SÚPER OPCIÓN
Coloque los alimentos que desea congelar en el cajón , gire el regulador del termostato hasta la posición SUPER (al máximo), y la luz
naranja se encenderá (véase fi gura 1). Al cabo de 24 horas, el congelado habrá terminado. A continuación, reinicie el termostato en la posición
2-3. La función SÚPER quedará desactivada automáticamente del panel de circuito al cabo de 26 horas. La placa indicadora muestra la cantidad
máxima de comida que puede ser congelada, (véase fi gura 3).
MODELO DE BASE
Coloque los alimentos que desea congelar en el cajón , la congelación queda asegurada independientemente de la posición de la rueda
(véase fi gura 2). Al inicio del proceso de congelación, para evitar que el compartimento del congelador esté excesivamente frío, puede que necesite
girar la rueda del termostato, retrocendiéndola en uno o dos niveles, en función de la carga y de la temperatura de la habitación. Una vez que se
complete el proceso de congelación, gire la rueda del termostato hasta alcanzar su valor habitual.
NOTA: para mejorar la circulación del aire, intente dejar siempre un espacio entre las comidas e impida que éstas bloqueen las salidas
de aire del congelador.
DESCONGELACIÓN
(Figura 3)
Un pequeño goteo de agua en la parte interna del compartimento del frigorífi co mientras
esté funcionando es totalmente normal.
Asegúrese de mantener siempre limpio el desagüe. Asegúrese de que las comidas no
tocan la parte trasera del compartimento del congelador.
El compartimento del congelador no exige ningún proceso de descongelación ya que
el presente producto se encuentra equipado con un sistema automático que evita la
formación de hielo (sin hielo)
Importante: Si la temperatura de la habitación es muy alta, el aparato seguirá funcionando pero una capa de hielo se
formará en la parte trasera del compartimento del frigorífi co. En este caso, gire el interruptor para alcanzar temperaturas
inferiores (1-2).
MODELO DE BASE Gire la rueda para encender el aparato y fi jar la temperatura del compartimento del congelador y del frigorífi co. Le
recomendamos que fi je la temperatura al nivel 2 o 3. Gire la rueda hasta “0” para apagar el aparato.
Importante: Algunos aparatos no empiezan a funcionar hasta 6 minutos
después de ser conectados a la red eléctrica, una vez que han alcanzado
la temperatura.
NOTA: Esta es la placa indicadora Si necesita contactar con nuestro servicio de
atención al cliente en caso de fallos o defectos, no olvide indicarle la información
contenida en dicha placa.
La luz verde “ON“ (Encendido) indica que la unidad está
funcionando. Esta luz es independiente de la posición de la
rueda, salvo en el caso de que ésta se encuentre fi jada en
la posición 0.
(Figura 2)
La luz verde “ON“ (Encendido) indica que la unidad está
funcionando. Esta luz es independiente de la posición de la
rueda, salvo en el caso de que ésta se encuentre fi jada en
la posición 0.

13 ES
Coloque el aparato en el suelo, respetando un
ángulo de 45°, ya que deberá trabajar sobre la
parte inferior del aparato.
Saque la bisagra del lado inferior derecho
desajustando los tornillos, la clavija y la arandelas.
A continuación, saque la puerta inferior.
Marque y perfore la ranura de la parte izquierda
del panel, situada en la zona de inserción.
Ajuste la bisagra del lado superior izquierdo que
se encuentra en su kit de accesorios.
Ajuste la caja de mandos y refuerce todo el
conjunto con ayuda de los tornillos y las tapas.
Para invertir el sentido de las asas: quite las
tapas exteriores situadas el la parte derecha de
las puertas.
Coloque las puertas y las bisagras instaladas de
arriba a abajo indicadas por los números
Desajuste las asas situadas en la parte izquierda
y colóquelas en la parte derecha. A continuación,
coloque las tapas externas en la parte izquierda
de las puertas.
Saque el plinto inferior, quitando las 3 tapas de
protección y desajustando los tornillos.
Quite las tapas (A) y (B), ajustadas por los
tornillos y saque una parte de la caja de mandos.
Desapriete la bisagra derecha.
Taladre el plinto en el lado izquierdo indicado.
Ponga el aparato en posición vertical y espere
dos horas antes de encenderlo.
2 horas
Para invertir el sentido de apertura de las puertas, siga las siguientes instrucciones en función del tipo de orifi cio y de bisagra que contenga su producto.
INVERTIR EL SENTIDO DE APERTURA DE LAS PUERTAS

14 PT
1
2
3
4
5
COMBINADO TOTAL NO FROST
PAINEL DE CONTROLO
Abra a porta superior do frigorífi co para aceder ao painel de controlo.
MODELO COM OPÇÃO SUPER Carregue no botão para ligar o aparelho e programe a temperatura do congelador e do frigorífi co. Recomendamos
que regule a temperatura para 2 ou 3. Rode o botão para “0” para desligar o aparelho.
A luz laranja acende-se quando o botão do termóstato está
programado para SUPER. Neste caso, o compressor continua
a funcionar normalmente.
CONGELAÇÃO
(Figura 1)
A conservação dos alimentos congelados é garantida em todos os compartimentos do congelador.
Em alguns produtos, está disponível uma secção
na parte superior (consulte o guia rápido).
MODELO COM OPÇÃO SUPER
Coloque os alimentos que pretende congelar na gaveta
, rode o termóstato no sentido dos ponteiros do relógio para a posição SUPER,
acendendo-se a luz laranja (ver fi gura 1). Após 24 horas, a congelação está concluída. Em seguida, coloque de novo o termóstato na posição 2-3.
A função SUPER é desactivada automaticamente da placa do circuito passadas 26 horas. A placa de identifi cação indica a quantidade máxima de
alimentos que podem ser congelados, (ver fi gura 3).
MODELO DE BASE
Coloque os alimentos a congelar na gaveta
, a congelação é garantida em qualquer posição do botão (ver fi gura 2).
No início do processo de congelação, para que o compartimento do frigorífi co não fi que excessivamente frio, pode ser necessário rodar o botão do
termóstato para trás aproximadamente 1/2 número, de acordo com a carga e a temperatura ambiente. Quando o processo de congelação estiver
concluído, programe o botão do termóstato para o valor normal.
Obs.: Para uma melhor circulação do ar, deixe algum espaço entre os alimentos e evite o bloqueio das saídas do ar de arrefecimento.
DESCONGELAÇÃO
(Figura 3)
A presença de uma camada fi na de gelo ou de gotas de água na parte posterior do
frigorífi co durante o funcionamento é normal
É importante manter a conduta de água sempre limpa. Evite guardar os alimentos
encostados às partes posterior ou lateral do compartimento do frigorífi co
O compartimento do congelador não tem de ser descongelado, porque este produto está
equipado com um sistema automático que impede a formação de gelo (sem gelo)
Importante: se a temperatura ambiente estiver muito quente, o aparelho pode continuar a funcionar de forma contínua
e irá formar-se uma camada de gelo na parte posterior do frigorífi co. Neste caso, rode o botão para programações mais
baixas (1-2).
MODELO DE BASE Carregue no botão para ligar o aparelho e programe a temperatura do congelador e do frigorífi co. Recomendamos que
programe a temperatura para 2 ou 3. Rode o botão para “0” para desligar o aparelho.
Importante: alguns aparelhos começam a funcionar pelo menos 6 minutos
depois de a fi cha ter sido ligada à tomada de alimentação e depois de
regulada a temperatura.
Obs.: Esta é a placa de identifi cação. Se necessitar de entrar em contacto com a
Assistência técnica em caso de avaria, deve fornecer-lhes a informação indicada
na placa.
O indicador luminoso “ON“ (Ligado) verde indica que o aparelho
está a funcionar. Este indicador luminoso está ligado,
independentemente da programação do botão, excepto quando
o botão está programado para 0.
(Figura 2)
O indicador luminoso “ON“ (Ligado) verde indica que o
aparelho está a funcionar. Este indicador luminoso está ligado,
independentemente da programação do botão, excepto quando
o botão está programado para 0.

15 PT
Deite ou incline o frigorífico a 45°, para facilitar
as operaçőes na parte inferior do mesmo.
Para retirar o fecho interior da direita, retire os
parafusos, a cavilha e as anilhas e, em seguida,
remova a porta inferior.
Faça uma incisăo e parta a aba da esquerda do
painel na zona marcada.
No saquinho dos acessórios fornecidos, procure
o fecho superior da esquerda.
Coloque novamente o painel, fixando-o com os
parafusos e coloque as tampas.
Para inverter os puxadores: retire as tampas de
protecçăo do lado direito das portas.
Monte outra vez os fechos e as portas de baixo
para cima,
Desaperte os puxadores do lado esquerdo e
desloque-os para o lado direito e, em seguida,
no lado esquerdo das portas, coloque as tampas
anteriormente retiradas.
Remova o rodapé, puxando as 3 tampas de
protecçăo e desapertando os parafusos.
Retire as tampas (A) e (B), desaperte os
parafusos e remova parcialmente o painel.
Desaparafuse o fecho da direita.
Perfure o rodapé na zona marcada à esquerda.
Coloque o equipamento na vertical, aguarde
duas horas e depois ligue-o.
2 horas
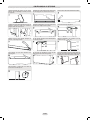
Para inverter a abertura das portas, siga as indicações relacionadas com o tipo de dobradiça e fecho incluídos no seu produto.
INVERTER A ABERTURA DAS PORTAS

16 EL
1
2
3
4
5
ΨΥΓΕΙΟΚΑΤΑΨΥΚΤΗΣ ΜΕ ΑΥΤΟΜΑΤΗ ΑΠΟΨΥΞΗ
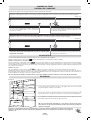
ΠΙΝΑΚΑΣ ΕΛΕΓΧΟΥ
Για να αποκτήσετε πρόσβαση στον πίνακα ελέγχου ανοίξτε την πάνω πόρτα του ψυγείου.
ΜΟΝΤΕΛΟ ΜΕ ΔΥΝΑΤΟΤΗΤΑ SUPER Γυρίστε το κουμπί για να ενεργοποιήσετε τη συσκευή και να ρυθμίσετε τη θερμοκρασία των χώρων κατάψυξης
και συντήρησης. Συνιστούμε να ρυθμίσετε τη θερμοκρασία στη θέση 2 ή 3. Για να απενεργοποιήσετε τη συσκευή γυρίστε το κουμπί στη θέση “0”.
Το πορτοκαλί φωτάκι ανάβει όταν γυρίσετε το κουμπί του
θερμοστάτη στη θέση SUPER (Έντονη ψύξη). Σ' αυτήν την
περίπτωση ο συμπιεστής εξακολουθεί να λειτουργεί κανονικά.
ΚΑΤΑΨΥΞΗ
(Εικόνα 1)
Η διατήρηση των κατεψυγμένων τροφίμων είναι εγγυημένη σε όλα τα διαμερίσματα του καταψύκτη.
Σε ορισμένα προϊόντα υπάρχει τμήμα
στο επάνω μέρος (βλέπε γρήγορο οδηγό).
ΜΟΝΤΕΛΟ ΜΕ ΔΥΝΑΤΟΤΗΤΑ SUPER
Τοποθετήστε τα τρόφιμα που θέλετε να παγώσουν στο συρτάρι , γυρίστε το θερμοστάτη δεξιόστροφα στη θέση SUPER και θα ανάψει το
πορτοκαλί φωτάκι (δείτε την εικόνα 1). Μετά από 24 ώρες, έχει ολοκληρωθεί το πάγωμα. Επομένως, τοποθετήστε πάλι το θερμοστάτη στη θέση 2-3.
Η λειτουργία SUPER θα απενεργοποιηθεί αυτόματα από το κύκλωμα ελέγχου μετά από 26 ώρες. Η πινακίδα στοιχείων δείχνει τη μέγιστη ποσότητα
τροφίμων που μπορούν να καταψυχθούν (δείτε την εικόνα 3).
ΒΑΣΙΚΟ ΜΟΝΤΕΛΟ
Τοποθετήστε τα τρόφιμα που θέλετε να καταψυχθούν στο συρτάρι . Η κατάψυξη είναι εγγυημένη για κάθε θέση του κουμπιού (δείτε την εικόνα
2). Στην αρχή της διαδικασίας κατάψυξης, για να μην κρυώσει υπερβολικά ο χώρος της συντήρησης, ίσως να χρειαστεί να γυρίσετε πίσω το κουμπί
του θερμοστάτη κατά 1/2 αριθμό, ανάλογα με το φορτίο και τη θερμοκρασία του περιβάλλοντος χώρου. Όταν η διαδικασία παγώματος ολοκληρωθεί,
γυρίστε το κουμπί του θερμοστάτη πάλι στη συνηθισμένη τιμή.
ΣΗΜΕΙΩΣΗ: Για καλύτερη κυκλοφορία του αέρα, αφήστε λίγο χώρο ανάμεσα στα τρόφιμα και αποφεύγετε να φράζετε τις εξόδους του
αέρα ψύξης.
ΚΑΤΑΨΥΞΗ
(Εικόνα 3)
Μια μικρή ποσότητα πάχνης ή σταγόνες νερού στο πίσω μέρος του χώρου της
συντήρησης είναι κανονικό φαινόμενο όταν λειτουργεί το ψυγείο.
Να βεβαιώνεστε ότι τα τρόφιμα δεν αγγίζουν την πίσω πλευρά ή τα πλαϊνά του χώρου
της συντήρησης
Ο χώρος κατάψυξης δεν απαιτεί απόψυξη επειδή το προϊόν αυτό διαθέτει αυτόματο
σύστημα που εμποδίζει το σχηματισμό πάγου (frost free)
Σημαντική παρατήρηση: Εάν η θερμοκρασία του περιβάλλοντος χώρου είναι πολύ υψηλή, η συσκευή ενδεχομένως να
λειτουργεί συνεχώς και να σχηματιστεί στοιβάδα πάχνης στο πίσω μέρος του χώρου της συντήρησης. Σ' αυτήν την
περίπτωση γυρίστε το κουμπί σε κάποια χαμηλότερη ρύθμιση (1-2).
ΒΑΣΙΚΟ ΜΟΝΤΕΛΟ Γυρίστε το κουμπί για να ενεργοποιήσετε τη συσκευή και να ρυθμίσετε τη θερμοκρασία των χώρων κατάψυξης και συντήρησης.
Συνιστούμε να ρυθμίσετε τη θερμοκρασία στη θέση 2 ή 3. Για να απενεργοποιήσετε τη συσκευή γυρίστε το κουμπί στη θέση “0”.
Σημαντική παρατήρηση: Ορισμένες συσκευές θα αρχίσουν να λειτουργούν
τουλάχιστον 6 λεπτά αφού συνδέστε τη συσκευή στην πρίζα και έχει
ρυθμιστεί η θερμοκρασία.
ΣΗΜΕΙΩΣΗ: Αυτή είναι η πινακίδα στοιχείων. Εάν χρειάζεται να απευθυνθείτε
στο Τμήμα μας Τεχνικής Εξυπηρέτησης σε περίπτωση κάποιου προβλήματος,
θυμηθείτε να αναφέρετε τις πληροφορίες που περιλαμβάνει αυτή η πινακίδα.
Το πράσινο φωτάκι “ON“ δείχνει ότι η μονάδα λειτουργεί. Αυτό το
φωτάκι είναι αναμμένο ανεξάρτητα από τη ρύθμιση, εκτός αν το
κουμπί γυριστεί στη θέση "0".
(Εικόνα 2)
Το πράσινο φωτάκι “ON“ δείχνει ότι η μονάδα λειτουργεί. Αυτό το
φωτάκι είναι αναμμένο ανεξάρτητα από τη ρύθμιση του κουμπιού,
εκτός αν το κουμπί γυριστεί στη θέση "0".

17 EL
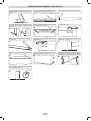
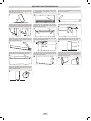
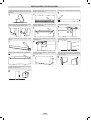
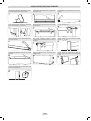
Για να αντιστρέψετε τη φορά που ανοίγουν οι πόρτες, ακολουθείστε τις ενδείξεις σχετικά με τον τύπο ποδιάς και μεντεσέ που παρέχονται με τη συσκευή.
ΑΝΤΙΣΤΡΟΦΗ ΤΗΣ ΦΟΡΑΣ ΠΟΥ ΑΝΟΙΓΟΥΝ ΟΙ ΠΟΡΤΕΣ
Τοποθετήστε τη συσκευή στο δάπεδο ή σε γωνία 45°,
όπως χρειάζεται για να εργαστείτε στο κάτω μέρος της
συσκευής.
Αφαιρέστε τον κάτω δεξιό μεντεσέ ξεβιδώνοντας τις βίδες,
αφαιρέστε τον πείρο και τις ροδέλες και κατόπιν αφαιρέστε
την κάτω πόρτα.
Αφαιρέστε τις βίδες από τον κεντρικό μεντεσέ και κατόπιν
αφαιρέστε την επάνω πόρτα.
Ξεβιδώστε το μεντεσέ από την πόρτα του ψυγείου
και τοποθετήστε στην άλλη πλευρά αυτόν που σας
έχει παραδοθεί.
Αφαιρέστε τα καπάκια (Α) και (Β), ξεβιδώστε τις βίδες και
αφαιρέστε μερικώς τον πίνακα.
Ξεβιδώστε το δεξιό μεντεσέ.
Σημειώστε και σπάστε την αριστερή υποδοχή στον
πίνακα, στην περιοχή της ποδιάς.
Από τα παρεχόμενα αξεσουάρ, πάρτε και συνδέστε τον
επάνω αριστερά μεντεσέ.
Προσαρμόστε τον πίνακα, στερεώστε τον με τις βίδες και
τοποθετήστε τα καπάκια τους.
Τοποθετήστε πάλι τους μεντεσέδες και τις πόρτες, από
το κάτω μέρος προς το επάνω.
Για να αντιστρέψετε τις λαβές: αφαιρέστε τα
εξωτερικά καπάκια από την δεξιά πλευρά της κάθε πόρτας.
Ξεβιδώστε τις λαβές από την αριστερή πλευρά, τοποθετήστε
τις στη δεξιά πλευρά, και στη συνέχεια τοποθετήστε τα
καπάκια στην αριστερή πλευρά της κάθε πόρτας.
Τοποθετήστε τη συσκευή σε όρθια θέση και περιμένετε
δύο ώρες πριν την ενεργοποιήσετε.
2 ώρες

18 PL
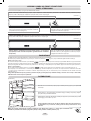
1
2
3
4
5
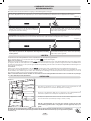
LODÓWKI KOMBI NO FROST I FROST FREE
PANEL STEROWANIA
Panel sterowania znajduje się za górnymi drzwiczkami lodówki.
MODEL Z OPCJĄ SUPER Obracając pokrętło, włącz urządzenie i ustaw temperaturę zamrażarki i chłodziarki. Zalecamy ustawienie pokrętła
na pozycji 2 lub 3. Aby wyłączyć urządzenie, porkętło należy obrócić w pozycję 0.
Kiedy pokrętło termostatu jest ustawione w pozycji SUPER,
świeci się pomarańczowa kontrolka. Przy takim ustawieniu
sprężarka kontynuuje zwykłą pracę.
ZAMRAŻANIE
(rysunek 1)
Produkty mrożone zachowują trwałość po umieszczeniu w dowolnej części zamrażarki.
Dla niektórych produktów przeznaczone jest miejsce oznaczone symbolem
w górnej części zamrażarki (patrz krótka instrukcja).
MODEL Z OPCJĄ SUPER
W celu zamrożenia produktów umieść je w szufl adzie
, a następnie ustaw pokrętło termostatu w pozycji SUPER. Zaświeci się pomarańczowa
kontrolka (rysunek 1). Produkt jest zamrożony po 24 godzinach. Ustawić termostat na pozycji 2-3. Funkcja SUPER zostaje automatycznie wyłączona po
upłynięciu 26 godzin. Na tabliczce znamionowej umieszczono informację o maksymalnej ilości produktów, jaką można zamrozić (patrz rysunek 3).
MODEL PODSTAWOWY
W celu zamrożenia produktów umieść je w szufl adzie
. Produkty zostają zamrożone bez wzgledu na pozycję pokrętła (patrz rys. 2).
Na początku procesu zamrażania, w celu uniknięcia nadmiernego obniżenia temperatury w lodówce, może być konieczne ustawienie termostatu
o 1/2 pozycji niżej, odpowiednio do zawartości lodówki i temperatury pokojowej. Po zakończeniu procesu zamrażania można ustawić termostat
w zwykłej pozycji.
Uwaga. Dla zapewnienia lepszej cyrkulacji powietrza między poszczególnymi produktami należy pozostawić nieco miejsca. Nie należy
także blokować wlotów i wylotów powietrza.
ROZMRAŻANIE
(rysunek 3)
Niewielka ilość lodu lub wody w tylnej części lodówki podczas jej pracy jest zjawiskiem
normalnym.
Należy dbać o to, aby odpływ wody był zawsze czysty. Produkty nie powinny dotykać
tylnej ani bocznych ścianek lodówki.
Zamrażarka nie wymaga odmrażania; produkt jest wyposażony w automatyczny system
zapobiegający formowaniu się lodu.
Ważne: W wysokiej temperaturze otoczenia urządzenie może działać bez przerwy, a w tylnej części zamrażarki może
odkładać się warstwa lodu. W takim przypadku pokrętło należy ustawić na niższą wartość (1-2).
MODEL PODSTAWOWY Obracając pokrętło, włącz urządzenie i ustaw temperaturę zamrażarki i chłodziarki. Zalecamy ustawienie pokrętła na
pozycji 2 lub 3. Aby wyłączyć urządzenie, porkętło należy obrócić w pozycję 0.
Ważne: Niektóre urządzenia zaczynają działać dopiero po upłynięciu
przynajmniej 6 minut od włożenia wtyczki do gniazda zasilania i ustawienia
temperatury.
Uwaga. Tabliczka znamionowa. W razie problemów, kiedy zachodzi konieczność
skontaktowania się z serwisem, należy podać informacje umieszczone na tej
tabliczce.
O tym, że urządzenie działa, świadczy zielona kontrolka ON.
Kontrolka ta świeci się bez względu na ustawienie pokrętła,
za wyjątkiem ustawienia w pozycji 0.
(rysunek 2)
O tym, że urządzenie działa, świadczy zielona kontrolka ON.
Kontrolka ta świeci się bez względu na ustawienie pokrętła,
za wyjątkiem ustawienia w pozycji 0.

19 PL
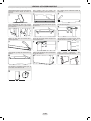
Przechylić urządzenie pod kątem ok. 45°, tak aby
uzyskać dostęp do dolnej części urządzenia.
Zdjąć prawy dolny zawias, odkręcając wkręty,
wyjmując bolec mocujący i zdejmując podkładki.
Następnie zdjąć dolne drzwi.
Naciąć i wyłamać otwór w zaznaczonym miejscu
po lewej stronie.
Z woreczka z akcesoriami wyjąć i zamocować
lewy zawias.
Zamocować listwę, dokręcić wkręty i założyć
zatyczki.
Przekładanie uchwytów: usunąć zatyczki
z prawej strony drzwi.
Ponownie założyć zawiasy i drzwi, idąc od dołu
ku górze:
Odkręcić uchwyty z lewej strony drzwi i przełożyć
je na prawą. Następnie założyć zatyczki z lewej
strony drzwi.
Zdjąć dolny cokół, wyciągając trzy bolce
mocujące i odkręcając wkręty.
Usunąć zatyczki (A) i (B), odkręcić wkręty
i częściowo wyciągnąć listwę.
Odkręcić prawy zawias.
Wywiercić otwór w cokole, w oznaczonym
miejscu po lewej stronie.
Ustaw urządzenie w pozycji pionowej. Przed
włączeniem odczekaj dwie godziny.
2 godziny
W celu odwrócenia kierunku otwierania drzwi należy postępować zgodnie ze wskazówkami odpowiednimi dla danego urządzenia oraz z uwzględnieniem specyfi cznych
zawiasów tego urządzenia.
ODWRACANIE KIERUNKU OTWIERANIA DRZWI

20 CZ
1
2
3
4
5
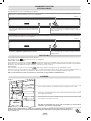
KOMBINOVÁ CHLADNIČKA FROST FREE
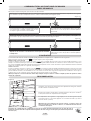
OVLÁDACÍ KONTROLNÍ PANEL
Pro přístup k ovládacímu panelu otevřete horní dveře chladničky.
MODEL S FUNKCÍ SUPER. Pro zapnutí spotřebiče otočte ovladačem termostatu a nastavte teplotu mrazničky i chladničky. Doporučujeme, abyste
teplotu nastavili na polohu 2 nebo 3. Pro vypnutí spotřebiče otočte ovladačem termostatu do polohy “0”.
Oranžové světlo se rozsvítí, pokud je ovladač termostatu
přepnut na SUPER. V tomto případě pokračuje kompresor
v normálním provozu.
ZMRAZOVÁNÍ
(Obrázek 1)
Uchovávání zmražených potravin je zaručeno ve všech oddělení mrazničky.
U některých výrobků je oddělení v horní části
(viz rychlý průvodce).
MODEL S FUNKCÍ SUPER
Potraviny pro zmrazení umístěte do zásuvky
, otočte voličem termostatu po směru hodinových ručiček na polohu SUPER, rozsvítí se oranžové
světlo (viz obrázek 1). Po 24 hodinách je proces zmrazení kompletní. Pokud nastavíte ovladač termostatu do polohy 2-3, funkce SUPER se automaticky
vypne po 26 hodinách. Popisný štítek stanovuje maximální množství potravin, které mohou být zmrazeny (viz obrázek 3).
ZÁKLADNÍ MODEL
Potraviny, které chcete zmrazit, vložte do zásuvky
, zmrazení je zaručeno ve všech polohách ovladače termostatu (viz obr. 2).
Abychom mrazící box na začátku mrazení příliš nezchladili, je potřeba otočit ovladač termostatu přibližně o 1/2 polohy zpět, podle obsahu a okolní
teploty. Jakmile je proces zmrazování ukončen, vraťte ovladač termostatu na obvyklou teplotu.
Poznámka: Pro lepší cirkulaci vzduchu ponechte nějaký prostor mezi potravinami a vyhněte se zablokování výstupů chladícího
vzduchu.
ODMRAZOVÁNÍ
(Obrázek 3)
Malé množství námrazy nebo kapek vody na zadní stěně prostoru chladničky je normální,
pokud je chladnička v provozu.
Zajistěte, aby tento odvod vody byl vždy čistý. Ujistěte se, že se potraviny nedotýkají
zadní stěny nebo stran oddělení chladničky.
Mrazící box nevyžaduje odmrazování, protože tento výrobek je vybaven automatickým
systémem, který zabraňuje vytváření ledu (frost free).
Důležité: Pokud je teplota v místnosti velmi vysoká, může spotřebič pracovat nepřetržitě a vrstva námrazy se bude ukládat
na zadní straně prostoru chladničky. V takovém případě nastavte ovladač na nižší nastavení (1-2).
ZÁKLADNÍ MODEL. Otočte ovladačem termostatu pro zapnutí spotřebiče a nastavte teplotu mrazničky i chladničky. Doporučujeme, abyste
teplotu nastavili na polohu 2 nebo 3. Pro vypnutí spotřebiče otočte ovladačem termostatu do polohy “0”.
Důležité: Některé spotřebiče budou uvedeny do chodu minimálně 6 minut po
zapojení zástrčky do zásuvky napájení elektrické sítě a nastavení teploty.
Poznámka. Toto je popisný štítek. Potřebujete-li kontaktovat servisní středisko
v případě závad, nezapomeňte jim poskytnout informaci z tohoto štítku.
Zelená kontrolka “ON“ svítí, když je spotřebič v provozu. Toto
světlo svítí bez ohledu na nastavení ovladače, výjimkou je
nastavení ovladače do polohy 0.
(Obrázek 2)
Zelená kontrolka “ON“ svítí, když je spotřebič v provozu. Toto
světlo svítí bez ohledu na nastavení ovladače termostatu,
výjimkou je případ, kdy je ovladač nastavený na polohu 0.
Sidan laddas ...
Sidan laddas ...
Sidan laddas ...
Sidan laddas ...
Sidan laddas ...
Sidan laddas ...
Sidan laddas ...
Sidan laddas ...
Sidan laddas ...
Sidan laddas ...
Sidan laddas ...
Sidan laddas ...
-
 1
1
-
 2
2
-
 3
3
-
 4
4
-
 5
5
-
 6
6
-
 7
7
-
 8
8
-
 9
9
-
 10
10
-
 11
11
-
 12
12
-
 13
13
-
 14
14
-
 15
15
-
 16
16
-
 17
17
-
 18
18
-
 19
19
-
 20
20
-
 21
21
-
 22
22
-
 23
23
-
 24
24
-
 25
25
-
 26
26
-
 27
27
-
 28
28
-
 29
29
-
 30
30
-
 31
31
-
 32
32


på andra språk
- italiano: Otsein-Hoover HCNP 4276 Manuale utente
- čeština: Otsein-Hoover HCNP 4276 Uživatelský manuál
- español: Otsein-Hoover HCNP 4276 Manual de usuario
- Deutsch: Otsein-Hoover HCNP 4276 Benutzerhandbuch
- polski: Otsein-Hoover HCNP 4276 Instrukcja obsługi
- português: Otsein-Hoover HCNP 4276 Manual do usuário
- français: Otsein-Hoover HCNP 4276 Manuel utilisateur
- English: Otsein-Hoover HCNP 4276 User manual
- dansk: Otsein-Hoover HCNP 4276 Brugermanual
- suomi: Otsein-Hoover HCNP 4276 Ohjekirja
- Nederlands: Otsein-Hoover HCNP 4276 Handleiding