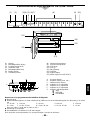
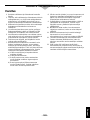
Panasonic NE-1646 Användarmanual
- Kategori
- Mikrovågor
- Typ
- Användarmanual

Operating Instructions.......Microwave Oven.....................For Commercial Use
Bedienungsanleitung.........Mikrowellengerät.............Für Gewerbliche Nutzung
Mode d’emploi..................Four à Micro-ondes..........Pour Usage Professionnel
Gebruiksaanwijzing.............Magnetronoven............Voor Professioneel Gebruik
Manual de Instrucciones..Horno Microondas .................Para Uso Commercial
Istruzioni............................Forno a Microonde................Per Uso Professionale
Bruksanvisning.....................Mikrovågsugn..........För Yrkesmässig Användning
Brugsanvisning...................Mikrobølgeovne...................Til Professionelt Brug
Bruksanvisning ...................Mikrobølge Ovn..For Profesjonell Bruk/Storkjøkken
Käyttöohjeet.........................Mikroaaltouuni...........................Ammattikäyttöön
Please read these instructions completely before operating this oven and keep for future reference.
Vor Gebrauch des Gerätes bitte die Bedienungsanleitung ausführlich durchlesen.
Lire attentivement ces instructions avant toute utilisation du four. Les garder pour un usage ultérieur.
Leest U s.v.p. eerst deze handleiding in zijn geheel door, voordat U de oven in gebruik neemt.
Por favor lea atentamente el manual de instrucciones antes de utilizar este horno microondas y mantengalo
accesible para futuras consultas.
Prima di utilizzare l’apparecchio, leggete attentamente queste istruzioni.
Läs instruktionema noga innan du använder ugnen och spara dessa för framtida bruk.
Læs omhyggelig brugsanvisningen før ovnen tages i brug.
Les bruksanvisningen før ovnen benyttes, og behold den så lenge ovnen er i drift.
Lue nämä käyttöohjeet huolellisesti ennen uunin käyttöönottoa ja säilytä ne seuraavaa kertaa varten.
NE-2156-2/NE-1656
NE-2146-2/NE-1846/NE-1646
English Nederlands Español ItalianoDeutsch
Svenska Dansk Norsk Suomi
Français
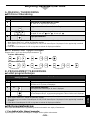
A
1
23
4
567
8
9
0
x2
x3
B
A
12
3
45
67
89
0
x2
x3
B
NE-2156-2
NE-1656 NE-1846/NE-1646
NE-2146-2

Contents
Important Safety Instructions . . . . . . . . . . . . . . . . . . . . . . . . . . . . . . . . . . . . . . . . . . . . . .1-2
Outline Diagram and Operation of NE-2146-2/NE-1846/NE-1646 . . . . . . . . . . . . . . . . . . . .3
Outline Diagram of NE-2156-2/NE-1656 . . . . . . . . . . . . . . . . . . . . . . . . . . . . . . . . . . . . . . .4
How to Operate NE-2156-2/NE-1656
A.Manual Heating . .single stage heating . . . . . . . . . . . . . . . . . . . . . . . . . . . . . . . . . . .5
. . . . . . . . . . . . . .2 or 3 stages heating . . . . . . . . . . . . . . . . . . . . . . . . . . . . . . . . . .6
B.Programmed Heating . . . . . . . . . . . . . . . . . . . . . . . . . . . . . . . . . . . . . . . . . . . . . . . . .7
C.Programming Number/Memory pads . .single stage heating . . . . . . . . . . . . . . . . . .7-8
. . . . . . . . . . . . . . . . . . . . . . . . . . . . . .2 or 3 stages heating . . . . . . . . . . . . . . . . . . .8
D.Programming Double or Treble Quantity pad . . . . . . . . . . . . . . . . . . . . . . . . . . . . . . . .9
E.Program Lock . . . . . . . . . . . . . . . . . . . . . . . . . . . . . . . . . . . . . . . . . . . . . . . . . . . .9-10
F. Beep Tone . . . . . . . . . . . . . . . . . . . . . . . . . . . . . . . . . . . . . . . . . . . . . . . . . . . . . .10-11
G.Program List . . . . . . . . . . . . . . . . . . . . . . . . . . . . . . . . . . . . . . . . . . . . . . . . . . . . . .11
H.Cycle Counter . . . . . . . . . . . . . . . . . . . . . . . . . . . . . . . . . . . . . . . . . . . . . . . . . . .11-12
I. Air Filter . . . . . . . . . . . . . . . . . . . . . . . . . . . . . . . . . . . . . . . . . . . . . . . . . . . . . . . . . .12
Installation Instructions for Stacking . . . . . . . . . . . . . . . . . . . . . . . . . . . . . . . . . . . . . . . . .13
Self Diagnostics Failure Code Explanation . . . . . . . . . . . . . . . . . . . . . . . . . . . . . . . . . . . .13
Care of Your Oven . . . . . . . . . . . . . . . . . . . . . . . . . . . . . . . . . . . . . . . . . . . . . . . . . . . . . .14
Cooking Instructions
Cookware . . . . . . . . . . . . . . . . . . . . . . . . . . . . . . . . . . . . . . . . . . . . . . . . . . . . . . . . . .15
Defrosting Frozen Foods . . . . . . . . . . . . . . . . . . . . . . . . . . . . . . . . . . . . . . . . . . . . . . .15
Other Helpful Instructions . . . . . . . . . . . . . . . . . . . . . . . . . . . . . . . . . . . . . . . . . . . . . . .15
Two Level Cooking . . . . . . . . . . . . . . . . . . . . . . . . . . . . . . . . . . . . . . . . . . . . . . . . . . . .15
Microwave Basics . . . . . . . . . . . . . . . . . . . . . . . . . . . . . . . . . . . . . . . . . . . . . . . . . . . .16
General Guidelines for Heating in a Panasonic Microwave Oven . . . . . . . . . . . . . . . . . .16
Cooking Instructions –– Heating and Defrosting Time Charts . . . . . . . . . . . . . . . . . . . . . .17
Technical Specifications . . . . . . . . . . . . . . . . . . . . . . . . . . . . . . . . . . . . . . . . . . . . . . . . .119

- 1 -
English
Important Safety Instructions
INSTALLATION
EARTHING
IMPORTANT:
FOR PERSONAL SAFETY, THIS
APPLIANCE MUST BE PROPERLY EARTHED.
When an outlet is not earthed, it is personal
responsibility and obligation of the customer to have it
replaced with a properly earthed outlet.
VOLTAGE AND POWER WARNING
The voltage used must be the same as specified on
the microwave oven. Using a higher voltage than that
which is specified is dangerous, and may result in a
fire or other type of accident causing damage.
PLACEMENT OF THE OVEN
Locate the oven on a surface which is flat and stable.
Do not place the oven in a hot or damp place;
e.g. near a gas or electric range. Do not operate the
oven when the room temperature is higher than 40˚C
(104˚F) and/or the humidity is more than 85%. Free
airflow around the oven is important.
There is a possibility of a small amount of interference
with weak broadcast signals if the microwave oven is
too close to a radio or TV.
For safe and efficient operation, the oven must have
sufficient air flow to the air vents i.e. 5 cm (2 inches) at
the side and rear; 20 cm (8 inches) at the top.
This microwave oven must be positioned so that the
plug is accessible.
CAUTION
REMOVAL OF PROTECTIVE FILM
A protective film is used to prevent scratching of the
outer case during transportation. Peel this film off
before installation or use.
DO NOT TURN ON THE OVEN WHEN IT IS EMPTY.
In order to maintain the high quality of the magnetron
tubes and other components, you are requested not to
turn the oven on with no food inside.
DO NOT OPEN THE CABINET.
High voltages are present inside the cabinet. Repairs
and adjustments should be done only by qualified
service personnel.
DO NOT BLOCK THE AIR VENTS.
This microwave oven requires free airflow in the back
for maximum cooling efficiency.You should keep the
air vents clear while cooking.
DO NOT DRY CLOTHES IN THE OVEN.
Do not dry clothes in the microwave oven since there
is a possibility of the clothes burning if left in the oven
for too long of a time.
ATTACH CAUTION LABEL.
If caution label is enclosed with your oven, a suitable
caution label must be attached before using. Please
select appropriate label provided and attach to top of
appliance.
This product is an equipment that fulfills the European standard for EMC disturbances (EMC = Electromagnetic
Compatibility) EN 55011. According to this standard this product is an equipment of group 2, class B and is
within required limits. Group 2 means that radio-frequency energy is intentionally generated in the form of
electromagnetic radiation for warming and cooking of food. Class B means that this product may be used in
normal household areas.

- 2 -
Important Safety Instructions
WARNING
1. The door seals and door seal areas should be
cleaned with a damp cloth.
2. The appliance should be inspected for damage
to the door seals and door seal areas and if
these areas are damaged the appliance should
not be operated until it has been repaired by
service technician trained by the manufacturer.
3. It is dangerous for anyone other than a service
technician trained by the manufacturer to perform
repair service.
4. If smoke is observed, press Stop/Reset pad and
keep door closed. Disconnect the power cord, or
shut off power at the fuse or circuit breaker
panel.
5. If the supply cord is damaged, it must be
replaced by the manufacturer or its service agent
or a similarly qualified person in order to avoid a
hazard.
6. Before use, the user should check that utensils
are suitable for use in the microwave ovens.
7. When heating liquids, e.g. soup, sauces and
beverages in your microwave oven, overheating
the liquid beyond boiling point can occur without
evidence of bubbling.This could result in a
sudden boil over the hot liquid.To prevent this
possibility the following steps should be taken:
a) Avoid using straight-sided containers with
narrow necks.
b) Do not overheat.
c) Stir the liquid before placing the container in
the oven and again halfway through cooking
time.
d) After heating, allow to stand in the oven for a
short time, stirring again before carefully
removing the container.
8. When heating food in plastic or paper containers,
check the oven frequently due to the possibility of
ignition.
9. The contents of feeding bottles and baby food
jars are to be stired or shaken.
The temperature has to be checked before
consumption to avoid burns.
10
. Liquids or other foods must not be heated in
sealed containers since they are liable to
explode.
11
. Eggs in their shell and whole hard-boiled eggs
should not be heated in microwave ovens since
they may explode.
12
. Microwave heating of beverages can result in
delayed eruptive boiling, therefore care has to be
taken when handling the container.
13
. Only allow children to use the oven without
supervision when adequate instructions have
been given so that the child is able to use the
oven in a safe way and understands the hazards
of improper use.

- 3 -
English
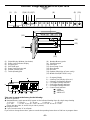
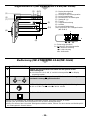
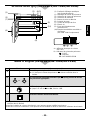
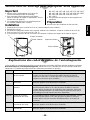
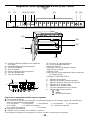
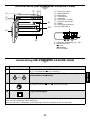
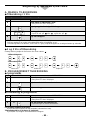
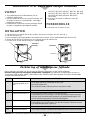
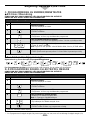
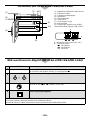
Outline Diagram and Operation of NE-2146-2/NE-1846/NE-1646
(8)
(7)
(6)
(9)
(1)
(2)
(3) (4)
(5)
(10)
A
B
(1) Digital Display Window (see below)
(2) Power Level Indicator Display
(3) Power Level Selector Buttons
(4) Timer Dial
(5) Start Button
(6) Door Handle
(7) Oven Lamp Cover
(8) Air Filter
(9) Splatter Shield (top of inner cavity)
(10) Middle Shelf (NE-2146-2 only)
A –– Heating Time Display (min. sec.)
B –– Power Level Indicator
:
HIGH
: MEDIUM
: DEFROST
Example:To cook food at MEDIUM power for 4 minutes
INSTRUCTION
DIGITAL DISPLAY WINDOW
PAD
2
Press the desired Power Level Selector Button, if other than
(HIGH).
3
Set heating time.
☛ Please check the heating time will appear.
Note:up to 25 min. on , 30 min. on or
4
Press Start Button.
☛ The oven lamp will turn on and heating will start. Power Level Indicator
will start to blink, and heating time will count down.
• When all time expires, beep tone will sound and heating will stop.The oven lamp will
turn off.“0” will blink until the door is opened. One minute later, cooling fan will stop.
• Open the door and take the food out.The oven lamp will turn on. Digital Display Window
will show “0” and Power Level Indicator
• Close the door.The oven lamp will turn off. One minute later, Digital Display Window will
go blank.
• When you press the Start Button with door open, “0” will appear in the display in all
cases.
• Even after setting the heating time you can still change the power level.
• If you wish to change the heating time during heating, simply adjust the timer to desired
minutes and seconds.
1
Open the door and put the food in the oven.
☛ The oven lamp will turn on. “0” and Power Level Indicator will
appear.
Note:While “0” appears, operation is available. One minute after the door
is closed, “0” will disappear.

- 4 -
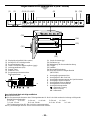
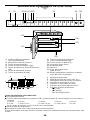
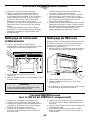
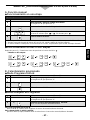
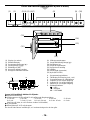
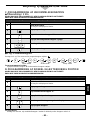
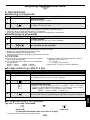
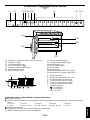
Outline Diagram of NE-2156-2/NE-1656
(1) Digital Display Window (see below)
(2) Power Level Indicator Display
(3) Program pad
(4) Shift (A/B) pad
(5) Power Level Selector pad
(6) Double Quantity pad
(7) Treble Quantity pad
(8) Number/Memory pads
(9) Stop/Reset pad
(10) Start pad
(11) Oven Lamp Cover
(12) Door Handle
(13) Air Filter
(14) Splatter Shield (top of inner cavity)
(15) Middle Shelf (NE-2156-2 only)
A –– Program Display
B –– Heating Time Display (min. sec.)
C –– Memory Pad Number Display
D –– 1st Stage Heating Indicator
E –– 2nd Stage Heating Indicator
F –– 3rd Stage Heating Indicator
G –– Power Level Indicator
:
HIGH
: MEDIUM
: DEFROST
A
1234567890
B
(13)
(11)
(12)
(14)
(15)
(8)
(1) (2)
(3)(4) (5) (6)(7)
(9)
(10)
x 2
x 3
PROG
231
AB
C
DE F
G
This oven is preset at the factory for the following:
◆ Manual operation
◆ Number/Memory pads preset HIGH power at the indicated heating times for single stage heating
1 = 10 sec. 2 = 20 sec. 3 = 30 sec. 4 = 40 sec. 5 = 50 sec.
6 = 1 min. 7 = 1 min. 15 sec.8 = 1 min. 30 sec.9 = 1 min. 45 sec.0 = 2 min.
(There are two sides, A and B. Only A-side is preset.)
◆ Program Unlock
◆ Cycle Counter set to “0” on all pads
If you wish to change these times, please consult the operating instructions to find how to program them.

- 5 -
English
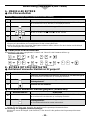
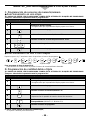
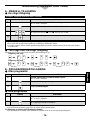
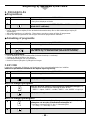
How to Operate NE-2156-2/NE-1656
A. MANUAL HEATING –– single stage heating ––
Example:To cook food at HIGH power for 2 minutes
INSTRUCTION
DIGITAL DISPLAY WINDOW
PAD
2
Press Power Level Selector pad once.
☛ The selected power level will be indicated and 1st Stage Heating
Indicator “1” will start to blink.
Note:To select HIGH power, press once.To select MEDIUM power, press
twice.To select DEFROST power, press three times.
1
3
Press Number/Memory pads “2”, “0” and “0”.
☛ The set heating time will appear.
Note:up to 15 min. on HIGH or MEDIUM power, 30 min. on DEFROST
2 0 0
1
4
Press Start pad.
☛ The oven lamp will turn on and heating will start. Power Level Indicator
will start to blink, and heating time will count down.
1
1
• When all time expires, beep tone will sound and heating will stop.The oven lamp will
turn off.“0” will blink until the door is opened. One minute later, cooling fan will stop.
• Open the door and take the food out.The oven lamp will turn on. Digital Display Window
will show the originally selected time and power.
• Close the door.The oven lamp will turn off. One minute later, Digital Display Window will
go blank.
1
1
Open the door and put the food in the oven.
☛ The oven lamp will turn on and “0” will appear.
Note:While “0” appears, operation is available. One minute after the door
is closed, “0” will disappear.

- 6 -
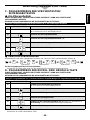
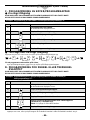
A. MANUAL HEATING –– 2 or 3 stages heating ––
INSTRUCTION
DIGITAL DISPLAY WINDOW
PAD
Follow steps 1 to 3 on page 4.
1
4
Press Power Level Selector pad three times.
☛ The selected power level will be indicated and 2nd Stage Heating
Indicator “2” will start to blink.
21
5
Press Number/Memory pads “1”, “0” and “0”.
☛ The set heating time will appear.
Note:up to 15 min. on HIGH or MEDIUM power, 30 min. on DEFROST
0 01
21
6
Press Start pad.
☛ The oven lamp will turn on.The total time for both stages will appear
and start to count down. 1st Stage Heating Indicator “1” and Power
Level Indicator for the first stage heating will start to blink.
21
21
• After the first stage heating, beep tone will sound. 2nd Heating Stage Indicator “2” and
Power Level Indicator for the second stage heating will start to blink and the remaining
heating time will count down.
• When all time expires, beep tone will sound and heating will stop.The oven lamp will
turn off.“0” will blink until the door is opened. One minute later, cooling fan will stop.
• Open the door and take the food out.The oven lamp will turn on. Digital Display Window
will show the originally set time and power.
• Close the door.The oven lamp will turn off. One minute later, Digital Display Window will
go blank.
2
21
Note:For 3 stages heating, select a power level once again after step 5 and set a heating time.
SPECIAL NOTE: For both single and 2 stages heating
1. While heating, one touch on Stop/Reset pad stops the operation.You can restart it by pressing Start pad or a
second touch on Stop/Reset pad will cancel the selected program.
2. While not heating, one touch on Stop/Reset pad cancels the selected program.
3. You can repeat exactly the same manually selected heating time by pressing only Start pad you use the oven
again within one minute.
4. One minute later of non-use with door closed, the repeat feature will be cancelled.
Example:To cook food at HIGH power for 2 minutes and at DEFROST power for 1 minute
How to Operate NE-2156-2/NE-1656

- 7 -
English
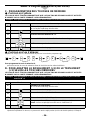
C. PROGRAMMING NUMBER/MEMORY PADS –– single stage heating ––
INSTRUCTION
DIGITAL DISPLAY WINDOW
PAD
2
Press Program pad.
☛ “PROG” will start to blink.
PROG
THE OVEN CAN NOT BE PROGRAMMED WHEN PROGRAM LOCK IS ACTIVATED! (see page 9-10)
DO NOT OPEN THE DOOR WHILE PROGRAMMING!
Example:To program cooking at DEFROST power for 1 minute into Number/Memory pad “5”
How to Operate NE-2156-2/NE-1656
1
Keep the door closed.
☛ Digital Display Window must be blank.
B. PROGRAMMED HEATING
INSTRUCTION
DIGITAL DISPLAY WINDOW
PAD
2
Press the desired Number/Memory pad “3”.
☛ The currently programmed information will be indicated.
3
PROG
1
3
Press Start pad.
☛ The oven lamp will turn on and heating will start.The heating time will
count down.
PROG
1
◆
In Program Unlock Mode:
• When all time expires, beep tone will sound and heating will stop.The oven lamp will
turn off.“0” will blink until the door is opened. One minute later, cooling fan will stop.
• Open the door and take the food out.The oven lamp will turn on.
• Close the door.The oven lamp will turn off. One minute later, Digital Display Window will
go blank.
◆
In Program Lock Mode:
Just press the desired Number/Memory pad. Heating will automatically start without pressing Start pad.
✐ For Double (or Treble) Quantity heating:
Press Double (or Treble) Quantity pad before pressing the desired Number/Memory pad.
Example: To select Number/Memory pad “3” at A side in which your desired heating program (at HIGH
power for 3 min., single stage heating) is set
1
Open the door and put the food in the oven.
☛ The oven lamp will turn on and “0” will appear.
Note:While “0” appears, operation is available. One minute after the door
is closed, “0” will disappear.
Note:
• When you want to select the number at B side, press Shift (A/B) pad before pressing the desired
Number/Memory pad.

- 8 -
6
Press Power Level Selector pad once.
☛ The power level for 2nd stage will be indicated, 2nd Stage Heating
Indicator “2” will start to blink, and Heating Time Display will go blank.
PROG
21
7
Press Number/Memory pads “2”, “0” and “0”.
☛ The set heating time will appear.
Note:up to 15 min. on HIGH or MEDIUM power, 30 min. on DEFROST
2 0 0
PROG
21
8
Press Prog pad.
☛ “PROG” and 2nd Stage Heating Indicator “2” will stop blinking. The
total time for both stages will appear.This means that you have
completed programming.
PROG
21
• Three seconds later, Digital Display Window will go blank.
Note:
• Program the remaining Number/Memory pads as desired by repeating steps above.
• When “PROG” is blinking in Digital Display Window, the program can be cancelled and/or one touch on
Stop/Reset pad erases the programmed Number/Memory pad number.
• When you want to program the B side, press Shift (A/B) pad before pressing Number/Memory pad.
C. PROGRAMMING NUMBER/MEMORY PADS –– 2 or 3 stages heating ––
INSTRUCTION
DIGITAL DISPLAY WINDOW
PAD
Follow steps 1 to 5 above.
PROG
1
Example:To program cooking at DEFROST power for 1 minute and at HIGH power for 2 minutes into Number/Memory pad “5”
THE OVEN CAN NOT BE PROGRAMMED WHEN PROGRAM LOCK IS ACTIVATED! (see page 9-10)
DO NOT OPEN THE DOOR WHILE PROGRAMMING!
How to Operate NE-2156-2/NE-1656
4
Press Power Level Selector pad three times.
☛ The selected power level will be indicated, 1st Stage Heating Indicator
“1” will start to blink, and Heating Time Display will go blank.
PROG
1
5
Press Number/Memory pads “1”, “0” and “0”.
☛ The set heating time will appear.
Note:up to 15 min. on HIGH or MEDIUM power, 30 min. on DEFROST
0 01
PROG
1
6
Press Program pad.
☛ “PROG” and 1st Stage Heating Indicator “1” will stop blinking.
This means that you have completed programming.
PROG
1
• Three seconds later, Digital Display Window will go blank.
Note:
• Program the remaining Number/Memory pads as desired by repeating steps 1-6 above.
• When “PROG” is blinking in Digital Display Window, the program can be cancelled and/or one touch on
Stop/Reset pad erases the programmed Number/Memory pad number.
• When you want to program the B side, press Shift (A/B) pad before selecting the desired Number/Memory pad.
3
Press Number/Memory pad “5”.
☛ The selected pad number will appear and currently programmed
information will be indicated.
5
PROG
1

- 9 -
English
How to Operate NE-2156-2/NE-1656
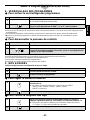
E. PROGRAM LOCK
INSTRUCTION
DIGITAL DISPLAY WINDOW
PAD
1
Keep the door closed.
☛ Digital Display Window must be blank.
2
Press Prog pad until “PROG”,“P” and “L” appear. (more than five
seconds)
☛ “PROG”, “P” and “L” will appear.
PROG
In Program Lock mode:
• The oven is started by pressing the desired Number/Memory pad.There is no need to press Start pad.
• Opening the door cancels the remaining time on the program.
• The oven can not be programmed or run manually until the program lock is released.
◆
To Activate Program Lock:
INSTRUCTION
DIGITAL DISPLAY WINDOW
PAD
2
Press Prog pad.
☛ “PROG” will start to blink.
PROG
4
Press Double Quantity pad.
☛ The currently programmed magnification number will appear.
Note:1.6 times is preset at factory.
x 2
PROG
5
Press Number/Memory pads “1” and “5”.
☛ The programmed magnification number will appear.
1
5
PROG
6
Press Prog pad.
☛ “PROG” will stop blinking.
This means that you have completed programming.
PROG
• Three seconds later, Digital Display Window will go blank.
Note:
• If you want to program your desired magnification number for treble quantity, repeat as above, using Treble
Quantity pad instead of Double Quantity pad.
3
Press Number/Memory pad “5”.
☛ The selected pad number will appear and currently programmed
information will be indicated.
5
PROG
1
Example:To program 1.5 times of heating time for double quantity into Number/Memory pad “5”
1
Keep the door closed.
☛ Digital Display Window must be blank.
D. PROGRAMMING DOUBLE OR TREBLE QUANTITY PAD
THE OVEN CAN NOT BE PROGRAMMED WHEN PROGRAM LOCK IS ACTIVATED! (see page 9-10)
DO NOT OPEN THE DOOR WHILE PROGRAMMING!

- 10 -
How to Operate NE-2156-2/NE-1656
F. BEEP TONE
The loudness of beep tone and the length of beep tone
at the end of heating cycle can be set.
There are four levels of the loudness.The level is
indicated by a number followed by the word “bEEP”.
3bEEP = loudest
2bEEP = middle
1bEEP = quietist
0bEEP = silent
There are two options of the length of beep tone at the
end of heating cycle.The length is indicated by 1 st or
2 nd Stage Heating Indicator.
1 = 3 beeps
2 = short beeps for 60 seconds
The loudest level and 3 beeps are preset at the factory.
◆
To Select Loudness Level and Length “3 beeps”:
INSTRUCTION
DIGITAL DISPLAY WINDOW
PAD
1
Open the door and leave it open.
☛ The oven lamp will turn on and “0” will appear.
2
Press Prog pad.
3
Press Number/Memory pad “0” once.
☛ The tone will sound at its loudness level and the loudness level “3”
followed by the word “bEEP” will appear. “PROG” will start to blink and
1st Stage Heating Indicator “1” (the length of beep tone “3 beeps”) will
be indicated.
Note:Repeating to press the pad “0” will lower the loudness all the way
to silent. (3 bEEP –– loudest, 2 bEEP –– middle,
1 bEEP –– quietest, and 0 bEEP –– silent)
0
PROG
1
4
Press Prog pad.
☛ “PROG” will stop blinking.That means that you have completed
program.
Three seconds later, “0” will appear.
PROG
1
• Close the door. One minute later, Digital Display Window will go blank.
Example:To select loudest beep tone
In Program Unlock mode:
• Oven reverts to a two-touch operating mode (Number/Memory pad + Start pad).
• Repeat and interrupt feature are operational.
• Number/Memory pads can be programmed.
• Tone loudness control and length control are operational.
◆
To Release Program Lock:
INSTRUCTION
DIGITAL DISPLAY WINDOW
PAD
1
Open the door and leave it open.
☛ The oven lamp will turn on, and “0” will appear.
2
While pressing Stop/Reset pad, press Prog pad until “PROG” and
“P” appear. (more than five seconds)
☛ “PROG” and “P ” will appear.
+
PROG

- 11 -
English
How to Operate NE-2156-2/NE-1656
H. CYCLE COUNTER
✐ For selecting length of tone “short beeps for 60 seconds”:
INSTRUCTION
DIGITAL DISPLAY WINDOW
PAD
Follow step 1-4 on page 9. DO NOT CLOSE THE DOOR!
PROG
1
5
Within three seconds after pressing Prog pad at step 4, press
Number/Memory pad “0” once.
☛ “PROG” will start to blink and 2nd Stage Heating Indicator “2” (the
length of beep tone “short beeps for 60 seconds”) will be indicated.
0
PROG
2
6
Press Prog pad.
☛ “PROG” will stop blinking.This means that you have completed
programming.
Three seconds later, “0” will appear.
PROG
2
• Close the door. One minute later, Digital Display Window will go blank.
G. PROGRAM LIST
INSTRUCTION
DIGITAL DISPLAY WINDOW
PAD
1
Open the door and leave it open.
☛ The oven lamp will turn on and “0” will appear.
2
While pressing Stop/Reset pad, press Start pad.
☛ All currently programmed information (the program set into each
Number/Memory pad (A/B sides), Beep Tone, and Program Lock
information) will continuously appear.
+
e.g.
PROG
PROG
1
PROG
1
PROG
2
Example:To select short beeps for 60 seconds
INSTRUCTION
DIGITAL DISPLAY WINDOW
PAD
1
Open the door and leave it open.
☛ The oven lamp will turn on and “0” will appear.
2
While pressing Stop/Reset pad, press Number/Memory pad “3”.
☛ The times that the pressed Number/Memory pad has been used will
appear.
+
3
e.g.
◆
To Read The Number of Times Each Memory Pad Has Been Used:
Example:To read times of Number/Memory pad “3” at A side (6666 times used)
Note
:
• When you want to read the times of each pad at B side, press Shift (A/B) pad while the display is still showing
the number of cycles in step 2.

- 12 -
How to Operate NE-2156-2/NE-1656
I. AIR FILTER
INSTRUCTION
DIGITAL DISPLAY WINDOW
PAD
1
Open the door and leave it open.
☛ The oven will turn on and “0” will appear.
2
While pressing Start pad, close and open the door.
3
Press Number/Memory pad “3”.
☛ The currently programmed hour will appear.
3
e.g.
4
Press Number/Memory pads “6”, “0” and “0”.
☛ The programmed hour will appear.
Note:up to 9999 hours
0 06
e.g.
5
Press Prog pad.
☛ Three seconds later, “0” will appear.
To check the total number of hours used,
◆ Open the door and leave it open.
◆ Press Number/Memory pad “3” while pressing Start pad.
◆ The total number of hours used and “H” will appear in Digital Display Window.
e.g. If the oven has been used for 20 hours,
Three seconds later, “0” will appear in Digital Display Window.
Note:If the oven cuts out after short operation, check if Air Filter is clean before calling an engineer.
Note:When “FILT” sign appears in Digital Display Window, remove Air FIlter and clean it with soapy water. Press
Stop/Reset pad to clear the display.
Example:To program cleaning Air Filter every 600 hours
3
Close the door while the display is still showing the number of
cycles that each pad has been used.
☛ The total cumulative cycles that the oven has been used in
Number/Memory pads at A/B sides and manual mode will appear.
e.g.
◆
To Read Total Cumulative Cycles That The Oven Has Been Used:
INSTRUCTIONPAD
DIGITAL DISPLAY WINDOW
◆
To Read The Number of Cycles That The Oven Has Been Used In Manual Mode:
INSTRUCTIONPAD
4
Open the door and leave it open.
☛ The oven lamp will turn on and “0” will appear.
5
While pressing Stop/Reset pad, press Power Level Selector pad.
☛ The times that the oven has been used in manual mode will appear.
+
e.g.
DIGITAL DISPLAY WINDOW

- 13 -
English
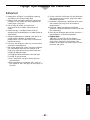
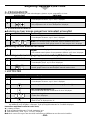
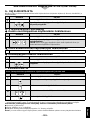
Installation Instructions for Stacking
IMPORTANT
1. Disconnect the power cord from the wall socket
before attempting installation.
2. For stacking installation, you must use the
PANASONIC Joint Plate which is enclosed with this
unit.
3. Combination of the unit for stacking is limited within
only the following PANASONIC models:
NE-1057, NE-1457, NE-1247, NE-1747, NE-1047,
NE-1447, NE-1257, NE-1757, NE-1442, NE-1856,
NE-1456, NE-1846, NE-1446, NE-2146-2,
NE-2156-2
4. The maximum stacking height is the total heights of
two units.
PREPARATION
Be sure the oven cavity is empty.
INSTALLATION
1. Stack the units and remove five screws (a) as shown in Fig.1.
2. Loosen the screw (b).
3. Projection on Joint Plate must face away from the oven. Place Joint Plate on the screw (b).
4. Attach and tighten five screws (a) and the screw (b). See Fig.2.
5. Ensure the top oven is at a safe and workable height.
Self Diagnostics Failure Code Explanation
This oven monitors its operation and displays a Failure Code in Digital Display Window when a problem occurs.
What to do when a Failure Code appears: Unplug the oven and wait more than ten seconds before
reconnecting. If normal operation does not resume, follow the next chart.
CODE
F01
F33-34
F05
F81-82
F86-87
F44
PROBLEM
Too high temperature of
exhausted air
Defective thermistor circuit
Defective memory IC
Defective relay circuit
Defective relay circuit
Defective control panel
WHAT TO DO
The oven shuts off automatically. Disconnect the power cord from the wall socket.
The oven beeps continuously and resets for operation when cool. Move the oven
to the cooler location. If the problem persists, call service agent.
The oven shuts off automatically. If the problem persists, call service agent.
If the problem persists, call service agent.The oven will operate even if Failure
Code appears, just not as designed. If the problem occurs during memory
heating, press Stop/Reset pad.Then other memory program and manual heating
will be possible.
If the problem persists, call service agent.The oven will operate even if Failure
Code appears, just not as designed. Press Stop/Reset pad and try again.
The oven shuts off automatically. If the problem persists, call service agent.
The oven shuts off automatically. If the problem persists, call service agent.
Note:Above codes shown in Digital Display Window do not indicate all possible failures on the unit.
(b)
Joint Plate
Projection
(a)
Fig. 1
Joint Plate
Projection
Fig. 2

- 14 -
Care of Your Oven
1. Remove the plug from the electrical socket before
cleaning.
2. Keep the inside of the oven [and Middle shelf
(NE-2146-2, NE-2156-2 only)] clean. If pieces of
food or spilled liquids stick to the oven walls, or
between door seal and door surface, they will
absorb microwaves and may cause arcing or
sparks.Wipe up all spills with a damp cloth. Kitchen
detergent or Food Sanitizer Solution may be used if
the oven gets very dirty. Do not use harsh
detergents or abrasives.
The middle shelf can be washed either in hot soapy
water or in the dishwasher.
3. The outside surface of this microwave oven should
be cleaned with soap and water, then dried with a
soft cloth. Make sure that water does not get into
the back ventilation or control panel, opening since
this can damage the unit.
4. The window of the door should be washed with
very mild soap and water. Be sure to use a soft
cloth. Never use window clearer.The front door can
be scratched by harsh soap or cleaners.
CLEANING OF THE
SPLATTER SHIELD
1. Hold snap in-snap out side stoppers of splatter
shield with both hands and pull them in and down.
Then take the splatter shield out of the oven cavity.
2. Rinse splatter shield in soapy water or Food
Sanitizer Solution. Dry.
3. Be sure to replace the shield before using the oven.
CAUTION
Splatter shield must be in place securely when
you use the oven.
CLEANING AIR FILTER
Cleaning Air Filter regularly according to the following
instructions.The oven may have problems when Air
Filter becomes clogged with dust.(*)
1. Remove Air Filter from the front bottom skirt by
returning the right screw to the left.Then slide the
filter to the right and lift it off the post at the left.
screw
post
2. Wash this filter in warm soapy water.
3. Be sure to replace Air Filter before using the oven.
(*)If Air Filter becomes clogged with debris this will
cause an overheating problem on the oven.

- 15 -
English
Cooking Instructions
COOKWARE
1. Before using the oven always check that containers
are suitable. DO NOT MICROWAVE sealed
containers as they may explode.
N.B. Always check manufacturer’s instructions as
some food manufacturers are producing food in
containers that do not require piercing.
2. DO NOT leave the appliance unattended if paper,
plastic or other combustible containers are used.
Do not use re-cycled paper products, as they may
contain impurities which may cause sparks and/or
fires when used, unless packaging states they are
specifically designed for MICROWAVE use.
3. Heat-proof glassware, such as Pyroceram and
Pyrex, is best suited for use in the microwave oven.
4. Do not use metal ware, ceramics trimmed with gold
or silver, or any container with a metal content.
5. If “arcing” should occur, check the cookware
carefully again for metal.
6. You may use ordinary glassware, chinaware,
plastic-ware and paper-ware, when cooking food
that requires a low temperature. Using this type of
cookware for high temperature cooking may cause
cracking or warping.
7. You can cook steamed vegetables in special “see-
through” wrapping film, such as Saran Wrap, or wax
paper. Do not cook in a plastic bag.
CAUTION
Do not use METAL UTENSILS in this oven.
OTHER HELPFUL
INSTRUCTIONS
FOR BEST RESULTS
1. When determining time for particular foods, always
figure minimum time and check occasionally during
cooking for progress.The microwave oven cooks so
quickly, therefore it is easy to overcook your foods.
2. Be careful of the cooking time for small quantities of
foods, or foods with low water content.They may
burn if cooked too long.
3. Do not use the oven for drying kitchen towels or
napkins.They may burn if heated too long.
4. Do not try to boil eggs in the oven.
5. When you cook an egg be sure to pierce the yolk
membrane prior to placing into the oven to prevent
the egg bursting.
HOW TO GET BROWNED FINISH
Generally foods do not brown when cooked by a
microwave oven.This is one of the features of the
equipment.To brown chickens, brush sauce on the
surface before or during cooking.You can also brown
meat in a conventional frying pan before cooking in
the oven. A browning skillet for the microwave oven
can obtain the same result.
FOR EVEN FINISHED COOKING
Open the door and give the dish a half turn, or turn
the food over during cooking.This helps to achieve
more even cooking.When you cook chicken the legs
cook faster than other parts.Wrap the legs with
aluminum foil during cooking to reflect the microwave
energy in order to create even cooking.
TWO LEVEL COOKING
(NE-2146-2/2156-2 only)
When heating, one item always place the container in
the centre of the bottom shelf.
When using the microwave mainly for reheating one
item at a time, remove the middle shelf and work on
the bottom shelf.
When reheating two items at a time place both dishes
on the bottom shelf side by side, unless the containers
are too large and then place one on the shelf.
When heating more than two plates, place the dishes
evenly on the two shelves.
Allow some space between each plate, do not cram
too much food into the oven.
If the middle shelf is not used, it should be stored
outside the oven and must not be put on the bottom
shelf.
DEFROSTING FROZEN
FOODS
1. If you try to completely defrost frozen foods in the
microwave oven, uneven defrosting may occur due
to the differences in the thickness and shape of the
food. Drippings may also result, and sometimes a
part of the food cooks although other parts still
remain frozen. In actual usage of frozen foods, you
should not normally defrost them 100%. 70%
defrosting in the microwave oven is ideal and
helpful for the next cooking operation.
2. To defrost evenly, turn over or rearrange the food
during defrosting.
3. To defrost fatty meat, heat it in the microwave oven
for a short time and leave it to stand at room
temperature, or heat it intermittently until defrosted.
4. When you defrost a whole chicken, or any frozen
food of irregular shape, wrap legs or thin parts with
aluminum foil. Otherwise thin parts will be defrosted
faster and sometimes cooked before other parts
have properly defrosted. For big pieces of meat,
wrap the sides with aluminum foil so that they will
be uniformly thawed by vertical microwaves only.
5. Ice should be removed at times during defrosting.

- 16 -
Cooking Instructions
MICROWAVE BASICS
Fundamental principles determine the success of
microwave food preparation.
They include:
1.
TEMPERATURE OF FOODS –– Frozen or
refrigerated food items will require longer heating
times to reach a desired serving temperature than
foods from room temperature.
2.
FOOD COMPONENTS –– Foods high in sugar,
salt, fats and moisture content heat faster because
these properties attract microwave energy. Denser
foods high in protein and fiber, absorb microwave
energy slower which means a lengthier heating
time.
3.
BULK/VOLUME –– The greater the mass of food,
the longer it takes to heat.
4.
CONTAINERS –– Ceramic, paper, china,
styrofoam, glass and plastic are suitable for use in
microwave ovens with the following caution.
DO NOT HEAT foods in a SEALED container or
bag. Foods expand when heated and can break the
container or bag.
5.
AVOID METAL because it “bounces” the
microwaves, causing uneven heating and
sometimes even flashes, which may pit or mark the
interior of the oven, the metal container or plate
trim.
6. Heated liquids can erupt if not mixed with air. Do
not heat liquids in your microwave oven without first
stirring.
Heating foods with either high sugar or high fat
content should be done ONLY in high
temperature-resistant containers since these
foods get very hot. Using styrofoam containers for
these foods will cause the styrofoam to warp.
Other low temperature restaurant glass or plastic
platters may crack or warp under similar
conditions.
GENERAL GUIDELINES FOR
HEATING IN A PANASONIC
MICROWAVE OVEN
For specific time, see each food category for
appropriate heating techniques, plus necessary pre-
preparation of foods.
HEATING FOODS FROM REFRIGERATED TEMPERATURE
Foods stored in the refrigerator (5˚C) should be
covered before reheating with the exception of breads,
pastries or any breaded product, which should be
heated uncovered to prevent sogginess.
Most conventionally prepared foods should be slightly
undercooked, and held in the refrigerator, so that
overcooking does not occur during microwave heating.
Cooked items, such as vegetables, may be portion
plated and covered for reheating without loss of color,
texture or nutritional content.
HEATING FOODS FROM ROOM TEMPERATURE
Food items such as canned entree, vegetables, etc.
will require significantly less heating time than those
from refrigerated temperatures.
IMPORTANT RECOMMENDATIONS
1. For best results it is recommended that foods
conventionally prepared be slightly undercooked
when subsequently heated in this oven.
2. REMEMBER that after the heating cycle has been
completed, internal food temperatures continue to
rise slightly in foods heated in this oven.
3. A major abuse of microwave applications is the
category of breads, pastries and pies.They are drier
than insides or fillings, they heat more slowly.
Therefore, baked goods should ONLY be heated
until the crust is warm to the touch (50˚C-55˚C).
4. DO NOT OVERHEAT YOUR FOOD: 99% of all food
quality complaints of microwave heated foods can
be traced to overheating.

- 17 -
English
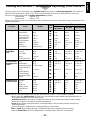
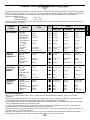
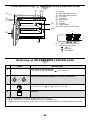
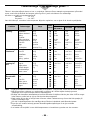
Cooking Instructions –– Heating and Defrosting Time Charts ––
The times given in the chart below are a guideline only. Many factors eg starting temperature of the food can
affect the final heating time required.The cooking and defrosting times must be adjusted when necessary.
All times are tested using foods at
starting temperatures as below;
Chilled foods . . . . . .Approx. +5˚C
Frozen foods . . . . . .Approx. -18˚C
Always check for the correct core temperature with a temperature probe to comply with current Government Food
Hygiene Regulations.
Function
Food Weight
Power
Level
Approx.Time
NE-2156-2
NE-1846 NE-1656/1646
NE-2146-2
Defrosting
Fish Fillets
Minced Beef
Whole Chicken
Composite Dish
Multi portion
Single portion
Apple Pie
Gateau
Bread Rolls
500 g
500 g
1.36 kg
1.36 kg
275 g
1 portion
1 portion
1 portion 50 g
8 min 8 min 8 min
5 min 5 min 5 min
25 min 25 min 25 min
20 min 20 min 20 min
8 min 8 min 8 min
1 min 15 s 1 min 15 s 1 min 15 s
2 min 2 min 2 min
30 s 30 s 30 s
Cooking from
Chilled Raw
Food
Scrambled Egg
Broccoli
Fish Fillets
Bacon
Chicken Portions
2 eggs + 2 tbsp. milk
500 g
500 g
2 rashers
500 g
20-25 s 25-30 s 30-40 s
3 min 3 min 30 s 3 min 55 s
2 min 20 s 2 min 45 s 3 min
40 s 50 s 1 min
4 min 4 min 45 s 5 min 20 s
Cooking and/or
Reheating from
Frozen
Peas
Cooked Rice
Cooked Sausages
Cooked Wings of
Fire
Cooked Boxed
Cheeseburger
Chocolate Fudge
Cake
500 g
167 g
x 3 (50 g each)
x 7 pieces
75 g
1 portion
3 min 20 s 4 min 4 min 30 s
1 min 20 s 1 min 40 s 1 min 55 s
50 s 1 min 1 min 5 s
1 min 20 s 1 min 40 s 1 min 55 s
50 s 1 min 1 min 5 s
30 s 30 s 30 s
Reheating from
Cooked Chilled
Lasagne
Chilli
Apple Pie
Pepper Sauce
Baked Beans
Soup
325 g
325 g
1 portion
100 ml
100 ml
125 ml
3 min 20 s 4 min 4 min 30 s
2 min 30 s 3 min 3 min 15 s
14 s 16 s 18 s
40 s 50 s 56 s
40 s 50 s 56 s
48 s 56 s 1 min 10 s
HINTS:
•
Do not cook/reheat/defrost directly onto the base of the oven –– use a suitable container.
•
When defrosting multi portions of foods, turn over and break apart halfway through defrost time to
allow better penetration of microwave energy.
•
Solid/dense foods should not be cooked from frozen as they will be overcooked round the edges
before the centre has reached the required temperature.
•
Cover dishes where appropriate during cooking/reheating.This will retain moisture and prevent
splashing/spillages.
•
Loosen lids/pierce clingfilm before cooking/reheating covered foods.
•
Stir or shake foods halfway through cooking/defrosting time to distribute the heat evenly.
•
Allow a Stand Time before food temperature is checked and/or offered for consumption.

- 18 -
Wichtige Sicherheitshinweise
Montage
Erdung
WICHTIGER HINWEIS: ZUR PERSÖNLICHEN
SICHERHEIT MUSS
DIESES GERÄT
ORDNUNGSGEMÄSS
GEERDET SEIN.
Sollte die für das Gerät vorgesehene Wandsteckdose
nicht geerdet sein, ist der Kunde verpflichtet, eine
vorschriftsmäßig geerdete- Steckdose anbringen zu
lassen.
Spannung und Leistung
Das Gerät muß an das Netz über eine mindestens
16-A-Installationssicherung angeschlossen werden.
Die Netzspannung und die für das Mikrowellengerät
vorgeschriebene Betriebsspannung müssen
übereinstimmen. Ein Betreiben des Gerätes mit
höherer Netzspannung als zulässig kann Brand und
andere Schäden verursachen.
Montageort des Mikrowellengerätes
Das Gerät niemals in sehr feuchter, heißer oder
fettiger Umgebung aufstellen, z. B. direkt neben oder
über einer Heizquelle bzw. Friteuse. Das Gerät nicht
direkt über oder neben einem Gas- oder Elektroherd
aufstellen.
Das Mikrowellengerät könnte beschädigt werden. Bei
Raumtemperaturen von mehr als 40 Grad Celsius,
einer Luftfeuchtigkeit von mehr als 85% und einem
hohen Fettgehalt in der Umgebungsluft, ist der
Betrieb nicht zulässig.
Ungehinderte Luftzirkulation ist unbedingt erforderlich.
Das Gerät ist auf einer geraden und stabilen
Oberfläche aufzustellen. Dabei muß ein
Mindestabstand von 5 cm rechts und links von den
Seitenwänden und der Rückwand des Gerätes
eingehalten werden. Ein Abstand von mindestens
20 cm ist über dem Gerät einschließlich der beiden
Ventilationsöffnungen einzuhalten.
Stehen Radio- bzw. Fernsehgeräte in unmittelbarer
Nähe des Mikrowellengerätes, so sind gelegentliche
Störungen beim Empfang schwacher Sender
während des Gebrauchs nicht ganz vermeidbar.
Stellen Sie das Gerät so auf, dass der Stecker frei
zugänglich ist.
Wichtiger Hinweis:
Vor der ersten Inbetriebnahme des Gerätes unbedingt
die beigefügte Warnung am Gerät befestigen. Bitte
das dafür vorgesehene Etikett auf die
Gehäuseoberfläche kleben.
Vorsicht
Das Mikrowellengerät nicht bei Ieerem Garraum
einschalten.
Um den Zustand der Magnetron-Röhren und anderer
Teile im Inneren des Gerätes nicht zu
beeinträchtigen, sollte das Gerät niemals im Leerlauf
betrieben werden.
Das Gehäuse nicht abbauen.
Das Mikrowellengerät arbeitet mit Hochspannung.
Reparaturen dürfen nur von geschulten.
Fachkräften ausgeführt werden.
Ventilationsöffnungen nicht blockieren.
Eine ungehinderte Luftzirkulation hinter dem Gerät ist
für Kühlzwecke unbedingt erforderlich.
Während des Betriebs dürfen die Luftöffnungen am
Mikrowellengerät also nicht blockiert werden.
Der Garraum ist kein Wäschetrockner!
Im Mikrowellengerät niemals Wäsche trocknen.
Bei längerem Verbleib könnten Brandflecke im
Gewebe entstehen.
Metallgeschirr
Kein Metallgeschirr im Gerät verwenden.
Bitte Warnhinweis Aufkleben (bei Modellen
NE-2156-2/NE-2146-2)
Vor der ersten Inbetriebnahme des Gerätes unbedingt
die beigefügte Warnung am Gerät befestigen. Bitte
das dafür vorgesehene Etikett auf die
Gehäuseoberfläche kleben.
Bei diesem Produkt handelt es sich um ein Gerät,
das die europäische Norm für EMV-
Funkstörungen (EMV = Elektromagnetische
Verträglichkeit), EN 55011, erfüllt. Gemäß dieser
Norm ist dieses Produkt ein Gerät der Gruppe 2,
Klasse B und hält alle Grenzwerte ein. Gruppe 2
bedeutet, dass in diesem Gerät Hochfrequenz-
Energie für das Erwärmen oder Garen von
Lebensmitteln absichtlich als elektromagnetische
Strahlung erzeugt wird. Klasse B sagt aus, dass
dieses Produkt in einem normalen Wohnbereich
betrieben werden darf.
Sidan laddas...
Sidan laddas...
Sidan laddas...
Sidan laddas...
Sidan laddas...
Sidan laddas...
Sidan laddas...
Sidan laddas...
Sidan laddas...
Sidan laddas...
Sidan laddas...
Sidan laddas...
Sidan laddas...
Sidan laddas...
Sidan laddas...
Sidan laddas...
Sidan laddas...
Sidan laddas...
Sidan laddas...
Sidan laddas...
Sidan laddas...
Sidan laddas...
Sidan laddas...
Sidan laddas...
Sidan laddas...
Sidan laddas...
Sidan laddas...
Sidan laddas...
Sidan laddas...
Sidan laddas...
Sidan laddas...
Sidan laddas...
Sidan laddas...
Sidan laddas...
Sidan laddas...
Sidan laddas...
Sidan laddas...
Sidan laddas...
Sidan laddas...
Sidan laddas...
Sidan laddas...
Sidan laddas...
Sidan laddas...
Sidan laddas...
Sidan laddas...
Sidan laddas...
Sidan laddas...
Sidan laddas...
Sidan laddas...
Sidan laddas...
Sidan laddas...
Sidan laddas...
Sidan laddas...
Sidan laddas...
Sidan laddas...
Sidan laddas...
Sidan laddas...
Sidan laddas...
Sidan laddas...
Sidan laddas...
Sidan laddas...
Sidan laddas...
Sidan laddas...
Sidan laddas...
Sidan laddas...
Sidan laddas...
Sidan laddas...
Sidan laddas...
Sidan laddas...
Sidan laddas...
Sidan laddas...
Sidan laddas...
Sidan laddas...
Sidan laddas...
Sidan laddas...
Sidan laddas...
Sidan laddas...
Sidan laddas...
Sidan laddas...
Sidan laddas...
Sidan laddas...
Sidan laddas...
Sidan laddas...
Sidan laddas...
Sidan laddas...
Sidan laddas...
Sidan laddas...
Sidan laddas...
Sidan laddas...
Sidan laddas...
Sidan laddas...
Sidan laddas...
Sidan laddas...
Sidan laddas...
Sidan laddas...
Sidan laddas...
Sidan laddas...
Sidan laddas...
Sidan laddas...
Sidan laddas...
Sidan laddas...
Sidan laddas...
Sidan laddas...
Sidan laddas...
Sidan laddas...
Sidan laddas...
Sidan laddas...
Sidan laddas...
-
 1
1
-
 2
2
-
 3
3
-
 4
4
-
 5
5
-
 6
6
-
 7
7
-
 8
8
-
 9
9
-
 10
10
-
 11
11
-
 12
12
-
 13
13
-
 14
14
-
 15
15
-
 16
16
-
 17
17
-
 18
18
-
 19
19
-
 20
20
-
 21
21
-
 22
22
-
 23
23
-
 24
24
-
 25
25
-
 26
26
-
 27
27
-
 28
28
-
 29
29
-
 30
30
-
 31
31
-
 32
32
-
 33
33
-
 34
34
-
 35
35
-
 36
36
-
 37
37
-
 38
38
-
 39
39
-
 40
40
-
 41
41
-
 42
42
-
 43
43
-
 44
44
-
 45
45
-
 46
46
-
 47
47
-
 48
48
-
 49
49
-
 50
50
-
 51
51
-
 52
52
-
 53
53
-
 54
54
-
 55
55
-
 56
56
-
 57
57
-
 58
58
-
 59
59
-
 60
60
-
 61
61
-
 62
62
-
 63
63
-
 64
64
-
 65
65
-
 66
66
-
 67
67
-
 68
68
-
 69
69
-
 70
70
-
 71
71
-
 72
72
-
 73
73
-
 74
74
-
 75
75
-
 76
76
-
 77
77
-
 78
78
-
 79
79
-
 80
80
-
 81
81
-
 82
82
-
 83
83
-
 84
84
-
 85
85
-
 86
86
-
 87
87
-
 88
88
-
 89
89
-
 90
90
-
 91
91
-
 92
92
-
 93
93
-
 94
94
-
 95
95
-
 96
96
-
 97
97
-
 98
98
-
 99
99
-
 100
100
-
 101
101
-
 102
102
-
 103
103
-
 104
104
-
 105
105
-
 106
106
-
 107
107
-
 108
108
-
 109
109
-
 110
110
-
 111
111
-
 112
112
-
 113
113
-
 114
114
-
 115
115
-
 116
116
-
 117
117
-
 118
118
-
 119
119
-
 120
120
-
 121
121
-
 122
122
-
 123
123
-
 124
124
-
 125
125
-
 126
126
-
 127
127
-
 128
128


Panasonic NE-1646 Användarmanual
- Kategori
- Mikrovågor
- Typ
- Användarmanual
på andra språk
- italiano: Panasonic NE-1646 Manuale utente
- español: Panasonic NE-1646 Manual de usuario
- Deutsch: Panasonic NE-1646 Benutzerhandbuch
- français: Panasonic NE-1646 Manuel utilisateur
- English: Panasonic NE-1646 User manual
- dansk: Panasonic NE-1646 Brugermanual
- suomi: Panasonic NE-1646 Ohjekirja
- Nederlands: Panasonic NE-1646 Handleiding