

SPECIAL MESSAGE SECTION
PRODUCT SAFETY MARKINGS: Yamaha electron-
ic products may have either labels similar to the graphics
shown below or molded/stamped facsimiles of these
graphics on the enclosure. The explanation of these
graphics appears on this page. Please observe all cau-
tions indicated on this page and those indicated on the
safety instruction section.
SEE BOTTOM OF ENCLOSURE OR LOWER FRONT
PANEL FOR GRAPHIC SYMBOL MARKINGS
The exclamation point within the equi-
lateral triangle is intended to alert the
user to the presence of important operat-
ing and maintenance (servicing) instruc-
tions in the literature accompanying the
product.
The lightning flash with arrowhead
symbol within the equilateral triangle
is intended to alert the user to the pres-
ence of uninsulated “dangerous volt-
age” within the product’s enclosure
that may be of sufficient magnitude to
constitute a risk of electrical shock.
IMPORTANT NOTICE: All Yamaha electronic prod-
ucts are tested and approved by an independent safety
testing laboratory in order that you may be sure that
when it is properly installed and used in its normal and
customary manner, all foreseeable risks have been elimi-
nated. DO NOT modify this unit or commission others
to do so unless specifically authorized by Yamaha. Prod-
uct performance and/or safety standards may be dimin-
ished. Claims filed under the expressed warranty may be
denied if the unit is/has been modified. Implied warran-
ties may also be affected.
SPECIFICATIONS SUBJECT TO CHANGE: The
information contained in this manual is believed to be
correct at the time of printing. However, Yamaha re-
serves the right to change or modify any of the specifica-
tions without notice or obligation to update existing
units.
ENVIRONMENTAL ISSUES: Yamaha strives to pro-
duce products that are both user safe and environmental-
ly friendly. We sincerely believe that our products and
the production methods used to produce them, meet
these goals. In keeping with both the letter and the spirit
of the law, we want you to be aware of the following:
Battery Notice: This product MAY contain a small non-
rechargeable battery which (if applicable) is soldered in
place. The average life span of this type of battery is ap-
proximately five years. When replacement becomes nec-
cessary, contact a qualified service representative to
perform the replacement.
Warning: Do not attempt to recharge, disassemble, or
incinerate this type of battery. Keep all batteries away
from children. Dispose of used batteries promptly and as
regulated by applicable laws. Note: In some areas, the
servicer is required by law to return the defective parts.
However, you do have the option of having the servicer
dispose of these parts for you.
Disposal Notice: Should this product become damaged
beyond repair, or for some reason its useful life is con-
sidered to be at an end, please observe all local, state,
and federal regulations that relate to the disposal of prod-
ucts that contain lead, batteries, plastics, etc.
NOTICE: Service charges incurred due to lack of
knowledge relating to how a function or effect works
(when the unit is operating as designed) are not covered
by the manufacturer’s warranty, and are therefore the
owners responsibility. Please study this manual carefully
and consult your dealer before requesting service.
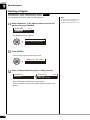
NAME PLATE LOCATION: The graphic below indi-
cates the location of the name plate. The model number,
serial number, power requirements, etc., are located on
this plate. You should record the model number, serial
number, and the date of purchase in the spaces provided
below and retain this manual as a permanent record of
your purchase.
Model _________________________________________
Serial No. ______________________________________
Purchase Date __________________________________
92-469
YAMAHA CORPORATION
MADE IN JAPAN
PATENTS
HS
1

IMPORTANT SAFETY INSTRUCTIONS
WARNING — When using any electrical or electronic
product, basic precautions should always be followed. These
precautions include, but are not limited to, the following:
Read these instructions.
Keep these instructions.
Heed all warnings.
Follow all instructions.
Do not use this apparatus near water.
Clean only with dry cloth.
Do not block any ventilation openings. Install in ac-
cordance with the manufacturer’s instructions.
Do not install near any heat sources such as radia-
tors, heat registers, stoves, or other apparatus (in-
cluding amplifiers) that produce heat.
Do not defeat the safety purpose of the polarized or
grounding-type plug. A polarized plug has two
blades with one wider than the other. A grounding
type plug has two blades and a third grounding
prong. The wide blade or the third prong are pro-
vided for your safety. If the provided plug does not
fit into your outlet, consult an electrician for re-
placement of the obsolete outlet.
Protect the power cord from being walked on or
pinched particularly at plugs, convenience recepta-
cles, and the point where they exit from the apparatus.
Only use attachments/accessories specified by the
manufacturer.
Use only with the cart, stand, tripod,
bracket, or table specified by the
manufacturer, or sold with the appa-
ratus. When a cart is used, use caution
when moving the cart/apparatus com-
bination to avoid injury from tip-over.
Unplug this apparatus during lightning storms or
when unused for long periods of time.
Refer all servicing to qualified service personnel.
Servicing is required when the apparatus has been
damaged in any way, such as power-supply cord or
plug is damaged, liquid has been spilled or objects
have fallen into the apparatus, the apparatus has
been exposed to rain or moisture, does not operate
normally, or has been dropped.
This product shall not be exposed to dripping or
splashing and that no objects filled with liquids,
such as vases, shall be placed on the apparatus.
Do not put burning items, such as candles, on the
apparatus.
Do not place this product or any other objects on
the power cord or place it in a position where any-
one could walk on, trip over, or roll anything over
power or connecting cords of any kind. The use of
an extension cord is not recommended! If you must
use an extension cord, the minimum wire size for a
25’ cord (or less) is 18 AWG. NOTE: The smaller
the AWG number, the larger the current handling
capacity. For longer extension cords, consult a local
electrician.
WARNING — To reduce the risk of fire or electric
shock, do not expose this apparatus to rain or mois-
ture.
Care should be taken that objects do not fall and liq-
uids are not spilled into the enclosure through any
openings that may exist.
This product, either alone or in combination with an
amplifier and headphones or speaker/s, may be ca-
pable of producing sound levels that could cause
permanent hearing loss. DO NOT operate for a long
period of time at a high volume level or at a level
that is uncomfortable. If you experience any hear-
ing loss or ringing in the ears, you should consult an
audiologist. IMPORTANT: The louder the sound,
the shorter the time period before damage occurs.
Some Yamaha products may have benches and/or
accessory mounting fixtures that are either supplied
as a part or the product or as optional accessories.
Some of these items are designed to be dealer as-
sembled or installed. Please make sure that benches
are stable and any optional fixtures (where applica-
ble) are well secured BEFORE using. Benches sup-
plied by Yamaha are designed for seating only. No
other uses are recommended.
This product shall be connected to a MAINS socket
outlet with a protective earthing connection.
This product has a power switch for shutting off all
system. The switch is located on the Power Supply
Unit nearby the entrance of the AC cord. Note that
the switch on the Controller does not shutdown all
system.
Make sure that the plug of the Power Supply Unit’s
power cable can easily be disconnected from the
AC outlet as a measure of precaution.
Battery
– Danger of explosion if battery incorrectly replaced.
Replace only with the same type.
Outlets for Speakers
– Connect speakers of 2A/1A (confirm the indication
to the outlets) or less of totals. Do not connect other
products except speakers.
– Consult Yamaha service technician when using the
outlets outside the purchased area.
92-469-DK
PLEASE KEEP THIS MANUAL
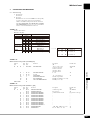
1.
2.
3.
4.
5.
6.
7.
8.
9.
10.
11.
12.
13.
14.
15.
16.
17.
18.
19.
20.
21.
22.
23.
24.
2

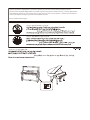
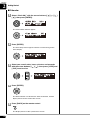
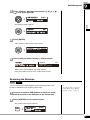
The control unit is classified as a Class 1 laser product. One of the
labels below is located on the inside of the CD drive unit.
La unidad de control está clasificada como producto láser de Clase 1.
Una de las etiquetas siguientes o similar está situada en el interior de la
unidad de disco CD.
Управляющий модуль классифицируется как лазерное изделие
класса 1. Одна из приведенных ниже этикеток или подобная
расположена на внутренней стороне привода CD.
控制器分类为第 1 类激光产品。下列标签中的一种位于 CD 驱动
装置的内侧。
控制器分類為第 1 類激光產品。下列標簽中的一種位于 CD 驅動
裝置的內側。
컨트롤 유닛은 1 등급 레이저 제품으로 분류됩니다 . 다음의 라벨
중의 하나가 CD 드라이브 유닛의 안쪽에 붙어 있습니다 .
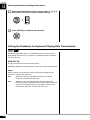
IMPORTANT NOTICE FOR THE UNITED KINGDOM
Connecting the Plug and Cord
IMPORTANT: The wires in mains lead are coloured in accordance
with the following code:
GREEN-AND-YELLOW : EARTH
BLUE : NEUTRAL
BROWN : LIVE
As the colours of the wires in the mains lead of this apparatus may
not correspond with the coloured markings identifying the
terminals in your plug, proceed as follows:
The wire which is coloured GREEN and YELLOW must be
connected to the terminal in the plug which is marked by the letter
E or by the safety earth symbol or coloured GREEN and
YELLOW.
The wire which is coloured BLUE must be connected to the
terminal which is marked with the letter N or coloured BLACK.
The wire which is coloured BROWN must be connected to the
terminal which is marked with the letter L or coloured RED.
CAUTION—Use of controls or adjustments or performance of
procedures other than those specified herein may result in
hazardous radiation exposure.
PRECAUCIÓN—El emplo de controles o ajustes o la realización
de procedimientos distintos a los especificados en este manual
podrá resultar en una peligrosa exposición a la radiación.
ПРЕДОСТЕРЕЖЕНИЕ—Использование управления,
регулировок или выполнение процедур, отличающихся от
описанных в этом руководстве, может привести к опасному
радиоактивному облучению.
注意 — 本操作说明书指定之外的控制器的使用、调整或操作
可能会导致危险的放射性照射。
注意 — 本操作說明書指定之外的控制器的使用、調整或操作
可能會導致危險的放射性照射。
주의 — 여기에 지정된 것 이외로 컨트롤을 사용하는 것 , 혹은
지정된 것 이외로 조정을 행하
거나 , 절차를 실행하는 것은 위
험한 방사선에 노출되는 결과를 초래할 수도 있습니다 .
Laite on liitettävä suojamaadoituskoskettimilla varustettuun
pistorasiaan.
Apparatet må tilkoples jordet stikkontakt.
Apparaten skall anslutas till jordat uttag.
이 기기는 가정용 (B 급 ) 전자파적 합기기로서
주로 가정에서 사용하는 것을 목적
으로 하며 , 모든 지역에서 사용할 수 있습니다 .
Laser Diode Properties
* Material: GaAIAs
* Wavelength: 790 nm
* Laser Output Power at the lens of the Laser Pick Up Unit: max.
0.2 mW
Propiedades del diodo láser
* Material: GaAIAs
* Longitud de onda: 790 nm
* Potencia de salida láser en el objetivo de la unidad Laser Pick
Up: máx. 0.2 mW
Свойства лазерного диода
* Материал: GaAlAs
* Длина волны: 790 нм
* Мощность лазерного излучения на линзах звукоснимателя:
макс. 0.2 мВт
激光二极管的性能
* 材料∶ GaAlAs
* 波长∶ 790 nm
* 激光拾波器透镜部的激光输出功率∶最大 0.2 mW
激光二極管的性能
* 材料:GaAlAs
* 波長:790 nm
* 激光拾波器透鏡部的激光輸出功率:最大 0.2 mW
레이저 다이오드 속성
* 재료 : GaAlAs
* 파장 : 790 nm
* 레이저 픽업 유닛 렌즈에서의 레이저 출력 : 최대 0.2 mW
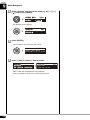
CLASS 1 LASER PRODUCT
LASER KLASSE 1
LUOKAN 1 LASERLAITE
KLASS 1 LASER APPARAT
APAREIL A LASER DE CLASSE 1
EN60825
CLASS 1 LASER PRODUCT
LASER KLASSE 1

Information for Users on Collection and Disposal of Old Equipment and used Batteries
These symbols on the products, packaging, and/or accompanying documents mean that used electrical and electronic
products and batteries should not be mixed with general household waste.
For proper treatment, recovery and recycling of old products and used batteries, please take them to applicable
collection points, in accordance with your national legislation and the Directives 2002/96/EC and 2006/66/EC.
By disposing of these products and batteries correctly, you will help to save valuable resources and prevent any
potential negative effects on human health and the environment which could otherwise arise from inappropriate
waste handling.
For more information about collection and recycling of old products and batteries, please contact your local
municipality, your waste disposal service or the point of sale where you purchased the items.
[For business users in the European Union]
If you wish to discard electrical and electronic equipment, please contact your dealer or supplier for further
information.
[Information on Disposal in other Countries outside the European Union]
These symbols are only valid in the European Union. If you wish to discard these items, please contact your local
authorities or dealer and ask for the correct method of disposal.
Note for the battery symbol (bottom two symbol examples):
This symbol might be used in combination with a chemical symbol. In this case it complies with the requirement set
by the Directive for the chemical involved.
Información para Usuarios sobre Recolección y Disposición de Equipamiento Viejo y Baterías usadas
Estos símbolos en los productos, embalaje, y/o documentación que se acompañe significan que los productos
electrónicos y eléctricos usados y las baterías usadas no deben ser mezclados con desechos hogareños corrientes.
Para el tratamiento, recuperación y reciclado apropiado de los productos viejos y las baterías usadas, por favor
llévelos a puntos de recolección aplicables, de acuerdo a su legislación nacional y las directivas 2002/96/EC y 2006/
66/EC.
Al disponer de estos productos y baterías correctamente, ayudará a ahorrar recursos valiosos y a prevenir cualquier
potencial efecto negativo sobre la salud humana y el medio ambiente, el cual podría surgir de un inapropiado manejo
de los desechos.
Para mayor información sobre recolección y reciclado de productos viejos y baterías, por favor contacte a su
municipio local, su servicio de gestión de residuos o el punto de venta en el cual usted adquirió los artículos.
[Para usuarios de negocios en la Unión Europea]
Si usted desea deshacerse de equipamiento eléctrico y electrónico, por favor contacte a su vendedor o proveedor para
mayor información.
[Información sobre la Disposición en otros países fuera de la Unión Europea]
Estos símbolos sólo son válidos en la Unión Europea. Si desea deshacerse de estos artículos, por favor contacte a sus
autoridades locales y pregunte por el método correcto de disposición.
Nota sobre el símbolo de la batería (ejemplos de dos símbolos de la parte inferior)
Este símbolo podría ser utilizado en combinación con un símbolo químico. En este caso el mismo obedece a un
requerimiento dispuesto por la Directiva para el elemento químico involucrado.

Для инструментов с заземленным кабелем питания
ПРЕДУПРЕЖДЕНИЕ
Электропитание/кабель питания
• Подключайте только к электросети с
соответствующим напряжением и защитным
заземлением. Неправильное заземление может
вызвать поражение электрическим током.
Беречь от воды
• Не держите инструмент там, где он может попасть
под дождь, рядом с водой, а также в сырых и
влажных помещениях. Не ставьте на него емкости
с жидкостью, которая может пролиться и попасть в
отверстия.
Беречь от огня
• Не ставьте на инструмент зажженные свечи и
другие подобные предметы. Горящий предмет
может упасть и вызвать пожар.
ВНИМАНИЕ!
Место установки
• При установке инструмента убедитесь в том, что
используемая электрическая розетка
легкодоступна. При возникновении какого-либо
сбоя или неисправности немедленно отключите
питание инструмента и отсоедините кабель
питания от электросети.
Даже если питание устройства отключено,
инструмент продолжает в минимальном
количестве потреблять электроэнергию.
Если инструмент не используется в течение
длительного времени, отсоедините кабель питания
от э
лектросети.
Для инструментов с незаземленным кабелем питания
ПРЕДУПРЕЖДЕНИЕ
Беречь от воды
• Не держите инструмент там, где он может попасть
под дождь, рядом с водой, а также в сырых и
влажных помещениях. Не ставьте на него емкости
с жидкостью, которая может пролиться и попасть в
отверстия.
Беречь от огня
• Не ставьте на инструмент зажженные свечи и
другие подобные предметы. Горящий предмет
может упасть и вызвать пожар.
ВНИМАНИЕ!
Место установки
• При установке инструмента убедитесь в том, что
используемая электрическая розетка
легкодоступна.
При возникновении какого-либо сбоя или
неисправности немедленно отключите питание
инструмента и отсоедините кабель питания от
электросети.
Даже если питание устройства отключено,
инструмент продолжает в минимальном
количестве потреблять электроэнергию.
Если устройство не используется в течение
длительного времени, отсоедините кабель питания
от э
лектросети.
Для инструментов с блоком питания
ПРЕДУПРЕЖДЕНИЕ
Беречь от воды
• Не держите инструмент там, где он может попасть
под дождь, рядом с водой, а также в сырых и
влажных помещениях. Не ставьте на него емкости
с жидкостью, которая может пролиться и попасть в
отверстия.
Беречь от огня
• Не ставьте на инструмент зажженные свечи и
другие подобные предметы. Горящий предмет
может упасть и вызвать пожар.
ВНИМАНИЕ!
Место установки
• При установке инструмента убедитесь в том, что
используемая электрическая розетка
легкодоступна. При возникновении какого-либо
сбоя или неисправности немедленно отключите
питание инструмента и отсоедините кабель
питания от электросети.
Даже если кнопка питания находится в положении
STANDBY, устройство продолжает в
минимальном количестве потреблять
электроэнергию. Если устройство не используется
в течение длительного времени, о
тсоедините
кабель питания от электросети.

ቂ߾ܕනृภቂȃ
ቂࣴճ2000mᇵݓฏภቂȃ
ጝᄎ࠲खၤֶׁܿؠডݒؠȃ
Важное примечание: Информация об условиях Гарантии для Клиентов в Российской Федерации [Русский]
Для получения подробной информации об условиях Гарантии на продукцию Yamaha в России, условиях гарантийного
обслуживания, пожалуйста, посетите веб-сайт по адресу ниже (на сайте доступен файл с условиями для скачивания и
печати) или обратитесь в офис представительства Yamaha в России.
http://ru.yamaha.com/ru/support/

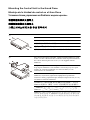
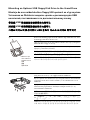
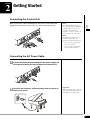
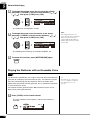
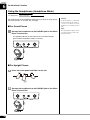
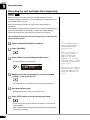
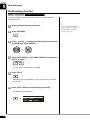
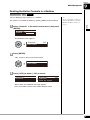
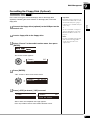
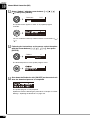
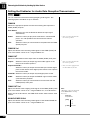
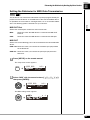
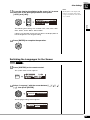
Mounting the Control Unit to the Grand Piano
Montaje de la Unidad de control en el Gran Piano
Установка блока управления на Disklavier модели «рояль»
将控制器安装在大钢琴上
將控制器安裝在大鋼琴上
그랜드피아노에 컨트롤 유닛 장착하기
Remove the four screws from the sides of the control unit.
Quite los cuatro tornillos laterales de la unidad de control.
Удалите четыре винта с боковых панелей блока управления.
从控制器左右侧面取下 4 个螺丝。
從控制器左右側面取下 4 個螺絲。
컨트롤 유닛의 측면에 있는 나사 네 개를 제거해 주십시오 .
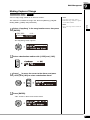
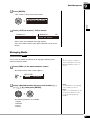
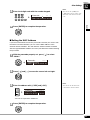
Place the metal suspension bracket, supplied with the Disklavier grand
model, over the control unit, then secure the metal suspension bracket to
the control unit using the four screws (4 10) supplied with the
Disklavier.
Coloque el soporte metálico de suspensión suministrado con el modelo
de gran piano Disklavier en la unidad de control, luego fije el soporte
metálico de suspensión utilizando los cuatro tornillos (4 10)
suministrados con el Disklavier.
Поместите металлический кронштейн подвески, поставляемый с
Disklavier, над блоком управления. Прикрепите кронштейн
подвески к блоку управления при помощи четырех винтов (4 10),
входящих в комплект Disklavier.
将 Disklavier 大钢琴机型配备的金属配件放在控制器上,然后用
Disklavier 配备的 4 个螺丝 (4×10)将金属配件固定在控制器上。
將 Disklavier 大鋼琴機型配備的金屬配件放在控制器上,然後用
Disklavier 配備的 4 個螺絲 (4×10)將金屬配件固定在控制器上。
Disklavier 그랜드 모델과 함께 제공되는 고정용 금속 브래킷을 컨트
롤 유닛 위에 장착한 후 , Disklavier 와 함께 제공되는 네 개의 나사
(4 10) 를 사용하여 고정용 금속 브래킷을 컨트롤 유닛에 단단히
고정시켜주십시오 .
(1)
(2)

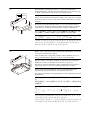
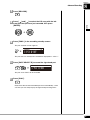
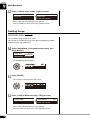
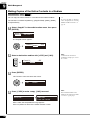
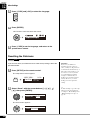
Insert the three restraining screws (5 12) into the marked nuts
underneath the bass side key bed, then tighten the screws, leaving a gap
of about 5 mm between head of the screw and piano body.
Coloque los tres tornillos de retención (5 12) en las tuercas marcadas
debajo del asiento del teclado del lado de bajo, luego apriete los tornillos
dejando un espacio de unos 5 mm entre la cabeza del tornillo y el cuerpo
del piano.
Вставьте три удерживающих винта (5 12) в указанные гайки в
штульраме со стороны басовых клавиш. Затяните винты, оставляя
зазор около 5 мм между головкой винта и корпусом Disklavier.
将 3 个安装螺丝 (5×12)插入位于低音侧键盘下面的螺孔中,然
后拧紧螺丝,在螺丝头和钢琴主体之间要留下约 5mm 间隙。
將 3 個安裝螺絲 (5×12)插入位於低音側鍵盤下面的螺孔中,然
後擰緊螺絲,在螺絲頭和鋼琴主體之間要留下約 5mm 間隙。
세 개의 고정나사 (5 12) 를 키보드의 베이스 쪽 받침대 하부에 설
치되어 있는 너트에 삽입한 후 , 나사머리와 피아노 본체 사이가
5mm 정도의 틈이 남도록 나사를 조여주십시오 .
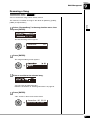
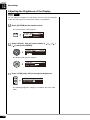
Fit the “slots” of the metal suspension bracket containing the control unit
to the screws mentioned in step (3).
After mounting the control unit, push the control unit back as far as it
will go and then tighten the three screws to secure the bracket.
Fije las “ranuras” del soporte metálico de suspensión que contiene la
unidad de control a los tornillos mencionados en el paso (3).
Después de montar la unidad de control, empújela hacia atrás hasta el
tope y luego fíjela con los tres tornillos para bloquear el soporte.
Через отверстия кронштейна подвески, удерживающего блок
управления, пропустите винты, описанные в пункте (3).
До упора подтолкните блок управления от себя и закрепите винт на
кронштейне.
使固定在控制器上的金属配件的 “ 槽 ” 穿过步骤 (3)所述的螺
丝。
装好控制器后,推入控制器到尽头位置,然后紧固 3 个螺丝来固定
金属配件。
使固定在控制器上的金屬配件的 “ 槽 ” 穿過步驟 (3)所述的螺
絲。
裝好控制器後,推入控制器到儘頭位置,然後緊固 3 個螺絲來固定
金屬配件。
컨트롤 유닛이 장착되어있는 고정용 금속 브래킷의 “ 슬롯 ” 을 순
서 (3) 에서 언급한 나사에 끼워 넣어 주십시오 .
컨트롤 유닛을 장착한 후 , 그 유닛을 뒤쪽으로 끝까지 밀어 준 다음
에 세 개의 나사를 조여서 브래킷을 단단히 고정시켜 주십시오 .
5 mm
(3)
(4)

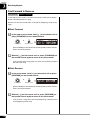
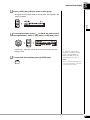
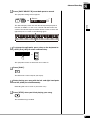
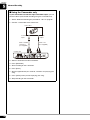
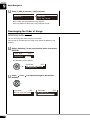
Connect the cables extending from the piano to the appropriate
connectors/jacks on the rear panel of the control unit.
• Coaxial cable: to the TO PIANO connectors
• Speaker cord*: to the OUTPUT jacks
* Only for models supplied with the monitor speakers.
Conecte los cables que salen del piano a los conectores/tomas apropiados
del panel trasero de la unidad de control.
• Cable coaxial: al los conectores TO PIANO
• Cable de los altavoces*: a las tomas OUTPUT
* Solamente para los modelos suministrados con los altavoces monitores.
Подключите кабельные шнуры Disklavier к соответствующим
разъемам на задней панели блока управления.
• Коаксиальный кабель к разъемам TO PIANO
• Кабель для подключения мониторов*: к гнездам OUTPUT
* Только для моделей, поставляемых с мониторами.
将从钢琴伸出的电缆连接到控制器背面板上相应的端子。
• 同轴电缆∶连接到 TO PIANO 端子
• 扬声器软线 * ∶连接到 OUTPUT 端子
*
仅适用于带监听扬声器的机型。
將從鋼琴伸出的電纜連接到控制器背面板上相應的端子。
• 同軸電纜:連接到 TO PIANO 端子
• 揚聲器軟線 *:連接到 OUTPUT 端子
*
僅適用於帶監聽揚聲器的機型。
피아노에 연결되어 있는 케이블을 컨트롤 유닛의 뒷면에 있는 적당
한 커넥터 / 잭에 연결해 주십시오 .
• 동축 케이블 : TO PIANO 커넥터에
• 스피커 코드 *: OUTPUT 잭에
*
모니터
스피커가
함께
제공되는
모델에만
한정됨
.
(5)

Notes:
1)Handle the metal suspension bracket and the control unit carefully to avoid scratches.
2)Screws;
For suspension bracket installation: Flat head (4
10)
4
For control unit suspension: Bind head (5
12)
3
3)When mounted correctly, the control unit is angled approximately 18° above horizontal.
Notas:
1)Manipule con cuidado el soporte metálico de suspensión y la unidad de control para evitar ralladuras.
2)Tornillos;
Para la instalación del soporte de suspensión: Cabeza plana (4
10)
4
Para la suspensión de la unidad de control: Cabeza fijadora (5
12)
3
3)Cuando está montada correctamente, la unidad de control queda angulada aproximadamente unos 18º respecto a la posición
horizontal.
Примечания:
1)При установке кронштейна подвески и блока управления соблюдайте осторожность во избежание появления
царапин.
2)Винты:
Для установки кронштейна подвески: Потайная головка (4
10)
4
Для подвески блока управления: Обвязывающая головка (5
12)
3
3)При правильной установке блок управления должен располагаться приблизительно под углом 18° к горизонту.
注∶
1)
小心操作金属配件和控制器,以免造成划伤。
2)
螺丝;
金属配件安装用∶平头螺丝 (
4×10
)
×4
控制器安装用∶连结头螺丝 (
5×12
)
×3
3)
当安装正确时,控制器应处于从水平仰起约
18°
左右的状态。
注:
1)
小心操作金屬配件和控制器,以免造成劃傷。
2)
螺絲;
金屬配件安裝用:平頭螺絲 (
4×10
)
×4
控制器安裝用:連結頭螺絲 (
5×12
)
×3
3)
當安裝正確時,控制器應處於從水平仰起約
18°
左右的狀態。
주목
:
1)
고정용
금속
브래킷과
컨트롤
유닛에
상처가
나지
않도록
조심해서
다루어
주십시오
.
2)
나사
;
고정용
브래킷
설치용
:
플랫
헤드
(4
10)
4
컨트롤
유닛
고정용
:
바인드
헤드
(5
12)
3
3)
컨트롤
유닛이
정확하게
장착되어있다면
,
그
각도가
수평면
위로
약
18
˚를
유지합니다
.

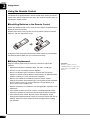
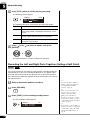
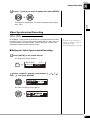
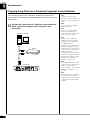
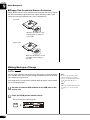
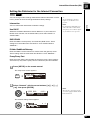
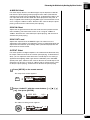
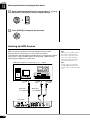
Mounting an Optional USB Floppy Disk Drive to the Grand Piano
Montaje de una unidad de disco floppy USB opcional en el gran piano
Установка на Disklavier модели «рояль» дисковода для USB
носителей, поставляемого по дополнительному заказу
将任选 USB 软磁盘驱动器安装在大钢琴上
將任選 USB 軟磁盤驅動器安裝在大鋼琴上
그랜드피아노에 옵션사양의 USB 플로피 디스크 드라이브 장착하기
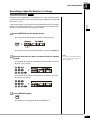
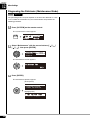
Remove the backing papers from the adhesive tape inside the case, and
fit the floppy disk drive into the case.
Quite el papel trasero de la cinta adhesiva dentro de la caja y coloque la
unidad de disco floppy en la caja.
Удалите бумажную подложку с клейкой ленты, покрывающей дно
корпуса, установите дисковод.
取下盒内的两面胶带覆纸,将软磁盘驱动器固定在盒中。
取下盒內的兩面膠帶覆紙,將軟磁盤驅動器固定在盒中。
케이스 내부에 있는 점착테이프로부터 보호지를 제거하고 , 플로피
디스크 드라이브를 케이스에 끼워 넣어주십시오 .
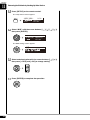
Attach the drive and case assembly to the bottom of the control unit,
using the four screws (3 6) supplied with the Disklavier.
Fije el conjunto de la unidad y la caja en la parte inferior de la unidad de
control por medio de los cuatro tornillos (3 6) suministrados con el
Disklavier.
Прикрепите корпус, с находящимся в нем дисководом, к нижней
панели блока управления с помощью четырех винтов (3 6),
поставляемых с Disklavier.
使用 Disklavier 配备的 4 个螺丝 (3×6)将软磁盘驱动器与盒一起
固定到控制器底面上。
使用 Disklavier 配備的 4 個螺絲 (3×6)將軟磁盤驅動器與盒一起
固定到控制器底面上。
Disklavier 와 함께 제공되는 네 개의 나사 (3 6) 를 사용하여 드라이
브와 케이스 조립부를 컨트롤 유닛의 하부에 부착시켜 주십시오 .
Adhesive tape
Cinta adhesiva
Клейкой лента
ਥܕ
ጳழ
닖뛯밒눺뿊
(1)
(2)

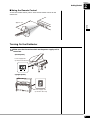
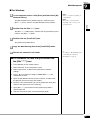
Connect the USB cable extending from the drive to the USB port on the
rear panel of the control unit.
Conecte el cable USB que sale de la unidad al puerto USB del panel
trasero de la unidad de control.
Подключите кабельные шнуры USB дисковода к соответствующим
разъемам на задней панели блока управления.
将从驱动器伸出的 USB 电缆连接到控制器的背面板上。
將從驅動器伸出的 USB 電纜連接到控制器的背面板上。
드라이브에 연결되어 있는 USB 케이블을 컨트롤 유닛의 뒷면에 있
는 USB 포트에 연결해 주십시오 .
Notes:
1)The case is supplied with the USB floppy disk drive.
2)Use the screws (3
6) supplied with the Disklavier when attaching.
Notas:
1)La caja se suministra con la unidad de disco floppy USB.
2)Utilice los tornillos (3
6) suministrados con el Disklavier para su fijación.
Примечания:
1)Корпус поставляется с USB-дисководом гибких дисков.
2)При закреплении корпуса используйте винты (3
6), поставляемые с Disklavier.
注∶
1)
盒为
USB
软磁盘驱动器的附件。
2)
安装时,要使用
Disklavier
配备的螺丝 (
3×6
)
注:
1)
盒為
USB
軟磁盤驅動器的附件。
2)
安裝時,要使用
Disklavier
配備的螺絲 (
3×6
)。
주목
:
1)
케이스는
USB
플로피
디스크
드라이브와
함께
제공됩니다
.
2)
부착
시에는
Disklavier
와
함께
제공되는
나사
(3
6)
를
사용하여
주십시오
.
USB cable
Cable USB
Кабель USB
USBݢେ
USBႬᢠ
USB 맆눺
(3)

English
Operation manual

English
i
Thank you for purchasing the Yamaha Disklavier piano!
The Disklavier is a fascinating instrument that integrates a classic Yamaha acoustic piano with innovative
electronics to suit your entertainment, educational, and creative needs, while retaining the tone, touch and
long-term value that have long made Yamaha pianos the world’s finest.
Before using your Disklavier piano, please read this manual thoroughly and retain it for future reference.
■ Notes on Source Code Distribution
For three years after the factory shipment, you may request from Yamaha the source code for any portions
of the product which are licensed under the GNU General Public License by writing to the following address:
10-1 Nakazawa-cho, Naka-ku, Hamamatsu, Shizuoka, 430-8650, JAPAN
Piano Development Department, Yamaha Corporation
The source code will be provided at no charge; however, we may require you to reimburse Yamaha for the
cost of delivering the source code to you.
The source code download is also available on the following website:
http://download.yamaha.com/sourcecodes/disklavier_e3/
• Note that we shall bear no responsibility whatsoever for any damage arising from changes (additions/
deletions) made to the software for this product by a third party other than Yamaha (or party authorized by
Yamaha).
• Note that re-use of source code released to the public domain by Yamaha is unguaranteed, and Yamaha
shall not bear any responsibility whatsoever for the source code.
■ Trademarks & Copyrights
• The contents of this operation manual and the copyrights thereof are under exclusive ownership by
Yamaha Corporation.
• Yamaha, Disklavier, DisklavierRadio, Silent, PianoSoft, PianoSoft·Plus, and PianoSoft·PlusAudio are
trademarks of Yamaha Corporation.
• SmartKey, CueTIME, and You Are The Artist are trademarks of Yamaha Corporation or Yamaha
Corporation of America.
• Disklavier E3 software, Copyright © 2008 Yamaha Corporation.
• This contains programs licensed under the GNU General Public License, GNU Lesser General Public
License, the BSD Copyright, the Artistic License, and the others.
• This product includes software developed by the OpenSSL Project for use in the OpenSSL Toolkit.
(http://www.openssl.org/)
• Windows is a registered trademark of Microsoft Corporation in the United States and other countries.
• Macintosh and Mac OS are trademarks of Apple Inc., registered in the U.S. and other countries.
• The company names and product names in this operation manual are the trademarks or registered
trademarks of their respective companies.
Welcome to the Yamaha Disklavier
TM
!

ii
Read the following before operating the Disklavier.
■ Warnings
• Do not locate the Disklavier in a place subject to
excessive heat, low temperatures, or direct
sunlight. This could be a fire hazard and may
damage the finish and internal parts.
• Excessive humidity or dust can lead to fire or
electric shock.
• Connect the plug on the Disklavier power cable
to a compatible AC outlet. Failure to do so will
present a fire and electric shock hazard. If the
power cable plug is not compatible with your AC
outlet, consult your dealer.
• Do not plug several devices into the same AC
outlet. This can overload the AC outlet, and lead
to fire and electric shock hazard. It may also
affect the performance of some devices.
• Do not place heavy objects on the power cable.
A damaged power cable is a potential fire and
electric shock hazard. If the power cable runs
under a carpet, make sure heavy objects,
including the Disklavier, are not placed on top of
the cable.
• If the power cable is damaged (i.e. cut or a bare
wire is exposed), ask your dealer for a
replacement. Using the Disklavier in this
condition is a fire and shock hazard.
• When disconnecting the power cable from an
AC outlet, always pull from the plug. Never pull
the cable. Damaging the cable in this way is a
potential fire and electric shock hazard.
• The cover of the unit should be removed only by
qualified service technicians.
• Do not place liquid containers such as vases,
potted plants, glasses, cosmetic bottles,
medicines, etc., on top of the Disklavier.
• Do not try to modify the Disklavier, as this could
lead to fire or electric shock hazard.
• When moving the Disklavier to another location,
turn off the power, remove the power plug from
the AC outlet, and remove all cables connected
to external devices.
■ Cautions
• Turn off all audio devices when connecting to
the Disklavier. Refer to the user’s guide for each
device. Use the correct cables and connect as
specified.
• Set the volume level on all the devices to
minimum before applying power.
• Do not play the Disklavier at a high volume for
extended periods; you may damage your
hearing. This is especially important when using
headphones. If you think your hearing ability is
impaired, consult your doctor.
• If the Disklavier is worked extremely hard —that
is, prolonged playback of very “busy” songs —
the Disklavier’s thermal relay may trip. The
thermal relay will automatically reset when the
Disklavier has cooled down.
• If you notice any abnormality — such as smoke,
odor, or noise — turn off the Disklavier
immediately, and remove the power plug from
the AC outlet. Consult your dealer for repair.
• If a foreign object or water gets inside the
Disklavier turn it off immediately, and remove
the power plug from the AC outlet. Consult your
dealer.
• If you plan not to use the Disklavier for a long
period of time (such as when you are on
vacation), disconnect the electrical mains.
• Always remove the power plug from the AC
outlet before cleaning the Disklavier. Leaving the
power plug connected presents a risk of electric
shock.
• Do not use benzene, thinner, cleaning
detergent, or a chemical cloth to clean the
Disklavier.
• Do not place metal objects with rubber feet on
top of the Disklavier. The color and finish of the
Disklavier can be damaged.
• Do not place heavy objects on the Disklavier.
Doing so can damage the Disklavier.
• Use a soft, dry cloth to clean the Disklavier.
However, if you discover a stain, carefully use a
soft damp cloth to remove it.
Important Precautions

English
iii
■ Interference
• The Disklavier uses high-frequency digital
circuits that may cause interference to radios
and TVs placed close to it. If interference does
occur, relocate the affected equipment.
■ Handling Batteries
The remote control of this unit is powered by dry
batteries. Improper use or misuse of the dry
batteries can cause the dry batteries to heat up,
leak electrolyte or burst which in turn may result in
a fire, damage to equipment and/or nearby objects
or in burns, injury or other bodily harm. Read
through and familiarize yourself with the following
safety precautions prior to use to ensure correct
usage.
• Do not directly touch the chemicals (electrolyte)
which have leaked from dry batteries.
1. If electrolyte from dry batteries has made
contact with your eyes, rinse your eyes
thoroughly with clean water and seek medical
treatment from a physician immediately.
2. If electrolyte from dry batteries has touched
your skin or clothing, rinse it off immediately
with clean water.
3. If electrolyte from dry batteries has found its
way inside your mouth, gargle immediately
and consult a physician.
• Do not install the dry batteries with the “+” and
“–” poles reversed. Misaligning the poles of dry
batteries can lead the dry batteries to be
charged or shorted or it can cause them to heat
up, leak electrolyte or burst which in turn may
result in a fire, damage to nearby objects or in
burns, injury or other bodily harm.
• Use only the designated batteries. Do not use
used batteries with unused batteries or different
types of batteries together. This can cause them
to heat up, leak electrolyte or burst which in turn
may result in a fire or in burns, injury or other
bodily harm. Replace all the dry batteries at the
same time. Do not use new and old dry batteries
together. Do not use different types of batteries
(alkaline and manganese batteries, batteries
made by different manufacturers or different
battery products made by the same
manufacturer) together: this can cause them to
heat up, ignite or leak electrolyte.
• When the battery-powered unit is not going to be
used for a prolonged period of time, remove the
dry batteries from the unit. Otherwise the
batteries will run down and their electrolyte may
leak, resulting in damage to the unit.
• Remove spent batteries immediately from
equipment. Otherwise, batteries will
overdischarge, causing them to heat up, leak
electrolyte or burst which in turn may result in
damage to nearby objects or in burns, injury or
other bodily harm.
• Dispose of batteries in accordance with the
applicable regulations and ordinances.
• The batteries shall not be exposed to excessive
heat such as sunshine, fire or the like.
Please keep this manual for future reference.

iv
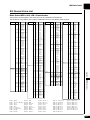
Table of Contents
Chapter 1 Introduction
Features .................................................................1
Items Supplied with the Disklavier .........................1
Names of Parts and Their Functions......................2
Basic Disklavier Terminology .................................8
Chapter 2 Getting Started
Connecting the Control Unit...................................9
Connecting the AC Power Cable ...........................9
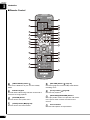
Using the Remote Control....................................10
Turning On the Disklavier.....................................11
Setting the Internal Calendar ...............................12
Turning Off the Disklavier (Standby Mode) ..........15
Shutting Down the Disklavier ...............................15
Compatible Media Format for the Removable
Media ...................................................................15
Compatible File Format........................................16
Basic Precautions for Using CDs .........................16
Chapter 3 Basic Song Playback
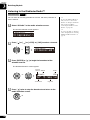
Types of Playable Software .................................17
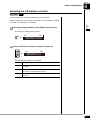
Selecting Medium and Their Contents.................18
Using the Number Keypad...................................20
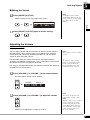
Starting Playback .................................................20
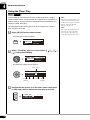
Stopping Playback ...............................................22
Pausing Playback.................................................22
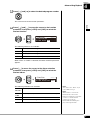
Fast Preview & Review ........................................23
Fast Forward & Reverse ......................................24
Searching a Specific Section of a Song ...............25
Listening to the DisklavierRadio™ .......................26
Adjusting the Volume ...........................................27
Chapter 4 Advanced Song Playback
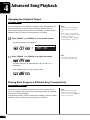
Changing the Playback Tempo ............................28
Playing Back Songs in a Different Key
(Transposition) .....................................................28
Repeating Song Playback....................................29
Repeating a Specific Section of a Song
(A-B Repeat) ........................................................30
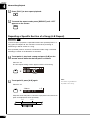
Playing Back Only the Desired Piano Part...........31
Adjusting the Volume Balance among the
Keyboard Playing, Ensemble Sound, and
Software Playback ...............................................32
Adjusting the Pitch of Audio .................................34
Adjusting the L/R Balance of Audio......................35
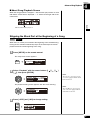
Using the Timer Play ........................................... 36
Skipping the Blank Part at the Beginning of a
Song .................................................................... 39
Video Synchronized Playback............................. 40
Adding Disklavier Accompaniment to Commercial
CD Songs (PianoSmart™ Playback)................... 41
SmartKey™ Playback ......................................... 41
Chapter 5 Advanced Piano Playing
Playing the Disklavier along with the Internal
Metronome .......................................................... 43
Playing the Disklavier with an Ensemble Voice... 44
Chapter 6 The Silent Piano™ Function
What is the Silent Piano™ Function?.................. 46
Quiet Mode and Headphone Mode ..................... 46
Playing the Digital Piano (Quiet Mode) ............... 47
Using the Headphones (Headphone Mode)........ 48
Adjusting the Volume in the Quiet Mode ............. 49
Adjusting the Volume in the Headphone Mode... 49
Selecting the Voice in the Quiet/Headphone
Mode ................................................................... 50
Applying the Reverb Effect to the Digital
Piano ................................................................... 51
Inactivating the Key Movement during
Playback.............................................................. 52
Chapter 7 Basic Recording
Recording a New Song ....................................... 53
Titling a Song at the Start of Recording .............. 54
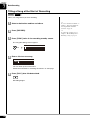
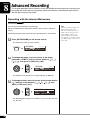
Chapter 8 Advanced Recording
Recording with the Internal Metronome .............. 56
Recording the Left and Right Parts Separately ... 58
Recording the Left and Right Parts Together
(Setting a Split Point)........................................... 60
Re-Recording One Part....................................... 62
Changing the Default Tempo .............................. 63
Video Synchronized Recording ........................... 65
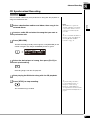
CD Synchronized Recording ............................... 69
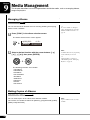
Chapter 9 Media Management
Managing Albums................................................ 70
Making Copies of Albums.................................... 70
Deleting Albums .................................................. 72

English
v
Creating a New Album .........................................73
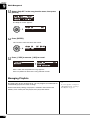
Renaming an Album ............................................74
Rearranging the Order of Albums ........................75
Managing Songs ..................................................76
Making Copies of Songs ......................................77
Deleting Songs.....................................................78
Renaming a Song ................................................79
Rearranging the Order of Songs..........................80
Converting Song Format......................................81
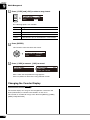
Changing the Counter Display .............................82
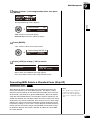
Converting MIDI Data to a Standard Form
(Strip XP) .............................................................83
Managing Playlists ...............................................84
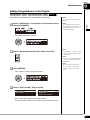
Adding Songs/Albums to the Playlist ...................85
Deleting a Playlist ................................................86
Creating a New Playlist........................................87
Renaming a Playlist .............................................88
Managing Media ..................................................89
Making Copies of the Entire Contents in a
Medium ................................................................90
Deleting the Entire Contents in a Medium ...........91
Copying Song File from a Personal Computer to
the Disklavier .......................................................92
Refreshing the Contents in [FromToPC]..............96
Formatting the Floppy Disk (Optional) .................97
Making Backups of Songs ...................................98
Restoring the Backups.........................................99
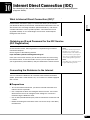
Chapter 10 Internet Direct Connection
(IDC)
What is Internet Direct Connection (IDC)?.........101
Obtaining an ID and Password for the IDC Service
(IDC Registration) ..............................................101
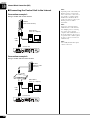
Connecting the Disklavier to the Internet ...........101
Accessing the Internet .......................................103
Checking Your Account Information ..................104
Updating the Disklavier Using the Internet.........105
Setting the Disklavier for the Internet
Connection.........................................................107
Initializing Internet Settings ................................108
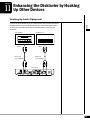
Chapter 11 Enhancing the Disklavier by
Hooking Up Other Devices
Hooking Up Audio Equipment............................109
Setting the Disklavier for Audio Data
Reception/Transmission ....................................110
Hooking Up MIDI Devices ................................. 112
Setting the Disklavier for MIDI Data
Reception .......................................................... 113
Setting the Disklavier for MIDI Data
Transmission ..................................................... 115
Setting the Disklavier for Keyboard Playing
Data Transmission ............................................ 116
Chapter 12 Other Settings
Tuning the Tone Generator
(TG Master Tune).............................................. 118
Assigning Frequently-used Functions to the
Number Keypad on the Remote Control ........... 119
Setting the Passcode to Prevent Unauthorized
Access............................................................... 122
Adjusting the Brightness of the Display............. 124
Switching the Languages for the Screen .......... 125
Resetting the Disklavier .................................... 126
Diagnosing the Disklavier
(Maintenance Mode) ......................................... 128
Updating the Disklavier ..................................... 129
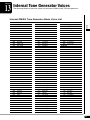
Chapter 13 Internal Tone Generator
Voices
Internal GM/XG Tone Generator Basic Voice
List..................................................................... 131
Internal TG3 Tone Generator Basic Voice
List..................................................................... 134
Chapter 14 Troubleshooting .................. 136
Chapter 15 Error Messages ................... 139
Chapter 16 Glossary................................. 140
Chapter 17 Specifications
General Specifications ...................................... 143
Function & Controls........................................... 144
Appendix Software License Notice....A-1
MIDI Data Format..............A-21
MIDI IMPLEMENTATION CHART

1
English
1
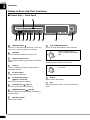
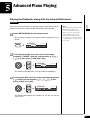
Chapter
Introduction
The Disklavier E3 offers the valuable features that open up your musical possibility to explore. Here are brief
explanations of such features:
Advanced Features for Your Listening Pleasure
• Special music CDs, contain over 17 hours of fantastic music, let you start listening on the day the
Disklavier E3 arrives at your home.
• DisklavierRadio™; you can listen to over 11 music channel by streaming broadcasts over the Internet.
• Yamaha’s innovative Silent Piano™ function lets you listen to songs or play the piano more quietly than
on the acoustic piano, or privately at any time*.
Convenient Recording Features to Preserve Your Musical Memories
• Total 128 megabytes of internal memory comes with the Disklavier E3 to preserve your valuable data.
• Connecting external USB devices to the Disklavier E3 allows you to record your performance directly onto
them, or even make backups of your valuable data in the internal memory.
• Video synchronization features offer great listening experience with sights. You can see as well as hear
performances with perfectly synchronized audio and video.
• Your valuable music data on the floppy disk can be played back with the optional floppy disk drive (UD-
FD01).
Simple and Easy-to-use Features Enhancing Your Performance
• The remote control, with clear and logical layout of buttons, lets you quickly enjoy the features of the
Disklavier E3.
• The display on the front panel employs an organic electro-luminescent display which makes it brighter
and more easily readable than ever.
* Only for models equipped with the Silent Piano™ function.
Check that the following items are supplied with your Disklavier:
• 1 Control unit
• 1 Control unit suspension bracket*
1
• 4 Screws for control unit suspension bracket
installation (4 10)*
1
• 3 Screws for control unit suspension (5 12)*
1
• 4 Screws for optional USB floppy disk drive
installation (3 6)*
1
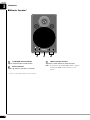
• 2 Monitor speakers*
2
• 1 Monitor speaker installation kit*
2
• 2 Speaker cords*
2
• 1 Remote control
• 2 Batteries for remote control
• 1 Stereo headphones*
3
• 2 Sample PianoSoft CD software
• 1 Operation manual
• 1 PianoSoft CD song list
• 1 Music book “50 greats for the Piano”
*
1
Only for grand pianos
*
2
Only for models supplied with the monitor speakers
*
3
Only for models equipped with the Silent Piano™ function
Features
Items Supplied with the Disklavier
Sidan laddas ...
Sidan laddas ...
Sidan laddas ...
Sidan laddas ...
Sidan laddas ...
Sidan laddas ...
Sidan laddas ...
Sidan laddas ...
Sidan laddas ...
Sidan laddas ...
Sidan laddas ...
Sidan laddas ...
Sidan laddas ...
Sidan laddas ...
Sidan laddas ...
Sidan laddas ...
Sidan laddas ...
Sidan laddas ...
Sidan laddas ...
Sidan laddas ...
Sidan laddas ...
Sidan laddas ...
Sidan laddas ...
Sidan laddas ...
Sidan laddas ...
Sidan laddas ...
Sidan laddas ...
Sidan laddas ...
Sidan laddas ...
Sidan laddas ...
Sidan laddas ...
Sidan laddas ...
Sidan laddas ...
Sidan laddas ...
Sidan laddas ...
Sidan laddas ...
Sidan laddas ...
Sidan laddas ...
Sidan laddas ...
Sidan laddas ...
Sidan laddas ...
Sidan laddas ...
Sidan laddas ...
Sidan laddas ...
Sidan laddas ...
Sidan laddas ...
Sidan laddas ...
Sidan laddas ...
Sidan laddas ...
Sidan laddas ...
Sidan laddas ...
Sidan laddas ...
Sidan laddas ...
Sidan laddas ...
Sidan laddas ...
Sidan laddas ...
Sidan laddas ...
Sidan laddas ...
Sidan laddas ...
Sidan laddas ...
Sidan laddas ...
Sidan laddas ...
Sidan laddas ...
Sidan laddas ...
Sidan laddas ...
Sidan laddas ...
Sidan laddas ...
Sidan laddas ...
Sidan laddas ...
Sidan laddas ...
Sidan laddas ...
Sidan laddas ...
Sidan laddas ...
Sidan laddas ...
Sidan laddas ...
Sidan laddas ...
Sidan laddas ...
Sidan laddas ...
Sidan laddas ...
Sidan laddas ...
Sidan laddas ...
Sidan laddas ...
Sidan laddas ...
Sidan laddas ...
Sidan laddas ...
Sidan laddas ...
Sidan laddas ...
Sidan laddas ...
Sidan laddas ...
Sidan laddas ...
Sidan laddas ...
Sidan laddas ...
Sidan laddas ...
Sidan laddas ...
Sidan laddas ...
Sidan laddas ...
Sidan laddas ...
Sidan laddas ...
Sidan laddas ...
Sidan laddas ...
Sidan laddas ...
Sidan laddas ...
Sidan laddas ...
Sidan laddas ...
Sidan laddas ...
Sidan laddas ...
Sidan laddas ...
Sidan laddas ...
Sidan laddas ...
Sidan laddas ...
Sidan laddas ...
Sidan laddas ...
Sidan laddas ...
Sidan laddas ...
Sidan laddas ...
Sidan laddas ...
Sidan laddas ...
Sidan laddas ...
Sidan laddas ...
Sidan laddas ...
Sidan laddas ...
Sidan laddas ...
Sidan laddas ...
Sidan laddas ...
Sidan laddas ...
Sidan laddas ...
Sidan laddas ...
Sidan laddas ...
Sidan laddas ...
Sidan laddas ...
Sidan laddas ...
Sidan laddas ...
Sidan laddas ...
Sidan laddas ...
Sidan laddas ...
Sidan laddas ...
Sidan laddas ...
Sidan laddas ...
Sidan laddas ...
Sidan laddas ...
Sidan laddas ...
Sidan laddas ...
Sidan laddas ...
Sidan laddas ...
Sidan laddas ...
Sidan laddas ...
Sidan laddas ...
Sidan laddas ...
Sidan laddas ...
Sidan laddas ...
Sidan laddas ...
Sidan laddas ...
Sidan laddas ...
Sidan laddas ...
Sidan laddas ...
Sidan laddas ...
Sidan laddas ...
Sidan laddas ...
Sidan laddas ...
Sidan laddas ...
Sidan laddas ...
Sidan laddas ...
Sidan laddas ...
Sidan laddas ...
Sidan laddas ...
Sidan laddas ...
Sidan laddas ...
Sidan laddas ...
Sidan laddas ...
Sidan laddas ...
Sidan laddas ...
Sidan laddas ...
Sidan laddas ...
Sidan laddas ...
Sidan laddas ...
Sidan laddas ...
Sidan laddas ...
Sidan laddas ...
Sidan laddas ...
Sidan laddas ...
Sidan laddas ...
Sidan laddas ...
Sidan laddas ...
Sidan laddas ...
Sidan laddas ...
Sidan laddas ...
Sidan laddas ...
-
 1
1
-
 2
2
-
 3
3
-
 4
4
-
 5
5
-
 6
6
-
 7
7
-
 8
8
-
 9
9
-
 10
10
-
 11
11
-
 12
12
-
 13
13
-
 14
14
-
 15
15
-
 16
16
-
 17
17
-
 18
18
-
 19
19
-
 20
20
-
 21
21
-
 22
22
-
 23
23
-
 24
24
-
 25
25
-
 26
26
-
 27
27
-
 28
28
-
 29
29
-
 30
30
-
 31
31
-
 32
32
-
 33
33
-
 34
34
-
 35
35
-
 36
36
-
 37
37
-
 38
38
-
 39
39
-
 40
40
-
 41
41
-
 42
42
-
 43
43
-
 44
44
-
 45
45
-
 46
46
-
 47
47
-
 48
48
-
 49
49
-
 50
50
-
 51
51
-
 52
52
-
 53
53
-
 54
54
-
 55
55
-
 56
56
-
 57
57
-
 58
58
-
 59
59
-
 60
60
-
 61
61
-
 62
62
-
 63
63
-
 64
64
-
 65
65
-
 66
66
-
 67
67
-
 68
68
-
 69
69
-
 70
70
-
 71
71
-
 72
72
-
 73
73
-
 74
74
-
 75
75
-
 76
76
-
 77
77
-
 78
78
-
 79
79
-
 80
80
-
 81
81
-
 82
82
-
 83
83
-
 84
84
-
 85
85
-
 86
86
-
 87
87
-
 88
88
-
 89
89
-
 90
90
-
 91
91
-
 92
92
-
 93
93
-
 94
94
-
 95
95
-
 96
96
-
 97
97
-
 98
98
-
 99
99
-
 100
100
-
 101
101
-
 102
102
-
 103
103
-
 104
104
-
 105
105
-
 106
106
-
 107
107
-
 108
108
-
 109
109
-
 110
110
-
 111
111
-
 112
112
-
 113
113
-
 114
114
-
 115
115
-
 116
116
-
 117
117
-
 118
118
-
 119
119
-
 120
120
-
 121
121
-
 122
122
-
 123
123
-
 124
124
-
 125
125
-
 126
126
-
 127
127
-
 128
128
-
 129
129
-
 130
130
-
 131
131
-
 132
132
-
 133
133
-
 134
134
-
 135
135
-
 136
136
-
 137
137
-
 138
138
-
 139
139
-
 140
140
-
 141
141
-
 142
142
-
 143
143
-
 144
144
-
 145
145
-
 146
146
-
 147
147
-
 148
148
-
 149
149
-
 150
150
-
 151
151
-
 152
152
-
 153
153
-
 154
154
-
 155
155
-
 156
156
-
 157
157
-
 158
158
-
 159
159
-
 160
160
-
 161
161
-
 162
162
-
 163
163
-
 164
164
-
 165
165
-
 166
166
-
 167
167
-
 168
168
-
 169
169
-
 170
170
-
 171
171
-
 172
172
-
 173
173
-
 174
174
-
 175
175
-
 176
176
-
 177
177
-
 178
178
-
 179
179
-
 180
180
-
 181
181
-
 182
182
-
 183
183
-
 184
184
-
 185
185
-
 186
186
-
 187
187
-
 188
188
-
 189
189
-
 190
190
-
 191
191
-
 192
192
-
 193
193
-
 194
194
-
 195
195
-
 196
196
-
 197
197
-
 198
198
-
 199
199
-
 200
200
-
 201
201
-
 202
202
-
 203
203
-
 204
204
-
 205
205
-
 206
206
-
 207
207


Yamaha DC2E3 PE Bruksanvisning
- Typ
- Bruksanvisning
- Denna manual är också lämplig för
på andra språk
- italiano: Yamaha DC2E3 PE Manuale del proprietario
- čeština: Yamaha DC2E3 PE Návod k obsluze
- español: Yamaha DC2E3 PE El manual del propietario
- Deutsch: Yamaha DC2E3 PE Bedienungsanleitung
- polski: Yamaha DC2E3 PE Instrukcja obsługi
- português: Yamaha DC2E3 PE Manual do proprietário
- français: Yamaha DC2E3 PE Le manuel du propriétaire
- Türkçe: Yamaha DC2E3 PE El kitabı
- English: Yamaha DC2E3 PE Owner's manual
- dansk: Yamaha DC2E3 PE Brugervejledning
- русский: Yamaha DC2E3 PE Инструкция по применению
- Nederlands: Yamaha DC2E3 PE de handleiding
- română: Yamaha DC2E3 PE Manualul proprietarului
