Hallde Cheese shredder RG-400i Bruksanvisningar
- Typ
- Bruksanvisningar

HALLDE • User Instructions
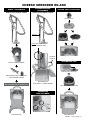
MANUAL PUSH FEEDER, CHEESE
FEED CYLINDER CHEESE
WRENCH
DECORING DEVICE FOR MANUAL
PUSH FEEDER CHEESE
SEE: FITTING THE CUTTING TOOL
MACHINE BASE
PARTS / ASSEMBLING
ASSEMBLING
FEED CYLINDER
ASSEMBLING FEED
ATTACHMENT
CHEESE SHREDDER RG-400i
MANUAL PUSH FEEDER, CHEESE
SHAFT
SHAFT INTO THE
FEED CYLINDER TUBE
LOCKING
HANDLE
MACHINE BASE
WITH FEED CYLINDER CHEESE
FITTING THE CUTTING TOOL
Decoring device
Grater/Shredder
Tray with Ejector plate
Ejector plate
KNIFE HOUSE
ASSEMBLING TRAY
INSERT EJECTOR PLATE
=
TRAY WITH EJECTOR PLATE
MACHINE BASE

3
HALLDE • User Instructions
USER INSTRUCTIONS
HALLDE
CHEESE
SHREDDER
RG-400I
CAUTION!
Take great care not to injure your hands on
the sharp blades of the cutting tools and on
moving parts.
The machine may be installed only by a
qualied service mechanic.
Never put your hands in the feed cylinder
other than for cleaning.
Never put your hands in the machine outlet
when the feed cylinder is lowered and the
locking handle is raised.
The deco ring device must be tightened
(by tur ning them anti-clockwise) and
unscrewed (clockwise), by means of the
wrench.
Always press the machine stop button
before tting or removing cutting tools, etc.
even if the machine is not running.
Before cleaning, switch o the machine and
remove the plug from the wall socket or turn
o the mains switch.
Only a qualified service mechanic may
repair the machine and open the machine
housing.
Do not use the machine to cut frozen foods.
This appliance is not to be operated by
children or persons with reduced physical,
sensory or mental capabilities or persons
lacking experience of such appliances,
unless they are given adequate instruction
or supervision.
The machine should only run continuously
for 1 hour maximum when the speed control
is set to "1". Let the machine rest for an
hour before starting it again.
When the speed control is set to "2", no
such restrictions apply.
UNPACKING
Check that all parts have been delivered, that
the machine operates as intended, and that
nothing has been damaged in transit.
The machine supplier should be notied of any
shortcomings within eight days.
INSTALLATION
Connect the machine to an electric power
supply that is suitable for the machine.
Remove the cutting tool before installing the
machine.
Reset the adjustable feet as necessary to make
sure that the machine stands rmly.
Locate the hanger for the cutting tools on the
wall in the vicinity of the machine for convenient
and safe use.
Check that the shaft rotates clockwise.
Check that the machine stops when the locking
handle is folded down.
Check that the machine stops when the
Cheese push feed attachment feed plate is
swung to the side so that the feed cylinder
opening is larger than 60 mm, and that the
machine restarts when it is swung back over
the feed cylinder.
If the machine does not function correctly, it
must receive attention before it is taken into
operation.
ALWAYS CHECK BEFORE USE
Remove the plug from the power supply socket
or open the isolating switch, and then check
that the electric cable is in good condition and
is not cracked on the outside.
WITH THE CHEESE FEEDER:
Check that, with a cutting tool fitted, the
machine stops within 2 seconds as soon as the
pusher plate is swung out to the side more than
60 mm, and re-starts when the pusher plate is
swung back over the feeder. NOTE! Less than
60 mm is approved.
Check that the machine, during operation,
stops when the lock handle is lowered.
If either of the two safety functions does not
perform as intended or if the electric cable is
cracked, call in a qualied service mechanic
or electrician to remedy the fault before
connecting the machine back to the power
supply.
Check that the pusher plate shaft runs freely.
If the shaft does not run freely, clean it carefully
and lubricate it with a few drops of machine oil.
Check that the cutting tools are in good
condition and are sharp.
With regard to cutting tools, see page 2.
TYPE OF PROCESSING
Takes whole blocks of cheese and opti-
mises the preparation of shredded cheese.
Recommended dimensions: 4.5, 6, 8 and 10
mm.
USERS
Cheese Shredder RG-400i is suited to large
kitchens; Restaurants, shop kitchens, pizze-
rias, central kitchens, institutional kitchens,
schools, hospitals, food industries, ships,
fast food outlets, catering kitchens, etc.
Cheese Shredder RG-400i can be advanta-
geously inte grated into a production system.
CAPACITY
Up to 48 kg per minute.
USING THE FEEDER
MANUAL PUSH FEEDER CHEESE
Feed Cylinder for Cheese with one internal wall
is optimized for orienting blocks of cheese for
preparation of shredded cheese.
ASSEMBLING AND
DISMANTLING
THE FEED CYLINDER
When tting, fold down the locking handle.
Push the feed cylinder onto the hinge pins of
the machine, and lower the feed cylinder.
Raise the locking handle.
When removing, rst remove the feed attach
ment.
Lower the locking handle.
Remove the feed cylinder from the hinge pins
of the machine.
THE MANUAL PUSH FEEDER CHEESE
Press in the machine stop button.
When tting, t Feed Cylinder Cheese.
Move the lever up all the way.
Fit the Manual Push Feeder Cheese attachment
shaft into the feed cylinder tube.
Press down the Manual Push Feeder Cheese
attachment and swing it in anti-clockwise.
When removing, press down the stop pad and
swing out the Manual Push Feeder Cheese
attachment clockwise and remove it.
INSTALLATION OF CUTTING
TOOLS AND TRAY
While using the manual push feeder Cheese
Shredder, make sure the pusher plate is in the
upper position and swing it out the feeder to
the left. Lower the locking handle and tilt the
feeder backwards.
If the tray is to be used, the ejector plate is
placed in the bottom of the tray. Ensure that the
machine’s knife housing has been thoroughly
cleaned. The tray, containing the ejector
plate, is then mounted around the shaft of the
machine’s knife housing. Turn/push down the
ejector plate down into its coupling.
Place the chosen cutting tool on the shaft and
rotate the cutting tool so that it drops rmly
into its position.
Secure the decoring device when using the
push feed attachment, by turning it anti
clockwise by means of the wrench onto the
centre shaft of the cutting tool.

HALLDE • User Instructions
4
REMOVAL OF THE CUTTING
TOOLS AND TRAY
Unscrew the decoring device clockwise using
the key and remove the cutting tool, and the
ejector plate together with the tray.
SETTING THE SPEED
CONTROLS
The machine speed control is recommended
as follows:
M = Machine.
GRATER/ SHREDDER
4,5–6 mm: ..........................PF = 2. M = 2.
8–10 mm: ...........................PF = 3. M = 1.
CLEANING
Read all of the instructions before you begin
to clean the machine.
BEFORE CLEANING: Always switch o the
machine and remove the power supply plug
from the socket. Alternatively, if the machine
does not have a plug, turn o the mains switch.
Remove all parts that are to be cleaned.
CLEANING IN A DISHWASHER: All removable
parts can be cleaned in a dishwasher machine.
CLEANING BY HAND: Always use hand
dishwashing liquid. .
CLEANING MATERIALS: Use the brush supp-
lied with the machine or a similar one to clean
the food zones. The knife shaft in the centre
of the machine can be cleaned with a small
bottlebrush. Use a damp cloth to wipe down
the other surfaces on the machine.
DISINFECTION: Use isopropyl alcohol
(65–70%). Isopropyl alcohol is highly inam-
mable so use caution when applying it.
WARNING:
• Do not pour or spray water onto the sides
of the machine.
• Do not use boiling or hot water.
• Do not use sharp objects or any objects not
intended for the purpose of cleaning.
• Do not use abrasive detergents or cleaning
products.
AVOID: Do not use cleaning sponges with
scouring pads (e.g. Scotch-Brite™) unless
absolutely necessary.
ADVICE ON CARE:
• Clean the machine immediately after use.
• Dry the machine immediately after cleaning
to avoid oxidation and discoloration of the
surface.
TROUBLE SHOOTING
To eliminate the risk of damage to the motor,
the Cheese Shredder RG400i is tted with
thermal motor protection that automatically
switches o the machine if the temperature
of the motor should become too high. The
thermal motor protection has automatic reset,
which means that the machine can be started
again when the motor has cooled down, which
usually takes between 10 and 30 minutes.
FAULT: The machine cannot be started or stops
while it is running and cannot be restarted.
REMEDY: Check that the plug is securely tted
into the power supply socket, or turn o the
mains. Press the starter button. Fit the feed
cylinder and feed attachment according to the
instructions under “Assembling” Check that all
components are correctly tted and that the
safety arm is raised. Check that the fuses in
the fuse box for the premises have not blown,
and that they have the correct rating. Wait for
a few minutes and try to restart the machine.
If the machine fails to run, call a qualied
service mechanic.
FAULT: Low capacity or poor cutting results.
REMEDY: Make sure that you are using the
correct cutting tool. Fit the decoring device.
Make sure that the speed controlsfor the
machine is in the right position in accor-
dance with the table under the heading
SETTING THE SPEED CONTROLS.
If necessary, the speed should be adjusted
by a qualied service mechanic. Check that
the grater/shredder plates are in good condi-
tion and are sharp. Press the food down with
less force.
FAULT: The cutting tool cannot be removed.
REMEDY: Always use the ejector plate. Use a
thick leather glove or other glove that the plates
of the grater/shredder cannot cut through, and
turn the cutting tool clockwise to release it.
FAULT: The decoring device cannot be
removed.
REMEDY: Use the wrench to unscrew it
clock wise.
TECHNICAL SPECIFICATION
HALLDE RG-400i
MACHINE: Motor: Two-speed, 1.5/0.9 kW,
208 V, 3-phase, 60 Hz, 230 V, 3-phase, 50 Hz,
400 V, 3-phase, 50 Hz, 415 V, 3-phase, 50 Hz,
with the motor protection set to 3.7 A. Trans-
mission: gear. Safety system: Three safety
switches. Degree of protection: IP45, buttons
IP65. Power supply socket: Earthed, 3-phase,
16 A. Fuse in fuse box for the premises: 10 A,
delayed. Sound level LpA (EN31201): 70 dBA.
CUTTING TOOLS: Diameter: 215 mm. Speed:
400/200 rpm.
NET WEIGHTS: Machine: 54 kg. Cheese Feeder
incl. Manual Push Feeder Cheese: 21 kg.
Cutting tools: About 1 kg on average.
NORMS/STANDARDS: See declaration of
conformity.

5
HALLDE • User Instructions
BRUKSANVISNING
HALLDE
OSTRIVARE
RG-400i
(SE)
VARNING
!
Akta händerna för skärverktygens vassa
knivar samt för rörliga delar.
Maskinen skall installeras av en behörig
fackman.
Stick aldrig ner händerna i matarcylindern
annat än vid rengöring.
Stick aldrig in händerna i maskinens
utlopp när en matarcylinder är nerfälld och
låshandtaget är uppfällt.
Borrhylsan skall dras åt (moturs) och
lossas (medurs) med hjälp av nyckeln.
Tryck alltid in maskinens stoppknapp före
montering och demontering av skärverktyg
etc., även om maskinen inte är igång.
Stäng först av maskinen och dra ut stick-
kontakten ur vägguttaget alternativt slå
ifrån arbetsbrytaren före rengöring.
Maskinen får endast repareras och maskin-
huset öppnas av en behörig fackman.
Maskinen får inte användas till frysta
råvaror.
Denna maskin skall inte användas av
barn eller personer med nedsatt motorik,
kognitiv förmåga eller handikapp som
utgör fara för användaren t.ex. nedsatt
syn eller hörsel, utan uppsikt eller tydliga
instruktioner.
Maskinen får endast köras kontinuerligt
under 1 timme maximum när hastighetsre-
galget är inställt på "1". Låt maskinen vila
en timme innan den startas igen.
När hastighetsreglaget är inställd på "2",
nns inga sådana restriktioner.
UPPACKNING
Kontrollera att alla detaljer nns med samt
att maskinen fungerar och att ingenting har
skadats under transporten. Anmärkningar
skall anmälas till maskinleverantören inom
åtta dagar.
INSTALLATION
Koppla maskinen till ett eluttag med för
maskinen korrekta data.
Avlägsna skärverktyg ur maskinen före instal-
lationen.
Se till att maskinen står stadigt med hjälp av
de ställbara fötterna.
Placera verktygshängare för skärverktygen på
väggen nära maskinen för bekväm och säker
användning.
Kontrollera att axeln roterar medurs.
Kontrollera att maskinen stannar när låshand-
taget fälls ner.
Kontrollera att maskinen stannar när den
ostmatartillsatsens matarplatta svängs åt sidan
så att matarcylinderns öppning blir större än
60 mm, samt att maskinen återstartar när den
svängs tillbaka över matarcylindern.
Vid felfunktion måste felet åtgärdas innan
maskinen tas i bruk.
KONTROLLERA ALLTID FÖRE
ANVÄNDNING
Dra ut stickkontakten ur vägguttaget alternativt
slå ifrån arbetsbrytaren och kontrollera därefter
att elkabeln är hel och inte har några sprickor.
MED OSTMATAREN:
Att maskinen med skärverktyg monterad
stannar inom två sekunder så fort som mata-
rens matarplatta svängs ut åt sidan mer än 60
mm, samt återstartar när matarplattan svängs
tillbaka över mataren. OBS! Mindre än 60 mm
godkänt.
Att maskinen under drift stannar när låsbygeln
fälls ner.
Om de två säkerhetsfunktionerna inte fungerar
eller om elkabeln har sprickor, skall fackman
tillkallas för åtgärd innan maskinen kopplas in
på nätet igen.
Att matarplattans axel löper lätt. Om axeln löper
trögt ska den rengöras noggrant och smörjas
med några droppar maskinolja.
Att skärverktyg är hela och har god skärpa.
Gällande skärverktyg, se sidan 2.
TYP AV BEREDNING
Rymmer hela ostblock, optimerar beredning
av riven ost.
ANVÄNDARE
RG-400i Ostrivare passar i stora kök; restau-
ranger, butikskök, pizzerior, centralkök, institu-
tionskök, skolor, sjukhus, livsmedelsindustrier,
fartyg, fast foodinrättningar, cateringkök etc.
RG400i Ostrivare kan med fördel byggas in
i ett produktionssystem.
KAPACITET
Upp till 48 kg per minut.
SÅ HÄR ANVÄNDS MATAREN
MANUELL MATARE OST, ERGO LOOP
Matarcylinder Ost med en skiljevägg, är opti-
merad för orientering av ostblock för att riva ost.
MONTERING OCH
DEMONTERING
AV MATARCYLINDERN
Vid montering, fäll ner låshandtaget.
Skjut in matarcylindern på maskinens gång-
järnstappar och fäll ner matarcylindern.
Fäll upp låshandtaget.
Vid demontering, avlägsna först eventuell
matar-tillsats.
Fäll ner låshandtaget.
Dra ut matarcylindern ur maskinens gång-
järnstappar.
AV MANUELL MATARE OST
Tryck in maskinens stoppknapp.
Vid montering, montera Matarcylinder Ost.
För upp hävarmen helt.
För ner den manuella matarens axel i matar-
cylinderns rör.
Pressa ner den manuella mataren och sväng
in den moturs.
Vid demontering, tryck ner stoppklacken och
sväng ut den manuella mataren medurs samt
avlägsna den.
MONTERING AV SKÄRVERK-
TYGEN OCH TRÅGET
Vid användning av Manuell matare Ost, se till
att matarplattan är i högsta läget och sväng ut
mataren till vänster.
Fäll ner låshandtaget och luta mataren bakåt.
Om tråget används placeras utmatarskivan i
botten på tråget. Tråget, med utmatarskivan
i, monteras sedan runt axeln i maskinens
knivhus. Vrid/pressa ner utmatarskivan i sin
koppling.
Placera den valda råkostrivaren på axeln
och rotera skärverktyget så att det faller ner
ordentligt.
Skruva fast borrhylsan moturs med nyckeln på
skärverktygets centrumtapp.
DEMONTERING AV SKÄRVERK-
TYGEN OCH TRÅGET
Skruva loss borrhylsan medurs med hjälp
av nyckeln samt avlägsna skärverktyget och
utmatarskivan tillsammans med tråget.
INSTÄLLNING AV
HASTIGHETSREGLAGEN
Maskinens hastighetsreglage ställs in enligt
följande:
M= Maskin.
RÅKOSTRIVARE
4,5–6 mm:...........................TM = 2. M = 2.
8–10 mm:............................TM = 3. M = 1.

HALLDE • User Instructions
6
RENGÖRING
Läs hela instruktionen innan du börjar rengöra
maskinen.
INNAN RENGÖRING: Stäng alltid av maskinen
och drag ut kontakten. Alternativt, slå ifrån
arbetsbrytaren om maskinen inte är försedd
med stickkontakt. Ta loss alla delar som skall
rengöras.
MASKINDISKNING: Alla löstagbara detaljer
kan maskindiskas.
HANDDISKNING: Använd alltid handdisk-
medel.
RENGÖRINGSVERKTYG: Använd borsten
som följde med maskinen eller liknande för
att rengöra matzonerna. Knivaxeln i mitten av
maskinen kan med fördel rengöras med en
liten askborste. Använd en fuktig trasa för att
torka maskinens övriga ytor.
DESINFEKTION: Använd isopropanol (65-70%).
Isopropanol är extremt lättantändligt, använd
därför med varsamhet.
VARNING:
• Häll eller spreja inte vatten på maskinens
sidor.
• Använd inte kokande eller hett vatten.
• Använd inte skarpa föremål eller föremål inte
avsett för rengöring.
• Använd inte rengöringsmedel med slipande
eekt.
UNDVIK: Använd inte rengöringssvampar med
skurnylon (t.ex. Scotch Brite™) om det inte är
absolut nödvändigt.
SKÖTSELRÅD:
• Rengör maskinen omgående efter använd
ning.
• Torka maskinen omgående efter rengöring
för att undvika oxidation och missfärgningar
på ytan.
FELSÖKNING
För att eliminera risken för skador på motorn,
har Ostrivare RG400i en brytarfunktion som
automatiskt stänger av maskinen om motorns
temperatur skulle bli för hög. Brytarfunktionen
har automatisk återställning vilket gör att
maskinen går att starta igen när motorn har
svalnat vilket normalt tar mellan 10 och 30
minuter.
FEL: Maskinen startar ej eller stannar under
körning och kan ej återstartas.
ÅTGÄRDER: Kontrollera att stickkontakten
sitter i vägguttaget alternativt att arbetsbrytaren
är påslagen. Tryck in startknappen. Montera
matarcylinder Ost och en matare enligt instruk-
tionerna under ”montering” Kontrollera att alla
komponenter är korrekt monterade och att
säkerhetsarmen är uppfälld. Kontrollera att
säkringarna i lokalens säkringsskåp är hela
och har rätt ampere-tal. Vänta några minuter
och försök att starta maskinen på nytt. Tillkalla
fackman för åtgärd.
FEL: Låg kapacitet eller dåligt skärresultat.
ÅTGÄRDER: Se till att rätt skärverktyg
har valts. Montera borr hylsan. Se till att
maskinens hastighetsreglage står i rätt
läge enligt tabellen under INSTÄLLNING
AV HASTIGHETSREGLAGEN (justeras av
behörig fackman). Se till att rivplåtar är hela
och har god skärpa. Pressa ner varan löst.
FEL: Skärverktyget går ej att ta bort.
ÅTGÄRDER: Använd alltid utmatarskivan.
Använd en tjock skinnhandske, etc. som inte
råkostrivaren kan skära igenom, och vrid loss
skärverktyget medurs.
FEL: Borrhylsan går ej att ta bort.
ÅTGÄRD: Skruva loss den medurs med
nyckeln.
TEKNISK DATA HÄLLDE
RG-400i
MASKIN: Motor: Två hastigheter, 1,5/0,9 kW,
400 V, 3fas, 50 Hz. Transmission: kuggväxel.
Säkerhetssystem: Tre säkerhetsbrytare.
Skyddsklass: IP45, knappar IP65. Väggan-
slutning: Jordad, 3fas, 16 A. Säkring i loka-
lens säkringsskåp: 10 A, trög. Ljudnivå LpA
(EN31201): 70 dBA.
VERKTYG: Diameter: 215 mm. Varvtal:
400/200 varv/min.
NETTOVIKTER: Maskin: 54 kg. Ostmatare inkl.
Manuell matare Ost: 21 kg. Skärverktyg: Ca 1
kg i genomsnitt.
NORMER: Se försäkran om överensstämmelse.

7
HALLDE • User Instructions
-
 1
1
-
 2
2
-
 3
3
-
 4
4
-
 5
5
-
 6
6


