EN GUIDE TO INSTALLATION DK
INSTALLATIONSVEJLEDNING
FR GUIDE D'UTILISATION FI
ASENNUSOHJEET
PT MANUAL DE UTILIZAÇÃO NO MANUAL FOR INSTALLASJON
DE BEDIENUNGSANLEITUNG SE GUIDE FÖR INSTALLATION
CZ NÁVOD K POUŽITÍ GR ΟΔΗΓΟΣ ΕΓΚΑΤΑΣΤΑΣΗΣ
Decorative Hood
Hotte decorative
Exaustor decorativo
Dekorative Dunstabzugshaube
Dekorativní odsavač par
Dekorativ emhætte
Koristekupu
Dekorativ hette
Dekorativ spiskåpa
Διακοσμητικός απορροφητήρας

2
EN
FR
PT
DE
CZ
DK
FI
NO
SE
GR
2
13
23
33
43
53
63
76
89
100

ENTABLE OF CONTENTS
1 / NOTICES TO THE USER
• Safety recommendations _____________________________________ 14
• Environmental protection _____________________________________ 15
• Description of your appliance _________________________________ 16
2 / INSTALLING YOUR APPLIANCE
• Environmental protection _____________________________________ 17
3 / USING YOUR APPLIANCE
• To use your cooker hood _____________________________________ 19
4 / CARING FOR AND CLEANING YOUR APPLIANCE
• Changing and cleaning the anti-grease lters ___________________ 20
• Changing the light bulb _______________________________________ 20
• Install the T-Sharp outelt ______________________________________ 20
• Maintaining your appliance ___________________________________ 21
5 / TROUBLESHOOTING ___________________________________________ 22
6 / AFTER-SALES SERVICE _________________________________________ 22
As part of our commitment to constantly improving our products, we reserve the right
to make changes to them based on technical advances to their technical and functional
features and appearance.
Warning:
Before installing and using your appliance, please carefully read this Guide
to Installation and Use, which will allow you to quickly familiarise yourself with its
operation.
• Installing your cooker hood ___________________________________ 17
3
1 / NOTICES TO THE USER
• Safety recommendations _____________________________________ 4
• Environmental protection _____________________________________ 5
• Description of your appliance _________________________________ 6
2 / INSTALLING YOUR APPLIANCE
3 / USING YOUR APPLIANCE
• To use your cooker hood _____________________________________ 9
4 / CARING FOR AND CLEANING YOUR APPLIANCE
lters ___________________ 10
• Changing the light bulb _______________________________________ 10
• Install the T-Sharp outelt ______________________________________ 10
• Maintaining your appliance ___________________________________ 11
5 / TROUBLESHOOTING ___________________________________________ 12
6 / AFTER-SALES SERVICE _________________________________________ 12
• Installing your cooker hood ___________________________________ 7

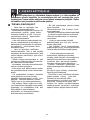
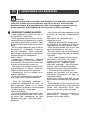
1 / NOTICES TO THE USEREN
Attention
Keep this user guide with your appliance. If the appliance is ever sold or transferred to
another person, ensure that the new owner receives the user guide. Please become familiar
with these recommendations before installing and using your oven. They were written for
your safety and the safety of others.
Warning
In the case of a kitchen heated by a device connected to a chimney (a stove, for exam-
ple) the “recycling” version of the hood should be installed. Do not use the hood without
metal fi lters.
Suitable ventilation should be provided in the room when the hood is used at the same time
as appliances operated by gas or another combustible fuel.
• SAFETY RECOMMENDATIONS
— This oven was designed for use by priva-
te persons in their homes.
— This appliance is to be used by adults.
Make sure that children do not touch and
that they do not treat it as a toy. Make sure
that they do not touch the appliance’s con-
trol panel.
— When you receive the appliance, unpack
or have it unpacked immediately. Give it an
overall general inspection. Make note of any
concerns or reservations on the delivery slip
and make sure to keep a copy of this form.
— Your appliance is intended for standard
household use. Do not use it for commercial
or industrial purposes or for any other pur-
pose than that for which it was designed.
— Do not modify or attempt to modify any
of the characteristics of this appliance. This
would be dangerous to your safety.
— Repairs must only be carried out by an
approved specialist.
— Always unplug the hood before cleaning
it or performing other maintenance acts.
— Provide adequate ventilation for the room
in the case of simultaneous use of the hood
and other appliances powered by an energy
source other than electricity. This will pre-
vent the hood from aspirating the combus-
tion gases.
— You should never “ ambé” dishes under
the hood or operate gas rings under the
hood without placing cookware on them
(the ames sucked up into the hood can da-
mage the appliance).
— When frying food under the appliance,
you must carefully monitor the preparation
at all times.
Oils and grease brought to very high tempe-
ratures can catch re.
— Respect the recommended frequency of
cleanings and lter replacements. The ac-
cumulation of grease deposits may cause
a re.
— The hood should never be used over a
combustible fuel burning stove (wood, coal,
etc.).
— Never use steam or high-pressure de-
vices to clean your appliance (requirement
imposed by electrical safety).
— With a view to constantly improving our
products, we reserve the right to modify
their technical, functional or aesthetic cha-
racteristics, making any changes to their
features considered necessary or desirable
in view of technical progress.
— In order to easily locate the reference
information for your appliance, we recom-
mend that you note these data on the “Af-
ter-Sales Service Department and Customer
Relations” page. (This page also explains to
you where to nd this information on your
appliance.)
- This appliance is not intended to be used
by persons (including children) with redu-
ced physical, sensory or mental abilities, or
persons lacking experience or awareness,
unless using it with the help of a person re-
ponsible for their safety, or under supervi-
sion and with prior instruction in its use.
with these recommendations before installing and using your appliance oven. They were
written for your safety and the safety of others.
— This appliance was designed for use by
private persons in their homes.
4

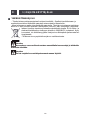
1 / NOTICES TO THE USER EN
Warning
Installation should only be performed by installers and qualifi ed technicians.
Warning
Remove the protective fi lm from the cartridge fi lter before use.
• ENVIRONMENTAL PROTECTION
— This appliance’s packaging material is recyclable. Help recycle it and protect the environ-
ment by dropping it off in the municipal receptacles provided for this purpose.
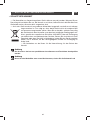
— Your appliance also contains a great amount of recyclable material. It is marked with
this label to indicate the used appliances that should not be mixed with other
waste. This way, the appliance recycling organised by your manufacturer will
be done under the best possible conditions, in compliance with European
Directive 2002/96/EC on Waste Electrical and Electronic Equipment. Contact
your town hall or your retailer for the used appliance collection points closest
to your home.
— We thank you doing your part to protect the environment.
5

1 / NOTICES TO THE USEREN
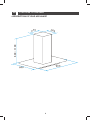
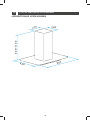
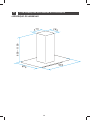
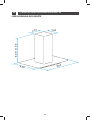
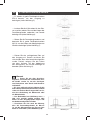
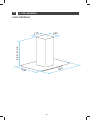
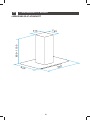
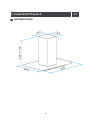
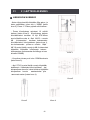
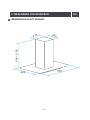
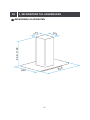
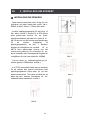
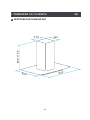
• DESCRIPTION OF YOUR APPLIANCE
6
0 09
6 0 0
6 0 0 - 1 1 0 0
2 8 5
2 7 0

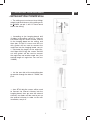
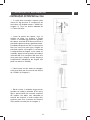
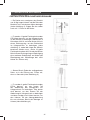
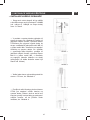
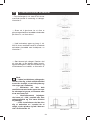
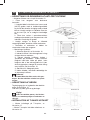
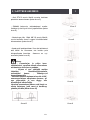
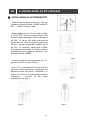
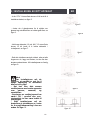
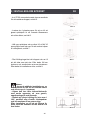
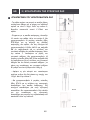
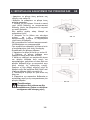
2 / INSTALLING YOUR APPLIANCE EN
• ENVIRONMENTAL PROTECTION
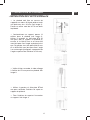
— The ceiling must can bear at least 40kgs
weight, and the thickness of the ceiling must
be
30MM, see pic 2, drill 1*170mm round
hole in the ceiling.
— According to the hanging board, drill
12 holes in the ceiling, see pic 2, 12pcs of
ST6*40mm big at screws will be used to
x the hanging board on the ceiling, and
then 8pcs of M4*10 screws and M4 nut
with gasket will be used to connect the
angle iron into the hanging board, see pic
1, calculated the length of the angle iron,
and 16pcs M4*10 big at screws and M4
nut with gasket will be used to connect
the angle iron and another angle iron ( the
overlap length of angle iron can not less
100MM)
— Let the one side of the extensible pipe
go outside through the hole of 170MM, see
pic 3.
— 4pcs ST4*8 big at screws will be used
to connect the internal chimney into the
hanging board, then put one the external
chimney, two hooks will be used to put up
the external chimney in order to the next
installation, see pic 4.
Pic 3
Pic 4
Pic 1
Pic 2
• INSTALLING YOUR COOKER HOOD
7
7
7
7

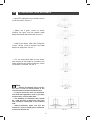
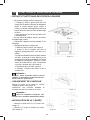
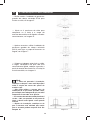
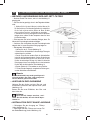
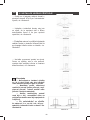
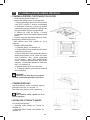
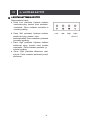
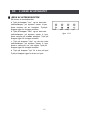
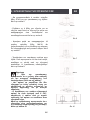
2 / INSTALLING YOUR APPLIANCEEN
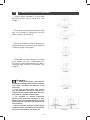
Note
— Before installation, please ensure
the area is clean to avoid suction of the
remaining bits of broken wood and dust.
— It cannot share the same air ventilation
tube with other appliance such as gas tube,
warmer tube, and hot wind tube.
— The bending of ventilation tube should
be ≤ 120°, parallel or above the start point
and should be connected to the external
wall.
— After installation, make sure that the
extractor is level to avoid grease collection
at one end. See Pic 10.
— 4pcs ST4*8 big at screws will be used to
install the outlet, see pic 5.
— Adjust the 4 glass screws to check
whether the glass and the cooker hood
body connected well and xed, see pic 6.
— Hold up the hood, 16pcs M4*10 big at
screws will be used to connect the hood
body into angle iron, see pic 7.
— Put the extensible pipe on the outlet;
after ensure all the things ok, put down the
hook, take from the external chimney, all the
installation is nished, see pic 9.
Pic 10
Pic 5
Pic 6
Pic 7
Pic 8
Pic 9
8

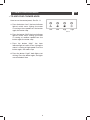
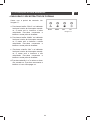
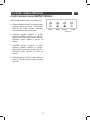
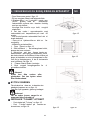
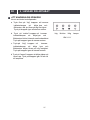
• TO USE YOUR COOKER HOOD
How to use the control panel, See Pic 11.
a. Press the button “Low”,the inner indicator
light of switch starts shining, the motor
is running at low speed.Press the button
again,the motor stop.
b. Press the button “Mid”,the inner indicator
light of switch starts shining, the motor
is running at medium speed.Press the
button again,the motor stop.
c. Press the button “High” ,the inner
indicator light of switch starts shining,the
motor is running at high speed. Press the
button again, the motor stop.
d. Press the button “Light”, both lights start
shining .Press the button again ,the lights
are switched off then
Pic 11
3 / USING YOUR APPLIANCE EN
Low
High Light
Mid
9
9

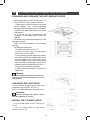
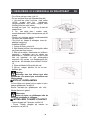
4 / CARING FOR AND CLEANING YOUR APPLIANCEEN
• CHANGING AND CLEANING THE ANTI-GREASE FILTERS
• CHANGING THE LIGHT BULB
• INSTALL THE T
-SHARP OUTELT
— Removing the lters as the instruction in Pic. 12
— You can clean the lter as below measure:
1. Soak them for about 3 minute in hot water
(40-50 degrees) with a grease-loosening
detergent then brush it gently with a soft brush.
Please do not apply too much pressure, avoid
damaging it.
2. It can be put into a dishwasher with
detergent, set the temperature at around 60
degrees.
— Please do not use abrasive detergent for it will
damage the hood;
— Make sure that the hood is shut off before
cleaning;
— Installing the carbon lter:
1. Remove the Al lter, see Pic.12
2. Insert the carbon lter in the rectangular
hole, tting it over the motor.
3. After inserting the front edge of the carbon
lter into the slot on the cooker hood. Lower
the back edge of the carbon lter, until it
clicks into place at the rear of the rectangular
hole. Raise the two xing bars, until they are
horizontal over the carbon lter. See Pic 13
4. Place the Al. lter back to position.
5. Apply reverse procedure to uninstall the
carbon lter.
Take the bracket and glass off and then take
the broken light bulb off, See Pic 14.
Fix the new light bulb,glass and bracket on.
— Fix the outlet outlet on the T-sharp, see
Pic 15.
— Fix the T-sharp outlet on the inside
chimney, see Pic 16.
Warning
the charcoal cannot be washed or re-
cycled. It should be changed at least every
four months.
Attention
Before changing the lights, ensure
that the appliance is not live.
Pic 14
Pic 16Pic 15
Pic 12
Pic 13
10

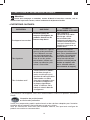
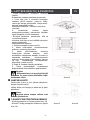
• MAINTAINING YOUR APPLIANCE
To preserve your appliance, we recommend that you use Clearit cleaning products.
Professional expertise
serving individuals
Clearit offers you professional products and solutions designed for the daily care of your
household appliances and kitchens.
They are on sale at your regular retailer, along with a complete line of accessories and
consumable products.
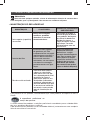
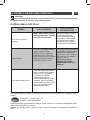
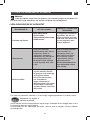
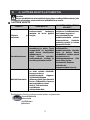
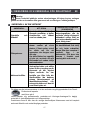
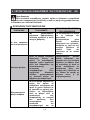
MAINTENANCE WHAT TO DO
PRODUCTS /
ACCESSORIES TO USE
Top surface and
accessories
Filter cartridge
Activated carbon fi lter
Never use metal scouring
pads, abrasive products or
excessively stiff brushes.
This fi lter traps fatty vapours
and dust. This component
plays an important role in
ensuring the effectiveness
of your hood. In the event
of tough stains, use a non-
abrasive cream, then rinse
with clean water.
This fi lter traps odours and
must be changed at least
once a year depending
on your level of use. You
should order these fi lters
from your dealer (quoting
the reference shown on the
identifi cation plate located
inside the hood) and note
the date the fi lter was
changed.
To clean the body and the
lighting port, you should
use only commercial
household cleaning
products diluted in water
and then rinse using clean
water, drying with a soft
cloth.
Use a commercial
household cleaning
product then rinse
abundantly and dry. These
fi lters can be cleaned in
a vertical position in your
dishwasher.
(Do not allow them to
touch dirty dishes or
silverware.)
Warning
Before carrying out any work, the power supply to the hood must be turned off, either
by unplugging it or by using the circuit breaker switch.
4 / CARING FOR AND CLEANING YOUR APPLIANCE EN
11

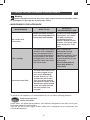
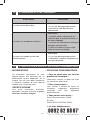
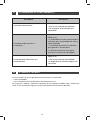
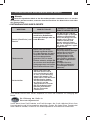
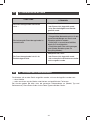
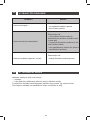
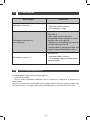
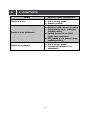
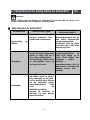
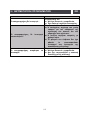
5 / TROUBLESHOOTINGEN
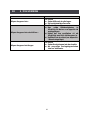
SYMPTOMS SOLUTIONS
The hood is not working...
The hood is not operating effectively...
The hood stopped working
Ensure that:
• The power is not cut off.
• A speed has been selected.
Ensure that:
• The selected motor speed is suffi cient
for the quantity of smoke and vapours to
be cleared.
• The kitchen is suffi ciently ventilated to
allow for fresh air intake.
• The carbon fi lter is not worn (hood
operating in recycling mode).
Ensure that:
• The power is not cut off.
• The single-pole cut-off device was not
activated.
6 / AFTER-SALES SERVICEEN
Any maintenance on your equipment should be undertaken by:
- either your dealer,
- or another quali ed mechanic who is an authorized agent for the brand appliances.
When making an appointment, state the full reference of your equipment (model, type and
serial number). This information appears on the manufacturer’s nameplate attached to your
equipment.
12

FRSOMMAIRE
1 / A L’ATTENTION DE L’UTILISATEUR
• Consignes de sécurité _______________________________________ 24
• Respect de l’environnement __________________________________ 25
• Description de votre appareil __________________________________ 26
2 / INSTALLATION DE L’APPAREIL
• Respect de l’environnement __________________________________ 27
3 / MODE D’EMPLOI
• Utilisation de la hotte aspirante ________________________________ 29
4 / NETTOYAGE ET ENTRETIEN DE L’APPAREIL
• Retrait et nettoyage des ltres à graisse ________________________ 30
• Changement de l’ampoule ____________________________________ 30
• Installation de la T-Sharp _____________________________________ 30
• Nettoyage et entretien de l’appareil ____________________________ 31
5 / ANOMALIES DE FONCTIONNEMENT _____________________________ 32
6 / SERVICE APRES-VENTE
• Interventions ________________________________________________ 32
• Relations consommateurs ____________________________________ 32
Dans le souci d’une amélioration constante de nos produits, nous nous réservons le
droit d’apporter à leurs caractéristiques techniques, fonctionnelles ou esthétiques
toutes modifi cations liées à leur évolution.
Important :
Avant de mettre votre appareil en marche, veuillez lire attentivement ce guide
d’installation et d’utilisation afi n de vous familiariser plus rapidement avec son
fonctionnement.
• Installation de L’hotte aspirante _______________________________ 27
13
1 / A L’ATTENTION DE L’UTILISATEUR
• Consignes de sécurité _______________________________________ 14
• Respect de l’environnement __________________________________ 15
• Description de votre appareil __________________________________ 16
2 / INSTALLATION DE L’APPAREIL
3 / MODE D’EMPLOI
• Utilisation de la hotte aspirante ________________________________ 19
4 / NETTOYAGE ET ENTRETIEN DE L’APPAREIL
• Changement de l’ampoule ____________________________________ 20
20
• Installation de la T-Sharp _____________________________________ 20
• Nettoyage et entretien de l’appareil ____________________________ 21
5 / ANOMALIES DE FONCTIONNEMENT _____________________________ 22
6 / SERVICE APRES-VENTE
• Interventions ________________________________________________ 22
• Relations consommateurs ____________________________________ 22
• Installation de L’hotte aspirante _______________________________ 17

1 / A L’ATTENTION DE L’UTILISATEURFR
Important
Conservez cette notice d’utilisation avec votre appareil. Si l’appareil devait être ven-
du ou cédé à une autre personne, assurez- vous que la notice d’utilisation l’accompagne.
Merci de prendre connaissance de ces conseils avant d’installer et d’utiliser votre appareil.
Ils ont été rédigés pour votre sécurité et celle d’autrui.
Attention
Dans le cas d’une cuisine chauffée avec un appareil raccordé à une cheminée (ex :
poêle), il faut installer la hotte en version recyclage. Ne pas utilisez la hotte sans les fi ltres
cassettes. Une ventilation convenable de la pièce doit être prévue lorsqu’une hotte de cui-
sine est utilisée simultanément avec des appareils utilisants du gaz ou un autre combus-
tible.
• CONSIGNES DE SÉCURITÉ
— Cet appareil a été conçu pour être uti-
lisé par des particuliers dans leur lieu
d’habitation.
— Cet appareil doit être utilisé par des adul-
tes. Veillez à ce que les enfants n’y touchent
pas et ne l’utilisent pas comme un jouet.
Assurezvous qu’ils ne manipulent pas les
commandes de l’appareil.
— A la réception de l’appareil, déballez-le
ou faites le déballer immédiatement. Véri-
ez son aspect général. Faites les éventue-
lles réserves par écrit sur le bon de livraison
dont vous gardez un exemplaire.
— Votre appareil est destiné à un usage
domestique normal. Ne l’utilisez pas à des
ns commerciales ou industrielles ou pour
d’autres buts que celui pour lequel il a été
conçu.
— Ne modi ez pas ou n’essayer pas de
modi er les caractéristiques de cet appareil.
Cela représenterait un danger pour vous.
— Les réparations doivent être exclusive-
ment effectuées par un spécialiste agréé.
— Débranchez toujours la hotte avant de
procéder à son nettoyage ou à son entre-
tien.
— Aérez convenablement la pièce en cas
de fonctionnement simultané de la hotte et
d’autres appareils alimentés par une source
d’énergie différente de l’énergie électrique.
Ceci a n que la hotte n’aspire pas les gaz
de combustion.
— Il est interdit de amber des mets ou de
faire fonctionner des foyers gaz sans réci-
pients de cuisson, au dessous de la hotte
(les ammes aspirées risqueraient de dété-
riorer l’appareil).
— Les fritures effectuées sous l’appareil
doivent faire l’objet d’une surveillance cons-
tante. Les huiles et graisses portées à très
haute température peuvent prendre feu.
— Respectez la fréquence de nettoyage et
de remplacement des ltres. L’accumulation
de dépôts de graisse risque d’occasionner
un incendie.
— Le fonctionnement au dessus d’un foyer
à combustible (bois, charbon…) n’est pas
autorisé.
— N’utilisez jamais d’appareils à vapeur ou
à haute pression pour nettoyer votre appa-
reil (exigences relatives à la sécurité élec-
trique).
— Dans le souci d’une amélioration cons-
tante de nos produits, nous nous réservons
le droit d’apporter à leurs caractéristiques
techniques, fonctionnelles ou esthétiques
toutes modi cations de leurs caractéristi-
ques liées à l’évolution technique.
— A n de retrouver aisément à l’avenir les
références de votre appareil, nous vous
conseillons de les noter en page “Service
Après-Vente et Relations Consommateurs”.
(Cette page vous explique également où les
trouver sur votre appareil).
14

1 / A L’ATTENTION DE L’UTILISATEUR FR
Attention
L’installation est réservée aux installateurs et techniciens qualifi és.
Attention
Avant la première utilisation du fi ltre cassette, retirez le fi lm de protection.
• RESPECT DE L’ENVIRONNEMENT
— Les matériaux d’emballage de cet appareil sont recyclables. Participez à leur recyclage
et contribuez ainsi à la protection de l’environnement en les déposant dans les conteneurs
municipaux prévus à cet effet.
— Votre appareil contient également de nombreux matériaux recyclables. Il est donc mar-
qué de ce logo a n de vous indiquer que les appareils usagés ne doivent pas
être mélangés avec d’autres déchets. Le recyclage des appareils qu’organise
votre fabricant sera ainsi réalisé dans les meilleures conditions, conformé-
ment à la directive européenne 2002/96/CE sur les déchets d’équipements
électriques et électroniques.
Adressez vous à votre mairie ou à votre revendeur pour connaître les points
de collecte des appareils usagés les plus proches de votre domicile.
— Nous vous remercions pour votre collaboration à la protection de
l’environnement.
15

1 / A L’ATTENTION DE L’UTILISATEURFR
• DESCRIPTION DE VOTRE APPAREIL
16
0 09
6 0 0
6 0 0 - 1 1 0 0
2 8 5
2 7 0

2 / INSTALLATION DE L’APPAREIL FR
• RESPECT DE L’ENVIRONNEMENT
— Le plafond doit être en mesure de
supporter au moins 40 Kg de poids et avoir
une épaisseur de ≥ 30 mm (voir Image 2).
Percez un ori ce rond de 1x170 mm dans
le plafond.
— Conformément au support, percez 12
ori ces dans le plafond (voir mage 2).
Utiliser 12 grandes vis tête plate ST6 40
mm pour xer le support au plafond et,
ensuite, 8 vis M4x10 mm et un écrou M4
avec joint pour xer l’angle au plafond, ainsi
que 16 grandes vies tète plate M4x10 mm
et un écrou M4 avec joint pour xer l’angle
à un autre angle (la longueur superposée de
l’angle ne pourra être inférieure à 100 mm).
— Veillez à bien raccorder le tube rallonge
à l’ori ce de 170 mm percé au plafond. Voir
Image 3.
— Utiliser 4 grandes vis tête plate ST4x8
mm pour raccorder l’intérieur du capot au
support du plafond.
— Fixer l’intérieur du capot et l’accrocher
au support. Voir image 4.
Image 3
Image 4
Image 1
Image 2
• INSTALLATION DE L’HOTTE ASPIRANTE
17

2 / INSTALLATION DE L’APPAREILFR
Remarque :
— Avant de procéder à l’installation,
vérifi ez que l’emplacement soit bien propre,
sans restes de débris, de copeaux ou de
poussière.
— L’air vicié ne doit jamais être évacué
vers une cheminée en service rejetant des
fumées ou des gaz de combustion. Ne pas y
raccorder les conduits d’évacuation.
— Les conduits ne doivent comporter
aucun coude prononcé supérieur à 120º.
Évacuer l’air vicié parallèlement vers le haut
et directement à l’air libre par traversée du
mur extérieur.
— Une fois la hotte installée, vérifi ez qu’elle
soit bien nivelée, afi n d’éviter l’accumulation
de graisse à l’intérieur. Voir Image 10.
— Utiliser quatre grandes vis tête plate
ST4x8 mm pour xer la sortie d’air. Voir
Image 5.
— Fixez le verre au corps de la hotte à l’aide
des 4 vis fournies et véri ez leur mise en
place correcte. Voir Image 6.
— Saisissez la hotte et utilisez 6 grandes vis
tête plate M4x10 mm pour xer le corps de
la hotte à l’angle. Voir Image 7.
— Raccordez le tube rallonge à la sortie
d’air. Véri ez qu’il est correctement mis
en place et xez dé nitivement le capot à
l’ancrage pour terminer l’installation. Voir
Image 9.
Image 10
Image 5
Image 6
Image 7
Image 8
Image 9
18

• UTLISATION DE LA HOTTE ASPIRANTE
Bandeau de commande. Voir Image 11.
a. Appuyez sur la touche « Petite » vitesse
et le témoin lumineux correspondant
clignotera, indiquant que le moteur tourne
à petite vitesse. Appuyez à nouveau
sur cette même touche pour arrêter le
moteur.
b. Appuyez sur la touche « Moyenne » vitesse
et le témoin lumineux correspondant
clignotera, indiquant que le moteur tourne
à vitesse moyenne. Appuyez à nouveau
sur cette même touche pour arrêter le
moteur.
c. Appuyez sur la touche « Grande » vitesse
et le témoin lumineux correspondant
clignotera, indiquant que le moteur tourne
à grande vitesse. Appuyez à nouveau
sur cette même touche pour arrêter le
moteur.
d. Appuyez sur la touche « Éclairage » et les
lampes s’allumeront. Appuyez à nouveau
sur cette même touche pour éteindre
l’éclairage.
Image 11
3 / MODE D’EMPLOI FR
ÉclairageGrande
Moyenne
Petite
19

4 / NETTOYAGE ET ENTRETIEN DE L’APPAREILFR
• RETRAIT ET NETTOYAGE DES FILTRES À GRAISSE
• CHANGEMENT DE L’AMPOULE
• INST
ALLATION DE LA T-SHARP
— Vous pouvez nettoyer les ltres comme suit :
1. Plongez les ltres à graisse dans de l’eau
chaude (40-50 degrés) contenant du détergeant
liquide et laissez tremper durant environ 3
minutes. Au besoin, frottez légèrement avec une
brosse douce, en veillant à ne pas endommager
les ltres.
2. Vous pouvez les laver en lave-vaisselle, à 60º
C de température.
— Ne pas utiliser de produits abrasifs, pour éviter
d’endommager la hotte.
— Débranchez l’appareil avant de procéder à son
nettoyage.
— Changement du ltre à charbon actif :
1. Retirez les ltres à graisse. Voir Image 12.
2. Insérez le ltre à charbon actif dans le
logement rectangulaire prévu à cet effet sur le
moteur.
3. Insérez ensuite le bord avant du ltre à charbon
actif dans la fente de la hotte. Appuyez sur la
languette arrière du ltre et emboîtez-le à l’arrière
du logement rectangulaire. Soulevez le deux
barres de xation pour les situer à l’horizontale
sur le ltre à charbon actif. Voir Image 13.
4. Remettez en place les ltres à graisse.
5. Procédez à l’inverse pour retirer le ltre à
charbon actif.
Retirez le cache et le hublot et ensuite
l’ampoule grillée. Voir Image 14.
Introduisez une nouvelle ampoule et
remettez en place le hublot et le cache.
— Montez la sortie d’air sur la T-sharp. Voir
Image 15.
— Montez la T-sharp à l’intérieur du capot.
Voir Image 16.
Attention :
Les fi ltres à charbon actif ne sont ni
lavables ni recyclables. Ils doivent être rem-
placés tous les quatre mois.
Attention :
Avant de remplacer l’ampoule, véri-
fi ez que vous avez bien débranché la hotte.
Image 14
Image 16Image 15
Image 12
Image 13
20
Sidan laddas...
Sidan laddas...
Sidan laddas...
Sidan laddas...
Sidan laddas...
Sidan laddas...
Sidan laddas...
Sidan laddas...
Sidan laddas...
Sidan laddas...
Sidan laddas...
Sidan laddas...
Sidan laddas...
Sidan laddas...
Sidan laddas...
Sidan laddas...
Sidan laddas...
Sidan laddas...
Sidan laddas...
Sidan laddas...
Sidan laddas...
Sidan laddas...
Sidan laddas...
Sidan laddas...
Sidan laddas...
Sidan laddas...
Sidan laddas...
Sidan laddas...
Sidan laddas...
Sidan laddas...
Sidan laddas...
Sidan laddas...
Sidan laddas...
Sidan laddas...
Sidan laddas...
Sidan laddas...
Sidan laddas...
Sidan laddas...
Sidan laddas...
Sidan laddas...
Sidan laddas...
Sidan laddas...
Sidan laddas...
Sidan laddas...
Sidan laddas...
Sidan laddas...
Sidan laddas...
Sidan laddas...
Sidan laddas...
Sidan laddas...
Sidan laddas...
Sidan laddas...
Sidan laddas...
Sidan laddas...
Sidan laddas...
Sidan laddas...
Sidan laddas...
Sidan laddas...
Sidan laddas...
Sidan laddas...
Sidan laddas...
Sidan laddas...
Sidan laddas...
Sidan laddas...
Sidan laddas...
Sidan laddas...
Sidan laddas...
Sidan laddas...
Sidan laddas...
Sidan laddas...
Sidan laddas...
Sidan laddas...
Sidan laddas...
Sidan laddas...
Sidan laddas...
Sidan laddas...
Sidan laddas...
Sidan laddas...
Sidan laddas...
Sidan laddas...
Sidan laddas...
Sidan laddas...
Sidan laddas...
Sidan laddas...
Sidan laddas...
Sidan laddas...
Sidan laddas...
Sidan laddas...
Sidan laddas...
Sidan laddas...
Sidan laddas...
Sidan laddas...
Sidan laddas...
Sidan laddas...
-
 1
1
-
 2
2
-
 3
3
-
 4
4
-
 5
5
-
 6
6
-
 7
7
-
 8
8
-
 9
9
-
 10
10
-
 11
11
-
 12
12
-
 13
13
-
 14
14
-
 15
15
-
 16
16
-
 17
17
-
 18
18
-
 19
19
-
 20
20
-
 21
21
-
 22
22
-
 23
23
-
 24
24
-
 25
25
-
 26
26
-
 27
27
-
 28
28
-
 29
29
-
 30
30
-
 31
31
-
 32
32
-
 33
33
-
 34
34
-
 35
35
-
 36
36
-
 37
37
-
 38
38
-
 39
39
-
 40
40
-
 41
41
-
 42
42
-
 43
43
-
 44
44
-
 45
45
-
 46
46
-
 47
47
-
 48
48
-
 49
49
-
 50
50
-
 51
51
-
 52
52
-
 53
53
-
 54
54
-
 55
55
-
 56
56
-
 57
57
-
 58
58
-
 59
59
-
 60
60
-
 61
61
-
 62
62
-
 63
63
-
 64
64
-
 65
65
-
 66
66
-
 67
67
-
 68
68
-
 69
69
-
 70
70
-
 71
71
-
 72
72
-
 73
73
-
 74
74
-
 75
75
-
 76
76
-
 77
77
-
 78
78
-
 79
79
-
 80
80
-
 81
81
-
 82
82
-
 83
83
-
 84
84
-
 85
85
-
 86
86
-
 87
87
-
 88
88
-
 89
89
-
 90
90
-
 91
91
-
 92
92
-
 93
93
-
 94
94
-
 95
95
-
 96
96
-
 97
97
-
 98
98
-
 99
99
-
 100
100
-
 101
101
-
 102
102
-
 103
103
-
 104
104
-
 105
105
-
 106
106
-
 107
107
-
 108
108
-
 109
109
-
 110
110
-
 111
111
-
 112
112
-
 113
113
-
 114
114


på andra språk
- slovenčina: Brandt 9CFV92IX Používateľská príručka
- Deutsch: Brandt 9CFV92IX Benutzerhandbuch
- português: Brandt 9CFV92IX Manual do usuário
- français: Brandt 9CFV92IX Manuel utilisateur
- dansk: Brandt 9CFV92IX Brugermanual